

Chocolate Covered Strawberries are a timeless delicacy, embodying both elegance and simplicity. Imagine biting into a juicy, sweet strawberry, perfectly enrobed in a rich, smooth layer of decadent chocolate. This simple yet sophisticated treat is surprisingly easy to create at home, elevating any occasion from a casual gathering to a romantic dinner. And for that extra touch of flair, a delicate chocolate drizzle can transform your berries into miniature works of art.
Planning a special event or simply craving an indulgent spread? Consider hosting a Chocolate-Covered Strawberry Dessert Bar, offering guests an array of toppings and chocolate varieties to customize their own gourmet berries. It’s a fantastic way to celebrate with a interactive and delicious dessert!
Mastering the Art of Homemade Chocolate Covered Strawberries
There’s something undeniably magical about a perfectly crafted chocolate-covered strawberry. It’s a treat that promises luxury and delight in every bite. Yet, so often, store-bought versions fall short of expectations. Have you ever experienced the disappointment of a berry that’s past its prime, or chocolate that peels away the moment you pick it up, leaving a sticky mess? These common issues can turn a luxurious treat into a letdown. The strawberries are frequently bruised or watery, and the chocolate lacks that professional snap and shine, often sliding off as the fruit releases its moisture.
Driven by these culinary frustrations, I embarked on a mission to perfect the homemade chocolate-covered strawberry. After countless trials and (delicious) errors – a process I certainly didn’t mind – I’ve finally uncovered the secrets to consistently creating fresh, exquisite, and utterly satisfying chocolate-dipped strawberries. My goal was to develop a recipe that guarantees a truly memorable experience every time, ensuring your strawberries are vibrant, your chocolate is flawless, and your presentation is impeccable.
These aren’t just any sweet treats; they’re a thoughtful gesture, a luxurious indulgence, and a perfect way to show your loved ones just how cherished they are. Whether it’s for Valentine’s Day, an anniversary, a birthday, or simply a spontaneous act of kindness, these homemade gourmet chocolate covered strawberries are sure to impress and bring smiles.
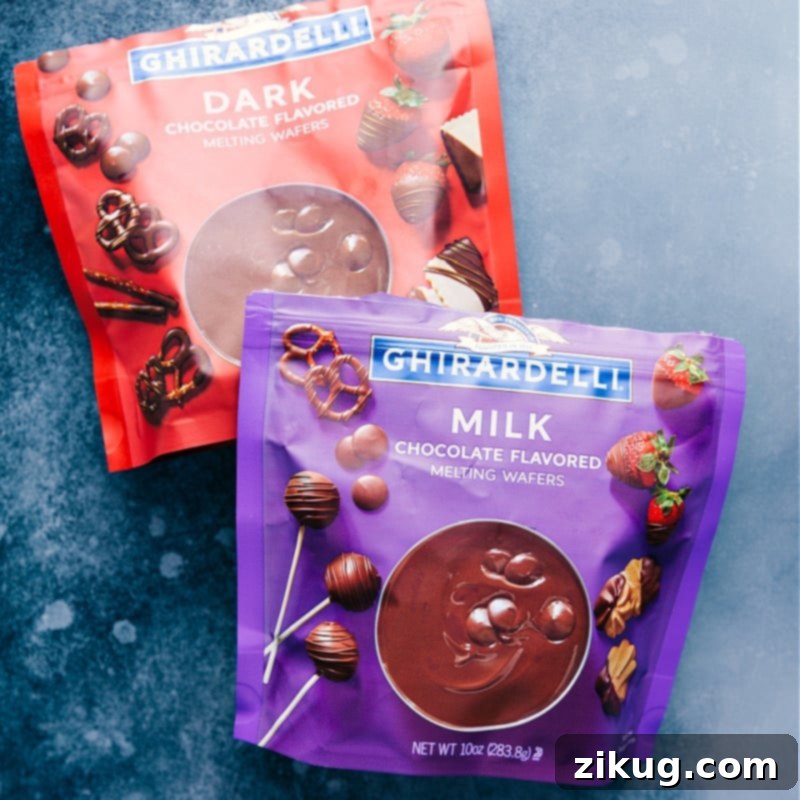
Essential Ingredients for Decadent Chocolate Covered Strawberries
Crafting the perfect chocolate-covered strawberry starts with selecting the right, high-quality ingredients. Each component plays a vital role in achieving that sought-after gourmet taste and elegant finish.
- Strawberries: The Star of the Show: The foundation of this exquisite treat lies in the quality of your strawberries. Always opt for the freshest, firmest, and brightest red berries you can find. Look for plump, blemish-free fruit with vibrant green caps. Avoid any berries that appear soft, mushy, or discolored, as these will not hold up well during dipping and can cause moisture issues. Ideally, choose organic strawberries when possible for the best flavor and fewer pesticides. The size of the strawberry can also impact your dipping experience – medium to large berries are generally easier to handle and provide a satisfying fruit-to-chocolate ratio.
- Melting Wafers or Baking Bars: The Secret to Smooth Chocolate: This is arguably the most crucial ingredient for a flawless coating. While chocolate chips might seem convenient, they often contain stabilizers that prevent them from melting smoothly, resulting in a thick, clumpy, or dull finish. For professional-looking results, always choose high-quality chocolate melting wafers or baking bars (such as Ghirardelli, Lindt, or Baker’s). These products are formulated to melt beautifully, creating a silky, consistent coating that hardens with a lovely sheen and satisfying snap. You can choose your preferred chocolate type: classic milk chocolate for a sweeter profile, rich dark chocolate for a more intense flavor, or elegant white chocolate for contrast and decoration.
- Oil: The Gloss Enhancer: A small amount of neutral-flavored oil, such as coconut oil or vegetable oil, is your ally in achieving a perfectly smooth, fluid chocolate consistency. It helps thin the melted chocolate slightly, making it easier to dip the berries evenly and ensuring a beautiful, glossy finish once set. Be careful not to add too much, as excessive oil can cause the chocolate to separate or slide off the strawberries. Start with a small amount and add more gradually if needed to reach the desired viscosity.
Expert Tips for Preparing Strawberries Before Dipping
Proper preparation of your strawberries is paramount for ensuring the chocolate adheres beautifully and the final product is pristine. Skipping these crucial steps can lead to frustrating issues like cracking chocolate or soggy berries.
- Select Only the Best: Begin by carefully inspecting your strawberries. Use only ripe, fresh, and firm berries. Discard any that show signs of bruising, soft spots, or mold. The integrity of the fruit directly impacts the success of your chocolate coating.
- Gentle Cleansing is Key: Wash the strawberries very gently under cool running water. Avoid harsh scrubbing or letting them soak, as this can damage the delicate skin and cause them to absorb excess water. The goal is to remove any dirt or residue without compromising the fruit’s structure.
- Thorough Drying – The Most Critical Step: After washing, meticulously dry each strawberry. This step cannot be overstated. Carefully pat each berry dry with paper towels, ensuring there is absolutely no visible moisture remaining on the surface. Any residual water will cause the chocolate to seize, clump, or simply not adhere properly, leading to a dull and grainy finish.
- Achieve Room Temperature: Once dry, let the strawberries stand at room temperature for at least 30 minutes, or even up to an hour. This allows any lingering surface moisture to evaporate and brings the berries to a temperature closer to that of the melted chocolate. Dipping cold strawberries directly from the fridge into warm chocolate can cause “thermal shock,” which may lead to condensation, cracking, or the chocolate refusing to stick smoothly. A perfectly dry, room-temperature strawberry is the ideal canvas for your chocolate masterpiece.
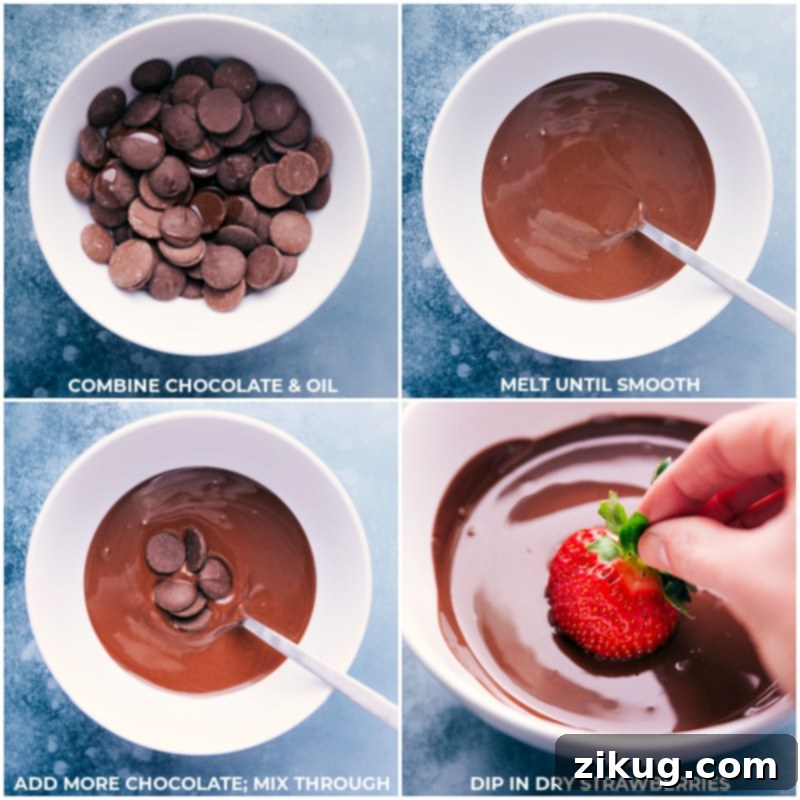
Foolproof Techniques for Dipping Chocolate Covered Strawberries
The actual dipping process is where the magic truly happens. Follow these expert tips to ensure your chocolate melts perfectly and coats your strawberries with a beautiful, even finish every time.
- Prioritize Heat-Safe Bowls: Always melt your chocolate in microwave-safe glass or ceramic bowls. Plastic bowls can retain heat unevenly, potentially scorching the chocolate or imparting unwanted flavors. Glass or ceramic provides more consistent heat distribution, which is vital for smooth melting.
- Prevent Burning with Gentle Heat: Chocolate is delicate and can burn quickly. To avoid this, microwave the chocolate in short bursts – typically 15 to 20 seconds at a time – and stir vigorously after each interval. Remember, chocolate continues to melt even after it’s removed from the microwave due to residual heat. The goal is to achieve a smooth, pourable consistency, not a scalding hot liquid. Patience is key here; don’t rush the melting process.
- Achieve a Silky Smooth Finish (Tempering Simplified): For a truly professional, shiny, and snap-able chocolate coating that resists melting at room temperature, consider a simplified tempering method. Once most of your chocolate has melted and is smooth, stir in a few solid, unmelted pieces of chocolate. Continue stirring until these pieces also melt into the mixture. This process slightly cools the chocolate, stabilizing its crystalline structure, which results in a glossy finish and helps the chocolate set properly and firmly. This “seeding” method prevents bloom (white streaks) and ensures a beautiful appearance.
- Hold by the Leaves for Cleanliness and Control: When dipping, gently hold each strawberry by its green leafy stem (calyx). This simple technique keeps your fingers clean and prevents smudges on the chocolate. It also gives you better control over the berry, allowing for an even coating and easy rotation.
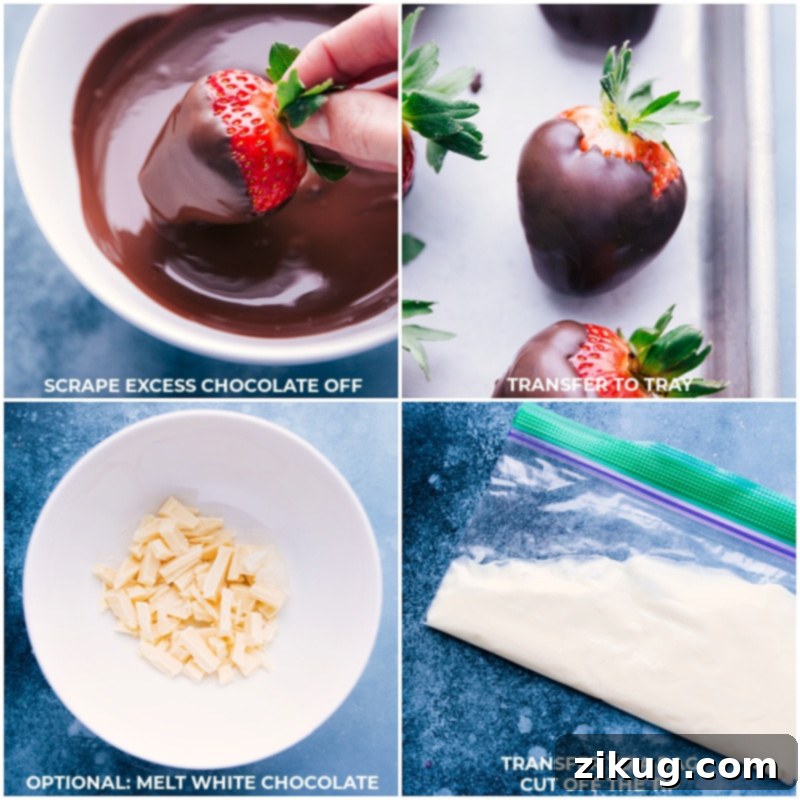
- Set on Parchment Paper: As soon as you’ve dipped a strawberry, place it gently onto a sheet pan lined with parchment paper or a silicone baking mat. These surfaces are non-stick and will prevent the chocolate from adhering as it cools and hardens, making for easy removal and a clean presentation. Avoid wax paper if possible, as it can sometimes stick.
Elevate Your Treats: Creative Decorating Ideas
While a plain chocolate-covered strawberry is delicious on its own, adding decorations can transform them into truly eye-catching, gourmet confections. Unleash your creativity and personalize your batch of berries!
- Salty and Sweet Perfection: For an irresistible flavor contrast that awakens the palate, sprinkle a tiny pinch of flaky sea salt (like Maldon) over the wet chocolate immediately after dipping. The salt enhances the sweetness of both the strawberry and the chocolate, adding a sophisticated touch.
- Delightful Extra Toppings: The possibilities for additional toppings are endless! Before the chocolate fully sets, gently dip or sprinkle your strawberries with a variety of textures and flavors. Consider crushed Oreo cookie crumbs for a playful twist, finely ground graham cracker crumbs for a hint of nostalgia, toasted coconut flakes for a tropical vibe, finely chopped nuts (like pistachios, almonds, or pecans) for a satisfying crunch, or colorful sprinkles for a festive look. Ensure toppings are finely chopped or crushed to adhere well.
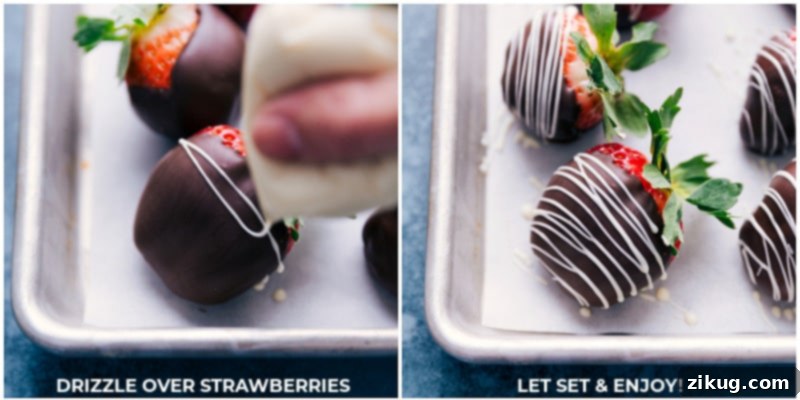
- Elegant Chocolate Drizzle: A drizzle of contrasting chocolate adds an instant touch of sophistication and visual appeal. Melt a small amount of white, milk, or dark chocolate (different from your main coating) with a tiny bit of oil to ensure it’s fluid. Transfer the melted chocolate to a small, sturdy plastic bag (like a Ziploc snack bag), snip off a tiny corner, and artfully drizzle it back and forth over the dipped strawberries. For a raised, defined drizzle, wait until the main chocolate coating has hardened. For a more blended, “melted-in” effect, drizzle immediately after dipping while the first layer is still wet. This technique allows for endless artistic variations!
Troubleshooting Your Chocolate Covered Strawberries
Even with the best intentions, a few common pitfalls can hinder your chocolate-covered strawberry success. Here’s how to address and prevent them:
Why Won’t the Chocolate Stick to My Strawberries?
This is one of the most frequent frustrations. The primary culprits are moisture and the wrong type of chocolate. Ensure your strawberries are absolutely, completely dry before dipping. Any moisture on the berry’s surface will prevent the chocolate from adhering properly, causing it to clump or slide off. Secondly, use high-quality melting wafers or baking bars; regular chocolate chips contain stabilizers that make them less ideal for smooth coating. Lastly, avoid adding too much oil to your chocolate; while a little helps with smoothness, an excess can make the chocolate too thin and prone to slipping off the fruit.
How Can I Prevent My Strawberries from Leaking?
Leaking strawberries usually indicate either overly ripe fruit or improper storage. Always start with fresh, firm, and fully dry strawberries. Overripe berries are more prone to releasing their juices. Also, avoid subjecting the dipped strawberries to rapid temperature changes, especially refrigeration or freezing immediately after dipping to speed up hardening. The condensation that forms when cold items warm up can cause the chocolate to “sweat” and the berries to leak. Let them set naturally in a cool, dry place at room temperature. For optimal freshness and to prevent leaking, it’s best to enjoy chocolate-covered strawberries on the same day they are made.
My Chocolate Looks Grainy or Clumpy. What Happened?
If your chocolate becomes grainy, clumpy, or “seized,” it’s almost always due to the introduction of moisture, even a tiny drop. This could be from wet strawberries, a drop of water in your melting bowl, or condensation from a cold environment. Once chocolate seizes, it’s very difficult to salvage for dipping. Ensure all your equipment is completely dry and your strawberries are thoroughly patted dry and at room temperature. Overheating the chocolate can also cause it to become grainy, so always melt it slowly and gently.
Storage Tips for Optimal Freshness
Can I Make Chocolate Covered Strawberries Ahead of Time?
While these decadent treats are at their absolute best when enjoyed the same day they are made, they can last approximately 8–10 hours in a cool, dry place before the strawberries begin to soften, leak, or become sticky. The vibrant freshness and crisp chocolate coating are most pronounced shortly after setting.
Avoid Refrigeration if Possible: It’s generally not recommended to refrigerate chocolate-covered strawberries. The moisture and condensation in a refrigerator can cause the chocolate to “bloom” (develop a dull, whitish film) or crack when brought back to room temperature. This condensation also encourages the berries to weep, making the chocolate sticky and potentially causing it to separate from the fruit. If you absolutely must store them in the fridge for a short period, place them in a single layer in an airtight container with a paper towel on the bottom to absorb excess moisture. Allow them to come to near room temperature before serving for the best texture and flavor.
Delicious Ways to Use Leftover Strawberries:
Don’t let any beautiful berries go to waste! If you have extra fresh strawberries, here are some fantastic recipes to incorporate them into:
- Jamba Juice Strawberry Wild Smoothie with creamy frozen yogurt.
- Strawberry Pretzel Salad, a delightful blend of sweet and salty.
- Strawberry Scones, made extra moist and tender with Greek yogurt.
- Nutella Crepes, elevated with slices of fresh strawberries.
- Strawberry Milkshake, a simple four-ingredient frosty treat.

Chocolate Covered Strawberries
Chelsea Lords
20
1
1 20
24
strawberries
Video
Equipment
-
Sheet pan (15″ x 10″) lined with parchment paper or a silicone mat
Ingredients
- 1-1/3 cups chocolate melting wafers (see Note 1)
- 1 teaspoon coconut oil
- 2 pounds strawberries (see Note 2)
Instructions
-
1. Wash strawberries very gently in cool water and carefully dry with paper towels. Let stand at room temperature for about 30 minutes to ensure the strawberries are completely dry. Do not dip strawberries unless they are completely dry, otherwise, the chocolate will become cloudy or won’t stick to the berries.
-
2. Line a large sheet pan with parchment paper, wax paper, or a silicone baking mat and set it aside. If using baking bars, coarsely chop the chocolate into small, even pieces. Be patient when melting the chocolate and avoid rapid temperature changes. Do not microwave for too long or too many times; stir the chocolate frequently as it melts. Allow the coated raspberries (note: should be strawberries) to harden at room temperature instead of refrigerating or freezing them.
-
3. Add all but 2 tablespoons of the chocolate melting wafers to a large microwave-safe bowl (see Note 3). Add 1 teaspoon oil. Microwave for 15 seconds, then stir vigorously for 15 seconds. Continue to do this until the chocolate is mostly melted and smooth. Once chocolate is melted, add the reserved 2 tablespoons of solid chocolate and stir until it melts completely (see Note 4). Be patient and resist the urge to microwave unless it isn’t melting after stirring for a full minute.
-
4. Once the chocolate is fully melted and smooth, hold a berry by the stem and dip it into the melted chocolate. Gently swirl to cover the strawberry completely in chocolate. Carefully slide the bottom of the strawberry against the edge of the bowl to remove any excess chocolate. Place the dipped strawberry on the lined sheet pan. Repeat with remaining strawberries. If the melted chocolate starts getting too thick or hard to dip, heat it in the microwave for another 15 seconds and remix. You may need to add 1/2 teaspoon or more of oil too, if needed, to maintain fluidity.
-
5. To drizzle additional chocolate on top, melt 2 ounces of white chocolate (or any contrasting chocolate) with 1/2 teaspoon of oil. Transfer the melted chocolate to a small plastic bag, seal it securely without air, and snip off a tiny tip from one corner. Drizzle artfully over the strawberries. For a raised, defined drizzle, wait until the main chocolate coating has hardened; for a more blended, “melted” effect, drizzle right after coating the strawberries. You can also sprinkle on toppings like sprinkles or crushed Oreos before the chocolate sets. Let all strawberries cool and set completely at room temperature.
Recipe Notes
Note 2: Choose the freshest strawberries you can find! Look for bright red, firm, and plump berries with no soft spots or blemishes. A 2-pound container is typically ideal, providing enough strawberries to ensure you have a good selection, in case some aren’t perfect for dipping. You’ll typically coat about 25–30 medium-sized strawberries, but you might have a few extra or slightly fewer depending on their size and how much chocolate you use.
Note 3: To prevent scorching the chocolate, it is crucial to melt it in very short bursts and stir frequently between each burst. The objective is to keep the chocolate warm enough to melt gradually from its own residual heat, but not hot; it should reach a smooth, velvety consistency at a relatively low temperature. This controlled melting is key to a beautiful shine.
Note 4: Melting chocolate slowly while stirring frequently helps to cool it and promote proper crystallization before the cocoa butter rises to the surface, which prevents unattractive streaks or bloom. Adding unmelted chocolate toward the end of the melting process helps to “seed” the chocolate, further cooling the mixture and encouraging it to set with a stable, smooth, and firm finish. This technique stabilizes the chocolate, giving it a desirable glossy appearance and ensuring it won’t easily melt on your fingers.
Storage: Chocolate Covered Strawberries are best eaten the same day for optimal freshness, flavor, and texture. They last about 8–10 hours in a cool, dry place before they may start to break down, leak, and become sticky. I do not recommend refrigerating them, as the moisture will create condensation on the outside of the chocolate, causing it to crack, become dull, or separate when you bite into them. If refrigeration is absolutely necessary, store them in a single layer in an airtight container with a paper towel at the bottom to absorb excess moisture, and let them come to room temperature before serving.
Nutrition
Serving:
1
serving
|
Calories:
61
kcal
|
Carbohydrates:
9
g
|
Protein:
0.9
g
|
Fat:
3
g
|
Sodium:
0.4
mg
|
Fiber:
1.4
g
|
Sugar:
7.2
g
Nutrition information is automatically calculated, so should only be used as an approximation.
Enjoy this recipe? Leave a comment below!
Creating your own chocolate-covered strawberries is a rewarding experience that yields delicious, impressive results. By following these detailed steps and tips, you can transform simple ingredients into a gourmet dessert that’s perfect for gifting, entertaining, or simply indulging yourself. Enjoy the process, and savor every exquisite bite of your homemade creations!