

Oreo Frosting isn’t just a dessert topping; it’s a creamy, buttery, and utterly irresistible experience that elevates any sweet treat from ordinary to extraordinary! Infused with the iconic flavor and delightful texture of crushed Oreo cookies, this frosting promises a taste sensation that will have everyone reaching for seconds. Move over, basic vanilla or chocolate—it’s time to transform your baking with the magical allure of homemade cookies and cream frosting.

The Ultimate Oreo Frosting Recipe: A Dessert Lover’s Dream
Are you searching for that one special topping to make your cakes and cupcakes unbelievably good? While classic cream cheese frosting and a timeless vanilla buttercream are undeniably delicious, have you ever experienced the sheer joy of biting into a dessert crowned with rich, homemade Oreo frosting? If not, you’re in for a truly delightful surprise!
As a devoted Oreo enthusiast, I can confidently say this cookies and cream frosting is one of my all-time favorites. It’s gloriously thick, perfectly buttery, exquisitely sweet, and generously packed with the distinctive flavor and delightful crunch of finely crushed Oreo cookies. Every spoonful offers an authentic taste of your beloved cookies in a creamy, spreadable form. It’s a guaranteed crowd-pleaser that adds a touch of playful sophistication to any baked good.
The best part? Crafting your own batch of this sensational frosting is remarkably straightforward. You only need a **few common ingredients** and to follow some **simple steps**, and you’ll be well on your way to creating a frosting that tastes incredibly professional. It’s the perfect complement for boosting the flavor of a simple vanilla cake, making ordinary cupcakes made from a mix truly pop, or even for those moments when you just want to grab a spoon and enjoy it straight from the bowl (seriously, no judgment here!). Get ready to elevate your desserts to an entirely new level of deliciousness with this easy-to-make, utterly addictive Oreo frosting.
Key Ingredients for Irresistible Oreo Frosting
The secret to a truly outstanding Oreo frosting lies in a careful selection of quality ingredients and understanding how each contributes to the final texture and flavor. Here’s a detailed breakdown of what you’ll need to create this creamy masterpiece:
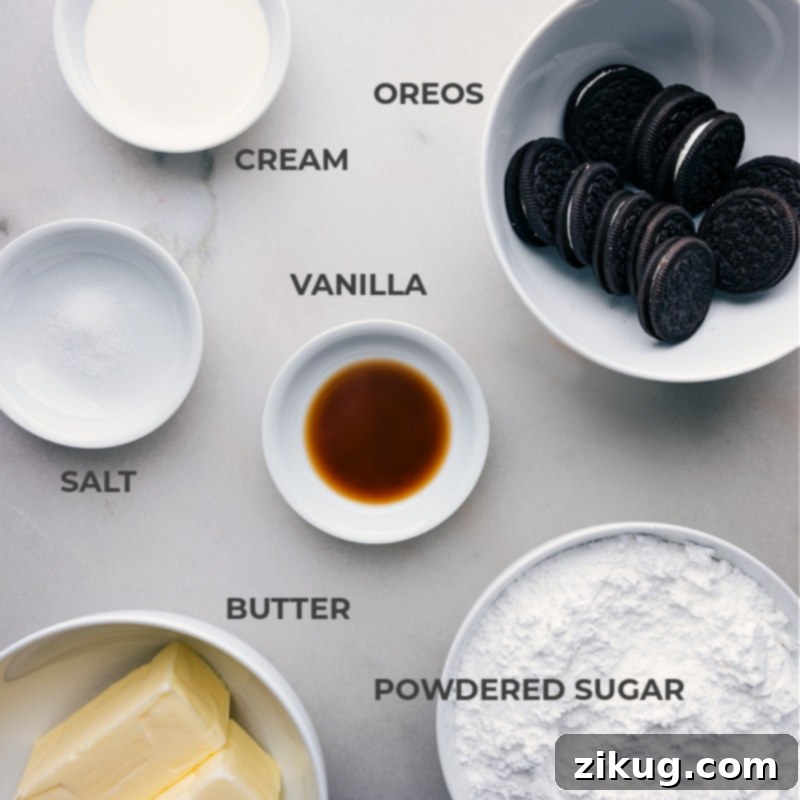
- Oreo Cookies: The star ingredient! For an authentic cookies and cream experience, opt for classic chocolate and vanilla flavored Oreos. Steer clear of Double Stuf or any flavored varieties (like mint or peanut butter) for this base recipe, as they can significantly alter the balance and texture. The most crucial detail here is to process them into **exceptionally fine crumbs**. This ensures your frosting is smooth, prevents any grittiness, and stops your piping bag from clogging. You’ll want a consistency akin to fine sand.
- Unsalted Butter: Using unsalted butter gives you precise control over the overall saltiness of your frosting. It is absolutely vital that your butter is at **room temperature**. This means it should be soft enough to leave a slight impression when gently pressed, but not melted, oily, or shiny. Properly softened butter creams beautifully with powdered sugar, incorporating air to create a light, fluffy, and stable buttercream base.
- Powdered Sugar (Confectioners’ Sugar): This ingredient is responsible for both the sweetness and the smooth, silky texture of the frosting. Unlike granulated sugar, powdered sugar dissolves instantly, preventing any grainy mouthfeel. It’s essential for achieving that professional, bakery-style finish. Ensure accurate measurement by spooning it into your measuring cup and leveling it off.
- Pure Vanilla Extract: A touch of high-quality pure vanilla extract is indispensable. It doesn’t just add sweetness; it deepens and rounds out the overall flavor profile, creating a harmonious blend with the butter, sugar, and Oreos. Always choose pure vanilla extract for the richest, most authentic taste.
- Heavy Whipping Cream: Cold heavy whipping cream is key for adjusting the frosting’s consistency and adding luxurious richness. It helps thin the buttercream to your desired spreadable or pipeable texture while contributing to its overall decadent mouthfeel. Start with the minimum amount specified and add more gradually, spoonful by spoonful, until the perfect consistency is achieved. Whole milk can be a suitable substitute if heavy cream isn’t available, but it will yield a slightly less rich and creamy result.
- Salt: A small pinch of salt may seem minor, but it plays a significant role in baking. In sweet recipes, salt acts as a powerful flavor enhancer. It cleverly balances the intense sweetness of the powdered sugar and butter, bringing forward the nuanced flavors of the Oreos and preventing the frosting from being overly sugary or cloying.
Quick Tip: Understanding Powdered vs. Confectioners’ Sugar
For those new to baking, the terms “powdered sugar” and “confectioners’ sugar” are often used interchangeably, and for good reason—they are virtually the same product! Confectioners’ sugar typically contains a small percentage of cornstarch (usually 3-5%), which serves to prevent caking and helps maintain its ultra-fine, powdery consistency. This cornstarch also slightly aids in stabilizing frostings. For all practical purposes in recipes like this Oreo frosting, you can use either name with confidence. The most important factor is its finely milled texture, which ensures a smooth, non-gritty finish.
How to Make the Perfect Creamy Oreo Frosting: Step-by-Step Guide
Creating this dreamy cookies and cream frosting is simpler than you might think! Follow these detailed instructions to ensure a perfectly smooth, rich, and flavorful result that will impress everyone.
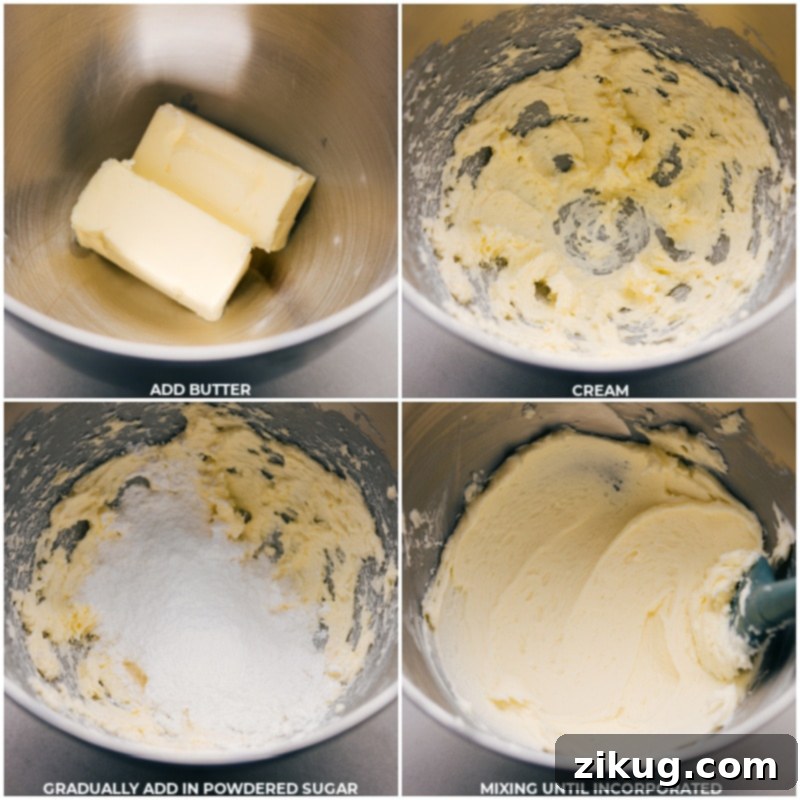
- Prepare Your Butter: The journey to perfect frosting begins with perfectly softened butter. Ensure your unsalted butter is at ideal room temperature—it should be soft enough that a gentle press leaves a slight indentation, but it should not be shiny, oily, or melted in any way. Refer to our “Mastering Butter Temperature” section below for expert tips on achieving this crucial consistency.
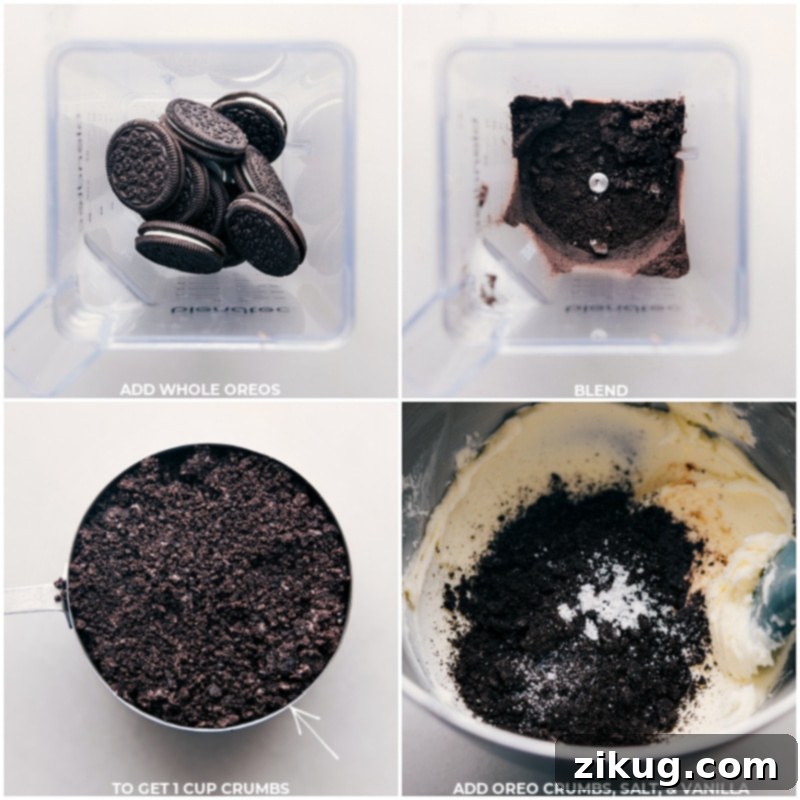
- Crush the Oreo Cookies: This step is where the magic of Oreo frosting truly comes to life! Place whole Oreo cookies (yes, the cream filling too!) into the bowl of a food processor or a high-powered blender. Pulse continuously until the cookies are transformed into very fine, uniform crumbs. Aim for a texture resembling fine sand; this ensures a smooth frosting and prevents any clogging if you plan to pipe it.
- Cream the Butter: In the bowl of a stand mixer fitted with the paddle attachment (or using a large mixing bowl with a hand mixer), add your perfectly softened butter. Beat the butter on low speed for approximately 1 to 2 minutes. The goal here is to achieve a wonderfully creamy and smooth consistency, not to incorporate excessive air at this initial stage. Remember to pause and scrape down the sides and bottom of the bowl frequently to ensure even mixing.
- Gradually Add Powdered Sugar: With the mixer still running on low speed, begin to slowly add the powdered sugar. Introduce it about half a cup at a time. This gradual addition is key to prevent a cloud of sugar from enveloping your kitchen! After each addition, scrape down the sides and bottom of the bowl thoroughly. Continue mixing on low speed until all the powdered sugar is fully combined with the butter, resulting in a thick, somewhat stiff base.
- Incorporate Oreos, Vanilla, and Salt: Now, it’s time to introduce the remaining flavor elements. Add your finely crushed Oreo crumbs, the pure vanilla extract, and the essential pinch of salt to the butter-sugar mixture. Keep the mixer on low speed and begin to gradually pour in 2 tablespoons of cold heavy whipping cream. Mix just until all the ingredients are well combined and the frosting takes on that characteristic cookies and cream appearance.
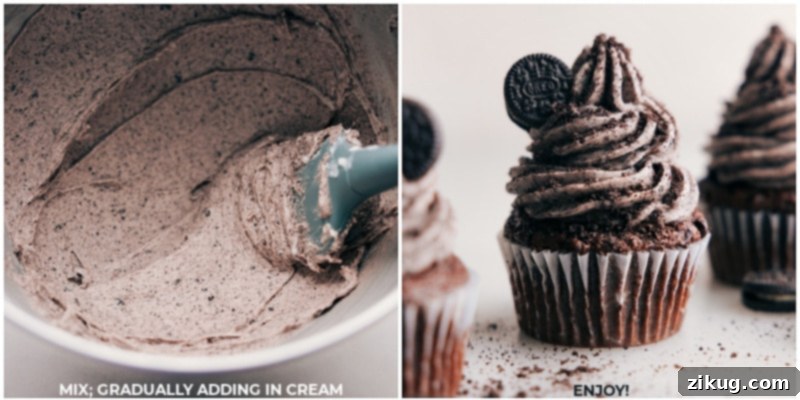
- Adjust for Perfect Consistency: At this point, assess the frosting’s thickness. If you find it too stiff or difficult to spread/pipe, add more heavy whipping cream, one teaspoon at a time. Mix thoroughly after each addition until you achieve your desired consistency. Whether you prefer a very thick frosting for intricate piping or a slightly looser texture for smooth spreading, you have full control. Don’t forget to taste your frosting! If you desire to intensify the flavors or further balance the sweetness, you can add another tiny pinch of salt and mix briefly.
- Time to Frost: Congratulations! Your creamy, dreamy homemade Oreo frosting is now perfectly ready for action. Ensure that whatever you plan to frost—be it cakes, cupcakes, or brownies—is completely cooled to prevent the frosting from melting and losing its beautiful structure. Unleash your creativity and enjoy your spectacular creation!
Endless Possibilities: How to Use Your Oreo Frosting
This phenomenal Oreo frosting is far too delicious and versatile to be confined to just one type of dessert! Its rich flavor and delightful cookies-and-cream texture make it a fantastic addition to a myriad of sweet creations. Here are some inspiring ways to incorporate this irresistible frosting into your baking repertoire:
- Classic Cakes and Cupcakes: The most obvious, yet undeniably perfect, application! This frosting is ideal for generously topping or expertly piping onto any flavor of cake or cupcake. It pairs exquisitely with rich chocolate cakes, light vanilla cupcakes, or even a simple yellow cake, instantly elevating them to a gourmet cookies and cream dessert.
- Gourmet Sandwich Cookies: Transform plain store-bought or homemade sugar cookies, shortbread, or even peanut butter cookies into impressive sandwich cookies. Simply spread a generous layer of Oreo frosting between two cookies for an elevated treat that’s perfect for parties or lunchboxes. Try it with homemade chocolate cookies for an extra decadent double-chocolate-Oreo experience!
- Decadent Brownie Topping: Take your favorite fudgy brownies from great to absolutely unforgettable. Once your brownies are completely cooled, spread a thick, luxurious layer of Oreo frosting over the top. The combination of chewy brownie and creamy, crunchy frosting is pure bliss.
- Whoopie Pie Filling: Ditch traditional cream fillings and use this luscious Oreo frosting as the star filling for whoopie pies. The texture holds up beautifully, creating a soft, dreamy center between two cake-like cookies.
- Layered Desserts (Parfaits & Trifles): Build stunning and incredibly flavorful layered desserts. Alternate spoonfuls of Oreo frosting with cubes of cake, cookie crumbles, fresh berries, or even additional crushed Oreos to create elegant parfaits or grand trifles. These are perfect for entertaining!
- Ice Cream Extravaganza: Get creative with ice cream! Swirl a generous amount of leftover frosting into homemade vanilla or chocolate ice cream before freezing for a custom cookies and cream flavor. Alternatively, gently warm a small portion of the frosting until it’s pourable and drizzle it over scoops of your favorite store-bought ice cream for an instant, luxurious topping.
- Fun Dips and Spreads: Serve this creamy frosting as a delightful dip for a fun and interactive dessert experience. It pairs wonderfully with crunchy dippers like pretzel sticks (for an amazing sweet and salty combination!), graham crackers, vanilla wafers, fresh apple slices, or even marshmallows. It’s an instant party hit!
Pro Tip: Effortlessly Filling a Piping Bag
If you’re baking solo, filling a piping bag can sometimes be a bit of a juggling act. Here’s a simple yet brilliant trick to make it mess-free and easy: Take a tall glass or a sturdy mug and stand your piping bag inside it. Fold the top edges of the piping bag down and over the rim of the glass. This creates a stable, wide-mouthed opening, allowing you to easily spoon in the frosting with both hands. Once filled, simply un-fold the edges, twist the top of the bag to secure, and you’re ready to pipe like a pro!
Expert Tips and Troubleshooting for Flawless Oreo Frosting
While making Oreo frosting is generally straightforward, a few expert tips can ensure your results are consistently perfect, smooth, and delicious every single time. These insights will help you avoid common pitfalls and achieve bakery-quality frosting at home.
- Achieve Ultra-Fine Oreo Crumbs: This cannot be overstated: the key to smooth, pipeable Oreo frosting is to pulse your whole Oreos (including the cream filling) into exceptionally fine crumbs in a food processor or high-speed blender. Any chunks or larger pieces will not only give your frosting a less-than-ideal gritty texture but will also inevitably clog your piping bag’s tip, leading to frustration during decoration. Aim for a consistency similar to powdered sugar or fine sand.
- Gradually Add Heavy Cream for Precision: The amount of heavy cream needed can slightly vary depending on factors like the temperature of your butter, the humidity in your kitchen, and how tightly you measured your powdered sugar. Always add the cream gradually—start with the minimum recommended amount, then add an additional tablespoon or even a teaspoon at a time, mixing thoroughly after each addition. This allows you to precisely control and achieve your desired frosting consistency, whether you prefer it thick for intricate piping or slightly softer for easy spreading.
- Scrape the Bowl Meticulously: During every stage of mixing, especially after adding the butter and powdered sugar, make it a habit to stop your mixer and scrape down the sides and bottom of the bowl with a rubber spatula. This crucial step ensures that all ingredients are fully incorporated and prevents any unmixed pockets of butter or sugar from remaining, which could lead to a lumpy, inconsistent, or even greasy frosting.
- Avoid Over-Beating (Especially After Adding Oreos): Once you’ve added the Oreo crumbs to your frosting, mix only until they are just evenly distributed. Over-beating at this stage can potentially cause several issues: it might break down the Oreo crumbs too much, turning them into a paste rather than distinct crumbs, or it could introduce too much air, which can sometimes lead to a slightly grainy, crumbly, or even separated texture in your finished frosting. A minute or two of gentle mixing is usually sufficient.
- Experiment with Creative Flavor Twists: While the classic Oreo frosting is undeniably superb, don’t hesitate to unleash your inner pastry chef! For a festive and refreshing variation, try adding a quarter teaspoon of mint extract along with a cup of finely crushed Mint Oreos for an incredible “Mint Cookies and Cream” frosting. You could also experiment with a hint of almond extract for a subtle, sophisticated twist, or even a touch of espresso powder to deepen the chocolate notes.
Mastering Butter Temperature: The Secret to Silky Frosting
The unsung hero of any outstanding buttercream frosting, including our delectable Oreo version, is perfectly tempered butter. Getting your butter to the correct room temperature isn’t just a suggestion—it’s a fundamental step that dictates the success of your frosting’s texture. Butter that is too cold will resist creaming, resulting in a lumpy, unappealing frosting. Conversely, butter that is too warm or partially melted will lead to a greasy, unstable, and soupy consistency that won’t hold its shape or incorporate air properly.
How to Determine if Your Butter is Soft Enough:
- The Gentle Finger Press Test: Lightly press your finger into the stick of butter. It should leave a slight, shallow indentation without your finger sinking all the way through, and the butter should not feel oily or squishy.
- The Effortless Slice Test: When you attempt to slice through the butter, your knife should glide through with ease, yet the butter itself should still maintain its original shape without collapsing. It should feel pliable, not firm.
- The Ideal Temperature Range: For optimal results, aim for an internal butter temperature between 65-70°F (18-21°C). At this temperature, the butter is cool to the touch but has a noticeable give.
Expedient Ways to Soften Butter (for when you’re short on time):
- Cut into Smaller Pieces: If you’ve forgotten to take your butter out of the fridge, simply cut the cold stick into 1-inch cubes. Spreading out the smaller chunks on a plate significantly increases their surface area, allowing them to come to room temperature much faster—usually within 15-20 minutes on the kitchen counter.
- The Warm Glass Method: This clever trick uses residual heat. Fill a microwave-safe glass or bowl with hot tap water and let it sit for a minute. Pour out the hot water, quickly dry the glass, and then immediately invert the warm glass over your stick of butter on the counter. The gentle, trapped warmth will soften the butter perfectly in about 5-10 minutes without melting it.
- Microwave with Extreme Caution: This is a last-resort method and requires utmost care to prevent melting, which can ruin your frosting. Heat the butter in the microwave at 10% power for very short intervals, typically 8-10 seconds. After each interval, flip the butter stick and gently press it to check for softness. Stop as soon as it’s pliable; you want it soft, not liquid!
Smart Storage Solutions for Your Oreo Frosting
Properly storing your homemade Oreo frosting ensures its freshness and allows you to prepare it in advance, saving precious time on busy baking days.
- Refrigeration: Any leftover frosting should be transferred to an airtight container and stored in the **refrigerator for up to one week**. A tight seal is essential to prevent the frosting from absorbing unwanted odors from other foods in the fridge.
- Freezing for Longer Term: For extended storage, this frosting freezes beautifully. Place it in a freezer-safe, airtight container and it will keep well in the **freezer for up to three months**.
- Thawing and Re-whipping: If you’ve frozen your frosting, the best way to thaw it is by transferring it to the refrigerator overnight. Once thawed (or if you’re using refrigerated frosting), allow it to come to room temperature on the counter for about an hour before use. For optimal consistency, place the softened frosting back into your stand mixer and re-whip it on low-medium speed for a few minutes until it regains its wonderfully light, fluffy, and creamy texture. If it seems a little stiff, you can add a tiny splash of cold heavy cream during the re-whipping process.
- Preparing Ahead: This Oreo frosting is an excellent component to make ahead of time! Simply follow the recipe, then store it in the refrigerator or freezer as directed. This convenient approach means less stress on your baking day, allowing you to focus on assembling and decorating your magnificent desserts.
Delicious Recipes to Utilize Leftover Oreos
Found yourself with a few extra Oreo cookies after making your sensational frosting? Don’t let those delicious crumbs go to waste! Here are some fantastic recipes that put leftover Oreos to brilliant use, ensuring every cookie finds its purpose:
- No-Bake Oreo Truffles: Effortlessly decadent chocolate-covered Oreo balls, perfect for gifting or a quick sweet bite.
- Oreo Fudge: A creamy, dreamy fudge recipe featuring white chocolate and generous chunks of crushed Oreos.
- Chocolate Covered Oreos: A simple yet elegant treat where Oreos are dipped in melted chocolate and often adorned with a decorative drizzle.
- Icebox Cake: A classic no-bake dessert featuring layers of cookies (including Oreos!), whipped cream, and sometimes a rich Nutella filling.
- Brownie Oreo Ice Cream Bars: The ultimate indulgence, combining fudgy brownie layers, delightful Oreo pieces, and a scoop of creamy ice cream, often finished with a warm fudge sauce.

Oreo Frosting (Cookies and Cream Frosting)
By Chelsea Lords
This homemade Oreo Frosting is exceptionally creamy, wonderfully buttery, perfectly sweet, and generously loaded with authentic Oreo cookie goodness—it’s guaranteed to transform any dessert into an unforgettable masterpiece!
Prep Time: 25 minutes
Total Time: 25 minutes
Yields: Enough for 12 large cupcakes, 24 standard cupcakes, or a 2-layer cake (see note 1)
Equipment
- Stand mixer with paddle attachment (or a powerful hand mixer)
- Blender or food processor
Ingredients
- 1 cup Oreo crumbs (from approximately 10 whole Oreo cookies)
- 16 tablespoons unsalted butter (which is 1 cup or 2 sticks), at room temperature (see note 2)
- 3 cups powdered sugar (confectioners’ sugar, see note 3)
- 2 teaspoons pure vanilla extract
- 2 to 4 tablespoons heavy cream (cold, adjust as needed)
- 1/4 teaspoon fine sea salt
Instructions
- Start with Room-Temperature Butter: Ensure your unsalted butter is perfectly softened but not melted. It should yield easily when pressed (refer to the “Mastering Butter Temperature” section for detailed guidance).
- Prepare Oreo Crumbs: Place whole Oreo cookies (including the cream filling) into a high-powered blender or food processor. Pulse until you achieve 1 cup of very fine, sand-like crumbs. Avoid leaving any large pieces to ensure a smooth frosting.
- Cream the Butter: In the bowl of your stand mixer fitted with the paddle attachment (or using a large bowl and a hand mixer), beat the softened butter on low speed for 1-2 minutes until it is creamy and smooth. Scrape down the sides and bottom of the bowl as necessary to ensure even mixing.
- Gradually Add Powdered Sugar: With the mixer still on low speed, slowly add the powdered sugar, about 1/2 cup at a time. After each addition, pause and scrape the bowl thoroughly. Continue mixing until all the sugar is fully incorporated and the mixture is thick.
- Incorporate Flavors: Add the fine Oreo crumbs, pure vanilla extract, and salt to the mixture. With the mixer on low, gradually pour in 2 tablespoons of cold heavy whipping cream. Mix just until all ingredients are combined and the frosting takes on a uniform cookies and cream appearance.
- Adjust Consistency & Taste: Check the frosting’s consistency. If it’s too thick, add more heavy cream, one teaspoon at a time, mixing well after each addition until your desired thickness is reached. Taste the frosting and add an extra tiny pinch of salt if you wish to further enhance and balance the sweetness.
- Frost Your Desserts: Your exquisite Oreo frosting is now ready! Spread or pipe it generously onto completely cooled cakes, cupcakes, or your chosen dessert. Enjoy the irresistible cookies and cream flavor!
Recipe Notes
Note 1 (Yield): This recipe yields enough frosting to generously frost 12 standard-sized cupcakes, cover 24 smaller cupcakes, or adequately frost a 9×13-inch sheet cake or a beautiful 2-layer round cake (either 8 or 9-inch diameter).
Note 2 (Butter Temperature): The temperature of your butter is paramount. It must be soft to the touch and pliable, yet still cool and holding its shape, not melted or oily. Butter that is too soft can result in a loose, greasy frosting, while butter that is too cold will lead to a lumpy texture. Refer to the “Mastering Butter Temperature” section above for detailed guidance on achieving perfect butter consistency.
Note 3 (Powdered Sugar Measurement): For precise results, ensure your measuring cups are completely filled with powdered sugar. Use the flat edge of a table knife to level off the top, avoiding packing the sugar down, as this can lead to an overly stiff frosting.
Nutrition Note: The provided nutrition information is an estimation for one serving, based on a total yield of 12 servings per batch of frosting. These values are automatically calculated.
Storage: Store any leftover Oreo frosting in an airtight container in the refrigerator for up to 1 week. For longer storage, it can be frozen for up to 3 months. Always allow frozen frosting to thaw in the refrigerator, then bring to room temperature and re-whip until light and fluffy before use.
Nutrition Information
Serving: 1 serving | Calories: 330 kcal | Carbohydrates: 40g | Protein: 1g | Fat: 19g | Saturated Fat: 11g | Polyunsaturated Fat: 1g | Monounsaturated Fat: 6g | Trans Fat: 1g | Cholesterol: 45mg | Sodium: 104mg | Potassium: 40mg | Fiber: 0.4g | Sugar: 35g | Vitamin A: 530IU | Vitamin C: 0.01mg | Calcium: 10mg | Iron: 2mg
Nutrition information is automatically calculated and should be used as an approximation. Individual results may vary based on exact ingredients and preparation methods.
Love this recipe? We’d be thrilled to hear from you! Please consider leaving a comment or sharing your wonderful creations below. Your feedback and experiences inspire us!
Leave a comment below!