
Irresistible Lemon Blueberry Sweet Rolls: A Bright & Zesty Treat
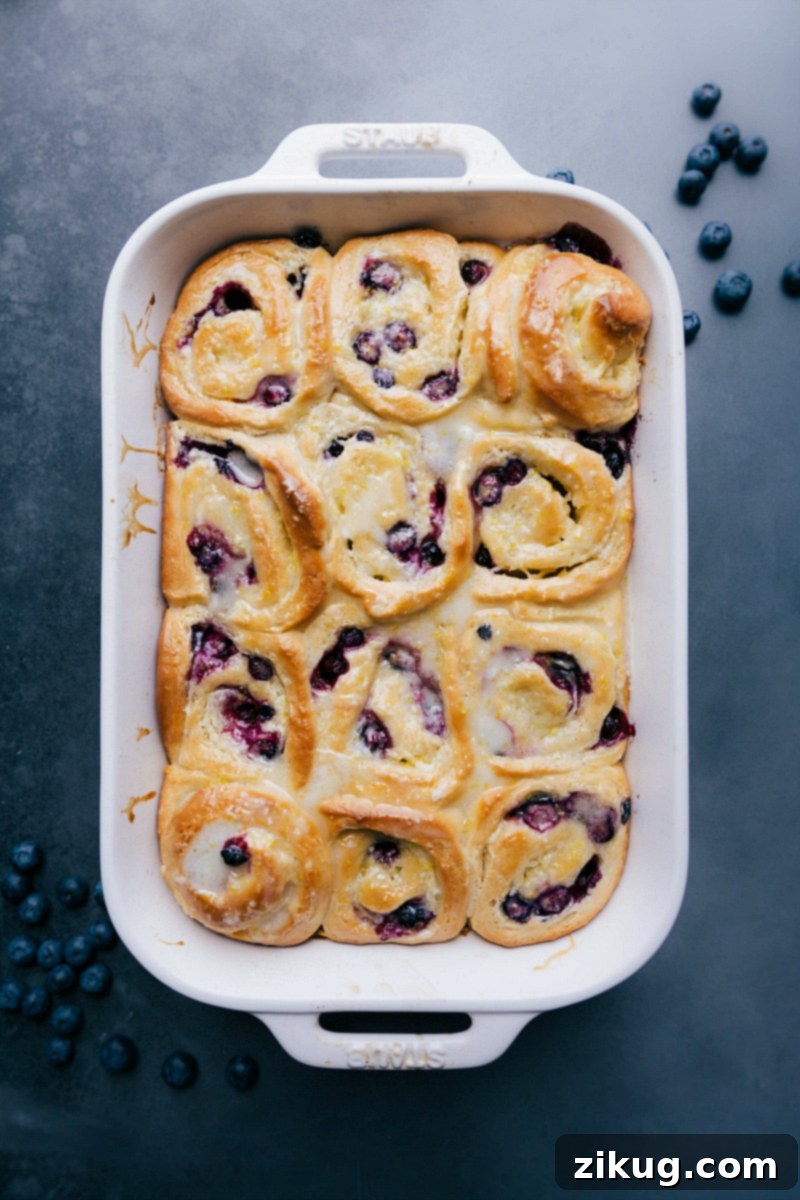
Welcome to the ultimate guide for creating truly Irresistible Lemon Blueberry Sweet Rolls. These delightful pastries start with a foundation of incredibly soft, sweet, and airy dough, meticulously prepared to achieve the perfect texture. Each roll is generously filled with a vibrant, tangy lemon-infused sugar and plump, juicy blueberry filling, creating a harmonious balance of sweet and tart flavors. Finally, they are crowned with a luscious, bright lemon glaze that adds an irresistible finish, making every single bite a burst of sunshine and pure indulgence. Perfect for breakfast, brunch, or a special dessert, these homemade sweet rolls promise to brighten any day with their fresh, citrusy aroma and delectable taste.
Why These Lemon Blueberry Sweet Rolls Are a Must-Try
For years, classic cinnamon rolls have been a beloved staple in many households, including mine. The comforting aroma and sweet, gooey goodness are hard to resist. However, a few weeks ago, I found myself craving a fresh twist, something equally comforting but with a vibrant, summery flair. After extensive testing and perfecting, these Lemon Blueberry Sweet Rolls were born, and they’ve since become an absolute sensation. My family, especially my boys, can’t get enough – they’ve officially retired plain cinnamon rolls in favor of this dazzling alternative!
These sweet rolls are not just a variation; they are a true game-changer in the world of baked goods. They strike a perfect balance, offering a delightful combination of buttery richness from the soft dough, a burst of sweetness from the filling, and a refreshing tartness from the lemon and fresh blueberries. The use of premium ingredients ensures a superior taste and texture that elevates them above standard pastries. Each element, from the perfectly proofed dough to the generous layer of fruit and the final vibrant glaze, contributes to an unforgettable culinary experience.
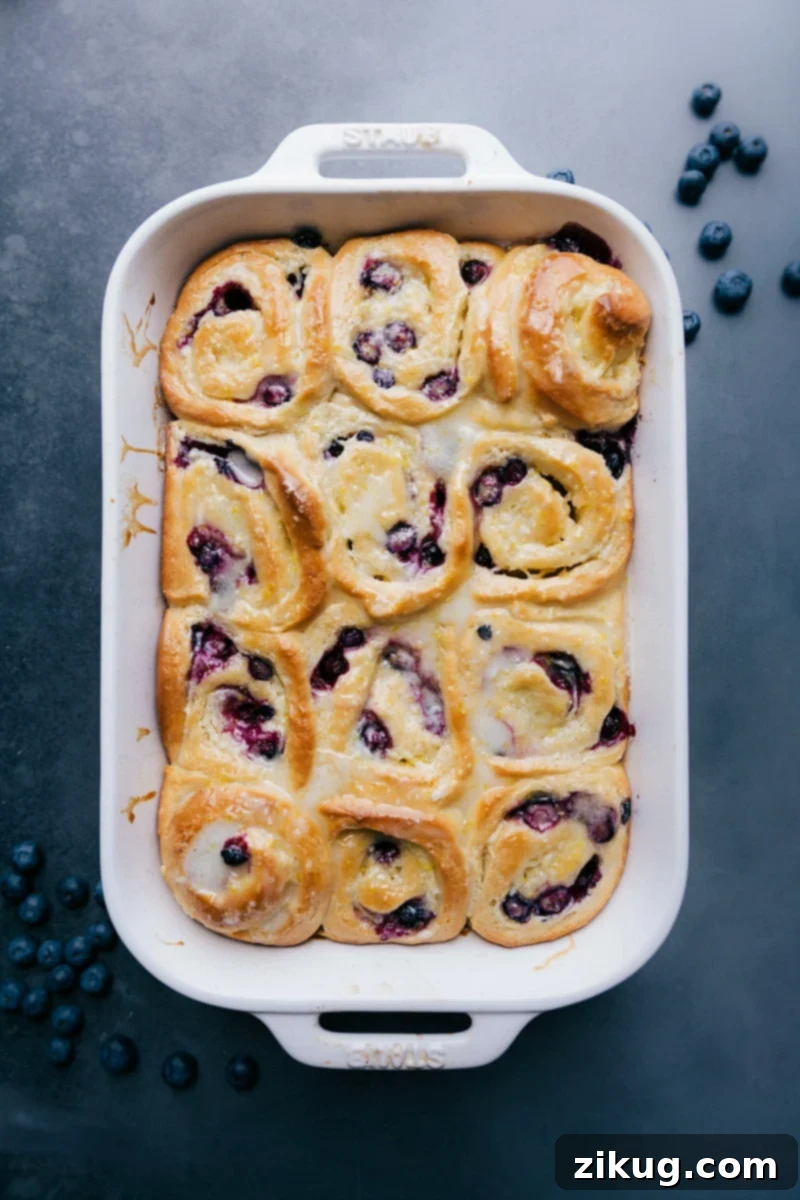
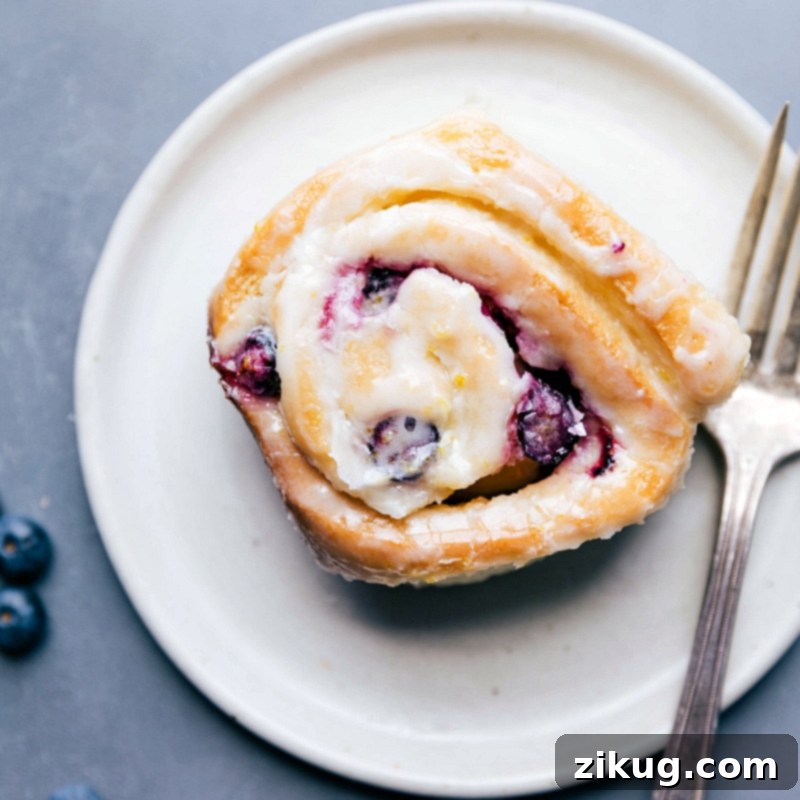
The star of the show, beyond the tender dough and fruit filling, is undoubtedly the glorious sweet-tart lemon glaze. Drizzled generously over the warm rolls, this glaze infuses every mouthful with a bright, zesty zing, elevating the entire experience and making each bite utterly vibrant and impossible to resist. This recipe promises a unique flavor profile that stands out from typical sweet rolls, making it perfect for special occasions or simply to brighten an ordinary morning. Prepare to be amazed by the freshness and complexity packed into every swirl.
Key Ingredients for Perfect Sweet Rolls
Crafting exceptional Lemon Blueberry Sweet Rolls begins with selecting high-quality ingredients. Each component plays a crucial role in achieving the desired texture, flavor, and overall deliciousness. Here’s a detailed look at what you’ll need and why:
For the Dough:
- Whole Milk: The foundation of our tender dough. Whole milk, with its higher fat content, contributes significantly to a richer flavor and a more tender, moist crumb. While lower-fat milk can be used, it may result in a slightly less luxurious texture. Ensure it’s warmed to the correct temperature for yeast activation – too hot will kill the yeast, too cold won’t activate it.
- Active Dry Yeast: This is the leavening agent that gives our rolls their airy, fluffy structure. It’s crucial to use active dry yeast, not instant yeast, as the activation process differs slightly and requires proofing. A good quality, fresh yeast will ensure a successful rise and a light, pillowy final product.
- White Granulated Sugar: Beyond sweetening the dough, granulated sugar is vital for feeding the active dry yeast, helping it to bloom and create those wonderful air pockets. It also contributes to the beautiful golden-brown crust and a balanced sweetness throughout the roll.
- Unsalted Butter (Melted and Cooled): Butter adds incredible richness and tenderness to the dough. Using unsalted butter allows you to control the overall saltiness of the recipe. It’s essential that the melted butter is cooled to room temperature before adding it to the yeast mixture; hot butter can kill the delicate yeast, preventing your rolls from rising.
- Vanilla Extract: Pure vanilla extract provides a warm, aromatic depth that beautifully complements the bright lemon and sweet blueberries. Opt for pure vanilla for the best and most authentic flavor profile, enhancing the overall sweetness without overpowering it.
- Large Egg Yolk: The egg yolk adds richness, color, and helps to bind the dough, contributing to a wonderfully soft and slightly chewy texture. It also lends a beautiful golden hue to the baked rolls. Save the extra egg white to make delightful Meringue Cookies!
- All-Purpose Flour: The primary structural component of the dough. It’s essential to measure flour correctly, ideally by weight, or by spooning it into a measuring cup and leveling off. Over-flouring is a common pitfall that can lead to dense, tough rolls, so be mindful of the dough’s consistency and adjust as needed.
- Fine Sea Salt: A small but mighty ingredient, salt balances the sweetness, enhances all the other flavors, and controls yeast activity. Fine sea salt dissolves easily and distributes evenly throughout the dough, preventing overly salty pockets.
For the Filling:
- Unsalted Butter (Softened): Softened butter forms the base of our filling, providing a rich canvas for the lemon sugar and blueberries. Ensure it’s at true room temperature for easy, even spreading across the dough without tearing it.
- Granulated Sugar: Combined with lemon zest, this creates a fragrant, sweet, and tangy base for the blueberry layer. It also helps to absorb some of the blueberry juices during baking, preventing a soggy interior.
- Large Lemon (Zest and Juice): The star of the show! Both the zest and a touch of fresh lemon juice are crucial for the filling’s bright flavor. Rubbing the zest into the sugar before sprinkling helps to release its aromatic oils, intensifying the lemon flavor and fragrance.
- Fresh Blueberries: Bursting with natural sweetness and a slight tang, fresh blueberries are perfect for this recipe. Their vibrant color and juicy texture create delightful pockets of fruit throughout the rolls. Patting them dry gently before use is key to prevent excess moisture from making the rolls soggy.
- Heavy Cream (Slightly Warmed): Brushed over the rolls before baking, heavy cream creates an incredibly moist interior and a beautiful, tender crust. Warming it slightly helps it absorb better into the dough, contributing to a truly decadent texture.
For the Frosting/Glaze:
- Large Lemon (Zest and Juice): Again, fresh lemon is indispensable for a bright, zesty glaze that perfectly complements the rolls. The juice provides the liquid for the glaze, while the zest adds intense citrus aroma and tiny, beautiful flecks of color.
- Unsalted Butter (Melted): A small amount of melted butter adds richness and a silky texture to the glaze, making it spread smoothly and taste even more decadent. It helps to emulsify the glaze, giving it a luxurious mouthfeel.
- Powdered Sugar: The base for any good glaze, powdered sugar (confectioners’ sugar) dissolves easily to create a smooth, creamy texture without any graininess.
- Salt: Just a pinch of salt in the glaze helps to cut through the sweetness and highlight the lemon flavor, making the glaze more dynamic and preventing it from being cloyingly sweet.
Pro Tip: Yeast Activation
Always ensure your active dry yeast is properly activated. When combined with warm milk and a touch of sugar, it should form a bubbly, foamy layer on the surface within 5-10 minutes. This indicates the yeast is alive and ready to work its magic. If you don’t see this foam, your yeast may be old or the milk was too hot (killing the yeast) or too cold (inhibiting activation). In such cases, it’s best to start over to guarantee light and airy rolls, rather than dense ones that fail to rise.
Step-by-Step Guide: How To Make Lemon Blueberry Sweet Rolls
Making homemade sweet rolls can seem daunting, but with this detailed guide, you’ll master the process and create bakery-worthy treats right in your own kitchen. Follow these steps carefully for the best results, paying attention to the nuances that make all the difference:
Phase 1: Preparing the Dough
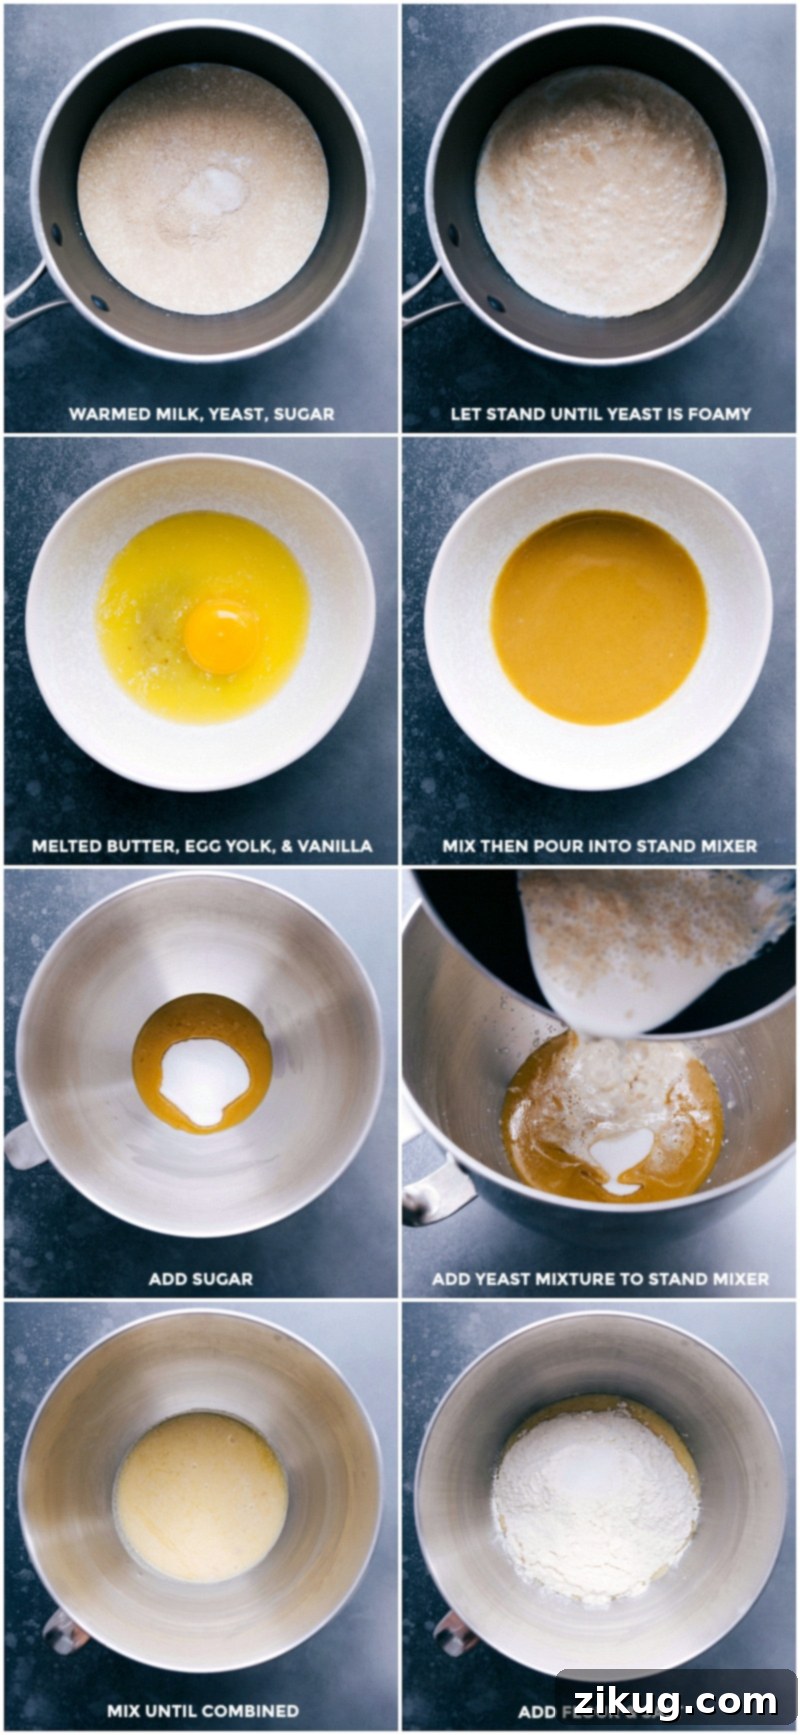
- Activate the Yeast: In a medium-sized pot, gently warm the whole milk over low heat until it reaches a temperature of 100°F (38°C). Use a kitchen thermometer for accuracy, as this temperature is crucial. Immediately remove the pot from the heat. Stir in the active dry yeast and 1/2 teaspoon of granulated sugar. Give it a quick, gentle stir until combined, then let the mixture sit undisturbed for 5 to 10 minutes. During this time, the yeast should become active and form a noticeable foamy layer on the surface, indicating it’s alive and ready. If it doesn’t foam, your yeast is likely inactive, and you’ll need to start this step again with fresh yeast or correctly tempered milk.
- Combine Wet Ingredients: While your yeast is proofing, melt the 4 tablespoons of unsalted butter and allow it to cool completely to room temperature. This cooling step is vital to avoid shocking or killing the yeast. Once cooled, whisk in the vanilla extract and the large egg yolk until the mixture is smooth and well combined. This combination adds richness and flavor to the dough.
- Mix Dough in Stand Mixer: Pour the cooled butter-vanilla-egg mixture into the bowl of a stand mixer. Add the remaining 1/3 cup of granulated sugar. Next, pour in the activated yeast and milk mixture. Using the paddle attachment, mix everything on low speed until just combined, about 30 seconds.
- Add Dry Ingredients & Knead: Add the all-purpose flour and fine sea salt directly on top of the wet ingredients in the stand mixer bowl. Switch to the dough hook attachment. Mix on low speed until the dough comes together and is thick and slightly sticky, about 2 minutes. Stop the mixer occasionally to scrape down the sides of the bowl with a spatula, ensuring all ingredients are incorporated. Increase the speed to medium and knead for approximately 5–6 minutes. The dough should become smooth and elastic, gathering around the dough hook and pulling away from the sides of the bowl. It should remain slightly sticky to the touch but not excessively so. Proper kneading develops the gluten, which is essential for a chewy yet tender roll.
- Adjust Flour (If Needed): Dough consistency can vary based on environmental factors such as humidity and altitude, as well as the specific brand of flour. Always strive for a dough that is slightly sticky and tacky to the touch but still forms a ball and pulls away cleanly from the sides of the mixer bowl. If your dough is too sticky and isn’t gathering around the hook, gradually add additional all-purpose flour, 1/4 cup at a time, up to a maximum of 3/4 cup extra, until it reaches the desired slightly tacky but workable consistency. Be cautious not to add too much flour, as this will result in a dry, tough roll. Trust the feel of the dough over strict measurements.
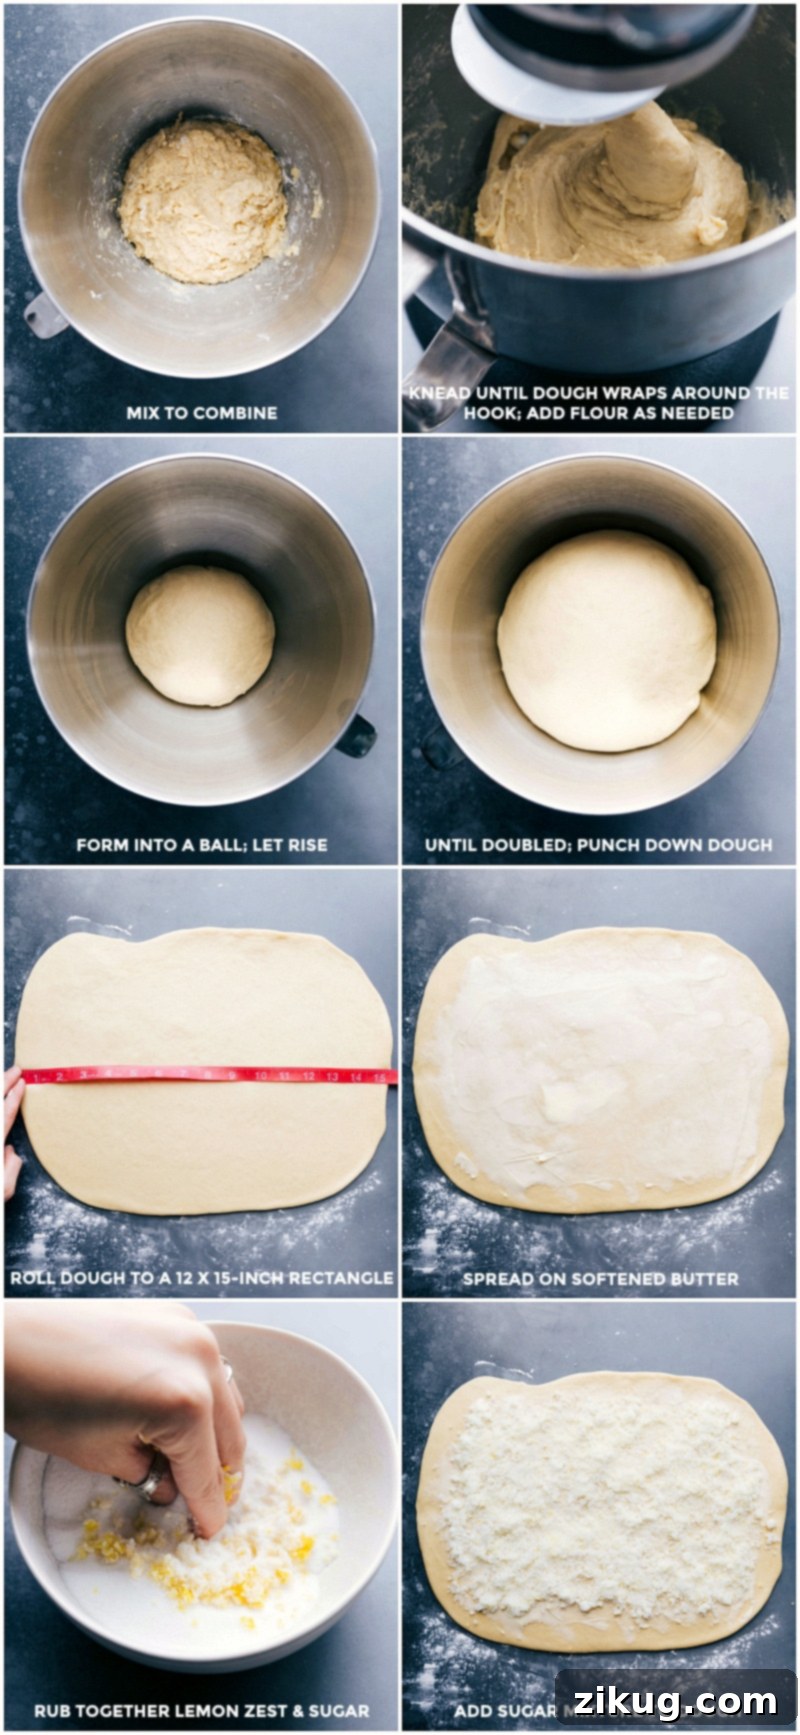
- First Rise: Gently remove the dough from the mixer and shape it into a smooth ball. Lightly grease the mixing bowl with cooking spray or a pat of butter, then return the dough to the bowl, turning it once to coat all sides. Cover the bowl tightly with plastic wrap or a clean kitchen towel. Place the bowl in a warm, draft-free spot (such as a slightly warmed oven that’s turned off, near a sunny window, or in a microwave with a cup of hot water). Let the dough rise until it has visibly doubled in size, which typically takes about 45 minutes to 1 hour and 15 minutes, depending on the warmth of your environment. This first rise is critical for flavor development and texture.
Phase 2: Assembling the Rolls
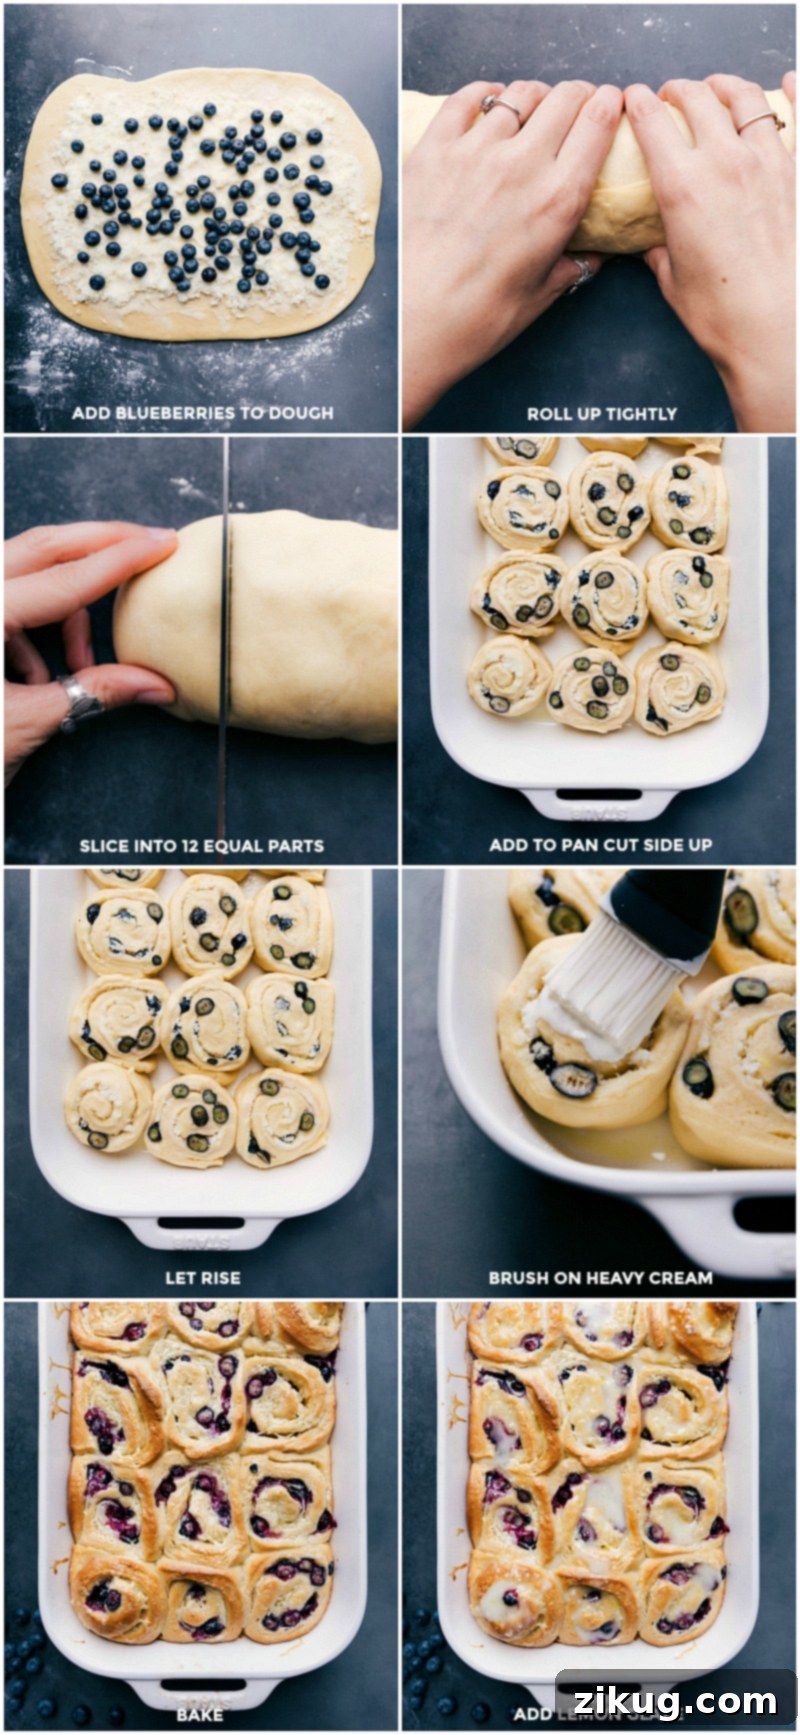
- Roll Out the Dough: Once the dough has doubled, gently punch it down to release the trapped air. Lightly flour a clean work surface (a large cutting board or countertop works well). Roll out the dough into an approximate 15 x 12-inch rectangle. Position the dough so the 15-inch side is facing you. Try to keep the thickness even across the entire rectangle to ensure consistent roll sizes. Avoid overworking the dough during this step; handle it gently to maintain its tenderness.
- Prepare the Lemon Sugar Filling: Using a table knife or offset spatula, spread the 4 tablespoons of softened unsalted butter evenly over the entire rolled-out dough, leaving a 1-inch border along one of the long edges (the one farthest from you). This border will help seal the roll. In a small bowl, combine the 3/4 cup granulated sugar with the zest of one large lemon (about 1 tablespoon). Use your fingertips to rub the zest into the sugar until it becomes incredibly fragrant and the zest is finely dispersed. This “lemon sugar” technique amplifies the citrus flavor by releasing the essential oils. Stir in 1/2 tablespoon of fresh lemon juice into this mixture.
- Add Filling Layers: Evenly sprinkle the fragrant lemon sugar mixture over the butter-coated dough, pressing gently to ensure it adheres. Next, scatter the 1 cup of fresh blueberries evenly over the lemon sugar mixture. Make sure your blueberries are patted dry to prevent excess moisture from making the rolls soggy. The combination of lemon and blueberry creates a truly vibrant flavor profile.
- Roll and Slice: Starting from the 15-inch side closest to you, tightly roll the dough into a snug log. Work carefully to keep the roll even. Pinch the seam gently to seal it completely along its length. Using a very sharp knife (a serrated bread knife often works best for clean cuts without squishing the dough), cut the dough log into 12 equal slices, each approximately 1 to 1.25 inches thick.
- Arrange for Second Rise: Lightly grease a 9×13-inch ceramic or glass baking pan. Ceramic or glass pans are highly recommended as metal pans can sometimes react with the lemon’s acidity, potentially imparting an undesirable metallic taste. Place the sliced rolls into the prepared pan, cut side up, leaving a little space between each roll as they will expand significantly during the second rise and baking.
- Second Rise & Preheat: Cover the pan with plastic wrap or a clean kitchen towel. Allow the rolls to rise again in a warm, draft-free place until they are nearly doubled in size, which typically takes about 20–30 minutes. This second rise ensures the rolls are extra light and fluffy. While the rolls are completing their second rise, preheat your oven to 375°F (190°C).
- Prepare for Baking: Just before baking, slightly warm the 1/3 cup heavy cream for 15–20 seconds in the microwave. It should not be hot, just lukewarm or no longer cold from the fridge. Using a pastry brush, gently brush the warm heavy cream over the tops and around the sides of the risen rolls in the pan. This step is a secret for incredibly moist and tender rolls, as the cream soaks into the dough. Allow it to soak in for a moment.
- Bake: Bake the sweet rolls in the preheated oven for 30–35 minutes, or until the edges are lightly golden brown and the centers are cooked through and spring back when lightly touched. If the tops start to brown too quickly, you can loosely tent the pan with aluminum foil for the remaining baking time to prevent over-browning.
Phase 3: Glaze and Serve
- Prepare the Lemon Glaze: While the rolls are cooling slightly, prepare your vibrant lemon glaze. In a medium bowl, whisk together the zest of one large lemon (about 1 tablespoon), 3 tablespoons of fresh lemon juice, 1 tablespoon of melted unsalted butter, 1-3/4 cups of powdered sugar, and 1/8 teaspoon of salt. Whisk vigorously until the glaze is completely smooth and free of lumps. Adjust the consistency if needed: add a tiny bit more lemon juice (1/2 teaspoon at a time) for a thinner glaze or a bit more powdered sugar for a thicker, more opaque glaze.
- Glaze and Enjoy: Allow the freshly baked sweet rolls to cool at room temperature in the pan for 5–10 minutes. This slight cooling period helps the glaze set without completely melting and running off, while still allowing the rolls to be warm. Once slightly cooled, evenly spread the prepared lemon glaze generously over the warm rolls using an offset spatula or the back of a spoon. Serve immediately and savor the delightful combination of warm, soft dough, tangy lemon, and sweet, juicy blueberries!
Dough Consistency Is Key!
Baking can be influenced by environmental factors such as humidity and altitude. These elements can significantly affect how much flour your dough requires. Always strive for a dough that is slightly sticky and tacky to the touch but still forms a cohesive ball and pulls away from the sides of the mixer. If it feels too wet and sticky after the initial kneading time, add flour gradually (1/4 to 3/4 cup extra); if it’s too dry, a tiny bit of milk or water can help, but it’s harder to correct. Trust your instincts and the feel of the dough over strict measurements for the perfect texture and rise.
Expert Tips for Sweet Roll Perfection
- Patience is a Virtue: Remember that baking with yeast is a process that requires time, particularly for the rising stages. While many steps are hands-off, rushing them will compromise the final texture and flavor. Factors like altitude and humidity can alter rising and baking times, so always observe your dough and oven, rather than strictly adhering to timers. A slow, steady rise often yields the best results.
- Flour Amount Flexibility: The exact amount of flour needed can vary significantly from day to day and kitchen to kitchen. Start with the recommended amount, then adjust slowly as the dough kneads. Your dough should be slightly sticky, tacky to the touch, and gather around the mixer hook without completely adhering to the bowl or your hands. A range of 1/4 to 3/4 cup additional flour is a common adjustment. Don’t be afraid to add more if the dough is too wet, or less if it feels too stiff.
- Choose the Right Baking Pan: To prevent any unwanted metallic flavors, especially from the acidic lemon, always opt for a ceramic or glass baking pan. These materials provide even heat distribution and are non-reactive, ensuring the pure, vibrant flavors of your rolls shine through. Metal pans can sometimes impart an off-flavor when reacting with citrus.
- Invest in a Stand Mixer: While possible to knead yeast dough by hand, a stand mixer with a dough hook attachment will make the process significantly easier and more efficient, ensuring proper gluten development for a soft, chewy texture without the arm workout. A hand mixer typically isn’t powerful enough or designed for the heavy load of yeast doughs.
- Don’t Overbake: Overbaking is the enemy of soft sweet rolls, leading to dry and tough results. Keep a close eye on them during the last 10-15 minutes of baking. They should be lightly golden brown on the edges and cooked through in the center (a skewer inserted should come out clean, or an internal temperature of 190-200°F / 88-93°C for the dough). Remove them from the oven promptly once done.
- Serve Warm for Best Experience: While delicious at any temperature, these Lemon Blueberry Sweet Rolls are truly at their peak when served warm, straight from the oven with the glaze slightly melted and gooey. The warmth enhances the aroma and softens the dough to perfection.
- Zest Smart: When zesting your lemons, ensure you only get the bright yellow part, avoiding the bitter white pith underneath. A microplane zester works best for this. This ensures pure lemon flavor without any unwanted bitterness.
Storage & Enjoying Leftovers
How to Store Your Lemon Blueberry Sweet Rolls:
To keep your delectable sweet rolls fresh and maintain their wonderful texture, proper storage is key. For short-term enjoyment, store any leftovers in an airtight container at room temperature. They will remain wonderfully fresh on the countertop for 1-2 days. If you need to extend their shelf life, you can refrigerate them for up to 5 days. For the best experience when reheating, a quick microwave for 10-15 seconds will restore their warmth and tenderness, making them taste almost freshly baked.
For longer storage, unglazed rolls are your best option for freezing. Once baked and cooled completely (but before applying the glaze), wrap them individually in plastic wrap, then again in aluminum foil, or place them in a freezer-safe sealed container. They can be frozen for up to 2 months. To enjoy, thaw the rolls overnight in the refrigerator, then warm them gently in the oven or microwave, and apply the fresh lemon glaze just before serving. This method ensures you can enjoy a taste of summer whenever the craving strikes!
More Delightful Baked Treats to Explore
If you’ve fallen in love with these Lemon Blueberry Sweet Rolls, you’ll surely enjoy these other fantastic baked treats from our kitchen. Each recipe offers its own unique charm and is perfect for satisfying your sweet tooth or sharing with loved ones:
- Indulge in our rich Peanut Butter Brownie Bites, crowned with a decadent chocolate ganache topping. These bite-sized treats are perfect for parties or individual cravings.
- Discover our indulgent Chocolate Muffins, a delightful copycat recipe reminiscent of your favorite bakery’s moist and deeply chocolatey creations. They make a wonderful breakfast or anytime snack.
- For a nostalgic treat with a twist, try our crunchy and sweet Chocolate Rice Krispie Treats, made even more irresistible with the addition of chocolate cereal for extra flavor and texture.
- Whip up a batch of safe-to-eat Edible Cookie Dough, featuring heat-treated flour for worry-free snacking. Enjoy the classic taste of cookie dough without the need for baking.
- For a quick and easy take on a classic, try our Simple Hawaiian Roll Cinnamon Rolls. These use pre-made rolls for a shortcut, making them ideal for busy mornings or impromptu cravings.
Lemon-Blueberry Sweet Rolls Recipe
These soft, sweet rolls boast a delightful lemon-sugar and blueberry filling, finished with a luscious sweet lemon glaze—pure deliciousness in every bite!
By: Chelsea Lords
Prep Time: 40 minutes
Cook Time: 30 minutes
Rising Time: 1 hour 30 minutes
Total Time: 2 hours 40 minutes
Servings: 12 Lemon Blueberry Sweet Rolls
Equipment:
- Medium pot
- Stand mixer
- 9 x 13-inch baking pan (glass or ceramic recommended)
Ingredients:
For the Dough:
- 1 cup whole milk (lower fat milk is not recommended for tenderness)
- 2-1/2 teaspoons active dry yeast (not instant)
- 1/3 cup + 1/2 teaspoon granulated sugar (divided)
- 4 tablespoons unsalted butter (melted and cooled to room temperature)
- 1/2 tablespoon vanilla extract
- 1 large egg yolk
- 2-3/4 cups all-purpose flour (plus additional flour if needed, up to 3/4 cup)
- 3/4 teaspoon salt
For the Filling:
- 4 tablespoons unsalted butter (softened)
- 3/4 cup granulated sugar
- 1 large lemon (for zest and juice)
- 1 cup fresh blueberries (patted dry)
- 1/3 cup heavy cream (slightly warmed)
For the Frosting/Glaze:
- 1 large lemon (for zest and juice)
- 1 tablespoon unsalted butter (melted)
- 1-3/4 cups powdered sugar
- 1/8 teaspoon salt
Instructions:
Make the Dough
- Heat the milk in a medium pot over low heat until it reaches 100°F (38°C). Remove from heat and add the yeast and 1/2 teaspoon sugar. Stir quickly. Let sit until foamy, about 5–10 minutes. (If no foam appears, the yeast may be inactive or killed by hot milk; start over).
- While yeast proofs, melt 4 tablespoons butter and cool to room temperature. Whisk in vanilla extract and egg yolk until smooth. Pour this mixture into a stand mixer bowl along with the remaining 1/3 cup sugar. Add the activated yeast and milk mixture. Mix until combined. Add 2-3/4 cups flour and 3/4 teaspoon salt on top.
- Mix on low speed with a dough hook until thick and slightly sticky (about 2 minutes), scraping sides as needed. Knead on medium speed for 5–6 minutes until the dough gathers around the hook. If too sticky, slowly add 1/4 to 3/4 cup additional flour until dough is slightly tacky and forms a ball, resisting the urge to over-flour.
- Remove dough, shape into a ball. Grease the mixing bowl with cooking spray or butter and return dough, turning to coat. Cover with plastic wrap or a towel and let rise until doubled (roughly 45 mins to 1 hour 15 minutes, faster in a warm spot).
- Lightly flour a clean surface and roll out the dough into an approximate 15 x 12-inch rectangle (15-inch side facing you). Avoid overworking.
For the Filling
- Spread 4 tablespoons softened butter evenly over the rolled-out dough, leaving a 1-inch border. In a small bowl, combine 3/4 cup sugar and the zest of 1 large lemon (about 1 tablespoon). Rub together with fingers until fragrant. Add 1/2 tablespoon lemon juice and mix. Sprinkle this lemon sugar over the butter. Sprinkle and gently press 1 cup fresh blueberries evenly over the lemon sugar mixture (ensure blueberries are patted dry).
- Tightly roll the dough into a log starting from the 15-inch side closest to you. Using a very sharp knife (like a bread knife), cut the log into 12 equal slices. Place the slices (cut side up) in a well-greased 9×13-inch ceramic or glass pan (avoid metal pans).
- Preheat oven to 375°F (190°C). Cover the rolls in the pan and allow them to rise until nearly doubled, about 20–30 minutes.
- Warm 1/3 cup heavy cream for 15–20 seconds in the microwave (should be lukewarm, not hot).
- Using a pastry brush, brush the warm heavy cream over the risen rolls, allowing it to soak in.
- Bake sweet rolls at 375°F (190°C) for 30–35 minutes, until edges are lightly golden brown and centers are cooked through.
For the Frosting/Glaze
- While the rolls are cooling slightly, prepare the glaze. Whisk together the zest of 1 large lemon (about 1 tablespoon), 3 tablespoons fresh lemon juice, 1 tablespoon melted butter, 1-3/4 cups powdered sugar, and 1/8 teaspoon salt until smooth.
- Allow sweet rolls to cool at room temperature for 5–10 minutes, then spread the glaze evenly over the warm rolls. Enjoy warm!
Recipe Notes
Storage: Store leftovers in a sealed container on the counter for 1–2 days or in the fridge for 5 days. Microwave for 10-15 seconds to warm. Freeze unglazed rolls in a sealed container or wrapped in plastic and foil for up to 2 months. Thaw in the fridge overnight, then warm and glaze.
Nutrition Information
Serving: 1 Sweet Roll | Calories: 379kcal | Carbohydrates: 63g | Protein: 5g | Fat: 13g | Saturated Fat: 8g | Polyunsaturated Fat: 1g | Monounsaturated Fat: 3g | Trans Fat: 1g | Cholesterol: 50mg | Sodium: 161mg | Potassium: 106mg | Fiber: 2g | Sugar: 39g | Vitamin A: 421IU | Vitamin C: 3mg | Calcium: 38mg | Iron: 1mg
Nutrition information is automatically calculated, so should only be used as an approximation.
Like this recipe? We’d love to hear your thoughts! Leave a comment below!