


The Ultimate Guide to Adorable Christmas Oreo Pops: Snowmen, Christmas Trees, Ornaments & Polar Bears!
Transform simple Oreos into magical holiday treats with our step-by-step guide to crafting the cutest Christmas Oreo pops. This delightful collection features a charming snowman, a festive Christmas tree, a sparkling ornament, and an endearing polar bear – perfect for adding a touch of homemade joy to your seasonal celebrations, gifting, or just enjoying with family.
Welcome back for the second exciting installment of our beloved Christmas Oreo pops! If you joined us yesterday, you might have already crafted the adorable penguin, delicate snowflake, charming reindeer, and classic candy cane designs. If you missed those festive creations, don’t worry – you can easily catch up and see the first four designs by clicking here. Today, we’re expanding our collection with four brand-new, equally delightful characters that are sure to bring smiles to everyone’s faces this holiday season!
Each of these delightful recipes yields approximately 20-25 Oreo pops, making them ideal for holiday parties, school events, or thoughtful homemade gifts. If you’re planning to create a diverse assortment of these charming treats, we recommend halving (or even quartering) each recipe to manage your batch sizes effectively. This ensures you can enjoy a variety of designs without an overwhelming amount of any single pop.

1. Whimsical Snowman Oreo Pops: A Frosty Delight
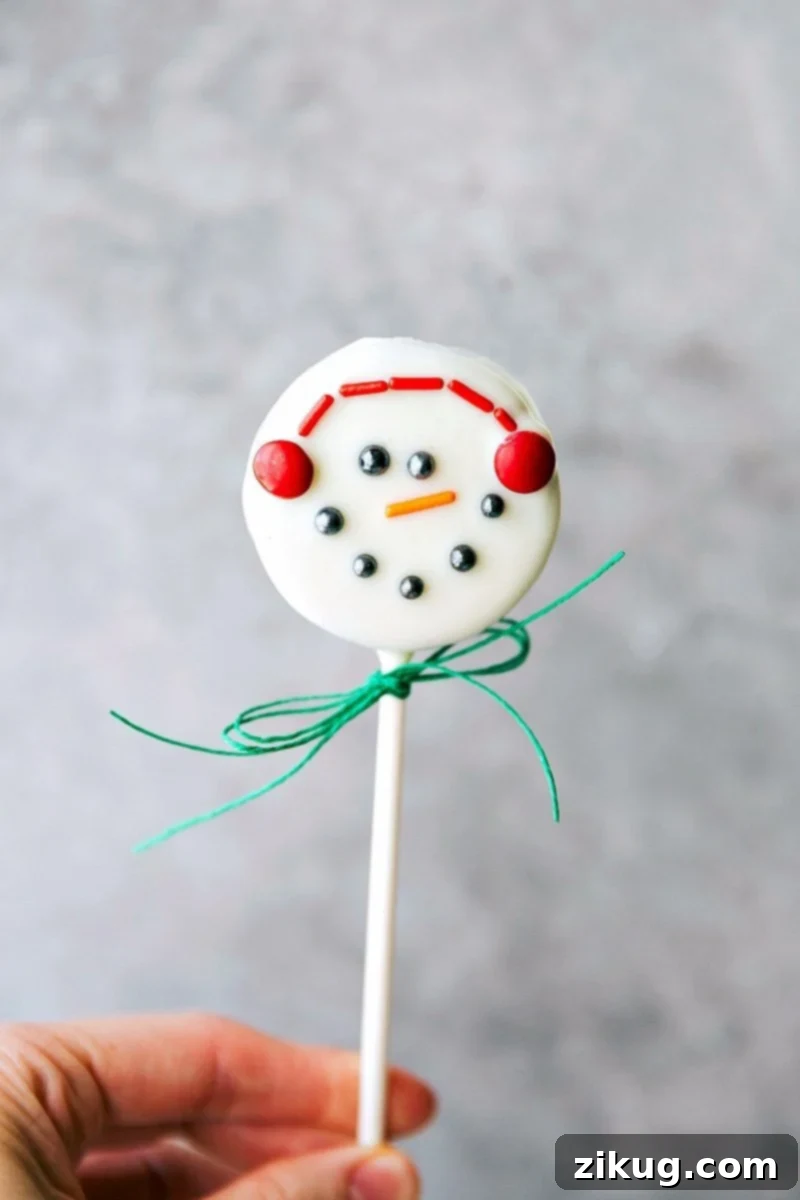

Snowman Pops
By Chelsea Lords
These Oreo Snowman Pops are the cutest winter treat! Made with Oreos, creamy white chocolate, and a few colorful sprinkles, these pops are as fun to make as they are to eat, bringing a smile to every face.
Prep Time: 30 minutes
Total Time: 30 minutes
Servings: 24 pops
Ingredients for Snowman Oreo Pops
For your convenience, here are links to the specific ingredients we used, available online:
- 1 package Oreos (use your favorite flavor!)
- 1 (11-ounce) bag white chocolate melting wafers or chips
- 1 container black pearl sprinkles
- Red and orange jimmies sprinkles (you can pick them out of a big tub of funfetti sprinkles)
- 48 Miniature Red M&M’s Milk Chocolate Baking Bits
- Lollipop sticks
- Vegetable oil (optional, makes the white chocolate easier to work with)
Equipment
- Parchment paper
- Microwave-safe bowls
- Spoons and forks for dipping
Instructions for Snowman Oreo Pops
- Prepare Oreos: Gently separate each Oreo by slowly twisting the halves apart. Some may break, which is perfectly okay, just try to be gentle.
- Melt White Chocolate: Divide the white chocolate into three separate microwave-safe bowls. This method helps prevent the chocolate from hardening too quickly while you are decorating. If using chocolate chips, stir in about 1/2 teaspoon of vegetable oil into each bowl; add more if needed to achieve a smoother, thinner consistency.
- Microwave with Care: Melt the chocolate in 20-second bursts in the microwave (microwave for 20 seconds, stir for 20 seconds, and repeat). Be patient during melting and stir thoroughly between bursts to avoid burning the chocolate.
- Assemble the Pops: Dip one end of a lollipop stick into the melted chocolate. Press this chocolate-dipped end firmly into the cream filling side of one Oreo half.
- Seal the Oreo: Carefully place the other half of the Oreo on top, gently pressing and holding for a few seconds to ensure it adheres well.
- Coat the Oreo: Place the assembled Oreo pop on top of a fork, holding it over one of the bowls of melted chocolate. Use a spoon to generously pour melted chocolate over the entire Oreo, ensuring full coverage.
- Smooth the Coating: Gently shake or tap the fork on the edge of the bowl until the chocolate forms an even, smooth layer, allowing any excess to drip off.
- Decorate the Snowman: Carefully transfer the coated Oreo pop onto a sheet of parchment paper. Immediately add two black pearl sprinkles for the eyes, an orange jimmie sprinkle for the nose, and more pearl sprinkles to form a cheerful mouth.
- Add Earmuffs: Place two miniature M&M’s on either side of the top of the Oreo to create the earmuffs. Connect the earmuffs by carefully arranging red jimmie sprinkles across the top of the Oreo, between the M&M’s.
- Harden: Allow your completed Snowman Oreo Pops to harden completely at room temperature. For faster setting, you can place them in the refrigerator for about 10-15 minutes.
Recipe Notes
Storage: Store any leftover chocolate-covered Oreos in an airtight container at room temperature for up to 1 week. For extended freshness, they can be kept in the refrigerator for up to 2 weeks.
Tips for Success: Ensure your white chocolate is not too hot, as this can cause the Oreos to soften and break. Working in small batches with chocolate prevents it from cooling and thickening too quickly. If your chocolate becomes too thick, re-microwave in 10-second bursts and stir until smooth.
Nutrition Information (Approximate per serving)
Serving: 1 serving | Calories: 103kcal | Carbohydrates: 15g | Protein: 0.6g | Fat: 6g | Saturated Fat: 4g | Polyunsaturated Fat: 0.1g | Monounsaturated Fat: 0.7g | Sodium: 22mg | Potassium: 25mg | Fiber: 0.3g | Sugar: 10g | Iron: 0.3mg
Nutrition information is automatically calculated and should only be used as an approximation. Individual results may vary based on exact ingredients and preparation.
2. Festive Christmas Tree Oreo Pops: Deck the Sweets!
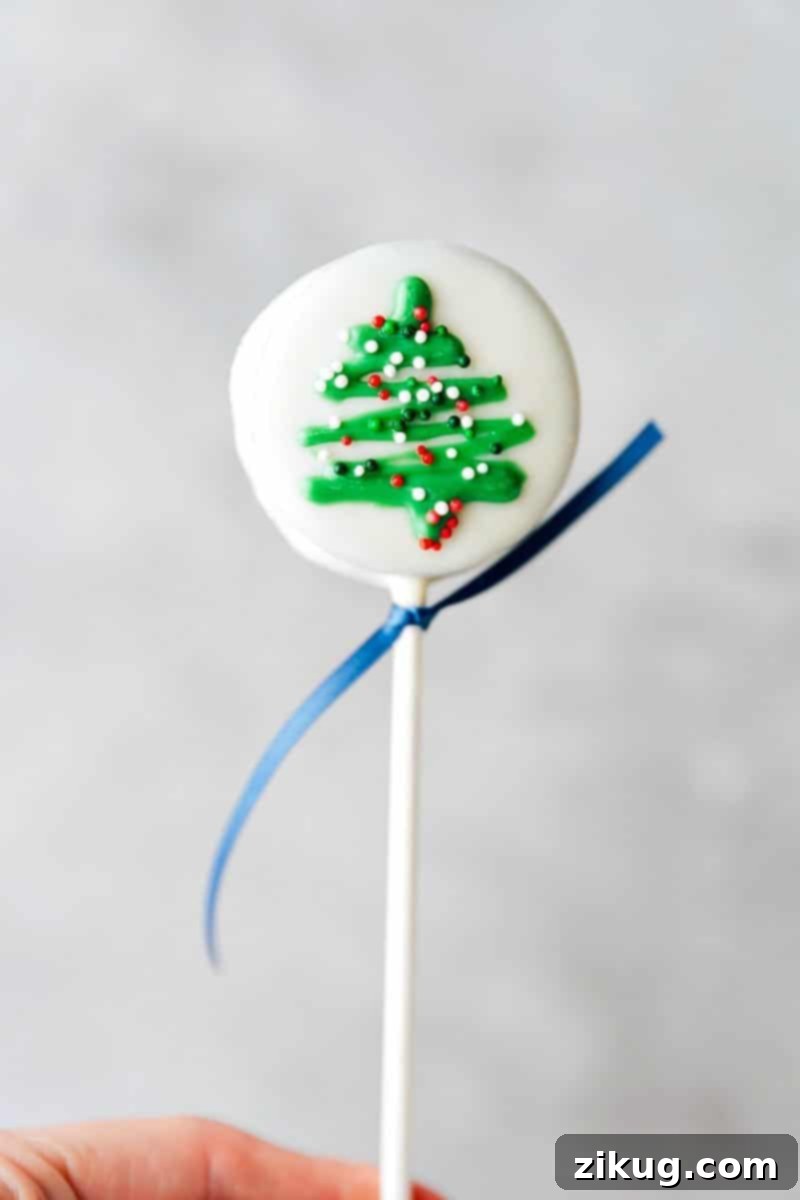

Christmas Tree Pops
By Chelsea Lords
These Christmas Tree Pops are a festive holiday treat! With an Oreo base, a coating of creamy white chocolate, and a green candy melt “tree,” these pops are perfect for parties, gifting, or holiday fun with the kids!
Prep Time: 30 minutes
Total Time: 30 minutes
Servings: 24 pops
Ingredients for Christmas Tree Oreo Pops
For your convenience, here are links to the specific ingredients we used, available online:
- 1 package Oreos (use your favorite flavor!)
- 1 (11-ounce) bag white chocolate chips (for the base coating)
- 1 (12-ounce) bag dark green candy melts (for the tree design)
- Christmas sprinkles
- 24 lollipop sticks
- Vegetable oil (optional, for thinning chocolate)
Equipment
- Small resealable plastic bag (for piping green chocolate)
- Parchment paper
- Microwave-safe bowls
- Spoons and forks for dipping
Instructions for Christmas Tree Oreo Pops
- Prepare Oreos: Gently separate each Oreo by slowly twisting the halves apart. Handle them with care to minimize breakage.
- Prepare Candy Melts: Divide the dark green candy melts into three separate microwave-safe bowls to keep them from hardening while you work.
- Thin the Chocolate (Optional): To make the candy melts easier to work with, add about 1/2 teaspoon of vegetable oil to each section. You can add more later if a thinner consistency is desired for piping.
- Melt Candy Melts: Melt the candy melts in 20-second bursts in the microwave, stirring well after each burst. Continue until smooth and fully melted, being careful not to burn the chocolate.
- Assemble the Pops: Dip one end of a lollipop stick into a small amount of melted green chocolate (this acts as “glue”). Press this end into the cream filling of one Oreo half.
- Seal the Oreo: Place the other half of the Oreo on top and gently press to secure it, holding for a moment.
- Coat the Oreo (White Chocolate Base): Melt the white chocolate chips following the same 20-second burst method as for the green candy melts. Dip the assembled Oreo pop into the white chocolate, ensuring it’s fully coated. Alternatively, you can use a fork and spoon method as described in the Snowman pops.
- Smooth the Coating: Gently tap the fork on the edge of the bowl to remove excess white chocolate and create an even layer.
- Harden the Base: Place the coated Oreo on a sheet of parchment paper and allow it to harden completely at room temperature. This solid white base will provide a perfect canvas for your tree.
- Prepare Green Chocolate for Decorating: Once the white chocolate base is firm, melt one-third of the dark green chocolate again. Add a little oil if needed to reach a good piping consistency.
- Transfer to Bag: Transfer the melted green chocolate into a small resealable plastic bag. Snip off a very tiny tip from one corner with scissors to create a precise piping bag.
- Pipe the Christmas Tree: Pipe the outline of a Christmas tree onto the white-coated Oreo (a simple zig-zag pattern from a wider base to a narrow top works beautifully). Immediately after piping, generously sprinkle Christmas sprinkles over the wet green chocolate before it hardens.
- Final Harden: Allow the Christmas Tree Oreo Pops to harden completely at room temperature.
Watch a quick video tutorial for these delightful Christmas Oreo Pops!

Click here to watch the full video: Christmas Oreo Pops #2
Recipe Notes
Storage: Store any leftover Christmas Tree Oreo Pops in an airtight container at room temperature for up to 1 week. For longer storage, keep them in the refrigerator for up to 2 weeks.
Creative Variations: Experiment with different shades of green candy melts or add edible glitter to your sprinkles for extra sparkle. You can also use small star-shaped sprinkles for the top of the tree, or pipe a thin line of yellow candy melt for a garland effect!
Nutrition Information (Approximate per serving)
Serving: 1 serving | Calories: 103kcal | Carbohydrates: 15g | Protein: 0.6g | Fat: 6.3g | Saturated Fat: 3g | Polyunsaturated Fat: 0.1g | Monounsaturated Fat: 0.7g | Sodium: 22mg | Potassium: 25mg | Fiber: 0.3g | Sugar: 10g | Iron: 0.3mg
Nutrition information is automatically calculated and should only be used as an approximation. Individual results may vary based on exact ingredients and preparation.
3. Dazzling Ornament Oreo Pops: Sparkle Your Holiday!


Ornament Pops
By Chelsea Lords
Ornament Pops are the ultimate holiday treat—an Oreo coated in red candy melts and decorated with colorful M&M “ornaments” and topped with a mini Reese’s for the perfect finishing touch, truly sparkling your holiday table.
Prep Time: 30 minutes
Total Time: 30 minutes
Servings: 24 pops
Ingredients for Ornament Oreo Pops
For your convenience, here are links to the specific ingredients we used, available online:
- 1 package Oreos (use your favorite flavor!)
- 1 (12-ounce) bag red candy melts (or your preferred ornament color!)
- 1 bag Miniature M&M’s Milk Chocolate Baking Bits
- 1 bag Miniature Reese’s Cups
- 24 lollipop sticks
- Vegetable oil (optional, makes chocolate easier to work with)
Equipment
- Parchment paper
- Microwave-safe bowls
- Spoons and forks for dipping
Instructions for Ornament Oreo Pops
- Prepare Oreos: Gently separate each Oreo by slowly twisting them apart. Work carefully to prevent breakage.
- Melt Candy Melts: Divide the red candy melts into three microwave-safe bowls. This method helps prevent the chocolate from hardening too quickly as you decorate.
- Thin the Chocolate (Optional): Add about 1/2 teaspoon of vegetable oil to each bowl of candy melts to achieve a smoother, more liquid consistency for dipping. Add more if needed.
- Microwave with Care: Melt the candy melts in 20-second bursts in the microwave, stirring thoroughly after each interval. Continue until the chocolate is smooth and completely melted, ensuring it doesn’t burn.
- Assemble the Pops: Dip one end of a lollipop stick into the melted candy. Press this chocolate-covered end into the cream filling of one Oreo half.
- Seal the Oreo: Place the other half of the Oreo on top and gently press, holding briefly to ensure it adheres well.
- Coat the Oreo: Position the assembled Oreo pop on a fork over the bowl of melted red candy. Use a spoon to generously coat the entire Oreo with the melted candy.
- Smooth the Coating: Gently tap the fork against the edge of the bowl to allow any excess candy coating to drip off, creating a smooth, even finish.
- Prepare for Decoration: Carefully transfer the coated Oreo pop onto a sheet of parchment paper.
- Decorate with M&M’s: While the candy coating is still wet, add miniature M&M’s in any pattern or color combination you desire! Get creative and make each ornament unique.
- Add the Ornament Top: Press a miniature Reese’s Cup onto the very top of the Oreo, just above the M&M’s, and hold it in place for a few seconds to secure it, mimicking the hanger of an ornament.
- Harden: Allow your beautiful Ornament Oreo Pops to harden completely at room temperature. For quicker setting, refrigerate them for about 10-15 minutes.
Recipe Notes
Storage: Store leftover Ornament Oreo Pops in an airtight container at room temperature for up to 1 week. For prolonged freshness, keep them in the refrigerator for up to 2 weeks.
Color Variety: Don’t limit yourself to red! Use different colored candy melts like green, blue, or even gold to create a diverse and festive set of ornament pops. Edible glitter can also be added to the wet coating for extra sparkle, making your ornaments truly shine.
Nutrition Information (Approximate per serving)
Serving: 1 serving | Calories: 103kcal | Carbohydrates: 15g | Protein: 0.6g | Fat: 6g | Saturated Fat: 4g | Polyunsaturated Fat: 0.1g | Monounsaturated Fat: 0.7g | Sodium: 22mg | Potassium: 25mg | Fiber: 0.3g | Sugar: 10g | Iron: 0.3mg
Nutrition information is automatically calculated and should only be used as an approximation. Individual results may vary based on exact ingredients and preparation.
4. Adorable Polar Bear Oreo Pops: A Sweet Arctic Friend!
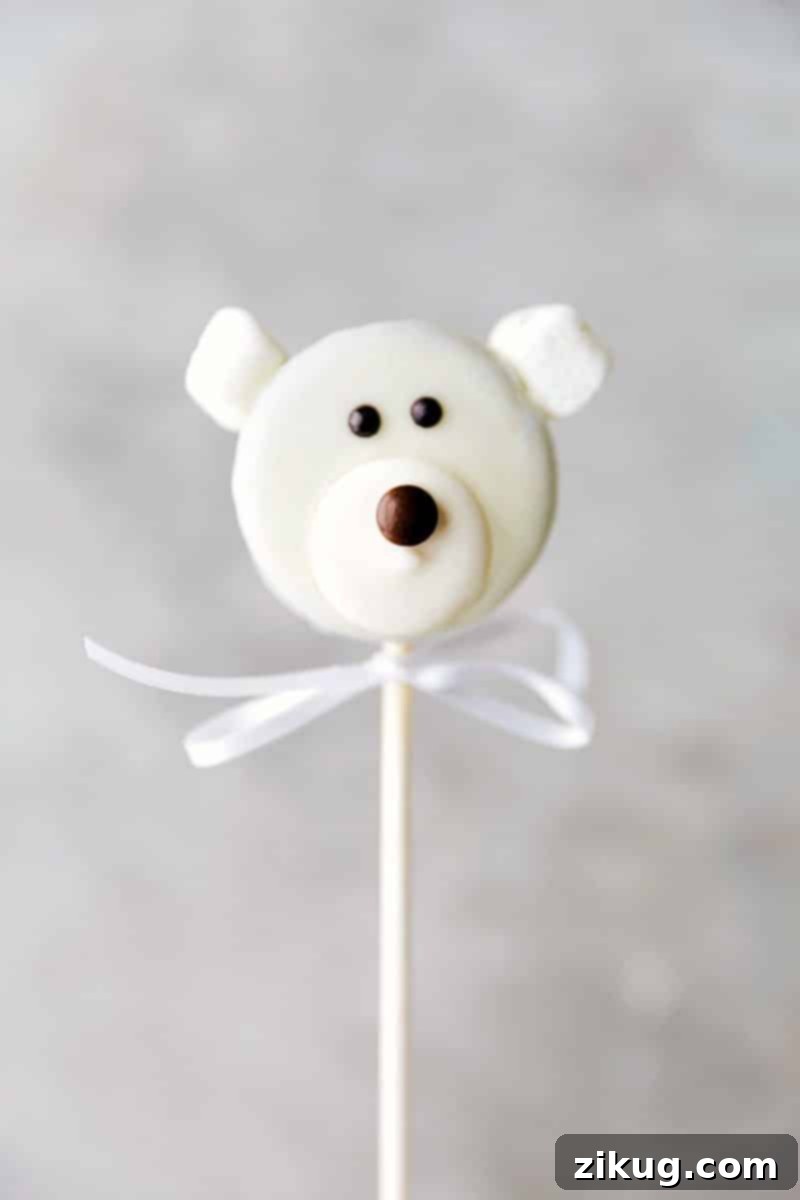

Polar Bear Pops
By Chelsea Lords
Polar Bear Pops are as cute as they are delicious! These adorable treats feature an Oreo base dipped in white chocolate, topped with marshmallow ears and a chocolate candy nose, making them truly irresistible.
Prep Time: 30 minutes
Total Time: 30 minutes
Servings: 24 pops
Ingredients for Polar Bear Oreo Pops
For your convenience, here are links to the specific ingredients we used, available online:
- 1 package Oreos (use your favorite flavor!)
- 2 (11-ounce) bags white chocolate melting wafers or chips
- Black decorating gel
- 24 brown miniature M&M’s Milk Chocolate Baking Bits
- 48 miniature marshmallows
- 24 lollipop sticks
- Vegetable oil (optional, for thinning chocolate)
Equipment
- Parchment paper
- Microwave-safe bowls
- Spoons and forks for dipping
Instructions for Polar Bear Oreo Pops
- Initial Preparation Note: Refer to the “Recipe Notes” section below (Note 1) to decide the best time to add the miniature marshmallows. The instructions below describe adding them after coating.
- Prepare Oreos: Gently separate each Oreo by slowly twisting the halves apart. Try to be as gentle as possible to minimize breakage.
- Melt White Chocolate: Divide the white chocolate melting wafers into three separate microwave-safe bowls. This helps prevent the chocolate from hardening too quickly while you are decorating.
- Thin the Chocolate (Optional): To make the chocolate easier to work with, add about 1/2 teaspoon of vegetable oil to each section. You can add more later if a thinner consistency is desired for dipping.
- Microwave with Care: Melt the white chocolate in 20-second bursts in the microwave, stirring thoroughly after each interval. Continue until the chocolate is smooth and completely melted, being careful not to burn the chocolate.
- Assemble the Pops: Dip one end of a lollipop stick into the melted chocolate. Press this chocolate-dipped end firmly into the cream filling side of one Oreo half.
- Seal the Oreo: Place the other half of the Oreo on top and gently press, holding briefly to secure it firmly.
- Coat the Oreo: Position the assembled Oreo pop on a fork over one of the bowls of melted white chocolate. Use a spoon to generously coat the entire Oreo with the melted white chocolate.
- Smooth the Coating: Gently shake or tap the fork against the edge of the bowl to remove any excess chocolate and ensure an even, smooth layer.
- Set Aside and Decorate: Carefully transfer the coated Oreo pop onto a sheet of parchment paper. While the chocolate is still wet:
- Attach two miniature marshmallows to the top sides of the Oreo for the “ears,” pressing gently to secure them in place.
- Press a white candy melt (or a small dollop of melted white chocolate) onto the center of the Oreo for the polar bear’s snout.
- Using a tiny dab of melted white chocolate, attach a brown miniature M&M to the center of the white candy melt for the nose.
- Add Eyes: Allow the chocolate to mostly harden (or fully harden if you prefer the eyes to stand out more clearly). Once semi-set, use black decorating gel to pipe two small dots for the eyes above the snout.
- Final Harden: Allow your adorable Polar Bear Oreo Pops to harden completely at room temperature.
Recipe Notes
Note 1 – Marshmallow Placement: In some video tutorials, mini marshmallow “ears” are added before dipping the Oreo in chocolate to keep them fresh. However, we found it generally easier to attach them *after* dipping the Oreo, while the chocolate is still wet. If you are making these treats well in advance, consider dipping the marshmallows briefly in white chocolate before attaching them to help keep them soft and prevent them from drying out.
Storage: Store leftover Polar Bear Oreo Pops in an airtight container in the fridge for up to 3 days to maintain marshmallow freshness. For longer storage, you can freeze them in a freezer-safe container for up to 1 month.
Nutrition Information (Approximate per serving)
Serving: 1 serving | Calories: 110kcal | Carbohydrates: 16g | Protein: 1.3g | Fat: 5.3g | Cholesterol: 0.2mg | Sodium: 31.9mg | Fiber: 1.1g | Sugar: 11.8g
Nutrition information is automatically calculated and should only be used as an approximation. Individual results may vary based on exact ingredients and preparation.
We hope you loved creating these delightful Christmas Oreo Pops! Your festive creations are sure to bring cheer to any holiday gathering. We’d love to hear about your masterpieces and see any creative twists you added.
Like this? Leave a comment below and share your experience!
More Christmas Fun: Sweet Treats & Gift Ideas!
Looking for more ways to make your holidays deliciously festive? Explore these other wonderful recipes and gift ideas to spread even more joy:
- Easy Christmas Mason Jar Gift Ideas (4 creative and thoughtful ideas)
- Bakery-Style Peppermint Sugar Cookies (with a delightful free printable!)
- 3-Ingredient Peppermint Bark Pretzels (quick, easy, and satisfying)
- Quick & Easy Microwave Caramel Chocolate Fudge (a rich treat in minutes)
- The First Set of Christmas Oreo Pops (don’t miss the penguin, snowflake, reindeer, and candy cane!)