
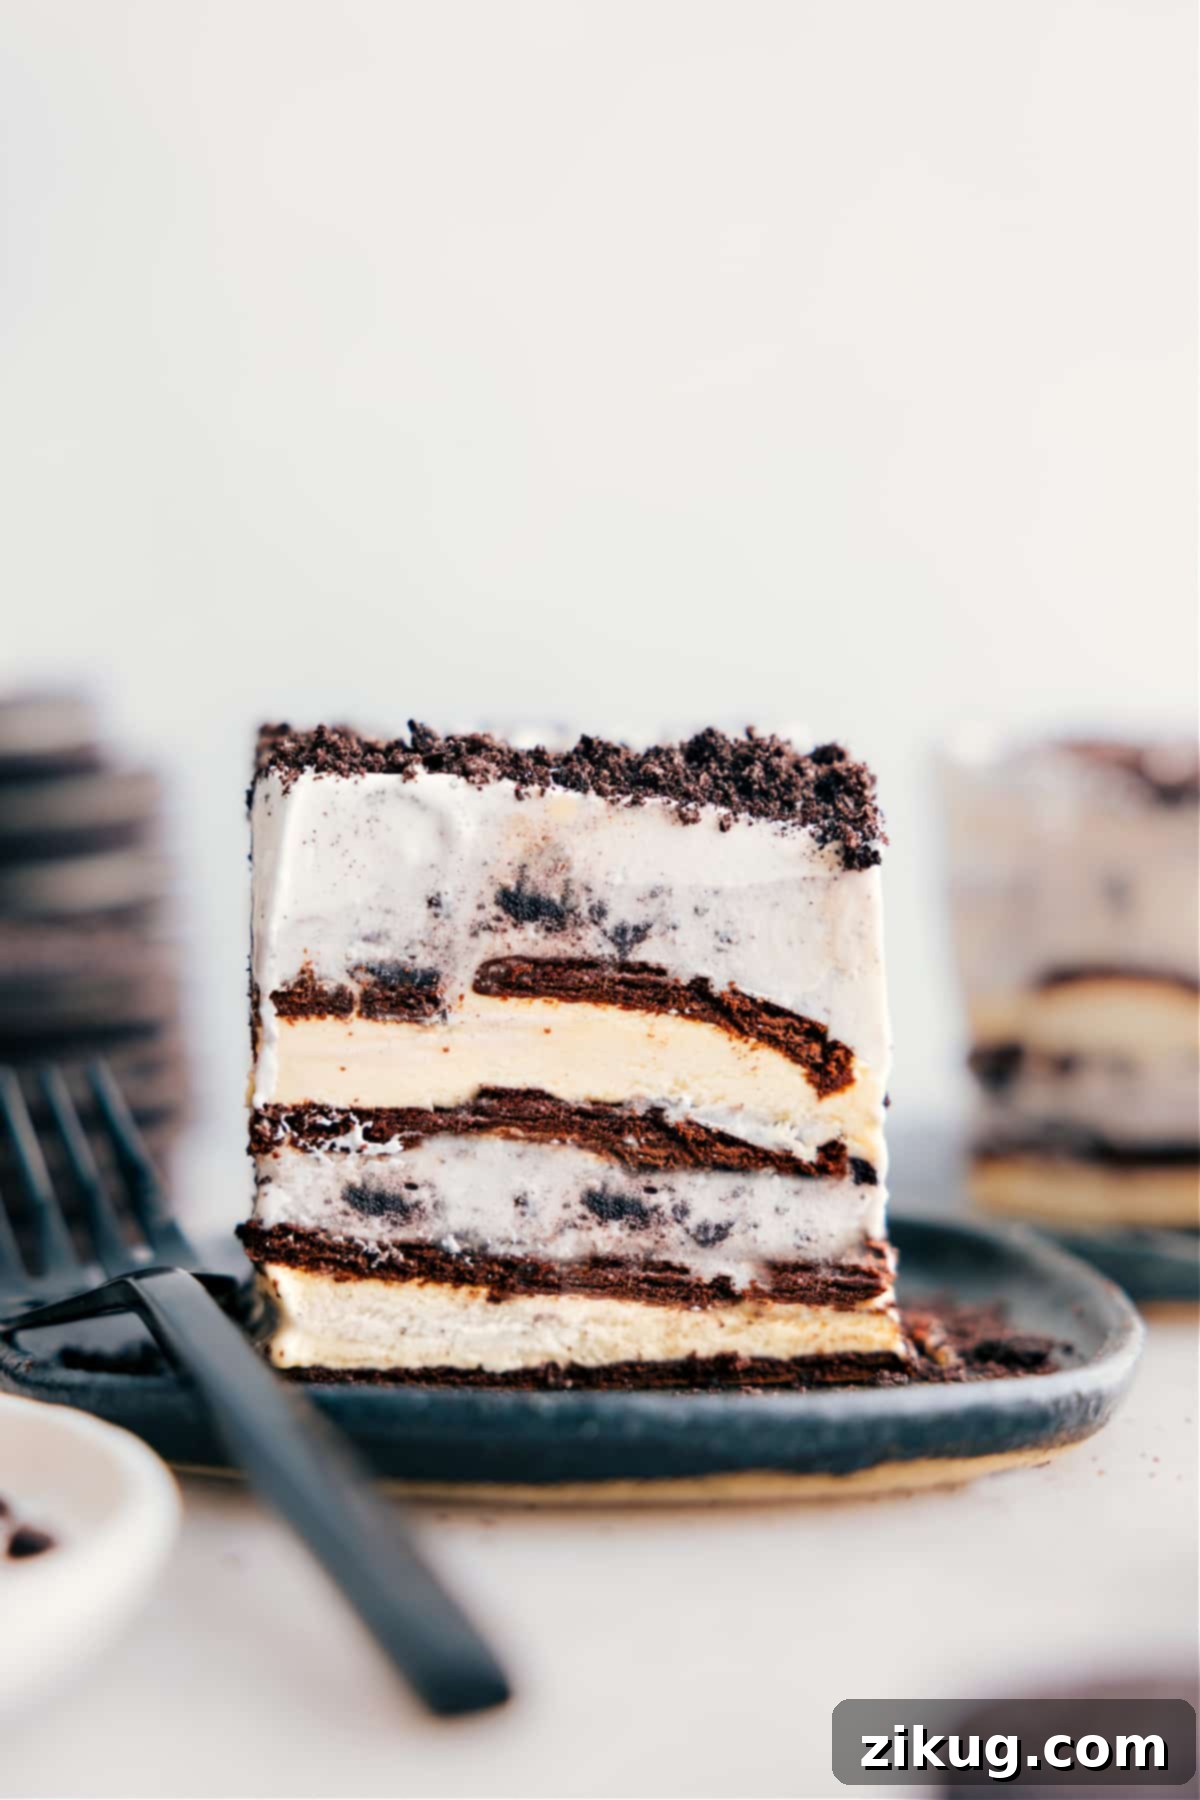
Craving a refreshingly simple yet incredibly delicious dessert that requires absolutely no baking? Look no further than this sensational Easy 4-Ingredient Ice Cream Sandwich Cake Recipe! This no-bake wonder is a dream come true for anyone who loves minimal prep and maximum flavor. Crafted with irresistible layers of classic ice cream sandwiches, rich cookies-and-cream ice cream, and a luscious, fluffy whipped cream topping, it’s a dessert that consistently steals the show and leaves everyone asking for more.

Author’s Note: A Childhood Favorite Reimagined
The 4-Ingredient Dessert That Captures Hearts and Creates Memories!
This delightful ice cream dessert holds a truly special place in my heart, much like my mom’s famous Ice Cream Pie. Growing up, it was a staple at every family gathering and summer cookout – the kind of treat that vanished almost as soon as it hit the table. I vividly remember eagerly requesting a second batch even before the first one was completely devoured! Its simplicity and undeniable deliciousness made it an instant hit with everyone, young and old.
A few summers ago, I decided to whip up this nostalgic recipe for a group of neighborhood kids, and their reactions were absolutely priceless. Their eyes lit up with every bite, and they kept returning for more, exclaiming it was “the best dessert ever.” It truly is one of those timeless recipes that brings instant joy and consistently delivers smiles and satisfied cravings. The magic lies in how effortlessly it comes together while delivering such a rich, creamy, and satisfying experience.
This ice cream cake is the ultimate crowd-pleaser, making it perfect for parties, barbecues, potlucks, and any summer get-together. What makes it even more appealing is its incredible simplicity. With just four readily available ingredients and a mere 10-15 minutes of active preparation, you can create a show-stopping dessert that’s guaranteed to be a hit and disappear in record time. Say goodbye to complicated baking and hello to effortless, frozen perfection that’s both easy on your time and wallet!
Mastering the Magic: The Four Essential Ingredients You’ll Need
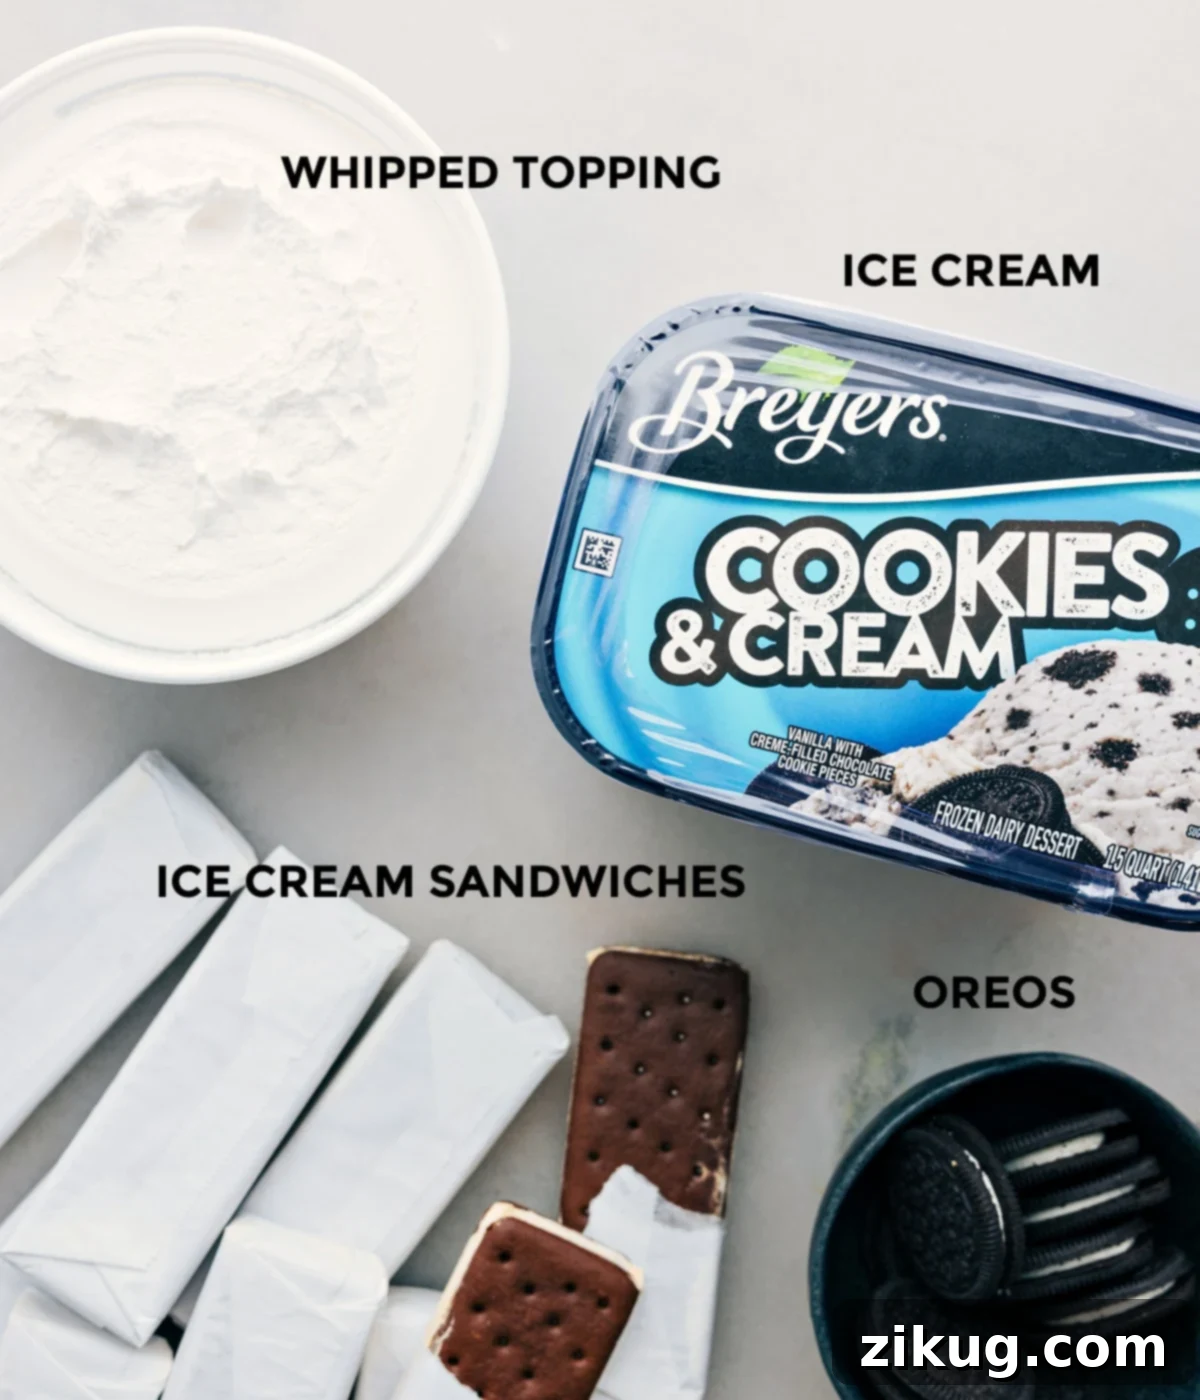
Prepare to be amazed by how just four simple ingredients can transform into such a magnificent dessert! Each component plays a crucial role in creating the perfect balance of texture, flavor, and visual appeal for your ice cream sandwich cake.
| Ingredient | Tips & Swaps for Perfection and Customization |
|---|---|
| Vanilla Ice Cream Sandwiches | These beloved frozen treats form the sturdy and delicious base (and middle layer!) of your cake. While classic vanilla is a fantastic choice that pairs well with almost anything, feel free to experiment with chocolate ice cream sandwiches for a richer, more intense flavor profile, or even strawberry for a fruity twist. For the smoothest and quickest assembly, make sure to unwrap all the sandwiches you plan to use before you begin layering. |
| Cookies and Cream Ice Cream | This flavor adds an irresistible layer of creamy goodness with delightful, crunchy cookie bits throughout. It’s a universally loved choice that complements the ice cream sandwiches beautifully. However, don’t limit yourself – this recipe is incredibly adaptable! Any favorite ice cream flavor like classic chocolate, creamy vanilla, refreshing mint chip, rich coffee, or even a vibrant strawberry would be absolutely delicious. For effortless spreading, let your ice cream container sit at room temperature for about 5-10 minutes to soften slightly; it should be scoopable but not melted. |
| Frozen Whipped Topping | The light, airy, and slightly sweet finish of frozen whipped topping (such as Cool Whip) brings all the components together with a delicate cloud-like texture. Ensure it’s properly thawed to room temperature before use for easy, smooth spreading. If you prefer a more artisanal touch, you can certainly use stabilized homemade whipped cream. Stabilizing it (e.g., with gelatin or cream cheese) is crucial to prevent it from deflating or becoming watery once frozen and thawed. |
| Oreo Cookies | Crushed Oreo cookies provide a satisfying crunch and their iconic chocolatey flavor, which perfectly complements the cookies and cream ice cream layer. This adds both texture and a familiar, comforting taste. Get creative with your toppings for endless customization! Crushed candy bars (like Heath, Butterfinger, or Skor), chocolate chips (mini or regular), colorful sprinkles, or other cookie crumbs (such as graham crackers, Nilla wafers, or even chocolate chip cookies) make excellent alternatives to personalize your cake and match any occasion. |
Essential Equipment for Your No-Bake Ice Cream Sandwich Cake
Gathering your tools beforehand will make the assembly process even smoother and quicker.
- 9 x 9-inch baking pan: A sturdy square pan is ideal for the proportions of this recipe.
- Parchment paper: Essential for easy removal of the finished cake. Make sure to get a roll wide enough to allow for an overhang.
- Large spoon or offset spatula: For smoothly spreading the ice cream and whipped topping.
- Ziploc bag and solid kitchen item: A rolling pin, meat mallet, or even the bottom of a heavy glass works perfectly for crushing cookies.
- Sharp knife: For clean and precise slices.
Crafting Your No-Bake Masterpiece: Step-by-Step Guide to Ice Cream Sandwich Cake
Creating this spectacular ice cream cake is incredibly straightforward and fun. Follow these simple, clear steps for a dessert that looks impressive and tastes even better than it looks!
- Prepare Your Pan for Effortless Removal: Begin by lining a 9×9-inch baking pan with parchment paper. This is a crucial step! Ensure you leave a generous overhang on all sides – these flaps will act as convenient “handles” later for effortlessly lifting the entire finished cake out of the pan. For added stability during layering, you can even use small binder clips to hold the parchment paper in place along the rim of the pan. This small, thoughtful step makes serving an absolute breeze! If your ice cream is super firm straight from the freezer, let it stand at room temperature for about 5-10 minutes to soften slightly; it should be easily scoopable but not melted or liquid.
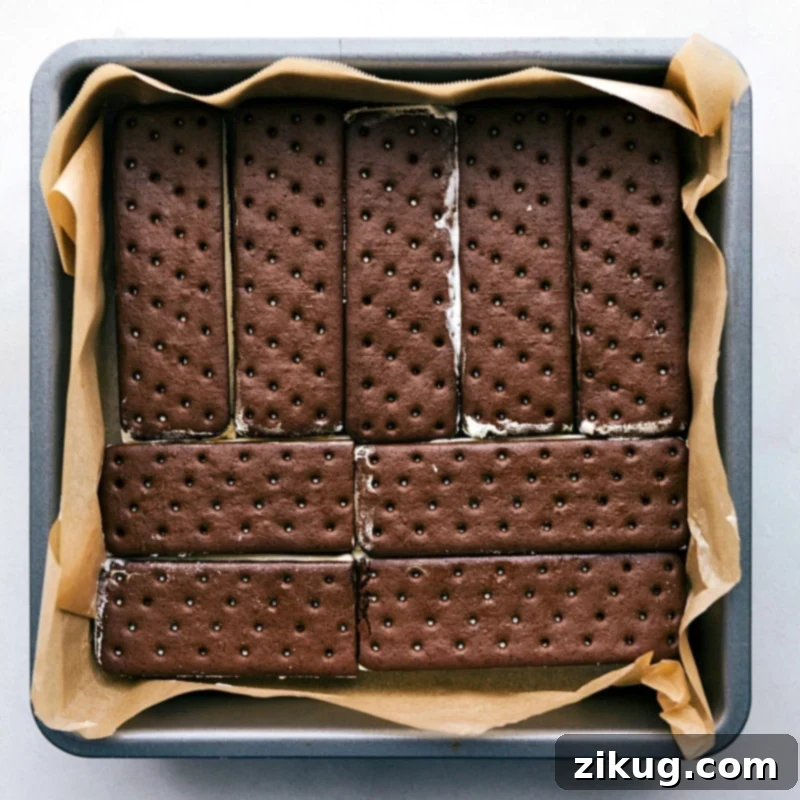
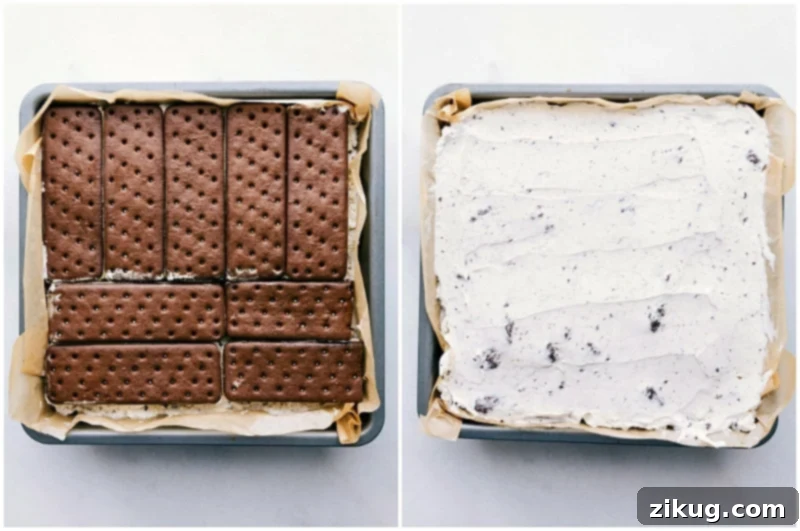
- Lay the First Ice Cream Sandwich Layer: Unwrap all the ice cream sandwiches you’ll be using. Carefully arrange 9 vanilla (or your chosen flavor) ice cream sandwiches on the bottom of the prepared pan, creating a solid, even base. Don’t worry if they don’t fit perfectly; you will likely need to gently cut one or two sandwiches down a little (as shown in the accompanying pictures) to fill any gaps and ensure a snug fit. If the sandwiches start to soften too much during this arrangement process, pop the entire pan into the freezer for a few minutes to firm them up before proceeding.
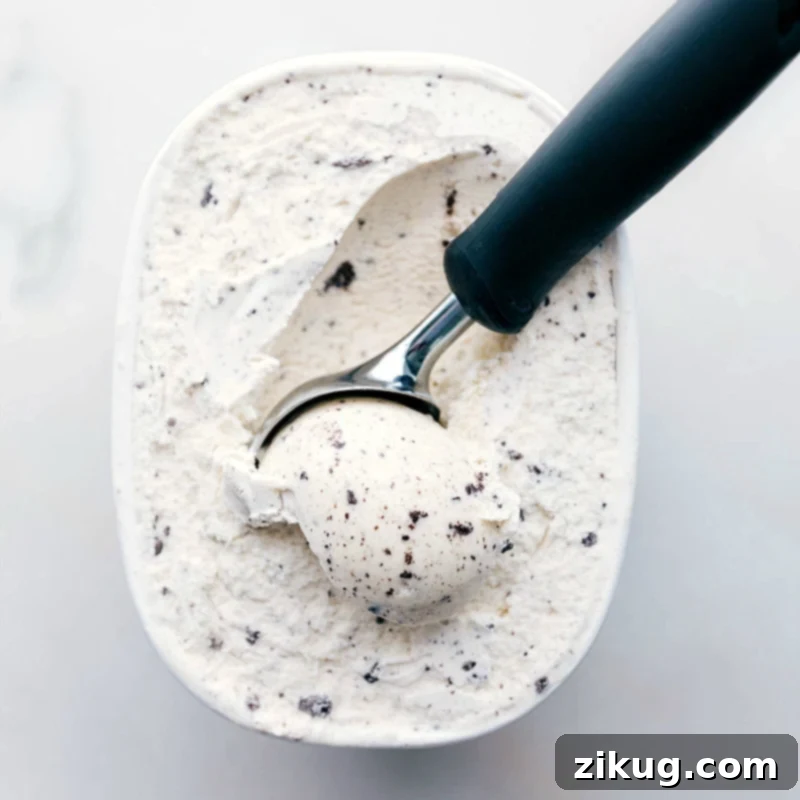
- Spread the First Creamy Ice Cream Layer: Once your ice cream sandwich base is firmly set, retrieve your slightly softened cookies and cream ice cream. Using the back of a large spoon or an offset spatula, carefully spread half of the ice cream evenly over the layer of ice cream sandwiches. The key here is to apply gentle but firm pressure as you spread to minimize any air pockets and ensure a compact, dense cake layer. This contributes to a smoother slice later on.
- Repeat the Layers and Chill: Now, firmly press the remaining 9 ice cream sandwiches directly on top of the first ice cream layer. Again, trim any sandwiches as needed to achieve a neat fit, ensuring the surface is as flat as possible. Follow this by spreading the remaining half of the cookies and cream ice cream evenly over the second layer of sandwiches, pressing down firmly as you did before. Once both ice cream layers are in place, cover the pan tightly with plastic wrap or aluminum foil and place it in the freezer for at least 1 hour, or until the layers are completely firm. This initial chilling time is absolutely crucial for the cake’s structural integrity.
- Add the Final Topping & Crushed Cookies: Once the cake layers are thoroughly firm, remove the pan from the freezer. Evenly spread the thawed frozen whipped topping over the entire top surface of the cake, creating a smooth, inviting white canvas. For the crushed Oreos (or your chosen topping), place them in a sturdy Ziploc bag and crush them using a rolling pin, a meat mallet, or the bottom of a heavy mug until you have fine crumbs or desired chunks. Sprinkle these crushed Oreos generously and evenly over the whipped topping. Return the cake to the freezer, gently covered with plastic wrap, until it is very firm – ideally for another 2-3 hours, or even overnight for the absolute best results. A longer chill time ensures easier, cleaner slicing.
- Slice & Serve with Professional Flair: When you’re ready to serve your masterpiece, use the parchment paper overhang to gently lift the entire cake out of the baking pan and transfer it onto a cutting board. For impeccably clean, sharp slices every time, here’s a professional tip: run a sharp knife under very hot water for several seconds, wipe it completely dry (to prevent water from freezing on the cake and creating ice crystals), then make one smooth slice. Repeat this warming and wiping process for each subsequent slice. Serve immediately and watch your delicious creation disappear!
- Storing Leftovers for Future Enjoyment: Any leftover slices should be immediately returned to the freezer. For optimal freshness and to prevent freezer burn, wrap individual slices tightly in plastic wrap, then place them in an airtight container. This method helps maintain their delicious flavor and texture for your next craving.
Quick Tip: Scaling for a Larger Crowd (9×13-inch Pan)
Planning for a bigger party or simply want more of this irresistible dessert? For a standard 9×13-inch baking pan, you’ll need to adjust your quantities to accommodate the larger surface area. Expect to use approximately 24 ice cream sandwiches, about 1 and ½ (48-ounce) containers of your favorite ice cream, and 2 (8-ounce) containers of frozen whipped cream topping. This ensures your larger cake is just as delicious, perfectly layered, and well-proportioned as the smaller version, ready to feed a hungry crowd!
Exciting Variations to Customize Your Ice Cream Sandwich Cake
While the classic cookies and cream version is undeniably delicious and a true crowd-pleaser, this recipe is incredibly versatile! Feel free to unleash your creativity and customize your ice cream sandwich cake with these exciting flavor combinations to suit any taste or occasion:
- Neapolitan Dream Cake: For a delightful triple-flavor experience that’s both nostalgic and refreshing, use Neapolitan ice cream sandwiches for your layers and complement them with creamy Neapolitan ice cream. The classic combination of chocolate, vanilla, and strawberry will transport you straight back to childhood summer days!
- Festive Peppermint Twist Cake: Perfect for the holiday season or whenever you crave a cool, refreshing treat, swap out the vanilla ice cream sandwiches for peppermint chocolate ice cream sandwiches and use a vibrant peppermint ice cream for the filling. Finish with a sprinkle of crushed candy canes for an extra seasonal touch and delightful crunch.
- Ultimate Candy Bar Extravaganza: Keep the reliable vanilla ice cream sandwiches as your sturdy base, but choose any favorite ice cream flavor for the filling – chocolate, caramel, or even a rich peanut butter ice cream works wonderfully. Instead of Oreos, top your cake generously with your favorite crushed candy bars like Heath, Butterfinger, Snickers, or Reese’s Peanut Butter Cups for an indulgent crunch and burst of flavor.
- Decadent Hot Fudge or Rich Caramel Swirl: Elevate your cake to new heights by adding a luscious drizzle of homemade or high-quality store-bought hot fudge or rich caramel sauce between the layers of ice cream. This adds an extra dimension of moisture and intense flavor, much like in these incredible brownie ice cream bars.
- Fruity Freshness: Incorporate the vibrant taste of fresh berries for a lighter, brighter cake. Use vanilla ice cream sandwiches, pair them with vanilla or strawberry ice cream, and add a layer of thinly sliced fresh strawberries or raspberries between the ice cream layers. Top with more fresh fruit for a beautiful, colorful, and refreshing finish.
- S’mores Sensation: For a campfire-inspired treat, opt for chocolate ice cream sandwiches and chocolate ice cream. Top the whipped cream layer with mini marshmallows and crushed graham crackers. For an extra special touch, you can lightly toast the marshmallows with a kitchen torch just before serving!
Chelsea’s Recipe Pro Tips
Achieving Perfection: My Best Ice Cream Sandwich Cake Recipe Tips
Follow these expert tips to ensure your ice cream sandwich cake turns out perfectly every single time, from flawless presentation to delicious taste:
- Line the Pan Meticulously: Don’t underestimate the power of parchment paper! Lining your baking pan thoroughly with parchment paper, ensuring a generous overhang on all four sides, is the absolute secret to effortlessly removing your frozen cake. This prevents sticking, keeps the pan clean, and makes transferring the cake to a cutting board simple and mess-free.
- Slightly Soften the Ice Cream (The Right Amount!): For smooth, even spreading without a struggle, allow your ice cream to sit at room temperature for approximately 5-10 minutes. It should be pliable enough to spread easily with a spoon or spatula, but crucially, it should not be so melted that it becomes soupy. Too soft, and your layers will mix; too hard, and it will be difficult to spread without tearing the sandwiches.
- Press the Layers Down Firmly: As you add each successive layer of ice cream sandwiches and ice cream, gently but firmly press everything down. This essential step helps to compact the cake, eliminate any hidden air pockets that could weaken its structure, and creates a solid, stable foundation. A compact cake is much easier to slice neatly and holds its shape beautifully.
- Master the Clean Slice Technique: To achieve beautifully clean, sharp slices that look professionally made every single time, employ the hot knife trick. Run a sharp knife under very hot water for several seconds, then quickly wipe it completely dry (this prevents any water from freezing onto the cake and creating unsightly ice crystals). Make one smooth cut, and then repeat this warming and wiping process for each subsequent slice. This technique ensures your knife glides through the frozen layers effortlessly.
- Chill Thoroughly for Best Results: Patience is a true virtue when making any ice cream cake! Ensure your cake is thoroughly chilled and very firm for at least 2-3 hours before attempting to serve it. For optimal firmness and the easiest, cleanest slicing experience, I highly recommend chilling it overnight. This extended chilling period allows all the layers to meld together and set properly, preventing a messy collapse when cut.
- Prep Ahead for Stress-Free Entertaining: This ice cream sandwich cake is an absolutely fantastic make-ahead dessert. You can assemble it completely a day or even two days in advance, keeping it tightly covered in the freezer until you’re ready to serve. This wonderful convenience frees up your valuable time on the day of your event, allowing you to relax and enjoy your guests without any last-minute dessert fuss!
Storage Solutions for Your Delectable Ice Cream Sandwich Cake
This delightful frozen treat stores beautifully, making it perfect for enjoying leftovers or preparing ahead! To keep any remaining Ice Cream Sandwich Cake fresh and delicious, transfer individual slices to an airtight container or wrap them tightly in plastic wrap (and then optionally in aluminum foil for extra protection). Store these securely in the freezer. For optimal taste, texture, and overall quality, it’s best enjoyed within 2 weeks. While it will remain safe to eat for longer, the quality might start to diminish after this period. Proper storage helps prevent freezer burn and maintains its delightful creaminess.
Frequently Asked Questions About Ice Cream Sandwich Cake
Got questions? We’ve got answers to help you make and enjoy your ice cream sandwich cake to the fullest!
- Can I make this ice cream sandwich cake ahead of time for a party?
- Absolutely! This cake is an ideal make-ahead dessert, making it perfect for entertaining. You can assemble it a day or two in advance and keep it tightly covered in the freezer until you’re ready to serve. In fact, a longer chill time (like overnight) often results in a firmer, even easier-to-slice cake.
- What other toppings can I use besides crushed Oreos?
- The possibilities are endless for customizing your topping! Beyond crushed Oreos, consider using other crushed cookies (like graham crackers, Nilla wafers, shortbread, or even chocolate chip cookies), colorful sprinkles, chocolate chips (mini or regular), mini marshmallows, a decadent drizzle of hot fudge or caramel sauce, or even fresh fruit like sliced strawberries or raspberries for a brighter flavor profile. Crushed candy bars (Heath, Butterfinger, Snickers, Kit Kat, M&M’s) are also fantastic for an extra layer of sweetness and crunch.
- My ice cream sandwiches are very hard to cut to fit the pan. Any tips?
- If your ice cream sandwiches are too hard and brittle, making them difficult to cut cleanly, allow them to sit at room temperature for just a minute or two. This brief softening period will make them easier to slice without crumbling. Using a sharp, thin-bladed knife also makes a significant difference.
- How many servings does this recipe typically make?
- The recipe as written for a 9×9-inch pan typically yields 9 generous slices. However, you can easily cut smaller pieces to get 12 to 16 servings, especially if you are serving it as part of a larger dessert spread or for smaller appetites.
- Can I use homemade whipped cream instead of frozen whipped topping?
- Yes, you certainly can, but it’s crucial to use stabilized homemade whipped cream. Unstabilized whipped cream can become watery, lose its volume, and deflate significantly when frozen and then thawed. Stabilizing it (often with a small amount of gelatin, cream cheese, or cornstarch) will help it hold its beautiful structure and prevent it from weeping.
- Can I use a different type of pan?
- Yes, you can. A 9×13-inch pan will yield a thinner cake and require more ingredients (as detailed in our “Quick Tip” section). You could also use a loaf pan for a smaller, thicker cake, adjusting ingredient amounts accordingly. Always line your pan with parchment paper, regardless of size.
Why You’ll Fall in Love with This Ice Cream Sandwich Cake (If You Haven’t Already!)
This isn’t just another dessert; it’s a testament to how simple ingredients can come together to create extraordinary moments of joy and deliciousness. Here’s why this 4-ingredient ice cream sandwich cake will undoubtedly become your new go-to for almost every occasion:
- Effortless Assembly: No Baking Required! Forget about heating up your kitchen, complicated techniques, or long baking times. With minimal active prep time, you can have a stunning, multi-layered dessert ready for the freezer in mere minutes. It’s the perfect recipe for beginner cooks, busy parents, or experienced hosts who want to minimize stress.
- Crowd-Pleasing Flavors Guaranteed: The classic and beloved combination of soft ice cream sandwiches, creamy cookies and cream ice cream, and a luscious whipped topping appeals to almost everyone across all age groups. It’s a guaranteed hit at parties, barbecues, summer picnics, family dinners, and school events – expect rave reviews every time!
- Customizable Creativity at Your Fingertips: This recipe is a fantastic canvas for your culinary creativity! Easily adapt the flavors to your personal liking. Swap out ice cream flavors, experiment with different ice cream sandwich varieties, or pile on your favorite crushed candies, sprinkles, or fruit. Every cake can be a unique and personalized creation.
- Perfect for Any Season (Not Just Summer!): While it undoubtedly shines as a quintessential summer treat, a no-bake ice cream cake is a delightful and welcome dessert year-round. It’s especially appreciated when you want a rich, satisfying dessert without the hassle of turning on the oven, making it perfect for holidays or chilly evenings too.
- Incredible Make-Ahead Convenience: The ability to prepare this cake days in advance is a game-changer for anyone hosting. Simply assemble it, freeze it, and then pull it from the freezer when dessert time rolls around. This advanced preparation dramatically reduces stress and allows you to fully enjoy your guests and the event without last-minute kitchen duties.
- Budget-Friendly Ingredients: Made with readily available and often affordable ingredients, this cake offers incredible value. You get a show-stopping dessert without breaking the bank, making it a smart choice for feeding larger groups.
So, whether you’re looking to relive cherished childhood memories or create entirely new ones with your loved ones, this Ice Cream Sandwich Cake offers a delightful, fuss-free, and incredibly satisfying path to dessert happiness. Give it a try – your taste buds (and your grateful guests) will undoubtedly thank you!
Explore More Irresistible Ice Cream Treats & Frozen Delights:
Frozen Treats
Fun & Easy Ice Cream In A Bag
Desserts
Delectable Churro Ice Cream Sandwiches
Desserts
Classic Spumoni Ice Cream Recipe
Beverages
Nostalgic Malted Milkshake
Ice Cream Sandwich Cake Recipe
By: Chelsea Lords
This delightful four-ingredient Ice Cream Sandwich Cake layers creamy ice cream sandwiches, rich cookies-and-cream ice cream, and a generous topping of whipped cream and crushed Oreos. It’s a quick, easy, and universally loved no-bake dessert perfect for any occasion!
Prep Time: 15 minutes
Chilling Time: 1 hour minimum (preferably 2-3 hours or overnight)
Total Time: 1 hour 15 minutes
Yields: 16 servings
Rating: 5 out of 5 stars (based on 1 review)
Print Recipe
Ingredients
- 18 regular vanilla ice cream sandwiches, unwrapped
- 1 (48-ounce) container cookies and cream ice cream (approximately 3 pints), slightly softened
- 1 (8-ounce) container frozen whipped topping, thawed to room temperature
- 6–8 regular Oreos, crushed (see note 1 for other topping ideas)
Equipment
- 9 x 9-inch baking pan
- Parchment paper
- Large spoon or spatula
- Ziploc bag and rolling pin/mallet
- Sharp knife
Instructions
- Line a 9×9-inch baking pan with parchment paper, ensuring a generous overhang on all sides for easy removal. If your ice cream is very firm, let it stand at room temperature for 5-10 minutes to soften slightly; avoid letting it become too soft.
- Unwrap all the ice cream sandwiches. Arrange and press 9 sandwiches onto the bottom of the prepared pan, trimming 1-2 sandwiches as needed to fit snugly and form an even base.
- Using a large spoon or spatula, spread half of the slightly softened cookies and cream ice cream evenly over the first layer of ice cream sandwiches. Press down gently but firmly to create a compact layer.
- Firmly press the remaining 9 ice cream sandwiches on top of the first ice cream layer. Spread the remaining ice cream evenly over these sandwiches, pressing down again. Cover the pan tightly and place it in the freezer for at least 1 hour, or until the layers are firm.
- Remove the dessert from the freezer. Evenly spread the thawed whipped topping over the entire top surface. Crush the Oreos (in a Ziploc bag) and sprinkle them generously over the whipped topping. Return the cake to the freezer, covered gently with plastic wrap, until it is very firm (at least 2-3 hours, or overnight for best results).
- To serve, use the parchment paper overhang to lift the cake out of the pan onto a cutting board. For clean slices, run a sharp knife under hot water for a few seconds, wipe it dry, make one slice, and repeat this process for each subsequent slice.
- Immediately return any leftover cake, covered tightly, to the freezer to maintain its quality.
Recipe Notes
- Note 1 (Topping Variations): Instead of Oreos, feel free to use other crushed candy bars (e.g., Heath, Skor, Butterfinger) or different cookie crumbs for a personalized touch.
- Storage: Store any leftover Ice Cream Sandwich Cake in an airtight container in the freezer. It is best enjoyed within 2 weeks for optimal freshness and texture.
Nutrition
Nutrition information is automatically calculated and should be used as an approximation.
| Serving Size: 1 serving | Calories: 423 kcal |
| Carbohydrates: 60 g | Protein: 7 g |
| Fat: 19 g | Saturated Fat: 9 g |
| Polyunsaturated Fat: 2 g | Monounsaturated Fat: 5 g |
| Trans Fat: 0.003 g | Cholesterol: 46 mg |
| Sodium: 194 mg | Potassium: 327 mg |
| Fiber: 1 g | Sugar: 42 g |
| Vitamin A: 561 IU | Vitamin C: 1 mg |
| Calcium: 167 mg | Iron: 1 mg |