
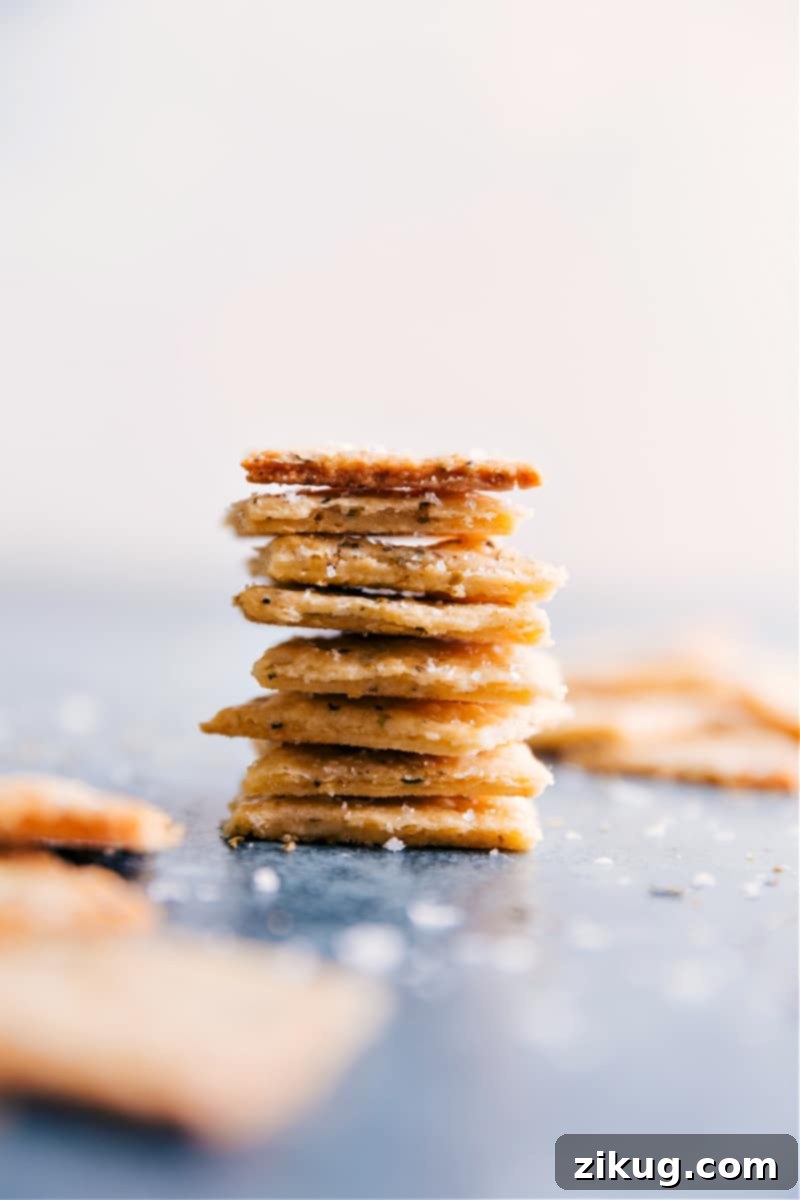
Unlock the Secret to Irresistible Homemade Crackers! Infused with the rich, savory goodness of Parmesan cheese and fragrant Italian seasoning, these crackers are a true culinary revelation. While the thought of making crackers from scratch might initially seem daunting or overly complicated, we’ve meticulously streamlined the process to bring you a recipe that is not only incredibly simple but also yields a truly drool-worthy result. Prepare to be amazed – once you experience the crispy perfection of these homemade delights, you’ll never look back!
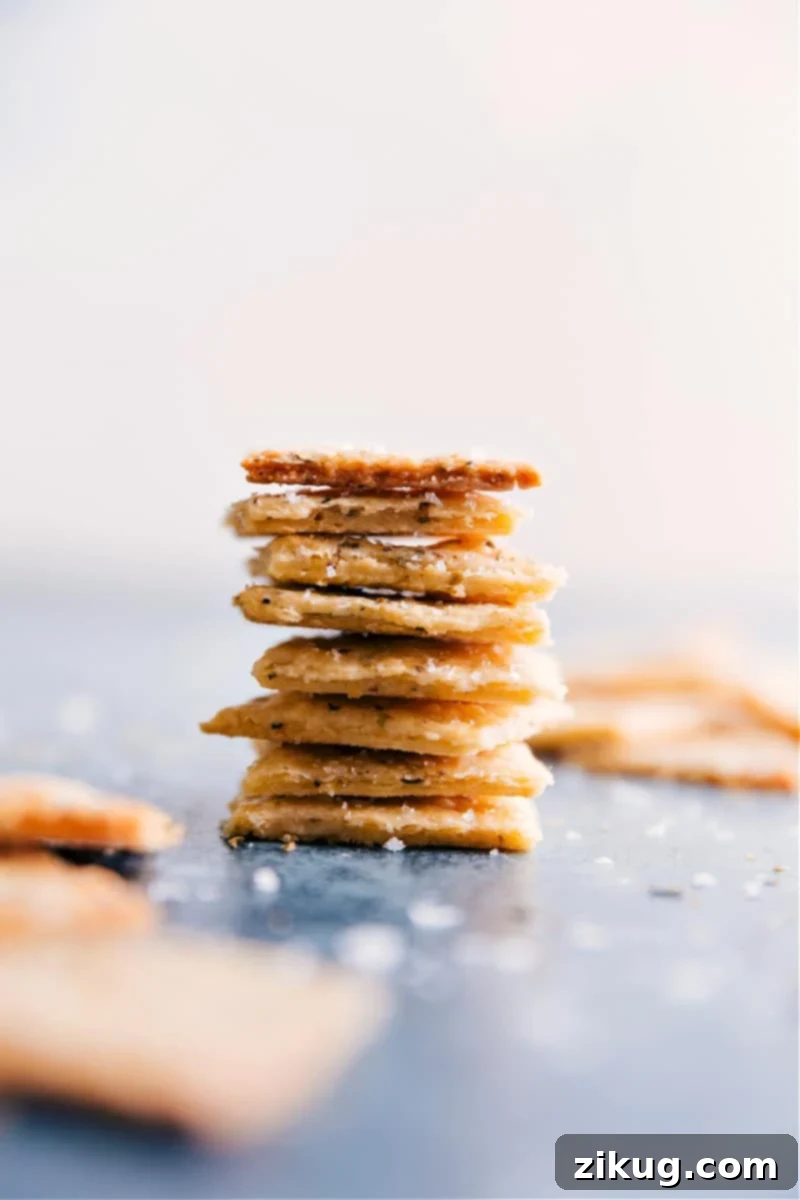
Are Homemade Crackers Truly Worth the Effort?
It’s a common sentiment, one echoed by my sister when she first tasted these: “I can’t imagine having my life together enough to ever make my own crackers!” And honestly, I get it. In a world of convenient, perfectly decent store-bought options, baking your own crackers might seem like an unnecessary indulgence or an overly ambitious kitchen project. But I’m here to tell you, with absolute conviction, that a single bite of these homemade Parmesan and Italian herb crackers will likely shift your perspective, even if just a little.
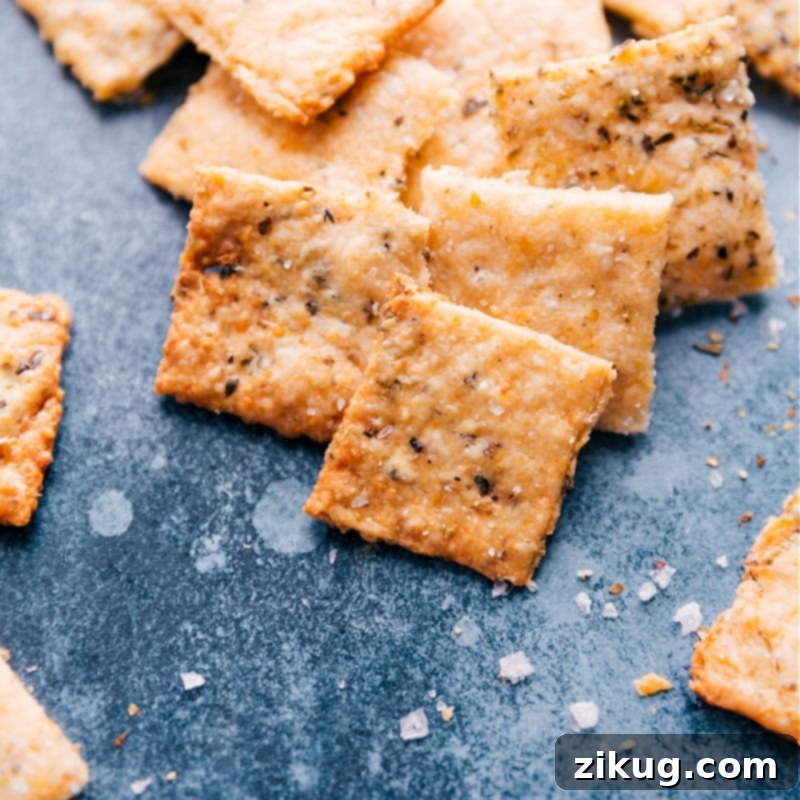
These aren’t just good crackers; they are, without exaggeration, the most flavorful and satisfying crackers I’ve ever tasted. The fresh ingredients, the perfect crispness, and the vibrant flavor profile elevate them far beyond anything you can buy off a shelf. Yes, they require a bit of time in the kitchen, but consider this: the effort involved isn’t significantly more than a trip to the grocery store to navigate crowded aisles and choose from endless boxes. When you weigh the incredible taste, cost-effectiveness, and the sheer joy of creating something truly special, the answer becomes a resounding “yes!”
Beyond the unparalleled taste, there are several compelling reasons to embrace the art of homemade cracker making:
- Unmatched Flavor and Freshness: Store-bought crackers simply cannot compete with the vibrant, fresh taste of crackers baked minutes ago. The aroma alone is enough to convert any skeptic.
- Economical Choice: Gourmet crackers can be surprisingly expensive. Making your own from basic pantry staples is significantly more budget-friendly, allowing you to enjoy premium quality without the premium price tag.
- Control Over Ingredients: This is a huge benefit! You dictate exactly what goes into your crackers, ensuring high-quality ingredients and avoiding unwanted preservatives, artificial flavors, or excessive sodium. This is particularly valuable if you’re making homemade crackers for toddlers or babies, or if you have specific dietary needs.
- Customization Opportunities: The basic recipe is a canvas for endless flavor explorations. Adjust seasonings, add different herbs, or incorporate unique spices to create your signature cracker.
- A Sense of Accomplishment: There’s immense satisfaction in serving something you’ve created from scratch. These crackers are always a conversation starter and a source of pride.
I’ve poured my efforts into making this recipe as straightforward and foolproof as possible, and I truly believe you’ll be impressed by how effortlessly these incredible crackers come together. Once you’ve mastered these, perhaps homemade graham crackers will be next on your baking adventure list! Enjoy the process and the delicious rewards!
Essential Ingredients for Perfect Crackers
Crafting delicious homemade crackers requires only a handful of common ingredients, but the quality of each truly makes a difference. Here’s what you’ll need and why each component is crucial:
- Parmesan Cheese: This is the star ingredient, imparting a deep, savory, and intensely cheesy flavor to your crackers. For the absolute best results, choose a high-quality block of Parmesan and grate it fresh. Pre-grated or canned Parmesan often contains anti-caking agents and can be excessively salty, which will compromise both the flavor and texture of your crackers. Freshly grated Parmesan melts beautifully and integrates perfectly into the dough.
- Unsalted Butter: Cold, unsalted butter is key to achieving that desirable rich, flaky, and tender cracker texture. The cold butter creates steam pockets as it bakes, leading to a light and crisp result. Using unsalted butter allows you to precisely control the overall saltiness of your crackers.
- All-Purpose Flour: The foundational element that provides structure to your crackers. When combined with the other ingredients, it forms a cohesive dough. Remember, gentle mixing is vital to keep your crackers light and crunchy, preventing them from becoming tough.
- Heavy Whipping Cream: This rich cream adds essential moisture to the dough, making it pliable and easy to handle without becoming sticky. Start by adding the specified amount gradually; you might not need every last drop, as dough consistency can vary slightly. Its fat content also contributes to the cracker’s overall richness.
- Italian Seasoning: Aromatic and versatile, Italian seasoning is a blend of dried herbs like oregano, basil, thyme, rosemary, and marjoram. It provides a delightful herby depth that perfectly complements the savory Parmesan cheese, creating a classic flavor profile.
- Seasoned Salt: While Parmesan adds some saltiness, seasoned salt (a blend often including salt, paprika, turmeric, onion, and garlic) enhances the overall flavor complexity and provides a balanced savory punch. Adjust the amount based on your preference and the saltiness of your Parmesan.
- Pepper and Paprika: A touch of black pepper adds a subtle kick, while paprika contributes a mild, sweet peppery flavor and a beautiful golden hue to the crackers.
- Dried Minced Garlic: For those who love a hint of garlic, this adds a gentle savory note without overpowering the other flavors. You can increase this for a more pronounced garlic cracker.
- Flaky Sea Salt (Optional, for topping): A sprinkle of flaky sea salt right after baking provides a delightful textural contrast and an extra burst of salty goodness, making your homemade crackers truly gourmet.
Crafting Homemade Crackers: A Simple Step-by-Step Guide
You’ll be delighted to discover just how incredibly easy and straightforward it is to make these flavorful homemade crackers. Utilizing basic ingredients and a common kitchen appliance, you can achieve crispy perfection in just four simple steps. Much like our favorite Biscuit Recipe or our go-to Pie Crust Recipe, we leverage the power of the food processor to effortlessly bring together a perfectly textured dough in mere minutes. Here’s how you’ll create these irresistible cheesy delights:
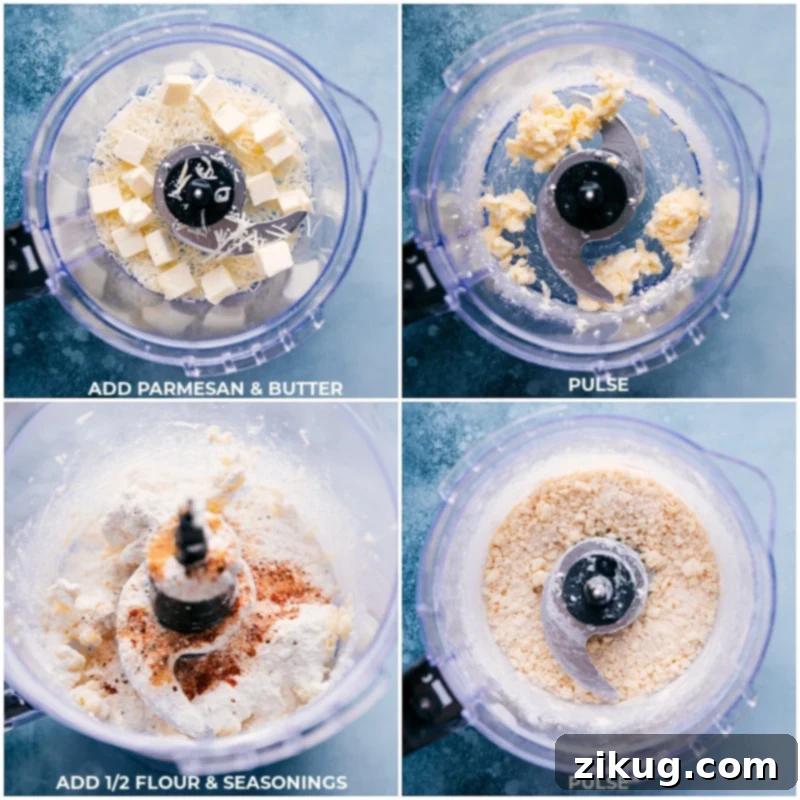
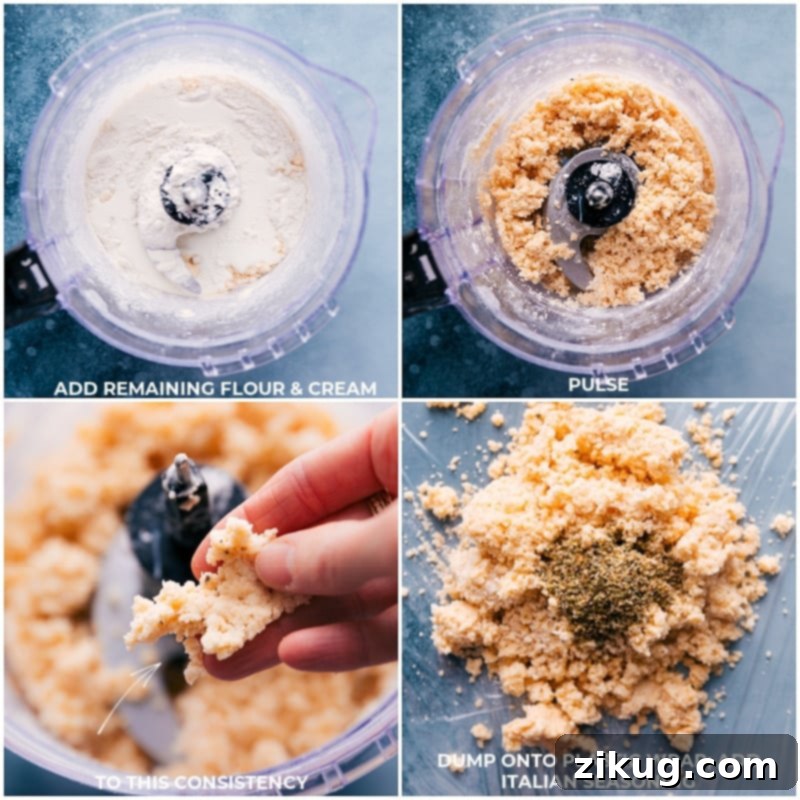
- Prepare and Combine Ingredients in a Food Processor: Begin by preheating your oven and preparing your baking sheet. Then, in the bowl of your food processor, combine the freshly grated Parmesan cheese and cold, cubed unsalted butter. Pulse the mixture in short bursts (around 10 one-second pulses) until it resembles coarse crumbs. The key here is to *pulse*, never purée, to avoid overworking the butter and flour, which could lead to tough crackers. Next, add the seasoned salt, pepper, paprika, dried minced garlic, and about half of the all-purpose flour. Pulse a few more times to incorporate these ingredients. Finally, add the remaining flour and 4 tablespoons of heavy cream. Pulse again until a clumpy dough begins to form. If the dough still seems too dry, add the final tablespoon of heavy cream, pulsing just until the mixture comes together.
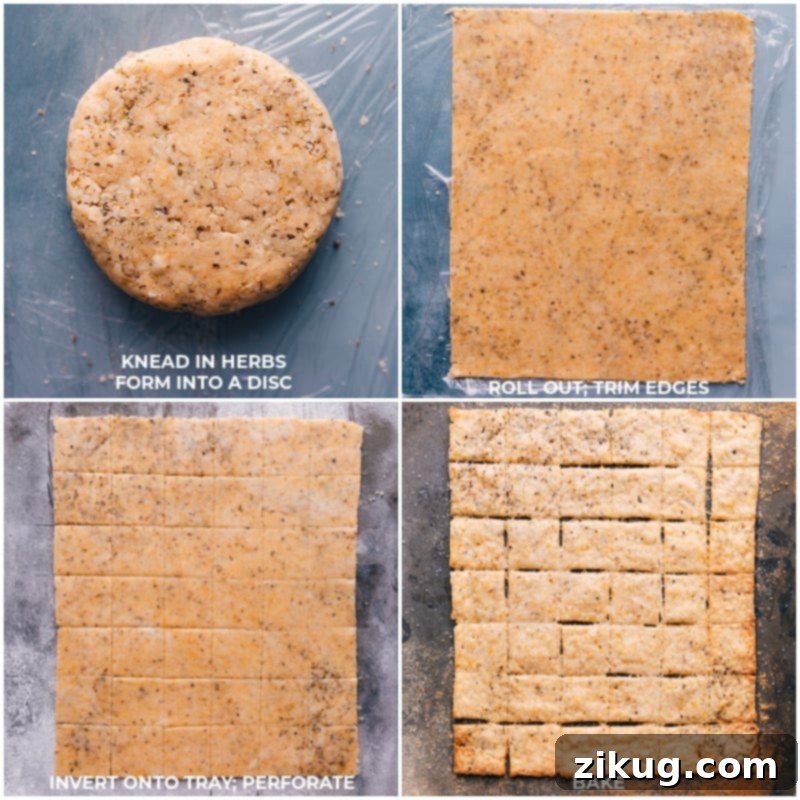
- Infuse and Roll Out the Dough: Carefully transfer the clumpy dough mixture directly from the food processor onto a sheet of plastic wrap or wax paper. Sprinkle the Italian seasoning evenly over the dough. Using the plastic wrap, gently fold and press the herbs into the dough until it comes together into a cohesive ball. The goal is to incorporate the herbs without kneading or overworking the dough, as this can develop the gluten too much, resulting in tough crackers. Place another piece of parchment paper on top of the dough ball. Using a rolling pin, roll out the dough to an even thickness of approximately 1/8 to 1/4 inch. Thinner dough yields crispier crackers, while thicker dough might result in a slightly chewier or doughier center.
- Score and Prepare for Baking: Once your dough is rolled to your desired thickness, carefully remove the top layer of parchment paper. If you prefer uniform crackers, you can trim the edges of the dough sheet at this point (though this is entirely optional for a more rustic look). Using the plastic wrap underneath, carefully lift and invert the large sheet of dough onto your prepared, lightly greased and floured baking sheet. Now, with a super sharp knife or a pizza cutter, gently score the dough into your desired cracker shapes and sizes (squares, rectangles, or triangles). It’s important to only perforate the dough, not cut all the way through, as this allows the crackers to bake together and then easily break apart after cooling.
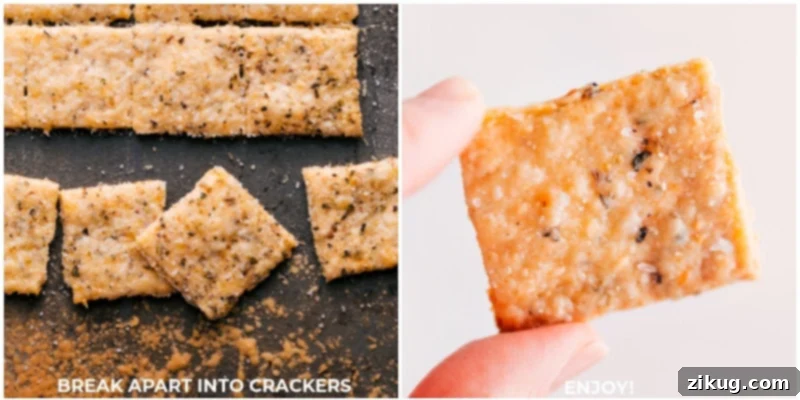
- Bake, Cool, and Enjoy: Place the baking sheet into your preheated oven. Bake for 8 to 14 minutes, or until the crackers are lightly golden brown around the edges and firm to the touch. Keep a close eye on them, especially during the last few minutes, as thinner crackers will bake faster. Remove the sheet pan from the oven and, if desired, immediately sprinkle the hot crackers with flaky sea salt. Allow the crackers to cool completely on the baking sheet. As they cool, they will become crispier. Once fully cooled, simply break them apart along the scored lines. These delectable homemade crackers are now ready to be enjoyed on their own, paired with your favorite dips, or as a star addition to a festive charcuterie board!
Achieving Cracker Perfection: Expert Tips and Tricks
While making homemade crackers is remarkably simple, a few expert tips can elevate your results from good to absolutely phenomenal. Pay attention to these details, and you’ll be baking perfect batches every time:
- To Score or Not to Score: Before baking, I highly recommend scoring the dough with a sharp knife. This perforation ensures that your crackers break into neat, uniform squares or rectangles, which is aesthetically pleasing and convenient for serving. However, if you prefer a more rustic, free-form look, you can skip scoring. Simply bake the entire sheet of dough until golden, let it cool completely, and then break it apart into irregular, charmingly rustic pieces, much like how you would break apart homemade peppermint bark.
- The Golden Rule of Thin Dough: This is perhaps the most crucial tip for achieving truly crispy crackers. Aim to roll your dough as thinly and evenly as possible, ideally between 1/8 to 1/4 inch thick. If the dough is too thick, the crackers won’t achieve that satisfying snap; instead, they might turn out soft, chewy, or even slightly doughy in the center. A consistent thickness also ensures even baking.
- The Unrivaled Importance of Quality Cheese: Exceptional homemade cheese crackers begin and end with exceptional cheese. Forget the pre-grated shakers; they often contain anti-caking agents and can be overly salty. Invest in a block of high-quality Parmesan (like Parmigiano-Reggiano) and grate it fresh using the small holes of a box grater or a food processor attachment. The difference in flavor is monumental. Alternatively, you can use finely shredded Parmesan cheese, but always prioritize freshly grated for the best aroma and taste.
- Chill Your Dough (Optional but Recommended): While this recipe doesn’t explicitly require chilling, if your kitchen is warm or if you find the dough difficult to handle, chilling it for 15-30 minutes before rolling can make it much more manageable. Cold dough is less sticky and easier to roll out thinly and evenly.
- Avoid Parchment or Silicone Liners During Baking: For optimal crispness, bake these crackers directly on a lightly greased and floured baking sheet. Parchment paper or silicone baking mats can sometimes trap moisture, hindering the crackers from achieving their desired crunch.
- Even Baking is Key: To ensure all your crackers bake evenly, consider rotating your baking sheet halfway through the baking time. Ovens often have hot spots, and rotating the pan helps prevent some crackers from browning too quickly while others remain pale.
- Cool Completely for Crispness: Patience is a virtue when it comes to crispy crackers. Allow them to cool completely on the baking sheet after removing them from the oven. They will continue to crisp up as they cool. Breaking them apart while warm might result in a softer texture.
Frequently Asked Questions About Homemade Crackers
Achieving that perfect, satisfying crunch is key to excellent homemade crackers. Here are our top suggestions to ensure your crackers turn out wonderfully crispy:
- Roll the dough thinly and evenly: This is paramount. The thinner the dough (aim for 1/8 to 1/4 inch), the crispier the cracker will be. Uneven thickness will lead to some parts being crispy and others being soft.
- Bake them adequately: Don’t be afraid to let them bake a bit longer than you might initially think. Look for golden-brown edges. If they are still pale, they likely need more time to crisp up.
- Cool completely: This step is critical! Crackers continue to crisp as they cool on the baking sheet. Resist the urge to break them apart and eat them while still warm, as they will be softer.
- Avoid parchment paper or silicone mats: For this recipe, baking directly on a lightly greased and floured metal baking sheet helps with crispness by allowing direct heat transfer and preventing steam from getting trapped underneath.
Tough crackers are almost always a result of overworking the dough. When you over-mix or knead flour-based doughs excessively, you develop the gluten, which creates elasticity and chewiness – great for bread, but undesirable for delicate, crispy crackers. To avoid this, mix the dough just until it barely comes together and no dry flour streaks remain. Additionally, too much flour can also be a culprit, making the dough stiff and leading to tough crackers.
Absolutely not! As mentioned above, kneading vigorously develops gluten, which will result in tough, chewy crackers instead of light and crisp ones. For this recipe, the food processor quickly brings the ingredients together. Once out of the processor, handle the dough minimally – just enough to incorporate the Italian seasoning and then roll it out. Think of it more as pressing and shaping rather than kneading.
While this specific recipe uses all-purpose flour, you can experiment with a high-quality 1:1 gluten-free flour blend. Look for blends that are specifically designed for baking and contain xanthan gum. You might need to adjust the amount of heavy cream slightly, as gluten-free flours can absorb liquids differently. The texture might vary slightly, but many bakers have success with gluten-free alternatives.
These Parmesan and Italian herb crackers are incredibly versatile! They are fantastic on their own as a savory snack. They also shine on any charcuterie board, complementing cheeses, cured meats, and fresh fruits beautifully. Pair them with your favorite dips – from a simple hummus to a creamy spinach artichoke dip. They also make a wonderful accompaniment to soups and salads, adding a delightful crunch instead of croutons.
Exciting Variations for Your Homemade Crackers
One of the joys of making crackers from scratch is the endless potential for customization. While the Parmesan and Italian seasoning version is a classic, don’t hesitate to get creative with flavors. Here are some inspiring variations to try:
- Healthy Homemade Crackers: If you’re looking for a healthier alternative, consider incorporating whole grains or seeds. Recipes like these multi-seed crackers offer a boost of fiber and nutrients while still delivering on crispness and flavor.
- Garlic Crackers Recipe: This base recipe already includes a hint of dried minced garlic. For a bolder garlic flavor, increase the amount of dried minced garlic to 1/2 teaspoon or even 1 teaspoon. For an even more intense taste, you could add 1/4 teaspoon of garlic powder.
- Homemade Saltine Crackers: Craving that classic, flaky, and slightly salty crunch? Try a dedicated recipe for saltines from scratch. It’s a rewarding project that yields a nostalgic snack.
- Spicy Kick Crackers: Add a pinch of cayenne pepper or red pepper flakes to the dough for a subtle warmth, or increase the amount for a fiery crunch. Smoked paprika can also add a smoky, spicy depth.
- Herb Garden Medley Crackers: Instead of Italian seasoning, experiment with a single herb for a stronger, focused flavor. Try dried crushed rosemary for an earthy note, thyme for a peppery aroma, or basil for a sweet and savory touch. Freshly chopped herbs can also be folded into the dough, but be mindful of their moisture content.
- Everything Bagel Seasoning Crackers: For a popular and incredibly flavorful twist, sprinkle everything bagel seasoning (sesame seeds, poppy seeds, dried garlic, dried onion, and flaky salt) onto the rolled-out dough before baking, or mix some directly into the dough.
- Cheese Blend Crackers: Don’t limit yourself to just Parmesan! Experiment with other hard or semi-hard cheeses like finely grated Asiago, Gruyere, or even a sharp white cheddar for different flavor profiles. A blend of cheeses can also create a complex and delicious cracker.
- Nutty Crackers: For added crunch and flavor, finely chop nuts like walnuts, pecans, or almonds and fold them into the dough. This adds a delightful texture and richness.
Quick Tip: Seasoning Swaps for Flavor Freedom!
Feeling adventurous with your homemade crackers? Instead of the classic Italian seasoning blend, try a single dried herb for a more pronounced flavor profile. Imagine the earthy notes of dried crushed rosemary, the subtle zest of thyme, the sweet aroma of basil, or the robust flavor of oregano. These simple swaps can transform your crackers into a completely new and exciting snack!
Storage Solutions for Your Homemade Crackers
Extend the Life of Your Delicious Homemade Crackers!
One of the fantastic benefits of making your own crackers is their excellent storage potential, allowing you to enjoy them long after baking or even prepare dough in advance. Proper storage ensures they remain fresh and crispy.
- Storing Baked Crackers at Room Temperature: Once your crackers are completely cooled (this is crucial for maintaining crispness), store them in an airtight container at room temperature. They will retain their delightful crunch and flavor for up to one week. While they are undoubtedly best on the day they are made, they remain a delicious snack for several days.
- Freezing Cracker Dough: If you enjoy meal prepping or want to have fresh crackers on demand, freezing the dough is an excellent option. Form the dough into a disc, wrap it tightly in plastic wrap, and then place it in a gallon-sized freezer bag. The dough can be stored in the freezer for 3-4 months. When you’re ready to bake, simply thaw the dough overnight in the refrigerator, then roll it out and bake as directed.
- Freezing Baked Crackers: You can also freeze baked and completely cooled crackers in an airtight container for up to 4 months. To serve, thaw them at room temperature. It’s important to note that while they will still be tasty, they may lose some of their original crispness after freezing and thawing. For optimal texture, a quick refresh in a low oven (around 250°F or 120°C) for 5-10 minutes can help restore some of their crunch.
Elevate Your Appetizer Spread with These Crackers:
These versatile homemade crackers are the perfect vehicle for a variety of delicious dips and spreads. Here are some fantastic appetizer pairings:
- Creamy Cheese Ball Recipe with crispy bacon and crunchy pecans.
- Elegant Pistachio Crusted Goat Cheese Ball featuring sweet dried apricots.
- Zesty Chipotle Ranch Dip made with real chipotle peppers for a smoky kick.
- Rich Queso Dip Recipe crafted with sharp white Cheddar cheese.
- Hearty Loaded Baked Potato Dip complete with bacon bits and fresh green onions.
Homemade Parmesan & Italian Herb Crackers
Chelsea Lords
15
10
25
35
crackers
Equipment
-
Large sheet pan (15″ x 21″)
-
Food processor
Ingredients
- Cooking spray
-
1/2
cup
freshly grated Parmesan cheese
(see Note 1) -
4
tablespoons
unsalted butter
(cold, cubed) -
1/2
teaspoon
seasoned salt -
1/8
teaspoon
pepper -
1/8
teaspoon
paprika -
1/8
teaspoon
dried minced garlic -
1
cup
all-purpose flour -
4 to 5
tablespoons
heavy cream
(not whipped, divided) -
2
teaspoons
Italian seasoning -
Flaky sea salt
or fine sea salt, optional, for topping
Instructions
-
Preheat oven to 400°F (200°C). Spray a large sheet pan with cooking spray and lightly flour the surface. Do not use parchment or silicone liners for crispest crackers. Set aside. Cube the cold butter into 8 equal pieces.
-
In a food processor, combine the freshly grated Parmesan cheese and cold butter. Pulse until the mixture is crumbly, about 10 quick one-second pulses. It should resemble coarse crumbs, not a smooth paste.
-
Add the seasoned salt, pepper, paprika, dried minced garlic, and half of the all-purpose flour to the food processor. Pulse 4 more times to combine. Add the remaining flour and 4 tablespoons of heavy cream. Pulse a few more times until a clumpy dough begins to form. If the dough still appears too dry, add the last tablespoon of heavy cream, pulsing just until the dough comes together. Avoid over-mixing.
-
Transfer the dough mixture directly from the food processor onto a sheet of plastic wrap or wax paper. Sprinkle the Italian seasoning on top. Gently fold and press the herbs into the dough until it forms a cohesive ball. Do not knead or overwork the dough, as this can lead to tough crackers.
-
Place a second piece of parchment paper on top of the dough ball. Using a rolling pin, roll out the dough evenly to a thickness of 1/8 to 1/4 inch, according to your personal preference for crispness (thinner is crispier). Remove the top parchment paper. If desired, trim the edges of the dough for uniform crackers (this is optional). Using the bottom plastic wrap, carefully lift and invert the large sheet of dough onto the prepared baking sheet.
-
With a super sharp knife or pizza cutter, perforate the dough to create lines for your crackers. Make sure to score deeply enough to create clear break lines, but do not cut all the way through the dough.
-
Bake for 8–14 minutes, or until the edges are lightly browned and the crackers appear dry and firm. Thicker crackers will require longer baking times, so keep a close eye on them and check every minute or so towards the end. Remove from the oven and immediately sprinkle with flaky sea salt (if using). Let the crackers cool completely on the sheet pan. As they cool, they will become crispier.
-
Once completely cooled, break the crackers apart along the perforated lines and enjoy your delicious homemade treats!
Recipe Notes
Storage: Store completely cooled baked crackers in an airtight container at room temperature for up to a week. For longer storage, you can freeze the disc of dough (wrapped tightly in plastic and placed in a gallon-sized freezer bag) in the freezer for 3–4 months. Thaw overnight in the refrigerator and roll out the next day. Alternatively, baked crackers can also be stored in an airtight container in the freezer for up to 4 months. Thaw at room temperature; however, note that they may lose some of their crispness compared to freshly baked crackers.
Nutrition
|
Calories: 16 kcal
|
Carbohydrates: 2.2 g
|
Protein: 0.6 g
|
Fat: 0.5 g
|
Cholesterol: 1.4 mg
|
Sodium: 15.3 mg
|
Fiber: 0.1 g
Nutrition information is automatically calculated, so should only be used as an approximation.
Love this recipe? Share your thoughts in the comments below!
Recipe adapted from NY Times.