
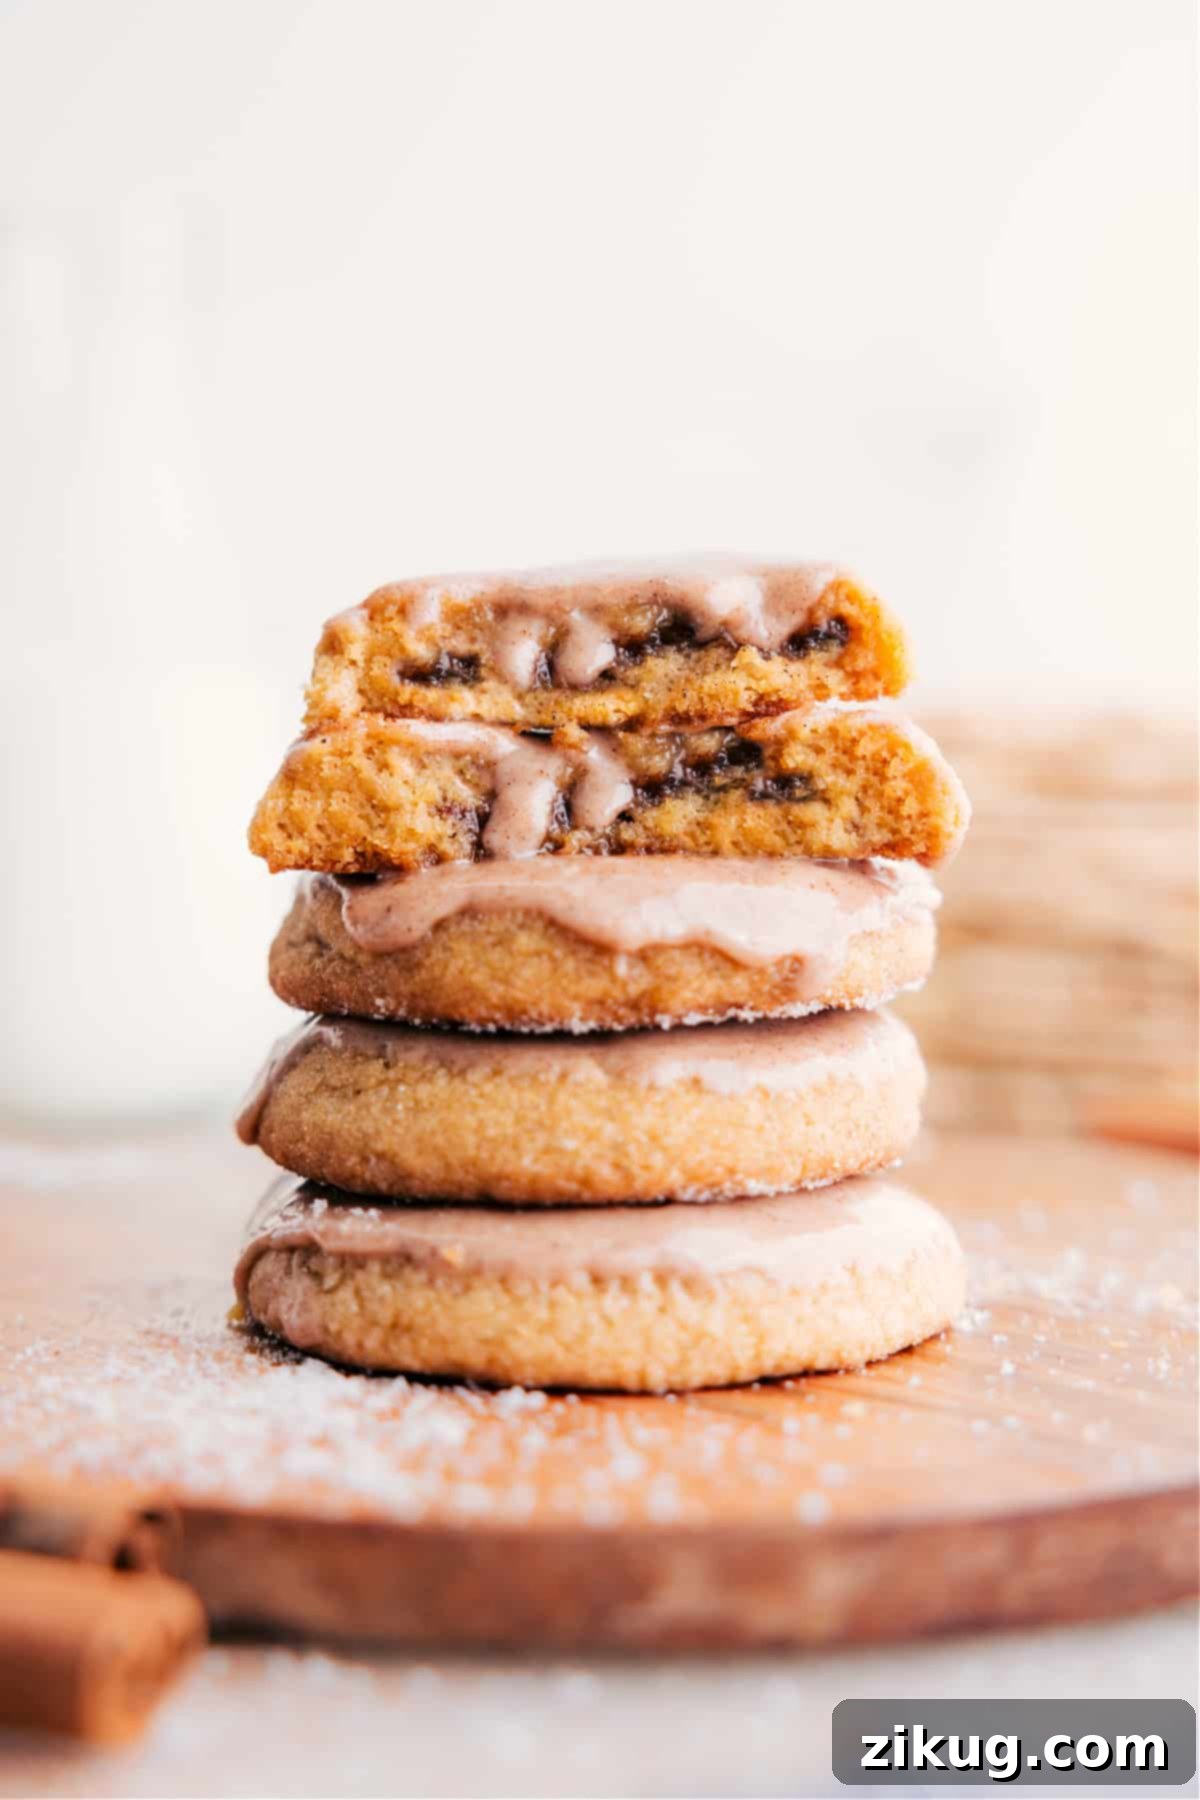
Ultimate Brown Sugar Pop-Tart Cookies: Your New Favorite Homemade Treat
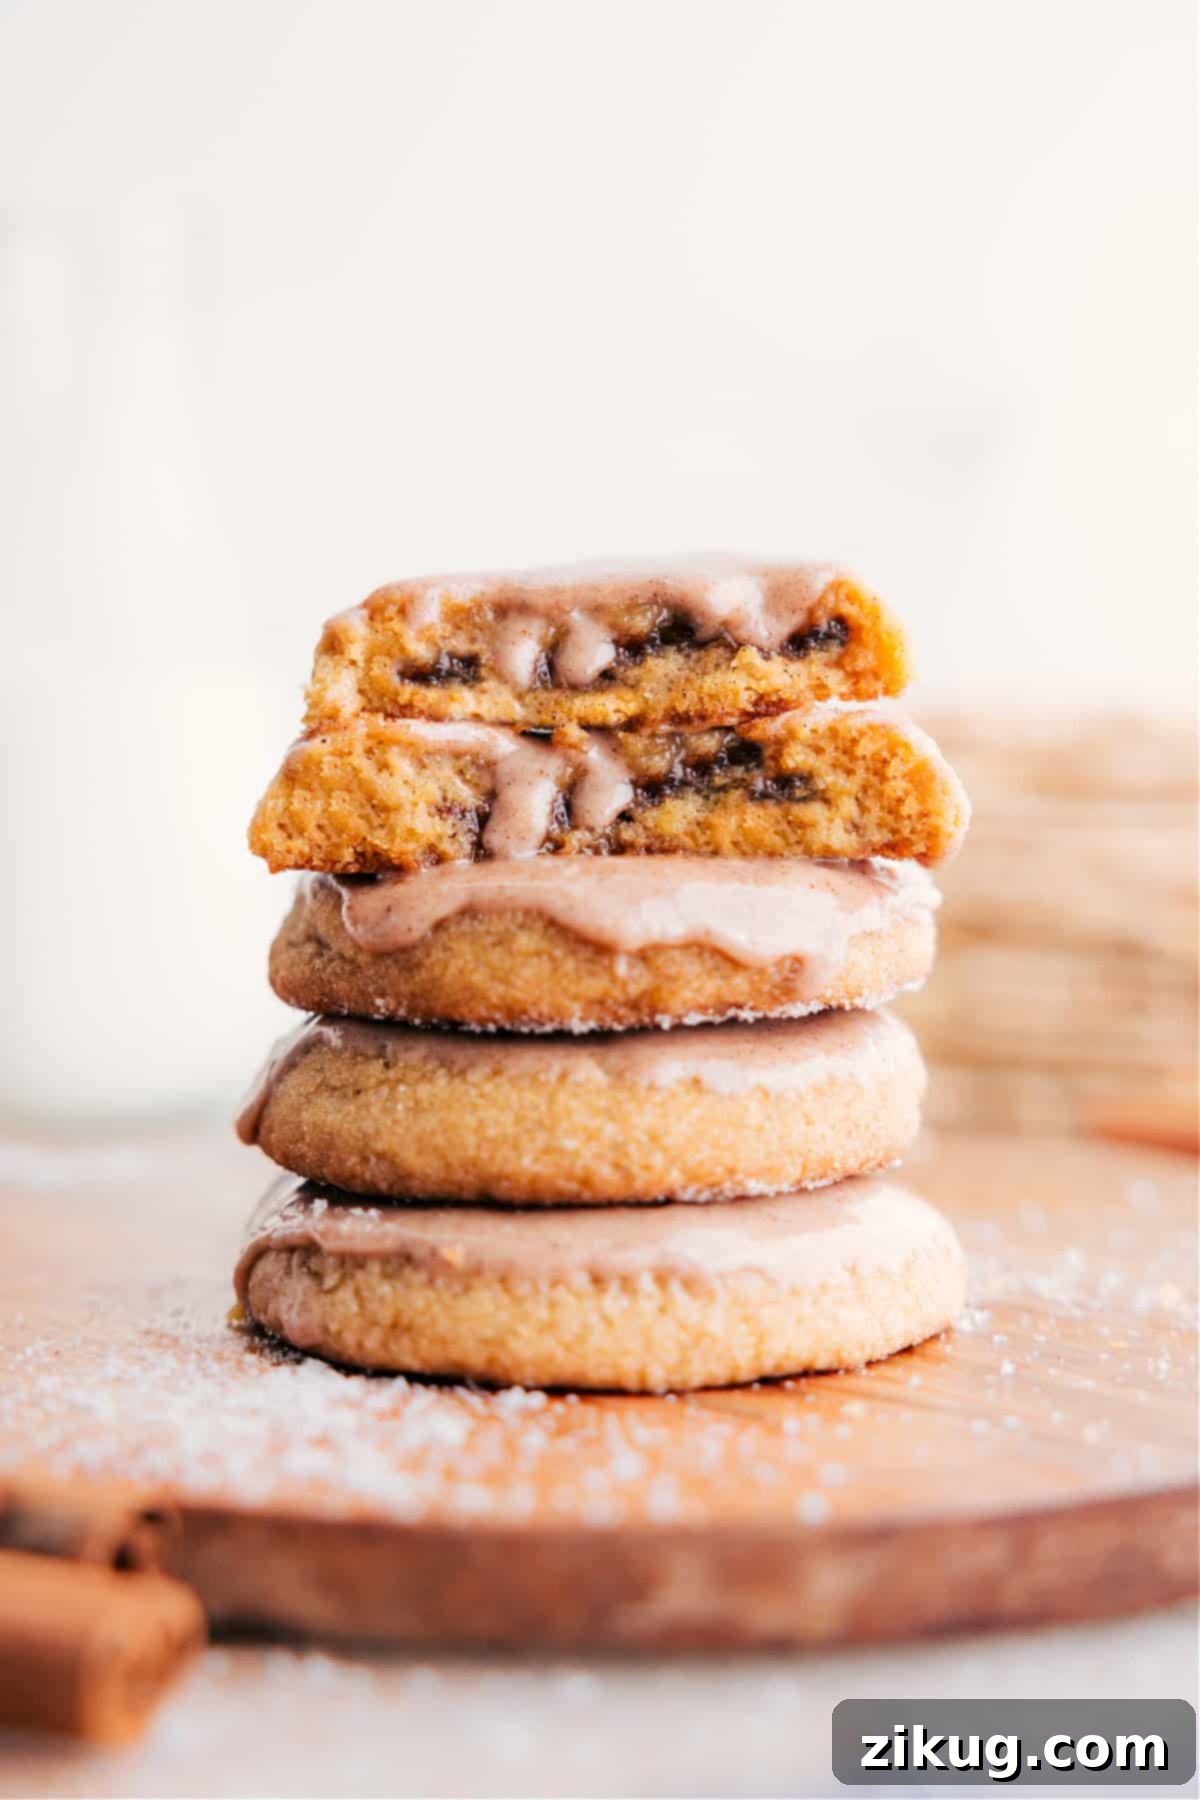
Step into a world where nostalgia meets gourmet baking with these incredible Brown Sugar Pop-Tart Cookies. Imagine a soft, buttery brown sugar cookie, perfectly baked to a tender chewiness, enrobing a warm, gooey cinnamon-sugar center. Each delightful bite is then crowned with a smooth, sweet cinnamon glaze, reminiscent of your favorite childhood breakfast pastry but elevated to an irresistible, melt-in-your-mouth cookie experience. These aren’t just cookies; they’re a celebration of flavor and texture, destined to become a beloved classic in your kitchen.

author’s note
The Pop-Tart Cookie Mashup You Didn’t Know You Needed!
My eldest son has always been utterly captivated by brown sugar Pop-Tarts. If given the choice, he’d happily start every morning with one. To be completely honest, I’ve never quite understood the profound obsession myself; I don’t recall ever truly craving one. Yet, a spark ignited in my mind: what if I could transform his go-to store-bought indulgence into a homemade sensation that would win over everyone, not just him?
That brilliant idea was the genesis of these spectacular Brown Sugar Pop-Tart Cookies. What emerged from my kitchen was far more than just a cookie. It’s a symphony of flavors and textures: a foundation of irresistibly soft brown sugar cookie dough, cradling a lusciously gooey cinnamon-sugar filling, all crowned with a sweet, vanilla-kissed glaze that impeccably mirrors the classic Pop-Tart topping. These cookies swiftly ascended to family-favorite status, vanishing from cooling racks almost as quickly as I could bake them. They’re not just a treat; they’re an experience, a delightful twist on a familiar favorite that brings smiles with every bite.
If your heart beats for comforting, chipless cookies like my signature Brown Sugar Cookies or classic Snickerdoodles, then these Pop-Tart inspired cookies are absolutely going to hit that sweet spot. They offer a unique blend of familiar flavors with an exciting new twist.
Why You’ll Fall in Love with These Pop-Tart Cookies
- Nostalgic Comfort: They perfectly capture the beloved taste of a brown sugar Pop-Tart in cookie form, evoking wonderful childhood memories.
- Irresistible Texture: Enjoy the best of both worlds with a soft, chewy cookie exterior and a wonderfully gooey, warm cinnamon-sugar interior.
- Homemade Goodness: Ditch the store-bought boxes! These cookies offer a fresh, wholesome taste that only homemade can deliver, with real ingredients you can feel good about.
- Flavor Harmony: The rich brown sugar cookie base, spicy cinnamon filling, and sweet vanilla glaze create a perfectly balanced flavor profile that’s truly addictive.
- Impressive & Unique: Stand out from the usual cookie crowd. These Pop-Tart inspired treats are a conversation starter and a guaranteed crowd-pleaser for parties, potlucks, or just a cozy night in.
- Easier Than You Think: While they look elaborate, the steps are straightforward, making them achievable for bakers of all skill levels.
Essential Ingredients for Perfect Brown Sugar Pop-Tart Cookies
Crafting these extraordinary Brown Sugar Pop-Tart Cookies requires a selection of common baking staples, many of which are cleverly shared across the cookie dough, the flavorful filling, and the luscious glaze. Here’s a detailed look at the ingredients and their crucial roles:
- Unsalted Butter (Melted): Key to achieving that incredibly soft, rich, and tender cookie texture. Using melted butter helps create a chewier cookie and ensures the dough comes together beautifully. Always let it cool slightly before mixing to prevent “greasy” cookies.
- Granulated Sugar: Contributes essential sweetness and helps achieve that desirable crispy edge and chewy texture in the cookies. A portion is also reserved for rolling, adding a delightful crunch.
- Light Brown Sugar (Packed): The star of the show! Brown sugar brings a deep molasses flavor, adds unparalleled moisture, and contributes significantly to the cookies’ characteristic chewiness and rich, caramel-like notes.
- Large Egg + Large Egg Yolk: The whole egg provides structure and binds the ingredients, while the extra egg yolk is a secret weapon for richness, moisture, and an even chewier cookie, enhancing that luxurious mouthfeel.
- All-Purpose Flour: The foundational structure of our cookies. Accurate measurement is absolutely critical here. Too much flour can lead to dry, crumbly cookies, while too little might result in excessive spreading. For professional results, a food scale is highly recommended.
- Salt: A non-negotiable flavor enhancer. Salt balances the sweetness of the sugars, bringing out the depth of the other ingredients and preventing the cookies from tasting one-dimensionally sweet.
- Baking Powder + Baking Soda: Our dynamic duo for leavening. Baking powder gives the cookies a lift, while baking soda reacts with the acidic brown sugar to create a wonderfully soft and tender crumb, ensuring they rise perfectly without becoming dense.
- Ground Cinnamon: The heart of the Pop-Tart flavor! This warm, sweet spice infuses both the cookie dough and the filling with its signature aroma and taste, making every bite undeniably Pop-Tart-like.
- Powdered Sugar (Confectioners’ Sugar): The base for our smooth, thick, and pourable glaze. Its fine texture dissolves easily, creating a silky finish without any graininess.
- Milk (Whole Preferred): Used in the glaze to achieve the perfect consistency. Whole milk lends a creamy richness that elevates the glaze, but any milk will work.
- Light Corn Syrup: A fantastic addition to the glaze, providing a beautiful glossy finish and preventing crystallization, ensuring a smooth, professional-looking topping that stays soft.
- Vanilla Extract: A touch of pure vanilla enhances all the other flavors in the glaze, adding a subtle warmth and aromatic complexity.
Crafting Homemade Brown Sugar Pop-Tart Cookies: A Step-by-Step Guide
Transforming simple ingredients into these irresistible Pop-Tart inspired cookies is a rewarding process. Here’s an overview of the key steps to guide you:
- Prepare the Cookie Dough: Begin by melting butter and allowing it to cool. This step is crucial for the final texture. Then, combine the cooled melted butter with sugars, eggs, and the dry ingredients, mixing just until combined. Chill the dough for at least an hour to prevent spreading and deepen the flavors.
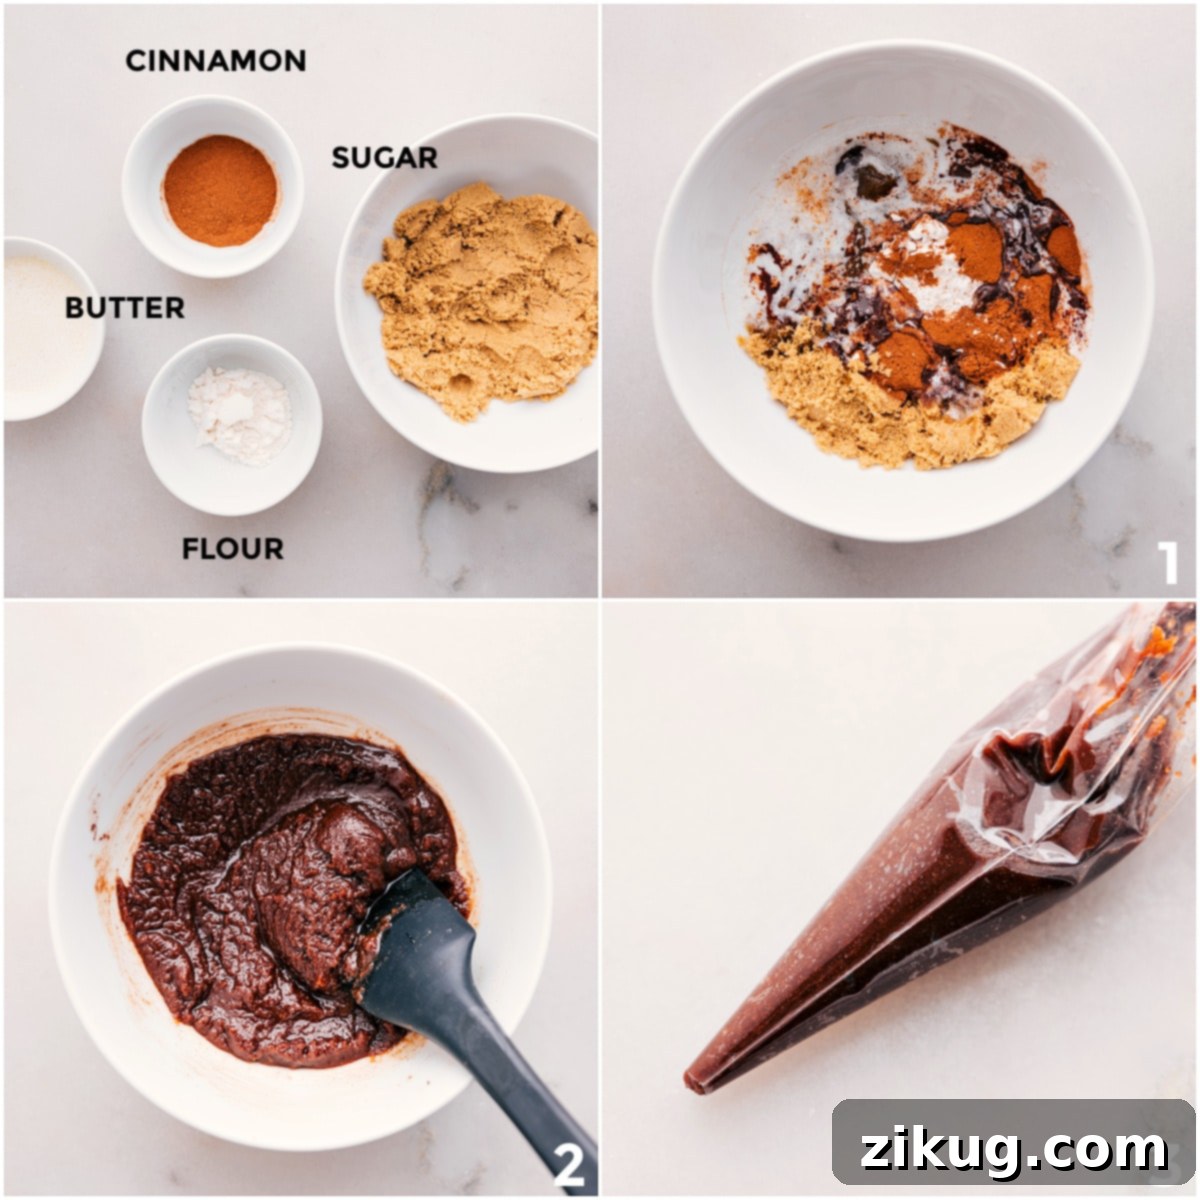
- Create the Cinnamon-Sugar Filling: While the dough chills, prepare the gooey cinnamon-sugar filling. Mix brown sugar, cinnamon, flour, and melted butter until smooth. Pipe small, consistent dollops onto a parchment-lined sheet pan and freeze them until they are solid. This makes them easy to handle and ensures the filling stays intact during baking.
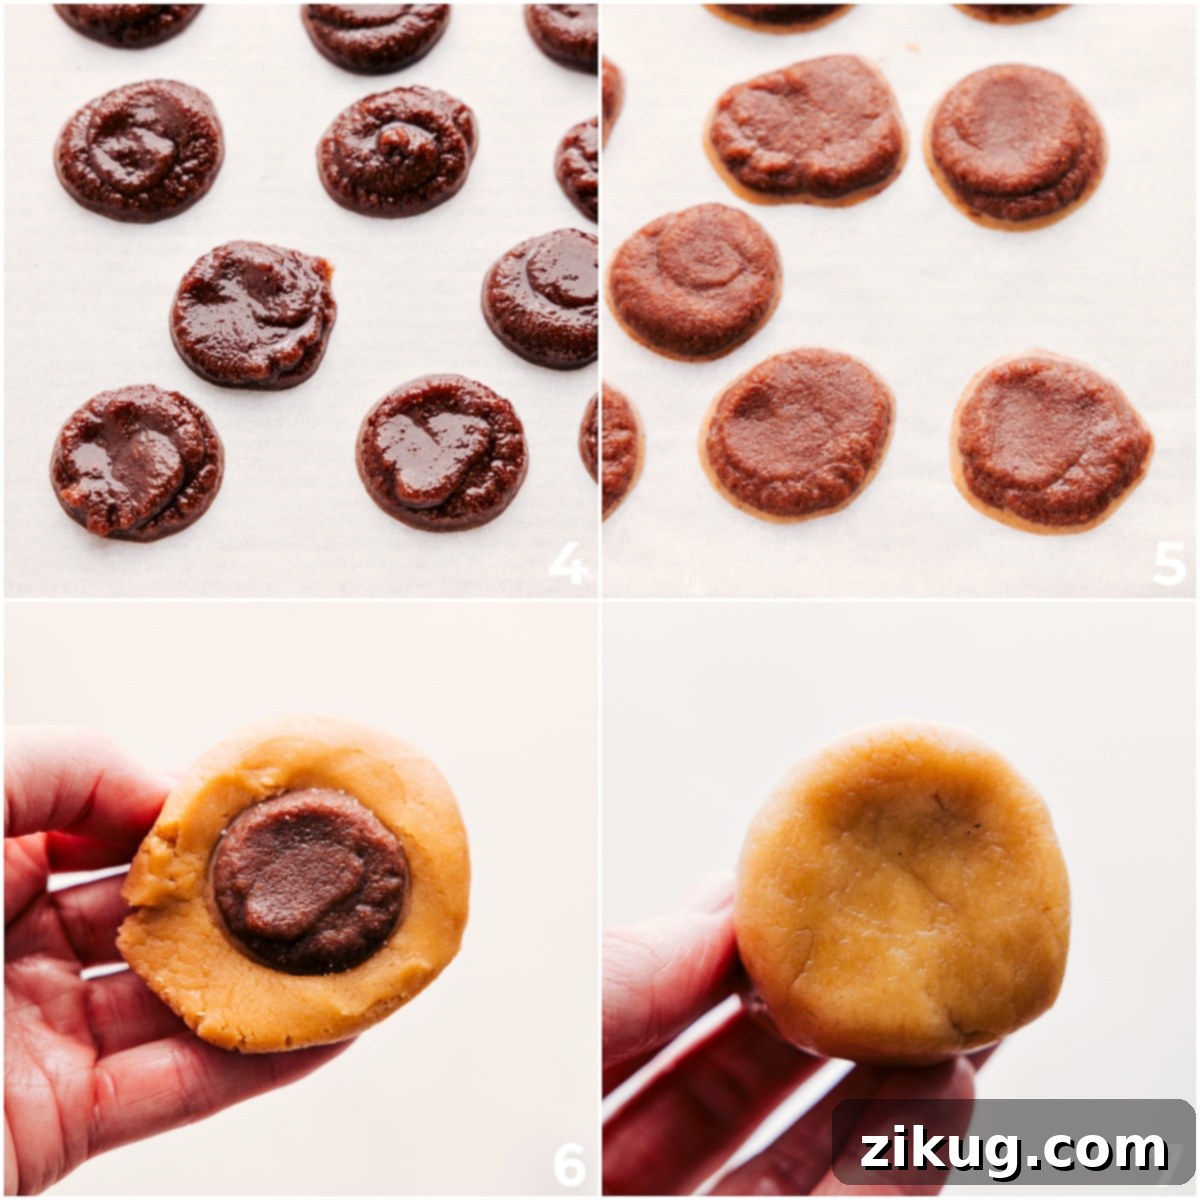
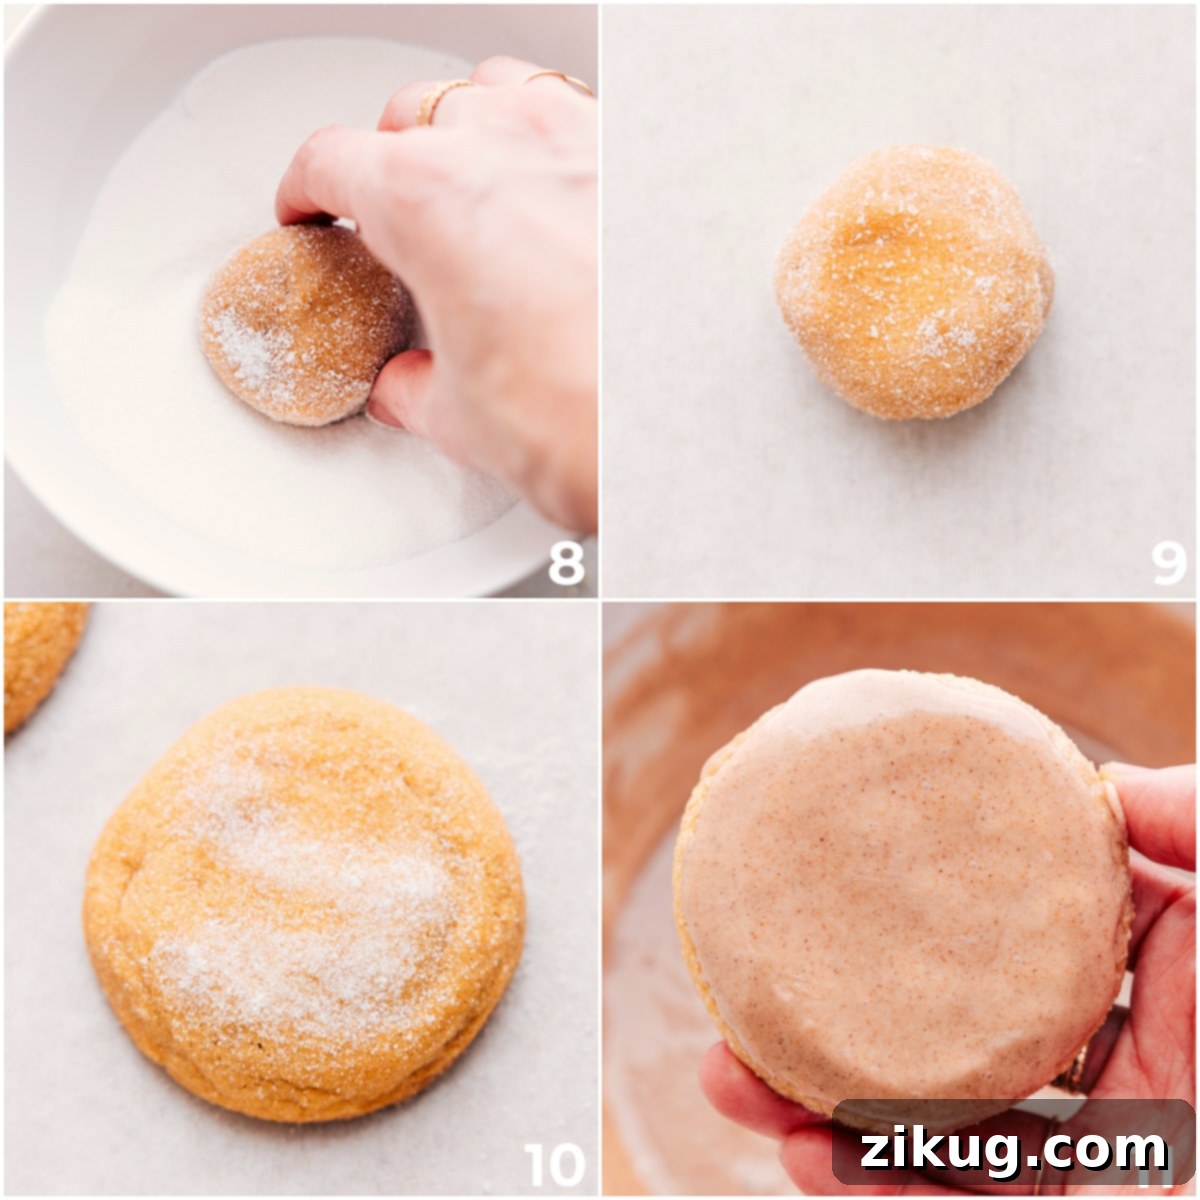
- Assemble the Cookies: Preheat your oven. Take portions of the chilled cookie dough, flatten them, and carefully enclose one frozen filling dollop within each. Roll the dough around the filling, ensuring it’s completely sealed, then roll each ball in granulated sugar for an extra sparkle and crunch.
- Chill and Bake: Arrange the formed cookie balls on a silicone-lined baking sheet and give them another quick chill (15-20 minutes). This second chill is vital for maintaining their shape and preventing excessive spreading. Bake at 350°F (175°C) for 10-12 minutes, aiming for slightly underbaked cookies for maximum softness and chewiness.
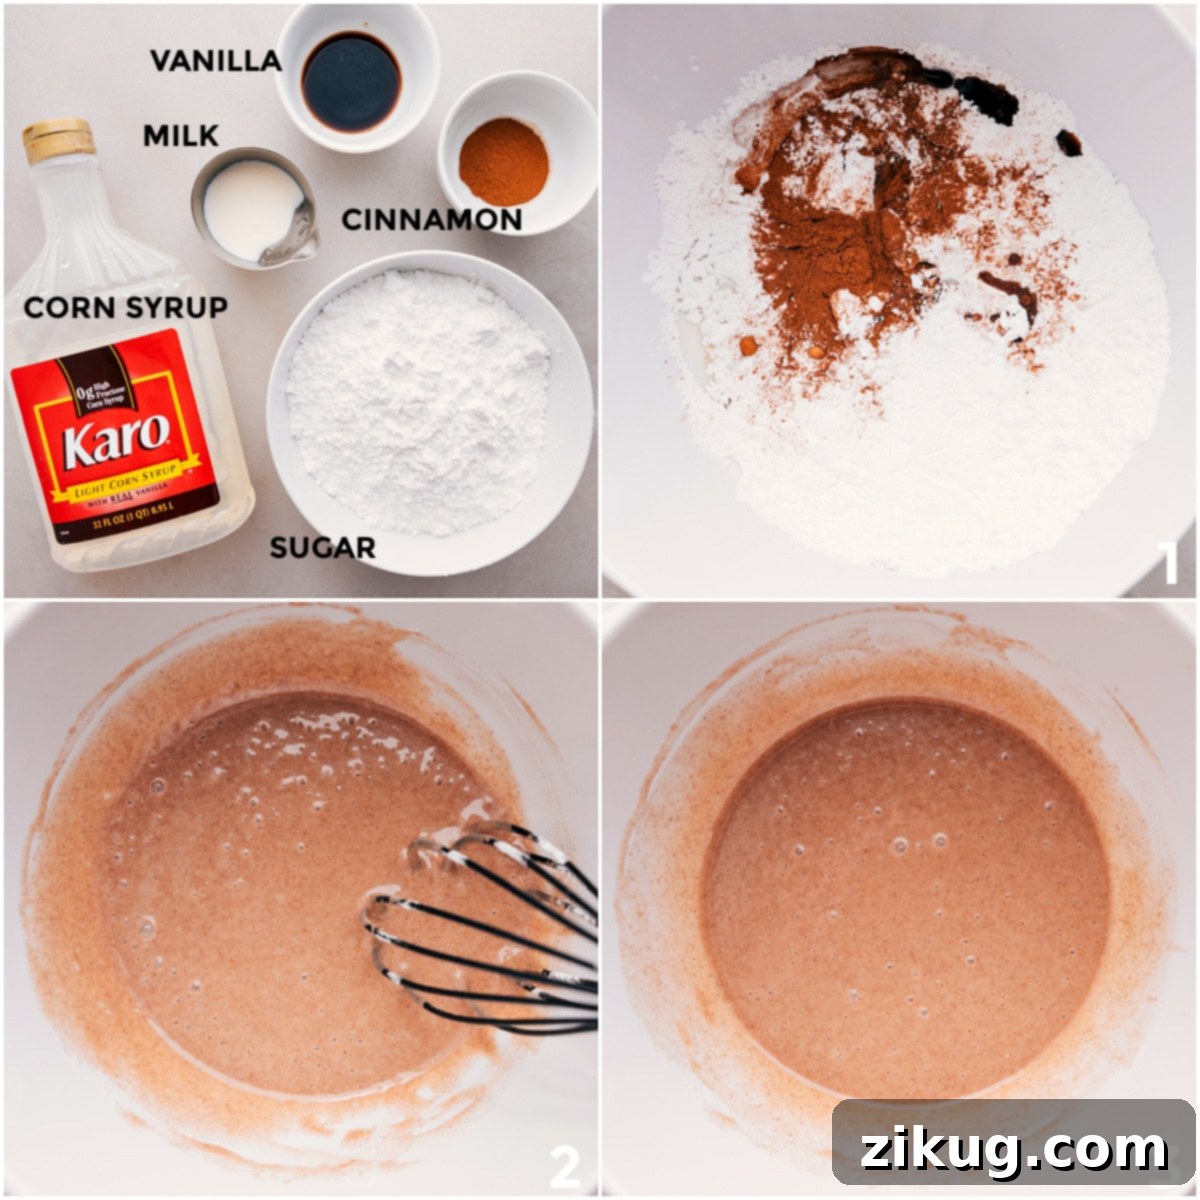
- Glaze to Perfection: While the cookies cool, whisk together powdered sugar, milk, corn syrup, vanilla, and cinnamon to create a smooth, pourable glaze. Once the cookies are completely cool, spoon the glaze over them, allowing it to set for about 20 minutes before serving. This creates that iconic Pop-Tart finish.
Expert Tips for Unforgettable Brown Sugar Pop-Tart Cookies
Achieving cookie perfection often comes down to a few key techniques. Follow these expert tips to ensure your Brown Sugar Pop-Tart Cookies turn out absolutely incredible every single time:
- Don’t Skip the Chill Time: Chilling the cookie dough for at least 1 hour (and even up to 24 hours!) is paramount. This allows the flour to fully hydrate, preventing the cookies from spreading too much in the oven. More importantly, it develops deeper flavors and results in a superior, chewier texture. Rushing this step is a common pitfall that leads to flat, less flavorful cookies.
- Avoid Overmixing the Dough: Once you add the dry ingredients to the wet, mix only until no dry streaks of flour remain. Overmixing develops the gluten in the flour, which can lead to tough, dense cookies instead of the desired soft and tender ones. Gentle folding or mixing on low speed is best.
- Slightly Underbake for Optimal Softness: The secret to perfectly soft and chewy cookies is knowing when to pull them from the oven. They should look just set around the edges but still appear slightly soft and underbaked in the center. The cookies will continue to cook and firm up as they cool on the baking sheet, ensuring a wonderfully tender interior.
- Cool Melted Butter to Room Temperature: When the recipe calls for melted butter, ensure it has cooled sufficiently to room temperature before combining it with the sugars. Adding hot or warm butter can melt the sugar crystals, leading to a greasy dough and potentially flat cookies. Patience here makes a big difference.
- Re-chill Formed Cookies Before Baking: After you’ve wrapped the dough around the frozen filling and rolled the cookies, give them another short chill in the refrigerator for 15-20 minutes. This quick chill helps the formed cookies maintain their beautiful round shape and prevents the filling from leaking out during baking.
- Measure Flour Accurately with a Food Scale: This cannot be stressed enough! Flour measurement is one of the most common reasons for baking mishaps. Using a food scale to measure flour by weight (aim for 405 grams for this recipe) ensures consistent and perfect results, avoiding dry, crumbly cookies or those that spread too much.
- Ensure Brown Sugar is Soft: For both the cookie dough and the filling, make sure your brown sugar is fresh and soft, free of hard clumps. Soft brown sugar integrates better and contributes to the moist, chewy texture of the cookies and the smooth consistency of the filling.
Storage Solutions for Your Brown Sugar Pop-Tart Cookies
Proper storage ensures your delightful Pop-Tart Cookies remain fresh and delicious for as long as possible:
Room Temperature: Store baked and glazed brown sugar Pop-Tart cookies in an airtight container at room temperature for up to 1 week. Placing a slice of bread in the container can help keep them extra soft.
Freezing Baked Cookies: Allow fully glazed cookies to set completely. Then, arrange them in a single layer on a baking sheet and freeze until solid. Once frozen, transfer them to a freezer-safe airtight container or bag, separating layers with parchment paper, for up to 2-3 months. Thaw at room temperature before serving.
Freezing Unbaked Dough Balls: For a quick future treat, freeze unbaked and unglazed cookie dough balls. After forming them around the frozen filling, place them on a baking sheet and freeze for 1 hour until firm. Then, transfer the frozen dough balls to a freezer-safe zip-top bag for up to 3 months. When ready to bake, simply place them on a baking sheet (no need to thaw) and add a few extra minutes to the baking time. Glaze them after they have cooled completely.
Variations & Customizations
While the classic Brown Sugar Pop-Tart Cookie is perfect as is, don’t hesitate to get creative and customize them to your liking:
- Different Fillings: Experiment with other fruit preserves like strawberry, raspberry, or even a chocolate hazelnut spread for a completely different flavor profile. Just make sure the filling is thick enough to freeze into dollops.
- Spice it Up: Add a pinch of nutmeg or a dash of allspice to the cinnamon filling for an even warmer, more complex spice blend.
- Citrus Zest: A little lemon or orange zest in the cookie dough can add a bright counterpoint to the sweetness.
- Sprinkle Fun: Before the glaze sets, sprinkle some festive sprinkles on top for an extra pop of color and texture, especially for holidays or birthdays.
- Nutty Crunch: Finely chopped toasted pecans or walnuts can be folded into the cookie dough for added texture and a nutty flavor.
Frequently Asked Questions (FAQ)
Here are answers to some common questions you might have while baking these delightful Pop-Tart Cookies:
Q: Can I use regular butter instead of unsalted?
A: Yes, you can, but it’s best to use unsalted butter to control the salt content in the recipe. If using salted butter, reduce the added salt in the cookie dough by about 1/4 teaspoon.
Q: My cookies spread too much. What went wrong?
A: Common culprits for spreading include butter that was too warm, not chilling the dough long enough, or inaccurate flour measurement (too little flour). Ensure your butter is cooled, the dough is properly chilled twice, and consider using a food scale for flour.
Q: Can I make the cookie dough in advance?
A: Absolutely! The cookie dough can be made up to 2-3 days in advance and stored tightly covered in the refrigerator. In fact, longer chilling can often enhance the flavor and texture of the cookies.
Q: How do I get the glaze to be the right consistency?
A: The glaze should be thick enough to coat the back of a spoon but still pourable. If it’s too thick, add milk a tiny bit at a time (1/2 teaspoon) until desired consistency. If too thin, whisk in a tablespoon more of powdered sugar until it thickens.
Q: What if my filling isn’t freezing solid?
A: Ensure your freezer is cold enough. The filling might also need a little more flour if it’s too wet. If it’s slightly soft but still firm enough to handle, it should be fine. If it’s too difficult to squeeze from the piping bag, briefly warm it in the microwave (10 seconds) to soften slightly.
More Fun Cookie Recipes to Explore:
Desserts
Easy & Delicious Cake Mix Cookies
Desserts
Refreshing Lemon Cookies
Cookies
The Best No Bake Cookies Recipe
Desserts
Secret Ingredient Chocolate Chip M&M Cookies
Brown Sugar Pop-Tart Cookies
Chelsea Lords
30 minutes
10 minutes
1 hour
20 minutes
2 hours
24
cookies
Equipment
-
Sheet pan (15″ x 10″) plus silicone liner
Ingredients
- 16 tablespoons unsalted butter melted
- 2/3 cup granulated sugar plus 1/2 cup for rolling cookies
- 2/3 cup light brown sugar packed
- 1 large egg
- 1 large egg yolk discard or save whites
- 2-3/4 cups flour
- 3/4 teaspoon salt
- 1 teaspoon baking powder
- 1 teaspoon baking soda sift if clumpy
- 1 teaspoon ground cinnamon
- 1/2 cup light brown sugar packed
- 1 tablespoon ground cinnamon
- 1 tablespoon flour
- pinch salt
- 4 tablespoons unsalted butter melted
- 2-1/4 cups powdered sugar
- 3 tablespoons milk whole preferred
- 1-1/2 tablespoons light corn syrup
- 1-1/2 teaspoons vanilla extract
- 1-1/2 teaspoons ground cinnamon
Instructions
Cookies
-
In a large microwave-safe bowl, melt the butter. Let it cool completely to room temperature. This crucial step prevents greasy cookies and ensures proper dough consistency.
-
Once the butter has cooled, add the granulated sugar and light brown sugar. Whisk thoroughly until well combined. Incorporate the large egg and egg yolk, whisking vigorously until the mixture is emulsified, light, and creamy.
-
Add the flour, salt, baking powder, baking soda, and 1 teaspoon ground cinnamon to the wet ingredients. Mix on low speed or by hand until there are no visible dry streaks of flour. Be careful not to overmix, as this can lead to tough cookies. Cover the dough tightly with plastic wrap and refrigerate for at least 1 hour (or up to 24 hours) to firm up and allow flavors to meld.
Filling
-
Line a sheet pan with parchment paper or a silicone baking mat. In a medium bowl, combine 1/2 cup light brown sugar, 1 tablespoon ground cinnamon, 1 tablespoon flour, a pinch of salt, and 4 tablespoons melted unsalted butter. Whisk until the mixture is completely smooth and free of lumps.
-
Transfer the prepared filling to a piping bag or a sturdy zip-top bag with the corner snipped off. Pipe approximately 1 teaspoon-sized dollops onto the prepared sheet pan. Aim for around 25 dollops. Place the sheet pan in the freezer until the filling dollops are firm, about 20-30 minutes. If the filling becomes too stiff to pipe, microwave for 5-10 seconds to slightly soften.
Assembly & Baking
-
Preheat your oven to 350°F (175°C).
-
Pour the remaining 1/2 cup granulated sugar into a shallow bowl for rolling. Measure out cookie dough balls, each weighing approximately 40 grams (or about 2 packed tablespoons). Flatten a dough ball slightly in your palm, place one frozen filling puck in the center, and carefully wrap the cookie dough around it, ensuring the filling is completely enclosed and sealed. Roll the formed dough ball gently in the granulated sugar until coated.
-
Arrange 8 cookie balls on a silicone-lined baking sheet, spaced about 2 inches apart. Immediately refrigerate the entire baking sheet for 15-20 minutes until the cookies are firm. This secondary chill is crucial for maintaining shape and preventing spread. Bake for 10-12 minutes, being careful not to overbake. The cookies should be lightly golden at the edges but still appear slightly soft in the center for a chewy result.
-
If any cookies have spread unevenly or have irregular edges right out of the oven, use a metal spatula or the back of a spoon to gently press their edges inward to reshape them into perfect circles while still warm. Let the cookies rest on the baking sheet for 5 minutes before carefully transferring them to a wire cooling rack to cool completely. Ensure they are fully cooled before proceeding to glaze.
Glaze
-
In a large bowl, whisk together the 2-1/4 cups powdered sugar, 3 tablespoons milk, 1-1/2 tablespoons light corn syrup, 1-1/2 teaspoons vanilla extract, and 1-1/2 teaspoons ground cinnamon until the mixture is completely smooth and free of lumps. The glaze should be thick but pourable. If it’s too thin, add more powdered sugar a tablespoon at a time until the desired consistency is reached. If too thick, add milk 1/2 teaspoon at a time.
-
Spoon the glaze generously over the completely cooled cookies. Use a toothpick to gently pop any small air bubbles in the glaze for a perfectly smooth finish. Allow the glaze to set at room temperature for about 20 minutes (or longer, depending on humidity) before serving, so it forms a delicate crust.
Recipe Notes
Flour Measurement Tip: Accurate flour measurement is paramount for the perfect cookie texture. Too much flour can result in dry, crumbly cookies, while too little can cause them to spread excessively. For the most precise results, using a digital kitchen scale is highly recommended. Aim for 405 grams (approximately 2-3/4 cups, but weight is more accurate) of all-purpose flour for the cookie dough.
Storage for Unbaked Dough: To prepare ahead, freeze unbaked, unglazed cookie dough balls (with filling enclosed) for 1 hour on a sheet pan until firm. Then, transfer them to a freezer-safe bag or airtight container for up to 3 months. When you’re ready to bake, place them directly from the freezer onto a baking sheet and add an extra few minutes to the baking time. Glaze the cookies after they have fully cooled.
Nutrition
Serving: 1cookie
|
Calories: 253kcal
|
Carbohydrates: 39g
|
Protein: 2.2g
|
Fat: 10.2g
|
Cholesterol: 41.2mg
|
Sodium: 134.8mg
|
Fiber: 0.7g
|
Sugar: 25.6g
Nutrition information is automatically calculated and should only be used as an approximation. It is not a substitute for professional nutritional advice.
Loved this recipe? Leave a comment below!
Your feedback helps us create more delicious content!