
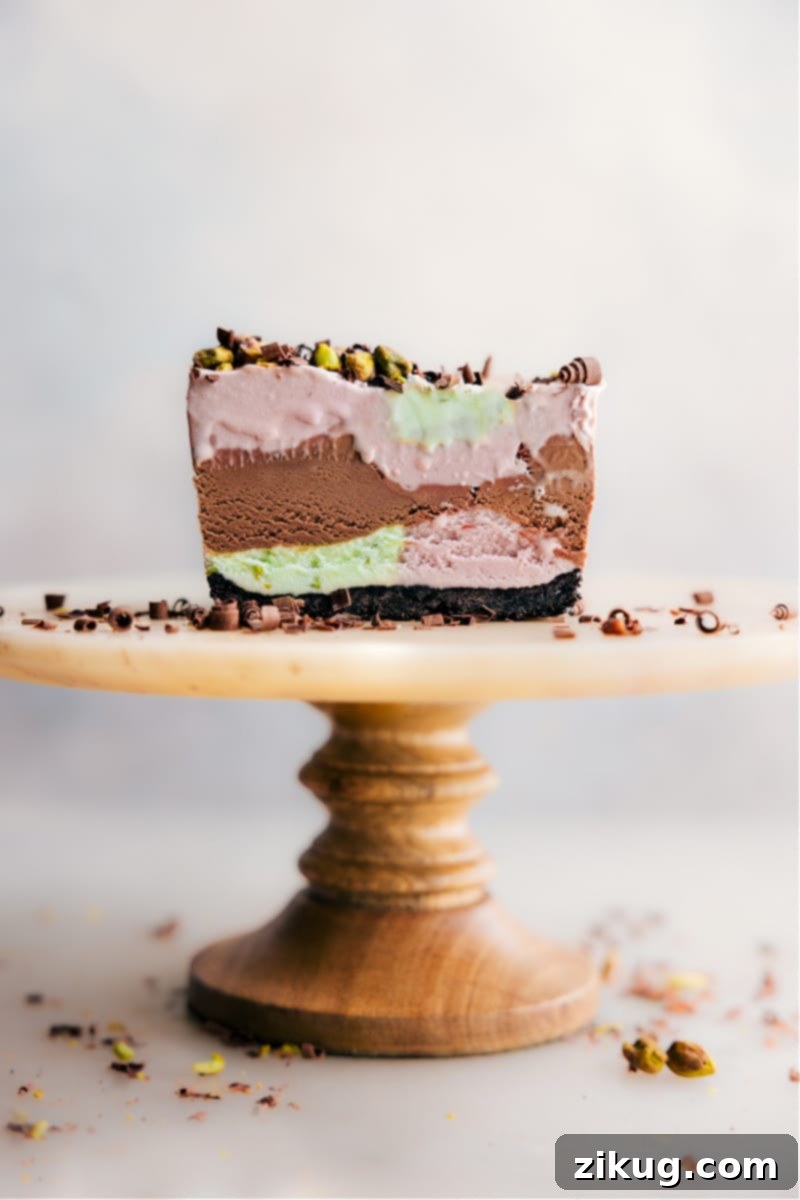
Unveiling the secret to a spectacular yet simple Spumoni Ice Cream Recipe, this guide shows you how to layer the classic flavors of cherry, chocolate (or vanilla), and pistachio into a loaf pan for an effortlessly elegant dessert. Perfect for any gathering or a delightful family treat, these vibrant, layered bars promise a taste of Italy right in your kitchen. Say goodbye to complicated desserts and hello to a refreshing, colorful, and utterly delicious no-bake creation that will impress everyone.
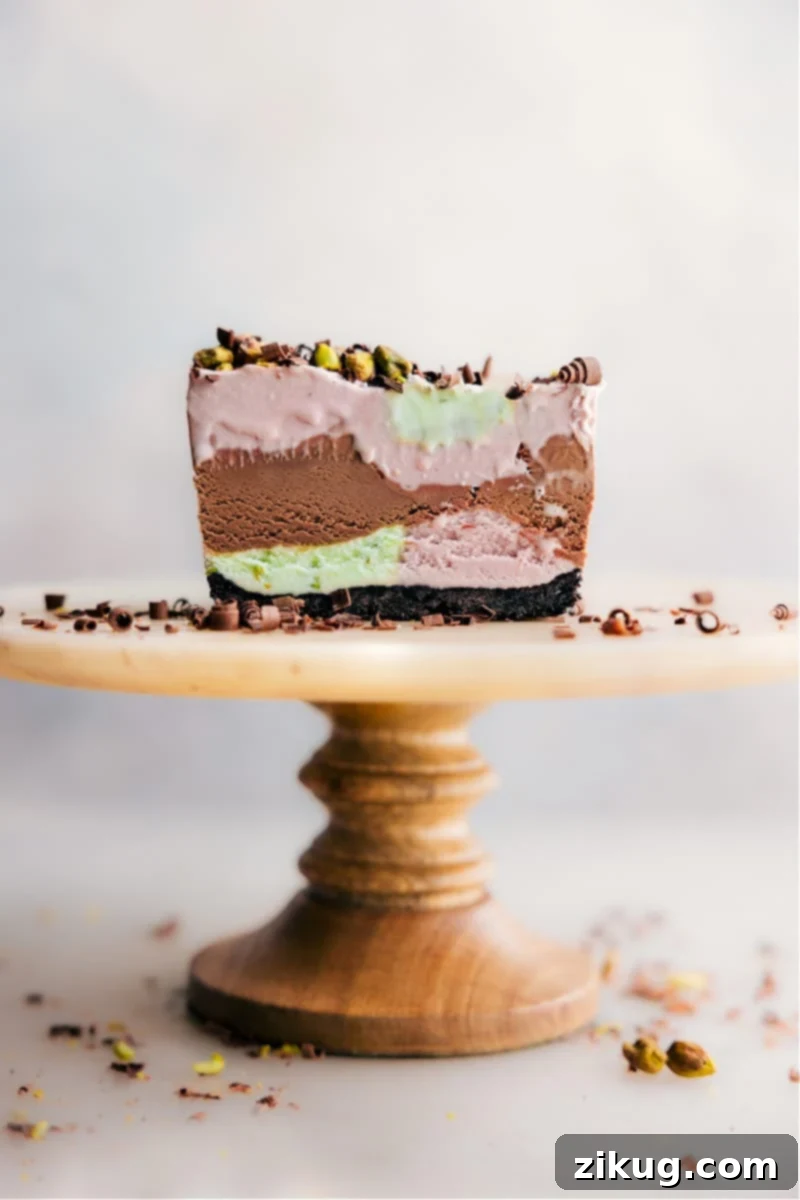

Author’s Note
It Was Love At First Bite!
My first encounter with Spumoni at a charming local Italian restaurant was an unforgettable experience – it was truly love at first bite! The harmonious blend of flavors and textures captivated me instantly. That’s why I’m incredibly excited to share my simplified take on this classic dessert. You won’t need to labor over making three separate homemade ice cream mixtures. Instead, this recipe leverages the convenience of store-bought cherry, pistachio, and chocolate ice creams, layered artfully in a bread pan. The result is a vibrant, flavorful dessert that comes together with remarkable ease, proving that exceptional taste doesn’t have to be complicated!
What Is Spumoni? Unraveling the Italian Delight
Spumoni is a traditional Italian frozen dessert, similar to ice cream, that originated in Naples. The name “Spumoni” itself comes from the Italian word “spuma,” meaning “foam,” which likely refers to its light and airy texture when first made. Typically, Spumoni is characterized by its distinctive layers of different flavored ice creams or gelatos, most commonly pistachio, cherry (or other fruit), and either chocolate or vanilla. These layers are often molded into decorative shapes, sometimes studded with candied fruits, nuts (like candied pecans), or even chocolate shavings, before being frozen solid and sliced to serve. It’s a distant cousin to American Neapolitan ice cream, but with a richer history and often more nuanced flavor combinations and textures, offering a more gourmet experience.
While traditional Spumoni can be quite intricate, often featuring layers of semifreddo or even whipped cream, our easy Spumoni recipe simplifies the process without compromising on flavor or visual appeal. By using readily available, high-quality store-bought ice creams, we can recreate the magic of this Italian classic in a fraction of the time, making it accessible for home cooks everywhere. It’s a perfect way to introduce friends and family to this delightful dessert.
Why You’ll Adore This Easy Spumoni Ice Cream Recipe
There are countless reasons why this particular Spumoni Ice Cream recipe stands out as a must-try dessert:
- Effortlessly Simple: Forget about complex techniques or hours in the kitchen. This is a truly no-bake recipe (aside from an optional crust), making it ideal for novice bakers and seasoned chefs alike.
- Vibrant & Visually Stunning: The distinct layers of cherry, chocolate, and pistachio create a beautiful, eye-catching dessert that’s sure to be the centerpiece of any table.
- Unforgettable Flavor Combination: The classic pairing of fruity cherry, rich chocolate, and nutty pistachio offers a symphony of tastes that’s both refreshing and indulgent.
- Highly Customizable: While we stick to tradition, you have the freedom to experiment with different ice cream flavors or add-ins to tailor it to your preferences.
- Perfect for Any Occasion: Whether it’s a summer barbecue, a holiday feast, or a simple weeknight treat, Spumoni is versatile and always a crowd-pleaser.
- Make-Ahead Convenience: Since it requires overnight freezing, you can prepare this dessert well in advance, freeing up your time on the day of your event.

Key Ingredients for Your Homemade Spumoni Masterpiece
Crafting this delightful Spumoni dessert relies on a few core ingredients. Choosing quality components will elevate your final product from good to truly exceptional. Here’s a closer look at what you’ll need:
- Cherry Ice Cream: This provides a beautiful pink hue and a wonderfully fruity, often slightly tart, contrast to the other flavors. Look for a brand with real cherry pieces or a vibrant cherry flavor profile.
- Chocolate Ice Cream (or Vanilla): A rich chocolate ice cream adds depth and a comforting sweetness. Alternatively, vanilla offers a milder, creamy backdrop, allowing the cherry and pistachio to shine even brighter. The choice is yours based on preference, but both create an incredible experience.
- Pistachio Ice Cream: The star of Spumoni, pistachio ice cream brings a unique nutty flavor and a distinctive green color. Opt for one with actual pistachio pieces for added texture and a more authentic taste.
These three ice cream flavors are the foundation of your Spumoni. Each plays a crucial role in creating the iconic taste and visual appeal. For the optional crust and toppings, you’ll need a few more simple items:
- Unsalted Butter: Essential for binding the Oreo cookie crust.
- Oreos (or similar chocolate sandwich cookies): The base of our crunchy, flavorful crust.
- Salt: A pinch to enhance the flavors of the crust.
- Coarsely chopped pistachios: For an elegant garnish that adds extra crunch and nutty flavor.
- Chocolate bar: For making delicate chocolate curls as an optional, sophisticated topping.
Spumoni Ice Cream with an Irresistible Oreo Cookie Crust
While traditional Spumoni often foregoes a crust, I find that adding a crunchy Oreo crust takes this easy Spumoni recipe to the next level. It introduces a delightful textural contrast and an extra layer of chocolatey goodness that perfectly complements the creamy ice cream layers. This addition is entirely optional, but highly recommended for those who love a little extra crunch and flavor in their frozen desserts.
Here are some essential tips to ensure your Oreo crust is absolutely perfect:
- Cool or Bake for Texture: You have a choice here! Baking the crust for about 8 minutes will give you a firmer, crispier texture with a slightly toasted flavor. If you prefer a softer, chewier crust that melts more readily with the ice cream, simply chill it in the fridge until firm instead of baking.
- Ensure Complete Cooling: This is a critical step! Whether you bake or chill your crust, it must be completely cool before you even think about adding the ice cream. Warmth from the crust will cause your ice cream to melt immediately, ruining the distinct layers.
- Select the Right Oreos: Stick to regular Oreos for the best results. Double Stuff or flavored varieties can alter the consistency and flavor balance of the crust.
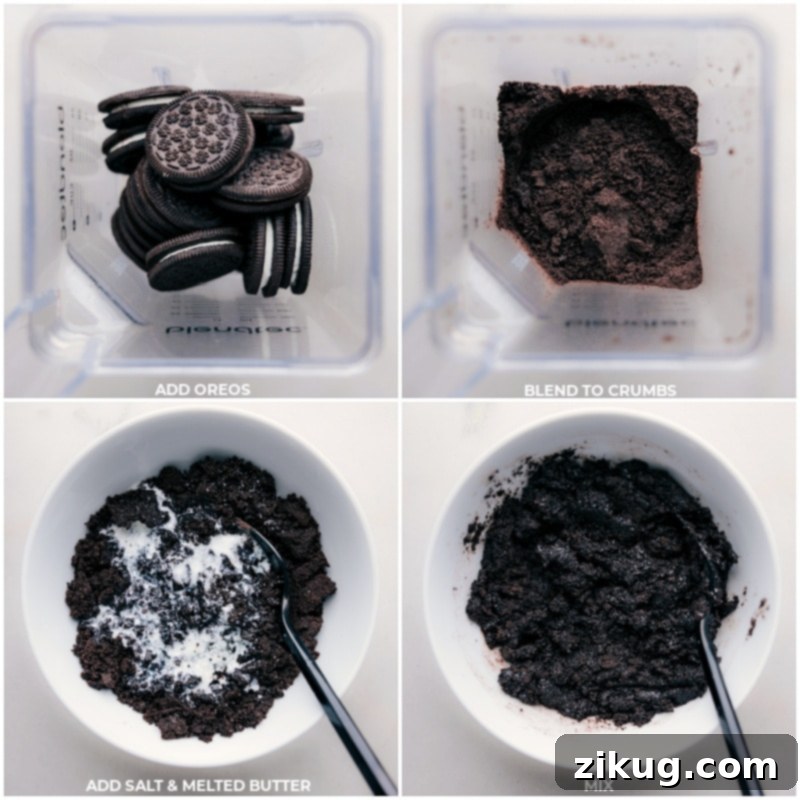
- Finely Crush the Cookies: Use a blender or food processor to crush your Oreos into fine, even crumbs. Large chunks won’t bind together properly, leading to a crumbly and unstable crust. The finer the crumbs, the sturdier your base will be.
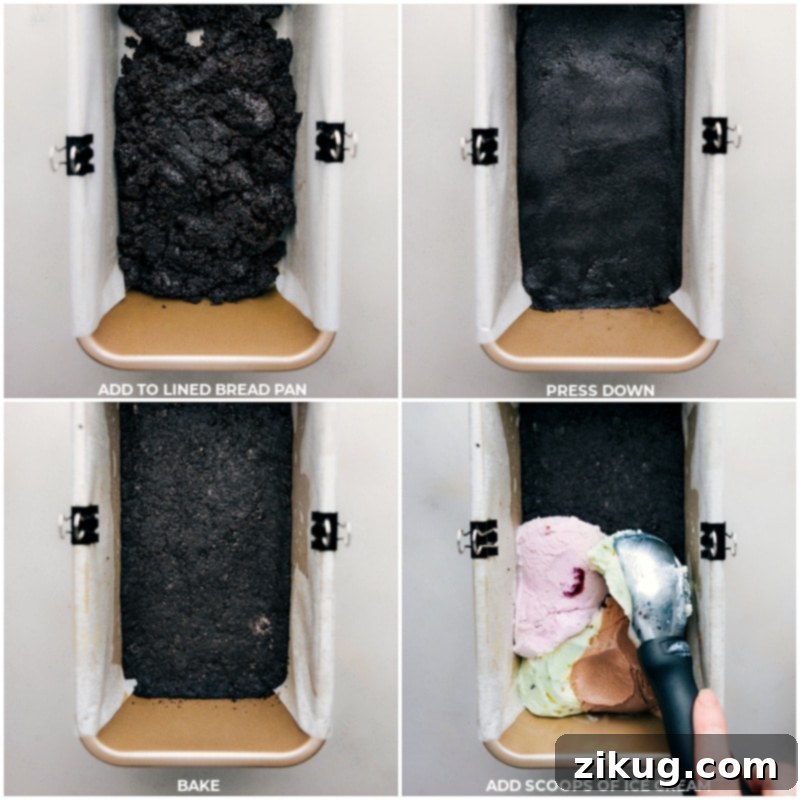
- Press Down Firmly: Once your cookie mixture is in the pan, press it down with considerable force. The bottom of a flat-bottomed measuring cup or glass works perfectly for this. A compact crust will hold its shape better when sliced and provide a satisfying bite.
How To Make Spumoni Ice Cream (Expert Tips for Perfection)
Creating beautiful, distinct layers of Spumoni is easier than you think, especially with these helpful tips:
- Invest in Quality Ice Cream: As good-quality ice cream forms the core of this easy Spumoni recipe, don’t skimp here. Premium brands offer richer flavor, a creamier texture, and tend to melt more slowly, which is beneficial during the layering process and when serving. This makes a noticeable difference in the final taste and mouthfeel of your homemade Spumoni.
- Soften Ice Cream Slightly: For effortless layering, allow each ice cream flavor to soften at room temperature for about 10-15 minutes before you begin. It should be soft enough to scoop and spread smoothly but not completely melted. This ensures seamless layers that adhere well to each other.
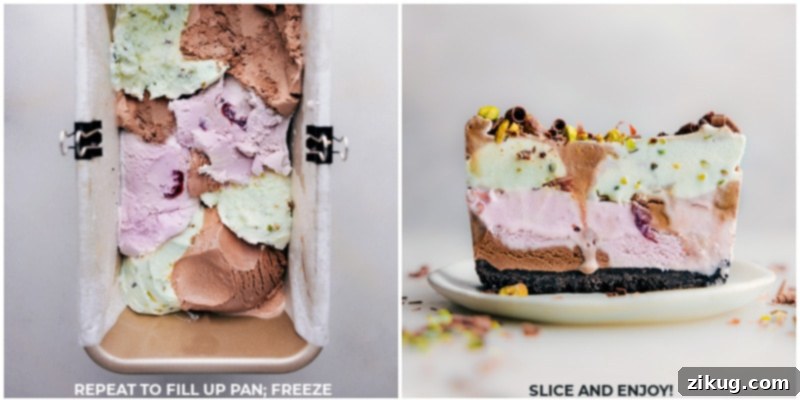
- Press Ice Cream Layers Firmly: When adding each scoop of ice cream, press it down firmly and evenly across the crust or the previous layer. Use the back of your ice cream scooper or a spatula to create a compact, smooth layer. This technique is crucial for achieving smooth, solid slices that hold their shape beautifully.
- Always Use Parchment Paper: Lining your loaf pan with parchment paper, leaving a generous overhang on the sides, is a non-negotiable step. This simple trick makes removing the frozen Spumoni from the pan incredibly easy and also aids in cleanup. You’ll be thankful for it when it’s time to slice and serve!
- Freeze Completely for Best Results: Patience is key here. Ensure your Spumoni is frozen completely solid, ideally overnight or for at least 8 hours. This ensures neater slices and helps the layers maintain their distinct shapes, preventing any melty mishaps.
- Slice with a Warm Knife: For perfectly clean and elegant slices, run a sharp knife under hot water for a few seconds, then wipe it dry. The warm blade will glide through the frozen ice cream with ease, creating pristine bars. Repeat this process for each slice.
Optional Spumoni Ice Cream Recipe Toppings & Sauces
While Spumoni is absolutely delicious on its own, adding a topping can introduce an extra layer of flavor and texture, transforming it into an even more decadent dessert. Here are a couple of ideas, including a delightful homemade tart cherry sauce:
Simple Toppings
- Chopped Pistachios: A sprinkle of coarsely chopped pistachios not only enhances the nutty flavor already present in the pistachio ice cream but also adds a pleasing crunch and a pop of green color.
- Chocolate Curls: For an elegant touch, grate a chocolate bar into delicate curls over your Spumoni bars just before serving. The rich chocolate adds visual appeal and a luxurious melt-in-your-mouth texture. (See Note 2 in the recipe card for an easy technique).
Homemade Tart Cherry Sauce
This vibrant, tangy sauce beautifully complements the sweetness of the ice cream and accentuates the cherry flavor. It’s a fantastic way to add a gourmet touch to your easy Spumoni.
Ingredients for Cherry Sauce:
- 1-1/2 cups tart cherries (pitted, thawed if frozen)
- 6 tbsp white sugar
- 1 tsp cornstarch mixed with 1 tsp water
Instructions for Cherry Sauce:
- In a medium saucepan, combine the pitted cherries and white sugar. Bring the mixture to a gentle simmer over medium heat. Continue to simmer for about 10 minutes, stirring occasionally, until the cherries have softened and released their juices.
- In a small bowl, whisk together the cornstarch and water until you have a smooth slurry. Gradually stir this cornstarch mixture into the simmering cherry sauce. Cook for an additional 2 minutes, stirring continuously, until the sauce has visibly thickened.
- For a smoother sauce, strain the cherry mixture through a fine-mesh sieve, pressing the solids with the back of a spoon to extract all the liquid. Discard any remaining pulp.
- Allow the sauce to cool completely. For best results, chill it in the refrigerator until ready to use. Drizzle generously over your Spumoni bars just before serving for an explosion of tart-sweet flavor.
Spumoni Variations & Creative Customizations
The true charm of this easy Spumoni recipe lies in its incredible adaptability. While the classic cherry, chocolate, and pistachio combination is divine, don’t hesitate to unleash your creativity and make it uniquely yours!
- Flavor Freedom: Pick any three (or even just two) of your absolute favorite ice cream flavors. Imagine layers of coffee, salted caramel, and vanilla bean, or a tropical blend of mango, coconut, and raspberry. The possibilities are endless!
- Add Textural Delights: Between each ice cream layer, consider adding a sprinkle of chopped nuts (walnuts, almonds, pecans), mini chocolate chips, shredded coconut, or even a thin layer of fruit preserves for an extra burst of flavor and texture.
- Crust Alternatives: Beyond the Oreo crust, you could try a classic graham cracker crust, a shortbread cookie crust, or even a crushed wafer cookie crust. Each will lend a different dimension to your Spumoni bars.
- Spices and Extracts: A hint of almond extract in your pistachio layer or a dash of cinnamon in the chocolate can introduce subtle, sophisticated notes.
- Boozy Bliss: For an adult-only version, lightly drizzle a complementary liqueur (like amaretto, kirsch, or an orange liqueur) over an ice cream layer before freezing.
There are so many wonderful ways to get creative and personalize this recipe to suit any taste or occasion. Let your imagination guide you!
Storage Tips for Your Spumoni Ice Cream Bars
To keep your delicious Spumoni Ice Cream Bars in perfect condition and prevent ice crystal formation, proper storage is essential:
- Promptly Return Leftovers to the Freezer: Like all ice cream desserts, Spumoni thaws relatively quickly, especially when exposed to room temperature. To preserve its creamy texture and quality, it’s crucial to return any uneaten portions to the freezer as soon as possible after serving.
- Store in an Airtight Container: Transfer any leftover Spumoni bars into a closed, airtight container. This barrier prevents freezer burn and protects the ice cream from absorbing odors from other foods in your freezer, maintaining its fresh flavor.
- Longevity: Properly stored, your homemade Spumoni can last for up to 2-3 weeks in the freezer, ready to be enjoyed whenever a craving strikes.
Frequently Asked Questions (FAQs) About Spumoni Ice Cream
Here are answers to some common questions you might have about making this easy Spumoni recipe:
- Can I use homemade ice cream for this recipe? Absolutely! If you have the time and desire, using homemade cherry, chocolate, and pistachio ice creams will undoubtedly take this dessert to an even more gourmet level. Just ensure they are firm enough for layering.
- What if I don’t have a loaf pan? No problem! You can use any similarly sized rectangular or square pan, such as an 8×8 inch baking dish. Just adjust the amount of ice cream slightly if your pan is larger, or simply make thinner layers. Ensure you still line it with parchment paper for easy removal.
- How do I prevent the ice cream layers from mixing? The key is to ensure each layer is pressed firmly and the ice cream is softened just enough to spread, but not liquid. After spreading a layer, you can pop the pan back into the freezer for 10-15 minutes to firm it up slightly before adding the next flavor.
- Can I add nuts or candied fruit directly into the ice cream layers? Yes, you can! For a more traditional Spumoni feel, gently fold chopped nuts or small pieces of candied fruit into each ice cream flavor before layering. This adds fantastic texture and flavor throughout the dessert.
- How long does it take for Spumoni to freeze solid? For best results, allow at least 8 hours of freezing time, or ideally, overnight. This ensures the dessert is completely firm, making it much easier to slice into clean, beautiful bars.
More Delicious Ice Cream Treats You’ll Love:
Desserts
Strawberry Cheesecake Ice Cream Cake
Desserts
Ice Cream Pie
Desserts
Brownie Oreo Ice Cream Bars
Desserts
Mississippi Mud Pie
Pin
Spumoni Ice Cream Recipe
Chelsea Lords
20 minutes
10 minutes
8 hours
8 hours 30 minutes
8 slices
Equipment
-
8.5 x 4.5-inch bread pan
-
Parchment paper
-
Blender or food processor
Ingredients
- 2 tablespoons unsalted butter melted
- 12 Oreos or other chocolate sandwich cookie
- 1/8 teaspoon salt
- 14 ounces cherry ice cream see note 1
- 14 ounces chocolate ice cream or vanilla ice cream
- 14 ounces pistachio ice cream
- Coarsely chopped pistachios optional, for garnish
- 1 chocolate bar for chocolate curls, optional, see note 2
Instructions
-
Line an 8.5 x 4.5-inch bread pan with parchment paper, ensuring there’s enough overhang on the sides for easy removal later. This step is crucial for effortlessly lifting your frozen dessert from the pan.
-
If making the optional Oreo crust, preheat your oven to 350°F (175°C). Melt the unsalted butter in a microwave-safe bowl. In a blender or food processor, process the whole Oreo cookies (no need to separate the cookie from the cream) until they form very fine crumbs. Combine these cookie crumbs with the melted butter and a pinch of salt; mix thoroughly until well combined. Press this mixture firmly and evenly along the bottom of the prepared pan. Use the bottom of a flat measuring cup or a glass to compress the crumbs into a solid, stable crust. Bake in the preheated oven for 8 minutes, then set aside to cool completely to room temperature before adding any ice cream. This cooling step is vital to prevent the ice cream from melting prematurely.
-
Once the Oreo crust has completely cooled, begin filling the pan with alternating layers of cherry, chocolate (or vanilla), and pistachio ice cream. Start with one flavor, scoop it into the pan, and press it down firmly with the back of the ice cream scooper or a spatula to create an even layer. Repeat with the next two flavors, ensuring each layer is compact and smooth. (Optional: For added texture and flavor, you can add a thin layer of chopped nuts or dried fruit between each ice cream flavor.) Level the top surface of the ice cream layers, cover the pan tightly with plastic wrap or aluminum foil, and freeze overnight or until the dessert is completely solid.
-
When ready to serve, use the overhanging parchment paper to carefully lift the frozen Spumoni dessert from the pan. Place it on a cutting board. For neat, clean slices, run a sharp knife under hot water, wipe it dry, and then slice the Spumoni into desired bars (see note 3 for detailed hot knife tip). Serve immediately. Optionally, garnish each bar with chopped pistachios and delicate chocolate curls (see note 2) if desired, for an extra touch of elegance. Promptly return any leftover Spumoni (covered tightly in an airtight container) to the freezer to maintain its texture and quality.
Recipe Notes
Note 2: To effortlessly create elegant chocolate curls, unwrap a chocolate bar. Hold it firmly and use a vegetable peeler to shave thin curls directly from the side of the chocolate bar over your Spumoni dessert. The larger the chocolate bar, the easier it is to make bigger curls.
Note 3: For exceptionally clean cuts when slicing your frozen Spumoni, use a hot, sharp knife. Run your knife under hot tap water for several seconds, then quickly dry it with a towel. The warmed blade will glide through the dense ice cream layers, producing perfectly smooth edges. Re-warm and wipe the knife after every one or two slices for the best results.
Nutrition Note: The provided nutrition information includes the optional cookie crust but does not account for any additional optional fruit, nuts, or sauces. Please note that the nutritional values will also vary depending on the specific brands of ice cream and ingredients you choose to use. This information should be used as an approximation.
Storage: To maintain the optimal texture and quality of your Spumoni, always return any leftovers to the freezer promptly. Store the dessert in a closed, airtight container to prevent freezer burn and keep it fresh.
Nutrition
Calories: 414kcal |
Carbohydrates: 52g |
Protein: 6g |
Fat: 21g |
Saturated Fat: 12g |
Polyunsaturated Fat: 1g |
Monounsaturated Fat: 5g |
Trans Fat: 0.1g |
Cholesterol: 61mg |
Sodium: 177mg |
Potassium: 358mg |
Fiber: 2g |
Sugar: 30g |
Vitamin A: 662IU |
Vitamin C: 4mg |
Calcium: 182mg |
Iron: 3mg
Nutrition information is automatically calculated, so should only be used as an approximation.
Love this Easy Spumoni? Share Your Thoughts Below!