
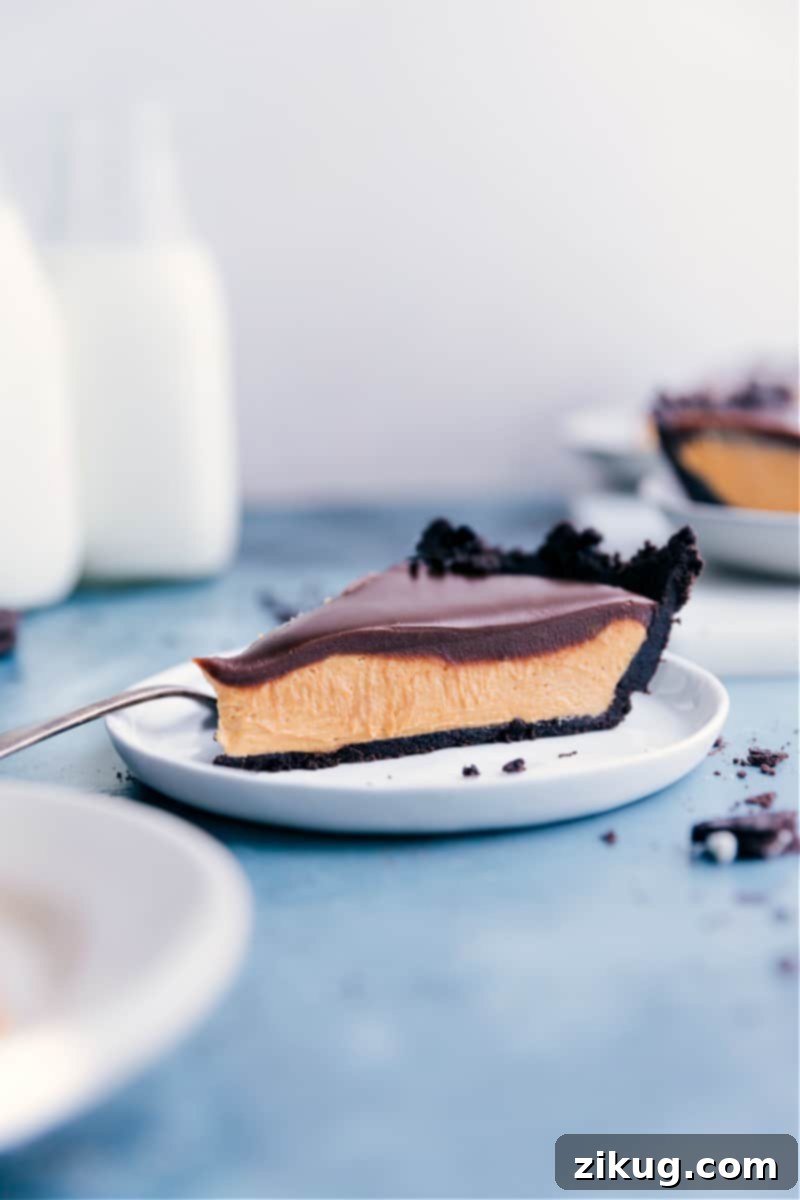
Peanut Butter Chocolate Pie is an absolute dream for anyone who loves the classic combination of sweet, salty, and utterly decadent flavors. This easy, no-bake dessert starts with a simple, buttery Oreo cookie crust, builds into a thick, sweet peanut butter filling, and finishes with a silky-smooth chocolate ganache topping. It’s a guaranteed crowd-pleaser that requires no oven and minimal effort, making it perfect for any gathering or a delightful treat at home.

Author’s Note
Experience a Peanut Butter Cup in Luxurious Pie Form!
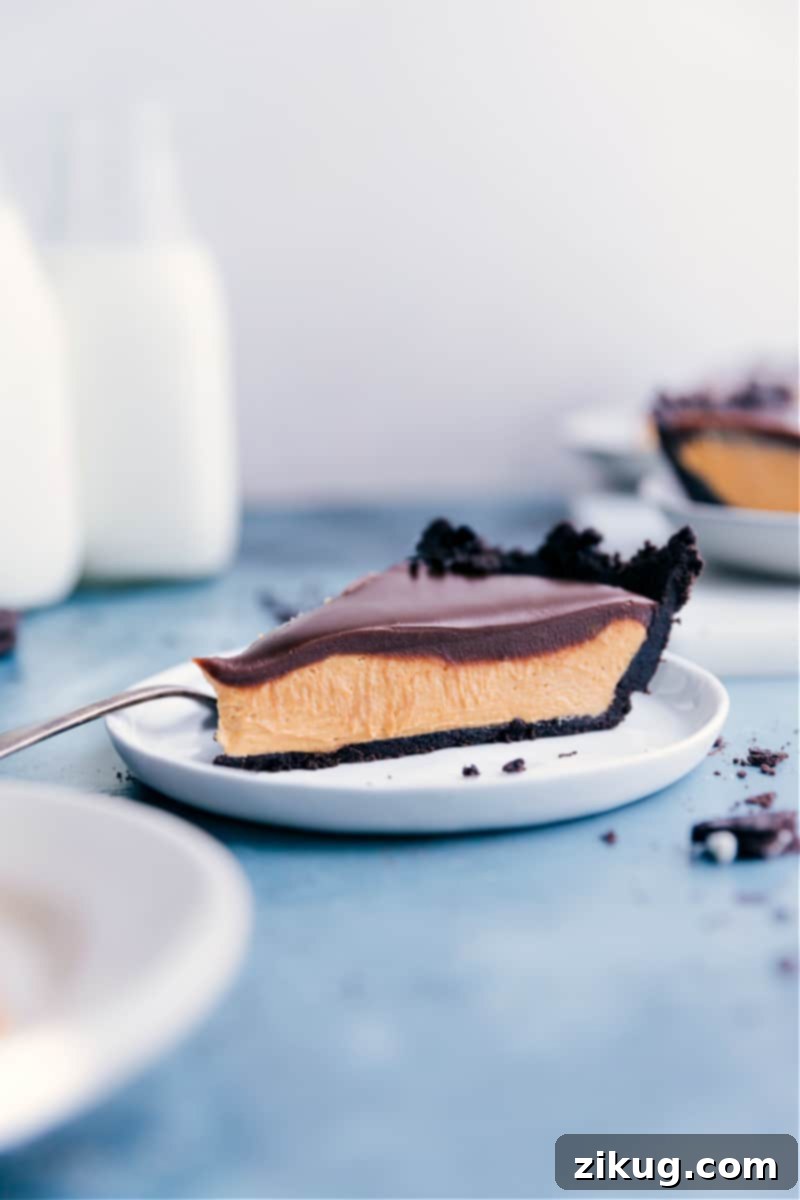
If you’ve ever tried my No-Bake Peanut Butter Cheesecake, you know it’s a huge hit in my family—it disappears almost as soon as it’s made! Today, I’m thrilled to share an even simpler, yet equally (if not more!) irresistible version: a stunning no-bake pie that captures all those beloved flavors.
Like its cheesecake cousin, this pie features a crunchy Oreo® cookie crust, a creamy peanut butter filling, and a decadent chocolate ganache. However, this pie’s filling takes the sweetness and peanut flavor to a whole new level, reminiscent of your favorite peanut butter cup candy. The texture is wonderfully lighter and airier, melting in your mouth more like a rich frosting than a dense cheesecake.
The best part? This magnificent dessert sets beautifully in just a few hours, making it perfect for last-minute gatherings or when you need a quick, impressive treat. If you’re a true enthusiast of the iconic peanut butter and chocolate pairing, prepare to be utterly obsessed with this Peanut Butter Chocolate Pie!
Why This No-Bake Peanut Butter Chocolate Pie Is a Must-Try
This dessert isn’t just easy; it’s a harmonious blend of textures and flavors that will delight every palate. Here’s why you’ll fall in love with this no-bake wonder:
- Effortless Elegance: No baking means no stress! This pie comes together quickly, making it ideal for busy schedules or hot summer days when you want to avoid turning on the oven.
- Irresistible Flavor Combination: The timeless duo of peanut butter and chocolate is elevated here, with each layer contributing to a symphony of sweet and salty notes.
- Perfect Texture Play: Enjoy the satisfying crunch of the Oreo crust, followed by the smooth, airy peanut butter filling, and topped with a luscious, melt-in-your-mouth chocolate ganache.
- Crowd-Pleasing Perfection: Whether it’s a casual family dinner, a birthday celebration, or a holiday feast, this pie is always a hit and will have everyone asking for the recipe.
Mastering the Oreo Crust: Tips for a Flawless Base
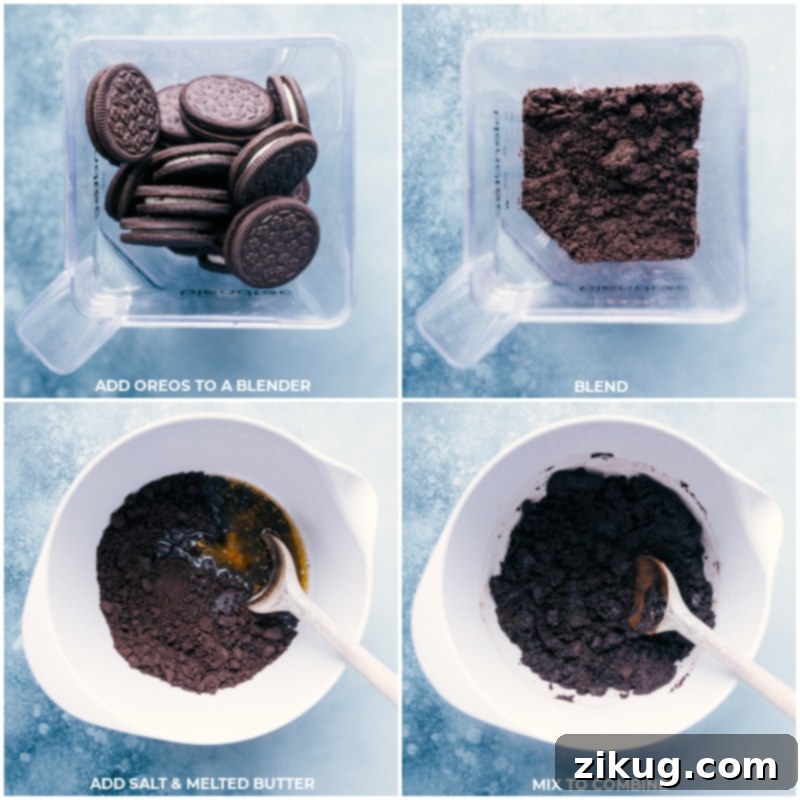
The foundation of this incredible pie is its simple yet crucial Oreo crust. Getting it right ensures a sturdy, flavorful base that perfectly complements the creamy filling. Here’s how to create a perfect crust every time:
- Achieve Fine Crumbs: For the smoothest slices and a cohesive crust, it’s essential to crush your Oreos thoroughly. Use a food processor for the best results, blending until they resemble fine, even crumbs. While larger chunks can still taste great, they won’t yield the neat, clean slices you desire for an elegant presentation.
- Cool the Butter: After melting your butter, allow it to cool slightly before mixing it with the Oreo crumbs. Adding hot butter can make the crust greasy and harder to press firmly into the pan, potentially leading to a crumbly base. Lukewarm butter helps bind the crumbs without liquefying them too much.
- Keep the Creme Filling: Don’t remove the white creme filling from the Oreos! This sweet, creamy layer is vital. It adds an extra layer of sweetness and, more importantly, acts as a binder, helping the crust hold its shape much better once chilled.
- No Extra Sugar Needed: Thanks to the inherent sweetness of the Oreo cookies, particularly their creme filling, there’s absolutely no need to add additional sugar to your crust mixture. This keeps the sweetness balanced and prevents it from being overly sugary, allowing the peanut butter filling to shine.
Crafting the Perfect Peanut Butter Filling: Smooth, Sweet, and Irresistible
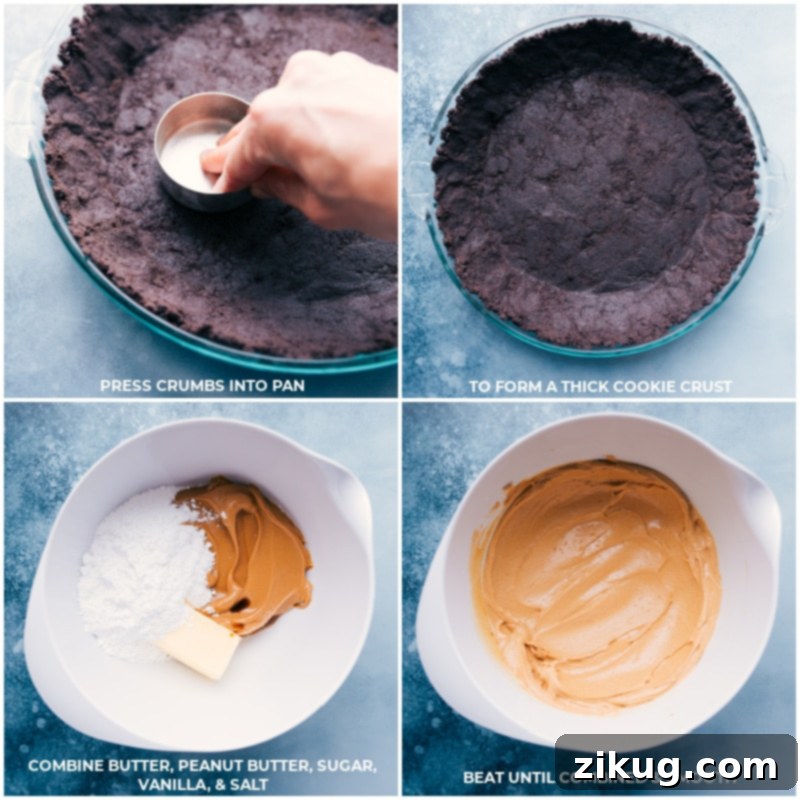
The heart of this pie is its incredibly rich and airy peanut butter filling. Achieving that perfect balance of sweetness, creaminess, and intense peanut flavor is key. Follow these guidelines for a filling that truly stands out:
- Choose the Right Peanut Butter: Opt for sweetened, creamy peanut butter like Skippy® or Jif®. These brands are formulated to be smooth and consistent, which is crucial for a no-bake filling that holds its texture and prevents separation. Avoid natural, stir-type peanut butter, as its oil tends to separate from the solids, leading to a less stable and potentially greasy filling.
- Room Temperature Butter is Essential: Always use room temperature unsalted butter, not melted butter, for the filling. Softened butter creamed with peanut butter and powdered sugar creates that light, airy, and stable texture. Melted butter will make the filling too thin and oily, preventing it from setting properly.
- Stick to Creamy Peanut Butter: While crunchy peanut butter is delicious in other applications, for this pie, you want a perfectly smooth and uniform filling. Crunchy bits would disrupt the desired silky texture, so save those for your sandwiches!
- Powdered Sugar Only: This is perhaps the most important tip for the filling. Since the pie isn’t baked, granulated sugar or other sugar types won’t dissolve, leaving your filling grainy and unpleasant. Powdered sugar (confectioners’ sugar) dissolves beautifully into the mixture, ensuring a wonderfully smooth and fine texture.
Quick Tip: Getting Butter to Room Temperature
For the ideal filling consistency, your butter should be soft enough to indent with a finger but not so soft that it’s oily or squishy. Generally, setting it out about an hour before you start baking is sufficient. If you’re in a rush, don’t fret! There are several quick methods to soften butter, such as cutting it into small cubes, gently microwaving it for short bursts (5-10 seconds), or placing it near a warm stove.
The Decadent Chocolate Ganache Topping: A Silky Finish
The grand finale to this amazing pie is a luscious chocolate ganache topping. This layer adds a rich, glossy finish and deep chocolate flavor that perfectly balances the sweet peanut butter. Here’s how to make it shine:
- Quality Chocolate Matters: For the best flavor and smoothest melt, use high-quality milk chocolate chips (or semi-sweet, depending on your preference). Premium chocolate melts more evenly and results in a silkier, more stable ganache. Cheaper brands often contain more stabilizers and less cocoa butter, which can lead to a waxy texture and difficulty achieving a smooth consistency.
- The Importance of Resting: After pouring the hot heavy cream over the chocolate chips and peanut butter, resist the urge to stir immediately. Covering the bowl and letting the mixture sit undisturbed for 5 minutes allows the hot cream to melt the chocolate thoroughly. This passive melting process is crucial for achieving a smooth, clump-free ganache once stirred.
- Decorate with Flair: Don’t worry if your ganache topping isn’t perfectly glossy or has a minor imperfection. A beautiful garnish can elevate the presentation instantly! Consider adding elegant chocolate curls, a sprinkle of finely chopped peanuts for added crunch, or even chopped Reese’s Peanut Butter Cups for an extra indulgent touch. These additions not only enhance the visual appeal but also add delightful textures.
How To Make This Irresistible Peanut Butter Chocolate Pie
Creating this show-stopping no-bake pie is surprisingly simple. Just follow these three main steps, and you’ll have a dessert that looks and tastes like it came from a gourmet bakery!
- Prepare the Crust: Start by blending whole Oreo cookies until they form fine crumbs. Mix these crumbs with melted butter and a pinch of salt until a thick, cohesive dough forms. Press this mixture firmly into a 9-inch pie pan, ensuring an even layer on the bottom and up the sides. Place the crust in the freezer to chill while you prepare the filling.
- Craft the Filling: In a large mixing bowl, combine all the creamy peanut butter filling ingredients. Using a stand or hand mixer, beat on low speed until the mixture is completely smooth and thoroughly combined. Be careful not to overbeat, as this can incorporate too much air and affect the final texture. Gently spread this luscious filling over the chilled Oreo crust in an even layer. Return the pie to the freezer to set further while you make the topping.
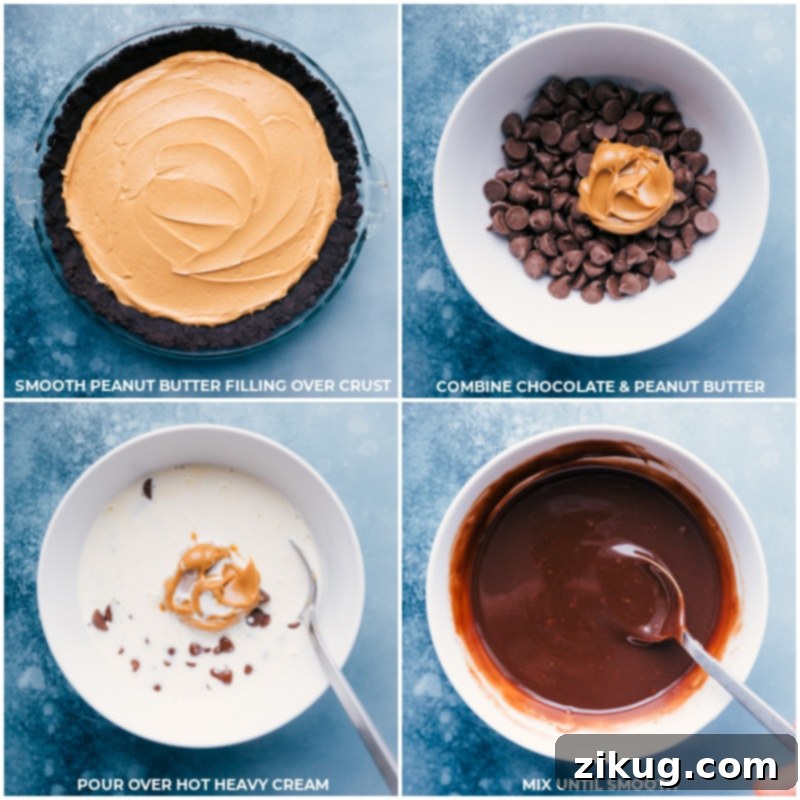
- Create the Topping: In a heat-proof bowl, combine your chosen chocolate chips and the specified amount of creamy peanut butter. Heat the heavy cream until it’s hot but not boiling (a microwave works perfectly for this). Pour the hot cream directly over the chocolate and peanut butter mixture. Cover the bowl immediately with a sheet pan or a pot lid and let it sit undisturbed for 5 minutes. This allows the heat to gently melt the chocolate. After 5 minutes, uncover and stir with a spoon until the mixture is completely smooth and glossy. Pour this decadent ganache over the peanut butter layer and gently spread it to create an even, beautiful chocolate layer. Place the entire pie in the refrigerator and chill until it is firm, which typically takes about 1 to 3 hours.
Expert Tips for a Flawless No-Bake Pie
Even though this pie is incredibly easy, a few extra tips can ensure your dessert is absolutely perfect every time:
- Read Through the Recipe First: Before you begin, take a moment to read the entire recipe. This helps you understand the steps, gather all your ingredients, and ensure you have all the necessary equipment on hand.
- Accurate Measurements: Baking and dessert making, even no-bake, benefits from precise measurements. Use proper measuring cups and spoons to ensure the right balance of ingredients for optimal taste and texture.
- Don’t Rush the Chilling: The chilling time is crucial for this no-bake pie. Allowing each layer to set properly ensures clean slices and a stable structure. Rushing this step can lead to a messy, unset pie. Patience is key!
- Hot Knife for Clean Slices: To achieve beautifully clean slices of your chilled pie, always use a sharp knife that has been run under hot water and then wiped dry. Reheat the knife between slices for the best results.
- Room Temperature for Flavor: While the pie needs to be chilled to set, serving it slightly closer to room temperature (after sitting out for 10-15 minutes) can enhance the flavors and soften the texture, making it even more enjoyable.
Storage Solutions for Your Peanut Butter Chocolate Pie
Wondering how to keep your delicious Peanut Butter Chocolate Pie fresh? Here’s everything you need to know for storing leftovers and making it ahead of time:
- Refrigerator Storage: To store the pie in the refrigerator, ensure it is covered exceptionally well with plastic wrap or aluminum foil. This prevents it from absorbing other odors in the fridge and keeps it fresh. When properly covered, your pie will stay delightful for up to 5 days.
- Freezer Storage: For longer storage, this pie freezes beautifully! Wrap the entire pie or individual slices tightly first in plastic wrap, then in aluminum foil. This double layer provides excellent protection against freezer burn. It can be frozen for up to 1 month. When you’re ready to enjoy it, simply transfer it to the refrigerator and let it thaw completely before serving.
Frequently Asked Questions (FAQs)
Here are answers to some common questions you might have about making this delicious pie:
- Can I use a different type of crust? While the Oreo crust is classic and highly recommended, you could experiment with a graham cracker crust or even a digestive biscuit crust for a different flavor profile. Just ensure any alternative crust is also no-bake and uses enough binder to hold together.
- What if my ganache isn’t smooth? If your ganache has lumps, it’s likely due to the chocolate not melting completely or being stirred too soon. You can gently reheat it over a double boiler or in short microwave bursts (5-10 seconds), stirring well after each, until smooth. Be careful not to overheat.
- Can I make this pie dairy-free? Yes, with some substitutions. Use dairy-free Oreos (check ingredients), plant-based butter alternatives (for both crust and filling), dairy-free creamy peanut butter, dairy-free chocolate chips, and a plant-based heavy cream substitute (like full-fat coconut cream, chilled, with the thick cream scooped off the top).
- How can I make the peanut butter flavor even stronger? For an intensified peanut butter flavor, you can slightly increase the amount of peanut butter in the filling (ensure the consistency remains stable) or swirl a little extra melted peanut butter into the ganache before spreading.
- Can I prepare this pie ahead of time? Absolutely! This pie is an excellent make-ahead dessert. You can prepare it a day or two in advance and store it covered in the refrigerator. In fact, the flavors often meld and deepen beautifully after a day of chilling.
More Chocolate And Peanut Butter Delights:
If you can’t get enough of the magical pairing of chocolate and peanut butter, explore these other fantastic recipes:
Desserts
Peanut Butter Crunch Candy
Desserts
Peanut Butter Brownie Bites
Snacks
Chocolate Peanut Butter Snack Mix
Desserts
Scotcheroos Recipe

★★★★★ (5 out of 5 stars from 1 vote)
Peanut Butter Chocolate Pie
By Chelsea Lords
This delightful Peanut Butter Chocolate Pie begins with a crunchy Oreo cookie crust, filled with a rich and creamy peanut butter blend, and crowned with a smooth, glossy chocolate ganache. Best of all, it requires absolutely no baking!
Prep Time: 20 minutes
Chilling Time: 1 hour
Total Time: 1 hour 20 minutes
Servings: 8 servings
Print Recipe
Video Tutorial
Watch how to make this delicious pie:
For a visual guide, check out the full recipe video above!
Equipment You’ll Need
- Pie pan (9-inch)
- Blender or food processor
- Stand mixer (or hand mixer)
- Heat-proof bowl
- Spatula
- Measuring cups and spoons
Ingredients
Crust
- 25 Oreos (about 1 and 3/4 cups crumbs)
- 4 tablespoons unsalted butter, melted and cooled
- 1/16 teaspoon salt
Filling
- 1-1/2 cups creamy peanut butter (such as Skippy® or Jif®)
- 8 tablespoons unsalted butter, room temperature (see note 1)
- 1/2 tablespoon vanilla extract
- 1 cup powdered sugar (confectioners’ sugar)
- 1/8 teaspoon salt
Topping
- 1 cup milk chocolate chips (or semi-sweet, your preference)
- 2 tablespoons creamy peanut butter
- 1/2 cup heavy cream
Instructions
- Prepare the Crust: In a blender or food processor, blend whole Oreos until they are entirely crumbled into fine crumbs. Measure to ensure you have a full 1 and 3/4 cups of crumbs, then transfer them to a bowl. Add the cooled melted butter and a tiny pinch of salt. Stir until the mixture forms a thick, uniform dough. Press this mixture firmly into a 9-inch pie pan. Use the bottom of a flat-bottomed cup or your fingers to ensure the crust is tightly packed into the bottom and up the sides of the pan. Place the prepared crust in the freezer to chill and set while you prepare the filling.
- Make the Peanut Butter Filling: In a large mixing bowl, combine all the ingredients for the peanut butter filling: creamy peanut butter, room temperature unsalted butter, vanilla extract, powdered sugar, and salt. Using a stand mixer fitted with the paddle attachment (or a hand mixer), beat on low speed until the mixture is completely combined, smooth, and creamy. Be careful not to overbeat, as this can make the filling too airy. With a spatula, gently transfer the filling onto the chilled Oreo crust and spread it evenly across the bottom. Return the pie to the freezer to continue setting while you prepare the topping.
- Craft the Chocolate Ganache Topping: Add the chocolate chips and the 2 tablespoons of creamy peanut butter to a heat-proof bowl. In a microwave-safe container, heat the heavy cream for 30–60 seconds, or until it is hot but not actively boiling. Pour the hot cream directly over the chocolate chips and peanut butter in the bowl. Immediately cover the bowl with a sheet pan or a pot lid and let it sit undisturbed for 5 minutes. This allows the heat from the cream to melt the chocolate. After 5 minutes, uncover and stir gently with a spoon or whisk until the mixture is completely smooth and glossy. Pour this luscious ganache over the peanut butter layer on the pie and carefully spread it into an even layer. Place the entire pie in the refrigerator and chill until it is completely firm, which will take approximately 1–3 hours.
- Slice and Serve: Once the pie is firm, use a sharp knife that has been run under hot water and thoroughly dried to slice it. Reheat and wipe the knife between each slice for the cleanest cuts. Serve immediately and return any leftover pie slices to the refrigerator, covered.
Recipe Notes
Note 1: If you need to quickly bring butter to room temperature, there are several effective methods. You can cut it into smaller pieces to expose more surface area, or gently microwave it on very low power in 5-10 second intervals, turning often, until softened but not melted. You can also place the wrapped butter in a bowl of warm water for about 10-15 minutes.
Storage: To store your delicious Peanut Butter Chocolate Pie, cover it tightly with plastic wrap or aluminum foil to protect it from drying out and absorbing other odors. Keep it refrigerated for up to 5 days. For longer preservation, wrap the pie (or individual slices) first in plastic wrap, then in a layer of aluminum foil, and freeze for up to 1 month. Always thaw frozen pie in the refrigerator before serving to maintain its best texture.
Nutrition Information
Nutrition information is automatically calculated and should only be used as an approximation.
Serving: 1 serving
Calories: 685 kcal
Carbohydrates: 70g
Protein: 7g
Fat: 44g
Saturated Fat: 22g
Polyunsaturated Fat: 5g
Monounsaturated Fat: 14g
Trans Fat: 1g
Cholesterol: 72mg
Sodium: 308mg
Potassium: 219mg
Fiber: 2g
Sugar: 55g
Vitamin A: 772 IU
Vitamin C: 1mg
Calcium: 32mg
Iron: 4mg
Enjoyed This Recipe? Share Your Thoughts!
We love hearing from you! If you tried this Peanut Butter Chocolate Pie, please leave a comment below and let us know how it turned out. Your feedback helps others discover delicious recipes!
Leave a comment below!
Smart Shortcuts for Quick Pie Prep
Even though this pie is already simple, sometimes you need to get dessert on the table even faster. Here are a few clever shortcuts to save you time and effort:
- Opt for a Store-Bought Oreo Crust: The biggest time-saver of all! Pre-made Oreo crusts are readily available at most grocery stores and eliminate the need for crushing cookies and pressing the crust yourself. Just ensure it’s a 9-inch crust.
- Prepare the Crust in Advance: If you prefer to make your own crust but are short on time on the day of serving, you can prepare the Oreo crust a day or two ahead. Store it covered in the refrigerator or freezer until you’re ready to add the filling.
- Simplify the Topping: While the homemade ganache is undeniably delicious, you can skip it for a quicker option. Instead, top your set peanut butter pie with a drizzle of store-bought chocolate syrup, melted peanut butter, or a sprinkle of crushed candy bars (like Reese’s Pieces or chopped peanut butter cups) for instant gratification.
The Ultimate No-Bake Indulgence Awaits!
This No-Bake Peanut Butter Chocolate Pie truly offers the best of both worlds: incredible flavor and effortless preparation. It’s a dessert that speaks to the heart of comfort food, blending the beloved tastes of creamy peanut butter and rich chocolate into a harmonious, irresistible treat. Whether you’re a seasoned baker or just starting your culinary journey, this recipe is designed for success. So go ahead, gather your ingredients, and whip up this sensational pie. Prepare for rave reviews and empty plates!