
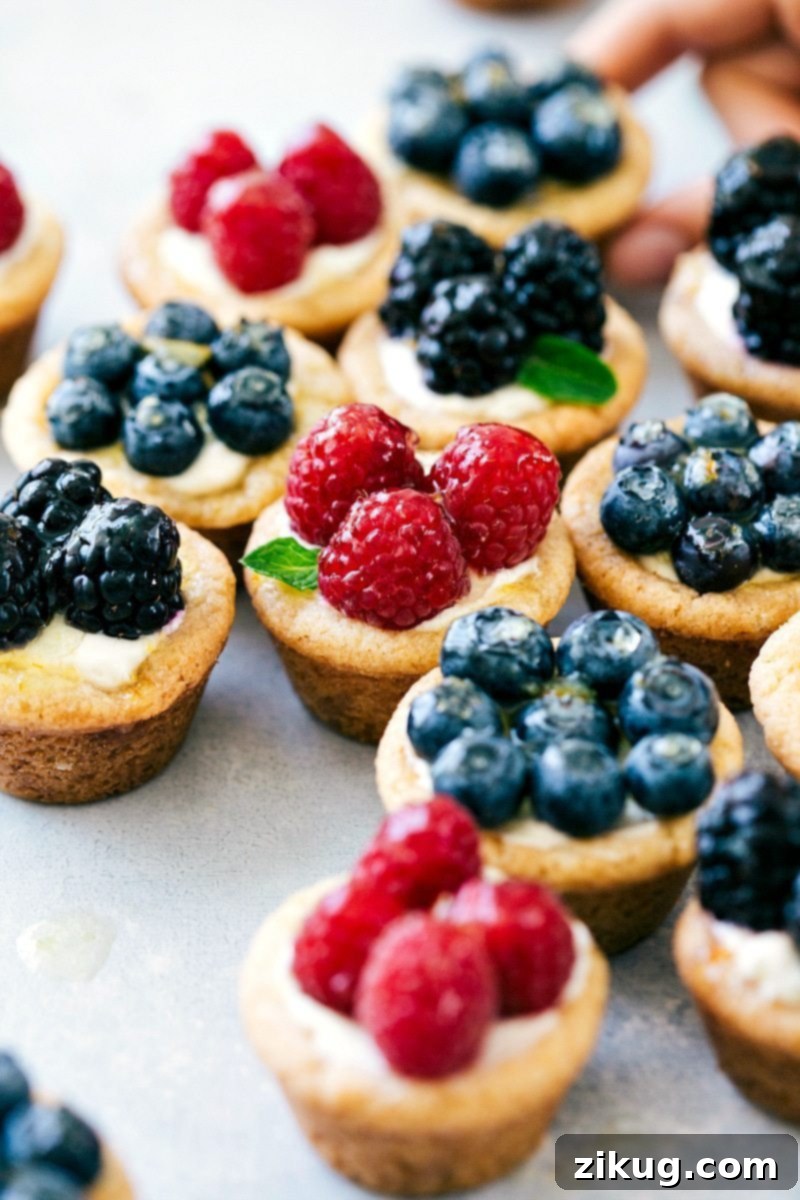
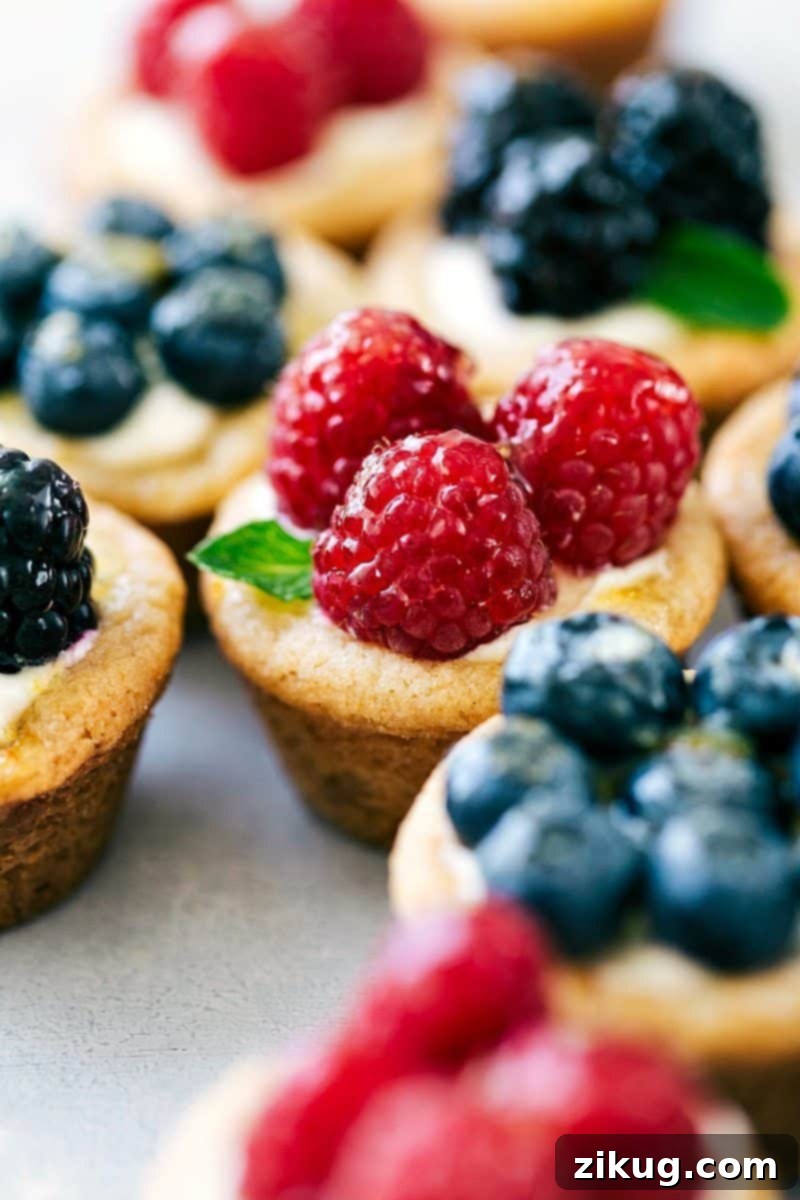
Indulge in these utterly delightful Mini Fruit Tarts, a perfect blend of simplicity and gourmet taste. This recipe features a crisp, buttery sugar cookie base, a rich and tangy cheesecake filling, an assortment of vibrant fresh fruit, and a glossy apricot glaze that ties all the flavors and textures together into one exquisite bite. They are not only a treat for the palate but also a feast for the eyes, making them an ideal centerpiece for any gathering.

Author’s Culinary Journey
A Crowd-Pleasing Favorite: Over 50 Mini Fruit Tarts and Still Craved!
I recently had the pleasure of hosting my niece’s second birthday party, and if there’s one dish that stole the show (apart from the birthday girl herself!), it was these Mini Fruit Tarts. I meticulously prepared over 50 of them, only to watch them vanish almost instantly! Guests kept returning for more, marveling at their charming appearance and irresistible flavor.
These mini tarts have become my ultimate go-to for any celebration. Whether it’s a baby shower, a wedding reception, or a casual family get-together, they consistently earn rave reviews. Their elegant presentation means they double as beautiful edible decorations, and without fail, I’m always asked for the recipe. The secret? They are surprisingly simple to make, especially when you start with a convenient ready-made sugar cookie mix. This recipe proves that you don’t need to be a pastry chef to create a show-stopping dessert that everyone will adore.
Mini fruit tarts offer a sophisticated yet approachable dessert option, perfect for home bakers of all skill levels. Their individual portions make serving a breeze, and the combination of textures – from the tender-crisp cookie to the creamy filling and juicy fruit – provides a truly satisfying experience. This guide will walk you through every step, ensuring your homemade mini fruit tarts are a resounding success.
Key Ingredients for Irresistible Mini Fruit Tarts
Crafting the perfect mini fruit tart begins with selecting quality ingredients. Each component plays a vital role in achieving that delightful balance of flavors and textures.
- Sugar Cookie Mix: This is your shortcut to a perfectly tender and buttery tart shell. Using a pre-made mix saves significant time without compromising on flavor. The key is to avoid over-baking, which can lead to hard, crumbly cookie cups. We want them soft and slightly chewy, making them easy to bite into.
- Cream Cheese & Sour Cream: For the most luxurious and rich cheesecake filling, always opt for full-fat cream cheese and sour cream. Their higher fat content contributes to a smoother, creamier texture and a richer flavor profile that truly elevates the tart. Ensure both are softened to room temperature for a lump-free filling.
- Orange (Juice & Zest): Fresh orange adds a bright, zesty dimension to the creamy filling, cutting through the richness beautifully. Remember to zest the orange *before* juicing it – it’s much easier! The zest carries the most intense citrus flavor.
- Vanilla & Orange Extracts: Vanilla extract is a baking staple that enhances overall sweetness and depth. The orange extract is an optional but highly recommended addition; it intensifies the citrus notes, creating a more pronounced and harmonious flavor in the cheesecake filling.
- Powdered Sugar: Also known as confectioners’ sugar, this fine sugar not only sweetens the cream cheese filling but also helps achieve its silky-smooth, thick consistency without any grainy texture.
- Fresh Fruit: The beauty of mini fruit tarts lies in their vibrant toppings. A colorful mix of seasonal berries and other fruits like strawberries, blueberries, raspberries, blackberries, kiwi, or mandarin oranges works best. Always wash and thoroughly dry your fruit before arranging it on the tarts to prevent sogginess.
- Apricot or Orange Jam: This ingredient acts as a brilliant, protective glaze, adding a beautiful sheen to the fresh fruit and locking in its moisture. Warm the jam slightly before brushing to make it smooth and easy to apply. It also adds an extra layer of subtle fruitiness.
Quick Tip: Get Creative with Toppings!
While these are called Mini Fruit Tarts, don’t feel limited to fresh fruit! If you’re out of fruit or simply want to try something different, these versatile tarts can be adapted. Consider sprinkling the tops with crushed graham crackers, mini chocolate chips, shredded coconut, or even a drizzle of your favorite ice cream toppings like caramel or hot fudge. The creamy filling is a fantastic canvas for various flavors!
Step-by-Step Guide: How to Make These Mini Fruit Tarts
Creating these elegant mini fruit tarts is simpler than you might imagine. Follow these easy steps to bake up a batch of perfect, bite-sized desserts.
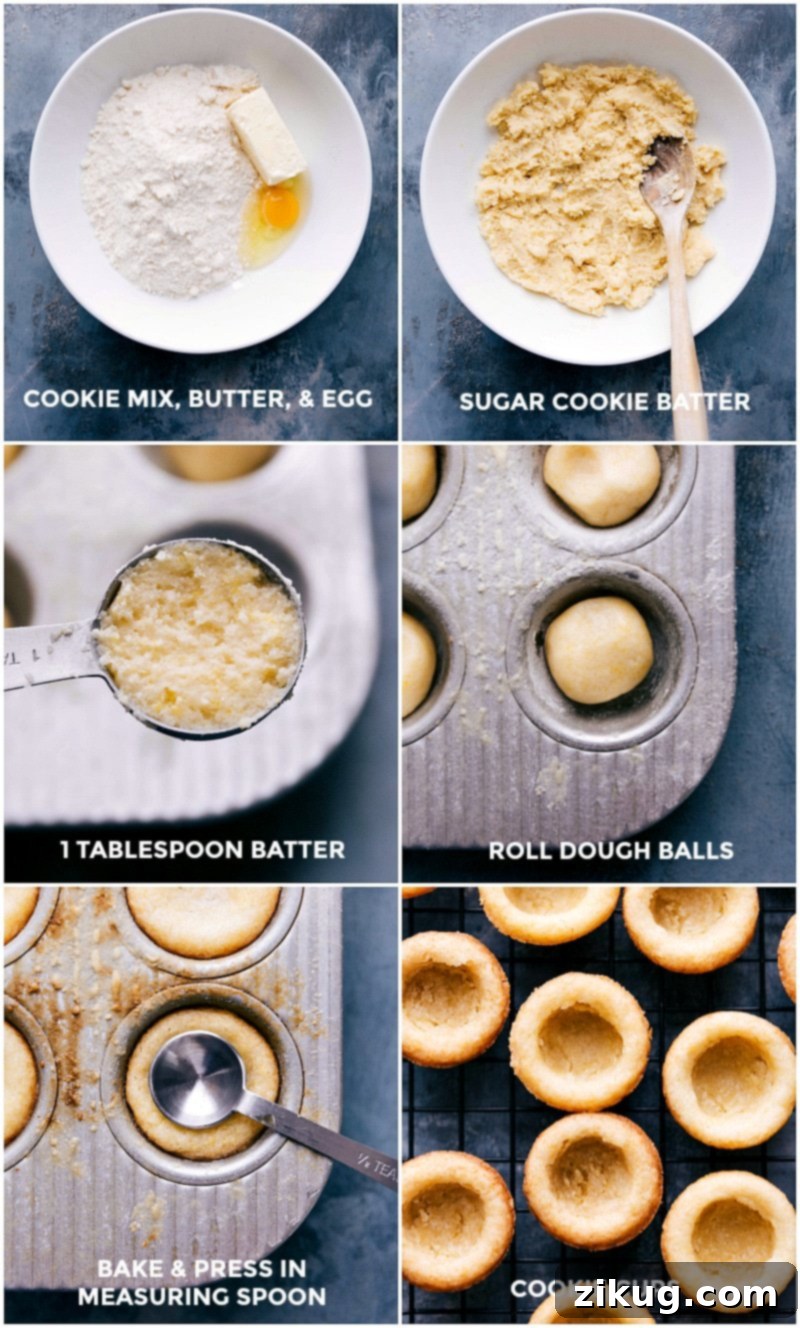
- Prepare the Sugar Cookie Cups: Begin by mixing your sugar cookie dough according to the package directions. It’s important to grease and lightly flour your mini muffin tin thoroughly to prevent sticking. Scoop small portions of dough, roll them into balls, and gently press them into each cavity, creating a slight indent for the filling. Bake until lightly golden, taking care not to overbake, as this will make the cups hard. Immediately after removing from the oven, use the back of a small spoon to deepen the indentations. Allow them to cool slightly before carefully removing them from the tin to a wire rack to cool completely.
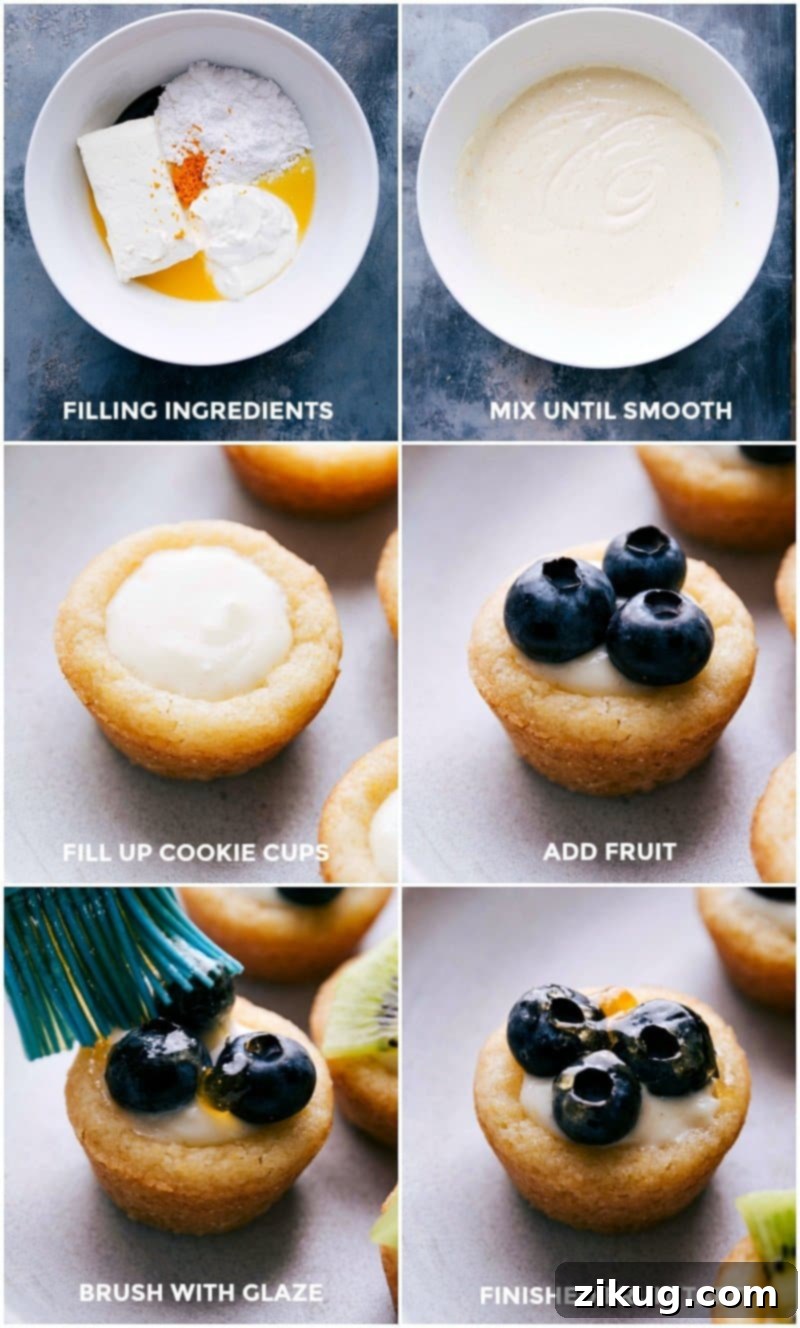
- Whip Up the Creamy Filling: In a large bowl, combine the softened full-fat cream cheese, full-fat sour cream, fresh orange juice, orange zest, vanilla extract, optional orange extract, and powdered sugar. Using a hand mixer, beat until the mixture is completely smooth, creamy, and free of lumps. If you desire a thicker consistency, you can gradually add a little more powdered sugar. Refrigerate the filling for at least 20 minutes to allow it to firm up and for the flavors to meld beautifully.
- Assemble Your Tarts: Once the cookie cups are completely cooled and the filling has firmed, it’s time to assemble! Spoon a generous amount of the creamy cheesecake filling into each sugar cookie cup. Then, artfully arrange your choice of fresh, chopped fruit or whole berries on top of the filling. Aim for a colorful and appealing display.
- Glaze for a Perfect Finish: In a small, microwave-safe bowl, combine the apricot or orange jam with a small amount of water. Microwave for about 15 seconds, then whisk with a fork until smooth and slightly thinned. This creates a beautiful, shiny glaze. Using a pastry brush, gently brush the warm jam over the fresh fruit on each tart. This adds a lovely sheen and helps preserve the fruit’s freshness.
- Serve and Enjoy Immediately: These mini fruit tarts are best enjoyed soon after assembly to ensure the sugar cookie cups remain wonderfully crisp and the fruit is at its peak freshness. While components can be prepared ahead, the final assembly should ideally happen just before serving for the ultimate taste and texture experience.
Expert Tips for Flawless Mini Fruit Tarts
Achieving bakery-quality mini fruit tarts at home is easily within reach with these helpful tips and tricks:
- Invest in a Quality Nonstick Mini Muffin Tin: A good quality nonstick mini muffin tin is indispensable. It ensures your delicate cookie cups release easily without breaking, preserving their perfect shape. Proper greasing and flouring are still recommended even with a nonstick surface.
- Grease the Tin Generously: Even with a nonstick pan, generously greasing and lightly flouring each cavity of your mini muffin tin is a crucial step. This acts as an extra layer of protection, guaranteeing that your cookie cups pop out effortlessly once baked.
- Portion Dough Accurately: Instead of laboriously measuring each ball of dough, a good visual guide is to fill each muffin tin cavity approximately halfway with the dough. This ensures consistent cup sizes and even baking. A tablespoon measuring spoon can help you scoop uniform amounts.
- Prompt Removal from Tin: After baking, don’t leave the cookie cups in the hot muffin tin for too long. Remove them after just a couple of minutes of cooling in the pan. This prevents them from sticking as they continue to cool and firm up. Gently tracing around the edges with a butter knife or carefully twisting them out can aid in removal.
- Variety is the Spice of Life (and Tarts!): Don’t be afraid to mix up your fruit toppings! Using a diverse array of colors and textures from different berries and fruits will make your tarts visually stunning and more appealing. Consider a combination of red strawberries, blue blueberries, and green kiwi for a truly vibrant display.
- Chill the Filling: Allowing the cream cheese filling to chill in the refrigerator for at least 20 minutes before spooning it into the cookie cups helps it firm up. This makes it easier to work with and prevents it from being too runny, ensuring a neat and professional finish.
- Don’t Overbake the Cookie Cups: This is critical for soft, bite-friendly cookie cups. Bake just until the edges are lightly browned and the tops are no longer glossy. They will continue to set as they cool. Overbaked cookies will be hard and crumbly.
Storage & Make-Ahead Tips
Leftovers?
Mini fruit tarts are truly at their best when enjoyed within a few hours of assembly. The moisture from the creamy filling and fresh fruit can gradually soften the sugar cookie cups, diminishing their delightful crispness. For this reason, I do not recommend keeping them fully assembled for extended periods.
However, you can easily prepare the components in advance and assemble them just before serving! The baked cookie cups can be stored in an airtight container at room temperature for up to 3 days. The orange cream cheese filling can be made ahead and kept in an airtight container in the refrigerator for up to 3 days. Fresh fruit should be washed, dried, and chopped, then stored in a separate airtight container in the fridge, also for up to 3 days. When guests arrive, simply spoon the filling into the cups, top with fruit, glaze, and serve! This make-ahead strategy ensures ultimate freshness and crispness for your delectable mini fruit tarts.
Why You’ll Love These Mini Fruit Tarts
Beyond their undeniable charm and delicious flavor, these mini fruit tarts offer a multitude of reasons to become your new favorite dessert. They are incredibly versatile, making them suitable for casual family dinners, elegant brunches, or festive holiday celebrations. The individual portion size is perfect for portion control and easy serving, eliminating the need for cutting and plating messy slices. Furthermore, the combination of a homemade feel with the convenience of a sugar cookie mix means you get impressive results with minimal effort. The vibrant colors of fresh fruit not only make these tarts visually appealing but also add a refreshing, healthy contrast to the rich filling and sweet crust. They are truly a dessert that pleases everyone!
Creative Variations & Customizations
While the classic mini fruit tart is a masterpiece on its own, don’t hesitate to experiment with different flavors and presentations. Here are a few ideas to inspire your culinary creativity:
- Crust Alternatives: Instead of a sugar cookie mix, you could try a shortbread cookie mix for a richer, denser crust, or even use crushed graham crackers mixed with melted butter for a no-bake option.
- Filling Flavors: Infuse the cream cheese filling with other flavors. Lemon zest and juice for a zesty lemon cream, almond extract for a nutty twist, or even a touch of cocoa powder for a chocolate cheesecake filling.
- Fruit Combinations: Explore different seasonal fruits. Peaches and blueberries in summer, pomegranate seeds and sliced kiwi in winter, or even tropical fruits like mango and pineapple for an exotic flair.
- Glaze Options: While apricot jam provides a beautiful neutral sheen, consider raspberry jam for a reddish tint and berry flavor, or a simple lemon glaze made from powdered sugar and lemon juice for an extra citrus kick.
- Garnish Galore: Beyond the fruit and glaze, a sprinkle of toasted coconut flakes, finely chopped nuts, or a dusting of powdered sugar can add an extra layer of texture and visual appeal.
Frequently Asked Questions (FAQs)
Here are answers to some common questions you might have about making mini fruit tarts:
- Can I use homemade sugar cookie dough? Absolutely! If you have a favorite homemade sugar cookie recipe, feel free to use it. Just ensure the dough has a good consistency for pressing into mini muffin tins.
- How do I prevent the crust from becoming soggy? The best way is to assemble the tarts just before serving. Storing the cookie cups, filling, and fruit separately helps maintain the crispness of the crust. The apricot glaze also acts as a slight barrier.
- What if my cream cheese filling is too thin? If your filling seems too thin, gradually beat in an additional tablespoon or two of powdered sugar until it reaches your desired consistency. Chilling it for longer will also help it firm up.
- Can these be frozen? The baked sugar cookie cups can be frozen plain in an airtight container for up to a month. Thaw at room temperature before filling. I do not recommend freezing the assembled tarts, as the filling and fruit texture will suffer.
- What’s the best way to transport mini fruit tarts? Use a sturdy container with dividers or line a flat container with parchment paper and arrange them snugly to prevent them from shifting and damaging the fruit. Transport them chilled and assemble the glaze on-site if possible.
More Delicious Desserts You’ll Love:
Desserts
The BEST Lemon Bars Recipe
Desserts
Fruity Pebbles Rice Krispies Treats
Desserts
Classic Thumbprint Cookies
Desserts
Decadent Chocolate Tart Recipe

Print Recipe
Mini Fruit Tarts
Chelsea Lords
25
10
35
36 miniature tarts
Video Overview

For a visual guide, watch our step-by-step video on how to make these delicious Mini Fruit Tarts!
Equipment
-
Mini muffin pan
-
Cooling rack
-
Hand mixer
Ingredients
- 1 (17.5-ounce) package sugar cookie mix (such as Betty Crocker; plus ingredients called for on package, typically 1/2 cup butter and 1 large egg)
- 8 ounces cream cheese (full-fat, softened)
- 1/2 cup sour cream (full-fat)
- 1 large orange (for zest and 2 tablespoons juice)
- 1/2 teaspoon vanilla extract
- 1/4 teaspoon orange extract (optional, but enhances citrus flavor)
- 1 cup powdered sugar
- Fresh fruit and berries (for topping, such as strawberries, raspberries, blueberries, blackberries, mandarin oranges, kiwi, etc.)
- 1/3 cup apricot jam (or orange jam)
- 3/4 tablespoon water
Instructions
-
Preheat your oven to 350°F (175°C). Thoroughly grease and lightly flour a high-quality mini muffin tin. Prepare the sugar cookie dough according to the package directions. Using a tablespoon measuring spoon, scoop out dough, filling the spoon about three-quarters full. Roll each portion into a small ball and place it into the prepared muffin tin cavities. Gently press the center of each dough ball with your finger to create a slight indent, forming a cup shape.
-
Bake for 7–10 minutes, or until the edges are no longer glossy and the tops are very lightly golden brown. Baking time can vary depending on your oven and the amount of dough, so monitor them closely. To ensure soft, easy-to-bite cookie cups, avoid overbaking. Remove the tin from the oven and, while the cookies are still warm, immediately press down the centers again using the back of a 1/2 teaspoon measuring spoon to reinforce the cup shape. Allow the cookie cups to cool in the tin for a few minutes. Then, gently loosen them by carefully tracing around the edges with a butter knife and using a fork or by pinching and twisting the edges to coax them out. Transfer the cooled cookie cups to a cooling rack and let them cool completely to room temperature before filling.
-
For the Filling: In a large mixing bowl, combine the softened cream cheese, sour cream, 2 tablespoons of fresh orange juice, 1 teaspoon of orange zest, vanilla extract, optional orange extract, and powdered sugar. Using a hand mixer, beat the ingredients together until the mixture is completely smooth, creamy, and well combined, with no lumps. If you prefer a slightly thicker filling, you can add an additional tablespoon or two of powdered sugar, beating until incorporated. Place the finished filling in the refrigerator for at least 20 minutes to firm up, which also allows the flavors to intensify.
-
Once the sugar cookie cups are completely cooled and the filling has firmed up, spoon the cream cheese filling into each cookie cup. Arrange your desired fresh, chopped fruit or whole berries artfully on top of the filling in each tart.
-
For the Glaze: In a small, microwave-safe bowl, combine the apricot jam (or orange jam) and water. Microwave for about 15 seconds, just until warm and slightly liquefied. Whisk vigorously with a fork until smooth. Using a pastry brush, gently brush the warm jam over the top of the fruit on each mini tart. This creates a beautiful, glossy sheen and helps preserve the fruit. Serve immediately for best results!
Recipe Notes
Storage: Mini fruit tarts are best enjoyed within a few hours of assembly to ensure the sugar cookie cups remain crisp and the fruit is at its freshest. If you need to store components, keep the filling in an airtight container in the refrigerator and the cooled cookie cups in an airtight container at room temperature. Assemble just before serving for optimal texture and flavor.
Nutrition Information
Serving:
1tart
Calories:
110kcal
Carbohydrates:
14.7g
Protein:
1.3g
Fat:
5.3g
Cholesterol:
16.3mg
Sodium:
113.7mg
Sugar:
9.3g
Nutrition information is an estimate based on ingredients used and is automatically calculated. It should only be used as an approximation.
Love this recipe? Share your thoughts below!