
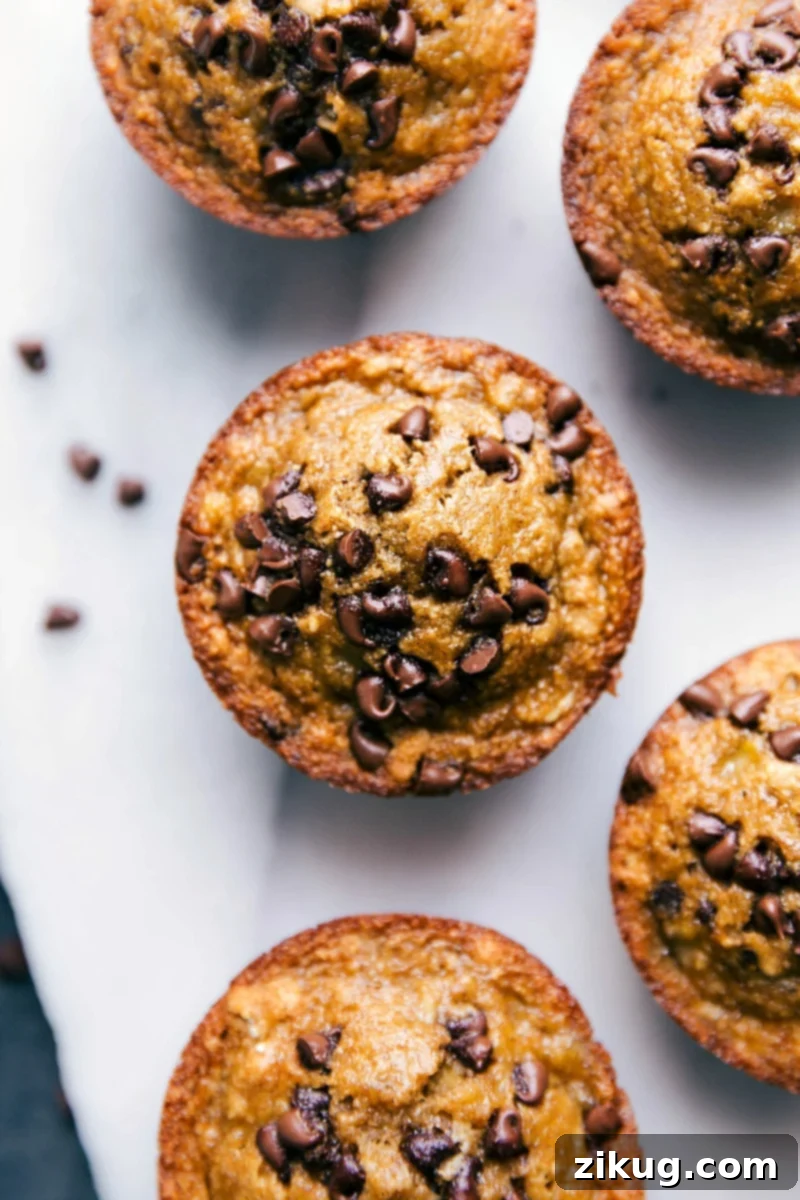
Indulge in these incredibly Flourless Banana Muffins, a delightful treat that’s soft, chewy, and wonderfully moist. Crafted without any traditional flour or refined sugars, they offer a healthier alternative that doesn’t compromise on taste. Best of all, this easy recipe comes together using common pantry staples, making it accessible for any home baker looking for a wholesome and delicious treat.
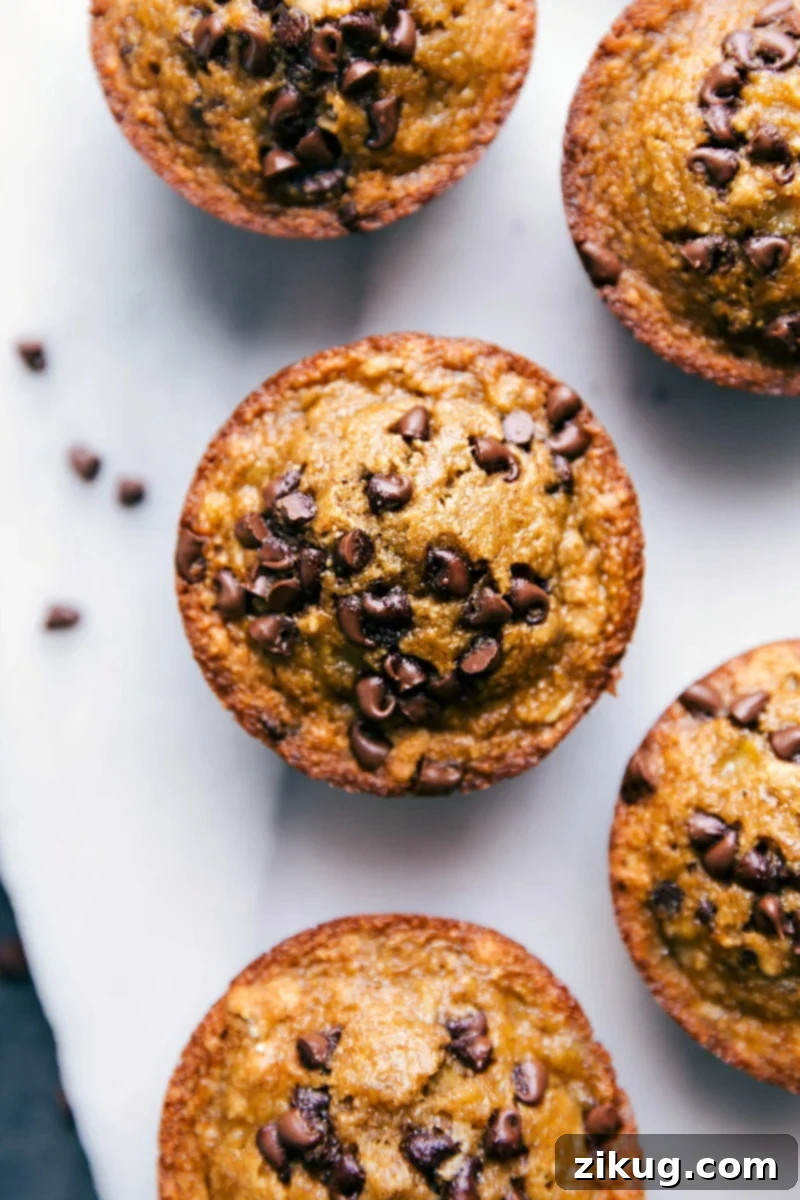

A Note from the Author
The Healthy Banana Muffins That Never Disappoint!
After the overwhelming success of my healthy pumpkin muffins, my mind kept drifting to the idea of a banana version. My family, like many, has an insatiable love for bananas. It seems we go through them at an incredible pace, yet I almost always find myself with a few perfectly overripe bananas lingering on the kitchen counter, just begging to be transformed. Crafting them into a batch of wholesome, delicious muffins felt like the most natural and rewarding next step.
The pumpkin muffins quickly soared to the top of reader favorites, which fills me with immense joy and makes me even more thrilled to share this banana muffin recipe with you today. Much like their pumpkin counterparts, these banana muffins are intentionally designed without traditional flour, butter, or refined sugar. This makes them naturally gluten-free and a truly healthy option for breakfast, a snack, or even a light dessert. What makes them truly special is their reliance on everyday pantry staples. You won’t need to embark on a quest to a specialty store or wait for online orders; everything you need is likely already in your kitchen, making baking these a breeze.
These aren’t just any banana muffins; they are a celebration of simple ingredients coming together to create something truly exceptional. The natural sweetness of ripe bananas combined with hearty oats provides a satisfying texture and rich flavor that appeals to everyone, whether they follow a gluten-free diet or not. They are the perfect way to use up those spotty bananas, turning what might be considered waste into a delightful, wholesome treat that your entire family will adore. This recipe is a testament to how simple, clean ingredients can yield incredibly flavorful and satisfying results.
Quick Tip for Gluten-Free Baking
While the core ingredients in these **Gluten-Free Banana Muffins** are naturally free from gluten, it’s crucial to exercise caution. Always take a moment to carefully check the labels of all your purchased ingredients (especially oats, baking powder, and chocolate chips) to ensure they were not processed in facilities that also handle gluten-containing products. This small but vital step helps guarantee your muffins remain truly gluten-free for those with sensitivities or celiac disease, preventing any unintended cross-contamination.
Essential Ingredients for Your Flourless Banana Muffins
Crafting these delectable flourless banana muffins requires a handful of simple, wholesome ingredients you likely already have on hand. Each component plays a crucial role in creating their soft, moist, and perfectly sweet profile. Here’s a closer look at what you’ll need and why these choices contribute to the muffins’ exceptional taste and texture:
- Old Fashioned Oats: These are the star of our flourless recipe! When blended, old-fashioned oats transform into a fine oat flour, providing the structural base for your gluten-free muffins. They lend a wonderfully hearty texture, a good dose of soluble fiber which aids digestion, and a subtle nutty flavor. Make sure to use *old-fashioned* (rolled) oats, not quick-cooking or steel-cut, as their texture and absorption properties are different and crucial for the final muffin consistency. For certified gluten-free, look for oats specifically labeled as such.
- Overripe Bananas: The riper, the better! Bananas with plenty of brown spots and even some black patches are ideal as they are naturally sweeter, more fragrant, and much easier to mash. Their high moisture content is key to keeping these muffins incredibly moist without added fats, while their natural sugars reduce the need for excessive refined sweeteners. Aim for 2-3 large, very ripe bananas to achieve the required cup of mashed fruit, ensuring maximum flavor and moisture.
- Large Egg: The egg acts as a vital binding agent, helping to hold all the ingredients together and giving the muffins their essential structure. It also contributes to a lighter, more tender crumb, ensuring your muffins are fluffy rather than dense. Additionally, the egg adds a touch of richness and protein.
- Baking Agents (Baking Soda & Baking Powder): This dynamic duo is essential for creating light, airy, and well-risen muffins. Baking soda reacts with the natural acids present in the bananas and maple syrup, while baking powder provides an extra lift, ensuring a beautiful dome and soft texture. Always ensure your baking powder and baking soda are fresh for optimal leavening; stale agents can result in flat, dense muffins. You can test their freshness with a simple trick: baking soda will bubble vigorously when mixed with vinegar, and baking powder will do the same with hot water.
- Ground Cinnamon and Salt: While optional, these two ingredients are highly recommended as they truly elevate the flavor profile. Ground cinnamon adds a warm, inviting spice that beautifully complements the banana and chocolate, enhancing the overall aroma and taste. A pinch of salt is vital for balancing the sweetness, intensifying the other flavors, and preventing the muffins from tasting bland, making every bite more satisfying.
- Pure Vanilla Extract: A splash of good quality pure vanilla extract introduces a subtle yet profound aromatic depth to your muffins. It rounds out the flavors and adds a comforting, classic bakery taste that makes these muffins truly irresistible.
- Coconut Oil: Used in a small amount, melted and cooled, coconut oil provides essential moisture and a delicate richness without the need for butter. It contributes to the muffins’ tender texture and helps keep them moist. It’s crucial that the coconut oil is cooled to room temperature before adding it to the batter to prevent it from accidentally cooking or seizing the egg.
- Pure Maple Syrup: As a natural, unrefined sweetener, pure maple syrup is an excellent alternative to granulated sugars. It offers a unique, rich, earthy flavor that pairs wonderfully with bananas and enhances the overall complexity of the muffins. Many reviewers have found that honey works equally well as a substitute if you prefer, providing a similar level of sweetness and moisture.
- Dark Chocolate Chips: These are optional but highly encouraged for an extra burst of flavor and texture! Dark chocolate chips offer a lovely contrast to the sweetness of the bananas and add a decadent, slightly bitter touch that makes these muffins feel truly indulgent. You can also opt for milk chocolate or semi-sweet chocolate chips based on your preference. For a healthier twist and richer flavor, look for varieties with higher cocoa content (70% or more).
A Featured Comment from Our Community
“Made these and they turned out perfectly! My entire family (including my hubby) devoured them! Thanks for the great easy recipe!”
– Laura, a happy baker
Step-by-Step Guide: How To Make These Delicious Flourless Banana Muffins
Creating these delightful flourless banana muffins is simpler than you might think, even for novice bakers. Follow these easy, detailed steps to bake a batch of soft, moist, and perfectly sweet treats that will disappear in no time:
- Prepare Your Oven and Muffin Pan: Begin by preheating your oven to a precise 350°F (175°C). While the oven comes to temperature, take a standard 9-cavity muffin pan and generously grease each individual cavity. This is an absolutely critical step for easy muffin release, as this moist, flourless batter can be prone to sticking. We highly recommend avoiding paper muffin liners, as the batter tends to cling to them, making it difficult to remove the muffins cleanly. Once greased, melt the coconut oil and set it aside to cool completely to room temperature. This cooling step is essential to prevent the warm oil from accidentally cooking or scrambling the egg when it’s combined with other ingredients.
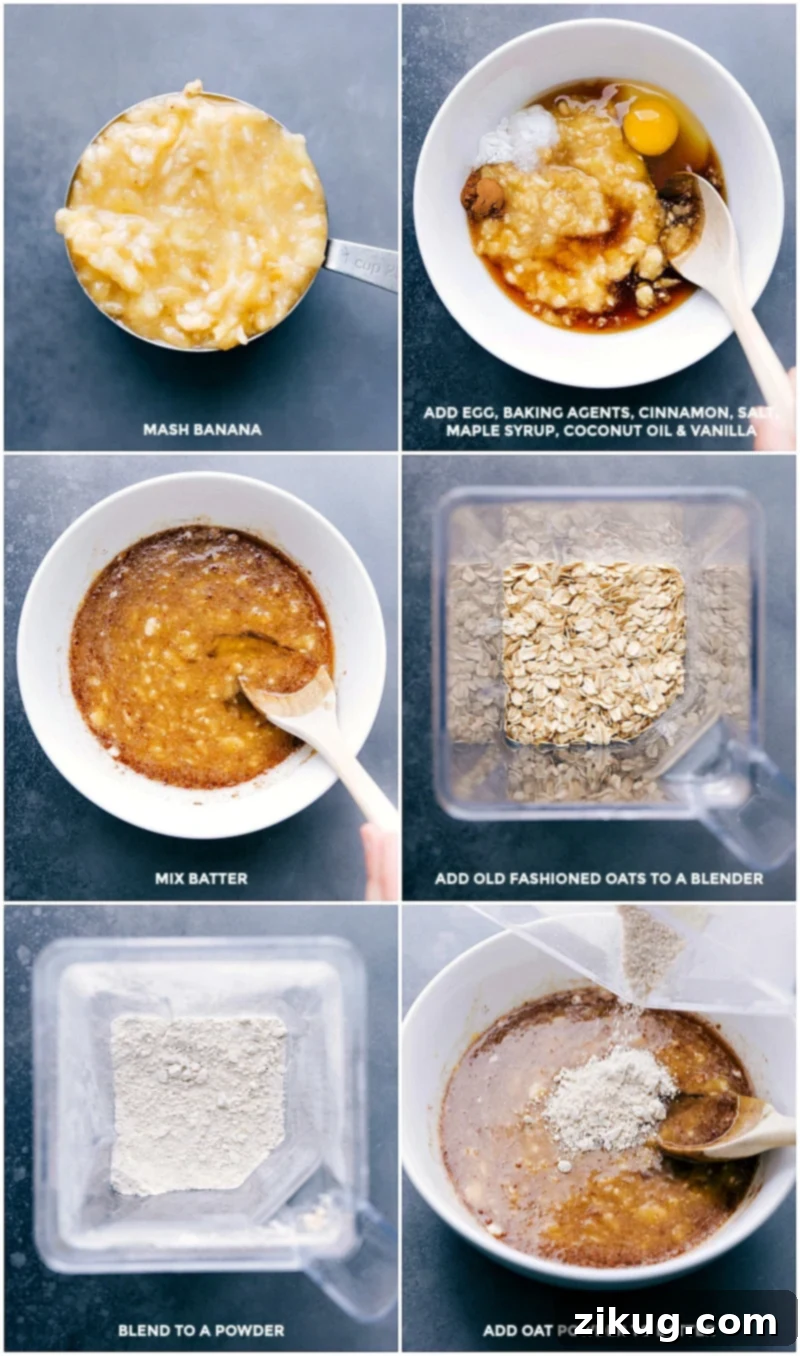
- Create Your Oat Flour: Accurately measure out 1 cup of old-fashioned oats. To ensure the correct amount, fill your 1-cup measuring cup and then level off the top with a straight edge or the back of a knife. Transfer these measured oats into a food processor or a high-speed blender. Process the oats until they transform into a fine, powdery flour-like consistency. If you notice any stubborn, larger chunks, pause the machine, stir the oats, and re-blend until the texture is uniform and resembles flour. This homemade “oat flour” is what provides the wonderful structure for your muffins without any traditional wheat flour.
- Mash the Bananas Thoroughly: In a separate small bowl, take your very ripe bananas (2-3 large ones should comfortably yield about 1 cup of mashed fruit) and mash them thoroughly using the back of a fork or a potato masher. The goal is to achieve a relatively smooth consistency. While a few tiny lumps are acceptable and can add a nice texture, aim to eliminate most large chunks. The smoother the mashed banana, the more uniform and consistent your muffin batter will be, leading to a better final texture.
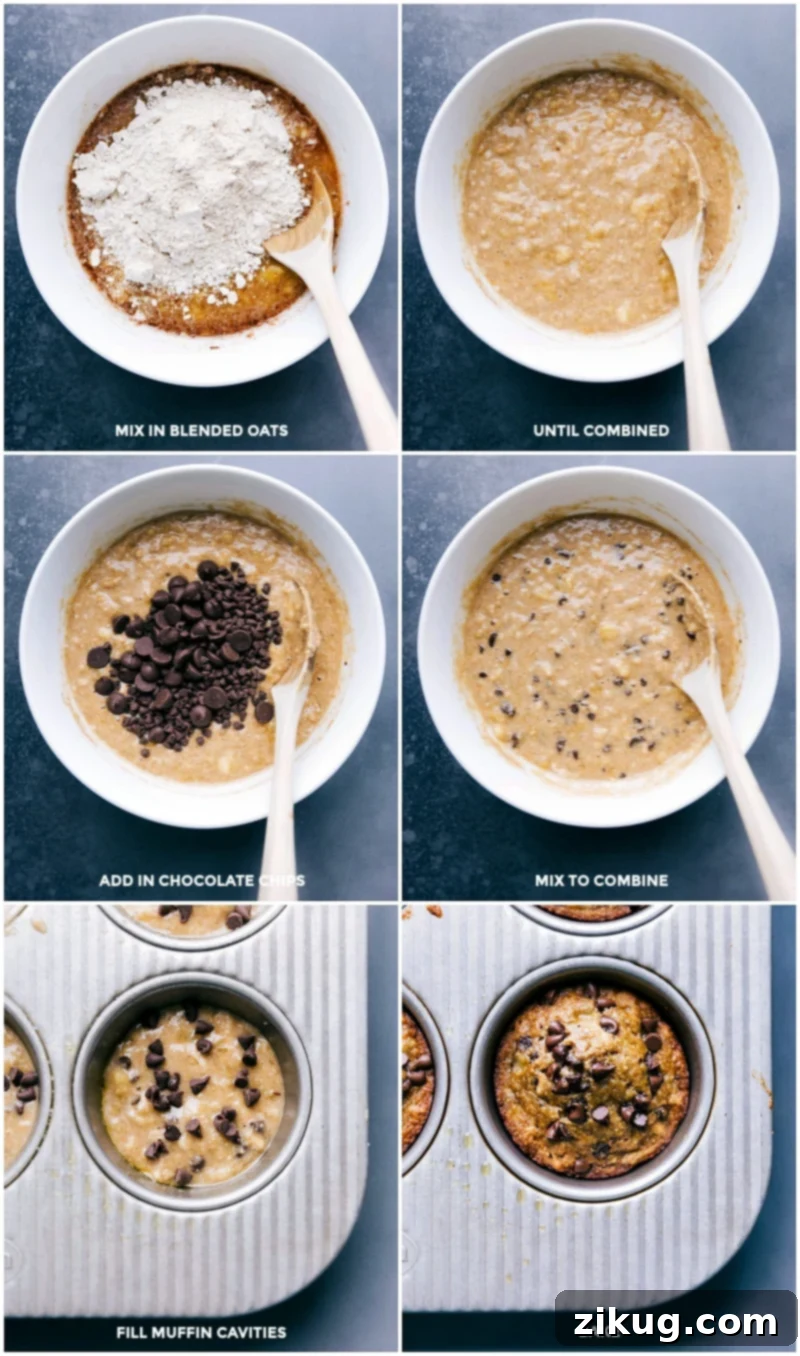
- Combine Wet and Dry Ingredients (and Chocolate!): In a large mixing bowl, combine all your wet ingredients: the mashed banana, the large egg, pure maple syrup, the cooled melted coconut oil, and pure vanilla extract. Also, add your dry leavening and seasoning agents: baking soda, baking powder, ground cinnamon, and salt. Stir these ingredients together until they are thoroughly combined and form a uniform mixture. Next, add your freshly blended oat flour to this wet mixture. Stir gently with a spoon or spatula until the oats are just incorporated into the batter; it’s crucial to avoid overmixing at this stage, as overmixing can lead to tougher muffins. Finally, fold in both the dark chocolate chips and mini chocolate chips (or your preferred total of 1/2 cup of chocolate chips) until they are evenly distributed throughout the batter.
- Fill and Bake to Golden Perfection: Carefully spoon the prepared muffin batter into the 9 generously greased muffin cavities. Ensure you divide the batter equally, filling each cavity to about three-quarters of its capacity. For an extra aesthetic touch and a delightful burst of chocolate on top, you can sprinkle a few additional chocolate chips onto the surface of each muffin before they go into the oven. Place the muffin pan into your preheated oven and bake for approximately 23–26 minutes. The muffins are ready when their edges are lightly golden brown and the tops no longer appear gooey or wet. A reliable test for doneness is to gently press the top of a muffin; it should spring back if fully baked.
- Cool and Serve Your Delicious Muffins: Once baked, remove the muffin pan from the oven and allow the muffins to rest and cool in the pan for about 5 minutes. This brief cooling period in the warm pan helps them firm up slightly, making them much easier to handle and preventing them from falling apart. After 5 minutes, use a fork or a small offset spatula to carefully coax the muffins out of the pan and transfer them to a wire cooling rack to cool completely. Enjoy them warm, or store for later! These muffins are equally delicious at room temperature.
Expert Tips for Baking Your Best Flourless Banana Muffins
Achieving perfectly soft, moist, and delicious flourless banana muffins is easy with a few simple tricks. Keep these expert tips in mind to ensure your baking experience is smooth and the results are consistently fantastic, delivering bakery-quality treats right from your home kitchen:
- Grease Your Muffin Tin Generously: This is perhaps the most crucial tip for easy release. Because these muffins are flourless and incredibly moist, they can be prone to sticking to the pan. Generously coat each muffin cavity with cooking spray, butter, or coconut oil. We strongly advise against using paper muffin liners, as the batter tends to cling to them, making it difficult to remove the muffins cleanly and potentially leaving behind delicious bits.
- Achieve a Smooth Batter: The key to uniform, tender muffins is thoroughly mashed bananas. Lumps of unmashed banana can create an inconsistent texture in your final product. For a perfectly smooth batter, mash your overripe bananas with a fork until very few, if any, large chunks remain. If you’re short on time or prefer an ultra-smooth consistency, an electric hand mixer or stand mixer can quickly achieve this for you.
- Don’t Be Shy with Extra Chocolate: For those who love a rich chocolatey experience, consider adding a few extra chocolate chips directly on top of each muffin before they go into the oven. As they bake, these chips will melt beautifully, creating enticing, gooey pools of chocolate on the surface that add both visual appeal and an extra burst of flavor.
- A Touch of Salty Sweetness (Optional): To truly elevate the flavor profile of your muffins, try sprinkling a few flakes of Maldon® sea salt (or any good quality flaky sea salt) on top of the muffins immediately after they come out of the oven. The delicate crunch and burst of salinity beautifully enhance and contrast the sweetness of the banana and chocolate, creating a gourmet touch that sophisticated palates will appreciate.
- Avoid Overmixing the Batter: Just like with traditional muffins, overmixing the batter can lead to a tougher texture. Even with oat flour, excessive mixing can overdevelop any potential gluten structures and reduce the aeration needed for fluffy muffins. Mix only until the ingredients are just combined and no streaks of dry oat flour remain. A few small lumps in the batter are perfectly fine and often desirable.
- Always Use Ripe Bananas: We cannot stress this enough! Overripe bananas (those with plenty of brown or black spots on the peel) are naturally sweeter, more fragrant, and softer in texture. They contribute significantly to the muffins’ moisture and deep banana flavor, which means you need less added sweetener and get a more delicious end product. Under-ripe bananas will result in less flavorful and drier muffins.
- Check Your Leavening Agents’ Freshness: Baking soda and baking powder are crucial for the muffins’ rise and light texture, but they lose their potency over time. Always ensure yours are fresh for optimal leavening. You can perform a quick test: baking soda should bubble vigorously when a small amount is mixed with vinegar, and baking powder should bubble when mixed with hot water. Replace any that don’t react as expected.
Frequently Asked Questions About Flourless Banana Muffins
Here are some common questions and helpful answers to ensure your flourless banana muffin baking experience is a success:
- Why are my muffins sticky? Sticky muffins can result from several factors. Underbaking is a common culprit; ensure you bake until the tops spring back when gently pressed. Over-mashing bananas can also release too much moisture into the batter. Lastly, not greasing the muffin tin adequately or using paper liners (which this batter tends to stick to) can also contribute to stickiness. Always cool muffins completely on a wire rack to allow steam to escape.
- Can I use a different sweetener? Yes, while pure maple syrup or honey is recommended for their natural qualities and complementary flavors, you can experiment with other liquid sweeteners like agave nectar. However, the texture and sweetness level might vary slightly. This recipe is specifically designed to be flourless and refined-sugar free, so avoid granulated sugars.
- Can I use frozen bananas? Absolutely! Frozen ripe bananas are excellent for baking. Simply thaw them at room temperature (you can place them in a bowl to catch any liquid that drains) and mash them as usual. It’s best to discard any excess liquid that might be released during thawing to maintain the correct batter consistency and prevent soggy muffins.
- What if I don’t have a food processor or blender? While a food processor or blender is ideal for making fine oat flour, if you don’t have one, you have a few options. You can buy pre-made oat flour, just ensure it’s certified gluten-free if needed. Alternatively, you can use a clean coffee grinder for small batches of oats, or gently crush them by hand in a sturdy ziplock bag if you don’t mind a slightly chunkier texture in your muffins.
- Are these muffins suitable for toddlers or babies? These muffins can be a great, healthy option for toddlers! With no refined sugar and wholesome ingredients, they make a nutritious snack. For babies, consider omitting the chocolate chips and ensure the bananas are very smoothly mashed to avoid any choking hazards. Always consult with a pediatrician regarding dietary introductions for infants.
- Can I add other mix-ins besides chocolate chips? Definitely! These muffins are incredibly versatile. Chopped nuts like walnuts, pecans, or almonds; dried fruits such as raisins, dried cranberries, or chopped dates; or even a handful of shredded coconut would make delicious additions. Keep the total amount of mix-ins to about 1/2 to 3/4 cup to avoid overwhelming the batter and ensuring proper baking.
- Can I make these muffins vegan? To make these muffins vegan, you would need to replace the egg. A “flax egg” (1 tablespoon ground flaxseed meal mixed with 3 tablespoons water, left to sit for 5 minutes) can often work as an egg substitute in muffin recipes. However, this has not been tested with this specific recipe, so results may vary.
Why Choose Flourless & Gluten-Free Banana Muffins?
In today’s health-conscious world, many are seeking delicious alternatives to traditional baked goods. These flourless and gluten-free banana muffins offer a multitude of benefits, making them a popular choice for various dietary preferences and health goals, proving that healthy eating can still be incredibly indulgent:
- Naturally Gluten-Free: For individuals with celiac disease, gluten sensitivities, or those simply choosing to reduce their gluten intake, these muffins are a safe and satisfying option. Using oat flour as the base ensures a delicious baked good without relying on any gluten-containing grains. It’s a wonderful way to enjoy muffins without dietary compromise.
- No Refined Sugars: By skillfully relying on the intense natural sweetness of ripe bananas and the caramel notes of pure maple syrup, these muffins are completely free from refined sugars. This makes them a much better choice for maintaining stable blood sugar levels, avoiding energy crashes, and promoting overall well-being. It’s a sweet treat you can feel good about.
- Rich in Fiber: Oats are renowned for their high fiber content, particularly soluble fiber, which is incredibly beneficial for digestive health, helps regulate blood sugar, and contributes significantly to a feeling of fullness and satiety. This makes these muffins more satisfying and keeps you feeling fuller for longer than those made with traditional, less fibrous refined flours.
- Wholesome and Nutritious Ingredients: This recipe focuses on simple, unprocessed, and nutrient-dense ingredients. Eggs provide essential protein, bananas offer potassium and various vitamins, and coconut oil provides healthy medium-chain triglycerides (MCTs). Every bite is packed with wholesome goodness, fueling your body rather than just filling it.
- Potentially Easier to Digest: For some individuals, flourless recipes can be easier on the digestive system compared to those heavy in wheat flour, which can sometimes cause discomfort. The simplicity of ingredients and absence of heavy flours can contribute to better digestive comfort.
- Kid-Friendly & Easily Customizable: Children often adore the naturally sweet taste of banana and the added fun of chocolate, making these muffins a fantastic and healthy snack option for little ones. Furthermore, the recipe is highly adaptable; the ability to add various mix-ins like nuts, seeds, or different dried fruits makes them easily customizable to suit any family member’s taste or dietary needs.
- Perfect for Using Overripe Bananas: This recipe provides an ingenious and delicious solution for using up those super ripe bananas sitting on your counter. Instead of letting them go to waste, you can effortlessly transform them into a delightful, wholesome, and guilt-free treat!
Serving Suggestions for Your Delicious Muffins
These flourless banana muffins are incredibly versatile and can be enjoyed in a multitude of ways, from a quick breakfast to a comforting dessert. Here are some serving suggestions to make them even more delightful and to help you savor every bite:
- Classic Breakfast or Snack: Enjoy them simply as they are, alongside your morning coffee, tea, or a glass of milk. They make for a quick, energizing, and wholesome snack any time of day, perfect for a mid-morning pick-me-up or an afternoon treat.
- Warm with a Decadent Spread: For an extra indulgent treat, warm a muffin slightly in the microwave or oven. Then, spread a dollop of your favorite nut butter (almond butter, peanut butter, or cashew butter) or a light cream cheese frosting on top. The warmth will melt the spread slightly, creating a luxurious experience.
- Paired with Fresh Fruit: For a balanced and refreshing meal, pair your muffin with a side of fresh berries (strawberries, blueberries, raspberries), sliced apples, or a vibrant fruit salad. The fresh fruit complements the rich muffin flavor beautifully.
- Yogurt Parfait Component: Crumble a muffin over a bowl of Greek yogurt (or your preferred dairy-free alternative) with some granola and fresh fruit layers for a wholesome, satisfying, and delicious parfait. It adds a wonderful texture and flavor dimension to your yogurt.
- A Simple Dessert Upgrade: Serve a warm muffin with a scoop of creamy vanilla bean ice cream or a drizzle of extra pure maple syrup or a light caramel sauce for a simple yet comforting dessert that’s sure to please.
- Ideal for Meal Prep: Bake a large batch of these muffins on the weekend. Once cooled, store them properly (or freeze them) to have healthy, ready-to-grab breakfasts or snacks throughout your busy week. They are perfect for on-the-go nourishment!
Storage and Freezing Instructions
Proper storage is key to enjoying your delicious **Gluten-Free Banana Muffins** for as long as possible while maintaining their freshness and wonderful texture. Here’s how to keep them at their best:
Once your muffins have completely cooled to room temperature, which is essential to prevent sogginess, transfer them to an airtight container. Store them at room temperature for optimal freshness. These delicious muffins are best enjoyed within 2-3 days. For slightly longer storage at room temperature (up to 4-5 days), you can place a piece of paper towel at the bottom of the container and another on top before sealing. This helps absorb any excess moisture, helping to prevent sogginess. Avoid refrigerating muffins, as the cool air can unfortunately dry them out quickly.
To Freeze & Thaw Your Muffins for Long-Term Enjoyment:
Freezing is an excellent option for long-term storage, allowing you to enjoy these wholesome muffins whenever a craving strikes, or to have a quick, healthy snack on hand!
- Cool Muffins Completely: This step is absolutely critical before freezing. Warm muffins will create condensation inside the wrapping, leading to ice crystals and soggy, unappetizing muffins upon thawing. Ensure they are fully cooled to room temperature, which might take 1-2 hours on a wire rack.
- Individual Wrapping for Freezing: For the best results and ultimate convenience, wrap each **Gluten-Free Banana Muffin** individually in plastic wrap. This step is vital to prevent freezer burn, maintain moisture, and makes it incredibly easy to grab and thaw just one muffin at a time as needed.
- Secure in Freezer Bags or Containers: Once individually wrapped, place the muffins in a large, freezer-safe ziplock bag or an airtight freezer container. This provides an additional layer of protection against freezer odors and helps maintain their freshness and flavor for up to 2-3 months. Label the bag with the date for easy tracking.
- Thawing Instructions: When you’re ready to enjoy a frozen muffin, you have a couple of convenient options:
- Room Temperature Thaw: Simply set the desired number of individually wrapped muffins out at room temperature for a few hours, or ideally, overnight, until they are fully thawed and soft.
- Quick Microwave Thaw/Warm: For a quicker thaw and a warm, comforting muffin, remove the plastic wrap and heat the frozen muffin in the microwave for 20-30 seconds on high power, or until it’s warmed through and soft. Be careful not to overheat, as this can make them tough or rubbery.
Explore More Delicious Gluten-Free Recipes:
If you loved these healthy flourless banana muffins, you’ll be thrilled to discover more healthy and delightful gluten-free treats from our kitchen. Expand your baking repertoire with these fantastic recipes that are sure to please everyone:
Desserts
Irresistible Gluten-Free Carrot Cake
Breakfast
Healthy Gluten-Free Zucchini Muffins
Desserts
Delightful Gluten-Free Apple Muffins
Desserts
The Best Gluten-Free Brownies Recipe

Pin Recipe
Print Recipe
Flourless Banana Muffins
Chelsea Lords
15
25
40
9 muffins
Recipe Video (External Link)
Watch how to make these delicious Flourless Banana Muffins by clicking the link below:
Watch Flourless Banana Muffins Video Here
Alternatively, you can view the video with a thumbnail:
Equipment Needed
-
Muffin pan
-
Blender or food processor
-
Large mixing bowl
-
Fork or potato masher
-
Wire cooling rack
-
Measuring cups and spoons
Ingredients for 9 Muffins
- 1 cup old-fashioned oats (not steel cut or quick oats)
- 1 cup mashed banana (from 2–3 large, very ripe bananas)
- 1 large egg
- 1/4 cup + 2 tablespoons pure maple syrup
- 1/2 teaspoon baking soda
- 1/4 teaspoon baking powder
- 1/2 teaspoon ground cinnamon
- 1/4 teaspoon salt
- 2 tablespoons melted coconut oil (cooled to room temperature)
- 1 teaspoon vanilla extract
- 1/4 cup dark chocolate chips
- 1/4 cup mini chocolate chips (see Recipe Notes for variations)
Detailed Instructions
-
Preheat Oven & Prep Muffin Pan: Preheat your oven to 350°F (175°C). Take a 9-cavity muffin pan and generously grease each cavity. This step is crucial for easy muffin release without sticking. Melt the coconut oil and set it aside to cool completely to room temperature before you start mixing the wet ingredients.
-
Prepare Oat Flour: Measure out 1 cup of old-fashioned oats by filling a 1-cup measuring cup and leveling the top with a straight edge or knife. Transfer these oats into a food processor or a high-powered blender. Blend the oats until they achieve a fine, flour-like consistency. If necessary, pause, stir the oats, and blend again to ensure there are no larger chunks remaining. Set your homemade oat flour aside.
-
Mash Bananas: In a small separate bowl, mash the very ripe bananas (aiming for 1 cup total) using the back of a fork. Mash them thoroughly until they are relatively smooth with minimal lumps. The smoother the bananas, the more uniform the muffin texture will be.
-
Mix the Batter: In a large mixing bowl, combine the mashed banana, the large egg, pure maple syrup, baking soda, baking powder, ground cinnamon, salt, the cooled melted coconut oil, and vanilla extract. Stir these ingredients thoroughly until they are well combined and uniform. Next, add the prepared blended oats to this wet mixture. Stir gently until the oats are just incorporated into the batter; avoid overmixing. Finally, fold in both the dark chocolate chips and mini chocolate chips (or your preferred total of 1/2 cup chocolate chips) until they are evenly distributed throughout the batter.
-
Bake to Perfection: Carefully spoon the muffin batter into the 9 prepared muffin cavities, ensuring each is filled to about three-quarters capacity. If desired, you can place a few extra chocolate chips on top of each muffin for a decorative touch. Bake for approximately 23–26 minutes. The muffins are ready when their edges are lightly golden brown and the tops no longer look wet or gooey. A good test is to gently press the top of a muffin; it should spring back if fully baked. Remove the pan from the oven and allow the muffins to rest in the pan for 5 minutes. This resting period helps them firm up, making them easier to remove. After 5 minutes, use a fork or small spatula to carefully lift the muffins out onto a wire cooling rack to cool completely.
Recipe Notes & Variations
Adding Nuts or Dried Fruits: For an extra layer of texture and flavor, consider folding in 1/4 to 1/2 cup of chopped nuts (like walnuts or pecans) or dried fruits (such as raisins or dried cranberries) along with the chocolate chips. This is a great way to customize your muffins and add more nutritional value.
Storage for Freshness: Once completely cooled, store your muffins in an airtight container at room temperature. They are best enjoyed within 2-3 days. To maintain freshness, placing a paper towel at the bottom of the container can help absorb any excess moisture, preventing sogginess.
Freezing for Later Enjoyment: To extend their shelf life, these muffins freeze beautifully! Ensure they are *completely* cooled before wrapping each muffin individually in plastic wrap. Then, place the wrapped muffins into a large freezer bag or an airtight freezer container. They can be stored in the freezer for up to 2-3 months. To thaw, simply set them out at room temperature for a few hours, or warm them gently in the microwave for a quick treat.
Nutrition Information (Per Serving)
Serving: 1 muffin
|
Calories: 178 kcal
|
Carbohydrates: 27 g
|
Protein: 3 g
|
Fat: 7 g
|
Saturated Fat: 5 g
|
Polyunsaturated Fat: 0.4 g
|
Monounsaturated Fat: 1 g
|
Trans Fat: 0.01 g
|
Cholesterol: 21 mg
|
Sodium: 156 mg
|
Potassium: 191 mg
|
Fiber: 2 g
|
Sugar: 16 g
|
Vitamin A: 58 IU
|
Vitamin C: 2 mg
|
Calcium: 51 mg
|
Iron: 1 mg
Please note: Nutrition information is automatically calculated and should be considered an approximation. For precise dietary needs, please consult a registered dietitian.
Love this recipe? Leave a comment below and share your experience!
Your feedback helps our community of bakers!