
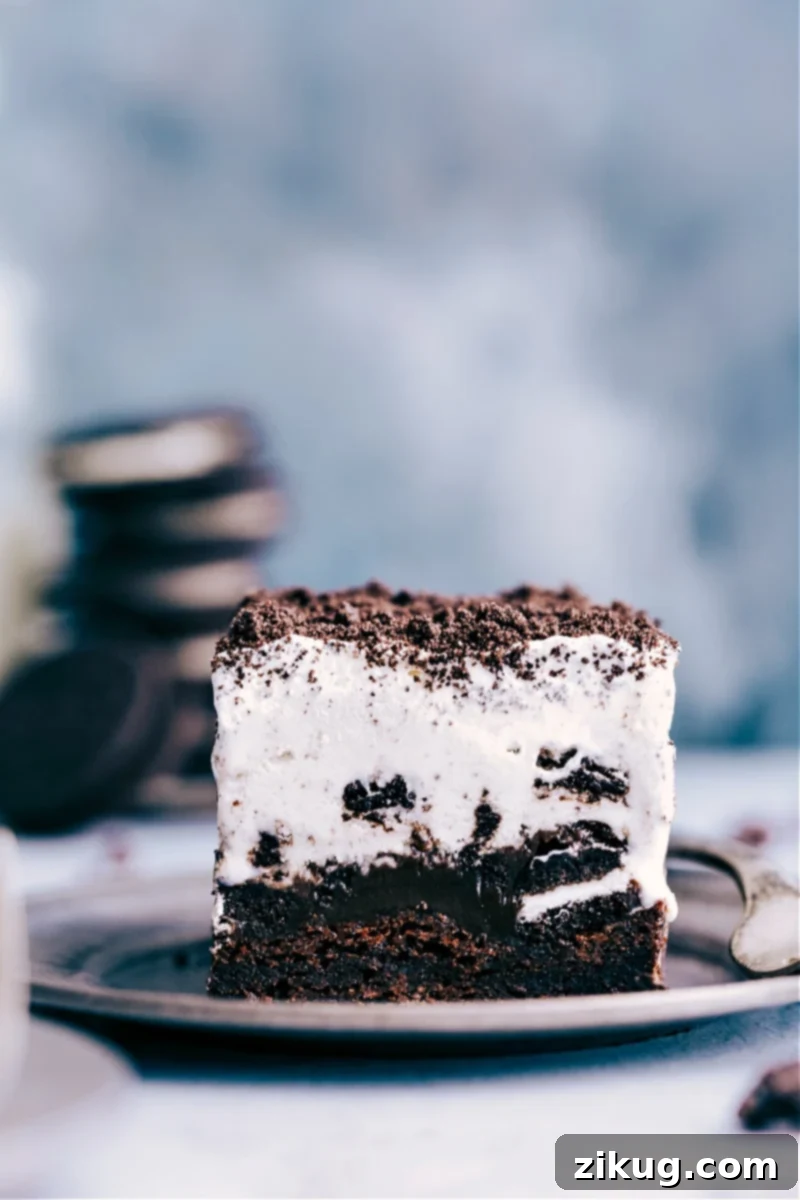
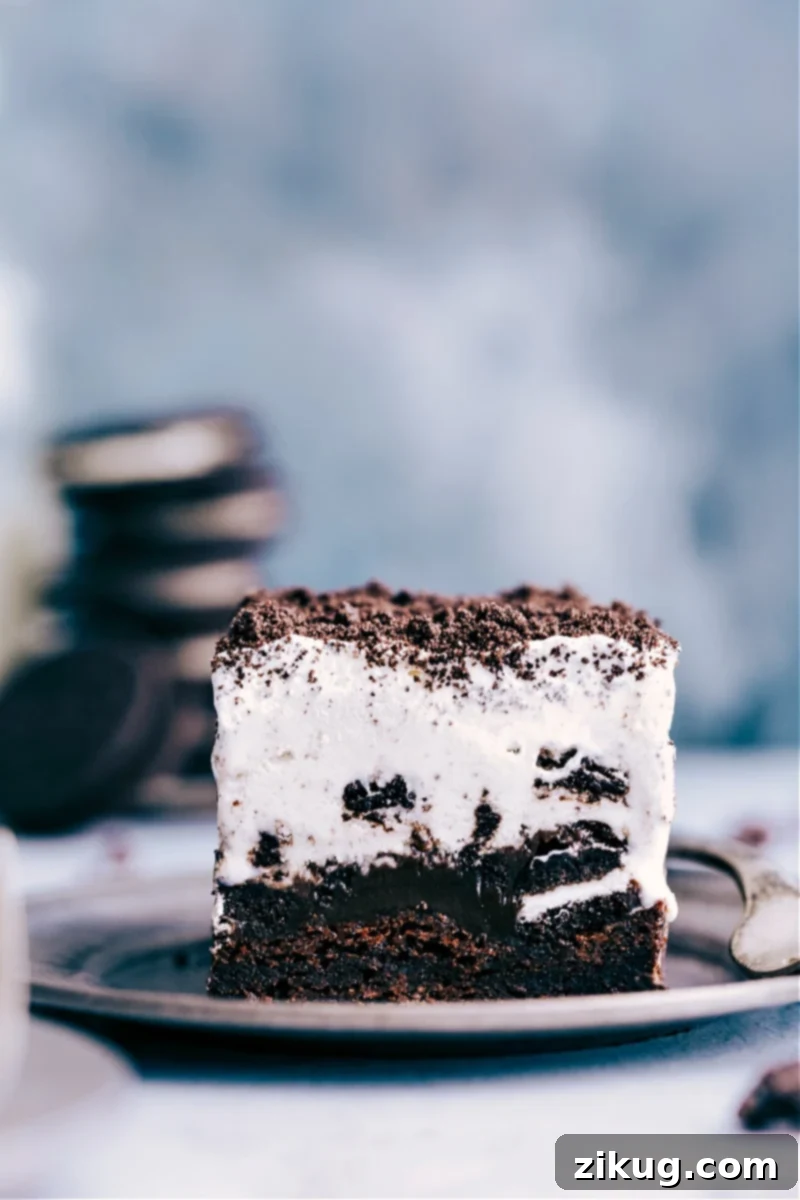
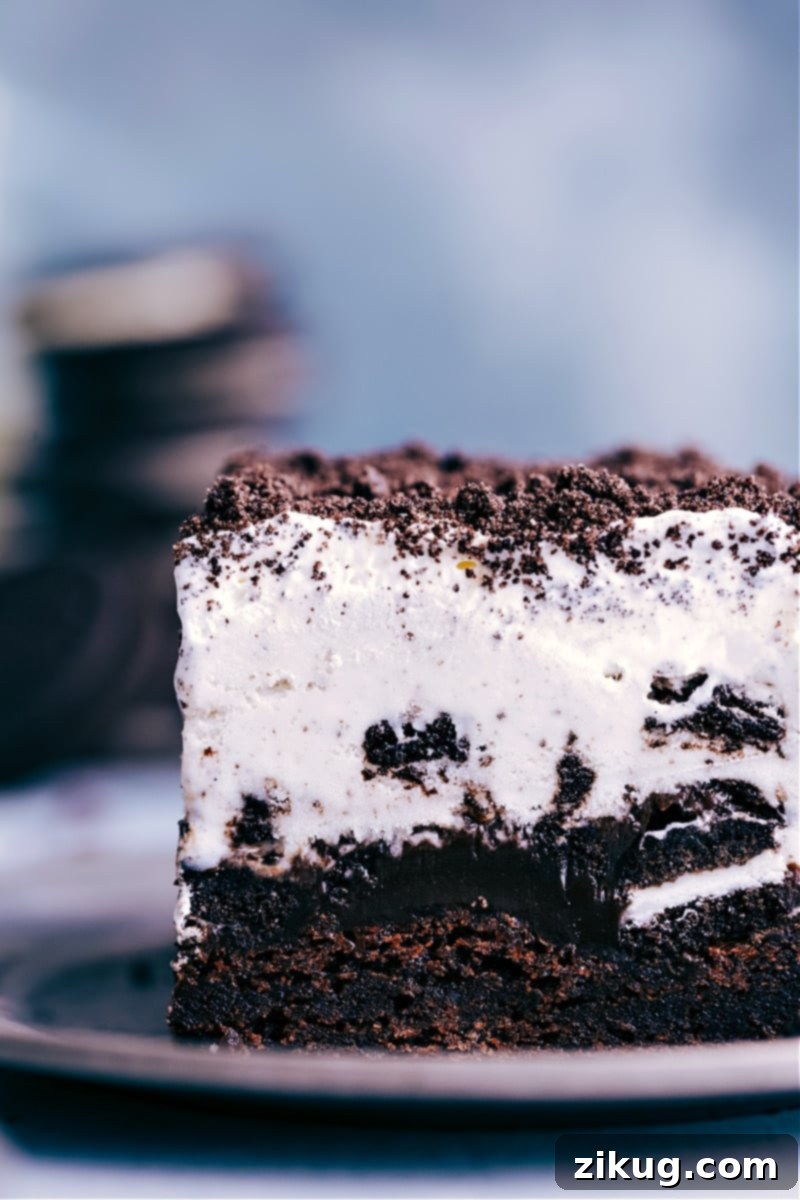
Brownie Oreo Ice Cream Cake: A Stack of Pure Indulgence. Imagine layers of rich, fudgy brownies, generously topped with hot fudge-covered Oreos, creamy cookies and cream ice cream, and finished with a cloud of fluffy whipped topping. This isn’t just a dessert; it’s an experience, a masterpiece that promises to be the highlight of any gathering. Prepare to impress with this ultimate frozen treat!
Crafting the Ultimate Brownie Oreo Ice Cream Cake
For years, I’ve perfected the art of celebration desserts, but none have garnered as much praise and annual requests as this spectacular Brownie Oreo Ice Cream Cake. What started as a quest to combine my husband’s favorite sweets for his birthday evolved into a tradition, a testament to its irresistible appeal. This isn’t just an ice cream cake; it’s a symphony of textures and flavors that will leave everyone asking for the recipe.
The magic lies in its harmonious blend: dense, chewy brownies, crunchy Oreos generously coated in warm hot fudge, lusciously smooth ice cream, and a light, airy whipped cream finish. Each spoonful delivers a perfect balance of chocolatey richness, sweet creaminess, and delightful crunch. It’s a dessert that’s not only incredibly delicious but also surprisingly straightforward to assemble, making it perfect for both seasoned bakers and novice enthusiasts alike.
Deconstructing the Decadent Layers of Your Brownie Oreo Ice Cream Cake
The secret to this incredible frozen dessert lies in its well-structured, delightful layers. Each component plays a crucial role in creating the ultimate taste and texture experience. Let’s break down how to perfect each delicious stratum.
The Foundation: Perfectly Fudgy Brownies
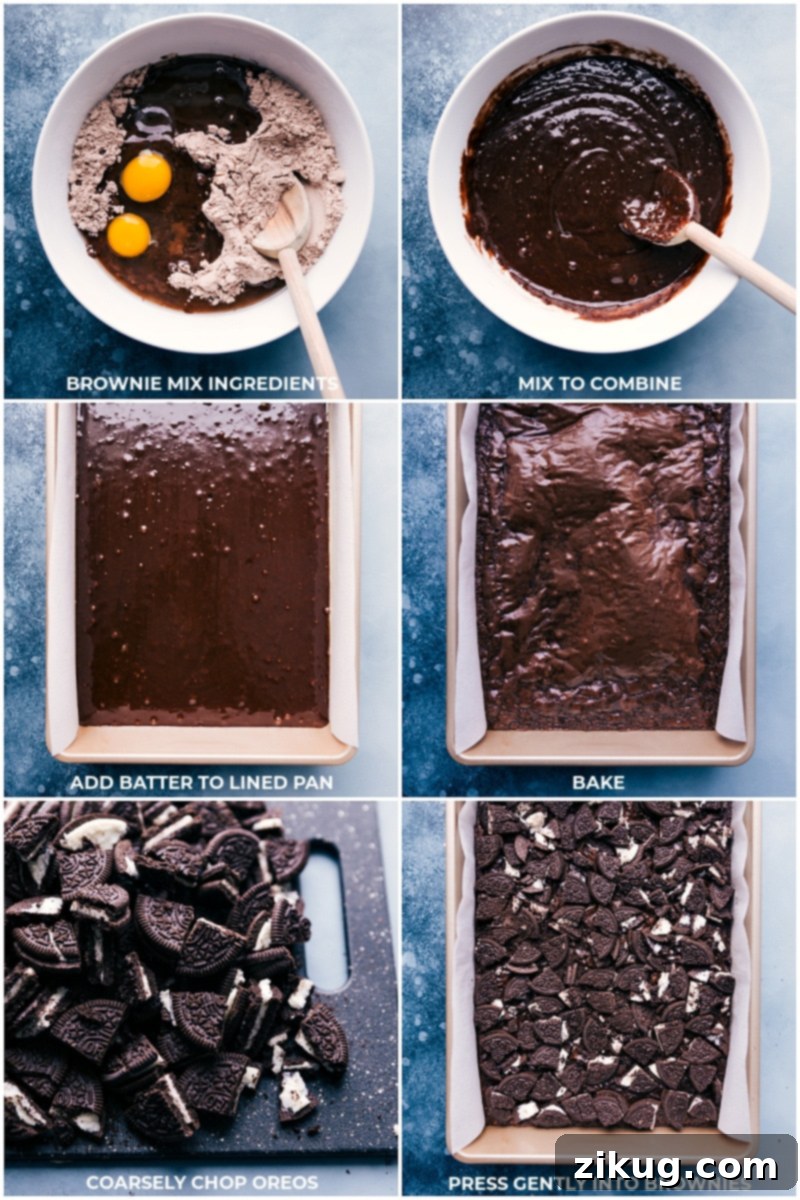
We kick off this magnificent Brownie Oreo Ice Cream Cake with a rich, dense brownie base. While making brownies from scratch offers a certain satisfaction, a high-quality boxed mix provides both convenience and consistent results, which is especially appreciated when assembling a multi-layered dessert. The goal here is speed and ease without compromising flavor.
If you’re opting for a boxed mix, ensure you select one specifically designed for a 9×13-inch pan to fit our recipe perfectly. My personal recommendation, known for its consistent fudgy texture, is Betty Crocker’s Fudge Brownie Mix®. There are several versions, so always double-check the pan size indication. For those who prefer a homemade touch, feel free to substitute with your favorite brownie recipe, as long as it yields enough batter for a 9×13-inch pan. Remember to omit any frosting if your homemade recipe includes it, as we’ll be adding plenty of delicious toppings!
The Crunchy Core: Crushed Oreo Cookies
As the brownies cool slightly, it’s time to prepare the star cookie: Oreos! These iconic chocolate sandwich cookies add a delightful crunch and an extra layer of chocolatey goodness. Coarsely chop most of your Oreos – aim for pieces that are substantial enough to provide texture in every bite, yet small enough to spread evenly. Save a few for garnish later.
The key to integrating the Oreos seamlessly into your Brownie Oreo Ice Cream Cake is to press them gently but firmly onto the brownies while they are still slightly warm and under-baked. This subtle under-baking ensures the brownie surface is soft enough for the cookie pieces to adhere beautifully, preventing them from scattering when sliced. Distribute them in a single, even layer across the entire brownie surface for maximum Oreo impact.
The Gooey Connective Tissue: Decadent Hot Fudge
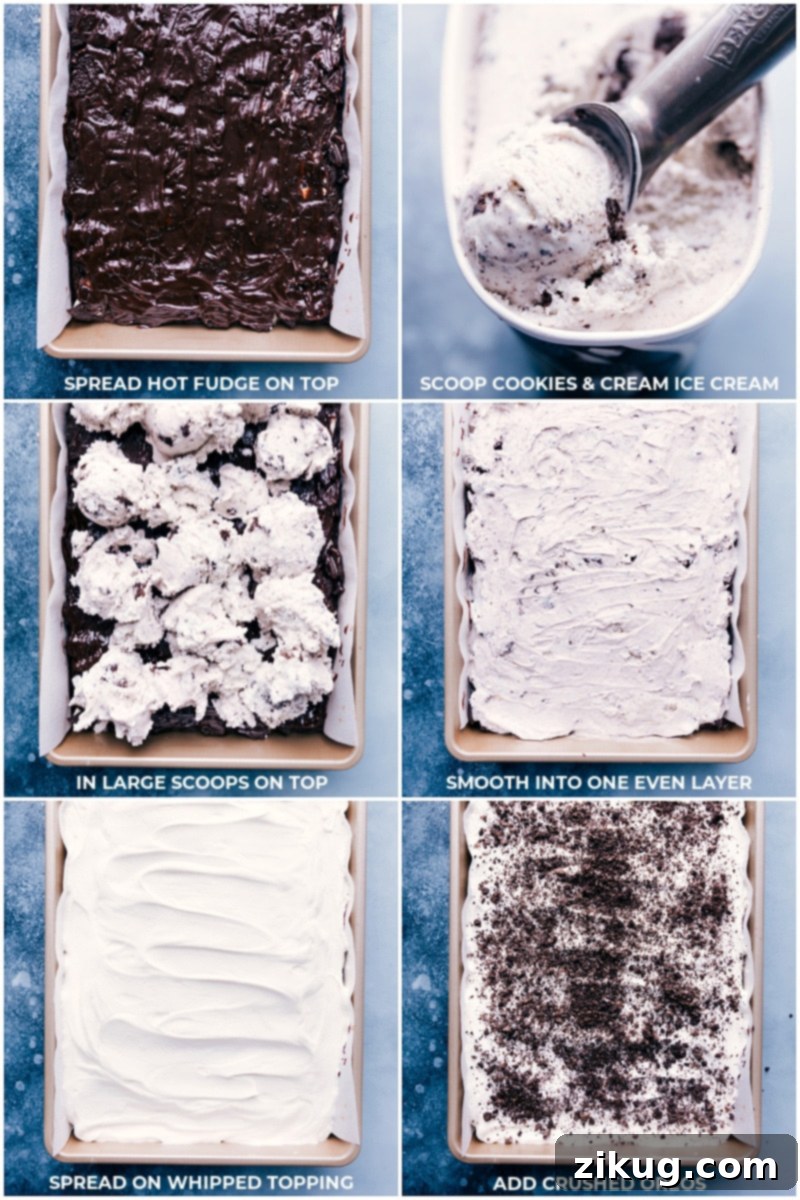
With the Oreos firmly in place, it’s time for the glorious hot fudge layer. This sticky, sweet topping doesn’t just add incredible flavor; it acts as a delicious adhesive, locking the Oreos to the brownies and preparing the base for the next creamy layer. Spreading cold fudge can be a challenge, so a quick warm-up in the microwave is highly recommended. Just a brief zap will make it wonderfully pliable.
Once warmed, spoon generous dollops of hot fudge all over the Oreo-covered brownies. Then, with a little patience and the back of a large spoon or a spatula, gently spread the fudge into a smooth, even layer. This layer creates a luscious barrier and a burst of intense chocolate flavor that elevates the entire Brownie Oreo Ice Cream Cake. Don’t worry if it’s not perfectly smooth; a rustic look adds to its charm!
The Creamy Heart: Cookies & Cream Ice Cream
Now for the main event of any ice cream cake: the ice cream itself! For this Brownie Oreo Ice Cream Cake, cookies and cream ice cream is the classic choice, perfectly complementing the Oreo base. Select your favorite brand – a high-quality ice cream will make a noticeable difference in the final taste and texture. If you’re unsure which brand to choose, taste tests by publications like The Washington Post can offer excellent guidance (Tillamook® is a popular choice for good reason!).
To ensure smooth spreading, allow the ice cream to soften slightly at room temperature for about 5-10 minutes before scooping. This makes it much easier to work with, allowing you to create a uniform, even layer without battling hard, frozen ice cream. Spread it carefully over the hot fudge, making sure to reach all the edges. This layer needs to be even to ensure every slice has the perfect proportion of creamy goodness.
The Fluffy Crown: Light Whipped Topping
The grand finale for our Brownie Oreo Ice Cream Cake is a generous layer of light and fluffy whipped topping. This adds a delicate creaminess that beautifully contrasts the richer layers beneath. You have two excellent options here: you can opt for the homemade route, creating fresh whipped cream from scratch for an unparalleled freshness, or choose the convenience of a thawed container of frozen whipped topping. Both options work wonderfully, so choose what best suits your time and preference.
Once you’ve spread the whipped topping evenly over the ice cream layer, it’s time for the finishing touch. Remember those few Oreos you saved earlier? Crush them and sprinkle them over the whipped topping for an extra visual appeal and another delightful textural pop. This not only enhances the presentation but also reinforces the iconic Oreo flavor profile.
Expert Tips for the Perfect Brownie Oreo Ice Cream Cake
Achieving a truly show-stopping Brownie Oreo Ice Cream Cake involves a few clever tricks. These tips will ensure your dessert is not only delicious but also perfectly structured and easy to enjoy:
- Maintain Chill Throughout Assembly: The key to successful layering and preventing an icy texture is to keep your Brownie Oreo Ice Cream Cake as cold as possible during the assembly process. If the ice cream or other frozen layers start to melt excessively, they can become icy when refrozen. Work quickly, and return the pan to the freezer briefly between each major step if needed, especially after spreading the hot fudge and before adding the ice cream.
- Slightly Under-bake Your Brownies: This is a crucial step for achieving the ideal texture in your frozen dessert. Brownies tend to firm up significantly when frozen. If baked for the full time specified on the package, they can become unpleasantly hard when chilled. By slightly under-baking them – typically by about 3 minutes – you’ll ensure they remain soft and fudgy even after freezing, offering a pleasant contrast to the cold, creamy ice cream and hot fudge. They should be set but still have a slight give in the center.
- Experiment with Flavor Variations: While cookies and cream is a classic choice, don’t hesitate to get creative with your ice cream selection. This Brownie Oreo Ice Cream Cake is incredibly versatile! Consider swapping out the cookies and cream for vanilla bean for a simpler, elegant flavor, cookie dough for an extra punch of sweetness, mint chip for a refreshing twist, or even a rich chocolate ice cream for the ultimate chocolate lover’s dream. Each variation opens up a new world of delicious possibilities.
- Prepare Your Pan for Easy Removal: Lining your 9×13-inch pan with parchment paper is a game-changer. Ensure you leave a generous overhang on two opposite sides. This “sling” will allow you to effortlessly lift the entire frozen cake out of the pan before slicing, guaranteeing clean, intact bars every time.
- Chill Thoroughly for Optimal Slicing: Patience is a virtue, especially with frozen desserts. Allow your Brownie Oreo Ice Cream Cake to chill in the freezer for at least 2 hours, and ideally overnight, before attempting to slice it. A fully frozen cake will hold its shape much better, resulting in neat, clean cuts.
Effortless Serving: Quick Tips for Your Brownie Oreo Ice Cream Cake
Serving your magnificent Brownie Oreo Ice Cream Cake can be just as enjoyable as making it, especially with these simple tips for clean, beautiful slices:
- Leverage the Parchment Paper Overhang: As mentioned, the parchment paper is your best friend. Once the cake is completely frozen, use the overhang to gently lift the entire slab out of the baking pan and place it on a cutting board. This prevents any struggle with removal and keeps your pan pristine.
- The Hot Knife Technique for Pristine Slices: For remarkably clean and easy slices, especially through the frozen layers, run your sharp knife under hot water for a few seconds. Immediately wipe the blade dry with a towel before making each cut. The warmth helps the knife glide through without dragging or breaking the layers. Repeat this process – warm, wipe, cut – between every slice for picture-perfect results.
- Choose a Very Sharp Knife: While the hot knife technique is effective, starting with a truly sharp knife will make the entire process much smoother. A dull knife will require more force and can lead to uneven, messy cuts.
- Allow a Brief Stand Time: Don’t cut your Brownie Oreo Ice Cream Cake straight from the deep freeze. Allowing it to stand at room temperature for about 5-10 minutes will soften it ever so slightly, making it significantly easier to slice without it being too hard or too melty. This short tempering period also enhances the eating experience, as the textures will be at their prime.
Storage Solutions for Your Brownie Oreo Ice Cream Cake
- To enjoy your delicious Brownie Oreo Ice Cream Cake for longer, store any leftovers in an airtight container in the freezer. Properly stored, it will maintain its quality and flavor for up to 2 months. Ensure it’s tightly covered to prevent freezer burn and keep it tasting fresh.
Explore More Irresistible Ice Cream Treats
If you’ve fallen in love with the magic of frozen desserts, here are more delightful ice cream recipes to expand your repertoire:
- Classic Ice Cream Pie (or try the festive Grasshopper Pie version)
- Churro Ice Cream Sandwiches with creamy vanilla bean ice cream
- Easy Ice Cream Sandwich Cake, made with actual ice cream sandwiches
- Homemade Gelato in two tempting flavors: rich chocolate and Stracciatella
- Loaded Cookie Dough Ice Cream Bars featuring an irresistible cookie dough crust
Brownie Oreo Ice Cream Bars
Chelsea Lords
20 minutes
25 minutes
3 hours
30 minutes
4 hours
15 minutes
24 bars
Equipment
-
9 x 13-inch baking pan
Ingredients
- 1 (18.4-ounce) package fudge brownie mix fully prepared, see note 1
- 27 regular Oreos divided
- 1 (11.75-ounce) container hot fudge topping
- 1 (48-ounce) container cookies and cream ice cream
- 1 (8-ounce) container frozen whipped topping completely thawed
Instructions
-
Line a 9×13-inch pan with parchment paper, ensuring there is an overhang on two sides for easy removal. Set aside. Preheat your oven according to the specific directions on your brownie package.
-
Prepare the brownie batter as instructed on the package. Bake the brownies according to package directions, but intentionally under-bake them by about 3 minutes. This ensures they remain soft and fudgy even after freezing, making them easier to cut. The brownies should be set but still soft. Remove from the oven and allow them to cool in the pan for approximately 20 minutes.
-
While the brownies cool, coarsely chop all but 3 of the Oreos. A good size is cutting each cookie into 4 even pieces. Gently but firmly press the chopped cookies into an even layer on top of the slightly warm brownies.
-
Warm the hot fudge topping in the microwave for about 30 seconds until it’s easily spreadable. Drizzle large dollops of the warmed fudge over the crushed Oreos. Use the back of a large spoon or a spatula to gently spread the fudge into a smooth, even layer. Place the pan in the freezer for 10 minutes to set the fudge.
-
Allow the cookies and cream ice cream to sit at room temperature for 5-10 minutes to soften slightly. Remove the pan from the freezer and scoop large portions of the softened ice cream over the hot fudge layer. Using a spatula, gently press and smooth the ice cream into an even, uniform layer across the entire surface.
-
Return the pan to the freezer. Freeze for a minimum of 2 hours, but for the best results and easiest slicing, allow it to freeze overnight.
-
Once the ice cream layer is firm, spread the completely thawed whipped topping evenly over the ice cream. If desired, crush the 3 remaining Oreos and sprinkle them over the whipped topping for garnish. Cover the bars loosely with plastic wrap or foil and return to the freezer for an additional 30 minutes to set the topping.
-
Before cutting, allow the frozen bars to sit at room temperature for about 5 minutes to soften slightly. Use the parchment paper overhang to carefully lift the entire dessert from the pan onto a cutting board. For clean slices, run a sharp knife under hot water, wipe it dry, and then cut through the bars. Repeat the warm-wipe-cut process for each slice. Cover any leftover bars tightly and return them to the freezer immediately.
Recipe Notes
Storage: Leftover Brownie Oreo Ice Cream Bars can be stored in an airtight container in the freezer for up to 2 months.
Nutrition
Serving:
1serving
|
Calories:
346kcal
|
Carbohydrates:
53g
|
Protein:
5g
|
Fat:
14g
|
Saturated Fat:
7g
|
Trans Fat:
1g
|
Cholesterol:
20mg
|
Sodium:
219mg
|
Potassium:
217mg
|
Fiber:
1g
|
Sugar:
37g
|
Vitamin A:
243IU
|
Vitamin C:
1mg
|
Calcium:
78mg
|
Iron:
2mg
Nutrition information is automatically calculated, so should only be used as an approximation.
Love this recipe? Share your thoughts and leave a comment below!