

The Ultimate Chocolate Chip Scones with Greek Yogurt: A Bakery-Style Delight
Indulge in the pure joy of homemade Chocolate Chip Scones. These aren’t just any scones; they are buttery, boast delightfully crisp edges, and feature incredibly tender centers, with irresistible pockets of melty chocolate in every single bite. What’s our secret for achieving such an extraordinary texture? A touch of Greek yogurt, which transforms them into an exceptionally moist and tender treat that rivals your favorite bakery’s best.


A Note from the Baker
The Game-Changing Ingredient: Greek Yogurt
While social media trends often highlight new “it” ingredients, my heart remains loyal to Greek yogurt. It’s popular, certainly, but perhaps doesn’t always get the recognition it deserves for its incredible versatility in baking. Forget the fleeting fads; Greek yogurt is a timeless workhorse in the kitchen, offering a creamy texture and subtle tang that elevates countless recipes.
When it comes to baking, I find Greek yogurt to be far superior to many alternatives. It blends seamlessly, bakes beautifully, and consistently delivers outstanding results. Incorporating Greek yogurt into scones has become one of my all-time favorite culinary hacks.
My classic cherry scones are undeniably delicious and a constant craving, but they typically require generous amounts of sugar and heavy cream to achieve that desired bakery-style richness. I aimed to create a similar indulgent experience without going quite so overboard. The solution? Reducing the sugar content and ingeniously swapping out some of the heavy cream for full-fat Greek yogurt.
This adjustment required a bit of careful testing and tweaking, but the final outcome was nothing short of spectacular. These chocolate chip scones are wonderfully tender, exceptionally moist, and utterly delicious. You’d honestly never guess they’re a lighter alternative to traditional scones. In fact, I might confidently say they are my new favorite scone recipe yet!
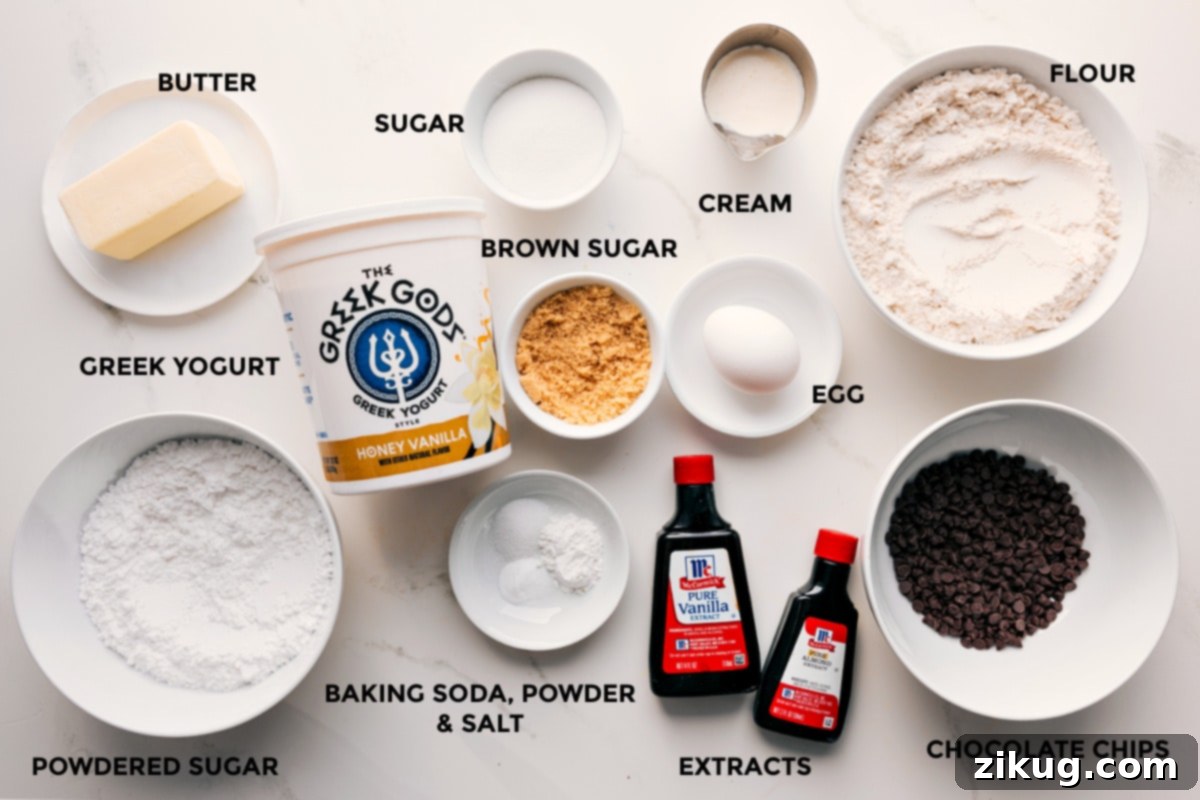
Essential Ingredients for Perfect Chocolate Chip Scones
Crafting the perfect scone begins with understanding each ingredient’s role. Here’s a detailed look at what you’ll need and some vital tips for success:
| Ingredient | Tips for Best Results |
|---|---|
| Flour, Granulated Sugar, Brown Sugar, Baking Powder, Baking Soda, Salt | Ensure your brown sugar is incredibly fresh, soft, and free from any hard clumps for even incorporation and moisture. Crucially, always check the freshness of your baking powder and baking soda; expired leavening agents will result in flat, dense scones. |
| Frozen Unsalted Butter | This is perhaps the most critical ingredient for flaky scones. Grate the butter directly from the freezer using the large holes of a box grater. Work quickly to prevent it from warming up. Cold butter creates steam in the oven, which leads to those coveted flaky layers. |
| Greek Yogurt, Egg, Vanilla Extract, Almond Extract | Always opt for a thick, full-fat Greek yogurt. The fat content contributes significantly to the scones’ tender texture and richness. A honey-vanilla Greek yogurt can add an extra layer of delightful flavor to your chocolate chip scones, complementing the chocolate beautifully. Make sure your egg is large and at room temperature for better emulsification. |
| Mini Chocolate Chips | While any chocolate chips are tasty, mini chocolate chips are highly recommended for this recipe. Their smaller size ensures they spread more evenly throughout the dough, guaranteeing a satisfying amount of melty chocolate in every single bite without making the dough difficult to handle or causing the scones to spread too much. Large chips didn’t perform as well in testing. |
| Heavy Cream (for brushing), Powdered Sugar, Milk/Cream (for Glaze) | A light brush of heavy cream before baking gives the scones a beautiful golden-brown top and a slightly richer crust. For the glaze, aim for a thick consistency – it should be pourable but not watery – to ensure it sets nicely and creates an elegant finish. Adjust with more liquid or powdered sugar as needed. |
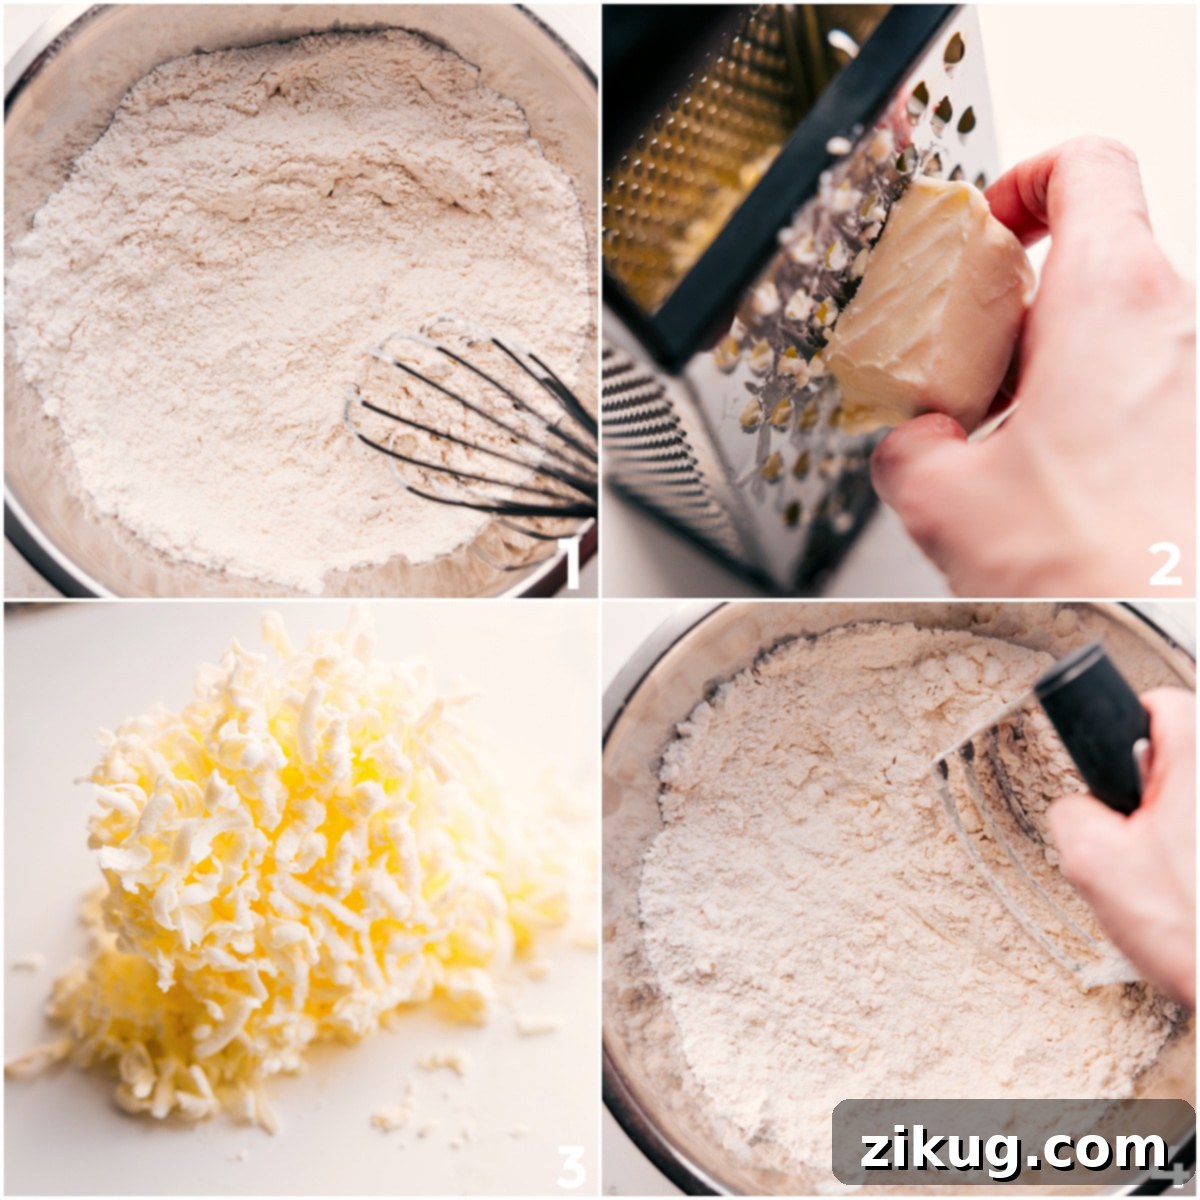
Step-by-Step Guide: How to Make Irresistible Chocolate Chip Scones
Making bakery-quality chocolate chip scones at home is simpler than you might think. Follow these detailed steps for guaranteed success and a batch of wonderfully tender, flaky, and chocolate-filled delights:
- Preparation is Key: Begin by placing your unsalted butter in the freezer for at least 30 minutes to ensure it’s thoroughly chilled and firm. Adjust your oven rack to the lower third position, then preheat your oven to a precise 400°F (200°C). Line a large baking sheet with a silicone baking mat or parchment paper, which prevents sticking and aids in even baking.
- Combine Dry Ingredients: In a spacious mixing bowl, thoroughly whisk together the flour, ¼ cup of granulated sugar, light brown sugar, baking soda, baking powder, and salt. Whisking ensures that the leavening agents and flavorings are evenly distributed, leading to a consistent rise.
- Incorporate Cold Butter: Retrieve the frozen butter and, using the large holes of a cheese grater, grate it directly into your dry ingredient mixture. Alternatively, you can cut the butter into tiny, pea-sized cubes and return them to the freezer briefly until they are solid. Using a pastry cutter, your fingertips, or two butter knives, swiftly work the cold butter into the flour mixture until it resembles coarse crumbs with some larger, pea-sized chunks of butter remaining. These cold butter pieces are essential for creating steam pockets during baking, which result in flaky layers. Stir in the mini chocolate chips, then place the bowl in the refrigerator while you prepare the wet ingredients to keep everything cold.
- Mix Wet Ingredients: In a separate, smaller bowl, combine the vanilla extract, a single drop of almond extract (if using), the Greek yogurt, and the large egg. Whisk these ingredients together until they are completely smooth and well-combined.
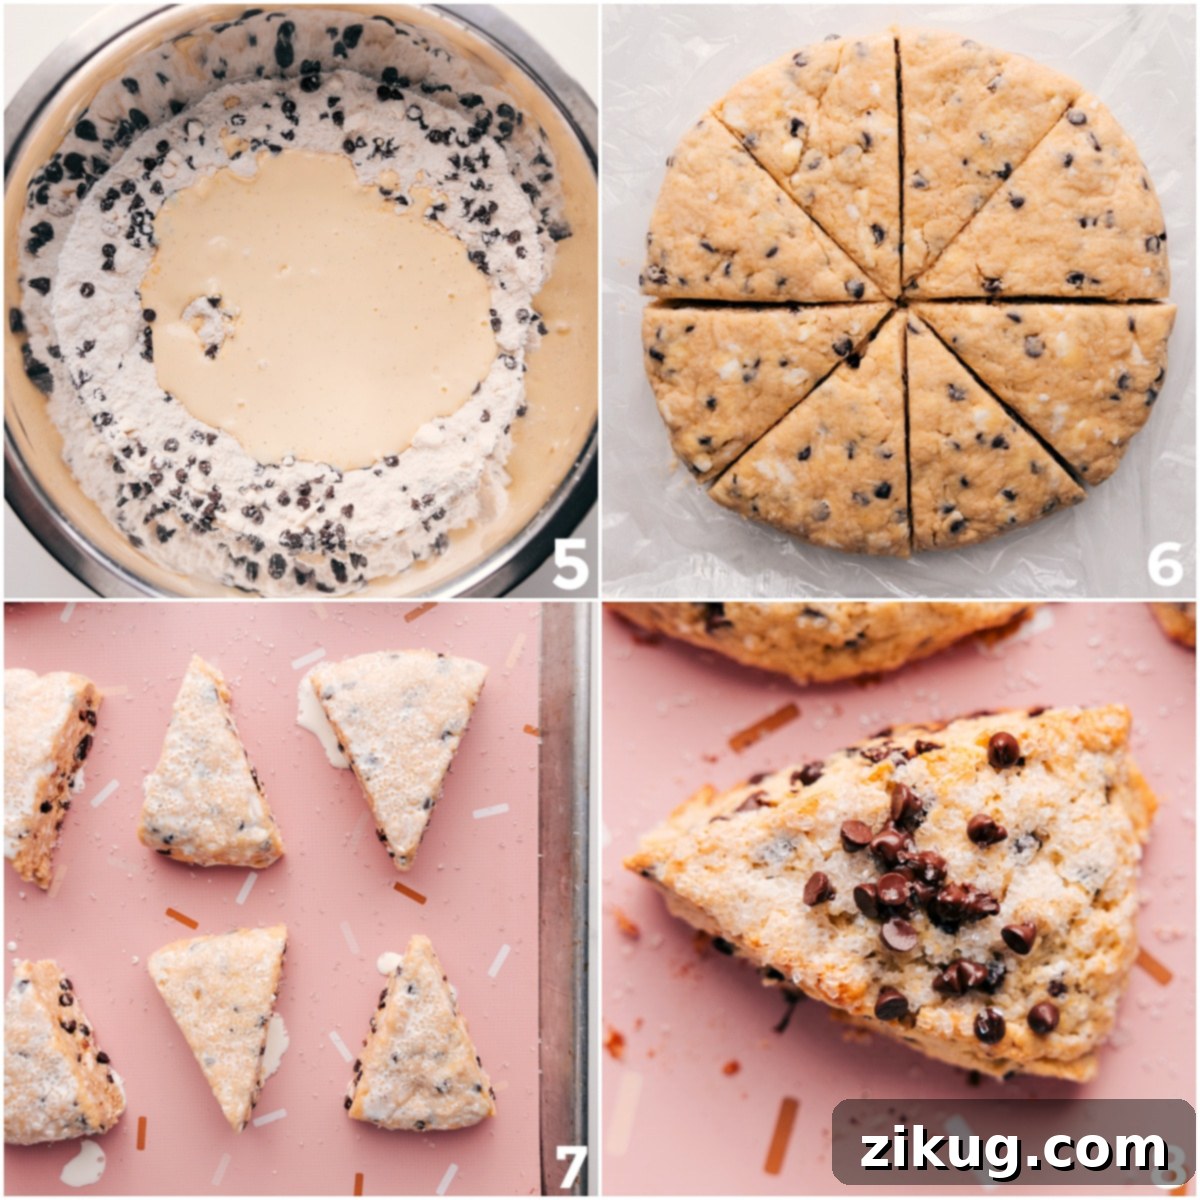
- Form the Dough: Pour the wet ingredients into the bowl with your chilled dry ingredients and butter mixture. Using a sturdy spatula or your hands, mix until the ingredients are *just* combined. The dough will be slightly sticky and might initially seem too dry to form a ball, but resist the urge to add more liquid. Gently press and knead it together a few times. The key here is to handle the dough as little as possible to avoid overworking the gluten, which can lead to tough scones. Stop mixing once it comes together.
- Shape and Chill: Lightly flour a clean surface. Transfer the dough and gently shape it into a 5.5-inch disc, approximately 1 inch thick. Wrap the disc tightly in plastic wrap and place it in the freezer for 20 minutes. This chilling step is crucial; it helps the butter remain solid, ensuring flaky layers, and prevents the scones from spreading too much during baking. Once chilled, unwrap the disc. Using a sharp knife, cut the disc into 8 equal triangles with decisive, swift cuts rather than a sawing motion, which can drag the dough. Carefully separate the triangles and arrange them on your prepared baking sheet, leaving about 1 inch of space between each.
- Brush and Sprinkle: For a beautiful golden top and a touch of sweetness, lightly brush the tops of each scone with heavy cream. Then, sprinkle them evenly with the remaining 1 teaspoon of granulated sugar. Return the entire baking sheet with the shaped scones to the refrigerator and chill for another 20 minutes. This second chill further ensures optimal flakiness and shape retention.
- Bake to Golden Perfection: Remove the chilled scones from the fridge and immediately transfer them to the fully preheated 400°F (200°C) oven. Bake for approximately 14–16 minutes, or until the edges are lightly golden brown and the tops are just barely golden. Keep a close eye on them, as ovens can vary. The goal is a light golden exterior and a tender interior.
- Prepare the Glaze: While the scones are baking or cooling, prepare your glaze. In a small bowl, whisk together the milk (or heavy cream), powdered sugar, and ¼ teaspoon of vanilla extract until the mixture is smooth and lump-free. Add more milk or powdered sugar in very small increments if needed, aiming for a thick, yet pourable consistency that will set nicely on the scones.
- Cool and Drizzle: Once baked, remove the scones from the oven and allow them to rest on the baking sheet for about 5 minutes. This allows them to finish cooking gently and firm up. Then, carefully transfer them to a wire rack to cool completely to room temperature. Once cooled, generously drizzle the prepared glaze over the tops of the scones using a spoon. Let the glaze set for a few minutes before serving.
Pro Baker’s Guide
My Favorite Tools for Making Flawless Chocolate Chip Scones
While you don’t need a professional kitchen, these simple tools can significantly enhance your scone-making experience and help achieve that perfect texture:
- Box Grater: An invaluable tool for grating frozen butter quickly and efficiently, ensuring it remains cold and distributed evenly without overworking it.
- Pastry Cutter (or two butter knives): Essential for cutting butter into the flour mixture, preventing your hands from warming the butter and minimizing dough handling.
- Flexible Measuring Tape or Ruler: Helps in accurately sizing and shaping your dough disc, ensuring uniform scones that bake evenly.
- Dough Scraper: A versatile tool that makes shaping, cutting, and transferring the sticky dough much easier, reducing direct hand contact.
- Silicone Baking Mat (or Parchment Paper): Provides a non-stick surface, ensuring the scones don’t stick and bake consistently, promoting even browning.
- Pastry Brush: Perfect for delicately brushing the tops of the scones with heavy cream before baking, giving them a beautiful golden sheen.
Frequently Asked Questions About Scones
Why Do My Scones Always Turn Out Hard?
Scones can become hard or tough if the dough is overmixed or if they are overbaked. Overmixing develops too much gluten in the flour, which makes the texture chewy and dense instead of tender and crumbly. Overbaking, on the other hand, simply dries them out. To ensure softer scones, always mix the dough just until the ingredients are combined and no dry streaks of flour remain. Additionally, monitor your oven closely and remove the scones as soon as they achieve that light golden color.
What Are The Secrets To Making Truly Good Scones?
Achieving truly exceptional scones relies on a few fundamental principles:
- Keep the Butter Cold: This is non-negotiable. Cold butter creates steam when baked, forming pockets of air that result in the signature flaky layers.
- Minimize Dough Handling: Work the dough as little as possible. Overworking develops gluten, which leads to tough scones. Gentle mixing is key.
- Don’t Over-Bake: Scones bake relatively quickly. Pull them from the oven as soon as they’re lightly golden. They will continue to set as they cool. Overbaking will dry them out.
- Chill the Shaped Scones: Chilling the cut scones before baking helps the butter solidify again and prevents the scones from spreading, allowing them to rise taller and maintain their beautiful shape.
- Use Fresh Leavening Agents: Baking powder and baking soda lose potency over time. Ensure yours are fresh for a proper rise.
Can I Add Different Mix-ins or Flavors?
Absolutely! While chocolate chips are classic, feel free to experiment with other additions. Consider dried cranberries, blueberries, lemon zest, orange zest, chopped nuts, or even a different type of chocolate. Just ensure your total amount of mix-ins doesn’t exceed 1 cup to maintain dough integrity. You can also adjust extracts; for example, orange extract pairs wonderfully with chocolate.
Can I Make Scone Dough Ahead of Time?
Yes, you can! You can prepare the dough, shape it into a disc, cut it into triangles, and then freeze the unbaked scones. Wrap them individually in plastic wrap and store them in an airtight container or freezer bag for up to 1 month. When ready to bake, place them directly from the freezer onto a prepared baking sheet, brush with cream, sprinkle with sugar, and bake, adding an extra 3-5 minutes to the baking time.
Storage Tips for Optimal Freshness
These delicious chocolate chip scones are truly best enjoyed the day they are baked, ideally still warm from the oven. Due to their moist, tender texture (thanks to the Greek yogurt!), they tend to soften quite a bit overnight. If you anticipate having leftovers or wish to prepare them in advance, freezing is your best option.
To Freeze Unbaked Scones: Place the freshly shaped, unbaked scones on a baking sheet lined with parchment paper or a silicone mat. Freeze them until they are completely solid (this prevents them from sticking together). Once frozen, transfer the solid scones to an airtight freezer-safe bag or container. They can be stored in the freezer for up to 1 month. When you’re ready to bake, simply place them directly from the freezer onto a lined baking sheet and bake as directed, adding an additional 1 to 3 minutes to the standard bake time.
To Store Baked Scones (Short Term): If you have baked scones that you plan to consume within a day, store them at room temperature in an airtight container. Reheating them briefly in a toaster oven or microwave can help restore some of their warmth and tenderness.
Next Up: More Irresistible Chocolate Delights!
If you’re a chocolate lover like us, you’ll adore these other decadent recipes. Perfect for satisfying any sweet craving!
Desserts
Classic Fudgy Brownie Recipe
Desserts
Soft Chocolate Crinkle Cookies
Desserts
Copycat Chili’s Molten Lava Cake
Breakfast
Hearty Chocolate Chip Baked Oatmeal

Print Recipe
Chocolate Chip Scones Recipe
These Chocolate Chip Scones are golden, buttery, and loaded with melty chocolate. Greek yogurt gives them that ultra-tender texture, making them a perfect bakery-style treat at home.
30 minutes
15 minutes
20 minutes
1 hour 5 minutes
8 scones
Recipe Video Guide
Watch the video above for a visual guide to making these delicious chocolate chip scones!
Equipment
- Large sheet pan (15″ x 21″), lined with a silicone baking mat or parchment paper
- Box grater (for butter)
- Pastry cutter or two butter knives
- Large mixing bowls
- Whisk and spatula
- Sharp knife or dough scraper
- Pastry brush
- Wire rack for cooling
Ingredients
Chocolate Chip Scones
- 8 tablespoons (1 stick) unsalted butter, frozen
- 2 cups all-purpose flour
- ¼ cup + 1 teaspoon granulated sugar, divided
- ¼ cup light brown sugar, lightly packed (ensure it’s soft and fresh!)
- ¼ teaspoon baking soda
- 1 teaspoon baking powder
- ½ teaspoon fine sea salt
- ½ cup mini chocolate chips
- 1 ½ teaspoons vanilla extract
- 1 drop almond extract (optional, but highly recommended for depth of flavor)
- ½ cup honey vanilla Greek yogurt (full-fat, thick)
- 1 large egg
- 3 tablespoons heavy cream (for brushing tops)
Glaze
- 2 tablespoons milk or heavy cream
- 1 cup powdered sugar
- ¼ teaspoon vanilla extract
Instructions
- Prepare for Baking: Place butter in the freezer to chill completely. Move your oven rack to the lower third position and preheat the oven to 400°F (200°C). Line a large sheet pan with a silicone baking mat or parchment paper; set aside.
- Mix Dry Ingredients: In a large bowl, whisk together the flour, ¼ cup of granulated sugar, brown sugar, baking soda, baking powder, and salt until thoroughly combined.
- Incorporate Butter: Grate the frozen butter using the large holes of a cheese grater directly into the dry ingredients (or cut into small, pea-sized cubes). Use a pastry cutter or two butter knives to quickly press and slice the butter into the dry ingredients until the mixture resembles coarse crumbs with some larger, visible chunks of butter. These cold butter pieces are crucial for achieving flaky layers. Stir in the mini chocolate chips. Place the bowl in the refrigerator while you prepare the wet ingredients to keep the butter cold.
- Combine Wet Ingredients: In a separate medium bowl, whisk together the vanilla extract, optional almond extract, Greek yogurt, and egg until smooth and well combined.
- Form the Dough: Add the wet ingredients to the dry ingredients. Mix with a strong spatula or your hands until just combined. The dough will be slightly sticky and may seem too dry initially, but keep gently pressing and kneading it—it will come together. Remember, the less you mix and knead, the more tender your scones will be.
- Shape and Chill Dough: Lightly flour a clean surface. Using your hands, shape the dough into a 5.5-inch disc, about 1 inch thick. Tightly wrap the disc in plastic wrap and place it in the freezer for 20 minutes to firm up. Remove and unwrap. Using a sharp knife, cut the disc into 8 equal triangles with swift, decisive cuts. Separate the triangles and arrange them on your prepared baking sheet, leaving about 1 inch of space between each.
- Pre-Bake Preparation: Brush the tops of the scones lightly with heavy cream. Sprinkle evenly with the remaining 1 teaspoon of granulated sugar. Place the sheet pan with the scones in the refrigerator and chill for another 20 minutes. This second chilling ensures the butter stays cold for maximum flakiness and helps the scones hold their shape.
- Bake the Scones: Remove the chilled scones from the fridge and immediately place them in the fully heated oven. Bake for approximately 14–16 minutes, or until the edges are lightly golden and the tops are just barely golden.
- Prepare the Glaze: While the scones are baking, whisk together the milk (or heavy cream), powdered sugar, and ¼ teaspoon of vanilla extract until the glaze is smooth and thick, yet still pourable. Add more milk or powdered sugar in tiny increments if adjustments are needed.
- Cool and Glaze: Remove the scones from the oven and let them rest on the sheet pan for 5 minutes to finish cooking. Then, transfer them to a wire rack to cool completely to room temperature. Once cooled, drizzle the glaze generously over the tops of the scones using a spoon. Allow the glaze to set before serving.
Recipe Notes
Note 1: To achieve truly flaky and tender scones, handle the dough as little as possible. Stop mixing as soon as the ingredients are combined. Cold butter and minimal gluten development are the foundational secrets to perfect scones.
Storage: These chocolate chip scones are at their absolute best when fresh, ideally on the day they are baked. Due to the added moisture from Greek yogurt, they will soften overnight. For the freshest taste and texture beyond the first day, we highly recommend freezing unbaked scones.
To freeze, place the shaped, unbaked scones on a lined baking sheet and freeze until solid. Once frozen, transfer them to an airtight freezer bag or container and store for up to 1 month. Bake straight from the freezer, adding an extra 1 to 3 minutes to the standard baking time.
Nutrition Information (Approximate per serving)
- Serving: 1 scone
- Calories: 431 kcal
- Carbohydrates: 61g
- Protein: 5g
- Fat: 19g
- Saturated Fat: 12g
- Polyunsaturated Fat: 1g
- Monounsaturated Fat: 4g
- Trans Fat: 0.5g
- Cholesterol: 65mg
- Sodium: 262mg
- Potassium: 88mg
- Fiber: 1g
- Sugar: 36g
- Vitamin A: 558IU
- Vitamin C: 0.2mg
- Calcium: 84mg
- Iron: 2mg
Nutrition information is automatically calculated and should only be used as an approximation. Actual values may vary based on specific ingredients and preparation methods.