
Say goodbye to mediocre store-bought options and elevate your pizza night with this incredible homemade pizza dough recipe. Surprisingly simple to make from scratch, this recipe delivers a crust that’s perfectly crispy on the outside, delightfully chewy on the inside, and absolutely bursting with flavor. Once you try it, you’ll never go back!

The Ultimate Homemade Pizza Dough Recipe
There’s nothing quite like the aroma of freshly baked pizza filling your home, especially when the crust is made from scratch. My sister, a true pizza aficionado, bakes it several times a week, often crafting her dough from the ground up. While she occasionally opts for quick solutions like fresh dough from Trader Joe’s or a speedy Naan Pizza when time is short, this particular recipe is her gold standard when she has the chance to truly indulge in the art of dough making.
The first time I tasted pizza made with this dough, I was instantly captivated. Its superior texture and taste stood out immediately. My own children, who are typically discerning critics, declared it the best pizza they’d ever had. That’s a testament to its irresistible quality! This recipe isn’t just about making pizza; it’s about creating a memorable culinary experience, transforming a simple meal into a delightful occasion for family and friends.
Why Choose Homemade Pizza Dough?
While convenience certainly has its place, the advantages of making your own pizza dough are undeniable. Homemade dough offers unparalleled freshness and flavor that pre-made options simply cannot match. You have complete control over the ingredients, ensuring a wholesome product free from unwanted additives or preservatives. Furthermore, crafting your own dough allows for customization—adjusting the flour type for a crispier or chewier result, or adding herbs and spices directly into the dough for an extra layer of flavor.
Beyond the quality, there’s a therapeutic satisfaction in the process itself. The act of kneading, watching the dough rise, and knowing you’ve created the foundation for a delicious meal is incredibly rewarding. Plus, it’s often more cost-effective than repeatedly buying store-bought dough or ordering takeout. This recipe yields three 12-inch pizzas, making it perfect for feeding a family or batch-prepping for future meals.
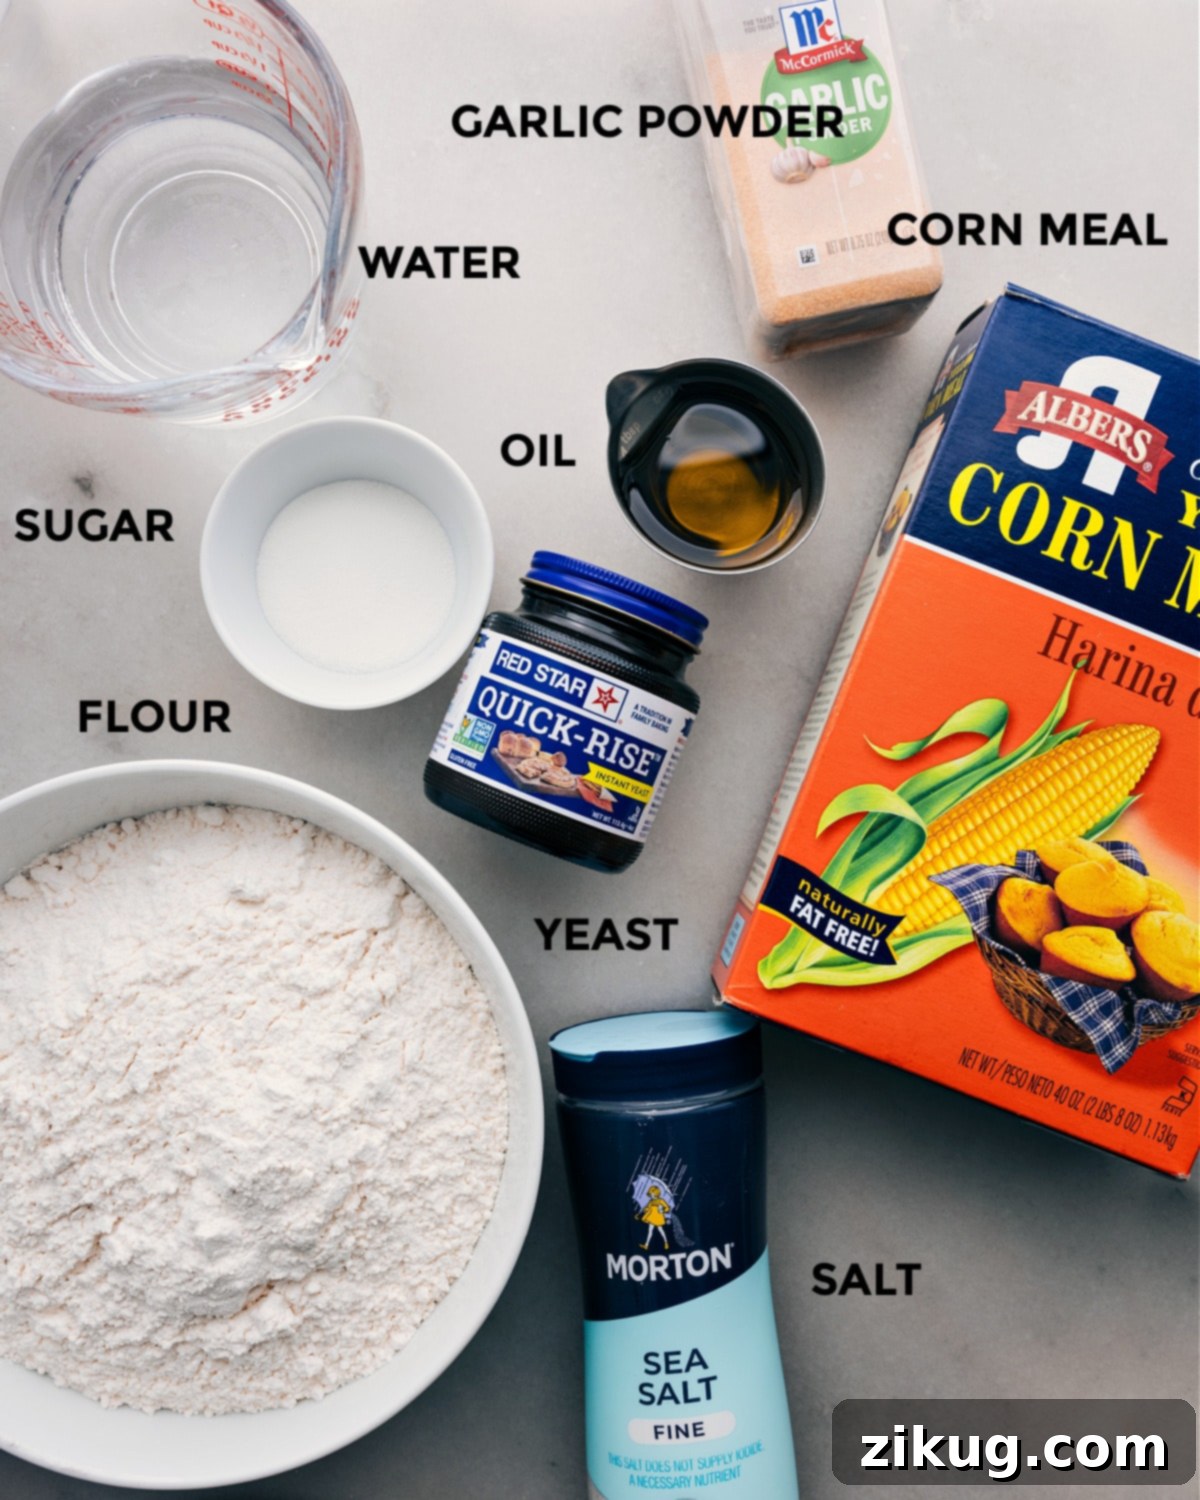
Key Ingredients for Perfect Pizza Dough
Creating extraordinary pizza dough begins with a few simple, high-quality ingredients. Each plays a crucial role in achieving the desired texture and flavor:
- Instant Yeast: This is the magic behind the dough’s rise. Dissolving it in warm water first helps activate it, ensuring your dough will be light and airy. It’s a good practice to test the yeast’s activity early on.
- Warm Water: The ideal temperature (around 105-115°F or 40-46°C) is essential for activating the yeast without killing it. Too cold, and the yeast won’t activate; too hot, and it will die.
- Sugar: A small amount of sugar acts as food for the yeast, encouraging it to bloom and produce carbon dioxide, which gives the dough its airy structure. It also contributes a subtle sweetness to the crust.
- Flour: While all-purpose flour works wonderfully for a versatile crust, bread flour, with its higher protein content, will yield a chewier, more substantial crust. For best results and consistency, measure your flour by weight using a food scale (590g is recommended for this recipe).
- Salt: Far from just a seasoning, salt enhances the flavor of the dough significantly and also helps regulate yeast activity, preventing it from rising too quickly.
- Olive Oil: Extra virgin olive oil adds richness to the dough, contributes to a beautiful golden crust, and helps create that desirable crispy texture on the outside. It also makes the dough more pliable.
- Garlic Powder: A secret ingredient for an extra layer of savory flavor directly in the crust, making your pizza even more irresistible.
- Cooking Spray: Used for greasing the bowl during the first rise and the pizza pan to prevent sticking.
- Cornmeal: Don’t skip this! Sprinkling cornmeal on the pizza pan before adding the dough provides a crucial barrier, preventing sticking and imparting a wonderfully crunchy, restaurant-quality bottom crust.
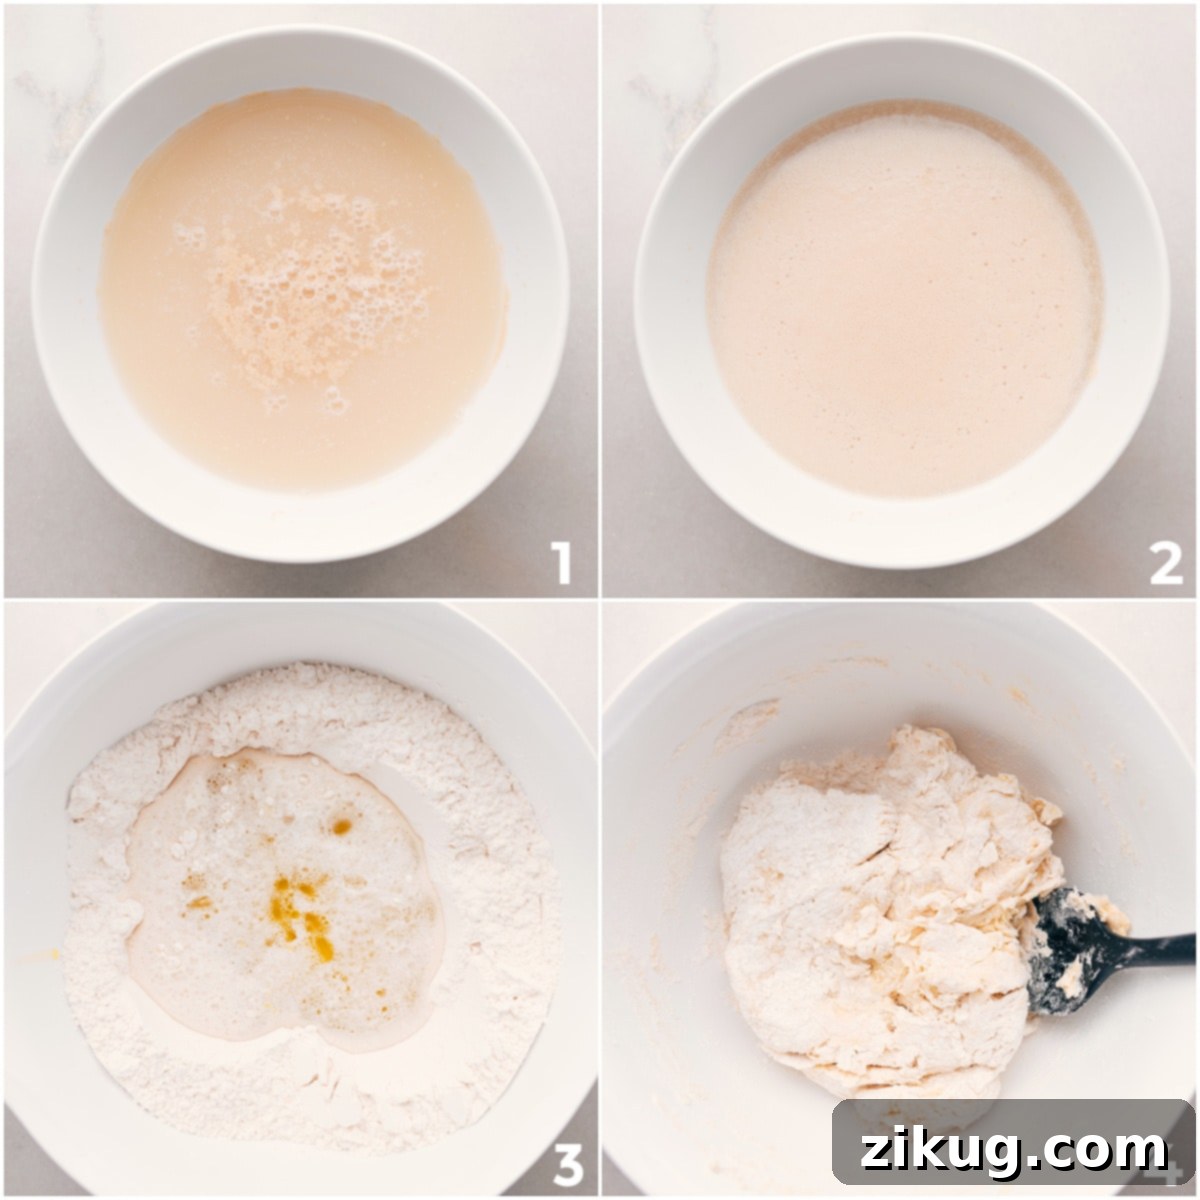
Step-by-Step Guide to Crafting Your Pizza Dough
Making homemade pizza dough is a straightforward process that yields delicious rewards. Follow these steps carefully for the best results:
- Activate the Yeast: In a medium bowl, whisk together the instant yeast, sugar, and warm water. Let this mixture sit for 5-10 minutes. It should become visibly creamy and foamy, indicating the yeast is active and ready to work. If it doesn’t foam, your water might have been too hot or too cold, or the yeast may be expired. It’s best to start over with fresh yeast and properly tempered water.
- Combine Dry Ingredients: In a large mixing bowl, whisk together the flour, salt, and garlic powder until well combined. This ensures even distribution of flavor throughout the dough.
- Mix Wet and Dry: Create a well in the center of your dry ingredients. Pour in the activated yeast mixture and the olive oil. Stir everything together, using a sturdy spoon or spatula, until a thick, shaggy dough forms. It will look a bit rough at this stage, but don’t worry.
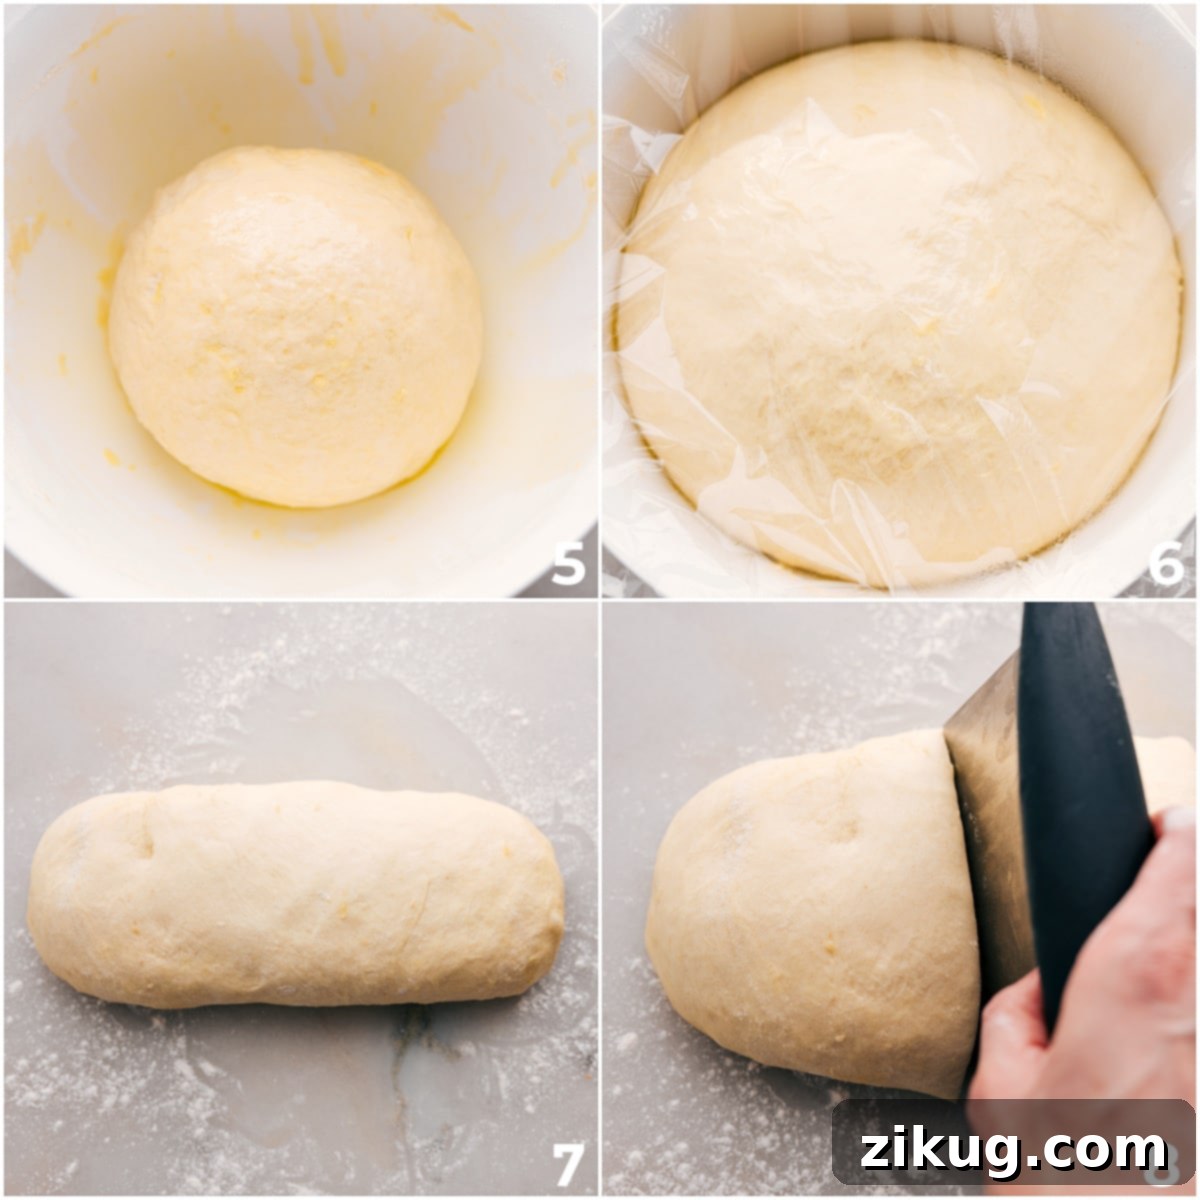
- Knead the Dough: Lightly flour a clean work surface (about 1 tablespoon of flour is usually enough to start). Turn the dough out onto the floured surface and begin to knead it for 5-6 minutes. The goal is to develop the gluten, which gives the dough its elasticity and chewiness. Continue kneading until the dough is smooth, elastic, and no longer sticky. Form it into a neat ball.
- First Rise (Bulk Fermentation): Drizzle a small amount of olive oil into the bowl you used for mixing, ensuring it coats the entire inside surface. Place the dough ball into the oiled bowl and turn it once to coat the dough with oil. Cover the bowl tightly with plastic wrap or a damp kitchen towel. Allow the dough to rise in a warm, draft-free place until it has doubled in size. This usually takes 1-2 hours, depending on your room temperature. A slightly warmer environment will speed up the rise.
- Divide the Dough: Once doubled, gently punch down the dough to release the air. Lightly flour your work surface again (another 1 tablespoon). Roll the dough into a cylinder and then cut it into three equal parts. For precision, use a food scale to ensure each piece weighs the same.
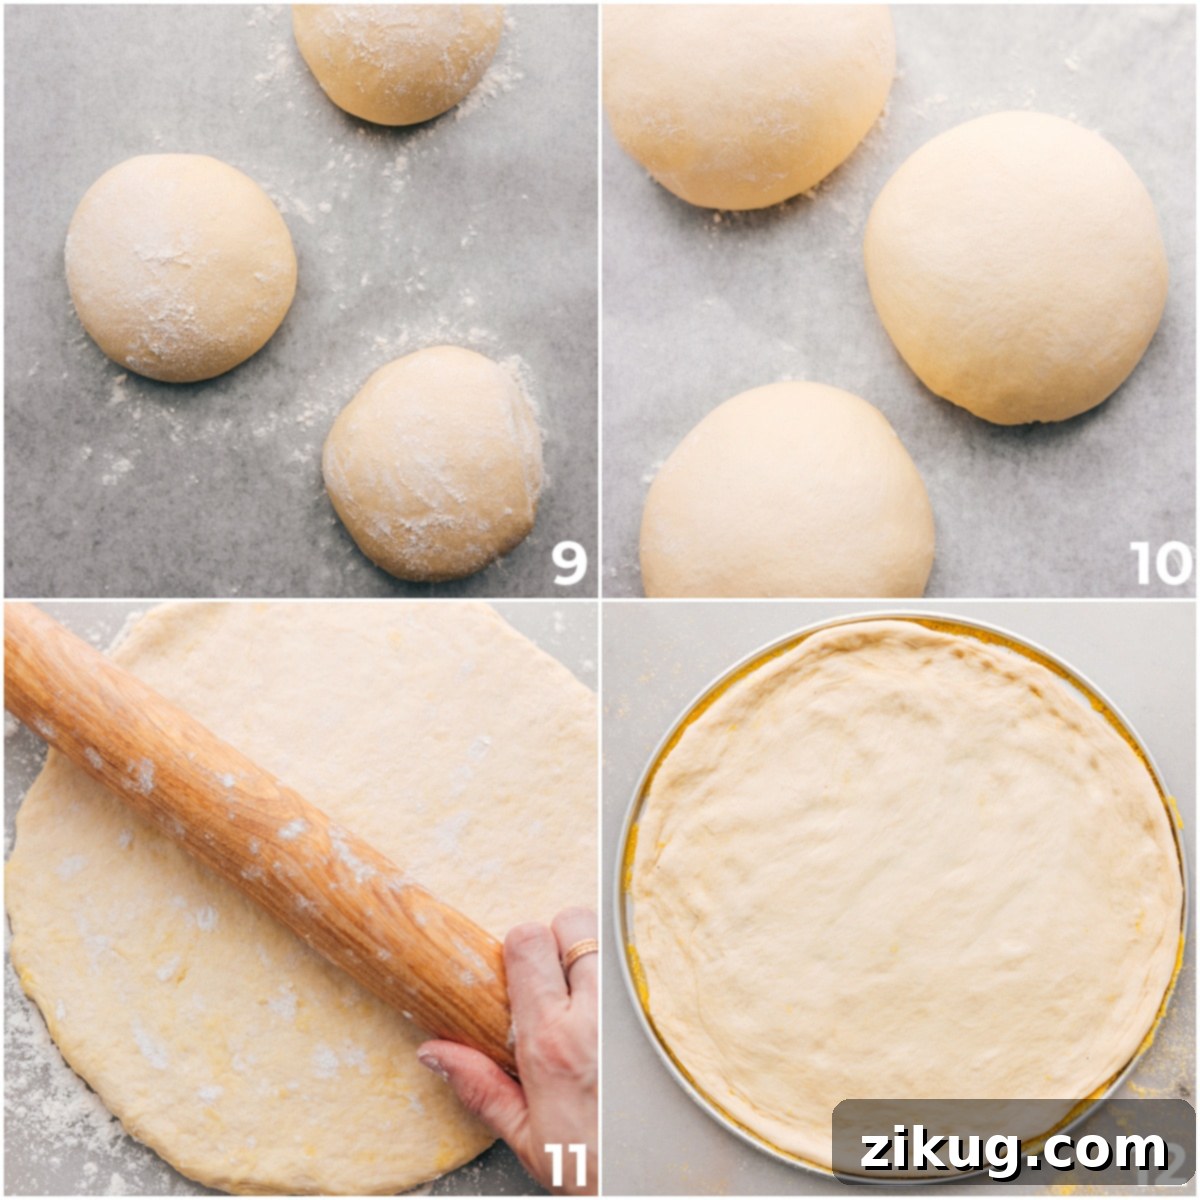
- Second Rise (Proofing): Shape each piece of dough into a smooth ball. Place these dough balls on a lightly floured or parchment-lined baking sheet, ensuring they are well-spaced. Lightly dust the tops with flour and cover them with a damp towel. Let them rise again for about 1 hour, or until they have nearly doubled in size. This second rise contributes to a lighter, airier crust.
- Preheat Oven: While the dough is on its second rise, position an oven rack in the top third of your oven. Preheat your oven to its maximum temperature, ideally 550°F (288°C). A hot oven is crucial for a crisp crust. If you have a pizza stone or steel, place it in the oven during preheating for even better results.
- Shape the Dough: Once the dough balls are ready, lightly flour your work surface again. Take one dough ball (keep the others covered) and gently press and stretch it into a 12-inch circular shape using your fingertips. Avoid using a rolling pin excessively, as it can press out too much air and result in a less airy crust. If the dough springs back, let it rest for a few minutes before continuing to stretch.
- Prepare the Pan: Grease a 12-inch pizza pan with cooking spray and generously sprinkle it with cornmeal. This prevents sticking and creates a wonderfully crisp bottom crust. Carefully transfer the shaped dough to the prepared pan, gently pressing it to fill the pan evenly.
- Add Your Favorite Toppings: Spread a very thin layer of your chosen pizza sauce over the dough, followed by thinly sliced mozzarella cheese, a light sprinkle of Parmesan, and any other desired toppings. Remember, less is often more when it comes to toppings to prevent a soggy pizza.
- Bake to Perfection: Bake one pizza at a time in your preheated oven for 9-12 minutes. The exact baking time may vary based on your oven. Look for a golden-brown crust and melted, bubbly cheese. You can gently lift the edge of the pizza with a metal spatula to check that the bottom crust is fully baked and golden.
- Serve and Enjoy: Carefully remove the hot pizza from the oven. For an optional touch, drizzle a little extra virgin olive oil over the top immediately after baking. Let it cool for a minute or two before slicing into wedges and serving. Repeat the process with your remaining dough balls to make two more delicious pizzas.
Mastering Your Pizza Toppings
Once your perfect pizza dough is ready, the fun begins with toppings! The right combination can elevate your homemade pizza from great to extraordinary. Here’s my preferred approach:
- Pizza Sauce: I highly recommend using a high-quality jarred sauce like Rao’s pizza sauce. It offers a rich, authentic flavor that tastes homemade without the extra effort. The key is to apply it sparingly – a thin layer is all you need. Too much sauce can make your pizza soggy, detracting from that wonderfully crispy crust you’ve worked so hard to achieve.
- Mozzarella Cheese: For the best melt and coverage, I prefer slicing a block of good quality mozzarella as thinly as possible. Arrange the slices evenly across the sauce. This method often results in a more consistent and beautiful melt compared to grated cheese, which can sometimes clump or burn.
- Parmesan Cheese: To finish, a light dusting of freshly grated Parmesan using a microplane adds a salty, umami kick and an extra layer of gourmet flavor. Just a whisper is enough to make a difference.
Inspiring Pizza Topping Combinations
Feel free to get creative with your toppings! Here are some beloved combinations to get you started, ensuring there’s a pizza for every palate:
- Classic Margherita: Simple perfection with fresh mozzarella slices, ripe tomato slices, and fragrant basil leaves added after baking.
- Pepperoni Power: A timeless favorite featuring generous amounts of mozzarella and crispy pepperoni slices.
- BBQ Chicken Delight: Shredded chicken breast tossed in tangy BBQ sauce, thinly sliced red onions, and fresh cilantro sprinkled on after baking.
- Garden Veggie Lover: A vibrant mix of colorful bell peppers, sweet onions, earthy mushrooms, fresh spinach, and briny black olives.
- Hearty Meat Lover: For the carnivores, a robust combination of pepperoni, savory sausage, crispy bacon, and tender ham.
- Tropical Hawaiian: A controversial but delicious pairing of savory ham and sweet, juicy fresh pineapple chunks.
- Spicy Buffalo Chicken: Shredded chicken coated in spicy buffalo sauce, crumbled blue cheese, and creamy mozzarella.
- Decadent Four Cheese: A harmonious blend of mozzarella, sharp cheddar, rich Parmesan, and mild provolone for ultimate cheesy indulgence.
- Mediterranean Freshness: Crumbled feta cheese, kalamata olives, fresh spinach, tender artichoke hearts, and sweet sun-dried tomatoes.
Quick Topping Tip
Remember the golden rule of toppings: Less is more! Avoid overloading your pizza dough, especially with wet ingredients. Excess toppings can weigh down the crust, prevent even cooking, and lead to a disappointingly soggy pizza. A lighter touch allows the incredible flavor of your homemade crust to shine through.
Expert Tips for Pizza Dough Success
Achieving consistently perfect pizza dough involves a few key considerations and techniques:
- Precision is Key: While baking often feels like an art, precision in ingredient measurement is crucial for consistent results, especially with dough. Whenever possible, use a food scale to weigh your flour (590g for this recipe) and other dry ingredients rather than relying on measuring cups, which can vary wildly in accuracy.
- Dough Consistency: If your dough feels too sticky during kneading, gradually add small amounts of flour (a teaspoon at a time) until it reaches the desired smooth, elastic texture. Conversely, if it feels too dry or stiff, incorporate a tiny bit of warm water (half a teaspoon at a time) to soften it.
- Temperature Matters: Yeast is highly sensitive to temperature. Your home’s ambient temperature will affect rise times; a warmer room will result in a faster rise, while a cooler room will slow it down. Aim for a warm, draft-free spot for optimal fermentation.
- Bake One Pizza at a Time: This tip is crucial for even cooking and achieving that perfect crust. Baking multiple pizzas simultaneously can lower the oven temperature, prevent proper heat circulation, and lead to unevenly cooked or undercooked crusts. Give each pizza its moment to shine!
- Pizza Stone or Steel: For truly professional-level results, consider investing in a pizza stone or steel. Preheat it in your oven while the oven comes to temperature. Placing your pizza directly onto a screaming hot stone or steel will provide an intense burst of heat to the bottom of the crust, resulting in an incredibly crispy base and better overall rise.
- Don’t Overwork the Dough: After the first rise, handle the dough gently. Too much manipulation can deflate the air pockets that create a light, airy crust.
Storage and Make-Ahead Strategies
Making Pizza Dough Ahead
This recipe is fantastic for meal prepping! After the first rise (bulk fermentation), you can cover the dough tightly with plastic wrap and store it in the refrigerator for up to 5 days. Cold fermentation actually enhances the flavor of the dough, giving it a more complex and nuanced taste. When you’re ready to use it, remove the dough from the fridge, divide it into three balls, and let them rise again at room temperature. Because the dough is cold, it will need a longer second rise—typically 3-4 hours—to come to temperature and fully proof.
Freezing Pizza Dough
For even longer storage, you can freeze individual dough balls. After the first rise, divide the dough into three portions. Lightly oil each ball, then wrap them tightly in plastic wrap, followed by aluminum foil or a freezer-safe bag. Freeze for up to 1-2 months. To use, transfer the frozen dough to the refrigerator the night before to thaw. Then, proceed with the second rise and shaping as directed in the recipe.
Reheating Leftover Pizza
- Stovetop Method: For a deliciously crispy base, heat slices in a dry skillet over medium heat for a few minutes. Cover with a lid for the last minute or two to melt the cheese thoroughly.
- Oven Method: Reheat at 350°F (175°C) for about 7-10 minutes. This method helps maintain a crisp crust without drying out the toppings.
- Microwave Method: This is the quickest option, but be warned—the crust won’t stay crisp. It’s best for when you’re in a hurry and prioritize speed over texture.
Don’t Let Leftover Yeast Go to Waste!
If you find yourself with extra instant yeast after making this delicious pizza dough, put it to good use with these other fantastic recipes:
Appetizers
No-Knead Bread
Lunch
Easy Focaccia Recipe
Breakfast
Easy Cinnamon Rolls (No Knead)
Appetizers
Soft Pretzel Bites

Homemade Pizza Dough Recipe
By Chelsea Lords
Making this homemade pizza dough is surprisingly easier than you think, and it consistently beats store-bought options! This recipe yields a perfectly crispy, wonderfully chewy, and incredibly flavorful crust. Ideal for oven-baked pizzas, it ensures a delicious and satisfying experience every time.
Prep Time: 20 minutes
Cook Time: 12 minutes
Rising Time: 3 hours
Total Time: 3 hours 32 minutes
Servings: 3 (12-inch pizzas)
Print Recipe
Equipment
- 3 pizza pans (12-inch)
- Large mixing bowl
- Medium bowl
- Whisk
- Food scale (optional, but recommended for accuracy)
- Plastic wrap or damp kitchen towel
Ingredients
Pizza Dough
- 2-1/4 teaspoons instant yeast
- 1-1/3 cup warm water (110℉ / 40-46°C)
- 1-1/2 tablespoons sugar
- 4 cups all-purpose or bread flour (590g), plus more as needed (see Note 1)
- 2 teaspoons salt
- 1/4 teaspoon garlic powder
- 1/4 cup olive oil, plus more for greasing bowl
- Cooking spray
- 2 tablespoons cornmeal
Pizza Toppings (per 12-inch pizza)
- 1/3 cup pizza sauce (like Rao’s Homemade)
- Mozzarella cheese, thinly sliced (see Note 2 for recommendations)
- Toppings as desired (see Note 3 for ideas)
- Parmesan cheese, freshly grated (optional, for finishing)
Instructions
- In a medium bowl, whisk together the yeast, sugar, and warm water. Let sit for 5-10 minutes until the mixture becomes creamy or foamy. If it doesn’t foam, the yeast might be inactive, or the water could be too hot/cold. You may need to start again.
- In a large bowl, whisk together the flour, salt, and garlic powder. Make a well in the center, then pour in the activated yeast mixture and olive oil. Stir until a thick, shaggy dough forms.
- Sprinkle 1 tablespoon of flour on a clean work surface. Pour out the dough and knead for 5–6 minutes until smooth and elastic. Shape into a ball.
- Drizzle olive oil in the bowl used to mix the dough, and brush it evenly inside. Place the dough ball in the bowl and turn to coat with oil. Cover with plastic wrap or a damp towel and let rise in a warm, draft-free place until doubled in size, 1–2 hours.
- Sprinkle 1 tablespoon flour on your work surface. Turn the dough out and gently roll it into a cylinder. Cut into three equal parts (a food scale helps with accuracy!). Shape each piece into a smooth ball and place them on a parchment-lined baking sheet, well spaced apart. Lightly dust the tops with flour and cover with a damp towel. Let rise until doubled in size, about 1 hour.
- Move an oven rack to the top third of the oven. Preheat your oven to its maximum temperature, 550°F (288°C). If using a pizza stone or steel, place it in the oven during preheating.
- Sprinkle 1 tablespoon of flour on your work surface. Working with one dough ball at a time (keep the others covered), gently press and stretch it into a 12-inch circle using your fingers. If absolutely necessary, use a rolling pin sparingly as a last resort, but avoid pressing out too much air.
- Grease a 12-inch pizza pan with cooking spray and sprinkle evenly with cornmeal. Carefully add the shaped dough to the pan and gently press to fill it evenly to the edges.
- Spread a very thin layer of pizza sauce on the dough. Follow with thinly sliced mozzarella, a light sprinkle of Parmesan (if desired), and your chosen toppings (see Note 3). Remember: less is more to prevent a soggy crust!
- Bake only 1 pizza at a time for 9–12 minutes, or until the crust is golden brown, the cheese is bubbly, and the bottom is fully baked (gently lift with a metal spatula to check).
- Right out of the oven, an optional light drizzle of olive oil can enhance the flavor. Let the pizza cool for 1-2 minutes, then cut into wedges and serve immediately.
- Repeat the entire process with the remaining dough balls, baking one pizza at a time, to create 2 more delicious pizzas.
Recipe Notes
Note 1 (Flour Measurement): For the most accurate results, use a food scale to measure 590g of flour. All-purpose flour yields a good, versatile crust, but for an extra-chewy texture, consider using bread flour.
Note 2 (Cheese): For the best melt and distribution, slice a block of high-quality mozzarella as thinly as possible and arrange in a single, even layer over the pizza sauce. For Parmesan, grate it lightly on top using a microplane. I usually eyeball these amounts for personal preference!
Note 3 (Topping Ideas):
- Classic Margherita: Mozzarella, tomato slices, fresh basil.
- Pepperoni: Mozzarella, pepperoni slices.
- BBQ Chicken: Shredded chicken, BBQ sauce, red onions, cilantro.
- Veggie Lover: Bell peppers, onions, mushrooms, spinach, olives.
- Meat Lover: Pepperoni, sausage, bacon, ham.
- Hawaiian: Ham, fresh pineapple.
- Buffalo Chicken: Chicken, buffalo sauce, blue cheese, mozzarella.
- Four Cheese: Mozzarella, Cheddar, Parmesan, provolone.
- Mediterranean: Feta, olives, spinach, artichokes, sun-dried tomatoes.
Toppings Note: To reiterate, do not overload the pizza dough! Using too many toppings or an excessive amount of wet ingredients can lead to a soggy pizza that doesn’t cook through properly. Less is truly more for a perfectly crisp crust.
Storage: You can prepare pizza dough ahead of time by allowing it to complete its first rise, then covering it tightly and storing it in the fridge for up to 5 days. When ready to use, form the dough into 3 balls and let them rise again at room temperature for 3–4 hours, as the cold dough will need more time to activate. For reheating leftover pizza: for a crispy base, heat in a skillet; for oven reheating, bake at 350°F for about 7 minutes; the microwave is quick but will result in a softer crust.
Nutrition
Serving: 1 serving | Calories: 687 kcal | Carbohydrates: 115.4 g | Protein: 15.9 g | Fat: 17.7 g | Sodium: 1333.8 mg | Fiber: 4.6 g | Sugar: 4 g
Nutrition information is automatically calculated and should be used only as an approximation.
Enjoyed this recipe? Please consider leaving a comment below and sharing your pizza creations!