

Homemade Fudge Stripe Cookies: The Ultimate Classic Recipe
Indulge in the irresistible charm of **Homemade Fudge Stripe Cookies** – a delightful blend of rich, buttery shortbread, perfectly balanced sweetness, and a generous coating of smooth, velvety chocolate, all finished with a subtle hint of vanilla and a touch of sea salt. These cookies are not just a treat; they’re a memory in the making, designed to be so utterly delicious that stopping at just one becomes an impossible task. Forget the store-bought versions; this recipe elevates the beloved classic to an entirely new level of homemade perfection.

Rediscovering a Childhood Favorite: The Magic of Fudge Stripe Cookies
For many of us, certain cookies hold a special place in our hearts, evoking fond memories of childhood snacks and simple pleasures. Growing up, the mere sight of two distinct store-bought cookies would instantly brighten my day: the iconic Oreos and, of course, Keebler’s Fudge Stripe Cookies. While Girl Scout Cookies certainly made a seasonal appearance and stole the show during their limited run, these two staples were always reliable sources of joy. Even today, I find myself gravitating towards these timeless treats. Oreos, in particular, often find their way into my baking experiments, proving that their versatility can truly make everything better.
But when summer arrives, and the craving for s’mores strikes, my go-to choices veer delightfully off the traditional path. Instead of graham crackers, I reach for Fudge-Striped Cookies or Samoa cookies. Imagine a warm, gooey, perfectly toasted marshmallow nestled between two buttery, chocolate-coated fudge-striped cookies – it’s a gourmet s’mores experience that’s truly unmatched! The combination of the crisp cookie, the soft marshmallow, and the rich chocolate creates a symphony of textures and flavors that traditional s’mores simply can’t compete with. This indulgent twist transforms a classic campfire treat into something extraordinary.
It was after one such camping trip, where we polished off a generous supply of these delightful cookies, that inspiration struck. Why not try to recreate this magic at home? The idea of baking my own batch of Fudge Stripe Cookies was exciting, and to my surprise, the process turned out to be far easier and more rewarding than I initially imagined. Experimenting with ingredients and techniques to perfect this recipe was not only fun but also incredibly satisfying. Plus, one of the best parts? No fiddly, specialized cookie cutters are required! Instead of grappling with two different-sized cutters, we employ a clever, simplified method: shaping the dough into logs and then effortlessly slicing off rounds. A standard piping tip makes removing the center a quick and simple task, ensuring perfectly authentic-looking cookies every time.
These homemade Fudge-Striped Cookies offer a superior experience, blending buttery goodness with the ultimate sweet, creamy chocolate. Each bite delivers a delightful crunch, giving way to a smooth, rich finale of melted chocolate drizzle. Simply put, they are absolutely delectable and will quickly become a household favorite. While the store-bought versions certainly have their charm, they genuinely cannot hold a candle to the fresh, vibrant flavors and perfect texture of this homemade rendition. Prepare to impress your family and friends with a batch of cookies that tastes like pure nostalgia, but better.
Essential Ingredients for Perfect Fudge Stripe Cookies
Crafting the perfect Fudge Stripe Cookie begins with selecting high-quality ingredients. Each component plays a crucial role in achieving the signature buttery texture and rich chocolatey flavor that makes these cookies so irresistible. Here’s a breakdown of what you’ll need and why:
- Cold Unsalted Butter: Using unsalted butter allows you precise control over the overall saltiness of your cookies. It’s critical that the butter remains chilled; this prevents the cookies from spreading too rapidly in the oven, ensuring they maintain their distinctive shape and achieve that desired tender, yet firm, shortbread texture.
- Light Brown Sugar: This adds a lovely caramel note and helps keep the cookies soft and moist. Ensure your brown sugar is soft and fresh; this makes creaming it with the butter much easier and results in a smoother, more evenly blended dough.
- Pure Vanilla Extract: A good quality vanilla extract is non-negotiable. It provides a deep, aromatic flavor that imitation vanilla simply cannot replicate, enhancing the overall sweetness and complexity of the cookie base.
- Fine Sea Salt: Salt is more than just a seasoning here; it’s a flavor enhancer. Fine sea salt balances the sweetness of the sugar and chocolate, making the flavors pop. Its fine texture ensures it blends evenly into the dough without gritty pockets.
- Cornstarch: This secret ingredient is key to creating exceptionally tender, melt-in-your-mouth cookies. It reduces gluten development, resulting in a delicate crumb structure.
- All-Purpose Flour: The foundation of our cookie. Measuring flour accurately is paramount. Too much flour can lead to dry, crumbly, or tough cookies, while too little can cause them to spread excessively and lose their shape. Always spoon flour into your measuring cup and level it off with a straight edge for best results, or better yet, use a kitchen scale for precision (approximately 325 grams).
- Semi-Sweet Chocolate Chips: These will form the delicious chocolate coating and stripes. Semi-sweet chocolate provides a classic, balanced flavor that complements the buttery cookie perfectly. Feel free to swap with dark chocolate for a richer taste or milk chocolate for a sweeter profile, depending on your preference. High-quality chocolate makes a noticeable difference in both melt and flavor.
- Vegetable Oil: A small amount of vegetable oil is added to the melted chocolate. This helps to thin it slightly, making it smoother and easier to dip and drizzle, ensuring a beautiful, even coating that sets nicely without cracking.
Remember, the quality of your ingredients truly makes the biggest difference in the final flavor and texture of your homemade Fudge Stripe Cookies. Opt for the best you can find to create a truly exceptional treat.
The Smart Way to Cut Out the Cookie Centers
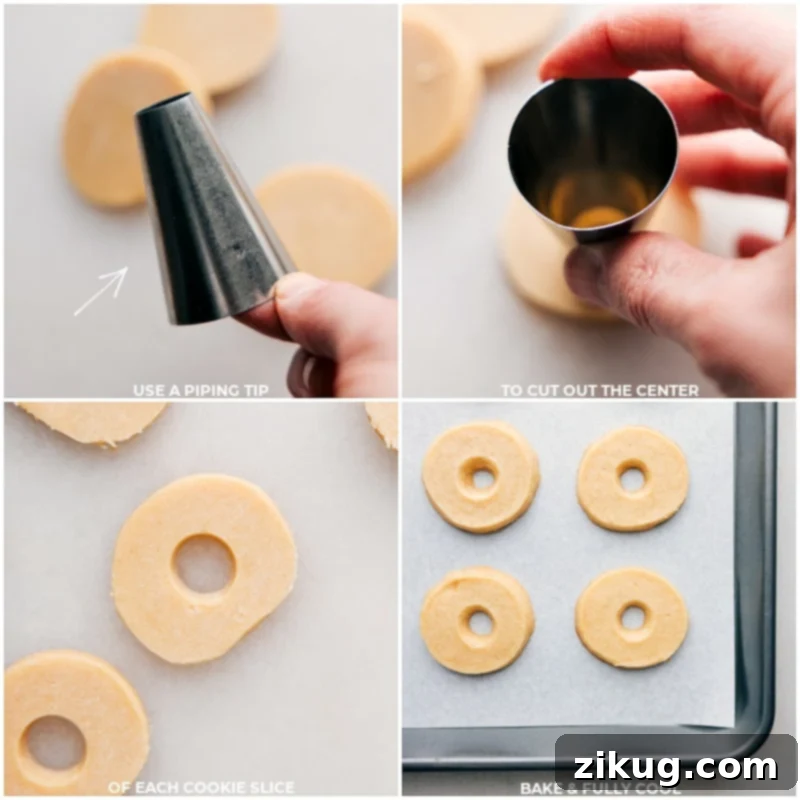
Achieving the signature “stripe” on Fudge Stripe Cookies often involves creating a hollow center. Many recipes suggest using two different-sized cookie cutters, which can be a bit cumbersome and create extra cleanup. My preferred method simplifies this step, making it much more efficient and less messy.
Instead of struggling with multiple cookie cutters, we adopt a straightforward approach. After chilling and slicing the dough into uniform rounds, we then expertly remove the center using the top of a **large round piping tip**. This clever trick ensures perfectly circular cut-outs with minimal effort and allows for consistent results across your entire batch. It’s a fantastic hack that streamlines the process, leaving you with more time to enjoy the baking itself.
I frequently rely on this versatile piping tip kit in my kitchen. These particular piping tips are among my most-used tools, not just for cookies, but also for beautifully decorating everything from cupcakes to other cookies. Their sturdy design and various sizes make them indispensable for any baker looking to add a professional touch with ease.
Expert Tips for Baking Flawless Fudge Stripe Cookies
Achieving bakery-quality Fudge Stripe Cookies at home is entirely within reach with a few key techniques. These expert tips will guide you through the process, ensuring your cookies are perfectly shaped, wonderfully tender, and lusciously chocolate-coated every single time:
- Butter Temperature is Key: The temperature of your butter is paramount to the cookie’s final texture and shape. Always use cold butter, cut into small cubes. This cold butter melts slower in the oven, giving the cookie dough time to set before fully softening, thus preventing excessive spreading and ensuring your cookies maintain their distinct shape. It also contributes to that desirable crumbly yet firm shortbread texture.
- Precise Flour Measurement: Over-measuring flour is a common pitfall that can lead to dry, crumbly, and tough cookies. For the most accurate measurement, spoon the all-purpose flour into your measuring cup and then level off the top with the flat side of a knife. Better yet, use a kitchen scale to measure your flour by weight (aim for 325 grams) for consistent results.
- Don’t Skip Chilling the Dough: This step is non-negotiable! Chilling the cookie dough for at least two hours (or even overnight for enhanced flavor) is crucial. It allows the butter to firm up, preventing spreading during baking, and gives the flavors a chance to meld together beautifully. This results in a more flavorful and structurally sound cookie.
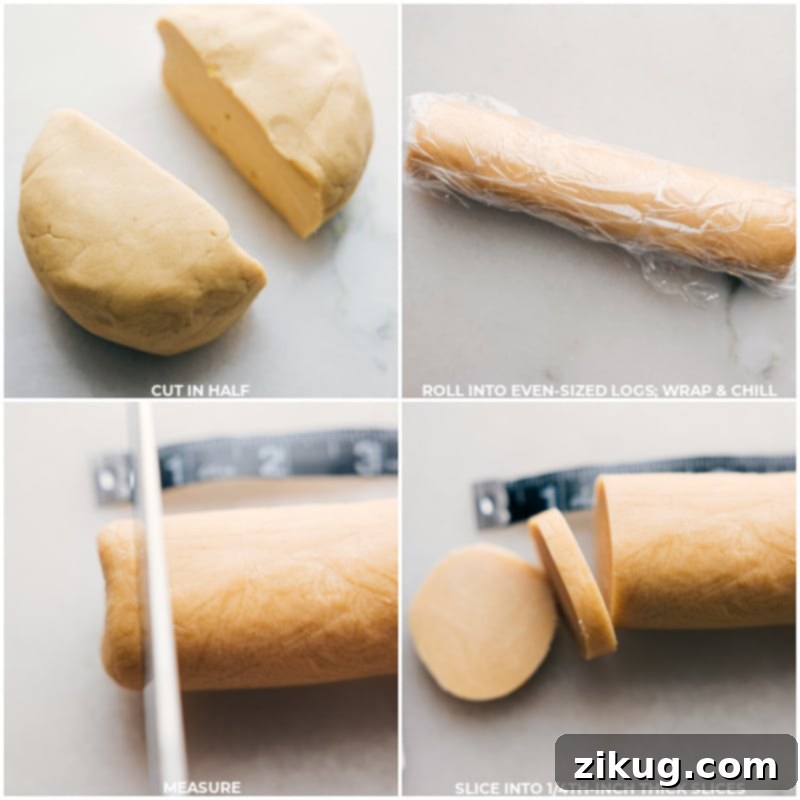
- Ensure Even Slices: When you’re slicing your chilled dough logs into individual cookies, strive for uniformity. Each slice should be approximately 1/4-inch thick. Consistent thickness ensures that all your cookies bake evenly, preventing some from being underbaked while others are overbaked. A sharp knife helps immensely here.
- Monitor Your Oven Closely: Ovens can vary significantly in temperature, so baking times are always an approximation. Keep a watchful eye on your cookies as they bake. They are ready when their edges just begin to turn a light golden-brown. Overbaking can lead to dry, brittle cookies.
- Complete Cooling Before Dipping: Patience is a virtue when it comes to the chocolate coating. Allow your baked cookies to cool completely on a wire rack before you even think about dipping them in melted chocolate. If the cookies are warm, the chocolate won’t set properly; it might melt off, become streaky, or create a messy finish.
- Mastering Chocolate Melting: When melting your chocolate chips, whether in the microwave or over a double boiler, do so in short intervals. If using a microwave, heat in 20-second bursts, stirring thoroughly for about 15 seconds after each burst. This prevents the chocolate from burning, seizing, or becoming grainy, ensuring a perfectly smooth and glossy finish.
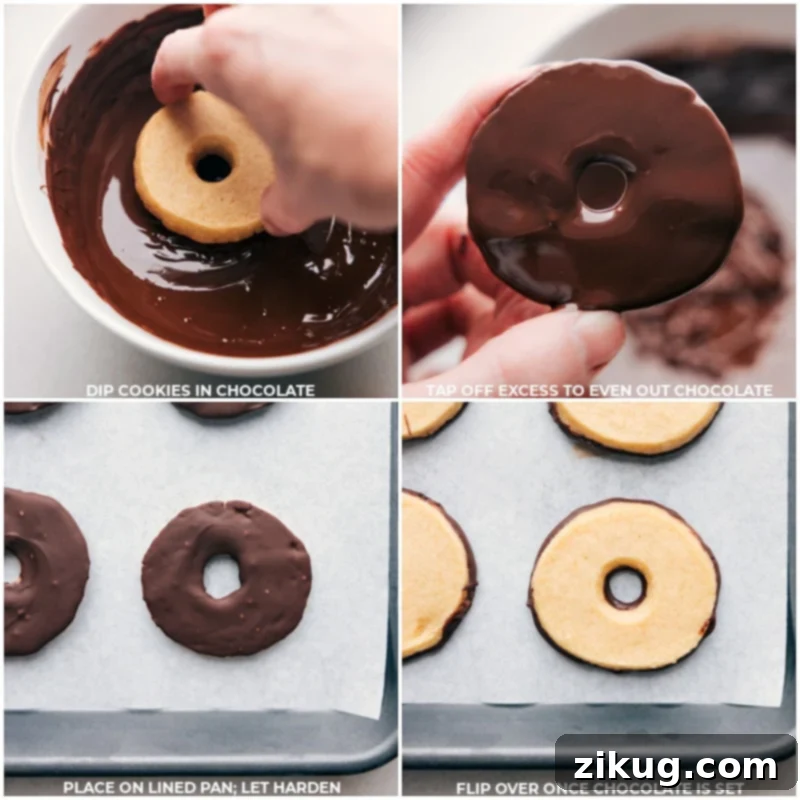
- Perfecting the Dip and Drizzle: After dipping the bottom half of each cooled cookie in the melted chocolate, gently tap the cookie against the edge of the bowl. This allows any excess chocolate to drip off, creating a neat, professional-looking base. For the iconic chocolate drizzle, if you don’t have a piping bag, a simple zipper-top plastic bag with a tiny corner snipped off works just as effectively to create fine, even lines.
- Allow Chocolate to Set Fully: For the best eating experience and to prevent sticky messes, let the chocolate coating and drizzle harden completely before serving or storing your cookies. You can significantly speed up this process by placing the chocolate-dipped cookies in the refrigerator or freezer for a short period.

The Science Behind Cold Butter in Baking
Understanding why cold butter is so essential for these Fudge Stripe Cookies is key to their perfect texture. When you use cold butter, it melts much slower in the oven compared to softened or room-temperature butter. This slower melting process gives the cookie dough a crucial window of time to set and firm up before the butter fully liquifies. The result? Cookies that hold their shape beautifully, preventing excessive spreading and maintaining those crisp edges.
Beyond shape retention, cold butter also plays a vital role in texture. When creamed with brown sugar, tiny pockets of air are incorporated into the butter. As these air pockets expand in the heat of the oven, they create a light, tender, and slightly crumbly texture, characteristic of a perfect shortbread cookie. This creaming action also ensures that the butter and sugar are evenly distributed throughout the dough, leading to consistent flavor and a delightfully smooth cookie base that melts in your mouth.
Quick Tip: Cubing Cold Butter
Why cut the cold butter into small cubes? It’s all about efficiency and even distribution! The initial creaming process, where butter and sugar are beaten together, is significantly faster and more effective when the butter is already cut into smaller pieces. Large, solid chunks of cold butter are much more difficult for your mixer to break down and incorporate evenly with the sugar, potentially leading to an uneven dough. Cubing it first ensures that the butter is softened and aerated uniformly, setting the stage for a consistently delicious cookie.
Storage Solutions for Your Fudge Stripe Cookies
Fudge Stripe Cookie Storage
To keep your homemade Fudge Stripe Cookies fresh and delicious for as long as possible, proper storage is essential. Whether you plan to enjoy them in the coming days or save some for later, here’s how to do it right:
- Cool Completely: This is the golden rule for storing any baked good, especially those with a chocolate coating. Only store your fudge stripe cookies once they are completely cool to the touch. Storing them while still warm will create condensation inside the container, leading to soggy cookies and potentially melted chocolate.
- Airtight Containers for Room Temperature: For short-term storage, transfer your fully cooled cookies to airtight plastic containers or resealable plastic bags. Stored this way at room temperature, away from direct sunlight and heat, your cookies will typically stay fresh and delicious for about 2-3 days, maintaining their crispness and flavor.
- Freezing for Extended Freshness: Both baked cookies and unbaked cookie dough can be frozen for much longer storage, allowing you to enjoy these treats whenever a craving strikes!
- Baked Cookies: To freeze baked cookies, arrange them in a single layer on a parchment-lined baking sheet until solid. Once frozen, transfer them to an airtight freezer-safe container, layering them with parchment paper between each layer to prevent sticking. They can be frozen for up to 3 months. Thaw at room temperature before serving.
- Unbaked Dough: For convenience, you can freeze the unbaked dough logs. After shaping the dough into logs and chilling them (as per the recipe), wrap them very tightly in several layers of plastic wrap, then an additional layer of aluminum foil. You can also slice the dough into rounds and freeze them flat on a baking sheet before transferring to a freezer bag. Frozen dough can be stored for up to 6 weeks. When ready to bake, simply slice the frozen log (if not pre-sliced) and bake directly from frozen, adding a couple of extra minutes to the original baking time.
With these storage tips, you’ll always have a supply of delectable Fudge Stripe Cookies ready to enjoy!
Explore More Irresistible Cookie Recipes:
Cookies
Nutella Stuffed Chocolate Chip Cookies
Desserts
Healthy No Bake Cookies
Cookies
Lemon Poppy Seed Cookies
Desserts
Peanut Butter Cookies

Fudge-Striped Cookies
Video
Equipment
-
Stand mixer
-
Sheet pan (15″ x 10″)
-
Parchment paper or silicone baking mat
-
Large piping tip to cut out centers
-
Cooling rack
Ingredients
- 16 tablespoons unsalted butter cold, 1 cup, cut into small cubes
- 3/4 cup light brown sugar soft, packed gently
- 1-1/2 teaspoons pure vanilla extract
- 1/2 heaping teaspoon fine sea salt
- 1 teaspoon cornstarch
- 2-1/4 cups all-purpose flour see note 1 (approx. 325 grams)
- 2 cups semi-sweet chocolate chips divided, see note 2
- 4 teaspoons vegetable oil divided
Instructions
-
In the bowl of a stand mixer fitted with a paddle attachment, combine the cold unsalted butter cubes and light brown sugar. Beat together on medium speed until the mixture is creamy and light in color, resembling peanut butter in consistency. This process should take approximately 3–5 minutes. Remember to scrape down the sides of the bowl periodically to ensure all ingredients are well incorporated.
-
Next, add the pure vanilla extract, fine sea salt, and cornstarch to the butter mixture. Beat on low speed just until these ingredients are combined. Then, gradually add the all-purpose flour, mixing only until it is barely incorporated. Be careful not to overmix, as this can develop too much gluten and result in tough cookies. The dough may appear a bit crumbly at first, but with a little mixing and light kneading, it will come together.
-
Once the dough is formed, gather it into a large ball. Divide this ball in half. Take each half and shape it into a log, approximately 9 inches long and about 2 inches in diameter. Gently roll the log on your countertop to help even out its shape. Wrap each dough log tightly in plastic wrap, ensuring no air can get in, and refrigerate for a minimum of 2 hours. Chilling is crucial for both flavor development and preventing the cookies from spreading during baking.
-
Preheat your oven to 350°F (175°C). Line a large sheet pan with parchment paper or a silicone baking mat. Remove one dough log at a time from the refrigerator. Using a sharp knife, slice the dough log into thin cookies, about 1/4-inch thick (aim for thin slices for the authentic Fudge Stripe cookie texture). To create the signature center hole, use the tip of a large round piping tip to cut out the middle of each cookie. Place the cut cookies on your prepared sheet pan, leaving about 1 inch of space between them.
-
Bake the cookies in the preheated oven for approximately 8–12 minutes. Baking times can vary, so keep a close eye on them. The cookies are ready when their edges are just beginning to turn a light golden-brown. Avoid overbaking to keep them tender.
-
Once baked, carefully remove the cookies from the oven and transfer them to a wire cooling rack to cool completely. Ensure they are entirely cool before proceeding to the chocolate-dipping step. Repeat the baking process with the remaining dough log.
-
In a microwave-safe bowl, combine 1 cup of semi-sweet chocolate chips with 2 teaspoons of vegetable oil. Microwave in 20-second increments, stirring well for 15 seconds between each burst, until the chocolate is completely melted and smooth. Dip the flat bottom half of each cooled cookie into the melted chocolate. Gently tap the cookie against the edge of the bowl to remove any excess chocolate and ensure an even coating. Place the dipped cookie, chocolate side up, on a lined sheet pan. Allow the chocolate to fully set and harden; you can place the sheet pan in the refrigerator or freezer to speed up this process.
(Melt the remaining 1 cup of chocolate chips and remaining 2 teaspoons of vegetable oil as needed for subsequent batches, rewarming the chocolate in short microwave bursts if it starts to thicken.)
-
Once all the cookie bases are dipped and set, it’s time for the iconic stripes. Line a tall cup with a resealable plastic bag. With any leftover melted chocolate, use a spatula to transfer it into the plastic bag. Seal the bag, ensuring there’s no air trapped inside. Snip off a tiny corner of the bag to create a fine opening, and then drizzle the chocolate over the undipped side of the cookies in thin, even stripes. Allow the chocolate stripes to set at room temperature (so they aren’t cold!) before serving. Enjoy your perfectly crafted homemade Fudge Stripe Cookies!
Recipe Notes
Note 2: Choosing Your Chocolate. The quality of your chocolate chips significantly impacts both the melting consistency and the overall flavor of your Fudge Stripe Cookies. Opt for the highest quality chocolate chips you can find. While semi-sweet chocolate offers a classic, balanced flavor that pairs wonderfully with the buttery cookie, feel free to experiment with your favorites. My family particularly enjoys milk chocolate, but dark chocolate is an excellent alternative for a richer, more intense flavor. For a truly unique twist, you could even try white chocolate chips.
Storage: Once your delicious Fudge Stripe Cookies have cooled completely and the chocolate has fully set, store them in an airtight container. They will maintain their freshness and delightful texture at room temperature for approximately 2–3 days. For longer storage, refer to the detailed freezing instructions in the “Storage Solutions” section above.
Nutrition
Nutrition information is automatically calculated, so should only be used as an approximation.