
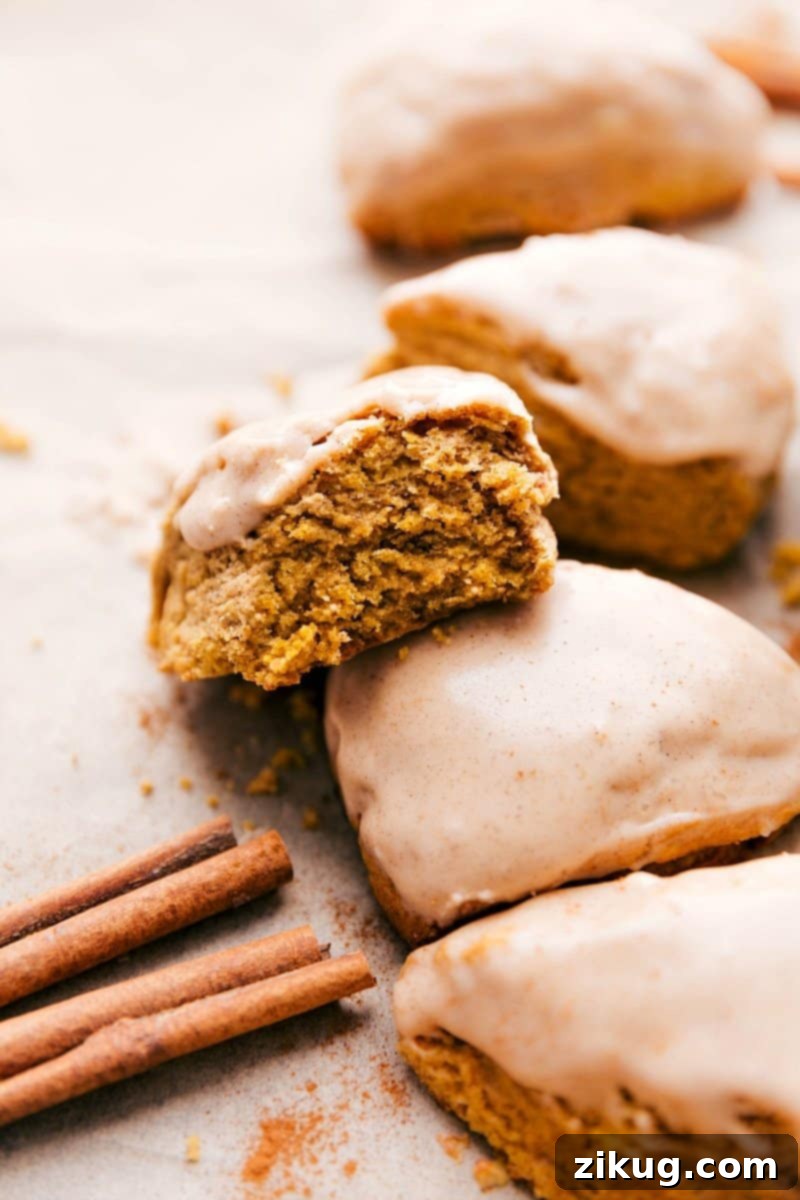
Indulge in the Ultimate Pumpkin Scones Recipe that promises a melt-in-your-mouth experience with every bite. These delightful scones are a testament to fall baking, offering a perfect balance of light, buttery texture, aromatic spices, and a subtly sweet finish. Each scone is crowned with a crisp sugary topping and elegantly drizzled with a rich maple glaze, creating a treat that’s both comforting and irresistible. Perfect for breakfast, brunch, or a cozy afternoon tea, these homemade pumpkin scones will quickly become a cherished autumn tradition.
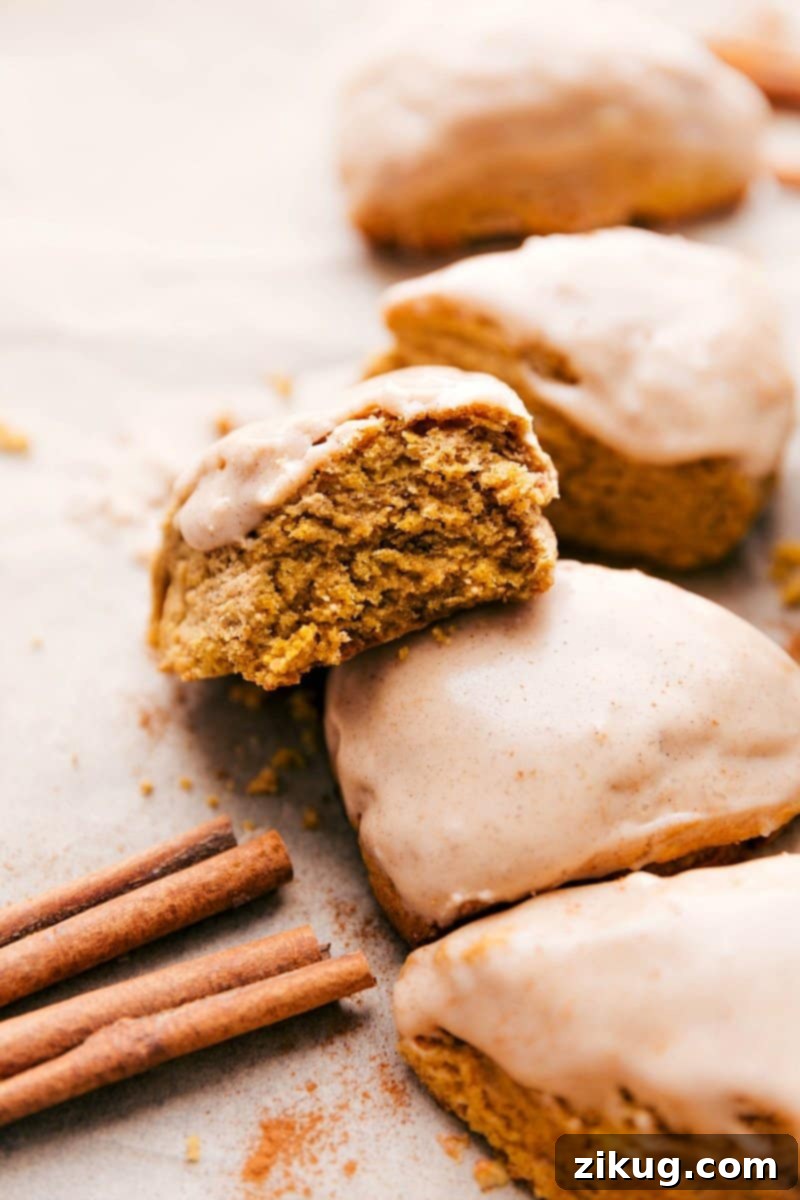

Author’s Culinary Corner
Homemade Pumpkin Scones That Truly Outshine Any Coffee Shop!
There’s an undeniable magic in the air when autumn arrives, and for me, nothing captures that cozy essence quite like a warm, freshly baked Pumpkin Scone straight from the oven. This recipe isn’t just about baking; it’s about crafting an experience. These scones are exquisitely buttery, remarkably light, and generously infused with a medley of comforting fall spices. The final touch? A luscious, sweet maple glaze that beautifully ties all the flavors together, creating a symphony of taste that’s simply divine. The aroma alone will transport you to a crisp autumn day, filling your home with warmth and nostalgia.
My quest for the ultimate pumpkin scone was deeply inspired by the beloved, iconic pumpkin scones found at popular coffee chains. However, I embarked on a mission to create a version that wasn’t just similar, but dared to be even better – a truly superior homemade pumpkin scone. My aim was to replicate that rich, authentic pumpkin flavor, achieve that satisfyingly crisp sugary top, and ensure a soft, flaky interior that melts in your mouth. After countless batches and meticulous adjustments, I’m thrilled to share this recipe that checks every single box. These are, without a doubt, the pumpkin scones I eagerly anticipate and dream about every single fall season, making them a true autumn essential.
If you’re anything like me, those frequent coffee shop bakery runs can quickly become an expensive habit. This recipe offers a delightful and budget-friendly alternative, allowing you to enjoy gourmet-quality pumpkin scones from the comfort of your own kitchen. Imagine starting your crisp autumn morning with one of these warm, spiced delights alongside a steaming mug of rich Hot Chocolate or a comforting Pumpkin Spice Latte Steamer. Beyond the incredible taste, the aroma alone will transform your entire home, filling it with the inviting, nostalgic scents of October. This isn’t just a recipe; it’s an invitation to embrace the warmth and unparalleled flavors of fall through the best homemade pumpkin scones.
Baking homemade treats like these pumpkin scones is more than just cooking; it’s an act of love and a way to create lasting memories. From the moment the warm spices fill your kitchen to that first tender bite, you’ll understand why this recipe is a cherished favorite. It’s an accessible way to bring gourmet bakery quality right to your dining table, perfect for special occasions or simply elevating an everyday moment. Get ready to bake a batch of pure fall happiness!
Essential Ingredients for Irresistible Pumpkin Scones
Crafting the perfect pumpkin scone begins with selecting and preparing the right ingredients. Each component plays a vital role in achieving that signature flaky texture, rich flavor, and aromatic spice profile. Here’s a closer look at what you’ll need and why these choices matter for the best homemade pumpkin scones.
| Key Ingredient | Important Tips & Substitutions for Perfect Pumpkin Scones |
|---|---|
| Canned Pumpkin Puree | Crucially, use 100% pure pumpkin puree, not pumpkin pie mix. Pumpkin pie mix contains added sugars and spices that will significantly alter the flavor and texture of your scones, making them too sweet or wet. For optimal results and to prevent a dense, wet dough, gently press out any excess moisture from the pumpkin puree using several layers of paper towels or a cheesecloth. This step is absolutely vital for achieving light, airy, and perfectly structured scones. |
| Frozen Unsalted Butter | The ultimate secret to achieving those desirable flaky layers in your scones lies in using extremely cold butter. For easy incorporation and to ensure the butter remains firm throughout the mixing process, I highly recommend grating frozen unsalted butter on a box grater directly into your dry ingredients. Alternatively, you can cut it into very small, uniform cubes and then return them to the freezer for at least 15-20 minutes before use. Keeping the butter super cold creates pockets of steam during baking, which expand and separate the dough layers, resulting in a wonderfully tender and flaky texture. |
| Heavy Cream | Heavy cream contributes significantly to the rich flavor, tender crumb, and overall luxurious texture of these pumpkin scones. Its high-fat content ensures a moist and delicate interior. While you can use half-and-half in a pinch, heavy cream delivers a noticeably superior texture and richer mouthfeel that truly elevates the scone experience. Ensure it is also chilled when adding it to your wet mixture. |
| Pumpkin Pie Spices | A carefully balanced blend of aromatic spices is what truly defines a classic pumpkin scone and infuses it with that signature fall flavor. This recipe calls for ground cinnamon, ginger, nutmeg, allspice, and cloves. For the freshest and most vibrant taste, consider mixing your own blend from freshly ground whole spices. If using a pre-made pumpkin pie spice, opt for a high-quality brand. Feel free to adjust the quantities slightly to suit your personal preference for a bolder or milder spice profile. |
| Pure Maple Syrup (for Glaze) | Pure maple syrup is an indispensable ingredient for the glaze, lending a distinct, warm, and sophisticated sweetness that perfectly complements the earthy pumpkin and spices in the scones. Its unique flavor profile is quintessentially autumnal. If absolutely necessary, honey can be a substitute, but for that authentic, rich fall flavor, pure maple syrup is highly recommended and truly makes the glaze shine. Always use good quality, pure maple syrup for the best taste. |
| White Sparkling Sugar | This coarse sugar is more than just a garnish; it adds a beautiful, glistening sparkle and, more importantly, a delightful crunchy texture to the top of your scones. This crisp exterior provides a wonderful contrast to the soft, tender interior, making each bite more interesting. White sparkling sugar is ideal, but any coarse sugar will work to achieve that desired irresistible crust. |
| All-Purpose Flour | The foundation of our scone dough. For best results, use unbleached all-purpose flour. Spooning and leveling the flour (rather than scooping) prevents over-measurement, which can lead to dry, dense scones. Keep it cold, as per our top tip, to maintain optimal butter consistency. |
| Light Brown Sugar | Adds a subtle caramel note and moisture to the scones, enhancing the overall depth of flavor and tenderizing the crumb. Ensure it’s firmly packed when measuring for accuracy. |
Step-by-Step Guide to Baking Fluffy Pumpkin Scones
Creating these sensational pumpkin scones might seem intricate, but with a clear, step-by-step approach and a focus on keeping ingredients cold, you’ll be enjoying homemade, coffee-shop-quality treats in no time. Precision and temperature control are your best friends for achieving that perfect flaky texture!
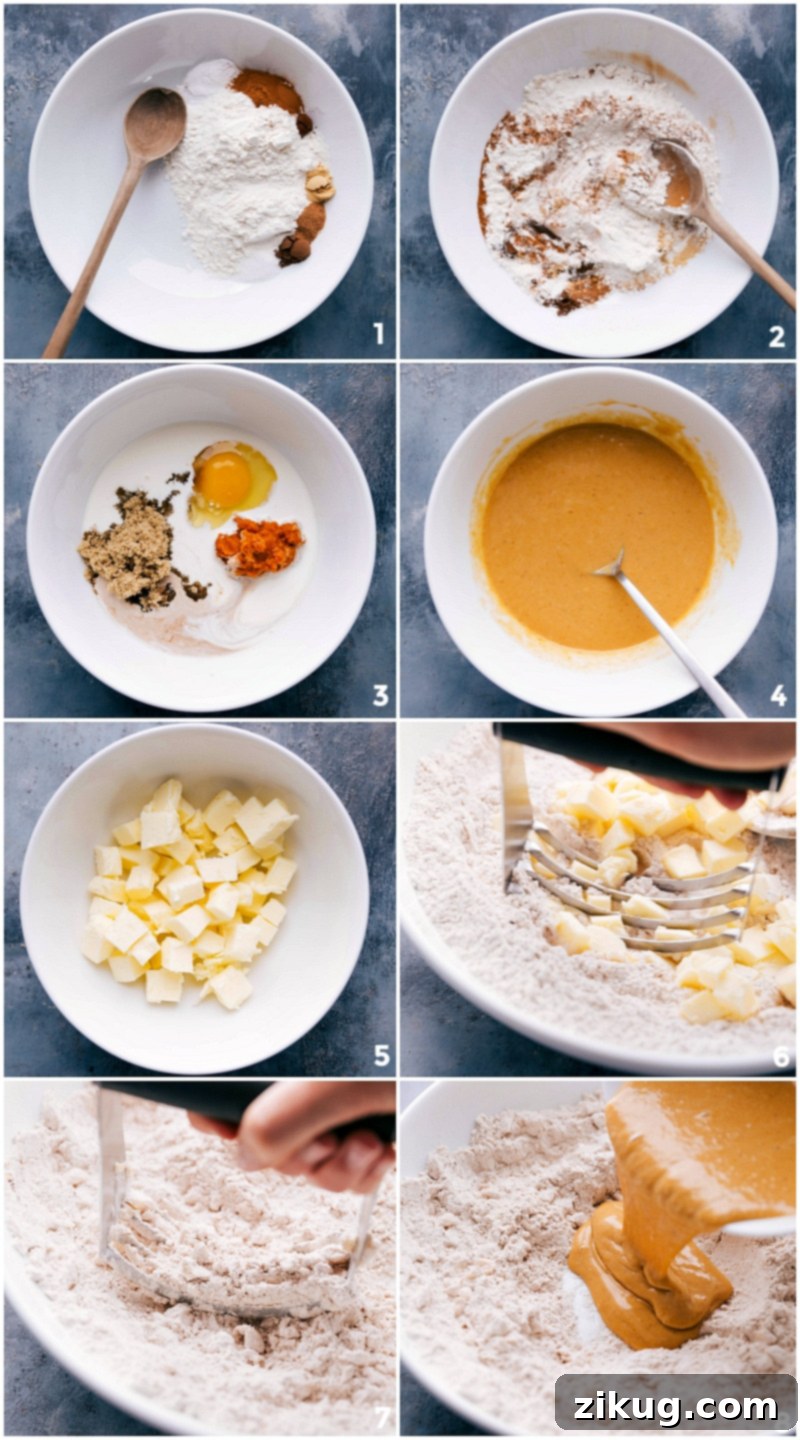
- Step 1: Combine Dry Ingredients. In a spacious large mixing bowl, thoroughly whisk together the all-purpose flour (ensure it’s spooned and leveled for accurate measurement), baking powder, ground cinnamon, ground ginger, allspice, ground nutmeg, and ground cloves, along with the salt. Whisk these dry components vigorously for about 30 seconds to ensure all leavening agents and spices are evenly distributed throughout the mixture. This initial step is crucial for consistent flavor and rise throughout your scones.
- Step 2: Prepare Wet Ingredients. In a separate, smaller bowl, vigorously whisk together the cold heavy cream (first portion, 1/2 cup), one large cold egg, the moisture-pressed 100% pure canned pumpkin puree, firmly packed light brown sugar, and vanilla bean paste (or pure vanilla extract). Continue whisking until the mixture is completely smooth and well-combined. The brown sugar should dissolve as much as possible, and the pumpkin should be thoroughly incorporated.
- Step 3: Cut In Frozen Butter. Add the small, pre-frozen cubes (or grated) of unsalted butter directly into the large bowl containing the whisked dry ingredients. Using a pastry cutter, two dinner knives, or your fingertips, swiftly cut the butter into the flour mixture. Work quickly to prevent the butter from warming up and melting. Continue this process until the butter is evenly dispersed and the mixture resembles coarse crumbs with visible pea-sized pieces of butter throughout. These cold butter bits are crucial for creating steam pockets during baking, which lift the dough and create the signature flaky layers.
- Step 4: Gently Form the Dough. Create a shallow well in the center of your dry mixture and butter mixture. Pour the entire combined wet ingredient mixture into this well. Using a wooden spoon or a sturdy spatula, gently stir the ingredients until the dough just begins to come together. The key here is minimal mixing; overworking the dough develops gluten, which will result in tough, dry, and chewy scones instead of light and tender ones. It’s perfectly fine if a few dry streaks of flour remain – slight under-mixing is always better than over-mixing for scone texture.
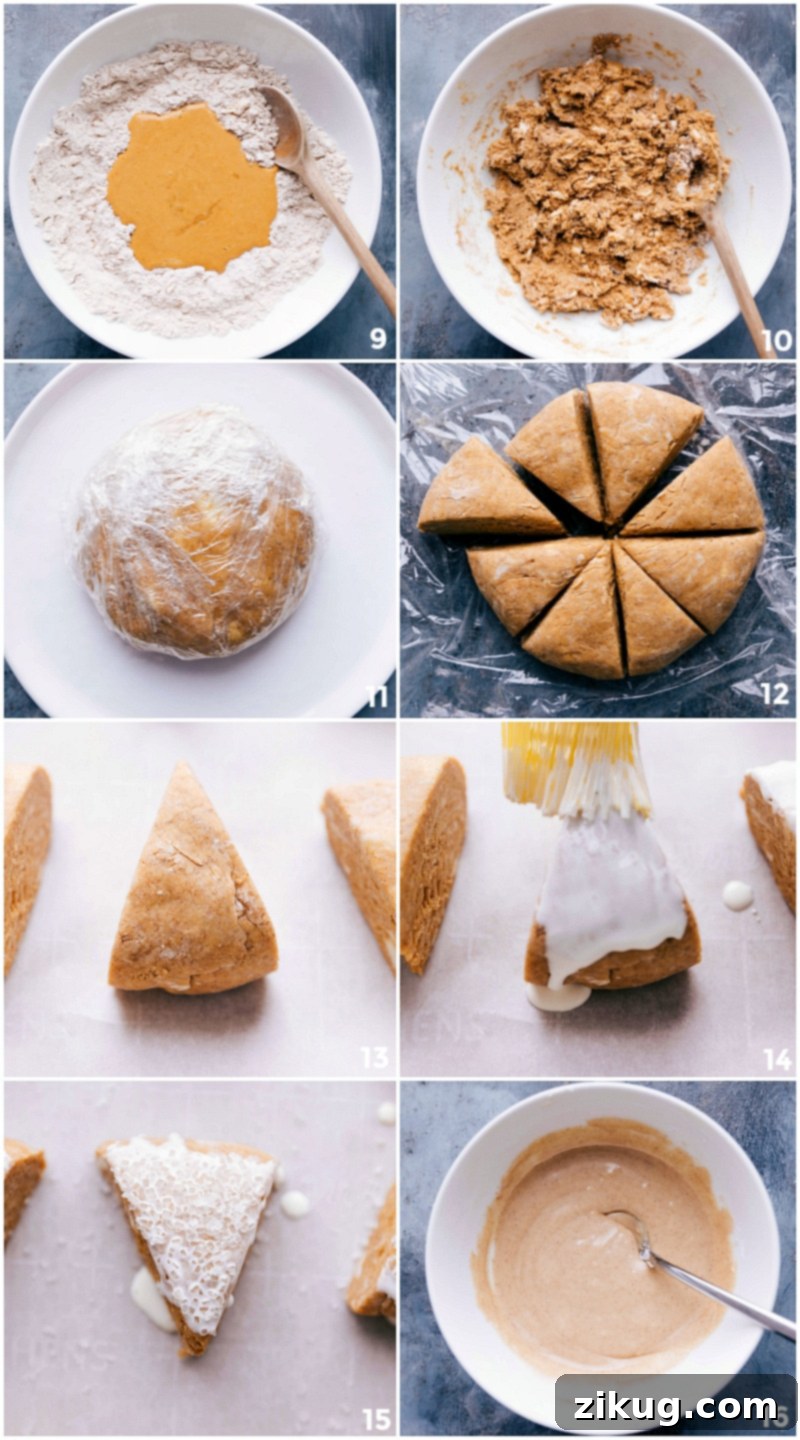
- Step 5: Shape and Initial Chill for Perfection. Lightly dust a clean work surface with a small amount of flour. Turn the shaggy dough mixture onto the floured surface. With lightly floured hands, gently pat and work the dough into a cohesive ball. Handle the dough as little as possible to keep it cold and prevent gluten development. If the dough feels overly sticky, incorporate a tiny bit more flour (half a teaspoon at a time). If it seems too dry or crumbly, add 1-2 tablespoons of cold heavy cream. Press the dough into a uniform disc, approximately 1 inch thick, then cut it precisely in half. Gently shape each half into a smaller disc, about 5 inches in diameter. Wrap these two discs tightly in plastic wrap and place them in the freezer for 20 minutes to firm up. This chilling process helps the butter solidify and prevents the scones from spreading too much during baking, ensuring a better rise.
- Step 6: Cut into Wedges, Brush, and Sugar. After the initial chill, remove the dough discs from the freezer. Using a sharp knife, carefully cut each disc into 8 equal wedges, like slicing a pizza. Try to make each cut in one decisive motion for cleaner, crisp edges. Arrange the wedges on a large baking sheet that has been lined with parchment paper or a silicone baking mat, ensuring they are spaced about 2 inches apart to allow for proper air circulation and even baking. Pour the remaining 2 (or 3 if preferred) tablespoons of cold heavy cream into a small dish. Using a pastry brush, gently brush the tops and sides of each scone with cream; this helps achieve a beautiful golden-brown crust and promotes a tender exterior. If desired, generously sprinkle the tops of the brushed scones with coarse white sparkling sugar for an added delightful crunch and an attractive, bakery-style finish.
- Step 7: Second Chill & Preheat Oven. Place the entire baking sheet with the prepared scones back into the freezer for another 20 minutes. This critical second chilling period ensures the butter is thoroughly re-chilled and the dough is firm, which is absolutely essential for maximum rise, minimal spread, and the lightest, flakiest texture possible. While the scones are chilling for the second time, preheat your oven to 400°F (200°C) to ensure it reaches the correct temperature.
- Step 8: Bake to Golden Perfection. Bake the thoroughly chilled pumpkin scones in the preheated oven for 17–23 minutes, or until the edges are beautifully light golden brown and the tops are lightly browned and feel firm when gently pressed. The exact baking time may vary slightly depending on your oven, so keep a close eye on them. It is important not to overbake scones, as this will lead to a drier, denser, and less flavorful result. The goal is a light, tender interior with a crisp exterior. Once baked, let them cool on the baking sheet for about 5 minutes to set slightly before carefully transferring them to a wire rack to finish cooling completely.
- Step 9: Prepare & Drizzle Maple Glaze. While the scones are cooling (they should still be just barely warm for the glaze to adhere and slightly melt beautifully), prepare the luscious maple glaze. In a small bowl, whisk together the powdered sugar, softened unsalted butter, pure maple syrup, a pinch of salt, and vanilla extract until the glaze is completely smooth and free of any lumps. If the glaze appears too thick for easy drizzling, add a tiny bit more pure maple syrup (or a very small amount of heavy cream or milk), one teaspoon at a time, until it reaches your desired drizzling consistency. Drizzle the warm glaze generously over the just-barely-warm scones. Allow the glaze a few minutes to set before serving. These delightful homemade pumpkin scones are best enjoyed warm, perhaps with an extra dollop of whipped cream or a dusting of cinnamon!
Quick Tip for Ultimate Flakiness: The Power of Cold!
The Golden Rule for Perfect Scones: Keep All Ingredients as Cold as Possible! This is the single most important tip for baking truly light, tender, and incredibly flaky pumpkin scones. The science behind it is simple: when cold butter hits a hot oven, the moisture in the butter rapidly creates steam, which then puffs up the layers of dough, resulting in that desirable flaky texture. To maximize this effect, I highly recommend chilling your flour in the fridge for 10-20 minutes before you even begin. Cut your unsalted butter into small cubes or grate it, and then place them back in the freezer until the very moment you need to incorporate them into the dry ingredients. Even your wet ingredients, like heavy cream and egg, should be used directly from the fridge. The colder your scone dough remains throughout the mixing and shaping process, the less the butter will melt before baking, creating more steam pockets in the oven. This meticulous attention to temperature will result in unbelievably light, airy scones that are miles away from being dense or heavy – a true bakery-quality triumph at home!
Storage & Make-Ahead Tips for Convenient Pumpkin Scones
To enjoy these delectable pumpkin scones at their absolute best, aim to bake them about an hour before you plan to serve them. Fresh from the oven is always the ultimate experience for any scone!
- Make Ahead (Refrigerate Overnight): For a convenient option to enjoy fresh-baked scones the next day, prepare and shape the dough into wedges as instructed in the recipe steps (up to Step 6, before the second chill). Place the unbaked scones in an airtight container or sealable bag and refrigerate overnight. When you’re ready to bake the next morning, simply retrieve them from the fridge, brush with the remaining heavy cream, sprinkle with sparkling sugar (if desired), and proceed with the baking instructions. The freezer chill step can be skipped if baking immediately from the fridge, or you can do a short 10-minute chill for extra insurance.
- Freeze for Longer Storage (Unbaked): To enjoy homemade pumpkin scones whenever a craving strikes, freezing them unbaked is an excellent solution. Arrange the shaped scones on a baking sheet lined with parchment paper, ensuring they don’t touch each other. Place the baking sheet in the freezer until the scones are completely solid (this prevents them from sticking together). Once frozen solid, transfer the individual scones to a freezer-safe airtight bag or container. They will keep well in the freezer for up to 1 month. When you’re ready to bake, there’s no need to thaw! Simply place the frozen scones on a prepared baking sheet, brush with cream, add sugar if desired, and bake. You’ll likely need to add an additional 3-5 minutes to the usual baking time (total 20-25 minutes), but always keep a close eye on them for golden edges and a firm top to avoid overbaking.
Why This Pumpkin Scone Recipe is a Fall Favorite
Beyond its incredible taste and flaky texture, this pumpkin scone recipe holds a special place in the hearts of many for several compelling reasons:
- Seasonal Delight & Comfort: Pumpkin is undeniably synonymous with autumn, and these scones perfectly capture the quintessential essence of the season. The warm, inviting spices and earthy pumpkin flavor evoke powerful feelings of comfort, nostalgia, and coziness, making them an ideal treat for crisp fall mornings or chilly evenings.
- Coffee Shop Quality, Homemade Comfort: Imagine savoring the premium quality of your favorite gourmet bakery scones without ever having to leave the warmth and comfort of your own home. The satisfaction of baking these yourself, filling your kitchen with their alluring, intoxicating aroma, is an experience unmatched by any store-bought alternative.
- Perfectly Balanced Flavors: This recipe is meticulously crafted to ensure a harmonious balance of flavors. The natural sweetness of the pumpkin is beautifully complemented by the rich, aromatic spices, and further enhanced by the delicate sweetness of the maple glaze. Each bite offers a delightful interplay of tastes without being overwhelmingly sweet, allowing the true pumpkin and spice notes to shine through.
- Impressive & Surprisingly Easy: While these pumpkin scones look undeniably sophisticated and impressive – perfect for entertaining guests or a holiday brunch – the step-by-step instructions are remarkably straightforward and accessible for bakers of all skill levels. They’re impressive enough to be a showstopper but simple enough for a relaxing weekend baking project.
- Versatile Treat for Any Occasion: These homemade pumpkin scones are incredibly versatile. They are ideal for a decadent breakfast, a leisurely brunch, a delightful afternoon tea spread, or even as a comforting dessert after dinner. They pair wonderfully with a robust cup of coffee, a soothing herbal tea, or any special fall beverage you desire.
Make the Most of Your Leftover Pumpkin Puree!
Often, a can of pumpkin puree leaves you with a little extra after making your delicious pumpkin scones. Don’t let that precious autumnal ingredient go to waste! Pumpkin puree is incredibly versatile and can be used in a delightful variety of other recipes, ensuring you enjoy every last bit of that fantastic fall flavor. Here are some fantastic ideas to inspire your next kitchen adventure and make the most of your remaining pumpkin puree:
Other Delicious Pumpkin Creations:
Desserts
Small Batch Pumpkin Cookies
Beverages
Pumpkin Spice Latte Steamer
Desserts
Pumpkin Cupcake Recipe
Desserts
Pumpkin Coffee Cake Recipe

Pin Recipe
Print Recipe
Fluffy Pumpkin Scones with Maple Glaze
Video Guide to Pumpkin Scones
Watch our comprehensive video guide to see how to make these delicious Pumpkin Scones step-by-step for perfect results every time!
Click here to watch the Pumpkin Scones video!

Essential Equipment You’ll Need
-
Pastry cutter (essential for cutting in butter without warming it)
-
Large Sheet pan (15″ x 10″ or similar)
-
Parchment paper or silicone baking mat
-
Box grater (optional, for grating frozen butter)
-
Two large mixing bowls (for wet and dry ingredients)
-
Whisk and sturdy wooden spoon or spatula
-
Pastry brush (for applying cream wash)
-
Sharp knife (for cutting scones)
Ingredients for Fluffy Pumpkin Scones
For the Pumpkin Scones
- 2 cups all-purpose flour (spooned and leveled, see Note 1 for chilling flour)
- 2-1/2 teaspoons baking powder
- 1-1/2 teaspoons ground cinnamon
- 3/4 teaspoon ground ginger
- 3/4 teaspoon allspice
- 1/2 teaspoon ground nutmeg
- 1/4 teaspoon ground cloves
- 3/4 teaspoon salt
- 1/2 cup unsalted butter (frozen in small cubes or grated, see Note 1)
- 1 large egg (cold)
- 1/2 cup + 2 to 3 tablespoons heavy cream (cold, divided for dough and brushing, see Note 1)
- 1/4 cup canned pumpkin puree (with liquid pressed out using paper towels, see Note 2)
- 1/2 cup + 2 tablespoons light brown sugar (firmly packed)
- 1/2 teaspoon vanilla bean paste (or 1 teaspoon pure vanilla extract)
- White sparkling sugar (or coarse sugar, for topping)
For the Sweet Maple Glaze
- 1 cup powdered sugar
- 1 tablespoon unsalted butter (softened)
- 1/4 cup pure maple syrup
- 1/8 teaspoon salt
- 1/2 teaspoon vanilla extract
- 1/4 teaspoon ground cinnamon
Detailed Baking Instructions for Perfect Pumpkin Scones
-
Step 1: Combine Dry Ingredients. In a spacious large mixing bowl, thoroughly whisk together the 2 cups of all-purpose flour (ensuring it is spooned and leveled for accurate measurement), 2-1/2 teaspoons of baking powder, 1-1/2 teaspoons of ground cinnamon, 3/4 teaspoon of ground ginger, 3/4 teaspoon of allspice, 1/2 teaspoon of ground nutmeg, 1/4 teaspoon of ground cloves, and 3/4 teaspoon of salt. Whisk these dry components vigorously for about 30 seconds to ensure all leavening agents and aromatic spices are evenly distributed throughout the mixture. This initial step is crucial for consistent flavor and optimal rise throughout your finished pumpkin scones.
-
Step 2: Prepare Wet Ingredients. In a separate, smaller bowl, vigorously whisk together the 1/2 cup of cold heavy cream, one large cold egg, the moisture-pressed 1/4 cup of 100% pure canned pumpkin puree, 1/2 cup + 2 tablespoons of firmly packed light brown sugar, and 1/2 teaspoon of vanilla bean paste (or 1 teaspoon pure vanilla extract). Continue whisking until the mixture is completely smooth and well-combined. The brown sugar should dissolve as much as possible, and the pumpkin should be thoroughly incorporated into a uniform, creamy consistency.
-
Step 3: Cut In Frozen Butter. Add the small, pre-frozen cubes (or grated) of 1/2 cup unsalted butter directly into the large bowl containing the whisked dry ingredients. Using a pastry cutter, two dinner knives, or your fingertips, swiftly cut the butter into the flour mixture. Work quickly to prevent the butter from warming up and melting from the heat of your hands. Continue this process until the butter is evenly dispersed and the mixture resembles coarse crumbs with visible pea-sized pieces of butter throughout. These cold butter bits are crucial for creating steam pockets during baking, which expand and lift the dough, resulting in the signature flaky layers and a tender interior.
-
Step 4: Gently Form the Dough. Create a shallow well in the center of your dry mixture and butter combination. Pour the entire combined wet ingredient mixture into this well. Using a wooden spoon or a sturdy spatula, gently stir the ingredients until the dough just begins to come together. The key here is minimal mixing; overworking the dough develops gluten, which will result in tough, dry, and chewy scones instead of light and tender ones. It’s perfectly fine if a few dry streaks of flour remain – slight under-mixing is always better than over-mixing for achieving the desired scone texture.
-
Step 5: Shape and Initial Chill for Perfection. Lightly dust a clean work surface with a small amount of all-purpose flour. Turn the shaggy dough mixture onto the floured surface. With lightly floured hands, gently pat and work the dough into a cohesive ball. Handle the dough as little as possible to keep it cold and prevent gluten development. If the dough feels overly sticky, incorporate a tiny bit more flour (half a teaspoon at a time). If it seems too dry or crumbly, add 1-2 tablespoons of cold heavy cream. Press the dough into a uniform disc, approximately 1 inch thick, then cut it precisely in half. Gently shape each half into a smaller disc, about 5 inches in diameter. Wrap these two discs tightly in plastic wrap and place them in the freezer for 20 minutes to firm up. This initial chilling process helps the butter solidify and prevents the scones from spreading too much during baking, ensuring a better, higher rise.
-
Step 6: Cut into Wedges, Brush, and Sugar. After the initial chill, remove the dough discs from the freezer. Using a sharp knife, carefully cut each disc into 8 equal wedges, like slicing a pizza. Try to make each cut in one decisive motion for cleaner, crisp edges. Arrange the wedges on a large baking sheet that has been lined with parchment paper or a silicone baking mat, ensuring they are spaced about 2 inches apart to allow for proper air circulation and even baking. Pour the remaining 2 (or 3 if preferred) tablespoons of cold heavy cream into a small dish. Using a pastry brush, gently brush the tops and sides of each scone with cream; this helps achieve a beautiful golden-brown crust and promotes a tender exterior. If desired, generously sprinkle the tops of the brushed scones with coarse white sparkling sugar for an added delightful crunch and an attractive, bakery-style finish.
-
Step 7: Second Chill & Preheat Oven. Place the baking sheet with the prepared scones back into the freezer for another 20 minutes. This critical second chilling period ensures the butter is thoroughly re-chilled and the dough is firm, which is absolutely essential for maximum rise, minimal spread, and the lightest, flakiest texture possible. While the scones are chilling for the second time, preheat your oven to 400°F (200°C) to ensure it reaches the correct temperature and provides an immediate burst of heat for the butter to steam.
-
Step 8: Bake to Golden Perfection. Bake the thoroughly chilled pumpkin scones in the preheated oven for 17–23 minutes, or until the edges are beautifully light golden brown and the tops are lightly browned and feel firm when gently pressed. The exact baking time may vary slightly depending on your oven, so keep a close eye on them. It is important not to overbake scones, as this will lead to a drier, denser, and less flavorful result. The goal is a light, tender interior with a crisp exterior. Once baked, let them cool on the baking sheet for about 5 minutes to set slightly before carefully transferring them to a wire rack to finish cooling completely.
-
Step 9: Prepare & Drizzle Maple Glaze. While the scones are cooling (they should still be just barely warm for the glaze to adhere and slightly melt beautifully), prepare the luscious maple glaze. In a small bowl, whisk together the 1 cup of powdered sugar, 1 tablespoon of softened unsalted butter, 1/4 cup of pure maple syrup, an 1/8 teaspoon pinch of salt, and 1/2 teaspoon of vanilla extract until the glaze is completely smooth and free of any lumps. If the glaze appears too thick for easy drizzling, add a tiny bit more pure maple syrup (or a very small amount of heavy cream or milk), one teaspoon at a time, until it reaches your desired drizzling consistency. Drizzle the warm glaze generously over the just-barely-warm scones. Allow the glaze a few minutes to set before serving. These delightful homemade pumpkin scones are best enjoyed warm, perhaps with an extra dollop of whipped cream or a light dusting of cinnamon for added indulgence!
Important Recipe Notes for Scone Success
Note 2: Properly Preparing Your Pumpkin Puree. Do not skip the critical step of pressing out excess liquid from your canned pumpkin puree. Canned pumpkin can contain a significant amount of water, and failing to remove it will result in a scone dough that is too wet and sticky, making it difficult to work with and leading to dense, heavy scones instead of the light, airy texture we’re aiming for. Use several layers of paper towels or a clean cheesecloth to gently but firmly press out as much moisture as possible from the pumpkin puree. This simple step is a small effort with a massive impact on the final outcome and the overall quality of your pumpkin scones.
Storage and Freezing Options: Enjoy Fresh or Prepare Ahead! These homemade pumpkin scones are truly at their peak when enjoyed fresh from the oven, ideally within an hour of baking. If possible, plan your baking schedule to coincide with serving to experience their ultimate flavor and texture.
- Make Ahead (Refrigeration for Overnight): For a convenient option to enjoy fresh-baked scones the next day, you can prepare and shape the scone dough into wedges as described in the instructions (up to Step 6, before the second chill). Place the unbaked scones in an airtight container or a large sealable bag and refrigerate them overnight. When you’re ready to bake the next morning, simply retrieve them from the fridge, brush with the remaining cold heavy cream, sprinkle with sparkling sugar (if desired), and then proceed with the baking instructions. You can skip the additional freezer chill step if baking immediately from the fridge, or opt for a short 10-minute chill for extra assurance against spreading.
- Freezing Unbaked Scones for Longer Storage: To enjoy homemade pumpkin scones whenever a craving strikes throughout the fall season, freezing them unbaked is an excellent solution. Arrange the shaped scones on a baking sheet lined with parchment paper, ensuring they are not touching each other. Place the baking sheet in the freezer until the scones are completely solid (this prevents them from sticking together once bagged). Once frozen solid, transfer the individual scones to a freezer-safe airtight bag or container. They can be stored in the freezer for up to 1 month. When you’re ready to bake, there’s no need to thaw! Simply place the frozen scones directly onto a prepared baking sheet, brush with cream, add sugar if desired, and bake. You will likely need to add an additional 3-5 minutes to the specified baking time (total 20-25 minutes), but always keep a close eye on them for beautifully golden edges and a firm top to ensure perfect doneness without overbaking.
Nutritional Information (Approximate)
Calories: 300 kcal |
Carbohydrates: 50g |
Protein: 4g |
Fat: 10g |
Saturated Fat: 6g |
Polyunsaturated Fat: 1g |
Monounsaturated Fat: 3g |
Trans Fat: 1g |
Cholesterol: 39mg |
Sodium: 187mg |
Potassium: 74mg |
Fiber: 1g |
Sugar: 26g |
Vitamin A: 901 IU |
Vitamin C: 1 mg |
Calcium: 65 mg |
Iron: 2 mg
Nutrition information is automatically calculated and is provided for convenience. It should only be used as an approximation and may vary based on specific ingredients and preparation methods. For precise dietary information, please consult a qualified nutritionist.
Enjoyed this recipe? Leave a comment and let us know!