

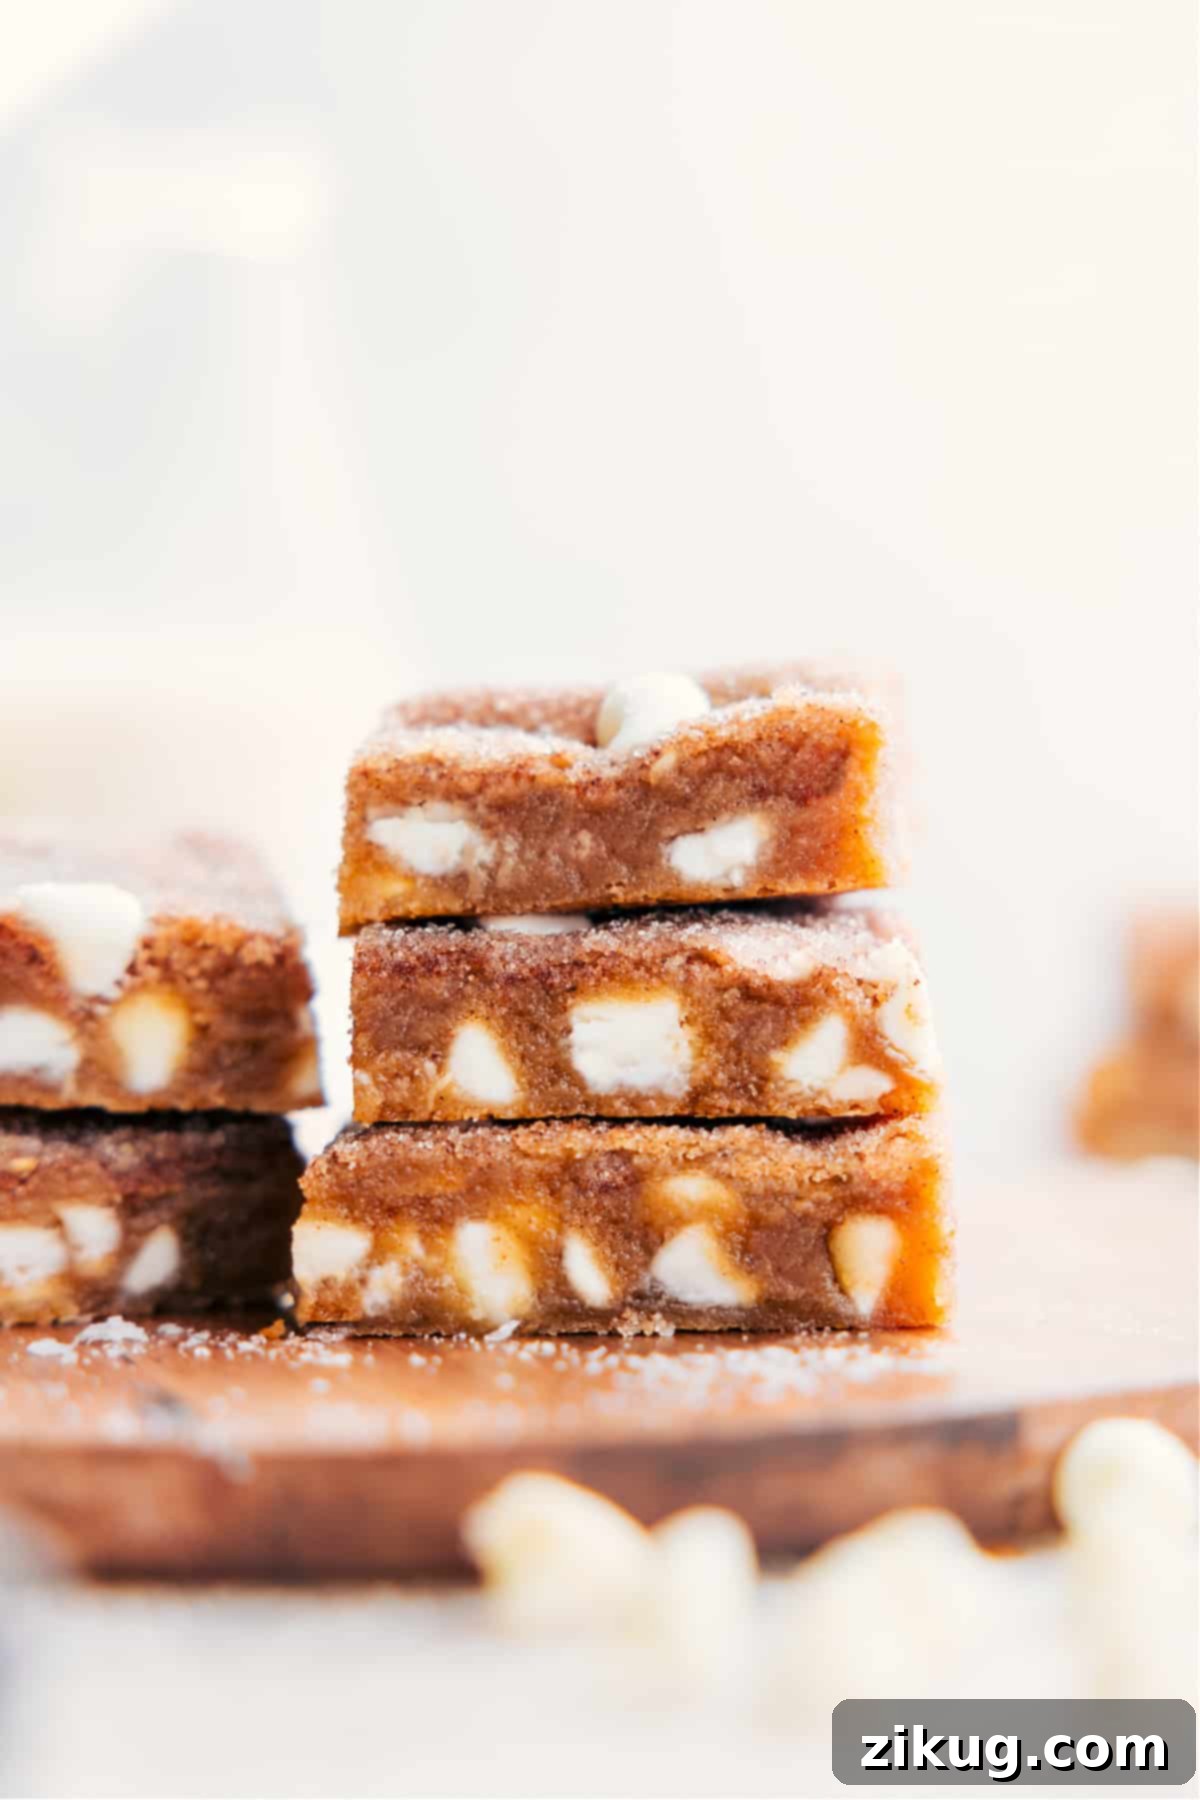
Snickerdoodle Blondies are not just another dessert; they are the ultimate sweet indulgence. Imagine a treat that’s supremely soft, delightfully chewy, and generously studded with creamy white chocolate chips, all crowned with that iconic, sweet cinnamon-sugar layer. These blondies bring the comforting warmth of a classic snickerdoodle cookie into a convenient, irresistible bar format, making them an instant favorite for any occasion. Perfect for parties, potlucks, or simply a cozy night in, these bars promise a taste experience that’s both familiar and wonderfully unique.

Author’s Note
Your New Go-To Dessert: Snickerdoodle Blondies!
As someone who has passionately baked for years, I can confidently say these Snickerdoodle Blondies have earned a top spot in my heart. If you’ve been following my culinary adventures, my obsession with Snickerdoodles won’t come as a surprise. My journey with this beloved flavor profile began with the classic Snickerdoodle cookie, evolving into creative variations like rich caramel-filled Snickerdoodles and seasonal favorites such as pumpkin Snickerdoodles.
It was only a matter of time before I translated that irresistible cinnamon-sugar magic into a bar form. But let me be clear: these are not your typical dry, crumbly cookie bars. Far from it! These Snickerdoodle Blondies are the softest, chewiest, and most flavor-packed bars you’ll ever sink your teeth into. Imagine the rich density of a fudgy brownie, but without the chocolate, infused instead with warm cinnamon and sweet brown sugar. Their remarkable density comes from a deliberate choice: no baking soda or baking powder is used, allowing the texture to remain incredibly dense and moist. They are simply sensational.
To elevate the flavor even further, I employed one of my all-time favorite baking tricks: browned butter. This simple technique adds a depth of nutty, toasted goodness that truly transforms the blondies. If you recall my much-loved brown butter oatmeal cookies, you know the incredible difference it makes. That same magical method is at play here, guaranteeing a flavor profile that is complex, comforting, and utterly unforgettable. Prepare to fall in love with these blondies!
Why These Snickerdoodle Blondies Will Be Your New Favorite
What makes this Snickerdoodle Blondies recipe stand out? It’s a harmonious blend of perfect texture, deep flavor, and surprising simplicity. Unlike many bar recipes that can turn out dry or crumbly, these blondies are crafted for maximum chewiness and a melt-in-your-mouth experience. Here’s why you’ll adore them and why they deserve a permanent spot in your recipe collection:
- Unrivaled Chewy and Dense Texture: Say goodbye to dry bars! Our recipe focuses on creating a dense, fudgy, and incredibly chewy texture that rivals the best brownies. The absence of chemical leaveners (baking soda/powder) is intentional, contributing to this desired rich, almost caramel-like density that is truly satisfying.
- Rich Browned Butter Flavor: This is the undeniable secret weapon. Browning the butter adds a nutty, toasted, and slightly caramelized depth that elevates the entire flavor profile of these blondies. It transforms them from simply sweet to truly complex and deeply satisfying, providing an underlying warmth that complements the cinnamon beautifully.
- Signature Cinnamon-Sugar Swirl: That iconic Snickerdoodle taste isn’t just infused within the batter; it’s generously sprinkled on top, creating a delicate, crisp, and aromatic crust. This crunchy topping provides a delightful textural contrast to the soft, chewy interior, making every bite an adventure.
- Creamy White Chocolate Perfection: Generous amounts of creamy white chocolate chips melt into the blondie batter, creating luscious pockets of sweet indulgence. Their mild, sweet flavor perfectly complements the warm spices without overpowering the classic Snickerdoodle essence. For those who prefer a different kind of sweetness, this element offers versatility.
- Surprisingly Easy to Make: Despite their sophisticated flavor and gourmet appeal, these bars are remarkably straightforward to prepare. The steps are simple, requiring no special equipment beyond a saucepan and a mixing bowl. This makes them accessible and enjoyable for bakers of all skill levels, from beginners to seasoned pros.
- A Crowd-Pleasing Dessert: Whether you’re bringing them to a potluck, serving them at a family gathering, or simply enjoying them as an afternoon treat, these Snickerdoodle Blondies are guaranteed to be a hit. Their familiar flavors, elevated by thoughtful techniques, make them universally loved.
The Magic of Browned Butter: A Flavor Game-Changer
If you’ve never browned butter before, prepare for a revelation. This simple technique takes ordinary butter and transforms it into a golden, nutty, and fragrant ingredient that adds incredible depth to baked goods. It’s the secret behind the unique, irresistible flavor of these Snickerdoodle Blondies, lending them a sophisticated, toasted note that plain butter simply cannot achieve. Here’s a detailed guide to browning butter perfectly and safely:
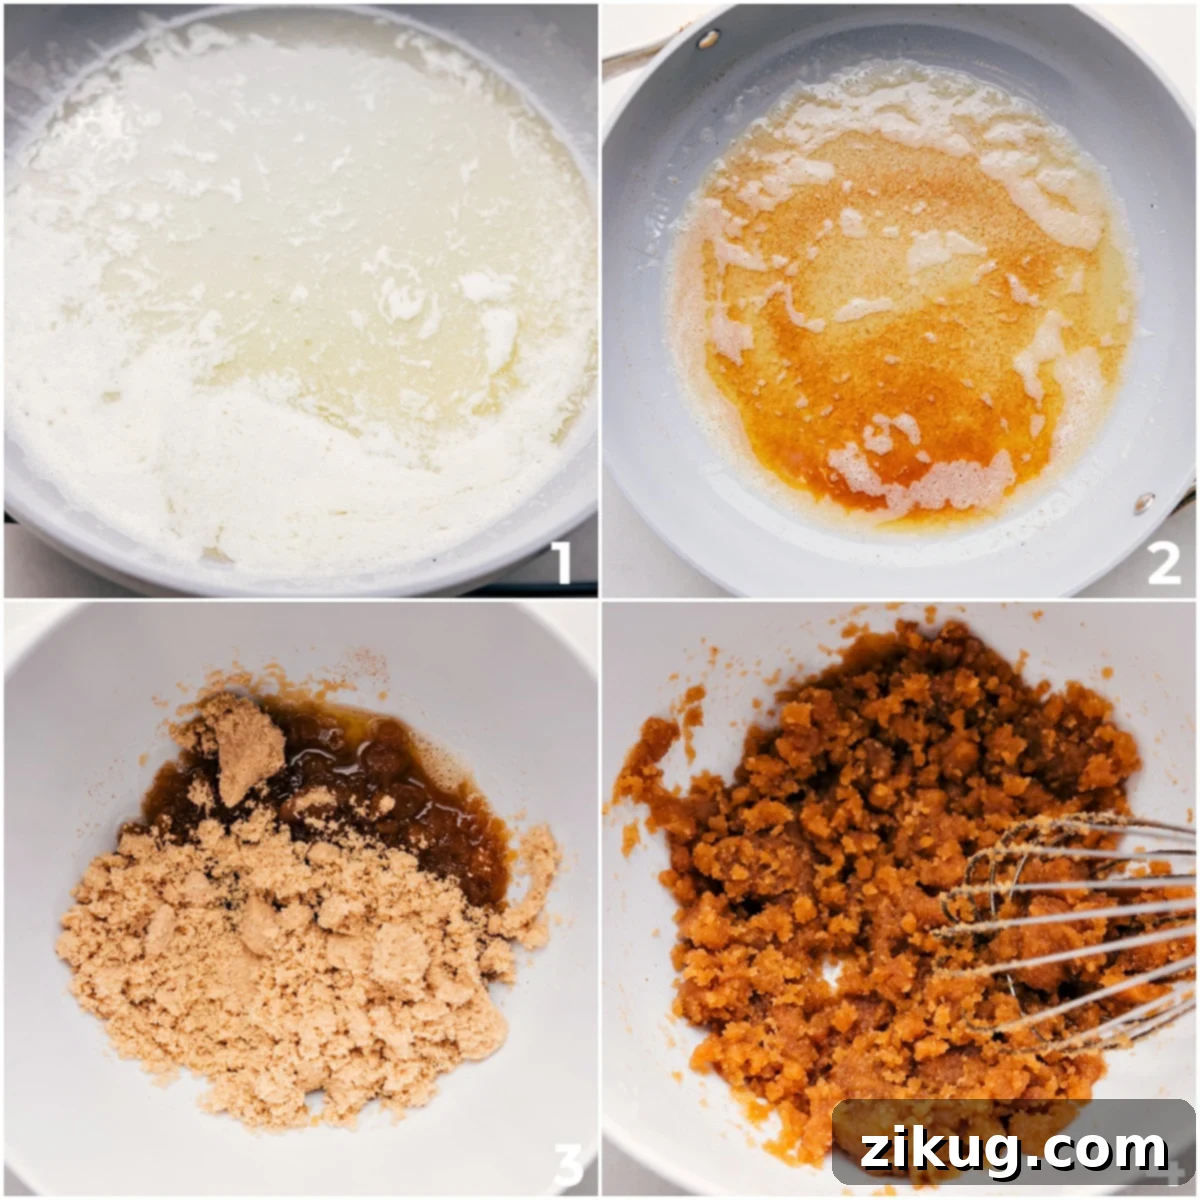
- Choose the Right Pan: Begin with a large, light-colored saucepan. The light interior is crucial because it allows you to clearly monitor the butter’s color change, making it easy to see when it’s perfectly browned and preventing it from burning.
- Melt the Butter: Place your unsalted butter, cut into small cubes for quicker melting, into the pan over medium heat. As it melts, stir occasionally with a silicone spatula to ensure it heats evenly and prevents scorching on one side.
- Observe the Transformation: The butter will first melt completely, then begin to foam and bubble vigorously. Keep stirring gently during this phase. This foaming is normal and indicates the water content in the butter is evaporating.
- Look for Golden Specks and Nutty Aroma: After a few minutes of bubbling, the foam will gradually begin to subside, and the butter will turn a beautiful golden amber color. Most importantly, you’ll start to see tiny, sediment-like brown specks forming at the bottom of the pan, and a distinct, delicious nutty, toasted aroma will fill your kitchen. This is your critical cue!
- Remove from Heat Immediately: As soon as you notice those golden-brown specks and smell that wonderfully nutty fragrance, take the pan off the heat without delay. Butter can go from perfectly browned to burnt in a matter of seconds. Pour the browned butter immediately into a separate heat-proof bowl, making sure to scrape out all those flavorful browned bits from the bottom of the pan – they are packed with the most intense flavor!
- Cool Slightly Before Use: Allow the browned butter to cool for approximately 5 minutes before incorporating it into your blondie batter. This short cooling period is important to prevent it from cooking your eggs or melting your brown sugar too quickly, which could affect the final texture of your blondies.
This extra step is minimal in effort but monumental in flavor, truly defining the rich, complex character of these Snickerdoodle Blondies. Don’t skip it!
Essential Ingredients for Irresistible Snickerdoodle Blondies
Crafting these extraordinary Snickerdoodle Blondies requires a few basic, high-quality ingredients. Paying close attention to the details of each component, from measurement to temperature, will make all the difference in achieving that perfect soft, chewy, and flavorful bar. Here’s a closer look at what you’ll need and some helpful tips to ensure your baking success:
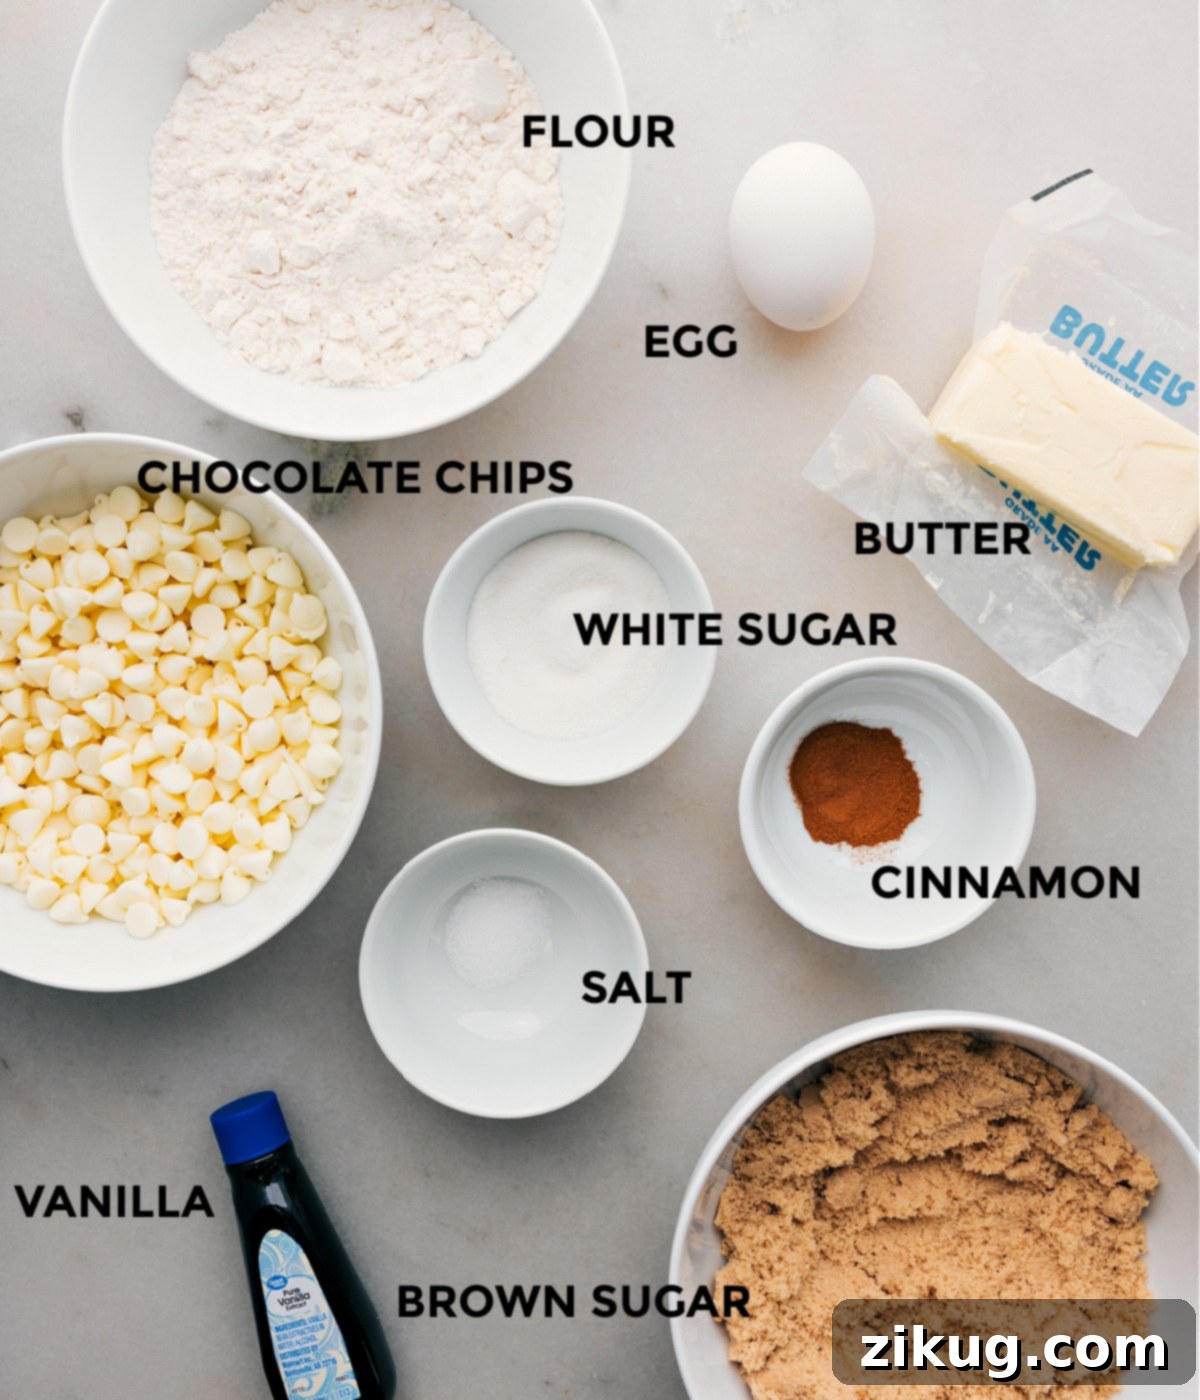
| Ingredient | Swaps & Tips for Best Results |
|---|---|
| Unsalted Butter, Browned | Using unsalted butter gives you precise control over the overall salt content in your recipe. If you only have salted butter on hand, remember to reduce any added salt elsewhere in the recipe by about ¼ teaspoon to balance the flavors. Browning the butter is absolutely essential for that signature nutty, complex flavor that elevates these blondies. Once browned, ensure it cools for at least 5 minutes before mixing with other ingredients. Crucially, don’t forget to scrape in all those delicious browned bits from the bottom of the pan – they are a flavor powerhouse! |
| Light Brown Sugar | This ingredient is paramount for achieving the blondies’ signature moist, chewy texture and imparting a rich, deep, caramel-like flavor. Always pack it firmly into your measuring cup to ensure you’re using the correct amount. While dark brown sugar can be used for an even deeper molasses note, light brown sugar offers the ideal balance for Snickerdoodle flavor. |
| Large Egg | Temperature matters! Using a large egg at room temperature is highly recommended. A room temperature egg emulsifies more smoothly and evenly with the butter and sugar mixture, creating a more uniform batter. This ultimately contributes to a superior, fudgier, and chewier texture in your baked blondies. Whisk the butter-sugar-egg mixture well until it becomes notably glossy and creamy. |
| Ground Cinnamon | The heart of the Snickerdoodle flavor! For the most vibrant and aromatic taste, ensure your ground cinnamon is fresh. Old spices lose their potency and won’t deliver the desired warm, spicy notes. For those who crave an extra intense burst of spice directly within the blondie batter, consider adding an additional 1/4 teaspoon to the mix. |
| All-Purpose Flour | Accurate flour measurement is vital for the desired soft and chewy texture. Over-measuring flour can lead to dense, dry, and crumbly blondies. If possible, weigh your flour (1 cup is approximately 120 grams). If you’re relying on measuring cups, use the “spoon and level” method: lightly spoon the flour into your measuring cup until it overflows, then level it off with a straight edge (like a knife or ruler) without packing it down. |
| White Chocolate Chips | These chips introduce delightful pockets of creamy sweetness that beautifully complement the warm cinnamon spice. They melt into soft pools of flavor within the blondie. Feel free to experiment with this element! You can swap them for cinnamon chips for an intensified spice experience, omit them entirely for a more classic, unadorned blondie bar, or try other mix-ins like butterscotch chips, chopped nuts, or even a mix of semi-sweet and white chocolate. |
| Cinnamon-Sugar Topping | This iconic Snickerdoodle finish provides that essential crisp, sugary crust. For the best results, mix the granulated sugar and ground cinnamon for the topping just before you’re ready to sprinkle it. This ensures the sugar crystals remain distinct and sandy, delivering that delightful textural crunch. When applying, sprinkle it from a bit higher up to achieve even coverage across the entire surface of the batter. |
How to Make The Best Snickerdoodle Blondies: Step-by-Step Perfection
Creating these delightful Snickerdoodle Blondies is a straightforward process, but a few key steps and precise execution will ensure they turn out perfectly soft, chewy, and bursting with flavor every single time. Follow these detailed instructions for baking success, and you’ll be enjoying these irresistible bars in no time:
- Prepare Your Pan: First, preheat your oven to 350°F (175°C). Lightly spray an 8×8 inch baking pan with cooking spray. Then, line the pan with a sheet of parchment paper, making sure to leave an overhang on two opposite sides. This overhang creates convenient “handles” that will allow you to easily lift the cooled blondies out of the pan later, ensuring a clean removal.
- Brown the Butter: Follow the detailed instructions provided earlier in the section titled “The Magic of Browned Butter” to properly brown your unsalted butter in a light-colored pan. Once the butter is perfectly browned and nutty, immediately transfer it to a large mixing bowl, ensuring you scrape out all the flavorful browned bits from the bottom of the pan. Allow this browned butter to cool for approximately 5 minutes before proceeding to the next step.
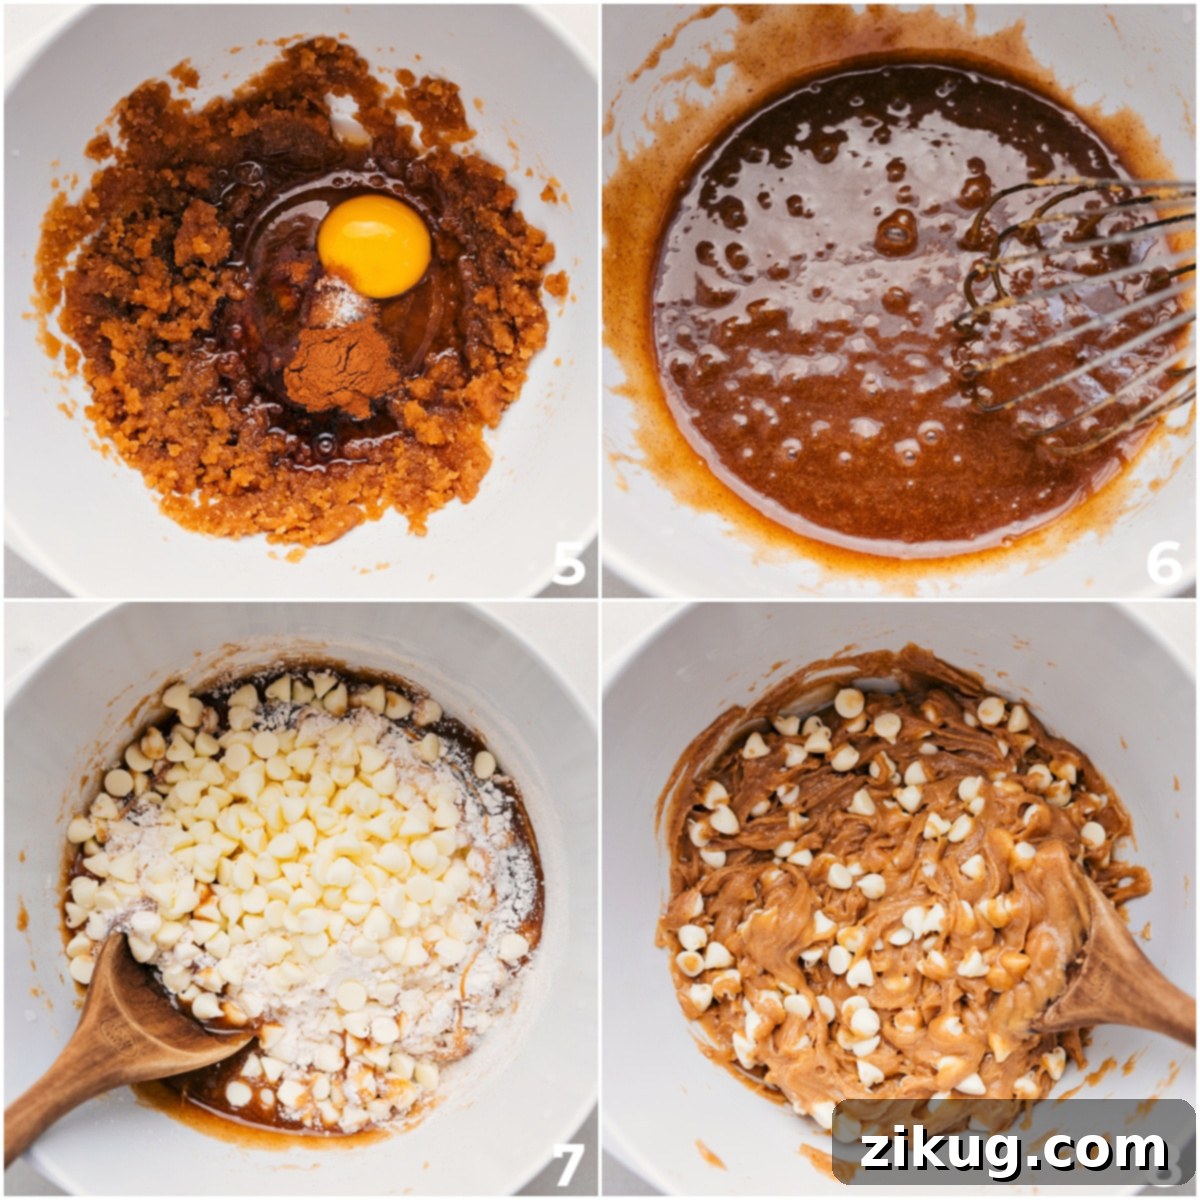
- Whisk Wet Ingredients: Into the slightly cooled browned butter, add the light brown sugar. Vigorously whisk the mixture until it is thoroughly combined and takes on the consistency of wet sand. Next, incorporate the room temperature large egg, vanilla extract, and salt. Continue to whisk briskly for about 1-2 minutes until the mixture becomes wonderfully creamy, smooth, and fully emulsified. You’ll notice it develops a distinct glossy sheen, which is crucial for achieving that signature chewy texture in your blondies.
- Combine Dry Ingredients: With a spatula, gently fold in the ground cinnamon and all-purpose flour. Mix just until no dry streaks of flour are visible in the batter. It’s very important not to overmix at this stage, as overmixing can lead to gluten development, resulting in tough, rather than tender, blondies. Finally, stir in the white chocolate chips until they are evenly distributed throughout the thick batter.
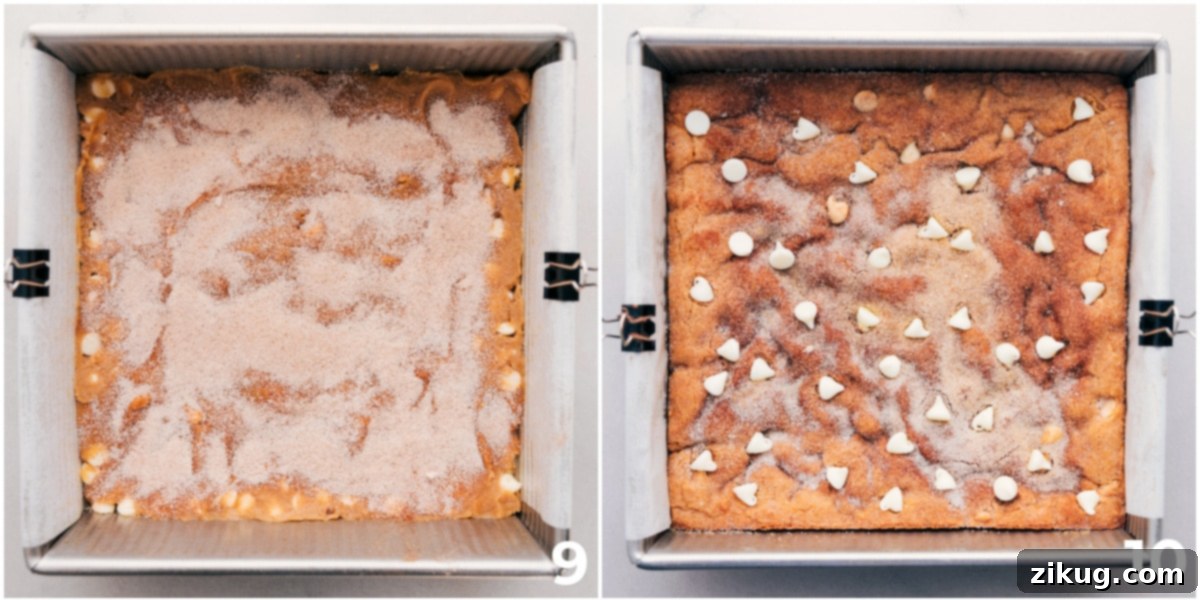
- Press into Pan & Add Topping: Transfer the thick blondie batter into your prepared 8×8-inch pan. Use a spatula or the back of a spoon to press and spread the batter evenly into all corners and edges of the pan, creating a smooth, level surface. In a small separate bowl, combine the granulated sugar and the remaining ground cinnamon for the topping. Sprinkle this aromatic mixture evenly over the entire surface of the blondie batter.
- Bake to Perfection: Place the pan in your preheated oven and bake for 25-27 minutes. The blondies are ready when the edges appear lightly golden brown and set, and the center springs back lightly when gently touched. It’s vital to avoid overbaking, as this is the most common reason for dry, crumbly blondies. A slightly soft center is desirable, as they will continue to set as they cool.
- Cool and Enjoy: Once baked, carefully remove the pan from the oven and allow the blondies to cool in the pan for at least 10-15 minutes. This crucial cooling period allows them to set properly and become firm enough to handle without falling apart. Then, use the parchment paper overhang to carefully lift the entire slab of blondies onto a wire cooling rack. Remove the parchment paper, let them cool a bit more (or completely, if you have the patience!), then cut into 16 perfect bars and serve. They are delicious slightly warm or completely cooled.
Storage Tips for Your Snickerdoodle Blondies
Keeping Snickerdoodle Blondies Fresh
While these blondies are so delicious they might disappear quickly, here are the best ways to store them to maintain their irresistible quality if you happen to have any leftovers:
- Best on Day 1: For the absolute peak of soft, chewy texture and the crispiest cinnamon-sugar topping, enjoy these bars fresh on the day they are baked. The flavors are most vibrant and the texture is truly unparalleled right out of the oven (after cooling, of course!).
- Room Temperature Storage: If you have leftover blondies, store them in an airtight container at room temperature for up to 3 days. This method helps preserve their moisture and keeps them soft. While they will still be incredibly delicious and moist the next day, the texture might firm up slightly compared to freshly baked, and the topping may soften a bit.
- Freezing for Longer: For extended storage, Snickerdoodle Blondies freeze exceptionally well. Once they are completely cooled to room temperature, wrap individual bars or the entire slab tightly in plastic wrap, then again in a layer of aluminum foil. Place them in a freezer-safe bag or container. They can be stored in the freezer for up to 1-2 months without significant loss of quality. To enjoy, thaw them at room temperature for a few hours, or warm them briefly in the microwave for a wonderfully fresh-baked feel. Keep in mind that while freezing is effective, the texture is truly superior when eaten fresh or within a day or two.
Blondie Baking Tips and Troubleshooting
Even though this recipe is relatively simple, a few expert tips can help you achieve blondie perfection every single time. And if things don’t go exactly as planned, here’s some common troubleshooting advice:
Tips for Success:
- Don’t Overmix the Batter: Once you add the flour, mix gently and just until the dry streaks disappear. Overmixing develops gluten in the flour, which can lead to tough, dense, and dry blondies instead of the desired fudgy, chewy texture.
- Avoid Overbaking at All Costs: This is perhaps the most common mistake with blondies and brownies. Overbaked blondies will quickly turn dry, crumbly, and cakey. The center should look slightly underdone, almost gooey, and still feel soft when gently touched with a fingertip when removed from the oven. They will continue to set and firm up significantly as they cool in the pan.
- Use a Room Temperature Egg: As emphasized in the ingredients section, a room temperature egg blends much more effectively with the browned butter and sugar. This creates a smoother, more uniform emulsion, which is key to achieving that consistent and supremely chewy crumb throughout your blondies.
- Scrape the Bowl Thoroughly: Ensure all ingredients are fully incorporated by regularly scraping down the sides and bottom of your mixing bowl with a spatula, especially after adding the wet and dry ingredients. This prevents unmixed pockets of flour or sugar.
Troubleshooting Common Issues:
- My Blondies are Dry and Crumbly: This is almost always a tell-tale sign of overbaking or inaccurate flour measurement. Double-check your baking time and oven temperature. Ensure your flour is measured accurately, preferably by weight, or using the spoon-and-level method.
- My Blondies are Too Cakey: Similar to dryness, a cakey texture often indicates overbaking or overmixing the batter. Remember, we are aiming for a dense, fudgy, and chewy bar, not a fluffy cake. Reduce baking time and mix less.
- My Blondies are Greasy: A greasy texture can occur if the egg mixture isn’t properly whisked until emulsified, or if the egg was added when the browned butter was still too hot, causing some separation. Ensure proper cooling of the butter and vigorous whisking.
- The Cinnamon-Sugar Topping Melted or Disappeared: This can happen if the topping is applied too early or if the oven temperature is uneven or too high. Make sure to sprinkle the topping evenly right before the pan goes into the oven.
Delicious Variations to Try
While these Snickerdoodle Blondies are absolutely perfect as is, part of the joy of baking is experimenting! Feel free to get creative with these delightful variations to customize them to your taste or for different occasions:
- Chocolate Chip Snickerdoodle Blondies: Can’t get enough chocolate? Swap half or all of the white chocolate chips for semi-sweet, milk, or even dark chocolate chips. This introduces a richer, more classic chocolate chip cookie bar vibe while retaining the signature snickerdoodle spices.
- Nutty Snickerdoodle Blondies: For added crunch, texture, and a deeper earthy flavor, fold in about 1/2 cup of finely chopped pecans, walnuts, or almonds along with the white chocolate chips. Toasting the nuts lightly beforehand in a dry pan will significantly enhance their flavor even more.
- Caramel Swirl Snickerdoodle Blondies: Elevate decadence by drizzling a generous amount of homemade or high-quality store-bought caramel sauce over the blondie batter just before baking. Swirl it gently with a knife. For an extra special treat, sprinkle a touch of flaky sea salt over the caramel for a irresistible salted caramel twist.
- Pumpkin Spice Snickerdoodle Blondies: Embrace the cozy flavors of fall by adding an additional 1/2 teaspoon of pumpkin pie spice blend along with the cinnamon into the batter. For an even more autumnal touch, consider swapping some of the white chocolate chips for butterscotch chips.
- Spiced Apple Snickerdoodle Blondies: For a hint of fruity tartness that pairs wonderfully with the warm cinnamon, fold in about 1/2 cup of finely diced, peeled apples (such as Granny Smith or Fuji) into the batter. This adds moisture and a lovely fresh element.
- Cream Cheese Swirl Blondies: Prepare a simple cream cheese swirl (softened cream cheese, a little sugar, and an egg yolk) and dollop it over the blondie batter before baking, then swirl with a knife for a rich, tangy counterpoint.
The base recipe for these amazing blondies is proudly adapted from my favorite Blondie recipe by InspiredTaste, a testament to its tried-and-true deliciousness and a foundation for many of my baking creations.
More Irresistible Desserts to Try:
Desserts
Carmelitas (My Favorite Dessert!)
Desserts
Fruity Pebbles Rice Krispies Treats
Desserts
Twix Cheesecake Bars
Desserts
Raspberry Bread Pudding
Print Recipe
Snickerdoodle Blondies
Chelsea Lords
20 minutes
25 minutes
45 minutes
16 bars
Video
Equipment
-
8 x 8-inch baking pan with parchment paper
-
Large light-colored pan see note 1 for browning butter
Ingredients
- Cooking spray
- 8 tablespoons unsalted butter cut into small cubes
- 1 cup light brown sugar firmly packed
- 1 large egg
- 1 teaspoon vanilla extract
- 1/4 teaspoon salt
- 1/2 teaspoon ground cinnamon
- 1 cup all-purpose flour
- 1-1/3 cups white chocolate chips
- 2 tablespoons granulated sugar
- 1/2 teaspoon ground cinnamon
Instructions
-
Preheat oven to 350°F (175°C). Spray an 8×8-inch pan with cooking spray and line it with parchment paper, leaving an overhang for easy removal.
-
Melt the butter in a light-colored, large pan over medium-high heat. Once melted, reduce to medium heat and stir constantly with a silicone spatula. When the butter smells nutty and light-brown specks appear under the foam, remove it from the heat and pour it into a bowl, scraping out all the bits. Let it cool for 5 minutes.
-
Whisk brown sugar into the cooled butter until it resembles wet sand. Add the egg, vanilla, salt, and cinnamon, and whisk briskly until the mixture is creamy and emulsified. Fold in flour and white chocolate chips with a spatula until no dry streaks remain. The batter will be thick.
-
Pour the batter into the prepared pan and smooth the top with a spatula. In a small bowl, stir together the granulated sugar and ground cinnamon for the topping. Sprinkle this mixture evenly over the batter.
-
Bake for 25–27 minutes, or until the edges are lightly golden and the top is set.
-
Remove from the oven and let the bars cool in the pan for 10–15 minutes. Use the parchment-paper overhang to transfer the bars to a cooling rack, then remove the parchment paper. Cut into bars and serve.
Recipe Notes
Storage: These bars are best enjoyed on the first day when they’re fresh and soft. Store any leftovers in an airtight container at room temperature—they’ll still be good the next day, but not as soft. For longer storage, you can freeze them, but they’re at their best when eaten fresh.
Nutrition
Nutrition information is automatically calculated, so should only be used as an approximation.
Love this recipe? Leave a comment below!