

Lemon Tiramisu is a bright, creamy, and undeniably luscious no-bake dessert that brings a refreshing citrus twist to the beloved Italian classic. Imagine delicate ladyfingers infused with a zesty lemon syrup, layered with a cloud-like mascarpone cream, and swirled with tangy homemade (or store-bought) lemon curd. This dessert is an absolute showstopper, perfect for any occasion that calls for something both elegant and incredibly delicious.


Author’s Note
A Culinary Love Story: My Husband’s Favorite Meets Mine in a Zesty Tiramisu
For many years, my husband has consistently ranked my lemon icebox cake among his top five desserts. It often makes me smile because it’s arguably one of the simplest desserts to prepare, essentially involving the assembly of just four readily available store-bought ingredients. His fondness for a good icebox cake is quite evident, and he genuinely appreciates its effortless charm.
On the other hand, my culinary obsession lies with classic tiramisu. Whenever I visit an Italian restaurant, ordering tiramisu is almost a non-negotiable ritual for me – sometimes even taking precedence over the main course! The rich, coffee-soaked layers and creamy mascarpone are simply irresistible.
Inspired by our shared love for delicious, comforting desserts, I decided to embark on a culinary adventure: combining the bright, refreshing essence of lemon that my husband adores with my deep affection for the elegant structure of tiramisu. The goal was to create one bright, creamy, and distinctively lemony dessert that would excite both of our palates. And let me tell you, this fusion did not just deliver; it soared beyond expectations.
This Lemon Tiramisu has easily become one of the best desserts I have ever created. As a dedicated lemon lover, I’m almost convinced I can’t return to the traditional coffee-flavored tiramisu after experiencing this vibrant version. It’s truly that exceptional, offering a delightful contrast of tangy citrus and smooth, sweet cream in every bite. While this lemon tiramisu requires a bit more effort and a few more ingredients than my simple lemon icebox cake, I assure you, every moment spent crafting it is profoundly worthwhile. The payoff is a dessert that tastes gourmet, yet is surprisingly accessible to make at home.
One crucial piece of advice for achieving the best results: plan to make the lemon curd a day in advance. Allowing it ample time to chill and thicken properly makes a world of difference in the final texture and stability of your tiramisu. Trust me, this single step significantly enhances the overall experience.
Why You’ll Adore This Lemon Tiramisu
This Lemon Tiramisu isn’t just a dessert; it’s an experience. It’s perfect for spring and summer gatherings, holiday celebrations, or simply when you crave a light yet indulgent treat. Here’s why this recipe will become a new favorite:
- **Bright & Refreshing:** The vibrant lemon flavor cuts through the richness of the mascarpone, offering a perfectly balanced and incredibly refreshing taste that’s not too heavy.
- **No-Bake Ease:** No need to turn on the oven! This dessert comes together beautifully with simple assembly, making it ideal for warmer months or busy schedules.
- **Elegant Presentation:** With its distinct layers and sunny lemon topping, this tiramisu looks as good as it tastes, impressing guests with minimal effort.
- **Customizable:** Easily adjust the tartness of the lemon curd to your preference, or add extra garnishes like fresh berries or candied lemon peel.
- **Make-Ahead Friendly:** It requires chilling, making it a perfect dessert to prepare a day or two in advance, freeing up your time on the day of serving.
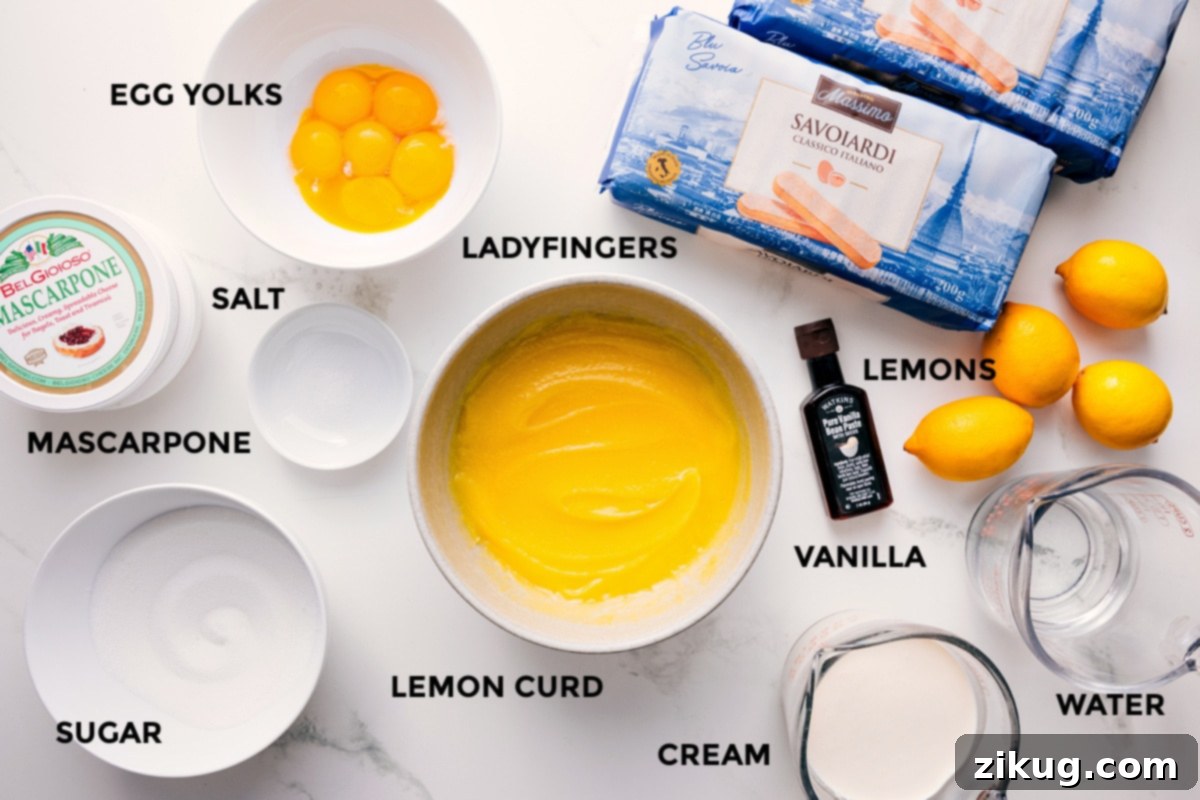
Essential Ingredients for Your Lemon Tiramisu
Crafting the perfect Lemon Tiramisu starts with selecting the right ingredients. Each component plays a vital role in achieving that harmonious balance of creamy, tangy, and sweet. Here’s a closer look at what you’ll need and some helpful tips for each:
| Ingredient | Expert Tip or Smart Swap |
|---|---|
| **Fresh Lemon Juice & Granulated Sugar** | Always opt for freshly squeezed lemon juice for the most vibrant and authentic lemon flavor. To maximize juice extraction, firmly roll lemons on your counter for a few seconds before slicing and juicing them. The sugar balances the tartness perfectly in the lemon soak. |
| **Large Egg Yolks & Vanilla** | These are key for the richness and stability of the mascarpone cream. Whisk the egg yolks, sugar, salt, and vanilla until the mixture is smooth, light, and wonderfully creamy. This aeration is crucial for a fluffy filling. If you have leftover egg whites, don’t discard them! They’re perfect for making delicious meringue cookies or a light meringue topping for another dessert. Vanilla bean paste offers a more intense vanilla flavor and speckled appearance, but regular vanilla extract works perfectly too. |
| **Mascarpone Cheese & Heavy Cream** | For an impeccably thick and smooth cream mixture, ensure both your mascarpone cheese and heavy cream are well-chilled. This helps them whip up to the desired consistency without becoming runny or splitting. Mascarpone is a rich, creamy Italian dairy product, similar to cream cheese but sweeter and less tangy, providing the signature velvety texture of tiramisu. |
| **Lemon Curd** | Whether you choose to make a luscious homemade lemon curd (highly recommended for superior flavor) or use a high-quality store-bought version, the most important factor is that it is completely chilled and firm before being incorporated into the cream and layered. This prevents the layers from becoming soggy and ensures a beautiful, stable structure. Consider making your lemon curd a day ahead for optimal chilling. |
| **Ladyfingers (Savoiardi)** | These light, delicate sponge cakes are the backbone of any tiramisu. The key is to dip them very quickly in the lemon soak. A swift turn on each side (counting to three as you flip) is usually sufficient. Over-soaking will cause them to become mushy and fall apart. I often find these ladyfingers online or in the international aisle of larger grocery stores. |
Quick Tip: Understanding Mascarpone
Mascarpone is a luxurious, soft Italian cream cheese renowned for its exceptionally rich, velvety texture and mild, subtly sweet flavor. It’s less tangy than traditional cream cheese and brings an unparalleled creaminess to desserts like tiramisu. You’ll typically find mascarpone in the specialty cheese section of your grocery store, often located near the deli counter or alongside other gourmet cheeses. Its unique properties are essential for the signature indulgence of this Lemon Tiramisu.
Crafting Your Dream Lemon Tiramisu: A Step-by-Step Guide
Creating this stunning Lemon Tiramisu is a rewarding process. Follow these detailed steps to ensure a perfectly layered, creamy, and delightful dessert:
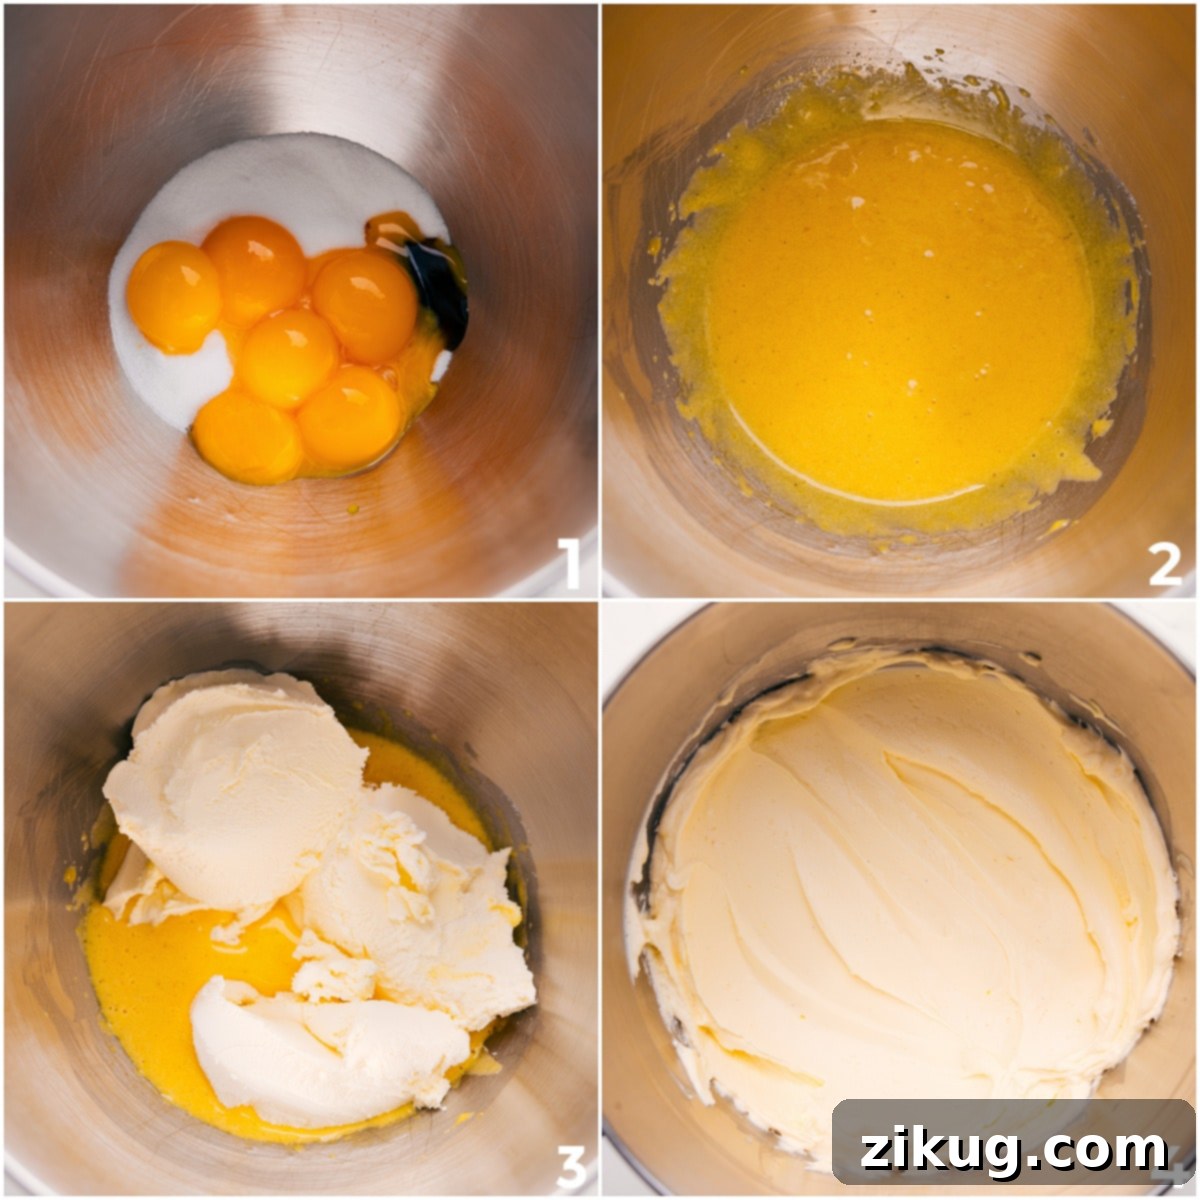
-
Prepare the Zesty Lemon Soak
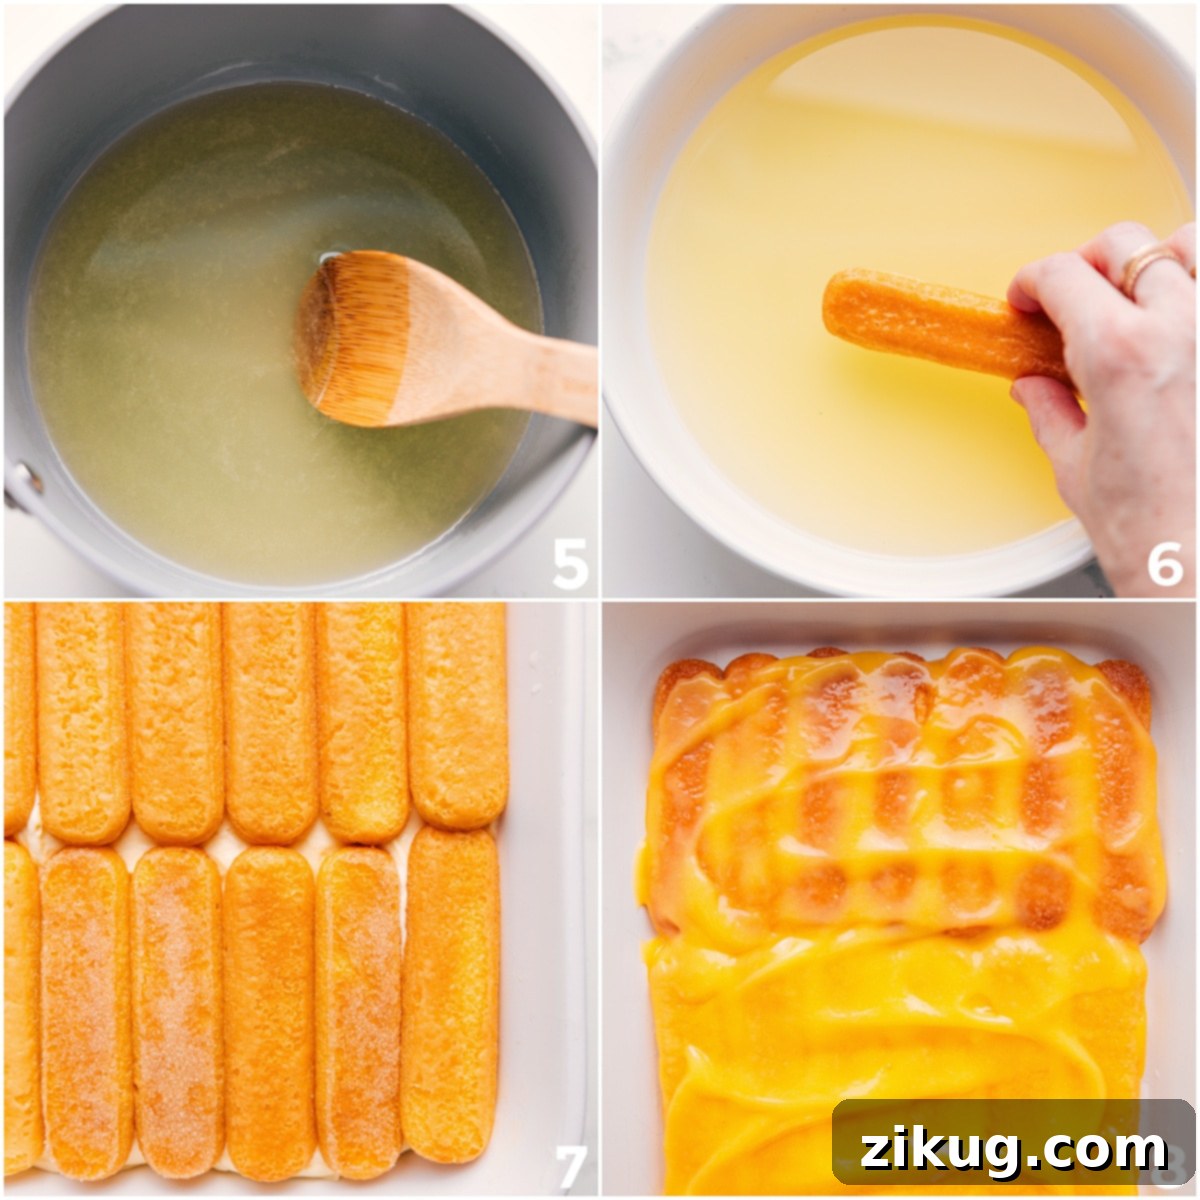
In a small saucepan, combine the granulated sugar, water, and freshly squeezed lemon juice. Heat the mixture over medium heat, stirring gently, until the sugar has completely dissolved and the liquid is clear. There’s no need to boil it. Once dissolved, pour this lemon syrup into a wide, shallow bowl – ideally one that allows easy dipping of ladyfingers. Set it aside to cool down completely to room temperature. A chilled lemon soak is essential for the best texture.
-
Begin the Cream Filling: Beat the Egg Mixture
In the bowl of a stand mixer fitted with a whisk attachment (or using a large bowl and a hand mixer), add the large egg yolks, granulated sugar, a pinch of salt, and vanilla bean paste (or vanilla extract). Beat these ingredients together on medium speed for approximately 1 minute. The mixture should transform into a smooth, pale yellow, and noticeably creamy consistency. Don’t forget to stop and scrape down the sides of the bowl with a spatula to ensure everything is thoroughly combined.
-
Incorporate Mascarpone and Whip to Perfection
Gently add the two (8-ounce) containers of cold mascarpone cheese to the egg mixture. Beat on medium speed for only about 10-15 seconds, just until the mascarpone is fully incorporated and the mixture is smooth. It’s crucial not to over-beat the mascarpone at this stage, as it can quickly become grainy or too soft, which will prevent your tiramisu from setting correctly. Scrape down the sides of the bowl once more to ensure uniform mixing.
-
Achieve Soft Peaks with Heavy Cream and Lemon Curd
Pour the cold heavy cream into the mascarpone mixture. Increase the mixer speed to medium-high and beat for 1 to 3 minutes, or until soft peaks begin to form. The cream should be thick and fluffy, but still have a gentle curve when you lift the whisk. Once soft peaks are achieved, carefully add 1/2 cup of the chilled lemon curd. Mix on the lowest speed just until the lemon curd is integrated, about 10 seconds. Finish mixing by gently folding with a spatula to ensure everything is evenly distributed without deflating the cream.
-
Dip the Ladyfingers with Precision
Working quickly and one ladyfinger at a time, briefly dip each side into the cooled lemon soak. The technique is a quick flip: count to three as you dip (back, front, back again), then immediately remove. The goal is to moisten the ladyfingers without saturating them. Over-soaking will make them fall apart, leading to a soggy tiramisu. Speed is key here!
-
Assemble Your Lemon Tiramisu Layers
Arrange the quickly soaked ladyfingers in an even, single layer at the bottom of your prepared 9×13-inch baking pan. Next, carefully spread 1/3 of the remaining chilled lemon curd evenly over the ladyfinger layer. Follow this with half of the creamy mascarpone mixture, spreading it smoothly. Repeat this layering process: add another layer of soaked ladyfingers, then another 1/3 of the remaining lemon curd, and finally, finish with the remaining mascarpone cream mixture. Aim for even and appealing layers.
-
Chill for Optimal Setting and Flavor Development
Once all layers are assembled, cover the baking pan tightly with plastic wrap. Ensure the plastic wrap lightly touches the surface of the cream to prevent a skin from forming. Transfer the tiramisu to the refrigerator and chill for at least 6 hours. For the best flavor development and firmest set, I highly recommend chilling it overnight, or ideally, for up to 24 hours. This extended chilling time allows the flavors to meld beautifully and the ladyfingers to soften to the perfect texture.
-
The Grand Finale: Garnish and Serve
Just before serving, remove the tiramisu from the refrigerator. Gently spread or drizzle the final 1/3 of your reserved, chilled lemon curd over the top layer of cream. This adds a beautiful sheen and an extra pop of tangy flavor. You can also dust it lightly with powdered sugar for an elegant finish, or garnish with fresh lemon slices and mint leaves. Slice the tiramisu into individual portions and serve cold. Each bite will be a bright, creamy, and utterly delightful experience!
Quick Tip: Mastering the Mascarpone Mixture
Do not over-beat the mascarpone mixture, especially after adding the mascarpone cheese. Once the mascarpone is introduced, mix it only until it is just combined and smooth, typically for about 10-15 seconds on medium speed. Over-beating can cause the delicate mascarpone to break down, resulting in a grainy texture or a mixture that is too soft and runny. This can prevent the tiramisu from setting properly, making it difficult to slice and enjoy. A gentle hand and quick mixing are key to achieving that signature light and fluffy cream.
Chelsea’s Note
What Are “Soft Peaks” in Whipped Cream?
Understanding “soft peaks” is essential for many dessert recipes, including this Lemon Tiramisu. When you’re whipping heavy cream, soft peaks signify that the mixture has become thick, airy, and fluffy, yet it remains wonderfully soft and pliable. To test for soft peaks, simply lift the whisk out of the cream. The cream on the tip of the whisk should form a peak that gracefully droops or curls over, rather than standing stiffly upright. The texture should appear smooth, creamy, and easy to spread, not overly stiff or dry. This consistency provides the perfect ethereal lightness for our mascarpone cream, allowing it to hold its shape while still being melt-in-your-mouth delicious.
Storage Tips for Your Lemon Tiramisu
To keep your Lemon Tiramisu fresh and delicious, store any leftovers tightly covered in the refrigerator. It will maintain its optimal flavor and texture for up to 3 days. It’s crucial to keep it well-wrapped or in an airtight container to prevent it from drying out or absorbing any unwanted odors from the fridge. This dessert is always best served cold, straight from the refrigerator. Please note that freezing is generally not recommended for tiramisu, especially this creamy lemon version. The delicate creamy layers, particularly those containing mascarpone and heavy cream, can separate and become watery or grainy once thawed, significantly affecting the dessert’s desirable smooth texture.
More Zesty Lemon Recipes You’ll Love:
If you’re a fan of the bright, refreshing flavor of lemon, you’re in for a treat! Explore more delightful lemon-infused recipes that are sure to satisfy your citrus cravings.
Desserts
Irresistible Lemon Bundt Cake Recipe
Desserts
The BEST Tangy Lemon Bars Recipe
Beverages
Sparkling Blueberry Lemonade for Refreshment
Desserts
Scrumptious Lemon Curd Cookies

Zesty & Bright Lemon Tiramisu
Chelsea Lords
45 minutes
12 hours
12 hours
45 minutes
16
servings
Video Tutorial
Equipment You’ll Need
-
1 9 x 13-inch baking pan
(glass or ceramic if possible, avoid metal pans for best flavor; see note 1 below for details) -
Stand mixer with whisk attachment (or hand mixer)
-
Small saucepan
-
Wide, shallow bowl for soaking
-
Spatula for folding and spreading
Ingredients for the Perfect Lemon Tiramisu
-
3/4 cup granulated sugar -
3/4 cup freshly squeezed lemon juice (from about 4 medium lemons) -
3/4 cup water
-
1 batch lemon curd (divided, see note 2 below; ensure it’s well-chilled) -
6 large egg yolks (see note 3 below for important raw egg information) -
3/4 cup granulated sugar -
1/8 teaspoon salt -
1 teaspoon vanilla bean paste (or good quality vanilla extract) -
2 (8-ounce) containers cold mascarpone cheese -
1-1/2 cups cold heavy cream
-
2 (7-ounce) boxes ladyfingers (Savoiardi)
Detailed Instructions for Lemon Tiramisu
-
1. Prepare the Lemon Soak: In a small saucepan, combine 3/4 cup granulated sugar, 3/4 cup water, and 3/4 cup freshly squeezed lemon juice. Heat the mixture over medium heat, stirring occasionally, just until the sugar completely dissolves. Do not bring it to a boil. Once clear, pour the lemon soak into a wide, shallow bowl (this makes dipping easier) and allow it to cool completely to room temperature. It’s important for the soak to be cool to prevent the ladyfingers from becoming mushy.
-
2. Create the Cream Filling Base: In the bowl of a stand mixer fitted with a whisk attachment, add the 6 large egg yolks, 3/4 cup granulated sugar, 1/8 teaspoon salt, and 1 teaspoon vanilla bean paste (or vanilla extract). Beat these ingredients on medium speed for about 1 minute, until the mixture becomes smooth, pale, and wonderfully creamy. Stop the mixer and scrape down the sides of the bowl with a rubber spatula to ensure all ingredients are well combined.
-
3. Incorporate Mascarpone and Whip Cream: Add the 2 (8-ounce) containers of cold mascarpone cheese to the egg yolk mixture. Beat on medium speed for a very brief period, approximately 10-15 seconds, just until the mascarpone is smoothly combined. Be careful not to over-beat at this stage, as mascarpone can become grainy or too soft if over-mixed. Scrape down the sides of the bowl thoroughly. Next, pour in the 1-1/2 cups of cold heavy cream. Increase the mixer speed to medium-high and beat for 1–3 minutes, until soft peaks form. The mixture should be thick, fluffy, and hold a soft peak when the whisk is lifted. Add 1/2 cup of the well-chilled lemon curd and gently mix on low speed until it is just integrated, about 10 seconds. Finish mixing any remaining streaks by gently folding with a spatula to maintain the airy texture.
-
4. Dip the Ladyfingers: Working quickly and one at a time, briefly dip each ladyfinger into the cooled lemon soak. Turn each ladyfinger to coat both sides, counting to three as you flip (front, back, front again). Immediately remove them from the liquid. It’s crucial not to soak them for too long, as they will quickly absorb liquid and become soggy, making them difficult to handle and resulting in a less desirable texture.
-
5. Assemble the Tiramisu Layers: Arrange a single, even layer of the soaked ladyfingers at the bottom of your prepared 9×13-inch baking pan. Next, carefully spread approximately 1/3 of the remaining (chilled) lemon curd over the ladyfinger layer. Then, gently spread half of the mascarpone cream mixture evenly over the lemon curd. Repeat this process: add another layer of quickly soaked ladyfingers, followed by another 1/3 of the reserved lemon curd, and finally, finish with the remaining mascarpone cream mixture, spreading it smoothly to the edges.
-
6. Chill Thoroughly: Cover the assembled tiramisu tightly with plastic wrap, ensuring the wrap presses lightly against the surface of the cream to prevent a skin from forming. Transfer the pan to the refrigerator and chill for a minimum of 6 hours. For the absolute best results, allowing it to chill overnight or for up to 24 hours is highly recommended. This extended chilling time is essential for the flavors to fully meld, for the ladyfingers to soften beautifully, and for the entire dessert to set firmly, making for clean slices.
-
7. Final Touches and Serving: Just before serving, remove the chilled Lemon Tiramisu from the refrigerator. Gently spread or artfully drizzle the remaining 1/3 of the reserved lemon curd over the top layer of cream. This adds a beautiful, glossy finish and an extra burst of tangy flavor. If desired, you can lightly dust the top with powdered sugar for an elegant presentation. Slice the tiramisu into desired portions (16 servings is typical for a 9×13-inch pan) and serve cold. Enjoy every bright and creamy bite!
Final step! Please let us know how it was by leaving a review.
Important Recipe Notes for Success
Note 2: Preparing the Lemon Curd. For the best texture and stability in your tiramisu, it is ideal to make your lemon curd a day in advance. This gives it sufficient time to fully chill and thicken to the perfect consistency. If you’re short on time and need to make it the same day, spread the freshly made lemon curd in a thin layer in a separate 9×13-inch pan, press plastic wrap directly onto its surface (to prevent a skin from forming), and chill it in the refrigerator for at least 1 hour before you plan to use it. This quick chilling method helps it set faster.
Note 3: Raw Eggs and Safety. This recipe calls for raw egg yolks in the mascarpone cream mixture. While delicious, there are considerations for safe consumption. Very young children, pregnant women, older adults, and anyone with a weakened immune system should exercise caution and ideally avoid desserts made with raw eggs. As a safer alternative, you can opt to use pasteurized eggs, which are available in many grocery stores and significantly reduce the risk of foodborne illness while maintaining the recipe’s integrity. Don’t forget, you can save the leftover egg whites from this recipe to make delicious meringues or other recipes that utilize them.
Note 4: Optimal Storage and Freezing Advice. To enjoy the best quality of your Lemon Tiramisu, cover any leftovers tightly with plastic wrap or transfer them to an airtight container and store them in the fridge for up to 3 days. For optimal texture and flavor, allow the tiramisu to chill for at least 8 hours before serving; this time allows the layers to soften and fully set, and the flavors to beautifully meld together. It is generally not recommended to freeze this dessert. The creamy mascarpone and heavy cream layers tend to separate and can become watery or grainy once thawed, significantly compromising the luxurious texture that makes tiramisu so special.
Nutrition Information (Per Serving)
|
Calories: 514kcal
|
Carbohydrates: 53g
|
Protein: 7g
|
Fat: 30g
|
Saturated Fat: 18g
|
Polyunsaturated Fat: 1g
|
Monounsaturated Fat: 8g
|
Trans Fat: 0.6g
|
Cholesterol: 203mg
|
Sodium: 112mg
|
Potassium: 126mg
|
Fiber: 0.6g
|
Sugar: 40g
|
Vitamin A: 992IU
|
Vitamin C: 7mg
|
Calcium: 82mg
|
Iron: 0.8mg
Nutrition information is automatically calculated and is an estimate. It should only be used as an approximation and may vary based on specific brands and preparation methods.
Loved this recipe? Share your thoughts in the comments below!