
Spooktacular Halloween Appetizers: Unleash the Fun with These Creepy-Crawly and Tasty Treats
Get ready to transform your Halloween gathering into an unforgettable feast with these four incredibly easy, wonderfully creative, and absolutely delicious **Halloween Appetizers**. Whether you’re hosting a grand party or a cozy family get-together, these spooky snacks are guaranteed to be a hit with everyone, from little ghouls to seasoned monsters. We’re diving into the details of our fan-favorite Spiderweb 7-Layer Dip, the delightfully eerie Walking Dead Mummy Dogs, monstrous Monster Meatball Sliders, and the unbelievably good Cheesy Monster Fingernail Bread. Prepare to impress your guests with minimal effort and maximum Halloween spirit!
Halloween Appetizers: 7-Layer Spider Web Dip – A Spooky Classic
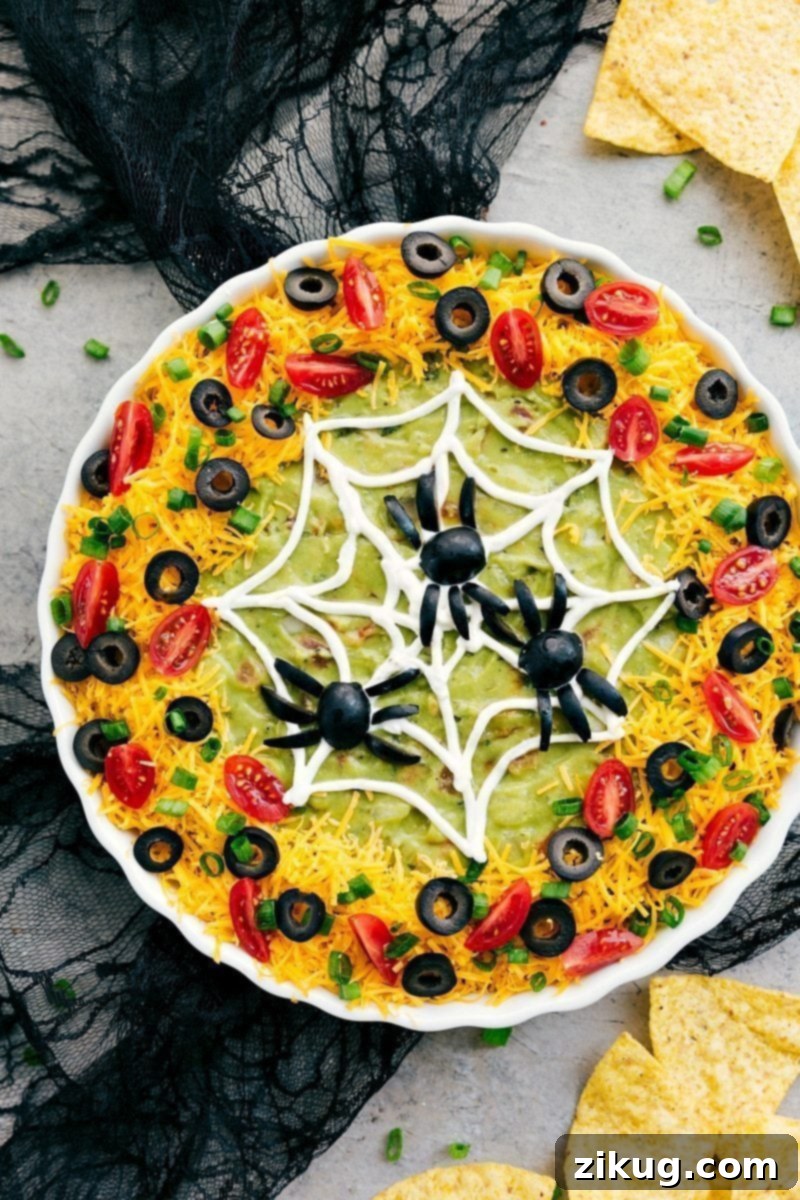
The **7-Layer Spider Web Dip** is not just any dip; it’s a Halloween masterpiece that’s surprisingly simple to assemble and universally loved. This spooky twist on the classic 7-layer bean dip takes your party spread to a new level of ghoulish delight. Imagine rich layers of flavorful ingredients, topped with a creamy sour cream spider web and adorned with olive “spiders” that are sure to make your guests gasp with delight before digging in. The best part? Much of this delicious appetizer can be prepared in advance, leaving you more time to enjoy the festivities. Just remember to add the fresh guacamole and finalize your eerie decorations right before serving to ensure maximum freshness and visual impact.
7-Layer Spider Web Dip
Chelsea Lords
7-Layer Dips are already a party favorite, and this Halloween appetizer gets a creative makeover, adding a simple spider web and olive “spiders” for a truly spooky presentation. It’s perfect for adding a festive touch to your Halloween buffet!
15 minutes
15 minutes
8 servings
Equipment
- 10 to 12-inch plate or pie tin or tart pan
Ingredients
- 1 (15-ounce) can refried beans
- 1 packet taco seasoning
- 1 cup sour cream, divided
- 1 cup chunky salsa (mild or medium, not watery)
- 1 cup freshly shredded Cheddar cheese or Colby jack cheese
- 1/2 cup cherry tomatoes, halved
- 3 to 4 green onions, diced
- 1/2 can drained olives, divided
- 1 cup guacamole
- Tortilla Chips, for serving
Instructions
- In a small bowl, mix the taco seasoning with the refried beans until well combined. Spread this mixture evenly across the bottom of a 10 to 12-inch plate, pie tin, or tart pan. Carefully spread 3/4 cup of sour cream over the bean layer, ensuring it forms a smooth, even base.
- Next, add dollops of salsa over the sour cream layer and gently smooth them out. Repeat this process with the guacamole, spreading it slowly and carefully to maintain distinct layers.
- For the festive toppings, slice half of the drained olives. Around the edge of the dip, generously sprinkle freshly grated cheese, thinly sliced green onions, the sliced olives, and the halved cherry tomatoes. To create the iconic spider web design, transfer the remaining 1/4 cup of sour cream into a small plastic bag and snip off a tiny corner of the tip. Squeeze the sour cream in concentric circles over the guacamole, then drag a toothpick from the center outwards to create a web pattern.
- To craft the olive spiders, halve a few olives lengthwise for the bodies, and then cut additional olives into small strips for the legs. Arrange the halved olives as spider bodies and place the strips around them to resemble creepy-crawly spider legs on your dip.
- Serve this amazing dip immediately, or within 10–15 minutes after decoration, to enjoy its fresh flavors and perfect texture. Accompany it with plenty of tortilla chips for dipping.
Recipe Notes
Storage: To keep any leftover dip fresh, cover it tightly and store it in the refrigerator. It’s best enjoyed within 2–3 days. For the freshest-tasting layers, avoid letting chips or raw veggies sit directly in the dip for extended periods.
Nutrition
Calories: 242 kcal |
Carbohydrates: 16g |
Protein: 7g |
Fat: 17g |
Saturated Fat: 7g |
Polyunsaturated Fat: 1g |
Monounsaturated Fat: 5g |
Trans Fat: 0.3g |
Cholesterol: 33mg |
Sodium: 628mg |
Potassium: 479mg |
Fiber: 5g |
Sugar: 2g |
Vitamin A: 926IU |
Vitamin C: 7mg |
Calcium: 154mg |
Iron: 1mg
Nutrition information is automatically calculated, so should only be used as an approximation.
Love this recipe? Leave a comment below and share your thoughts!
Walking Dead Mummy Dogs – A Kid-Friendly Halloween Treat
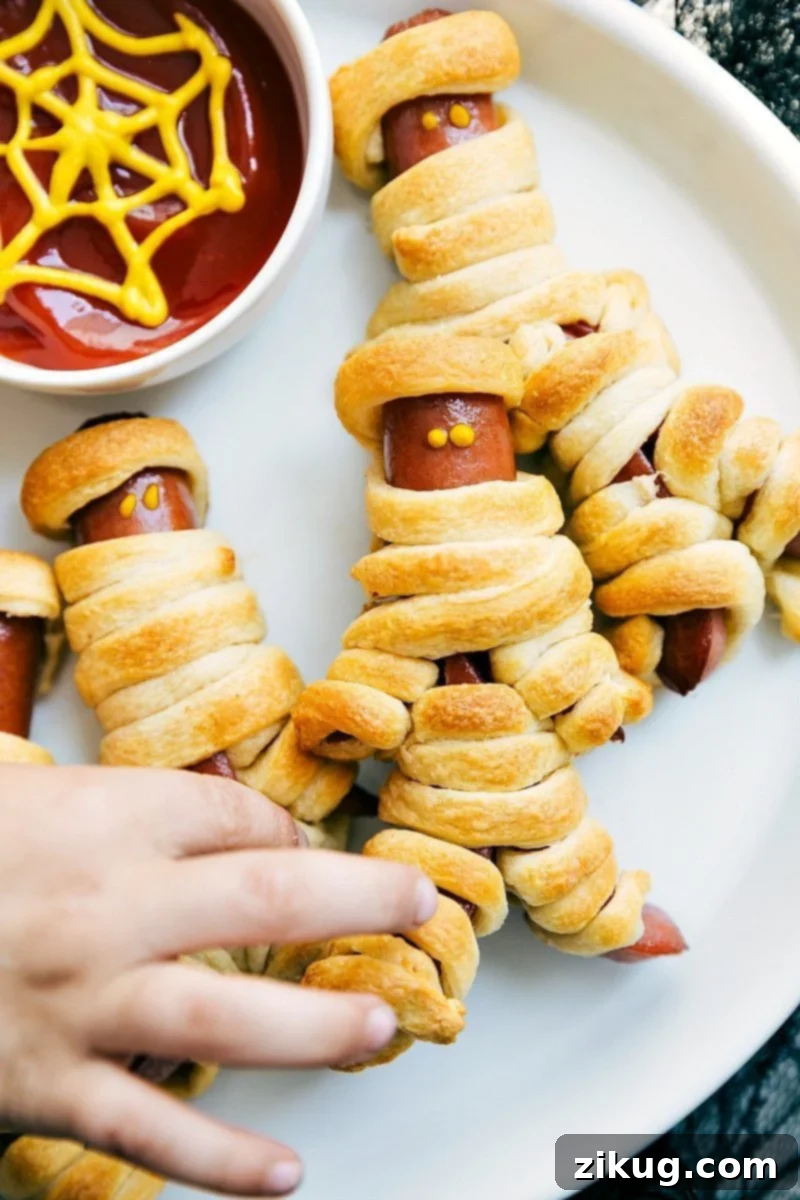
**Walking Dead Mummy Dogs** are the ultimate spooky Halloween appetizer, perfect for celebrating the season with a playful yet eerie touch. These delightful creations feature classic hot dogs, ingeniously wrapped with strips of flaky pastry crust, then baked to golden perfection and decorated to resemble the shambling undead. They are an absolute guaranteed party hit, especially with younger guests who will love the fun, ghoulish appearance. Beyond being a fantastic finger food, they also make for a wonderfully kid-friendly Halloween meal. Serve them with generous bowls of ketchup and/or mustard, and watch them disappear faster than ghosts in a graveyard! This recipe combines simplicity with creativity, ensuring a memorable and delicious addition to your Halloween spread.
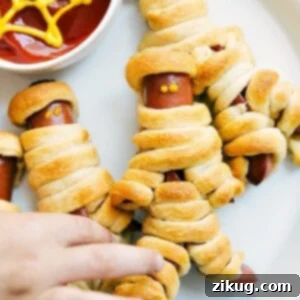
Walking Dead Mummy Dogs
Chelsea Lords
These finger food mummies are both delicious and incredibly simple to make, making them a Halloween appetizer favorite for all ages, from the youngest trick-or-treaters to the grown-up monsters.
15 minutes
44 minutes
59 minutes
10 mummy dogs
Equipment
- Sheet pan (15″ x 10″)
Ingredients
- 1 (8-ounce) container refrigerated crescent rolls
- 10 large hot dogs
- Cooking spray
- Yellow mustard or ketchup, or both, for decoration and dipping
Instructions
- Preheat your oven to 375℉ (190°C). Unroll the refrigerated crescent dough and lay it flat on a clean cutting board. Cut the dough along the perforations to create 4 even rectangles. Firmly press together any other perforations within these rectangles to seal them completely.
- Using a sharp knife, carefully cut each dough rectangle lengthwise into 10 thin strips. This will give you a total of 40 strips of dough, perfect for wrapping your mummies.
- Take one hot dog at a time. Make two small slits along its sides to resemble the mummy’s arms. Then, make another slit at the bottom to create its legs, giving each mummy a distinct, slightly severed limb appearance.
- Wrap the dough strips around each individual arm and leg of the hot dog. Then, continue wrapping the strips around the main body of each hot dog, leaving a small, unwrapped space near the top where the mummy’s face will be. This will allow room for their “eyes.”
- Arrange the prepared mummy dogs on a large, ungreased sheet pan, ensuring they have enough space between them. Lightly spray the dough strips with cooking spray to help them achieve a beautiful golden-brown color and a crispy texture.
- Bake the mummies for 12–15 minutes, or until the crescent dough turns a light golden brown. Once baked, remove them from the oven. Pour some yellow mustard into a small plastic bag and snip off a tiny corner of the tip with scissors. Carefully pipe two small “eyes” onto the unwrapped face area of each mummy dog.
- Serve these fun mummy dogs immediately with extra mustard and ketchup for dipping, if desired. They are best enjoyed warm and fresh from the oven!
Recipe Notes
Storage: Store any leftover mummy dogs in an airtight container in the refrigerator for up to 3 days. To reheat and restore their crispiness, warm them in the oven or an air fryer.
Nutrition
Calories: 226 kcal |
Carbohydrates: 10g |
Protein: 6g |
Fat: 17g |
Saturated Fat: 6g |
Polyunsaturated Fat: 1g |
Monounsaturated Fat: 7g |
Trans Fat: 0.5g |
Cholesterol: 50mg |
Sodium: 450mg |
Potassium: 99mg |
Fiber: 0.4g |
Sugar: 1g |
Vitamin A: 20IU |
Vitamin C: 0.2mg |
Calcium: 16mg |
Iron: 1mg
Nutrition information is automatically calculated, so should only be used as an approximation.
Enjoying these spooky ideas? Leave a comment below!
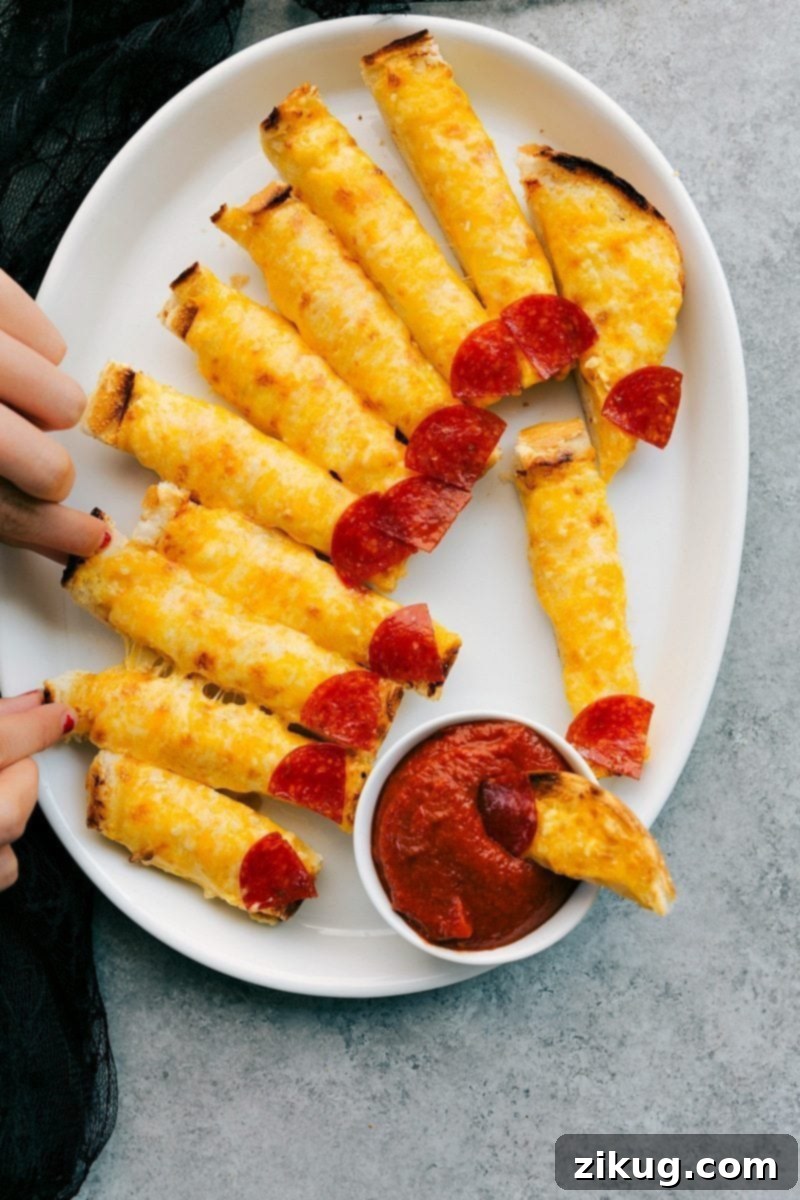
Halloween Appetizers: Cheesy Bread Fingers – The Undeniably Delicious Crowd-Pleaser
These **Cheesy Bread Fingers** are consistently the first appetizer to vanish from any Halloween spread – and for good reason! Beyond their undeniable festive and fun appearance, they are simply OUTRAGEOUSLY DELICIOUS. Many claim this to be the best cheesy bread they’ve ever tasted, and guests frequently beg for the recipe. Imagine perfectly toasted bread generously slathered with a rich, garlicky cheese mixture, then adorned with pepperoni “fingernails” for a truly ghoulish effect. The key to serving these is timing: make sure to pop them into the oven right before your party guests arrive, so they can enjoy them warm, gooey, and at their absolute best. Prepare for rave reviews and empty plates!
Cheesy Bread Fingers
Chelsea Lords
This Halloween appetizer truly deserves a prime spot on your Halloween dinner party menu! This cheesy bread is beyond delicious, striking the perfect balance between spooky fun and incredible flavor.
10 minutes
3 minutes
13 minutes
4 servings, as an appetizer
Equipment
- Large sheet pan (15″ x 21″)
- Aluminum foil or parchment paper
Ingredients
- 4 tablespoons unsalted butter, softened
- 2 teaspoons minced garlic
- 1 cup freshly shredded mozzarella cheese (not bagged mozzarella)
- 2 cups freshly shredded sharp Cheddar cheese
- 1/4 cup mayo
- 1 tablespoon sour cream
- 1 loaf French Bread or ciabatta bread, halved horizontally
- 1 (6-ounce) bag pepperoni, cut in quarters
Instructions
- Preheat your oven’s broiler to high. Slice the loaf of bread in half horizontally, ensuring the crusts face down. Place both halves on a large sheet pan, which you can line with aluminum foil or parchment paper, or simply spray with cooking spray. Set this aside.
- In a small bowl, combine the softened unsalted butter and minced garlic, mixing until you achieve a smooth paste. In a separate, larger bowl, thoroughly mix together the freshly shredded mozzarella cheese, sharp Cheddar cheese, mayo, and sour cream until all ingredients are well combined. Now, fold the garlic butter mixture into the cheese mixture, blending until homogenous.
- Evenly spread and smooth the cheese mixture over both halves of the prepared bread loaves. Place the cheesy bread under the preheated broiler for 2–4 minutes, or until the cheese is nicely browned and bubbly. It’s crucial to watch the bread very carefully during this step to prevent burning, as broilers can cook very quickly.
- While the cheesy bread is broiling, take the pepperoni and cut each piece into quarters. These small, rounded pieces will serve as your eerie “fingernails” for the monster bread.
- Once the cheesy bread is browned to your liking, remove it from the oven. Allow it to cool slightly for a few minutes before slicing. Using a sharp bread knife, cut the loaves into thin, finger-like slices. These will resemble ghoulish “fingers.” Place one pepperoni wedge at the top of each thin slice, positioning it like a fingernail.
- Serve these Cheesy Bread Fingers immediately to your delighted (and slightly grossed-out) guests! They are fantastic on their own, but can also be enjoyed with a side of warm marinara sauce for dipping, if desired, enhancing their savory flavor.
Recipe Notes
Storage: Any leftover cheesy bread can be stored in an airtight container in the refrigerator. To reheat, simply warm it in the oven or an air fryer until it’s warm and crisp again.
Nutrition
Calories: 502 kcal |
Carbohydrates: 13g |
Protein: 18g |
Fat: 42g |
Saturated Fat: 18g |
Polyunsaturated Fat: 3g |
Monounsaturated Fat: 14g |
Trans Fat: 0.4g |
Cholesterol: 83mg |
Sodium: 800mg |
Potassium: 213mg |
Fiber: 0.5g |
Sugar: 1g |
Vitamin A: 500IU |
Vitamin C: 0.2mg |
Calcium: 250mg |
Iron: 0.7mg
Nutrition information is automatically calculated, so should only be used as an approximation.
Was this recipe a scream? Let us know in the comments!
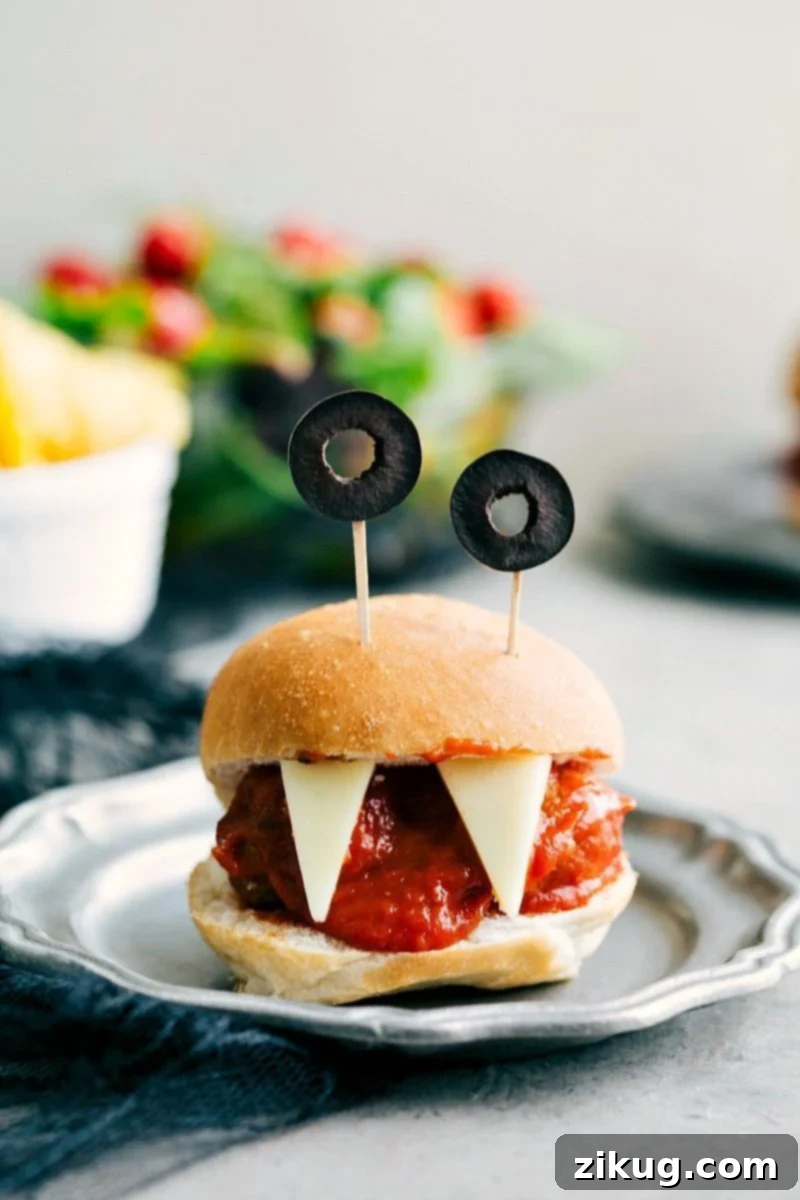
Monster Meatball Sliders – Ghoulishly Good and Filling
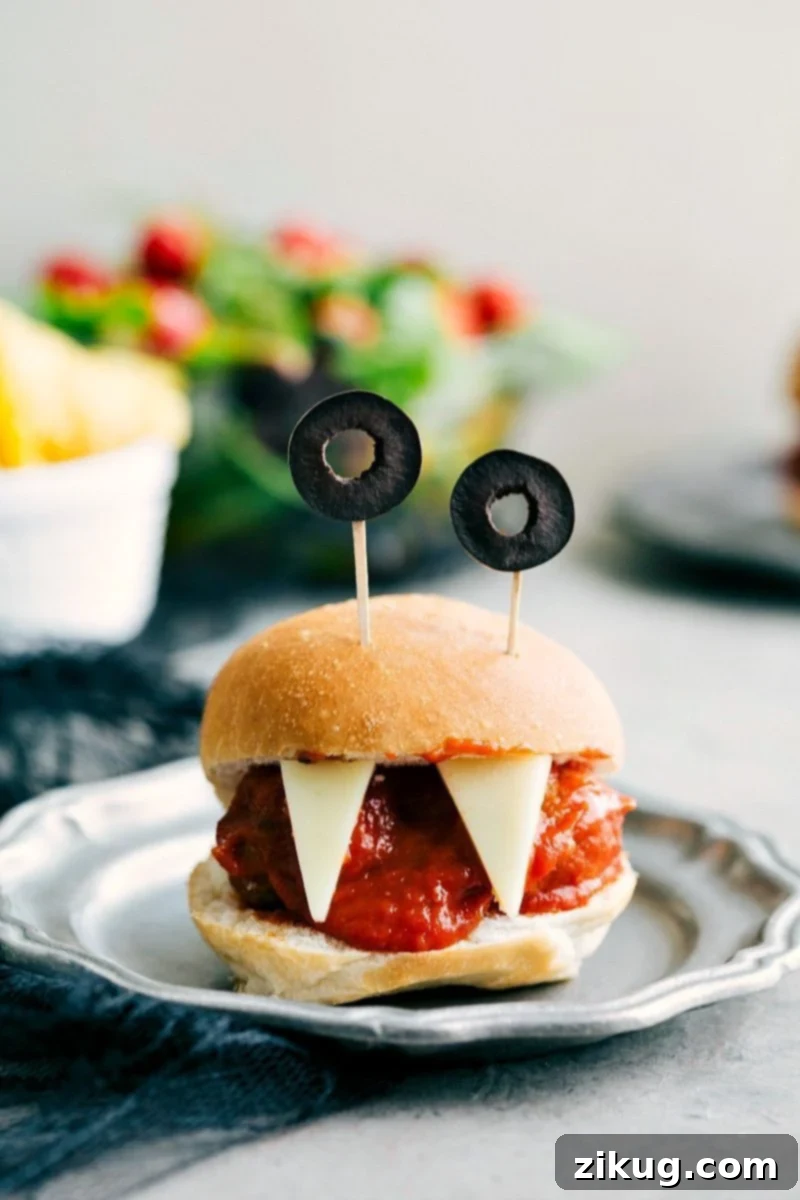
**Monster Meatball Sliders** are the perfect solution for a hearty yet spooky meal or an impressive Halloween appetizer to celebrate the season. These bite-sized delights combine your favorite meatball recipe (or simply grab some pre-made meatballs if you’re in a pinch!) nestled between soft slider rolls. The magic happens with the monstrous details: add some creatively cut cheesy “teeth” and finish these little monsters off with sliced black olive “eyeballs” to bring them to life. These sliders are incredibly quick to make, universally appealing to both kids and adults, surprisingly filling, and undeniably festive. They offer a fantastic savory option amidst the usual sweet Halloween treats, ensuring everyone leaves your party satisfied and thrilled by your culinary creativity.
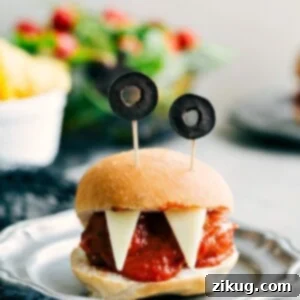
Monster Meatball Sliders
Chelsea Lords
These spooky Halloween appetizers are fun to create, satisfyingly filling, and remarkably easy to put together, making them a perfect addition to any festive gathering!
15 minutes
15 minutes
30 minutes
24 servings (depending on meatball size)
Equipment
- Toothpicks
Ingredients
- 1 bag frozen Italian meatballs (or see note 1 for my favorite homemade meatballs!)
- 1 (24-ounce) jar marinara sauce
- 24 dinner rolls
- 1 (16-ounce) block mozzarella cheese, divided
- 1/2 of 1 jar black olives, sliced
- Toothpicks
Instructions
- Begin by preparing your meatballs according to the package directions if using frozen. If you prefer to make them from scratch, refer to the recipe notes for links to my favorite homemade meatball recipes.
- Once the meatballs are cooked, combine them thoroughly with the marinara sauce in a saucepan over low heat, allowing them to simmer gently and absorb the rich flavors. While the meatballs are simmering, prepare your “monster teeth.” Cut approximately 48 small, jagged “teeth” shapes from the block of mozzarella cheese (adjust the number based on how many sliders you are making). Grate the remaining mozzarella cheese to yield about 1 cup, which will be used for sprinkling.
- When you’re ready to serve, carefully slice the dinner rolls in half horizontally. Lay the bottom halves of the rolls on a serving platter or tray. Sprinkle a generous amount of the shredded mozzarella cheese over each bottom roll. Then, top each with a hot, marinara-covered meatball, adding a little extra sauce if desired, before placing the top half of the sandwich roll over the meatball.
- To complete your monster sliders, thinly slice the black olives. Take one olive slice and carefully attach it to a toothpick. Insert this toothpick into the top of each slider, positioning the olive slice to look like a monstrous “eyeball.” Finally, gently press the pre-cut mozzarella cheese “teeth” into the sides of the meatballs, just under the top bun, to create a fearsome, cheesy grin. Serve these Monster Meatball Sliders immediately while they are warm and gooey, much to the delight of your hungry party guests.
Recipe Notes
Note 1: For those who love homemade, here are my favorite homemade meatball recipes that would be fantastic in these sliders! Check out these Cheese Stuffed Meatballs and these Crockpot Meatball Sliders for delicious alternatives.
Did these sliders disappear too fast? Tell us about it in the comments!
Conclusion: Your Ultimate Halloween Appetizer Guide
And there you have it – four fantastic, frightfully delicious, and incredibly easy Halloween appetizer recipes designed to make your celebration a smashing success! From the intricate yet simple **Spiderweb 7-Layer Dip** that offers a savory and artistic centerpiece, to the playful and kid-approved **Walking Dead Mummy Dogs** that bring a smile to every face, and the truly unforgettable **Cheesy Monster Fingernail Bread** with its uncanny resemblance and irresistible taste, all the way to the hearty and fun **Monster Meatball Sliders** that will keep your guests fueled for trick-or-treating or dancing. Each of these recipes offers a unique blend of spooky fun and mouth-watering flavor, proving that Halloween treats don’t have to be complicated to be spectacular.
Whether you’re planning an elaborate Halloween bash or a simple family dinner, these appetizers provide a perfect balance of creativity and convenience. They’re designed to be enjoyable to make, impressive to serve, and, most importantly, absolutely delicious to eat. So, gather your ingredients, unleash your inner culinary monster, and get ready to create a Halloween spread that will be talked about long after the last ghostly gasp. Happy Halloween, and happy cooking!