
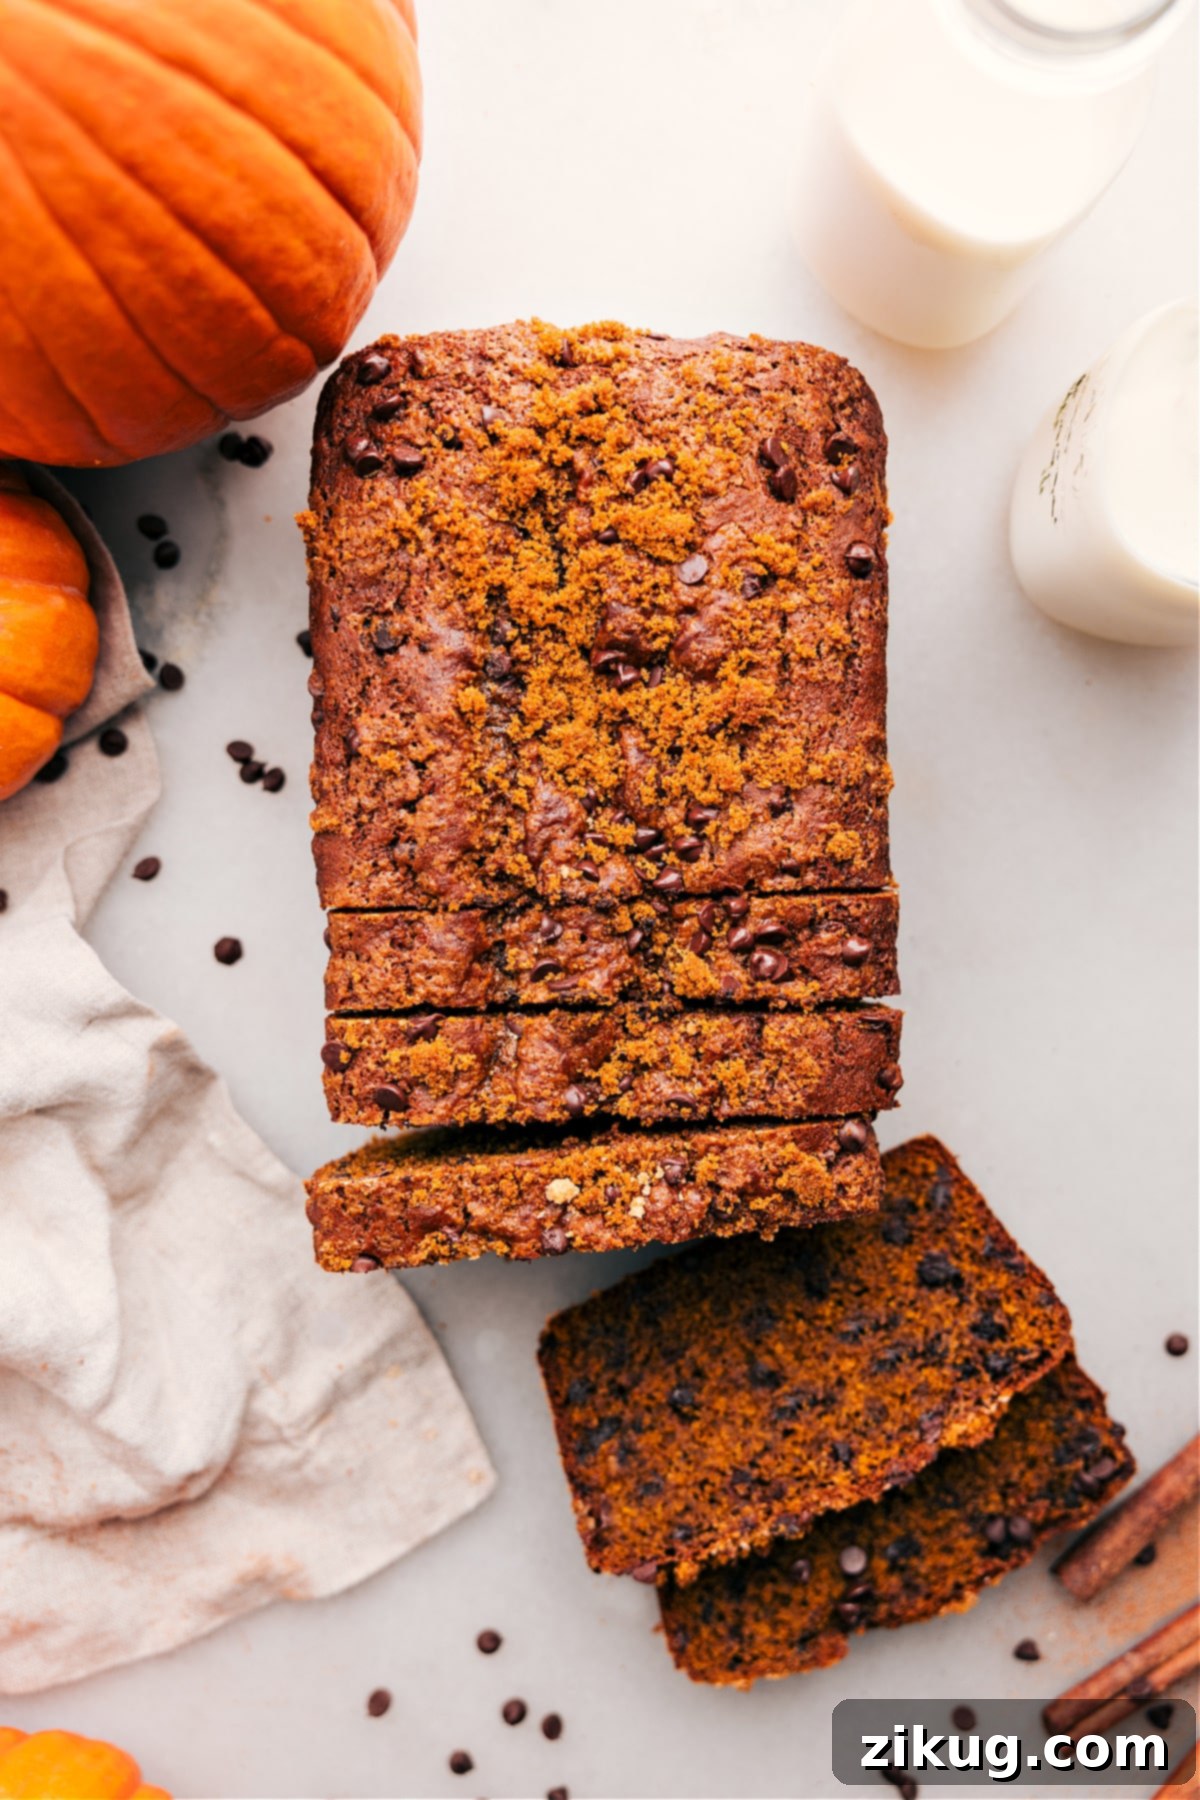
Easy & Moist Chocolate Chip Pumpkin Bread: Your Perfect Fall Treat
Welcome to the ultimate recipe for a truly unforgettable Chocolate Chip Pumpkin Bread. This incredibly easy, moist loaf is bursting with comforting warm spices and an abundance of melty chocolate chips in every single bite. It’s the perfect autumn baking project, requiring just one bowl and no mixer, making it an absolute breeze to whip up. Get ready to fill your home with the inviting aromas of fall and savor a delicious treat that tastes even better on day two!
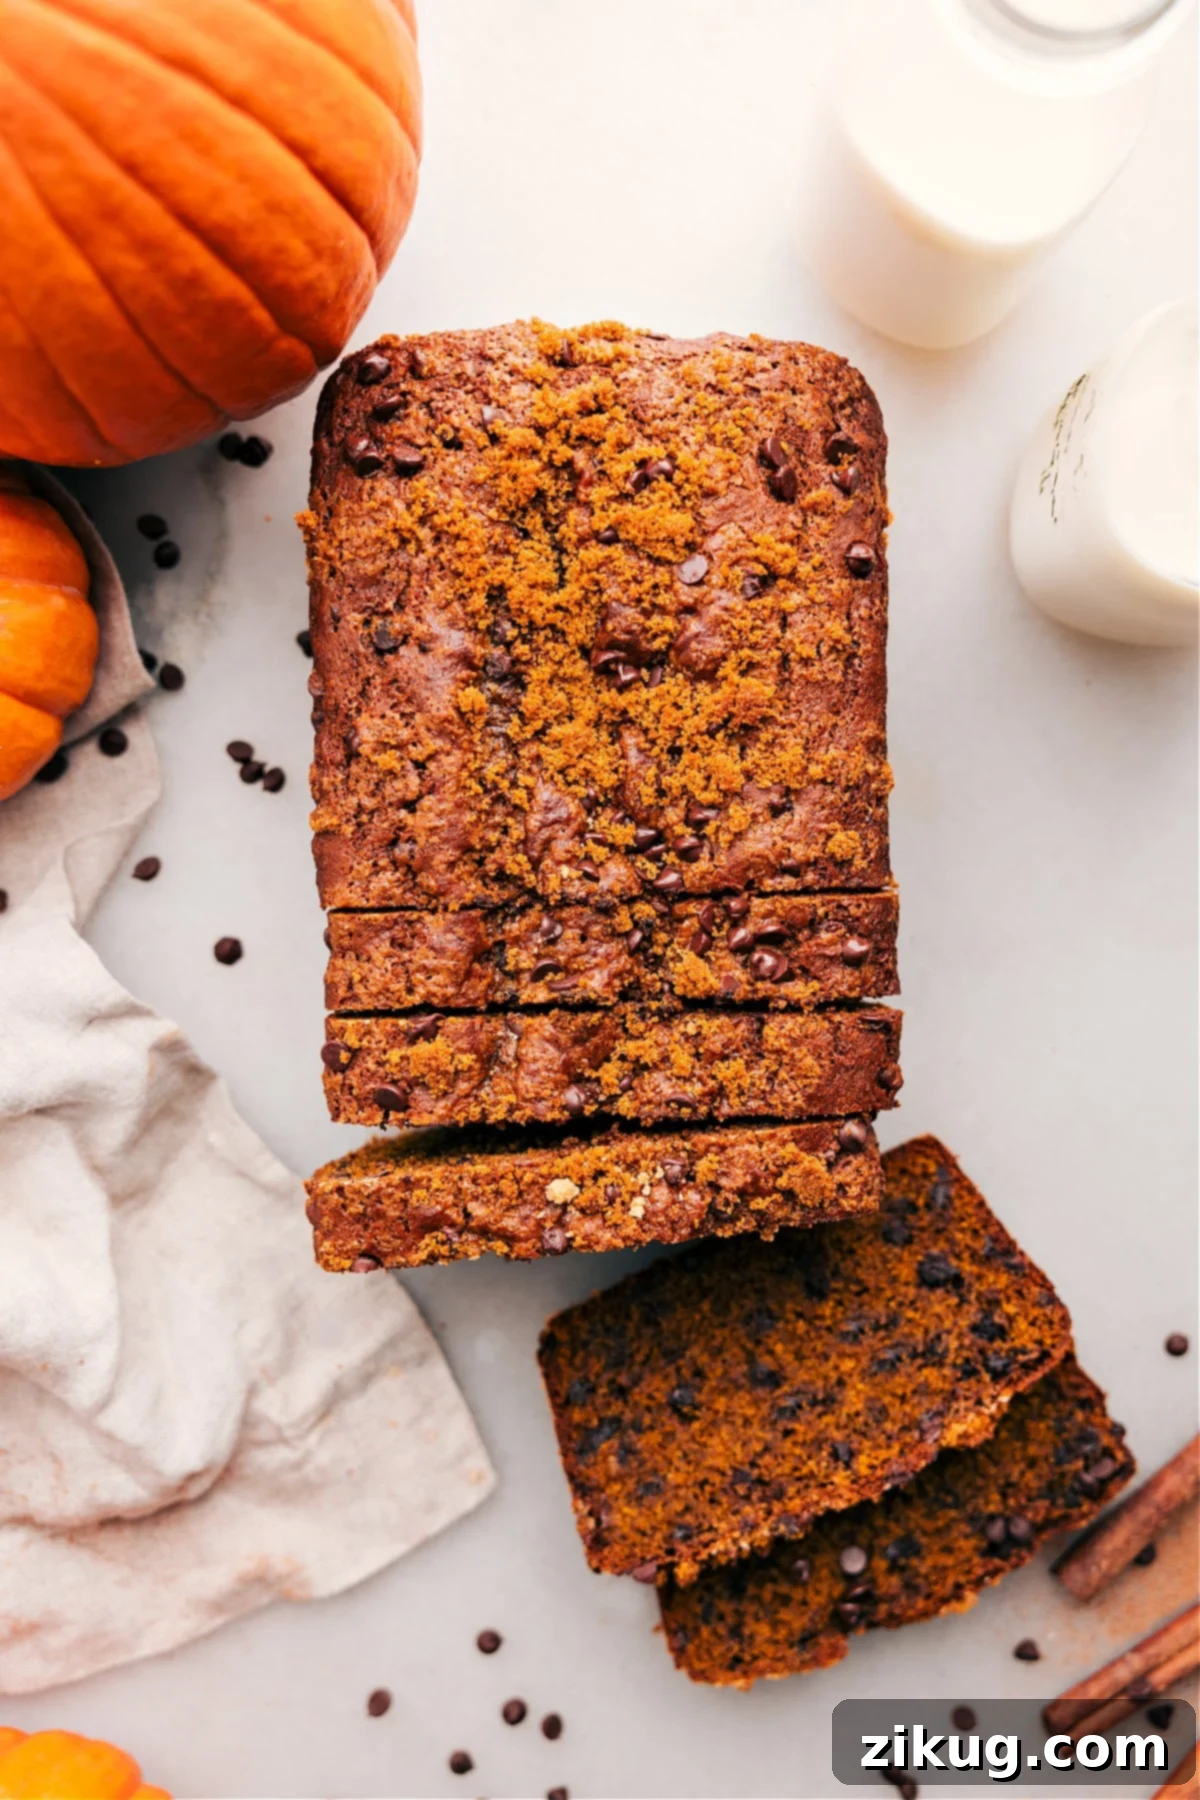

Author’s Note
From Skepticism to a Family Favorite: My Chocolate Chip Pumpkin Bread Journey!
For years, I found myself second-guessing pumpkin bread recipes. Each fall, I’d bake a test loaf, share a slice, and then tell myself, “I’ll perfect it and post it next season.” I was determined to create a pumpkin bread that was not just good, but truly exceptional – one that I wouldn’t hesitate to share immediately with friends and family.
This time, my approach was different. I meticulously tweaked and tested, adjusting the ratios of pumpkin, spice, and chocolate until it reached absolute perfection. I aimed for a texture that was incredibly soft and tender, a flavor profile rich with bold pumpkin spice, and mini chocolate chips distributed so evenly that every single bite was a delight. It wasn’t just about getting the taste right; it was about achieving that quintessential fall comfort in a loaf that truly stands out.
The true test came when my kids, who can be quite picky, started asking for “the chocolate pumpkin bread” three days in a row. That’s when I knew, without a shadow of a doubt, this recipe was ready to be shared with the world. This easy pumpkin bread became an instant hit in our home. An added bonus? This bread actually slices even better the next day, as the flavors have more time to mingle and deepen, creating an even richer, more harmonious taste experience. It’s an easy win for fall baking that you’ll want to make again and again!
Why This Chocolate Chip Pumpkin Bread Will Become Your Go-To:
- Unrivaled Pumpkin Flavor: Experience a delightful blend of rich pumpkin and warm, inviting spices, encased in a super soft, incredibly tender crumb.
- Chocolate in Every Bite: Our secret is using mini chocolate chips, which ensure a perfect chocolatey surprise and melty goodness in every single slice, from crust to center.
- Effortless Preparation: This is a true one-bowl wonder that doesn’t require any fancy equipment. All you need is a whisk and a bowl, making cleanup an absolute breeze.
- Stays Moist for Days: Enjoy consistently moist slices that miraculously taste even better on day two, as all the comforting fall flavors have more time to mingle and deepen.
- Perfect for Fall: This recipe captures the essence of autumn, making it the ultimate treat for crisp mornings, cozy evenings, holiday gatherings, or simply sharing with loved ones.
- Beginner-Friendly: A straightforward and forgiving recipe that consistently yields impressive results, making it ideal for both experienced bakers and those new to the kitchen.
Essential Ingredients for Your Chocolate Chip Pumpkin Bread
Crafting the perfect moist chocolate chip pumpkin bread starts with high-quality ingredients and a few key considerations. Each component plays a vital role in achieving that delightful flavor and tender texture. Here’s a breakdown of what you’ll need and some helpful tips for each to ensure your loaf turns out perfectly every time:
| Ingredient | Swap or Tip for Best Results |
|---|---|
| Pumpkin Purée | Use pure canned pumpkin, NOT pumpkin pie filling. Pumpkin pie filling contains added sugars and spices that will throw off the flavor balance of this recipe. Always ensure you’re measuring out only the specific amount needed, as a standard can often contains more than the 1 cup required here. |
| Brown Sugar | Both light or dark brown sugar work wonderfully, each contributing a slightly different nuance. Dark brown sugar will lend a slightly richer, deeper molasses flavor, enhancing the warmth of the spices. Light brown sugar offers a more subtle sweetness. Ensure it’s lightly packed into your measuring cup for accurate volume. |
| Oil + Melted Butter | This dynamic duo is key for both moisture and rich flavor in your pumpkin bread. The oil (vegetable or canola is recommended) keeps the bread incredibly soft and moist for days, even at room temperature. The melted butter, meanwhile, adds a rich, deep, and comforting dairy flavor that pairs beautifully with pumpkin. For maximum moisture, you can opt for all oil; for a profoundly rich flavor, use all butter, though this might make the bread slightly denser. |
| All-Purpose Flour | Accurate flour measurement is critical for quick breads. To avoid a dry, tough loaf, use the “spoon and level” method: gently spoon flour into your measuring cup until overflowing, then level it off with a straight edge (like the back of a knife). For ultimate precision, weigh your flour with a kitchen scale (1 cup all-purpose flour typically weighs 120-125 grams). |
| Pumpkin Pie Spice + Cinnamon & Nutmeg | These spices form the aromatic heart of our fall flavor profile. Pumpkin pie spice is a pre-blended mix, usually containing cinnamon, nutmeg, ginger, and cloves. By adding extra ground cinnamon and a touch of nutmeg, we amplify that classic, warm, and inviting aroma and taste. Feel free to slightly increase the cinnamon if you adore its bold presence. |
| Large Eggs | Bringing your eggs to room temperature before incorporating them into the batter is a small but impactful step. Room temperature eggs emulsify much better with other ingredients, leading to a smoother, more uniform batter and ultimately contributing to a finer, more tender crumb in the finished bread. |
| Mini Chocolate Chips | Mini chocolate chips are highly recommended for this recipe. Their smaller size ensures they distribute more evenly throughout the entire loaf, guaranteeing you get a delightful burst of chocolate in every single bite, rather than having larger chips sink to the bottom. Don’t forget to reserve a small handful to sprinkle on top before baking for an appealing presentation! |
| Baking Powder & Baking Soda | These crucial leavening agents work in harmony to give the bread its perfect rise and tender, airy texture. Always ensure your baking powder and baking soda are fresh and active for optimal lift and lightness; old leaveners can result in a dense loaf. | Salt | A pinch of salt is far more than just a seasoning; it’s a flavor enhancer. It’s crucial for balancing the sweetness of the sugars and pumpkin, and for accentuating all the delicious, warming spices in the bread. Don’t skip it! |
| Vanilla Extract | Pure vanilla extract provides a lovely, sweet aromatic depth that beautifully complements and rounds out the rich flavors of pumpkin and spices. It adds that extra layer of complexity to the overall taste. |
Featured Comment
“I just love making homemade bread with my kids. This recipe was so delicious and turned out perfectly soft & moist. A new family favorite for fall!”
– Stephanie
Step-by-Step Guide: How to Make the Best Chocolate Chip Pumpkin Bread
Making this incredible moist chocolate chip pumpkin bread is remarkably straightforward, even for novice bakers. By following these detailed steps and incorporating our helpful tips, you’ll achieve a perfectly moist, spiced, and chocolate-studded loaf every single time:
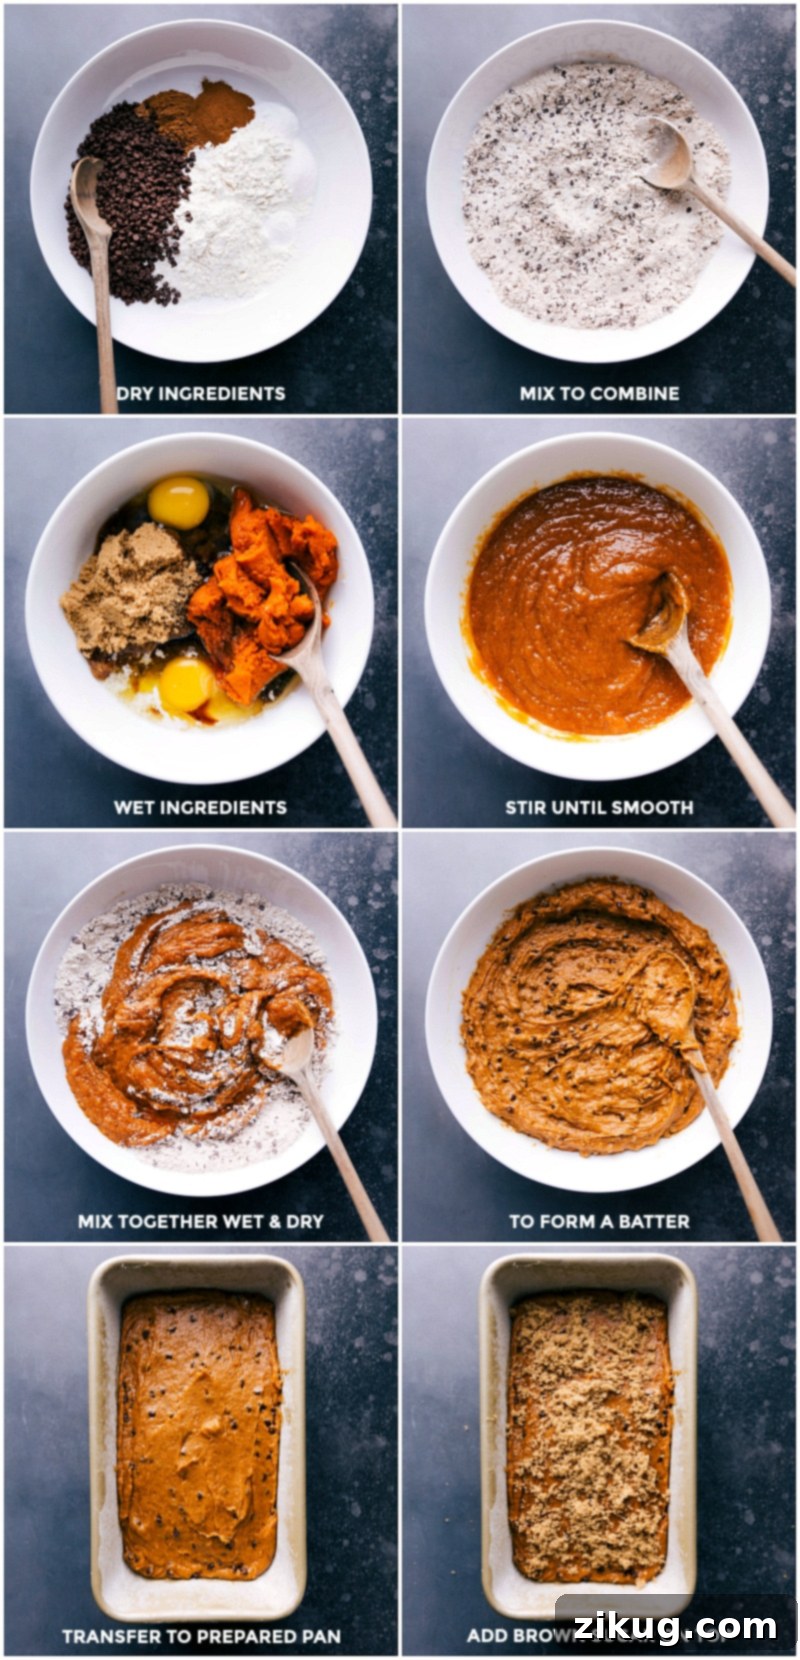
- Prepare Your Baking Pan and Preheat Oven: Begin by preheating your oven to 350°F (175°C). Ensure your melted butter has cooled to room temperature and your eggs are also at room temperature, as this aids in creating a smooth batter. Generously grease a metal 9×5-inch loaf pan (or three mini loaf pans, if you prefer smaller portions) with cooking spray or butter. For effortless removal after baking, consider lining the pan with a parchment paper sling, allowing some overhang on the longer sides to act as “handles.” Then, lightly dust the greased pan with a little all-purpose flour, tapping out any excess to prevent sticking.
- Combine Dry Ingredients: In a large mixing bowl, thoroughly whisk together all the dry ingredients: all-purpose flour, baking powder, baking soda, salt, ground cinnamon, pumpkin pie spice, and ground nutmeg. Whisking ensures that the leavening agents and spices are evenly distributed throughout the flour, which is vital for a consistent rise and flavor in your pumpkin bread.
- Combine Wet Ingredients: In a separate medium-sized bowl, add the melted and cooled unsalted butter, vegetable oil (or canola oil), light brown sugar, canned pure pumpkin purée, large room temperature eggs, and vanilla extract. Whisk these wet ingredients briskly until the mixture is completely smooth, glossy, and well combined. The brown sugar should be fully dissolved, and the mixture should appear homogenous.
- Gently Mix Batter and Fold in Chips: Pour the wet ingredient mixture into the large bowl containing your whisked dry ingredients. Using a rubber spatula, gently fold the wet and dry ingredients together *just until no visible streaks of flour remain*. The key here is to avoid overmixing at all costs; overmixing develops the gluten, which can lead to a tough and dense loaf. A few small lumps in the batter are perfectly normal and preferred. Once nearly combined, gently fold in the 1 cup of mini chocolate chips until they are evenly distributed throughout the batter. Remember to save a small handful of mini chips (and the optional 2 tablespoons of brown sugar) for sprinkling on top before baking.
- Transfer to Pan and Bake to Perfection: Carefully scrape all the prepared batter into your greased and floured loaf pan(s), spreading it evenly with the spatula. If desired, sprinkle the reserved mini chocolate chips and brown sugar evenly over the top for a beautiful, slightly caramelized crust. Place the pan in the preheated oven. A standard 9×5-inch loaf will typically bake for 50-65 minutes, while smaller mini loaves will require a shorter baking time of approximately 35-40 minutes (refer to note 3 below for more on baking time variations). The bread is done when a wooden skewer or toothpick inserted into the very center comes out clean or with only moist crumbs attached, but no wet batter. If the top of the bread begins to brown too quickly before the center is cooked, you can loosely tent the pan with aluminum foil for the remainder of the baking time.
- Cool Completely for Best Slicing: Once baked, remove the pan from the oven and allow the bread to cool in the pan for a crucial 15 minutes. This brief resting period allows the internal structure of the bread to set and prevents it from crumbling when you try to remove it. After 15 minutes, use the parchment paper sling (or carefully invert the pan) to transfer the loaf to a wire cooling rack. It is absolutely essential to allow the bread to cool *fully* to room temperature before attempting to slice it with a sharp serrated knife. Slicing warm quick bread often results in a sticky, crumbly mess, whereas a fully cooled loaf will yield neat, clean, and perfectly tender slices.
Baking Uniformity Tip
For consistent and uniform baking, especially when preparing multiple mini loaves, consider using a food scale. Weigh the batter directly into each pan to ensure that every loaf contains the exact same amount. This simple technique guarantees even baking times and results in beautifully uniform and perfectly cooked breads across the board.
Pro Tips for Achieving the Best Chocolate Chip Pumpkin Bread
Even though this is an incredibly easy recipe, a few expert tips can elevate your homemade pumpkin bread from great to absolutely phenomenal, ensuring a consistently moist, flavorful, and tender loaf every single time:
- Avoid Overmixing the Batter: This is arguably the most crucial tip for any quick bread. When flour is overmixed, the gluten proteins within it develop excessively, leading to a tough, chewy, and dense texture rather than the desired soft and tender crumb. Mix just until the dry ingredients are barely incorporated into the wet, and no streaks of flour remain. A few small lumps in the batter are perfectly acceptable and even preferred.
- Ensure Room Temperature Ingredients: Always make sure your eggs and any dairy, like the melted butter (which should also be cooled), are at room temperature. Room temperature ingredients emulsify much better with each other, creating a smoother, more uniform batter. This consistent batter, in turn, contributes to a lighter, more tender, and beautifully textured crumb in your finished pumpkin bread.
- Measure Flour Accurately: One of the most common baking mistakes is accidentally over-measuring flour, which invariably leads to dry and tough baked goods. For precision, always use a kitchen scale to weigh your flour (1 cup of all-purpose flour typically weighs between 120-125 grams). If you don’t have a scale, use the “spoon and level” method: lightly spoon flour into your measuring cup until it overflows, then level it off with the back of a straight edge (like a knife) without packing it down.
- Calibrate Your Oven Temperature: Oven temperatures can vary significantly from what their displays indicate, which can drastically impact baking time and overall results. Investing in an inexpensive oven thermometer and placing it inside your oven will help you ensure that your oven is preheated to the precise temperature stated in the recipe, ensuring optimal baking conditions.
- Practice Patience with Cooling: It’s incredibly tempting to slice into a warm, fragrant loaf of pumpkin bread straight from the oven, but resist the urge! Cooling the bread completely on a wire rack is vital. This allows the internal structure to fully set, preventing the bread from becoming gummy or crumbling when you slice it. Furthermore, the flavors of the pumpkin and spices actually continue to meld and deepen as the bread cools, resulting in an even more delicious final product.
- Enhance the Spice Profile: While the recipe provides specific amounts for pumpkin pie spice, cinnamon, and nutmeg, feel free to adjust these to your personal preference. If you adore a bolder, more intense spice profile, consider adding a little extra cinnamon or even a tiny pinch of ground ginger or cloves for an extra layer of warmth and complexity.
- Customize Your Chocolate: While mini chocolate chips are recommended for their even distribution, this recipe is highly adaptable. You can absolutely experiment with other types of chocolate to tailor it to your taste. Try milk chocolate chips for a sweeter, creamier profile, dark chocolate chunks for a richer, more intense contrast, or even a mix of white chocolate chips and dried cranberries for a festive twist!
Delicious Ways to Serve Your Pumpkin Chocolate Chip Bread
This moist chocolate chip pumpkin bread is incredibly versatile and utterly fantastic on its own. However, if you’re looking to elevate your experience, here are some delightful serving suggestions to make it even more special:
- Simply Sliced and Enjoyed: The bread is truly a star on its own. A warm slice, with its melty chocolate chips and rich pumpkin flavor, is a pure delight for breakfast, a mid-day snack, or a comforting dessert.
- With a Decadent Spread: Elevate a warm slice by slathering it with a generous pat of softened butter, a dollop of tangy cream cheese (perhaps whipped with a touch of maple syrup), or a cloud of freshly whipped cream for an extra indulgent treat.
- Perfect Pairing with Beverages: It’s the ideal companion to your morning coffee, a cozy cup of hot tea, a festive mug of spiced apple cider, or even a glass of cold milk for the kids.
- Transform into French Toast: Have some leftover slices? Transform them into an incredible pumpkin bread French toast for a truly special weekend brunch. The inherent flavors of the bread will make for an unforgettable dish.
- Warm Dessert with Ice Cream: For an amazing dessert, gently warm a slice of pumpkin bread and serve it with a scoop of vanilla bean ice cream or cinnamon swirl ice cream. The contrast of warm bread and cold ice cream is divine.
- As Part of a Brunch Spread: Arrange slices on a platter with fresh fruit, yogurt, and other pastries for an inviting and festive autumn brunch.
Explore More Amazing Pumpkin Treats:
If you’re as passionate about pumpkin as we are, you’ll love these other fall-favorite recipes!
Desserts
Cake Mix Pumpkin Cookies
Desserts
Pumpkin Cupcake Recipe
Desserts
Pumpkin Pecan Pie
Desserts
Pumpkin Carrot Cake
Print Recipe
Pumpkin Chocolate Chip Bread
Chelsea Lords
30 minutes
1 hour
15 minutes
1 hour
45 minutes
12 slices (using a large loaf pan)
Recipe Video
Equipment
-
9 x 5-inch bread pan (or 3 mini bread pans)
-
Cooling rack
-
Large mixing bowl
-
Whisk
-
Rubber Spatula
-
Parchment paper (optional, for easy bread removal)
-
Measuring cups and spoons
Ingredients
-
Cooking spray or butter for greasing pan
- 1-1/2 cups all-purpose flour (spooned & leveled)
- 1 teaspoon baking powder
- 1 teaspoon baking soda
-
1 teaspoon
salt
- 1 tablespoon ground cinnamon
- 1 tablespoon pumpkin pie spice (see note 1 below)
- 1/4 teaspoon ground nutmeg
- 1 cup mini chocolate chips (plus 1/4 cup for topping, if desired)
- 4 tablespoons unsalted butter (melted and cooled)
- 1/4 cup vegetable oil (or canola oil)
- 1 cup light brown sugar (or dark brown sugar, lightly packed)
-
1 cup
canned pure pumpkin purée
(see note 2 below) - 2 large eggs (at room temperature)
-
1/2 tablespoon
vanilla extract
- 2 tablespoons brown sugar (optional topping, for a crispier crust)
Instructions
-
1. Prepare Oven and Pan: Preheat your oven to 350°F (175°C). Ensure your melted butter has cooled to room temperature and your large eggs are also at room temperature. Generously grease a 9×5-inch (1-pound) bread pan or three mini bread pans. For effortless removal, you can also line the pan with parchment paper, leaving an overhang on the long sides to create a “sling.” Lightly dust the greased pan with a little all-purpose flour, tapping out any excess.
-
2. Whisk Dry Ingredients: In a large mixing bowl, combine the flour (spooned & leveled), baking powder, baking soda, salt, ground cinnamon, pumpkin pie spice, and ground nutmeg. Whisk these dry ingredients together thoroughly for about 30 seconds to ensure they are evenly distributed, which is crucial for uniform leavening and flavor.
-
3. Combine Wet Ingredients: In a separate medium-sized bowl, add the melted and cooled unsalted butter, vegetable oil, light brown sugar (lightly packed), canned pure pumpkin purée, large room temperature eggs, and vanilla extract. Whisk briskly for 1-2 minutes until the mixture is completely smooth, glossy, and well combined, with no lumps of sugar visible.
-
4. Gently Mix Batter and Fold in Chips: Pour the wet ingredient mixture into the large bowl with the dry ingredients. Using a rubber spatula, gently fold the wet and dry ingredients together *just until no visible streaks of flour remain*. Be careful not to overmix, as this develops gluten and can make the bread tough. A few small lumps are perfectly fine. Once just combined, gently fold in the 1 cup of mini chocolate chips until they are evenly distributed. Avoid overmixing once the chips are added. Scrape all the batter into your prepared bread pan(s) and smooth the top. If desired, gently sprinkle the optional 2 tablespoons of brown sugar and any reserved mini chocolate chips evenly over the top for a beautiful, slightly caramelized crust.
-
5. Bake and Test Doneness: Bake in the preheated oven for 50–65 minutes for a standard loaf, or 35–40 minutes for mini loaves (see note 3 below for more on baking time). To check for doneness, insert a wooden skewer or toothpick into the very center of the bread; if it comes out clean or with only moist crumbs attached (not wet batter), it’s ready. If the top of the bread begins to brown too quickly before the center is cooked through, you can loosely tent the pan with aluminum foil for the remainder of the baking time to prevent over-browning.
-
6. Cool Completely for Best Slicing: Remove the bread from the oven and allow it to cool in the pan for a crucial 15 minutes. This resting period allows the internal structure of the bread to set and prevents it from crumbling when you try to remove it. After 15 minutes, use the parchment paper sling (or carefully invert the pan) to transfer the loaf onto a wire cooling rack. It is absolutely essential to allow the bread to cool *fully* to room temperature before attempting to slice it with a sharp serrated knife. Slicing warm quick bread often results in a sticky, crumbly mess, whereas a fully cooled loaf will yield neat, clean, and perfectly tender slices.
Recipe Notes
Note 2: Pure Pumpkin Purée: It’s crucial to use pure canned pumpkin (sometimes labeled 100% pure pumpkin) and not pumpkin pie filling. Pumpkin pie filling is a pre-mixed product that is already sweetened and spiced, which would significantly alter the carefully balanced flavor profile of this recipe. Also, please be mindful that this recipe only calls for 1 cup of pumpkin purée, so you won’t use the entire contents of a standard large can.
Note 3: Baking Time Variations: The exact baking time for your pumpkin bread can vary based on several factors unique to your kitchen. These include the specific material and size of your loaf pan (metal pans conduct heat differently than glass), the humidity levels in your environment, and, most importantly, the calibration of your individual oven. It’s always best to keep a close eye on your bread (peeking through the oven glass is ideal; avoid opening the oven door too frequently as it causes significant heat loss) and always rely on the toothpick test for the most accurate indication of doneness.
Storage Instructions: To keep your delicious chocolate chip pumpkin bread as moist and fresh as possible, ensure it has completely cooled to room temperature before storing. Wrap the entire loaf or individual slices very tightly first in plastic wrap, then an additional layer of aluminum foil, or place them securely in an airtight container. Store at room temperature for up to 4 days. For extended freshness, refrigerate for up to 1 week, ensuring it remains well-sealed to prevent it from drying out or absorbing any refrigerator odors.
Freezing Instructions: This pumpkin bread freezes beautifully, making it an excellent option for meal prepping or having a ready-made treat. Once the baked loaf or individual slices are at room temperature, wrap them tightly in plastic wrap, followed by a layer of aluminum foil for double protection. Then, place the wrapped bread into a resealable freezer bag, pressing out as much air as possible before sealing. Label the bag clearly with the date. It can be stored safely in the freezer for up to 3 months. To enjoy, simply remove from the freezer and let it thaw at room temperature for a few hours (for slices) or overnight (for a whole loaf). You can also gently warm thawed slices in the microwave or a low oven for a “freshly baked” experience.
Nutrition Information
Calories: 308kcal |
Carbohydrates: 45g |
Protein: 4g |
Fat: 13g |
Saturated Fat: 6g |
Polyunsaturated Fat: 3g |
Monounsaturated Fat: 2g |
Trans Fat: 0.2g |
Cholesterol: 43mg |
Sodium: 161mg |
Potassium: 106mg |
Fiber: 2g |
Sugar: 30g |
Vitamin A: 3376IU |
Vitamin C: 1mg |
Calcium: 130mg |
Iron: 2mg
Nutrition information is automatically calculated and provided for general informational purposes only. It should be used as an approximation and may vary based on specific brands, preparation methods, and ingredient variations.
Frequently Asked Questions About Pumpkin Chocolate Chip Bread
Several factors can contribute to a tough or dense pumpkin bread, but they are all easily addressed to ensure a softer, more tender result:
- Overmixing the Batter: This is by far the most common culprit for tough quick breads. When flour is overmixed, the gluten proteins within it develop excessively, leading to a dense, chewy, and rubbery texture. Always mix just until the dry ingredients are barely incorporated, and no streaks of flour remain.
- Incorrect Flour Measurement: Too much flour can significantly dry out the bread and make it tough. Always measure flour accurately using a kitchen scale for precision, or the “spoon and level” method if using measuring cups. Never scoop directly from the bag.
- Old Leavening Agents: Baking powder and baking soda lose their potency over time. If they’re old or expired, your bread won’t rise properly and can end up dense and heavy. Always check the expiration dates and ensure your leaveners are fresh.
- Inaccurate Oven Temperature: An oven that is too hot or too cold can significantly affect the bread’s texture. Use an oven thermometer to ensure your oven is calibrated correctly and maintains the precise temperature specified in the recipe throughout the baking process.
- Watery Pumpkin Purée: While pure pumpkin is crucial, some brands can be more watery than others. Excess moisture can make the bread gummy or dense. If your pumpkin purée seems particularly thin, you can gently drain off some of the excess liquid before incorporating it into the batter.
- Not Enough Fat: The combination of oil and butter in this recipe is crucial for moisture and tenderness. Ensure you’re measuring these ingredients correctly, as too little fat can result in a drier, tougher loaf.
Absolutely! This chocolate chip pumpkin bread freezes beautifully, making it perfect for preparing ahead, stocking your freezer, or enjoying a taste of fall long after the season ends. Here’s how to freeze it for the best results and maintain its delicious quality:
- Cool Completely: This is paramount. Ensure the baked bread has cooled down entirely on a wire rack to room temperature. Freezing warm bread can lead to condensation and the formation of ice crystals, which can negatively affect the bread’s texture upon thawing.
- Wrap Tightly: Once completely cool, wrap the entire loaf or individual slices very tightly first in plastic wrap, ensuring no air gaps. Then, add an additional layer of aluminum foil. This double layer provides superior protection against freezer burn.
- Bag and Label: Place the tightly wrapped bread into a sturdy, resealable freezer bag, pressing out as much air as possible before sealing it. Label the bag clearly with the date of freezing.
- Storage Duration: Store the pumpkin bread in the freezer for up to 3 months. Beyond this, its quality may start to degrade, though it will likely still be safe to eat.
- Thawing Instructions: To enjoy, simply remove the desired portion from the freezer and let it thaw at room temperature. Slices will thaw in a few hours, while a whole loaf may take overnight. You can also gently warm thawed slices in the microwave (for a few seconds) or in a low oven (around 300°F/150°C for 5-10 minutes) for a “freshly baked” experience.
Proper storage is essential to keeping your delicious chocolate chip pumpkin bread moist, fresh, and flavorful for as long as possible. Follow these guidelines for optimal results:
- At Room Temperature: First and foremost, ensure the bread has completely cooled to room temperature before storing. Wrap the entire loaf or individual slices tightly in plastic wrap to create an airtight seal. Then, place it in an airtight container or a large resealable bag. Stored this way, the bread will remain fresh and moist at room temperature for up to 4 days.
- In the Refrigerator: If you need to store it longer than a few days, or if your kitchen is particularly warm and humid, refrigerate the tightly wrapped bread in an airtight container for up to 1 week. Be sure it’s well-sealed to prevent it from drying out or absorbing unwanted odors from other foods in the refrigerator.
- Manage Moisture: Pumpkin bread is naturally very moist. If you notice any condensation forming inside your container, you can place a fresh piece of paper towel on top of the bread (under the lid) to absorb excess moisture. Change the paper towel daily if needed to prevent sogginess.
- Avoid Direct Sunlight/Heat: Always store your bread in a cool, dry place away from direct sunlight or heat sources, as these can accelerate spoilage and drying.
Absolutely! This chocolate chip pumpkin bread recipe is wonderfully versatile and responds beautifully to additional mix-ins, allowing you to customize it to your personal preferences. You can easily add other ingredients to enhance flavor and texture. Popular additions include:
- Chopped Nuts: Walnuts or pecans are classic choices that add a delightful crunch and an earthy, nutty flavor that pairs perfectly with pumpkin and chocolate. Fold in about 1/2 to 1 cup of chopped nuts with the chocolate chips.
- Dried Fruits: Dried cranberries, golden raisins, or finely chopped dried apricots can introduce a lovely chewy texture and a subtle tart sweetness that complements the rich flavors of the bread. Add 1/2 to 1 cup with the chocolate chips.
- Additional Spices: If you desire a more complex or intense spice profile, a tiny pinch of ground ginger, cloves, or allspice can further enhance the warm, autumnal notes. Add sparingly to taste.
- Coconut Flakes: Toasted coconut flakes can add a unique tropical twist and a lovely texture. Fold in about 1/2 cup with the chocolate chips.
- Zest: The zest of an orange or lemon can brighten up the flavors beautifully, adding a fresh aromatic note.
Just be mindful not to overcrowd the batter with too many additions (keep the total amount of mix-ins to around 1.5 cups), as this can affect the loaf’s texture, rise, and overall baking time. Experiment and find your favorite combination!
To achieve perfect, clean slices of your moist pumpkin bread without it crumbling or falling apart, especially with all those delicious chocolate chips, follow these essential tips:
- Ensure it’s Fully Cooled: This is the single most important factor. Warm quick bread is very delicate, and its internal structure is still setting. Attempting to slice it while warm will almost certainly result in crumbling and a squashed texture. Allow your loaf to cool completely on a wire rack for at least 2-3 hours, or even longer (overnight is ideal if you can resist!). The flavors also meld beautifully as it cools.
- Use a Serrated Knife: A long, sharp serrated knife is your best tool for slicing quick breads. The “sawing” motion of a serrated blade cuts through the tender crumb without squishing or tearing it, which can happen with a straight-edged knife.
- Apply Gentle Pressure: When slicing, apply gentle, even pressure and use a back-and-forth sawing motion rather than pressing straight down. Let the knife do the work.
- Clean Your Knife Between Slices: If your bread is particularly moist or has a high concentration of melty chocolate chips, the knife might get sticky. Wipe the blade clean with a damp cloth between each slice for neater, more precise cuts.
- Consider Chilling Briefly: For extremely neat slices, you can briefly chill the completely cooled loaf in the refrigerator for 30 minutes before slicing. This can help firm up the bread and make it easier to cut clean lines.
We sincerely hope you love this easy and incredibly moist Chocolate Chip Pumpkin Bread as much as we do. It’s truly a quintessential taste of autumn, perfect for sharing with family and friends, or simply savoring a quiet moment. Happy baking, and enjoy every flavorful bite!
Loved This Recipe? Share Your Thoughts Below!
Your feedback helps us create more delicious content and connect with fellow bakers.