

Mastering Homemade Swig Sugar Cookies: A Soft, Chewy, and Irresistible Treat
These homemade Swig Sugar Cookies offer a delightful and unique twist on traditional sugar cookies. Celebrated for their incredibly soft, delightfully chewy, and satisfyingly thick texture, each cookie is generously topped with a luscious layer of frosting, creating an irresistible dessert perfect for any occasion.
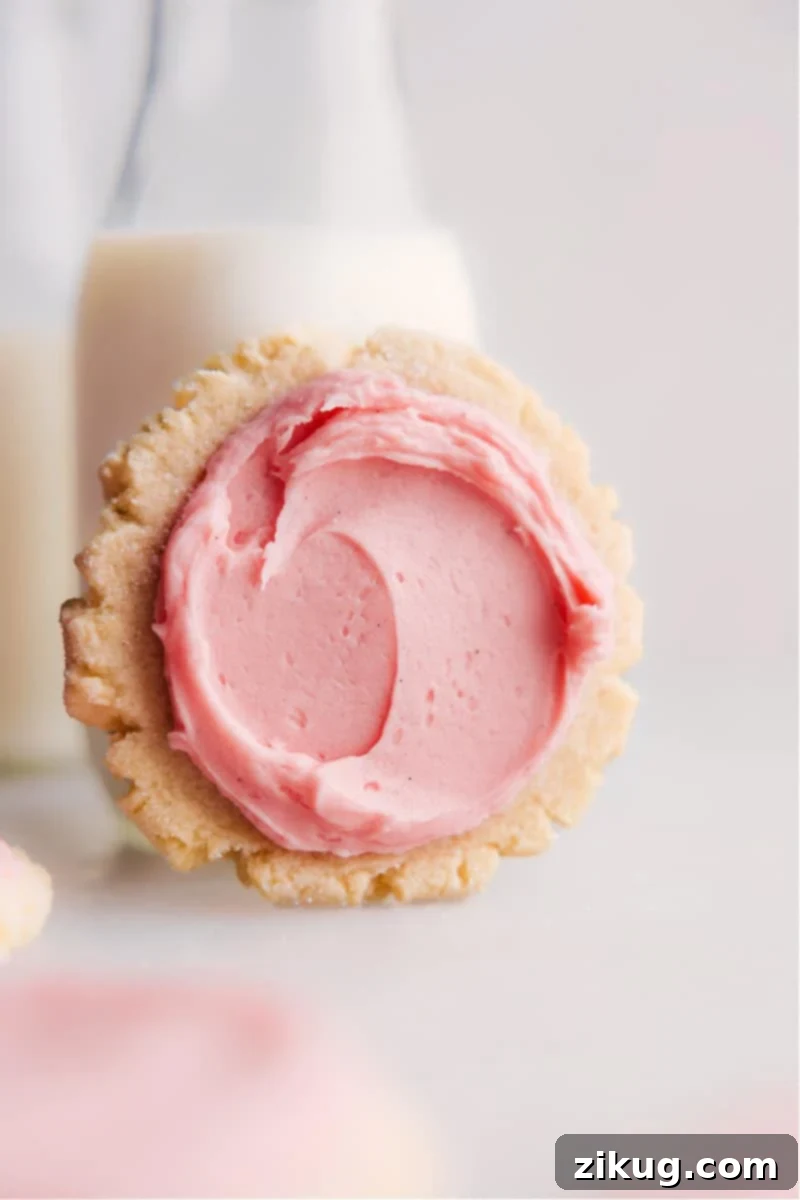
What Are Swig Sugar Cookies? A Beloved Culinary Phenomenon from Utah
Swig® is a renowned drive-thru drink and snack shop that originated in Utah, gaining immense popularity for its distinctive and utterly addictive sugar cookies. What began as a local sensation quickly expanded into a regional, and now national, culinary trend, with Swig locations making their way far beyond their Utah roots. These aren’t just ordinary sugar cookies; they possess a unique texture and flavor profile that truly sets them apart from typical sugar cookie recipes.
The hallmark of a Swig sugar cookie is its exceptionally soft, thick, and chewy consistency, accompanied by a subtle tang. This characteristic texture is largely attributed to a special combination of leavening agents, typically including both baking soda and cream of tartar, which work in harmony to help the cookies rise beautifully and puff up during baking. This careful balance ensures a substantial yet tender cookie that practically melts in your mouth.
In addition to their unique dough, Swig sugar cookies are instantly recognizable by their signature “Swig” mark. This gentle indentation is formed by pressing the bottom of a glass into the unbaked cookie dough. This ingenious technique creates a slightly flattened center with a charming raised edge, forming the perfect well to cradle a generous, thick layer of creamy frosting. This ensures that every single bite delivers an ideal combination of the tender cookie and its delightful sweet topping.
The Science of Softness: Exploring the Swig Cookie Texture
The distinctive soft, chewy, and slightly tangy texture of Swig Sugar Cookies is no accident; it’s a testament to clever baking science, particularly the strategic use of leavening agents. Unlike many traditional sugar cookies that might rely solely on baking powder, Swig cookies frequently incorporate both **baking soda** and **cream of tartar**. This specific combination is pivotal to achieving their signature rise and unique flavor profile.
Baking soda, being an alkali, requires an acid to activate and produce carbon dioxide gas, which is responsible for the lift in baked goods. Cream of tartar, a mild acid, provides this essential acidic environment, allowing the baking soda to react effectively and create a rapid leavening action. This synergistic effect helps the cookies to puff up quickly and evenly, contributing significantly to their impressive thickness and soft crumb. Furthermore, the cream of tartar imparts a subtle, pleasant tanginess that beautifully complements the sweetness of both the cookie and its rich frosting, preventing the overall taste from being overly sweet or cloying. This precise balance of leavening and flavor is what truly elevates a Swig Sugar Cookie to its legendary status, making it a textural and taste sensation.
How to Bake the Best Swig Sugar Cookies: Essential Tips for Success
Achieving consistently perfect Swig Sugar Cookies is a rewarding culinary endeavor. By paying close attention to these critical baking tips, you can ensure your cookies are always exceptionally soft, delightfully chewy, and utterly delicious.
-
Ensure All Ingredients are at Room Temperature
This foundational step is paramount, especially when working with butter and eggs. Butter at a genuine “room temperature” (approximately 65-68°F or 18-20°C) creams optimally with sugar, incorporating air that results in a lighter, fluffier cookie dough. If the butter is too cold, it won’t blend smoothly, leading to a lumpy dough and potentially dense cookies. Conversely, if it’s too warm or melted, the dough becomes greasy, which can cause the cookies to spread excessively during baking. Room temperature eggs also emulsify better with fats, contributing to a smoother, more uniform dough structure.
-
Avoid Over-Mixing Your Dough
Once you’ve added the dry ingredients—flour, baking soda, cream of tartar, and salt—to your wet mixture, it’s crucial to mix just until everything is combined. Over-mixing activates and develops the gluten in the flour excessively, which can result in tough, dense cookies rather than the desired soft and chewy texture. Mix on the lowest speed until you no longer see streaks of dry flour, then stop immediately. Even a few extra seconds of mixing can noticeably compromise the final texture of your cookies.
-
Invest in High-Quality Ingredients
When a recipe uses a relatively small number of components, the quality of each ingredient truly shines through. Opting for high-quality unsalted butter and pure vanilla extract can dramatically elevate the flavor and aroma of your Swig Sugar Cookies. Pure vanilla extract delivers a complex, deep flavor that imitation versions simply cannot replicate. Similarly, good butter contributes significantly to both the cookie’s texture and its rich, authentic buttery taste.
-
Do Not Over-Bake Your Cookies
The signature softness and chewiness of Swig Sugar Cookies are achieved by baking them just right, meaning they should appear slightly under-baked when removed from the oven. Watch them carefully; take them out when the edges are set and have just begun to turn a very pale golden color, while the centers still look soft and slightly pale. The residual heat on the baking sheet will continue to cook the cookies gently as they cool, allowing them to firm up to perfection. Over-baking is the quickest way to end up with dry, hard cookies.
-
Achieve the Perfect Cookie Size and Shape
Consistency in the size of your cookie dough balls is essential for even baking and achieving the authentic Swig texture. For this recipe, aim for tightly packed balls of dough, each weighing approximately 40 grams (or about 2 packed tablespoons). While this may seem large, it’s the ideal size to ensure the cookies bake up thick and substantial, retaining their desired chewiness. Smaller cookies tend to bake faster and can become thin and crisp. After rolling, gently press the bottom of a sugared glass into the center of each dough ball to create the characteristic “Swig” indentation, which is perfect for holding a generous amount of frosting.
-
Utilize a Dark-Colored Sheet Pan
Through extensive testing, we’ve found that baking Swig Sugar Cookies on a dark-colored sheet pan consistently yields superior results compared to lighter, shiny pans. Darker pans absorb heat more effectively, which promotes more even baking and slightly quicker cooking times. Lighter, reflective pans tend to bounce heat away, potentially leading to longer baking times and less uniform results, where cookie edges might be undercooked or centers remain too soft. Using a dark pan helps ensure your cookies achieve that perfect slightly golden bottom and tender, soft center every single time.
-
Cool Completely Before Frosting
Patience is truly a virtue, especially when it comes to frosting your cookies. It is absolutely paramount that your cookies cool down completely to room temperature before you apply any frosting. If the cookies retain even a hint of warmth, the frosting will begin to melt, turning runny and making it impossible to achieve that beautiful, thick, and stable layer that these cookies are known for. Transfer them to a wire cooling rack and allow them at least an hour, or more, until they are entirely cool to the touch.
Precision Baking: Why a Kitchen Scale is Your Best Friend
Achieving consistently perfect Swig Sugar Cookies, or any baked good for that matter, often hinges on precise ingredient measurements. This is where a reliable kitchen scale proves to be an indispensable tool. Measuring flour, in particular, is notoriously inconsistent when relying on volume measures like measuring cups.
Different methods of scooping flour—whether directly from a bag or container, or carefully spooning it into a cup and leveling—can result in wildly varying amounts of flour. Scooping directly often compacts the flour, leading to significantly more than intended, while a light spooning might yield too little. These discrepancies can dramatically impact the final texture of your cookies:
- Too much flour can result in cookies that are dry, dense, and crumbly, losing their characteristic softness and chewiness. They may also resist spreading properly during baking.
- Too little flour can cause the cookies to spread excessively thin, becoming greasy, brittle, and lacking the desired thick, substantial body.
By using a kitchen food scale to measure flour and other dry ingredients by weight (grams), you eliminate these inconsistencies entirely, ensuring you use the exact amount specified in the recipe every single time. This level of accuracy guarantees consistent and reliable results, which is paramount for a recipe like Swig Sugar Cookies where a specific texture and consistency are key to its appeal.
Beyond ingredients, a kitchen scale is also incredibly beneficial for portioning out your cookie dough balls. By measuring each ball to the recommended 40 grams, you ensure that every cookie is uniform in size. This not only creates a visually appealing batch but, more importantly, guarantees that all cookies bake evenly. You won’t have to worry about some cookies being over-baked while others remain underdone. If you own a food scale, we highly recommend switching to the “Metric” measurements on the recipe card and utilizing the gram weights for the most accurate and reliable baking experience. Investing in a good kitchen scale will undoubtedly revolutionize your baking, ensuring perfectly consistent and delicious results every single time.
Flavorful Variations and Creative Toppings for Your Swig Sugar Cookies
While the classic Swig Sugar Cookie, with its signature vanilla frosting, is a beloved favorite, there’s plenty of room to let your creativity shine and customize this recipe to perfectly match your preferences or a special occasion. Feel free to experiment and make these cookies uniquely your own!
-
Customize the Cookie Dough Itself
Infuse your cookie dough with different flavor profiles to create exciting new taste sensations. Consider adding the vibrant zest of various citrus fruits like lemons, limes, or oranges for a bright, tangy undertone. Spices can also introduce wonderful warmth and depth; a hint of ground cinnamon, a touch of apple pie spice, or a dash of pumpkin pie spice can transform the cookie into a delightful seasonal treat. For more distinct flavors, experiment with different extracts such as lemon extract, peppermint extract (ideal for the holidays!), or even a subtle hint of rum extract for a more sophisticated twist.
-
Experiment with Frosting Flavors and Toppings
The frosting provides another fantastic canvas for creative expression. While the traditional vanilla buttercream is undeniably delicious, explore other delightful frosting options. A rich cream cheese frosting can add a lovely tang and extra richness, while a fruit-flavored frosting (achieved with fruit purées or extracts) can introduce a vibrant and refreshing dimension. Don’t hesitate to dye your frosting any color imaginable using gel food coloring to match a specific theme, season, or simply to add a cheerful burst of color. To elevate your cookies even further, get playful with toppings! Sprinkles are always a hit, adding both color and a slight textural crunch. Finely chopped nuts, such as pecans or walnuts, can provide an earthy contrast, and crushed-up freeze-dried fruit offers intense natural flavor and a beautiful, rustic hue. These creative additions will make your Swig Sugar Cookies both fun to look at and incredibly delicious to eat.
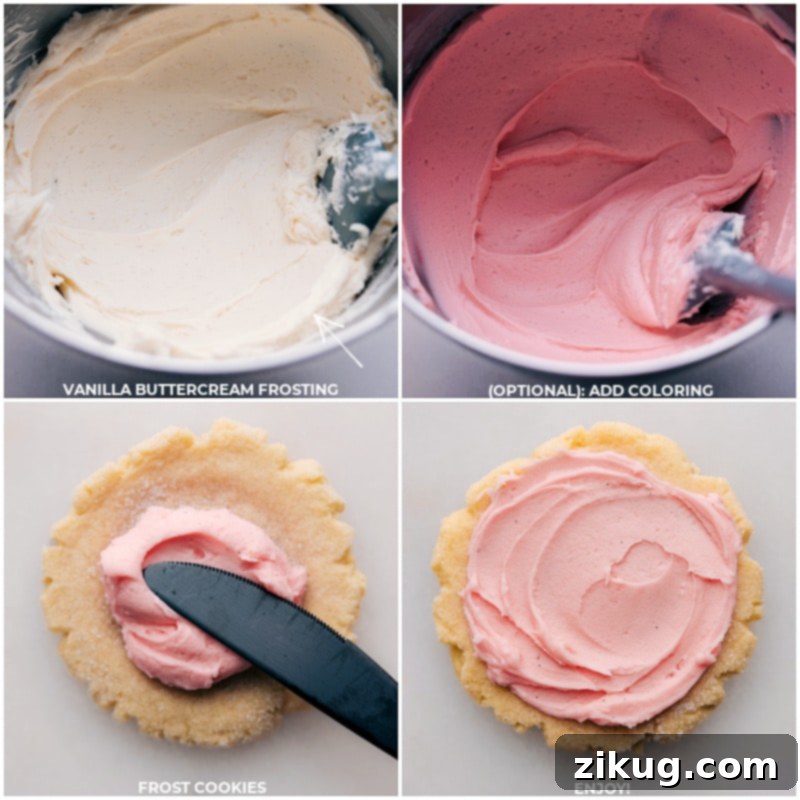
Crafting the Perfect Swig Sugar Cookie Frosting: Tips for a Luscious Topping
The thick, creamy, and subtly tangy frosting is as integral to the Swig Sugar Cookie experience as the cookie itself. Achieving that ideal spreadable consistency and rich flavor is paramount for an authentic result. Follow these expert tips to master your Swig Sugar Cookie frosting:
-
Properly Soften the Butter
As with the cookie dough, using true room temperature butter is crucial for the frosting. The butter should be soft enough to leave a slight indentation when pressed with a finger, but it must not be melted or greasy. If your butter is too cold, your frosting will likely be lumpy and difficult to whip into a smooth, airy consistency. Conversely, if it’s too warm, the frosting can become runny and won’t hold its beautiful, thick shape when applied to the cookies.
-
Sift the Powdered Sugar for Ultimate Smoothness
Powdered sugar frequently contains small clumps, which can result in a noticeably gritty frosting texture. To ensure your frosting is incredibly silky-smooth and uniform, take the extra step to sift the powdered sugar before you incorporate it into the creamed butter. While it might seem like a minor detail, this step makes a significant difference in the luxurious mouthfeel of your finished frosting.
-
Add Cream Gradually for Ideal Consistency Control
When you’re incorporating the heavy cream (or milk), add it slowly, one tablespoon at a time, mixing thoroughly after each addition. This allows you precise control over the frosting’s consistency. If you add all the liquid at once, you risk making the frosting too thin and runny, which will prevent it from forming that coveted thick, stable layer on your cookies. Aim for a frosting that is robust enough to hold its shape but still wonderfully spreadable.
-
Opt for Pure Vanilla Extract for Superior Flavor
Just like with the cookie dough, the quality of your vanilla extract profoundly impacts the overall flavor of the frosting. Pure vanilla extract delivers a rich, natural, and complex flavor profile that genuinely elevates the frosting. It’s best to avoid imitation vanilla extract, which often has an artificial taste that can detract from the homemade quality of your delicious treat.
-
Adjust Consistency as Needed
Baking is often an art of observation and adjustment. If your frosting appears too thick or stiff, simply add a tiny bit more cream or milk, a teaspoon at a time, mixing well until you achieve your desired smooth, spreadable consistency. Conversely, if the frosting becomes too thin, gradually mix in more confectioners’ sugar, a tablespoon at a time, until it thickens up. Don’t be hesitant to make small adjustments to reach frosting perfection.
-
Chill the Frosting Before Spreading
If your kitchen is particularly warm or if your frosting feels a bit too soft after mixing, a quick chill can perform wonders. Place the bowl of frosting in the refrigerator for about 20-30 minutes. This chilling period will help it firm up slightly, making it significantly easier to spread evenly and ensuring it maintains its beautiful, thick shape on top of your cooled cookies.
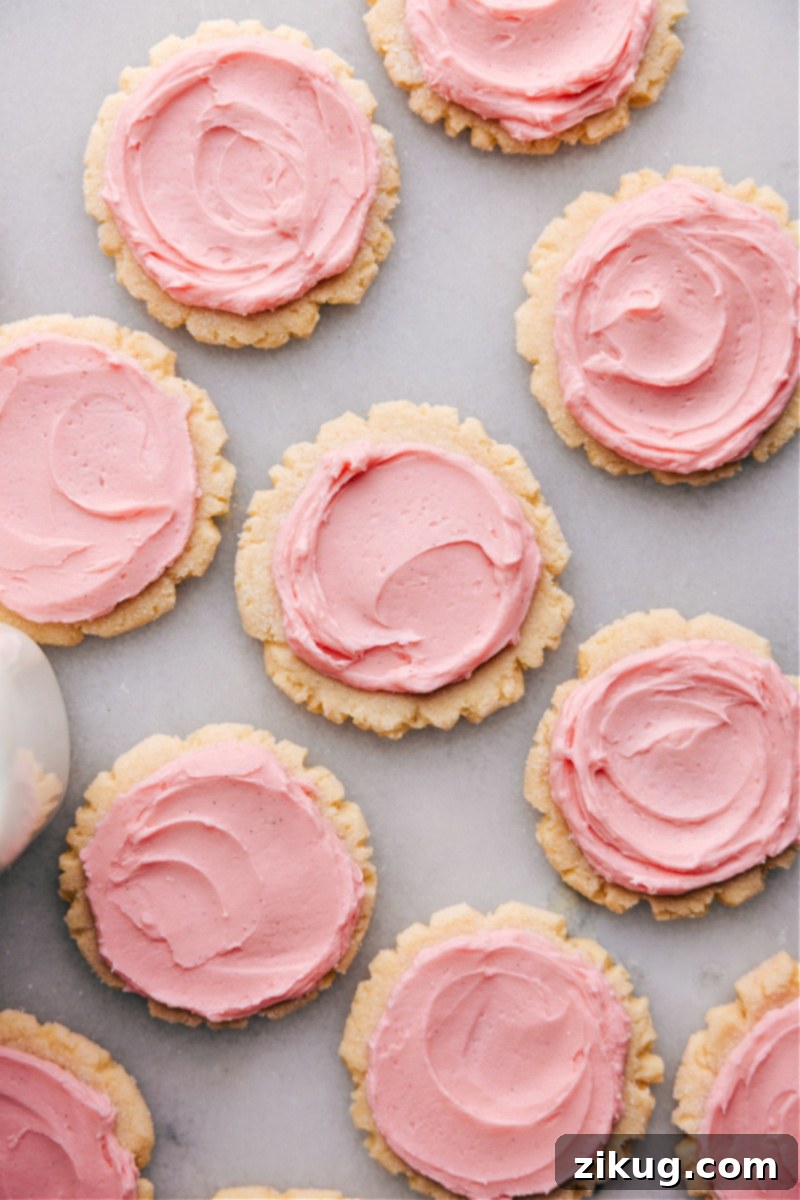
Storing Your Swig Sugar Cookies for Lasting Freshness
To ensure your homemade Swig Sugar Cookies remain as delicious as possible, proper storage methods are crucial. These cookies are wonderfully fresh and moist when first baked, and with the right care, they can retain their delightful qualities for several days.
-
Optimal Room Temperature Storage
For short-term enjoyment, it is best to store frosted Swig Sugar Cookies in an airtight container at room temperature. Under these conditions, they will typically maintain their soft, chewy texture and delicious flavor for approximately 2-3 days. If you need to stack multiple layers of cookies, place a sheet of parchment paper between each layer to protect the frosting’s appearance. It’s generally advisable to avoid refrigerating frosted cookies unless absolutely necessary, as the cold can sometimes cause the cookies to dry out and the frosting to harden excessively.
-
The Best Method: Freezing Cookie Dough for Extended Preservation
If you plan to bake a batch ahead of time or wish to save some for future enjoyment, freezing the cookie dough is by far the superior method compared to freezing baked cookies. Freezing pre-baked and frosted cookies can often compromise the delicate texture of both the cookie and its frosting upon thawing. To effectively freeze the dough:
- First, form the cookie dough into individual balls, ensuring they are the correct recommended size (e.g., 40 grams each) for consistent results.
- Gently press the bottom of a glass into each dough ball to create the signature “Swig” indentation.
- Arrange these shaped cookie dough “pucks” on a baking sheet lined with parchment paper, making sure they are spaced apart and not touching each other.
- Place the entire baking sheet into the freezer until the dough pucks are completely solid, which usually takes about 1-2 hours.
- Once frozen solid, transfer the dough pucks to a freezer-safe airtight container or a heavy-duty freezer bag. Be sure to label the container with the date. The cookie dough can be safely frozen and stored for up to 3 months.
-
Baking Directly from Frozen Dough
When you’re ready to enjoy freshly baked Swig Sugar Cookies, there’s no need to thaw the dough beforehand! Simply arrange the frozen cookie dough pucks on your prepared baking sheet and bake them according to the recipe’s instructions. You may need to add an extra 2-4 minutes to the specified baking time to account for their frozen state. Bake until the edges appear lightly golden and set, while the centers still look soft and slightly pale. Allow the cookies to cool completely on a wire rack, then prepare a fresh batch of frosting and generously apply it for a truly fresh-baked and delightful experience.
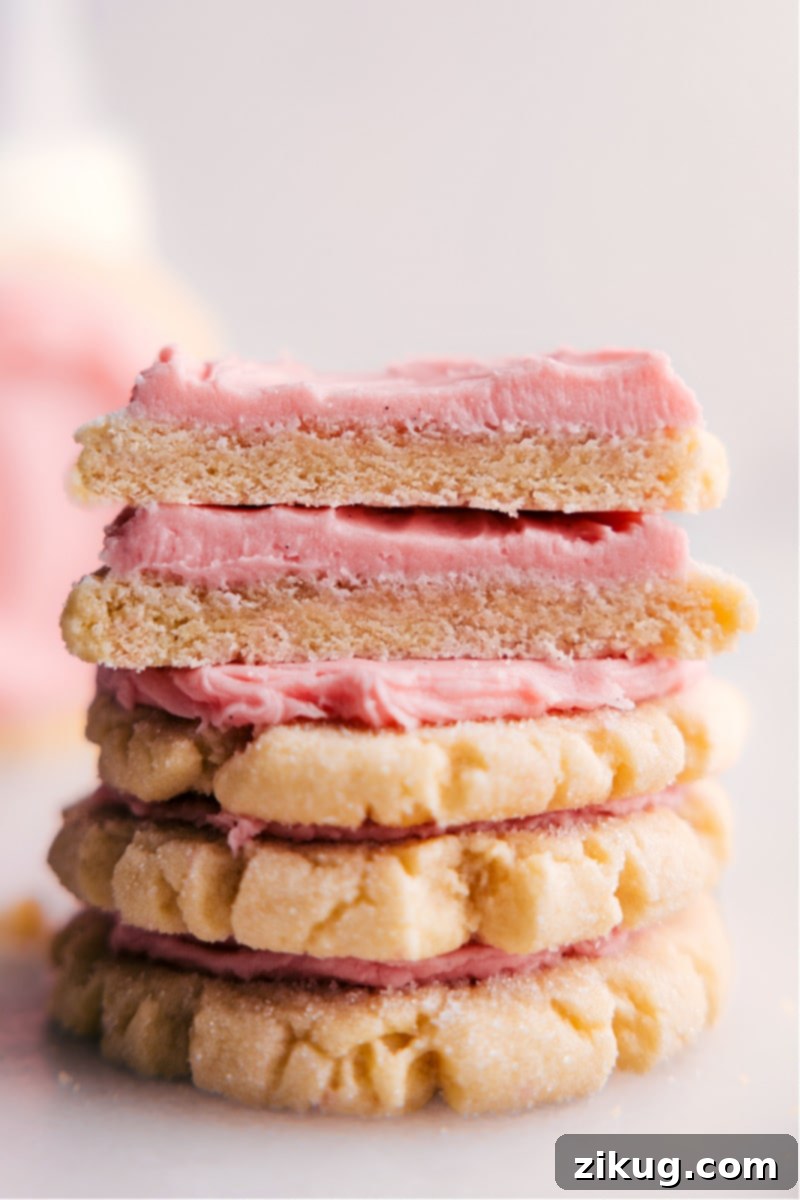
Frequently Asked Questions About Swig Sugar Cookies
Here are answers to some common questions that arise when making these incredibly delicious Swig Sugar Cookies:
-
Can I prepare the cookie dough in advance?
Yes, absolutely! The cookie dough can be prepared and refrigerated for up to 2-3 days before you plan to bake. Ensure the dough is tightly wrapped in plastic wrap to prevent it from drying out. When you’re ready to bake, you might need to let the dough sit at room temperature for about 10-15 minutes to soften slightly before it becomes pliable enough to roll and shape, especially if it’s very firm from refrigeration.
-
What if I don’t have cream of tartar on hand?
Cream of tartar plays a significant role in achieving the signature tangy flavor and unique soft, chewy texture of Swig Sugar Cookies. While some recipes might suggest substitutes like baking powder, for the most authentic Swig cookie experience, cream of tartar is highly recommended. If you absolutely cannot find it, you might try substituting it with lemon juice or white vinegar (for every 1/2 teaspoon of cream of tartar, use 1 teaspoon of lemon juice or white vinegar), but please note that the resulting flavor and texture might be slightly different.
-
Why did my cookies spread out too much during baking?
Several factors can contribute to cookies spreading excessively. Common culprits include butter that is too soft or melted, overmixing the dough (which overdevelops gluten), using too little flour, or an oven that isn’t accurately preheated to the correct temperature. To prevent spreading, always ensure your butter is at room temperature but not greasy, measure your flour precisely (preferably with a kitchen scale), and allow your oven to fully preheat. Additionally, chilling the shaped dough balls for 15-30 minutes before baking can significantly help prevent unwanted spreading.
-
Can I use different flavored extracts in the frosting?
Yes, certainly! While classic vanilla is the traditional choice, feel free to get creative and experiment with other extracts in your frosting. Almond, lemon, peppermint, or even a combination of extracts can add wonderful new dimensions. Start with a small amount and gradually add more to taste, as the intensity of extracts can vary.
-
How do I achieve the iconic light pink frosting color like original Swig cookies?
To replicate the signature light pink color of the classic Swig frosting, simply add a tiny drop of red or pink gel food coloring to your frosting after all other ingredients have been thoroughly mixed. Gel food coloring is ideal because it provides vibrant color without altering the consistency of your frosting. Mix thoroughly until you achieve your desired delicate shade.
More Delightful Utah-Inspired Recipes You’ll Love
If you’ve thoroughly enjoyed baking and tasting these Swig Sugar Cookies, you might also appreciate exploring other popular and beloved recipes inspired by Utah’s unique culinary landscape:
- Utah Scones (a delicious sweet fry bread, traditionally served warm with honey butter)
- Cafe Rio Sweet Pork Recipe (a phenomenal slow-cooker favorite, perfect for crafting savory tacos, burritos, or salads)
- Strawberry Pretzel Salad (a uniquely delightful layered dessert featuring a harmonious salty-sweet crunch and creamy center)
- Funeral Potatoes (a classic comforting, cheesy potato casserole topped with a crispy, crunchy crust)
- Crumbl Oreo Cookies (a fantastic homemade rendition inspired by another famous Utah cookie company!)

Swig Sugar Cookies
By Chelsea Lords
These homemade Swig Sugar Cookies are soft, chewy, and thick, thanks to a unique blend of baking soda and cream of tartar. Topped with a rich layer of frosting, they’re the perfect sweet treat!
Prep Time: 39 minutes
Cook Time: 10 minutes
Total Time: 49 minutes
Servings: 22 large cookies
Print Recipe
Equipment
- Large sheet pan (15″ x 21″)
- Stand mixer with paddle attachment, or large bowl and hand mixer
- Food scale (optional, but highly recommended, see note 1)
- Silicone baking mat or parchment paper
- Cooling rack
Ingredients
For the Cookies:
- 8 tablespoons unsalted butter, at room temperature
- 1-1/4 cup granulated sugar, divided
- 1/2 cup powdered sugar
- 1 large egg
- 1-1/2 teaspoons vanilla extract
- 1/4 teaspoon almond extract or coconut extract (optional)
- 1/3 cup vegetable oil or canola oil
- 3/4 teaspoon salt
- 1/2 teaspoon cream of tartar
- 1/2 teaspoon baking soda
- 3 cups all-purpose flour
For the Frosting:
- 16 tablespoons unsalted butter, at room temperature
- 4-1/2 cups powdered sugar
- 2 teaspoons vanilla extract or 1 teaspoon vanilla bean paste
- 1/8 teaspoon salt
- 4 tablespoons heavy cream, plus extra to use as needed
- Red food coloring (optional, to make frosting pink)
Instructions
- Preheat oven to 350°F (175°C). Line a large dark-colored sheet pan with parchment paper or a silicone liner. (If using a light-colored sheet pan, add 2–4 minutes to the baking time).
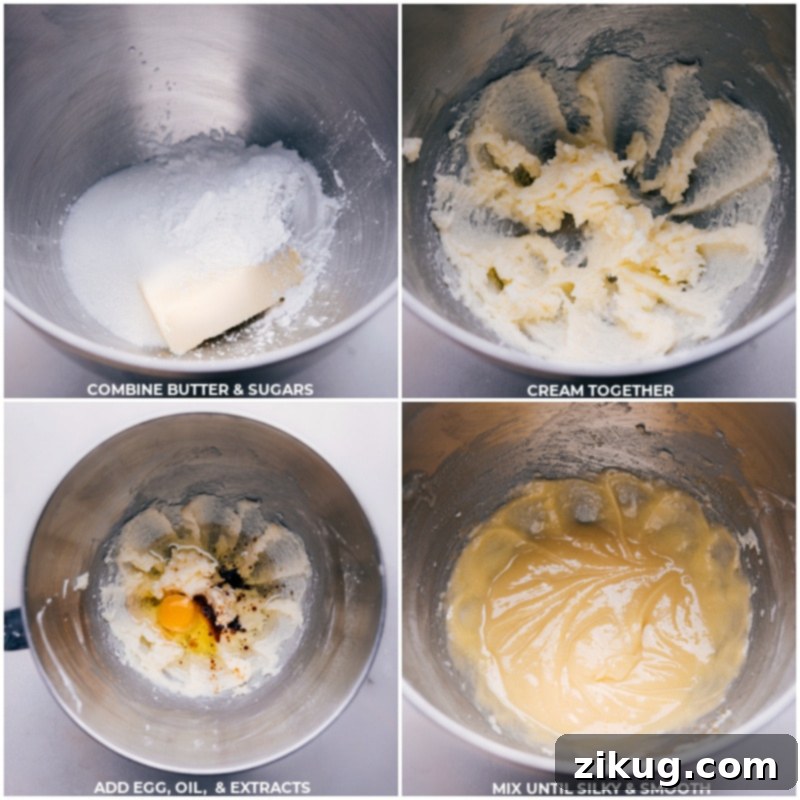
- Using a stand mixer fitted with a paddle attachment (or a large bowl and hand mixer), cream butter, 2/3 cup granulated sugar, and powdered sugar until smooth and creamy. Add egg, vanilla, almond extract (if using), and vegetable oil. Beat at medium speed, scraping sides as needed, until creamy and silky-smooth.
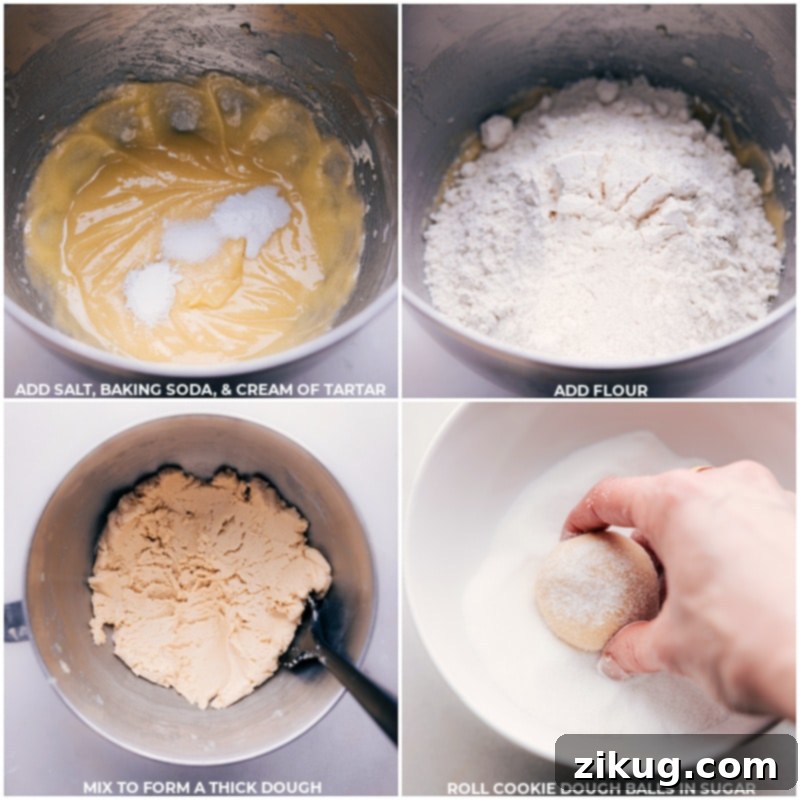
- Add baking soda, cream of tartar, salt, and flour on top. Beat on low until integrated, then increase speed and beat until a smooth dough is formed. Do not overmix.
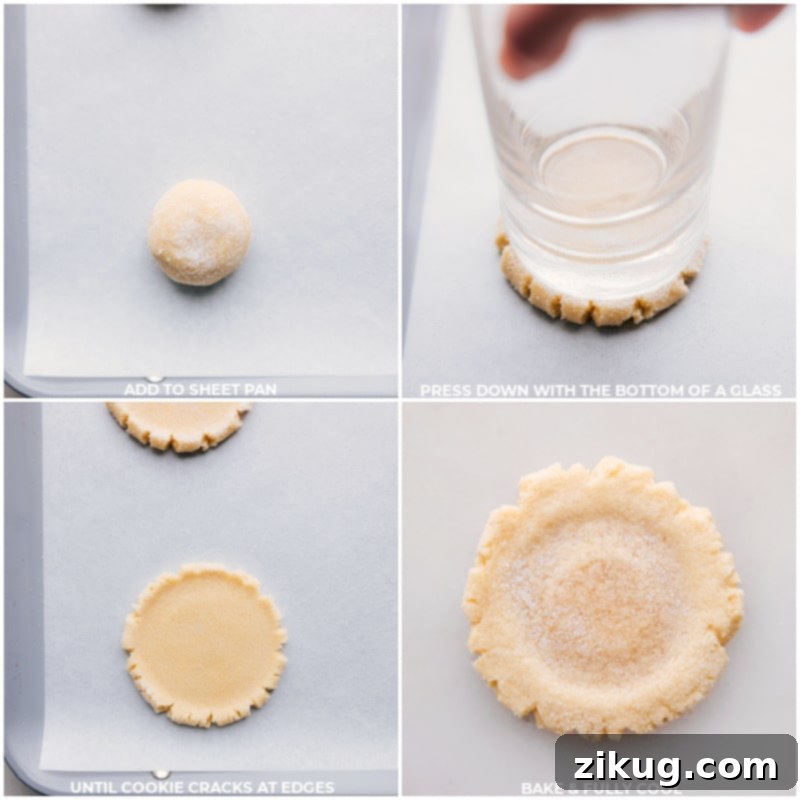
- Roll even-sized dough balls (2 tightly packed tablespoons or 40 grams each). Add remaining 1/2 cup granulated sugar to a small bowl. Roll balls in the sugar and generously space them apart on the lined sheet pan (bake only 6 at a time to prevent overcrowding). Dip the bottom of a glass into the sugar, then press into the center of each cookie until the edges crack a bit. (If the dough feels overly soft or warm, place the tray of cookie dough in the freezer for 15 minutes before baking to prevent excessive spreading.)
- Bake for 8–10 minutes. The cookies will not brown significantly and should look almost undercooked in the center, but the bottom should be slightly golden and dry when gently lifted with a metal spatula. Immediately after removing from the oven, you may need to gently press the cup into the tops of the cookies again if they puffed up too much. (Be careful not to press down too hard.) Let cookies stand on the sheet pan for 5 minutes before carefully transferring them to a cooling rack. Allow them to cool completely before frosting, as warm cookies are fragile and will melt the frosting. Repeat with remaining dough until all cookies are baked.
- Prepare frosting while cookies are cooling: Using a stand mixer with a paddle attachment, beat butter on medium speed until creamy, about 2 minutes. Add 4½ cups powdered sugar, vanilla, and salt. Mix on low speed. Gradually pour in 1 tablespoon of heavy cream at a time (start with 4 tablespoons total), and mix on medium-high speed until all ingredients are integrated and smooth. Scrape sides and bottom of the bowl as needed. Once integrated, add food coloring (if using) and beat on medium-high speed for 2 minutes until smooth and creamy. Taste and adjust as desired (add more cream for a thinner consistency, or more powdered sugar if too soft). If the frosting feels too soft, chill it for 10–15 minutes before frosting.
- Gently frost the completely cooled cookies using a table knife or an off-set spatula. Aim for a nice, thick layer of frosting. You will likely have about 1 cup of extra frosting, which can be used on pancakes, waffles, or a small batch of cupcakes. Enjoy your delicious homemade Swig Sugar Cookies!
Recipe Notes
Note 1: A food scale is an invaluable tool for precise measurements, especially for flour, ensuring consistent results in baking. Use the gram measurements listed under the “Metric” option if you have one. It’s also great for portioning cookie dough balls for even baking.
Note 2: Using room-temperature butter is crucial for both the cookies and the frosting, contributing to a smoother texture. Butter should be firm but pliable, not melted or greasy. Too-cold butter prevents proper creaming; too-warm butter can cause cookies to spread excessively.
Storage: Cover cookies tightly and store them at room temperature for 2–3 days for best freshness. For longer storage, freeze unbaked cookie dough pucks instead of baked cookies. Refer to the “Storing Your Swig Sugar Cookies for Lasting Freshness” section in the blog post for detailed freezing instructions.
Nutrition Information
Nutrition information is an approximation and will vary based on ingredients used and serving size.
- Serving: 1 cookie
- Calories: 371 kcal
- Carbohydrates: 52 g
- Protein: 2 g
- Fat: 18 g
- Saturated Fat: 10 g
- Polyunsaturated Fat: 3 g
- Monounsaturated Fat: 4 g
- Trans Fat: 1 g
- Cholesterol: 46 mg
- Sodium: 124 mg
- Potassium: 41 mg
- Fiber: 0.5 g
- Sugar: 38 g
- Vitamin A: 455 IU
- Vitamin C: 0.02 mg
- Calcium: 10 mg
- Iron: 1 mg