

Tuna Patties are a weeknight dinner hero, offering a delightful combination of crispy exterior and a wonderfully soft, flavorful interior. This quick, easy, and incredibly family-friendly recipe transforms simple canned tuna into a crave-worthy meal that’s perfect when paired with a refreshing coleslaw and a zesty, homemade tartar sauce. Forget dry, bland tuna cakes; these homemade tuna patties are designed for maximum taste and the ideal texture every single time, making them a fantastic healthy dinner option.


Author’s Note
From Can to Crave-Worthy: The Magic of Tuna Patties!
I’m constantly amazed by the culinary potential hidden within a humble can of tuna. It’s truly one of the best ingredient hacks for quick, delicious, and budget-friendly meals. From elegant tuna sushi stacks to comforting tuna casserole and vibrant Mediterranean tuna salad, the possibilities are endless.
So, it comes as no surprise that I’m back, cracking open another can to bring you these incredibly easy and flavorful tuna patties. After perfecting my salmon burgers using canned salmon, I knew a tuna patty version was an absolute must-share. This recipe delivers on all fronts: they’re not just quick and simple to prepare, but also promise a delightful texture and rich taste that will make them an instant family favorite. The best part? You can assemble them ahead of time, making dinner prep a breeze even on the busiest evenings. Get ready to transform everyday ingredients into an extraordinary homemade meal!
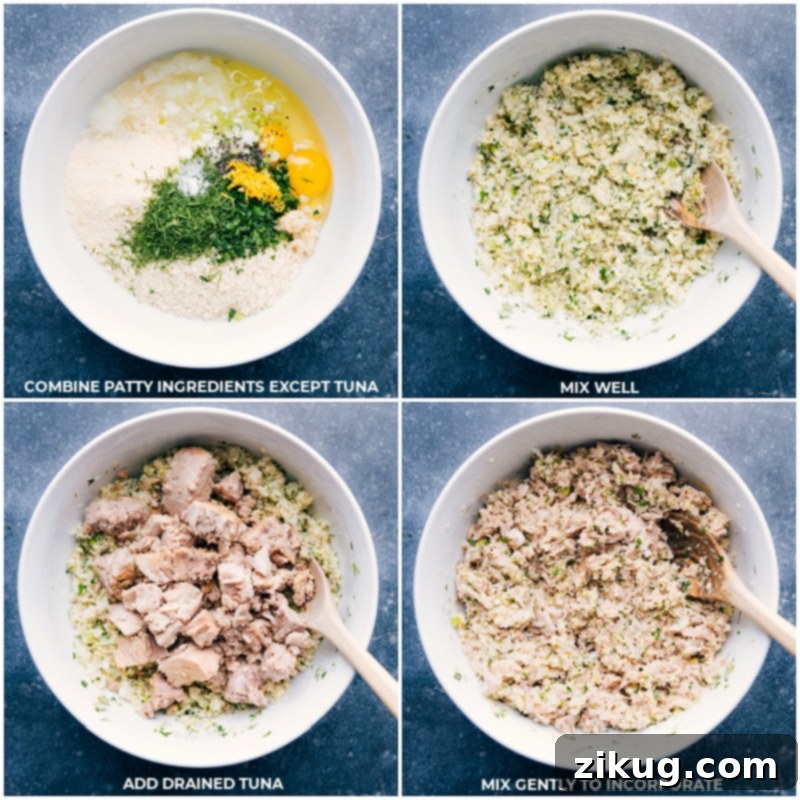
Essential Ingredients: What Makes These Tuna Patties the BEST?
While canned tuna is undoubtedly the star, the supporting cast of ingredients truly elevates these patties from good to absolutely fantastic. Each component plays a crucial role in developing their incredible flavor, texture, and overall appeal. Let’s dive deeper into the key elements:
- High-Quality Canned Tuna Packed in Olive Oil: This is arguably the most critical ingredient. Opting for premium tuna packed in olive oil, such as Genova’s® albacore tuna, makes a substantial difference. It offers a noticeably richer, more vibrant, and fresher flavor profile compared to tuna packed in water. Crucially, tuna in olive oil tends to hold its chunky, flakey shape much better within the patty blend, which is essential for that desirable, hearty texture instead of a mushy consistency. Always remember to drain it very thoroughly before mixing!
- Crispy Panko Breadcrumbs: This is where the magic happens for that perfect exterior crunch. Panko breadcrumbs are superior to regular breadcrumbs because of their larger, airier, and more irregular flake structure. This unique characteristic results in a much crunchier, crispier, lighter, and more delicate coating on your patties, providing an irresistible textural contrast to the tender interior.
- Freshly Grated Parmesan Cheese: This ingredient adds a layer of savory depth and umami. It’s vital to skip the pre-grated Parmesan found in cans, as it’s often overly salty and can easily overpower the delicate flavors of the tuna and herbs. Instead, use freshly grated Parmesan cheese, ideally with a fine, sandy-like consistency. This offers a subtle, nutty, and savory note without dominating the dish. We’ve had fantastic results with both Bella Rosa and Kraft’s grated Parmesan options found at the store.
- Aromatic Fresh Herbs: The combination of fresh herbs is what gives these tuna patties their bright, complex, and incredibly delicious taste. Our preferred trio includes fresh dill, vibrant green onions (scallions), and flavorful flat-leaf parsley. This blend creates a wonderfully nuanced flavor profile. Always opt for flat-leaf parsley over curly parsley, as the flat-leaf variety boasts a much more robust and appealing flavor.
- Onion, Paprika, and Garlic Powder: These foundational aromatics and spices provide essential savory notes and a subtle warmth. Finely grated yellow onion integrates seamlessly into the mixture, contributing moisture, a touch of sweetness, and a foundational savory base. Paprika adds a hint of mild pepperiness and a lovely color, while garlic powder ensures a consistent, savory undertone throughout each bite.
- Mayonnaise: Beyond its critical role as a binder, a good quality mayonnaise (Hellmann’s/Best Foods® is a consistent favorite for its rich flavor) adds essential moisture and a subtle tang to the patties. This ensures they are never dry or crumbly, contributing to their succulent, tender interior.
- Fresh Lemon Zest and Juice: Fresh lemon is an indispensable ingredient for balancing and brightening the flavors. The zest provides intense aromatic notes, infusing the patties with a fresh, citrusy perfume. The juice, on the other hand, cuts through the richness of the tuna and mayonnaise, adding a vibrant tang that elevates the entire dish and prevents it from feeling heavy.
Do Eggs Go In Tuna Patties? Absolutely! Here’s Why.
Yes, absolutely! Eggs are a non-negotiable and essential ingredient in our tuna patty recipe, serving multiple critical functions that ensure a perfect result every time. First and foremost, eggs act as a superb binder, coagulating during cooking to hold all the patty ingredients together. This prevents the patties from crumbling or falling apart, whether you’re pan-frying or baking them.
Beyond their structural role, eggs also contribute significantly to the overall richness, moisture, and tender texture of the patties. They help to create a succulent, juicy interior, ensuring your tuna cakes are never dry or crumbly. So, for perfectly formed, flavorful, and moist tuna patties, do not skip the eggs!
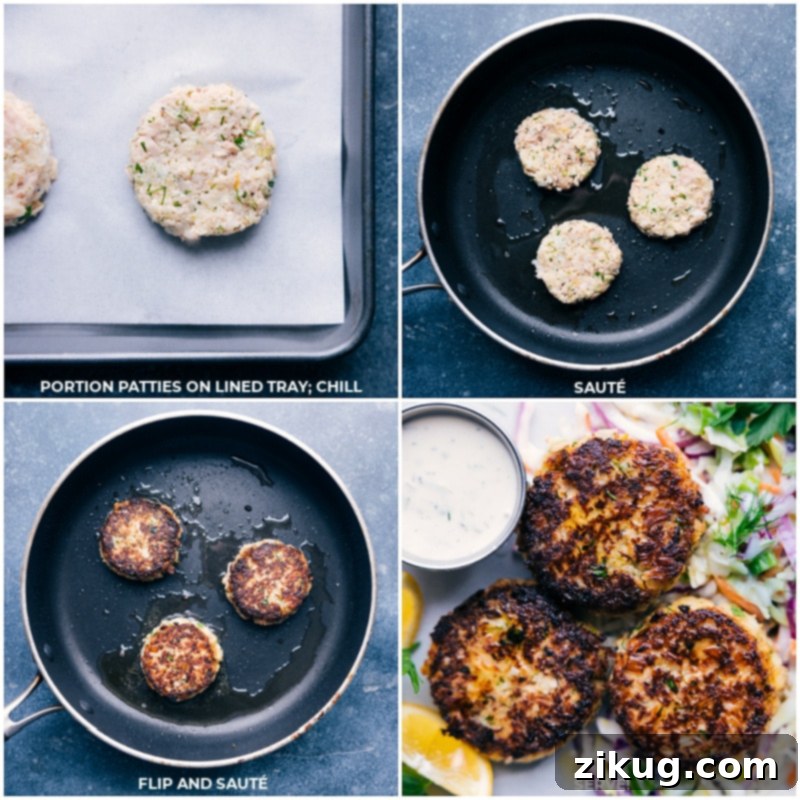
Crafting Perfect Tuna Patties: A Step-by-Step Guide
Making these crispy, flavorful tuna patties is surprisingly straightforward and incredibly rewarding. Follow these steps, incorporating our expert tips, to ensure perfect results every time:
- Prepare & Combine Initial Ingredients: Begin by gathering and prepping all your non-tuna patty ingredients. This includes your finely grated yellow onion, panko breadcrumbs, paprika, garlic powder, a generous mix of fresh chopped herbs (parsley, green onions, dill), large eggs, freshly grated Parmesan cheese, fresh lemon zest and juice, and mayonnaise. In a large mixing bowl, combine all these ingredients thoroughly. This initial careful mix ensures that all the foundational flavors and binders are evenly distributed throughout the base mixture. Don’t forget to season generously with salt and pepper to taste at this stage; we recommend starting with about 1/4 teaspoon of each.
- Gently Fold in the Tuna: Once your flavorful binder mixture is ready, add the thoroughly drained canned tuna. The crucial step here is to mix gently. You want to incorporate the tuna into the mixture without completely breaking down its beautiful, flaky chunks. Preserving these larger pieces of tuna contributes significantly to a superior, more satisfying, and less mushy texture in the finished patties. Over-mixing can lead to a dense, undesirable consistency.
- Form and Chill for Success: Using a 1/4-cup measuring scoop, firmly pack the tuna mixture, then gently form it into uniform patties, aiming for them to be just under an inch thick. This compactness is vital for them to hold their shape during cooking. Carefully place these formed patties onto your prepared parchment-lined sheet pan. Then, pop the sheet pan with the patties into the freezer and chill for a minimum of 15–20 minutes. This chilling step is a secret weapon against crumbling – the cold temperature helps to firm up the fats and binders within the mixture, making the patties much more stable and significantly easier to handle and ensuring they stay intact when they hit the hot pan. This is also the perfect time to prepare your accompanying coleslaw and homemade tartar sauce!
- Cook to Golden Perfection: You have the flexibility to either pan-fry these patties for a classic crispy exterior or bake them for a lighter, more hands-off approach (refer to Note 5 in the recipe card for baking instructions). If pan-frying, heat olive oil in a large skillet over medium-high heat until shimmering. Carefully transfer the chilled patties to the hot pan, making sure not to overcrowd it. Cook for 3–4 minutes per side, or until they develop a beautiful golden-brown and wonderfully crispy crust. Once cooked, place the patties on a paper-towel-lined plate to absorb any excess oil. Repeat the process with remaining patties, adding more olive oil to the pan as needed. Serve these golden-brown, succulent tuna patties immediately and savor every bite!
Perfect Pairings: What to Serve with Flavorful Tuna Patties
These incredibly versatile and flavorful tuna patties can be enjoyed in a multitude of ways, making them a flexible addition to your meal rotation. However, our absolute favorite and highly recommended method involves a classic, easy pairing that brings out their best qualities:
Hands-down, the most satisfying way to enjoy these tuna patties is served warm atop a crisp, refreshing bed of two-ingredient coleslaw. This simple approach keeps things wonderfully fresh and convenient. The cool, crunchy slaw provides a perfect textural and temperature contrast to the warm, savory patties. This dynamic duo is then elevated to perfection with a generous dollop of our quick homemade tangy tartar sauce. Trust us, taking those extra couple of minutes to whip up your own tartar sauce is absolutely worth it for the burst of zesty, creamy flavor it adds!
For our go-to quick coleslaw, we simply grab a bag of pre-mixed tri-colored coleslaw and a bottle of fresh, refrigerated coleslaw dressing (we highly recommend Litehouse for its creamy texture and balanced flavor, though this is not a sponsored endorsement!). Just toss the two ingredients together until the mix is thoroughly coated and reaches your desired creaminess. Refrigerate until ready to serve, and remember to toss again just before plating to re-distribute the dressing. If you’re feeling ambitious and prefer to make everything from scratch, we also have a fantastic homemade coleslaw recipe available on our site.
But the delicious possibilities for serving these tuna patties don’t end there! Here are other fantastic ways to enjoy them:
- On a Salad: Serve them warm or chilled over a vibrant bed of mixed greens, arugula, or spinach. Drizzle with a light vinaigrette for a healthy, protein-packed lunch or dinner.
- As an Appetizer or Finger Food: Form smaller, bite-sized patties and serve them with toothpicks and a dollop of tartar sauce for an elegant and easy party appetizer.
- As a Versatile Side Dish: These patties make an excellent protein-rich side dish alongside roasted vegetables, steamed greens, a simple rice pilaf, or even baked sweet potato fries.
- In a Quick Tuna Burger: For a hearty and satisfying meal, place a warm, crispy tuna patty inside a lightly toasted brioche bun. Layer with your favorite burger fixings, such as crisp lettuce, juicy tomato slices, and thinly sliced red onion. Instead of traditional mayonnaise, slather the buns with a generous spread of that zesty homemade tartar sauce for an unforgettable flavor combination!
- With Pasta or Grains: Crumble cooked patties over a simple lemon-garlic pasta or a quinoa salad for an added burst of protein and flavor.
Quick Tip: The Etymology of “Coleslaw”
Ever paused to wonder about the origin of the word “coleslaw”? It’s quite fascinating and straightforward! The Latin word for cabbage is “cole,” while the Dutch word is “kools.” Therefore, “Koolsla” is simply Dutch for “cabbage salad.” Now it all makes perfect sense, doesn’t it?

The Essential Companion: Crafting the Perfect Homemade Tartar Sauce
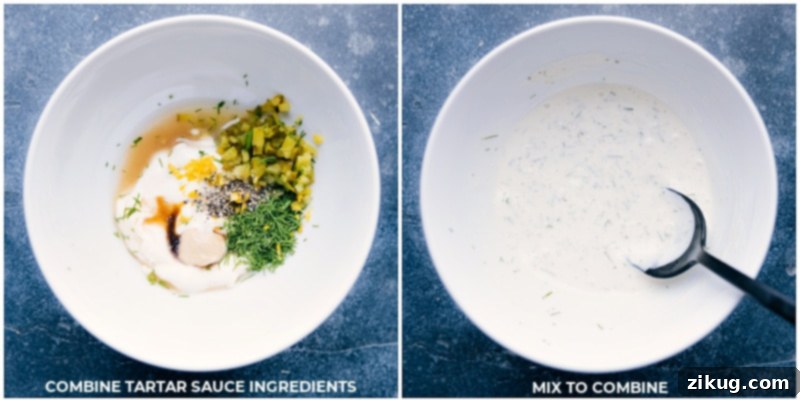
While these tuna patties are delicious on their own, preparing your own tangy tartar sauce is an absolute game-changer and comes highly recommended. It’s truly the ultimate accompaniment, transforming a great meal into an exceptional one. This homemade sauce is creamy, bursting with fresh, vibrant flavors, and offers a zesty tang that perfectly complements the savory richness of the tuna patties. A bonus? Many of the fresh ingredients used in the patties, like dill and lemon, overlap with the sauce, streamlining your prep time!
Here are a few quick tips and insights for crafting an exceptional homemade tartar sauce:
- Fresh Herbs are Key (Especially Dill): Fresh dill is a star in tartar sauce, lending a distinct, aromatic freshness. If you’re already using fresh dill for your patties, it’s fantastic to include it in the sauce too. However, if fresh dill isn’t readily available or you’re omitting it from the patties, a touch of high-quality dried herbs (dried dill is a good option) can serve as a suitable substitute, though fresh is always preferred for maximum impact.
- Choose Your Mayo Wisely for the Best Base: The foundation of any great tartar sauce is its mayonnaise. The quality of your mayonnaise significantly impacts the overall flavor and creaminess. We consistently find that a high-quality, full-fat mayonnaise like Hellmann’s/Best Foods® delivers the best results, providing a rich, emulsified base that holds all the other flavors beautifully.
- Lemon Zest and Juice for Unmatched Brightness: Do not underestimate the transformative power of fresh lemon in tartar sauce. The zest provides intense aromatic notes and a bright, citrusy perfume that awakens the palate. Meanwhile, the fresh lemon juice cuts through the richness of the mayonnaise and other ingredients, adding a vibrant tang that balances the flavors. We highly recommend using a microplane to achieve a super fine zest for maximum aromatic impact, and then following up with a reliable citrus juicer to extract every last drop of tangy juice. These two tools make prep a breeze and truly enhance the sauce’s flavor profile.
- Sweet Pickle Relish and Dijon Mustard for Complexity: Sweet pickle relish adds a lovely sweet-and-sour crunch, providing both flavor and textural interest. The brine from the relish also contributes to the sauce’s tangy profile. A hint of Dijon-style mustard (Grey Poupon is a classic choice) provides a subtle, sophisticated kick and helps to emulsify the sauce, ensuring a smooth, cohesive consistency.
- Make Ahead for Enhanced Flavor: Like many sauces, tartar sauce benefits immensely from a little time for the flavors to meld. Preparing it an hour or even a day in advance allows the ingredients to harmonize, resulting in a deeper, more cohesive, and even more delicious sauce. Store it covered in the refrigerator until ready to serve.

Troubleshooting: How to Prevent Tuna Patties from Falling Apart
One of the most common frustrations encountered when making homemade patties is having them crumble or disintegrate in the pan. Nobody wants a messy, broken tuna cake! Fear not, with a few simple yet effective techniques, you can ensure your tuna patties stay perfectly intact, hold their beautiful shape, and cook to crispy perfection every single time:
- Utilize Robust Binders: Binders are the glue that holds your patties together, and in this recipe, we strategically employ two powerhouse binders: two large eggs and a couple of tablespoons of mayonnaise. The eggs provide protein coagulation that sets during cooking, creating a strong internal structure. The mayonnaise not only adds rich flavor and moisture but also acts as an excellent emulsifier and binder. It is crucial not to reduce these amounts, as they are essential for the patties’ structural integrity.
- Chill the Formed Mixture Thoroughly: This step is often overlooked but is incredibly effective and arguably one of the most important tips. After you’ve formed your patties, place them on the parchment-lined sheet pan and pop them into the freezer for a good 15-20 minutes. The cold temperature helps to firm up the fats and binders (like egg and mayo) within the mixture. This chilling process makes the patties much more stable, less fragile, and significantly less prone to breaking apart when they encounter the heat of the cooking surface. Don’t skip this step for perfect patty integrity!
- Handle with Care (and the Right Tools): Gentle handling is key. When transferring your delicate patties from the chilling tray to the hot skillet, always use a sharp, thin metal turner or spatula. This type of tool allows you to slide smoothly underneath the entire patty, providing full and even support, preventing any bending or breaking. Transfer one patty at a time gently and deliberately. Furthermore, to minimize disruption, flip the patties only once during cooking. Excessive flipping can weaken their structure.
- Thoroughly Drain the Tuna: Excess moisture is the sworn enemy of a cohesive patty. If your canned tuna is overly wet when added to the mixture, it will create a soggy, loose consistency that is far more likely to fall apart during forming and cooking. Take the extra time to press out as much liquid as possible from your canned tuna before incorporating it into the blend. You can use a fine-mesh sieve or simply press it firmly against the side of the can or in a bowl with a spoon. This ensures a firmer, more manageable patty mixture that holds its shape beautifully.
More Delicious & Easy Tuna Recipes to Explore
If you’ve fallen in love with the versatility and satisfying flavor of tuna as much as we have, you’re in for a treat! Tuna is a pantry staple that can be transformed into countless delicious meals. Here are some other fantastic tuna recipes from our kitchen that are sure to become new favorites in your home:
- One-Skillet Cheesy Tuna Pasta: A wonderfully comforting and incredibly convenient meal that comes together effortlessly, all in a single pot, minimizing cleanup.
- Avocado Tuna Salad Lettuce Wraps: A light, fresh, and vibrant take on classic tuna salad, featuring creamy avocado, crunchy pickles, and zesty red onion, all neatly tucked into crisp lettuce cups for a healthy, low-carb option.
- Classic Tuna Melts: The ultimate comfort food sandwich! This recipe elevates the beloved tuna melt with sharp Cheddar cheese, perfectly toasted bread, and a creamy, flavorful tuna salad filling.
- Tuna-White Bean Salad: A Mediterranean-inspired salad bursting with robust flavors, tender white beans, and a zippy vinaigrette that makes for a perfect light lunch or side dish.
- Creamy Tuna Pasta with Peas: A nostalgic and incredibly satisfying dish, featuring tender pasta, a rich and creamy tuna sauce, and sweet frozen peas, perfect for a quick and easy family dinner any night of the week.

Pin Recipe
Print Recipe
Tuna Patties
Chelsea Lords
25 minutes
6 minutes
15 minutes
46 minutes
12 patties
Watch the Step-by-Step Recipe Video!
Equipment You’ll Need
-
Large sheet pan (approximately 15″ x 21″)
-
Parchment paper
-
Large skillet or frying pan
-
Box grater or food processor (for onion)
-
Microplane zester (for lemon zest)
-
Citrus juicer (for lemon juice)
Ingredients
- 1 large yellow onion (finely grated, yielding about 1 cup)
- 1 cup panko breadcrumbs
- 1/2 teaspoon paprika
- 1/2 teaspoon garlic powder
- 6 tablespoons finely chopped fresh herbs (a vibrant combination of flat-leaf parsley, green onions, and fresh dill is highly recommended)
- 2 large eggs
- 1/2 cup freshly grated Parmesan cheese (see Note 1 for best results)
- 1 lemon (for zest and juice for the patties)
- 2 tablespoons mayonnaise (high-quality recommended)
- 3 (5-ounce) cans tuna in olive oil (crucially, thoroughly drained; see Note 2)
- Salt and freshly ground black pepper (to taste, we suggest 1/4 tsp each to start)
- Olive oil (for cooking the patties)
- Tri-colored coleslaw mix and Litehouse coleslaw dressing (optional, for serving; see Note 3)
- 1 lemon (for zest and juice for the sauce)
- 1/2 cup mayonnaise (high-quality recommended)
- 1-1/2 tablespoons sweet pickle relish
- 1 tablespoon finely chopped fresh dill
- 1/2 teaspoon Worcestershire sauce
- 1/2 teaspoon Dijon-style mustard
- Salt and freshly ground black pepper (to taste, we suggest 1/8 tsp each to start)
Step-by-Step Instructions
-
Step 1: Prepare Ingredients for Patties. Peel and finely grate the large yellow onion using the large holes of a grater to yield approximately 1 cup (200g). Finely chop your fresh herbs: parsley, green onions, and dill, measuring out 2 tablespoons of each. Zest one lemon to obtain about 1 teaspoon of fragrant lemon zest, then juice the same lemon for roughly 2 tablespoons of fresh lemon juice. Crucially, thoroughly drain all three cans of tuna, pressing out as much liquid as possible; set aside. Line a large sheet pan (15″ x 21″ is ideal) with parchment paper and set it aside for later use.
-
Step 2: Assemble the Patty Mixture. In a large mixing bowl, combine all the tuna patty ingredients *except* the thoroughly drained tuna. This includes the grated onion, panko breadcrumbs, paprika, garlic powder, chopped fresh herbs, large eggs, freshly grated Parmesan cheese, the prepared lemon zest and juice, and mayonnaise. Season generously with salt and freshly ground black pepper to taste (we recommend starting with 1/4 teaspoon of each). Mix these ingredients very well until thoroughly combined and cohesive. Next, gently fold in the drained tuna, being careful to maintain its flakes and chunks. This gentle mixing technique is key to achieving a superior texture in the finished patties, preventing them from becoming mushy. (Refer to Note 4 in the recipe notes below for troubleshooting tips if the mixture’s consistency seems off.)
-
Step 3: Form and Chill the Patties. Using a 1/4 cup measuring cup, scoop the tuna mixture and firmly pack it into the cup. Gently form it into uniform patties, aiming for a thickness of just under an inch. Carefully place these formed patties onto your prepared parchment-lined sheet pan. Repeat this process until all the mixture is used, which should yield approximately 12 patties. Transfer the sheet pan with the patties to the freezer and chill for 15–20 minutes. This crucial chilling step helps the patties firm up significantly, making them much more stable and preventing them from falling apart during the cooking process. This also provides the perfect window of time to prepare your accompanying coleslaw and tartar sauce!
-
Step 4: Prepare the Tangy Tartar Sauce. Zest the second lemon to get about 1/2 teaspoon of zest, then juice it for approximately 2 tablespoons of fresh lemon juice. In a small bowl, combine this lemon juice and zest with the mayonnaise, sweet pickle relish, finely chopped fresh dill, Worcestershire sauce, and Dijon-style mustard. Season the sauce generously with salt and freshly ground black pepper to taste (we suggest starting with 1/8 teaspoon of each). Mix all ingredients thoroughly until well combined. Taste and adjust seasonings to your personal preference for the perfect balance of tangy, sweet, and savory. Refrigerate the tartar sauce until you’re ready to use it; its flavors will meld and deepen beautifully as it sits, making it even more delicious.
-
Step 5: Optional Coleslaw Preparation. If you opt to serve with coleslaw, simply combine a bag of pre-mixed coleslaw with your preferred amount of prepared coleslaw dressing (such as Litehouse brand) to achieve your desired level of creaminess. Toss the mixture with tongs until all components are thoroughly coated. Refrigerate the coleslaw until you are ready to serve. Remember to give it another good toss just before serving to ensure the dressing is evenly distributed.
-
Step 6: Cook the Tuna Patties (Pan-Frying Method). Heat 2 tablespoons of olive oil in a large pan or skillet over medium-high heat until the oil is shimmering hot. Using a sharp metal spatula (to provide full support), carefully transfer the chilled patties one at a time from the sheet pan to the hot pan, ensuring not to overcrowd the pan. Cook the patties for 3–4 minutes per side, or until they develop a beautiful golden-brown, crispy crust and are heated through. Once cooked, transfer the patties to a paper-towel-lined plate to absorb any excess oil. Repeat this process with the remaining patties, adding more olive oil to the pan as needed for subsequent batches. (For instructions on baking the tuna patties, please refer to Note 5 in the recipe notes section below.)
-
Step 7: Serve and Enjoy! Arrange the prepared coleslaw (if using) onto individual serving plates as a vibrant base. Top each serving of coleslaw with a few warm, crispy tuna patties. Finish with a generous dollop of your homemade tangy tartar sauce, allowing its creamy zestiness to complement the patties perfectly. Garnish with fresh lemon wedges if desired, for an extra burst of brightness. Serve promptly and savor this incredibly delicious and easy family-friendly meal!
Recipe Notes for Success
Note 2: Quality Tuna in Olive Oil is Key. For the richest flavor and most desirable chunky texture, select high-quality tuna packed in olive oil. Our top recommendation is Genova® albacore tuna. Tuna packed in olive oil tends to maintain its chunky shape better than water-packed varieties and delivers a superior flavor profile. Regardless of your choice, ensure the tuna is thoroughly drained by pressing out as much liquid as possible; excess moisture can lead to soggy, falling-apart patties.
Note 3: Quick Coleslaw Serving Suggestion. For a wonderfully quick and easy side dish, simply combine a bag of pre-packaged coleslaw mix with your favorite fresh, refrigerated coleslaw dressing (such as Litehouse brand). Toss well until evenly coated and chill before serving. This takes mere minutes!
Note 4: Troubleshooting Patty Consistency. If your tuna patty mixture feels too dry and crumbly, indicating it won’t hold together well, gradually add a bit more mayonnaise or a tiny splash of water (1/2 teaspoon at a time) until it reaches a moist, cohesive consistency that can be easily formed. If, conversely, the mixture is too wet and loose, making it difficult to form into patties, incorporate an additional tablespoon or two of panko breadcrumbs, mixing until it firms up. The ideal consistency should be slightly moist but compact and easily shapeable. Handle the formed patties gently to prevent breakage.
Note 5: Baking Instructions for Tuna Patties. For a delicious baked alternative to pan-frying, preheat your oven to 425°F (220°C). Drizzle 2 tablespoons of a high smoke point vegetable oil (such as canola or grapeseed, avoiding olive oil for high heat baking) onto a large sheet pan and place it in the preheated oven for 1 minute to heat the oil. Carefully arrange the chilled patties in a single layer on the hot pan. Bake for 12–15 minutes, then gently flip the patties using a metal spatula and continue baking for another 4–6 minutes, or until they are beautifully golden brown and cooked through. Serve promptly to enjoy their best texture.
Nutrition Note: Important Disclaimer. Please be aware that the provided nutritional information pertains specifically to the tuna patties and does not include the tartar sauce or coleslaw. The nutritional values for these accompaniments will vary significantly based on their specific ingredients and preparation methods. This information is automatically calculated and should only be used as an approximation for the tuna patties themselves.
Storage & Reheating for Best Results. Store any leftover cooked tuna patties in an airtight container in the refrigerator for up to 3 days. For longer storage, you can freeze them: wrap individual cooled patties tightly in plastic wrap, then place them in a freezer-safe bag, and freeze for up to 2 months. To reheat, the best method to preserve their crispy exterior is to warm them gently in a skillet over medium heat until crispy and heated through. Alternatively, you can reheat them in an oven at 350°F (175°C) for 10-15 minutes.
Nutrition Information
Calories: 132 kcal |
Carbohydrates: 7.8 g |
Protein: 13 g |
Fat: 5.1 g |
Cholesterol: 44.4 mg |
Sodium: 152.4 mg |
Fiber: 0.6 g |
Sugar: 1.1 g
Nutrition information is automatically calculated and should only be used as an approximation. It does not include the tartar sauce or coleslaw, as their nutritional values can vary.
❤
Love this recipe? Leave a comment below!