
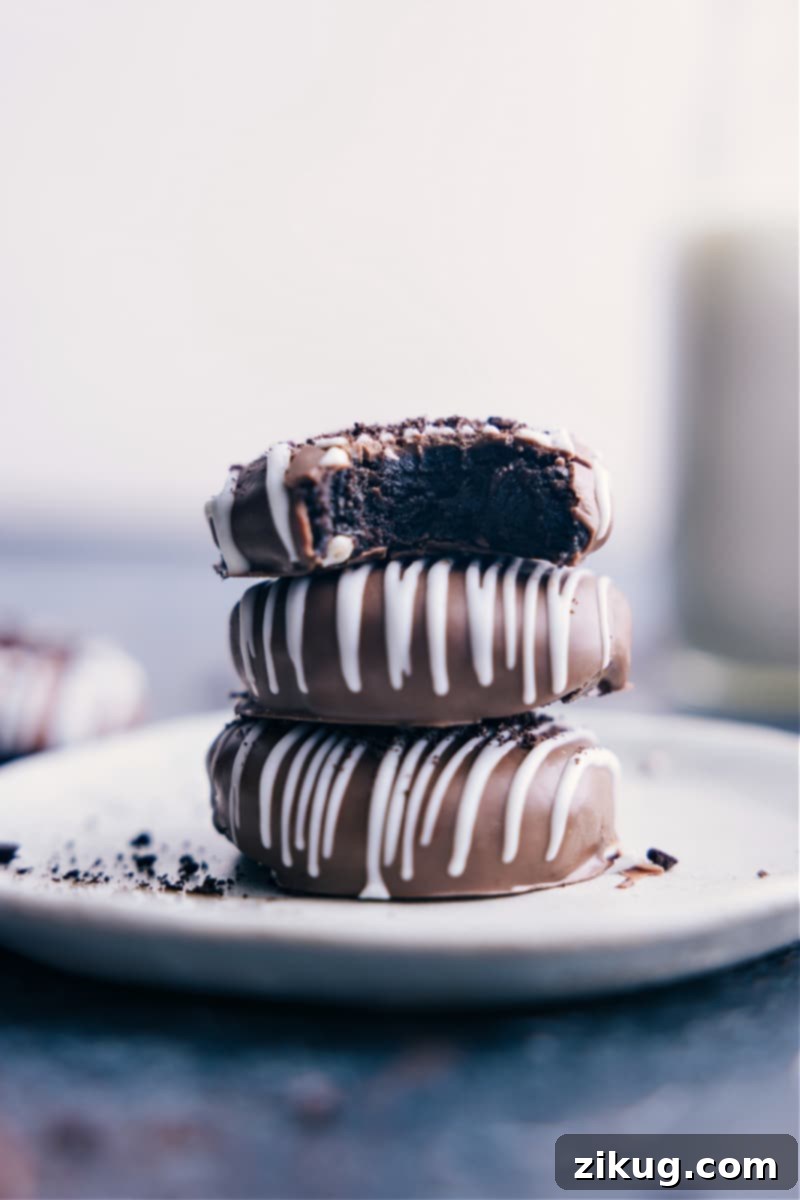
Indulge in the irresistible delight of homemade Oreo Truffles! These no-bake wonders require minimal effort and just five simple ingredients to create a truly spectacular treat. Combining the classic crunch of crushed Oreo cookies with smooth, tangy cream cheese, these truffles are then enveloped in a luscious chocolate coating, often finished with an elegant drizzle. Perfect for any occasion, from casual gatherings to elaborate holiday spreads, Oreo Truffles are a guaranteed crowd-pleaser that will disappear as quickly as you can make them.
If you’re an avid fan of everything Oreo, you’ll also adore these other delightful creations: Oreo Icebox Cake, Oreo Popcorn, Chocolate-Covered Oreos, or Oreo Fudge.

Discover the Magic of Homemade Oreo Truffles
Oreo Truffles are a testament to how effortlessly decadent a dessert can be. These treats are incredibly simple to prepare, combining finely crushed Oreo cookies with softened cream cheese to form a rich, pliable dough. Once rolled and shaped, these delightful morsels are then dipped into a smooth, melted chocolate coating, creating a harmonious blend of textures and flavors.
While often shaped into classic spherical truffles, a slightly flattened disc shape, as pictured, offers a unique and pleasing experience. This method was a personal favorite at my sister’s wedding cookie table, where these flat truffles were the star, even surpassing classic Snickerdoodles for the bride’s affection! The flatter shape isn’t just about aesthetics; it provides an optimal balance between the creamy Oreo-cream cheese filling and the crisp chocolate shell, ensuring every bite is perfectly proportioned. Whether you prefer traditional balls or elegant discs, the result is a truly remarkable dessert that tastes far more complex than its simple preparation suggests.
The beauty of Oreo Truffles lies in their versatility and universal appeal. They are an ideal choice for last-minute dessert needs, holiday platters, or simply satisfying a sweet craving. Their no-bake nature makes them accessible to even the most novice bakers, while their rich flavor and customizable toppings impress even the most discerning palates. These truffles are not just a dessert; they are a delightful experience waiting to happen, promising rich chocolatey goodness with every bite.
Step-by-Step Guide: Crafting Your Perfect Oreo Truffles
Creating these heavenly Oreo Truffles is a straightforward process, broken down into a few easy steps. Follow these instructions carefully to ensure perfectly textured and delicious results:
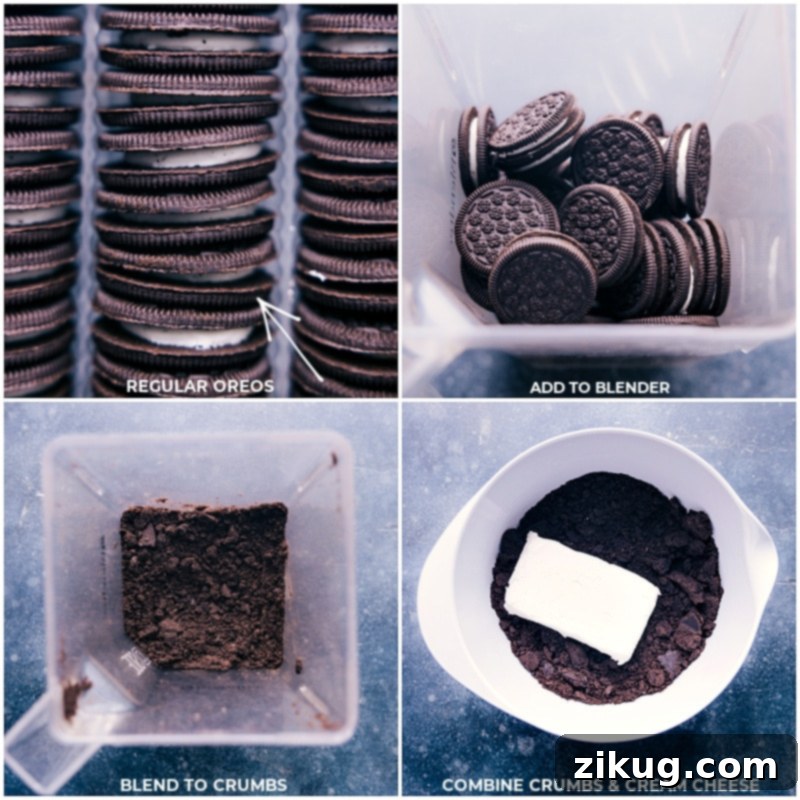
- Crush Your Oreos: Begin by placing entire Oreo cookies, including the cream filling, into a food processor. Pulse until the cookies are reduced to very fine, uniform crumbs. The finer the crumbs, the smoother your truffle filling will be. Avoid leaving any large chunks, as these can disrupt the texture of the finished truffles. If you don’t have a food processor, you can place the Oreos in a sturdy zip-top bag and crush them with a rolling pin or meat mallet until fine. Transfer the crushed Oreos to a large mixing bowl.
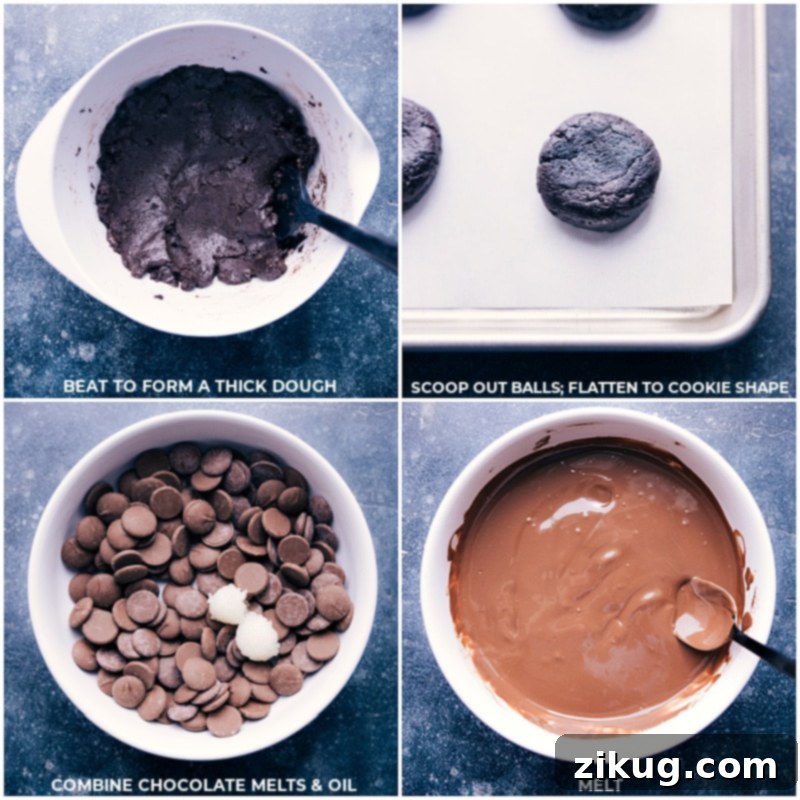
- Combine Crumbs & Cream Cheese: Add the softened cream cheese to the Oreo crumbs. It’s crucial that your cream cheese is at room temperature (but not melted) to ensure it blends smoothly and evenly with the crumbs. Using a hand mixer or the whisk attachment on a stand mixer, beat the mixture on medium speed until the ingredients are thoroughly combined and a thick, slightly sticky, homogeneous dough forms. If you don’t have a mixer, you can knead the mixture by hand until smooth, ensuring all ingredients are well incorporated.
- Roll and Shape: Once your truffle dough is ready, use a cookie scoop (approximately 1.5 tablespoons) or a regular tablespoon to portion out the mixture. Roll each portion between your palms to form smooth, uniform balls. For a presentation similar to the pictures, gently flatten each ball into a disc shape. Consistency in size and shape ensures even chilling and dipping. If the mixture feels too wet or sticky to handle, cover it and chill it in the refrigerator for 15-20 minutes to firm up slightly. Place the shaped balls or discs onto a large, parchment-lined baking sheet.
- Chill to Perfection: This step is vital for easy dipping. Once all your truffles are shaped and arranged on the baking sheet, cover the pan tightly with plastic wrap and chill them in the refrigerator for at least 20-30 minutes. This chilling period allows the truffles to firm up significantly, making them much easier to dip into melted chocolate without falling apart or leaving crumbs in your coating.
Mastering the Art of Dipping Oreo Truffles
Dipping your Oreo truffles in chocolate can seem daunting, but with the right technique, you’ll achieve a professional-looking, smooth coating every time. Patience and proper temperature control are key.
Start by preparing your melted chocolate. You can do this in a microwave-safe bowl, melting the chocolate melting wafers in short 15-second bursts, stirring thoroughly after each interval. This gradual melting prevents scorching and ensures the chocolate remains smooth and workable. Alternatively, use a double boiler for a more controlled melting process. Add about 2 teaspoons of coconut oil to your chocolate as it melts; this helps thin the chocolate to a perfect dipping consistency and gives it a beautiful sheen. Ensure the chocolate is warm, not hot – it should feel comfortably warm to the touch, not piping hot.
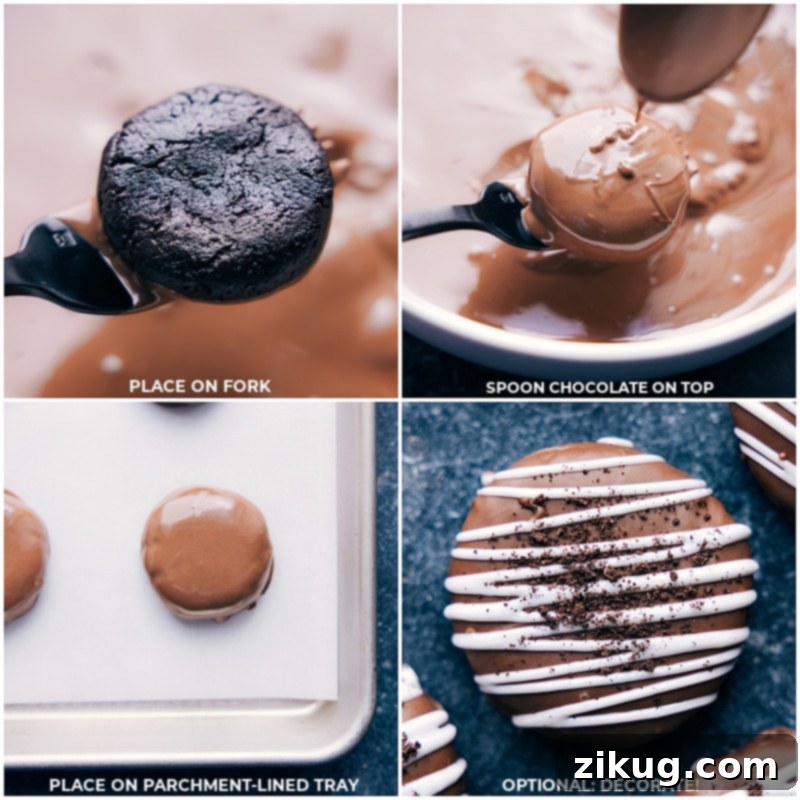
To dip each truffle, take a chilled ball or disc directly from the refrigerator. Submerge a fork (a two-tined candy dipping fork works best, but a regular dinner fork will do) into the melted chocolate. Place one chilled truffle on top of the chocolate-coated fork. Using a spoon from your other hand, gently pour more melted chocolate over the entire truffle, ensuring it’s fully coated. Once covered, lightly tap the fork against the rim of your bowl a few times. This helps excess chocolate drip off and encourages a smooth, even coating on the truffle. Finally, gently slide the fork along the edge of the bowl to remove any remaining drips from the bottom of the truffle, then carefully slide the truffle onto a parchment-lined tray. Repeat this process for all your truffles. Allow them to harden completely at room temperature; avoid placing them in the fridge or freezer immediately after dipping, as this can sometimes cause the chocolate to bloom or crack. If your chocolate starts to thicken during the dipping process, reheat it briefly in the microwave for a few seconds, stirring well. You might need to do this a couple of times, depending on your dipping speed.
Essential Ingredients for Irresistible Oreo Truffles
The magic of Oreo Truffles truly lies in the quality and type of ingredients you choose. While the recipe calls for only a few components, selecting the right ones makes a significant difference in the final taste and texture of your truffles. The core ingredients are Oreos, cream cheese, and chocolate, with optional additions like coconut oil and a white chocolate drizzle for enhanced flavor and presentation.
- Oreo Cookies: Opt for regular Oreo cookies, not double-stuffed. The ratio of cookie to cream in regular Oreos provides the perfect balance for the truffle filling. Double-stuffed varieties can make the mixture too soft and difficult to handle. Feel free to experiment with different flavored Oreos (mint, peanut butter, golden) for exciting twists, but always ensure they are fully crushed into fine crumbs for a smooth truffle base. A standard 14.3-ounce package usually contains about 36 cookies, which is ideal for this recipe.
- Cream Cheese: For the richest flavor and best consistency, always use full-fat, brick-style cream cheese. Brands like Philadelphia Cream Cheese® are highly recommended for their quality and texture. Avoid using low-fat or whipped cream cheese, as they contain more water and will result in a runny, less stable truffle mixture. Ensure the cream cheese is at room temperature when you mix it with the Oreo crumbs. This allows for seamless blending, creating a smooth, homogenous dough without lumps.
- Chocolate Melting Wafers: This is where many recipes go wrong. For a truly smooth, glossy, and easy-to-work-with chocolate coating, use high-quality chocolate melting wafers (such as Ghirardelli® or Candiquik) or good baking bars (like Baker’s or Lindt). Avoid regular chocolate chips or baking morsels, as these contain stabilizers that prevent them from melting into a perfectly smooth, thin consistency suitable for dipping. Melting wafers are designed to melt easily and set quickly with a beautiful shine. You can choose milk, semi-sweet, or dark chocolate based on your preference; milk chocolate often pairs wonderfully with the Oreo flavor.
- Coconut Oil (Optional): A small amount of coconut oil is a secret weapon for achieving a perfectly smooth and dippable chocolate coating. Adding 1.5-2 teaspoons to your melting chocolate helps thin it out, making it easier to coat the truffles evenly and preventing a thick, clumpy shell. It also contributes to a lovely gloss once the chocolate sets. Use refined coconut oil if you don’t want any coconut flavor to transfer to your truffles.
- White Chocolate Melting Wafers (Optional Drizzle): If you plan on adding a decorative white chocolate drizzle, use white chocolate melting wafers for the same reasons as dark/milk chocolate wafers. They melt smoothly and offer a beautiful contrast against the darker chocolate coating.
Expert Tips for Flawless Oreo Truffles Every Time
Achieving perfect Oreo Truffles is simple, but a few key tips can elevate your results from good to absolutely fantastic:
- Achieve Ultra-Fine Oreo Crumbs: The texture of your truffles largely depends on the consistency of your crushed Oreos. Ensure they are pulverized into very fine, almost powder-like crumbs. Any larger chunks can create an uneven texture and make the truffles harder to roll and dip smoothly. A food processor is your best tool for this.
- Room Temperature Cream Cheese is Non-Negotiable: Cold cream cheese will be difficult to mix evenly with the Oreo crumbs, leading to a lumpy mixture. Always allow your cream cheese to come to a full room temperature for at least an hour before you begin. It should be soft enough to easily blend but not so warm that it’s melted or greasy.
- Thorough Chilling is Key: Do not skip or shorten the chilling steps! Chilling the truffle mixture before rolling helps it firm up, making it easier to handle and shape. More importantly, chilling the shaped truffles before dipping is crucial. Firm, cold truffles are less likely to crumble or soften when dipped into warm chocolate, resulting in a cleaner, more even coating. If you notice your truffles softening during the dipping process, pop them back into the freezer for 5-10 minutes.
- Optimize Chocolate Consistency: If your melted chocolate coating appears too thick or becomes difficult to work with, add an additional 1/2 to 1 teaspoon of coconut oil (or a neutral oil like vegetable oil) to thin it out. Stir well until smooth. This helps achieve a thinner, more elegant coating. Conversely, if your chocolate is too thin, it might be too hot or you may have added too much oil. Allow it to cool slightly, or add a few more melting wafers to thicken it.
- Patience with Melting Chocolate: When melting your chocolate, whether in the microwave or a double boiler, use low heat and stir frequently. Chocolate can seize or scorch easily if overheated. Melt it in short bursts, stirring continuously, even after it’s removed from the heat, as residual heat will continue to melt the remaining pieces.
- Work Cleanly: Prepare your workstation with parchment paper on your baking sheets for easy handling and cleanup. Have all your tools ready before you start dipping.

Creative Variations to Elevate Your Oreo Truffles
Unleash Your Creativity: Fun Ways to Customize This Recipe!
While classic Oreo truffles are undeniably delicious, they also serve as a fantastic canvas for creative customization. Don’t hesitate to experiment with different flavors and textures to make them uniquely yours!
- Experiment with Flavored Oreos: The world of Oreos offers a plethora of exciting flavors beyond the original. Try using Toffee Crunch, Hazelnut, Peanut Butter, Mint, Birthday Cake, or even seasonal variations to infuse your truffles with new and exciting tastes. Each flavored Oreo will bring its own unique character to the truffle.
- Change Your Chocolate Coating: Don’t limit yourself to one type of chocolate! Swap out the standard milk chocolate for rich semi-sweet chocolate, intense dark chocolate, or sweet and creamy white chocolate. You can even combine different types, like dipping in dark chocolate and drizzling with white, or vice versa.
- Add Exciting Toppings: Before the chocolate coating completely hardens, seize the opportunity to add an array of delightful toppings. Consider a sprinkling of finely crushed nuts (pecans, walnuts, almonds), miniature chocolate chips, colorful sprinkles for a festive touch, crushed peppermint candy during the holidays, a dusting of cocoa powder, or a hint of sea salt to balance the sweetness.
- Elegant Chocolate Drizzles: A simple drizzle can elevate the visual appeal of your truffles immensely. As pictured in this post, a contrasting drizzle of melted white chocolate over a dark chocolate coating creates a sophisticated finish. You could also drizzle with a different shade of chocolate (e.g., milk chocolate over dark) or even colored candy melts for themed events.
- Flavor Extracts: A tiny drop of food-grade flavor extract (like peppermint, almond, or coffee) can be added to the cream cheese mixture for an extra flavor dimension. Just be careful not to add too much!
- Dip in Other Coatings: Beyond chocolate, you can experiment with other coatings! Consider a simple dusting of powdered sugar, cocoa powder, or even finely crushed nuts for a different look and texture.
With these variations, you can transform a simple Oreo truffle into a gourmet dessert that caters to any taste preference or special occasion.
More Effortless No-Bake Dessert Ideas:
If you love the simplicity and deliciousness of no-bake treats, you’ll certainly want to explore these other fantastic recipes that require no oven time:
- Monster Energy Balls with delightful mini M&Ms, perfect for a quick energy boost.
- Peanut Butter Bars, a rich and satisfying dessert crowned with a luscious chocolate topping.
- Muddy Buddies, a classic chocolate-peanut butter snack mix that’s addictively good.
- Healthy No Bake Cookies, a guilt-free indulgence made with wholesome ingredients and dark chocolate.
- Edible Cookie Dough, a safe and utterly delicious way to enjoy your favorite cookie dough, packed with mini chocolate chips.

Classic No-Bake Oreo Truffles
Equipment
-
Blender or food processor
-
Hand mixer or stand mixer
-
Large sheet pan (15″ x 21″)
Ingredients
- 1 (14.3-ounce) package Oreos not double stuffed, finely crushed, 36 cookies
- 1 (8-ounce) package cream cheese full-fat, brick-style, at room temperature
- 2 cups chocolate melting wafers milk, semi-sweet, or dark chocolate, see note 1
- 1/2 cup white chocolate melting wafers optional
- 2-1/2 teaspoons coconut oil optional, divided
Instructions
-
Place whole Oreo cookies (with creme) in a blender or food processor. Pulse until crushed into very fine crumbs, ensuring there are no large pieces. Transfer the crumbs to a large bowl or the bowl of a stand mixer.
-
Add softened cream cheese (ensure it’s at room temperature but not melted) to the Oreo crumbs. Using a hand mixer or the whisk attachment on a stand mixer, beat until the ingredients are well combined and a smooth, thick dough forms. If you don’t have a mixer, you can knead the mixture thoroughly with your hands until smooth and fully combined.
-
Use a cookie scoop to portion out 1-1/2 tablespoon balls of the dough. Roll each portion into a smooth ball between your palms. Optionally, flatten the balls slightly to shape them into even-sized discs for a “cookie” appearance. If the mixture is too wet or sticky to shape easily, cover it and chill it in the fridge for 15-20 minutes to firm up. Place the shaped balls or discs on a large parchment-lined sheet pan.
-
Chill the shaped balls or discs on the pan, covered tightly with plastic wrap, for 20-30 minutes in the refrigerator. This step is essential to ensure they are firm enough for easy dipping.
-
Once the truffles are chilled, add the chocolate melting wafers and 2 teaspoons of coconut oil to a microwave-safe bowl. Melt in short bursts of 15 seconds, stirring thoroughly between each burst for about 15 seconds. Be patient to avoid burning the chocolate; it continues to melt even after being removed from the microwave. The goal is smooth, pourable chocolate, warm but not hot.
-
Once the chocolate is melted and smooth, begin coating the Oreo discs. Dip a fork into the melted chocolate, then place an Oreo disc directly from the chilled pan onto the chocolate-coated fork. Using a spoon, pour more melted chocolate over the entire disc until fully coated. Gently tap the fork a few times against the side of the bowl to smooth the chocolate and remove any excess. Drag the bottom of the fork along the edge of the bowl to clean off any drips, then use a small knife or another fork to carefully push the coated Oreo disc off the fork onto the parchment-lined sheet pan. Repeat this process until all truffles have been dipped. Allow the dipped cookies to harden completely at room temperature (avoid the fridge or freezer at this stage unless specified, as it can cause cracking or blooming). Refer to Note 3 for troubleshooting tips.
-
Optional White Chocolate Drizzle: Once the chocolate coating on the truffles has hardened, melt the white chocolate melting wafers with the remaining 1/2 teaspoon of coconut oil in the microwave. Microwave in short bursts of 20 seconds, stirring well after each burst for 15 seconds. Transfer the melted white chocolate to a small plastic bag and seal it securely. Snip off a tiny tip of the corner of the bag to create a fine opening, then pipe decorative stripes over the hardened Oreo truffle discs. Work quickly, as white chocolate tends to harden much faster than darker chocolate.
-
Allow the drizzles to set completely. Once firm, your delicious Oreo Truffles are ready to enjoy! Store any leftovers in an airtight container in the refrigerator to maintain their freshness and texture.
Recipe Notes
Note 2: When melting chocolate, always use short bursts of heat and stir frequently, even off the heat, to prevent scorching and ensure a gradual, even melt. The chocolate should be warm and fluid, not excessively hot, and should feel around room temperature once fully melted. This controlled melting process is crucial for a smooth and workable consistency.
Note 3: Troubleshooting your chocolate coating: If your melted chocolate becomes too thick during dipping, stir in an additional 1/2 teaspoon of coconut oil (or neutral vegetable oil) until it reaches the desired thinner consistency. If the chocolate hardens as you work, simply reheat it briefly in the microwave for a few seconds, stirring well. Depending on how quickly you work, you may need to remelt the chocolate a few times to maintain its smooth, dippable consistency.
Storage: Store any leftover Oreo truffles in an airtight container in the refrigerator for up to one week. For longer preservation, arrange them in a single layer on a baking sheet and freeze until solid. Once frozen, transfer the truffles to a sealed freezer-safe bag or container and store them in the freezer for up to three months. Thaw them in the refrigerator before serving for the best texture.
Nutrition
Nutrition information is automatically calculated, so should only be used as an approximation.