
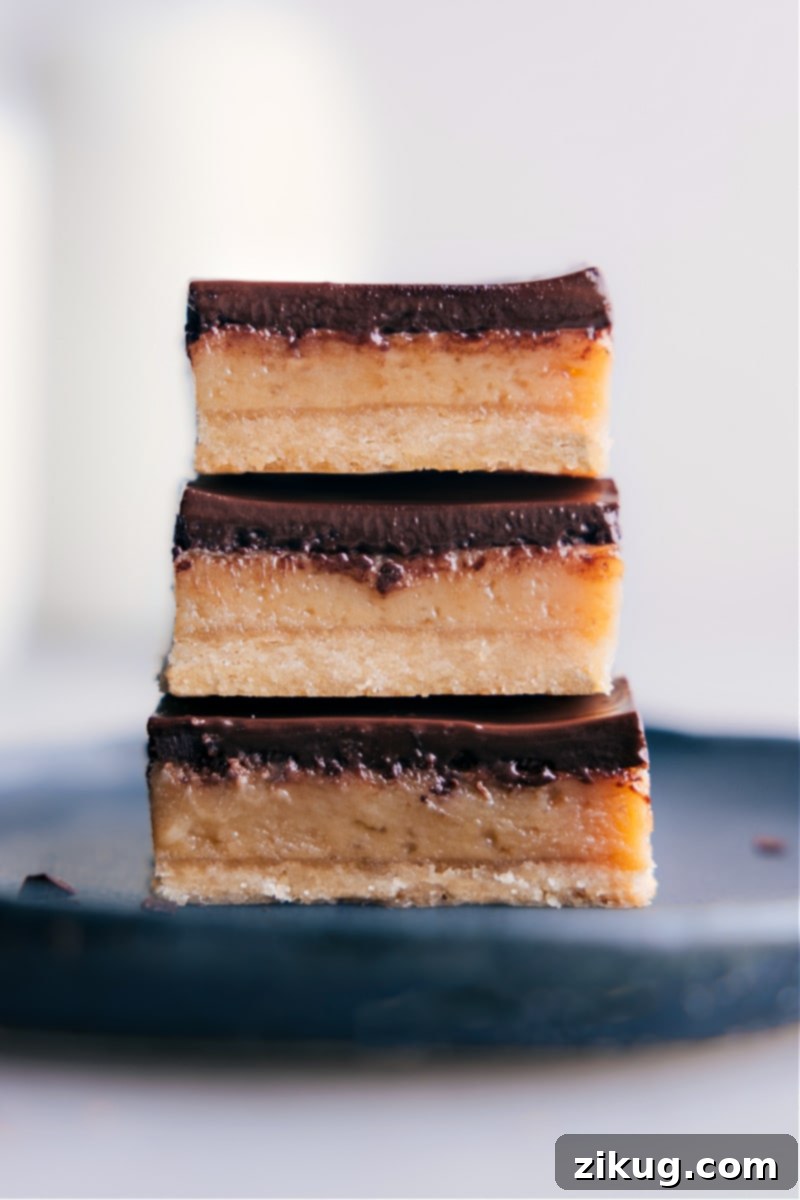
Indulge in Homemade Perfection: The Ultimate Twix Bars Recipe
Forget the store-bought candy aisle! Prepare to embark on a delightful baking journey that culminates in the most irresistible homemade Twix Bars you’ve ever tasted. These aren’t just an imitation; they are an elevated experience, featuring a perfect trifecta of buttery shortbread, luxuriously gooey caramel, and a rich, decadent chocolate topping. Each bite delivers a harmonious blend of textures and flavors that will transport you straight to dessert heaven, proving that homemade truly is always better.
Whether you’re a seasoned baker or a kitchen novice, this recipe guides you through creating impressive, layered treats that are sure to be a showstopper. Perfect for parties, family gatherings, or simply treating yourself, these homemade Twix Bars offer a nostalgic taste with a gourmet touch. Get ready to ditch the wrapper and dive into a world of pure, unadulterated shortbread, caramel, and chocolate bliss!
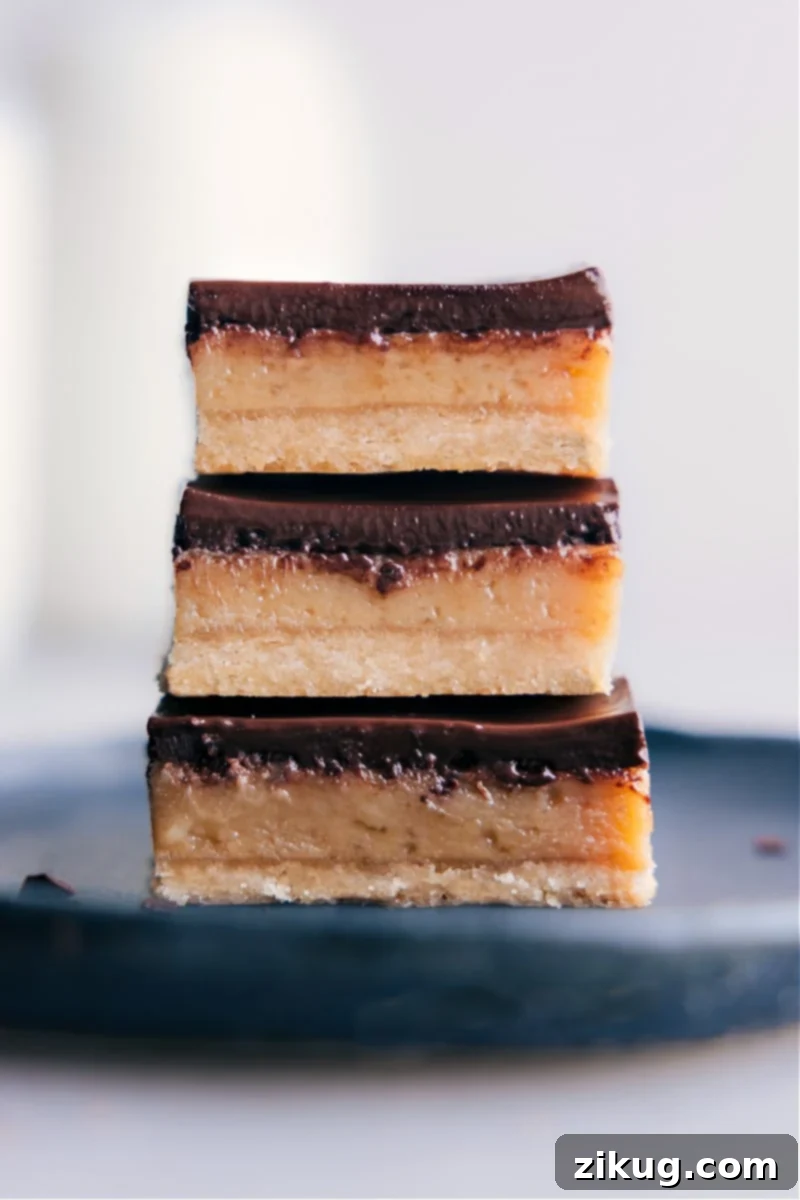
Why You’ll Fall in Love with These Homemade Twix Bars
- Unbeatable Homemade Flavors: While the classic candy bar holds a special place, our homemade Twix Bars offer a depth of flavor that store-bought versions simply can’t match. Using fresh, high-quality ingredients allows the distinct tastes of real butter, rich caramel, and premium chocolate to shine through, creating a truly superior treat.
- A Symphony of Perfect Textures: The magic of these bars lies in their incredible textural contrast. You’ll savor the crumbly, tender shortbread crust that melts in your mouth, followed by the soft, stretchy, vanilla-kissed caramel, all enveloped by a smooth, snappy chocolate shell. It’s a multi-sensory delight in every bite.
- The Ultimate Wow Factor: Looking to impress at your next potluck, holiday party, or special occasion? These stunning, layered bars are guaranteed to turn heads and elicit rave reviews. They look intricate and gourmet, yet are surprisingly achievable with our detailed instructions.
- Pure Ingredients, No Nasty Additives: When you bake at home, you control exactly what goes into your food. Skip the artificial flavors, preservatives, and questionable additives found in commercial candy. Enjoy a wholesome, delicious dessert made with ingredients you trust.
- A Fun and Rewarding Baking Project: Whether you’re baking solo for some therapeutic kitchen time or making memories with family and friends, crafting these Twix Bars is a rewarding experience. The process is engaging, and the delicious outcome is the sweetest reward.
Key Ingredients for Your Perfect Twix Bars
Crafting the perfect homemade Twix Bars relies on a few essential ingredients. Each plays a crucial role in achieving those signature layers of flavor and texture:
- Unsalted Butter: This is the backbone of both our rich shortbread crust and our velvety caramel. Using unsalted butter allows you to control the salt content precisely, ensuring a balanced flavor.
- Brown Sugar (Light or Dark): For the shortbread, brown sugar adds a subtle molasses note and helps create that tender, chewy texture. In the caramel, it’s essential for developing the deep, classic caramel flavor. Dark brown sugar will yield a more robust, almost toffee-like caramel.
- Vanilla Extract: A touch of pure vanilla extract elevates the sweetness and adds a warm, aromatic complexity to both the shortbread and, especially, the caramel layer. Don’t skip this flavor enhancer!
- Salt: A pinch of salt is vital for balancing and enhancing all the sweet flavors. It prevents the bars from being overly saccharine and highlights the nuances of the butter, caramel, and chocolate.
- All-Purpose Flour: The foundation of our crumbly shortbread crust. Accurate measurement is key here; too much flour can lead to a dry, tough crust, while too little can make it too soft. Spoon and level for best results.
- Sweetened Condensed Milk: This is the non-negotiable star for achieving that perfectly gooey, smooth, and authentic caramel texture. **Crucially, ensure you use full-fat sweetened condensed milk.** Reduced-fat or evaporated milk will not yield the same rich consistency.
- Semi-Sweet Chocolate Chips: We recommend semi-sweet chocolate to provide a beautiful contrast to the sweetness of the caramel and shortbread. However, if you prefer a taste closer to the traditional Twix bar, milk chocolate chips are an excellent alternative. High-quality brands like Ghirardelli or Guittard will melt smoother and offer a superior flavor.
- Vegetable Oil: A small amount of vegetable oil is mixed with the chocolate chips to create a silky-smooth topping that’s easy to spread and less prone to cracking once set. Coconut oil is also a fantastic alternative that adds a subtle, pleasant aroma.
Change Things Up! Delicious Twix Bar Variations
While the classic Twix Bar combination is undeniably perfect, these homemade treats are incredibly versatile. Feel free to experiment with these exciting variations to create a unique flavor experience:
- Salted Caramel Delight: For a sophisticated twist, sprinkle a generous amount of flaky sea salt over the melted chocolate topping just before it sets. The contrasting notes of sweet caramel and savory salt create an addictive flavor profile that’s a true crowd-pleaser.
- Crunchy Texture Boost: Add another layer of textural intrigue by mixing crushed nuts (like pecans, walnuts, or almonds) or crisp rice cereal into your melted chocolate topping. This provides a satisfying crunch with every bite, mimicking a chocolate bar with inclusions.
- Tropical Coconut Infusion: Transport your taste buds to a tropical paradise! Swap out the vegetable oil for coconut oil in your chocolate topping for a subtle coconut aroma. For an even more pronounced flavor, use coconut extract instead of vanilla in the caramel, and finish by sprinkling toasted coconut flakes over the chocolate before it sets.
- Espresso Kick: For coffee lovers, add 1/2 teaspoon of instant espresso powder to the chocolate topping before melting. This will deepen the chocolate flavor and add a subtle, sophisticated coffee note without making it taste explicitly like coffee.
- White Chocolate Dream: Instead of semi-sweet or milk chocolate, try a white chocolate topping. Ensure you use good quality white chocolate chips or chopped white chocolate bars for best melting and flavor. You can even drizzle with a bit of dark chocolate for a striking visual contrast.
Tips for Making Perfect Homemade Twix Bars
Achieving bakery-quality Twix Bars at home is easier than you think with these expert tips:
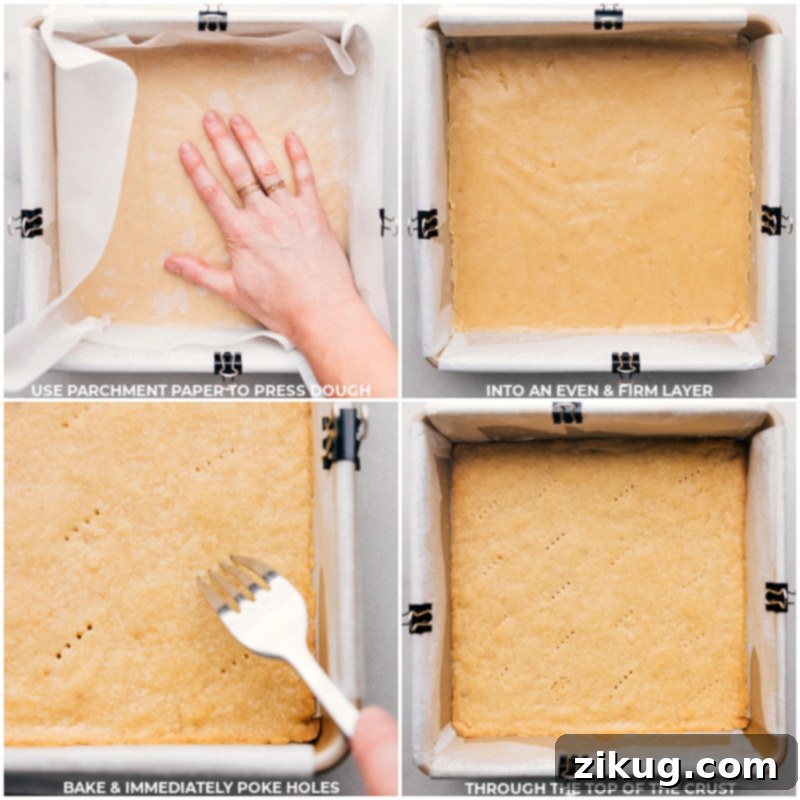
- The Parchment Paper Sling is Your Best Friend: Lining your baking pan with parchment paper, leaving an overhang on two sides, is absolutely essential. This creates a “sling” that allows you to effortlessly lift the entire slab of cooled bars out of the pan for clean, easy cutting. It also prevents the caramel from sticking to the pan edges, ensuring perfect removal.
- Mind the Butter Temperature for Shortbread: When preparing the shortbread crust, ensure your butter is melted but *not hot*. Hot butter can make the dough too greasy and dense, resulting in a less tender crust. Allow it to cool slightly after melting.
- Press for Even Shortbread Layers: An even shortbread crust is key for consistent baking and a uniform texture. After pressing the dough into the pan, place another piece of parchment paper on top and use a flat-bottomed glass or your hands to press down firmly and evenly across the entire surface.
- Poking Holes in the Crust: Gently poking holes across the top half of the warm shortbread crust (without piercing all the way through) creates tiny channels for the caramel to seep into. This helps the caramel bond beautifully with the shortbread, preventing separation when cut.
- Patience with Cooling: Resist the urge to rush the cooling process! Each layer needs adequate time to set and firm up before the next is added or before cutting. Proper cooling ensures distinct layers, optimal textures, and prevents your bars from becoming a messy, melty lump.
- The Hot, Dry Knife Trick: For super clean, professional-looking slices, use a very sharp knife. Dip it into hot water for a few seconds, wipe it completely dry with a towel, and then make your cut. Repeat this warming and drying process for each slice, especially through the sticky caramel layer.
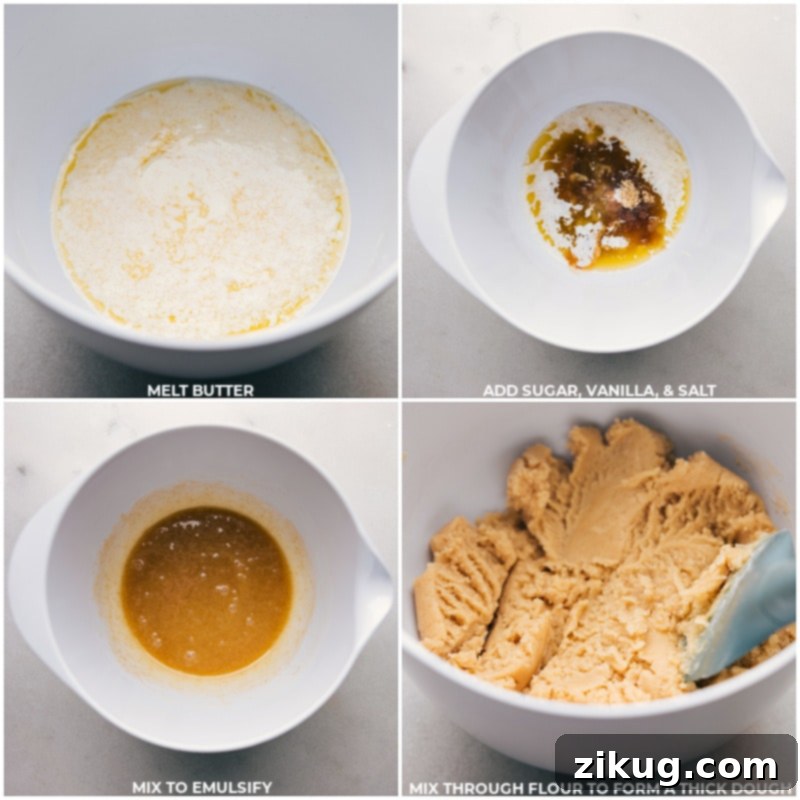
- Emulsify the Caramel Properly: When making the caramel, ensure the butter and brown sugar are fully emulsified before adding the condensed milk. This means whisking them together until the mixture is smooth and the butter no longer appears separated. This step is crucial for a homogenous, silky caramel.
- Measure Flour Accurately: For the shortbread, spoon your flour into the measuring cup and then level it off with a straight edge. Scooping directly from the bag can compact the flour, leading to too much being used and a dry, tough crust.
The Importance of Pan Size
Achieving the ideal thickness for each layer of your homemade Twix Bars is crucial for both taste and texture, and this is heavily dependent on using the correct pan size.
- The Gold Standard: A 9×9-inch pan is highly recommended for this recipe. This size ensures that your shortbread crust is perfectly sturdy yet tender, your caramel layer is gooey without being overwhelming, and your chocolate topping provides the right amount of snap. It also aligns with the tested baking times for optimal results. You can find a suitable 9×9-inch pan here.
- Using an 8×8-inch pan (with caution): While a 9×9-inch pan is ideal, an 8×8-inch pan can be used, but with a few important adjustments and careful monitoring. Because the layers will be thicker, the baking times will vary significantly. The caramel layer, in particular, will take longer to set. Watch for small, consistent bubbles across the surface and only a *slight* jiggle when you gently shake the pan. If it still wobbles a lot, it needs more time in the oven. Be prepared for a denser, taller bar, and adjust your expectations for baking duration.
Twix Bar Storage and Serving Suggestions
Proper storage ensures your homemade Twix Bars remain delicious and retain their perfect texture for days. Here’s how to keep them at their best:
- Room Temperature Storage: Store your Twix Bars in an airtight container at room temperature for 3 to 5 days. This allows the shortbread to remain tender and the caramel to stay wonderfully gooey.
- Refrigeration for Warmer Climates: If you live in a hot and humid environment, or if your kitchen runs warm, it’s best to refrigerate the bars to prevent the chocolate from melting and the caramel from becoming too soft. Just be aware that refrigeration might make the caramel slightly firmer.
- Serving Temperature: For the absolute best flavor and texture experience, serve your Twix Bars at room temperature. If refrigerated, allow them to sit out for about 10-15 minutes before serving to soften the caramel and enhance the chocolate’s texture.
- Freezing for Long-Term Enjoyment: For longer storage, you can freeze Twix Bars! Wrap individual bars or the entire slab tightly in plastic wrap, then place them in an airtight freezer-safe container or bag. They can be frozen for up to 2-3 months. Thaw them in the refrigerator overnight or at room temperature for a few hours before serving.
More Irresistible Dessert Recipes:
- Nutella Stuffed Chocolate Chip Cookies
- No-Bake Cookies
- Microwave Caramel Corn
- Caramel Cookie Bars
- Chocolate Caramel Cookies
Homemade Twix Bars
Chelsea Lords
These homemade Twix Bars feature buttery shortbread, gooey caramel, and rich chocolate—just like the candy bar, but even better!
45 minutes
30 minutes
1 hour 50 minutes
3 hours 5 minutes
16 bars
Video Tutorial
Learn how to make these delicious Twix Bars with our helpful video tutorial.
(Video content placeholder – original video player was complex and JavaScript-driven. For a static HTML version, you might embed a direct YouTube/Vimeo iframe here if available, or just refer to it as a separate resource.)
Equipment
- 9 x 9-inch baking pan (see note 1)
- Parchment paper
- Small pot
Ingredients
- Cooking spray
Crust
- 8 tablespoons unsalted butter, melted but not hot
- 1/4 cup light brown sugar, firmly packed
- 1 teaspoon vanilla extract
- 1/4 teaspoon salt
- 1 cup + 1 tablespoon all-purpose flour
Caramel Filling
- 8 tablespoons unsalted butter, cut into cubes
- 1/2 cup light brown sugar, lightly packed
- 1/8 tsp salt
- 1 (14-ounce) can sweetened condensed milk (see note 2)
- 1 teaspoon vanilla extract
Chocolate Topping
- 1 cup + 2 tablespoons semi-sweet chocolate chips (or milk chocolate chips, see note 3)
- 3 teaspoons vegetable oil
Instructions
- Preheat oven to 325°F (160°C). Line a 9×9-inch metal baking pan with parchment paper, allowing an overhang on two sides for easy removal, then grease with cooking spray.
- In a medium bowl, combine the melted (but not hot!) butter, brown sugar, vanilla, and salt. Stir in the flour until thoroughly combined. The dough will be thick. Press the dough firmly and evenly into your prepared pan. (You can place another piece of parchment paper on top and press down with a flat object for a smooth surface). Bake for 17–23 minutes, or until the edges are lightly browned. Remove from the oven. Using a fork, poke holes all over just the top half of the warm crust (do not press the fork all the way through). Let the crust cool slightly while you prepare the caramel.
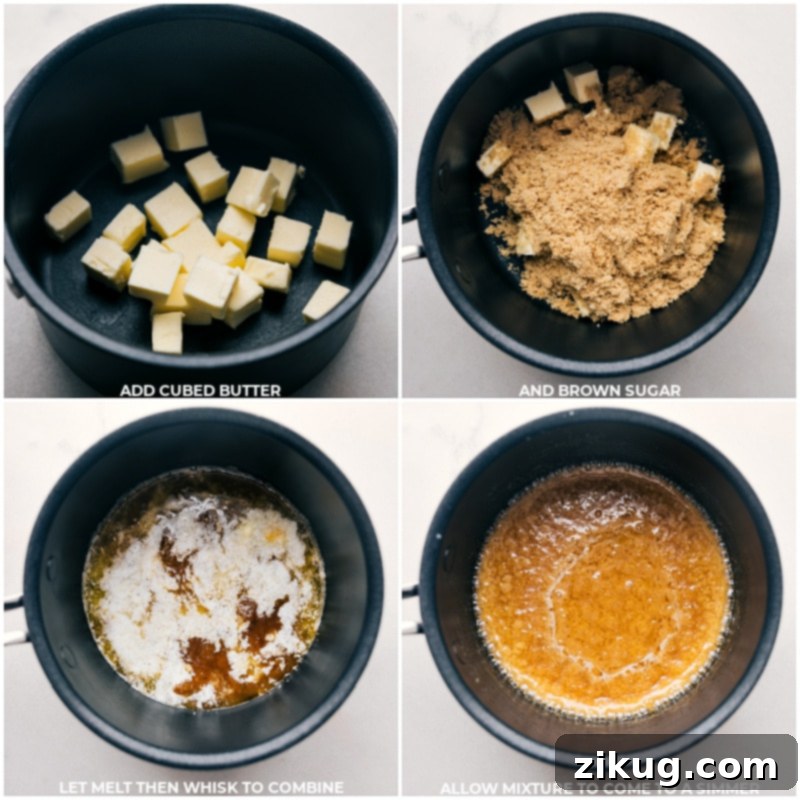
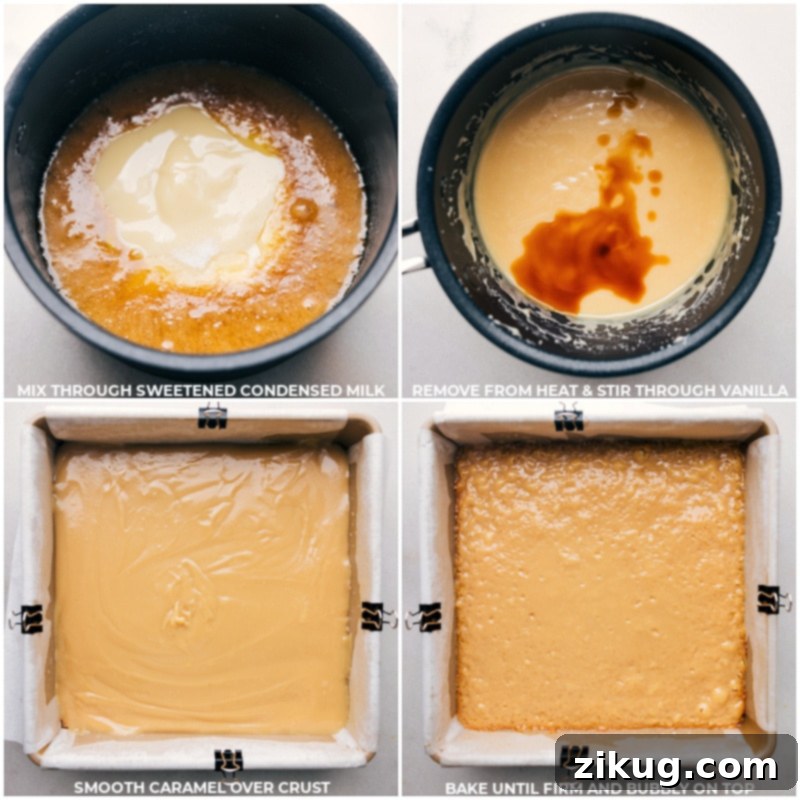
- Place the cubed butter and brown sugar in a small pot over medium-low heat. Allow the butter to melt completely, then whisk it with the sugar until they are emulsified (the butter should no longer be separating from the sugar). Let the mixture come to a gentle simmer. As soon as small bubbles appear, add the sweetened condensed milk and salt. Whisk constantly for 5 minutes, or until large, slow bubbles begin to appear. Remove from heat and whisk for an additional minute before stirring in the vanilla extract. Pour this warm caramel over the cooled shortbread crust and spread it out evenly with a spatula.
- Bake the bars for 12–17 minutes, or until the caramel surface is bubbly all over and exhibits only a slight jiggle when the pan is lightly shaken. This indicates that the caramel has set. (Refer to recipe images for visual cues if available!)
- Allow the bars to cool at room temperature for 25 minutes, then transfer them to the refrigerator for another 25 minutes to cool further. Ensure the bars are not overly cold before adding the chocolate, as this might hinder the chocolate from setting properly or cause it to crack.
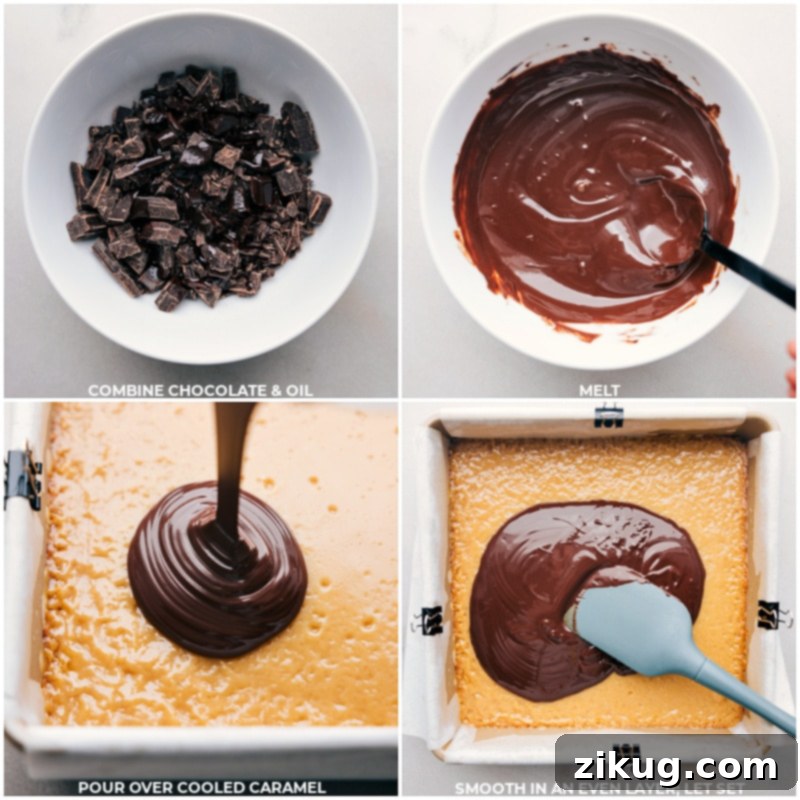
- In a microwave-safe bowl, combine the chocolate chips and vegetable oil. Microwave in 30-second intervals, stirring for 20 seconds between each interval, until the chocolate is fully melted and smooth. Pour the melted chocolate evenly over the set caramel layer and spread it out smoothly with a spatula. Gently tap the pan a few times on the counter to ensure a perfectly flat surface.
- Refrigerate the bars until the chocolate is fully set, which typically takes about 1 hour. Before cutting, let the bars stand at room temperature for about 10 minutes. Use the parchment paper overhang to carefully remove the entire slab of bars from the pan. To cut them cleanly, use a sharp knife that has been warmed under hot water (remember to wipe the knife completely dry with a towel after each warming). Repeat this process with each cut to achieve perfect slices.
Recipe Notes
Note 1: Pan Size Matters: A 9×9-inch baking pan is highly recommended for optimal results. An 8×8-inch pan can be used, but requires careful monitoring of the caramel layer during baking. Look for tiny bubbles and minimal jiggle when the pan is shaken. If it wobbles excessively, bake a bit longer until set.
Note 2: Sweetened Condensed Milk is Key: For the caramel, it is imperative to use only full-fat sweetened condensed milk. Reduced-fat or sugar-free versions will not achieve the correct texture or flavor. Double-check your label to avoid accidentally using evaporated milk, which is a different product entirely.
Note 3: Chocolate Choice: Semi-sweet chocolate chips help to balance the overall sweetness of the bars. However, if you prefer a flavor profile closer to a classic Twix candy bar, milk chocolate chips are a fantastic choice. For the smoothest melt and best taste, opt for high-quality chocolate brands like Ghirardelli or Guittard.
Storage: Store your homemade Twix Bars in an airtight container at room temperature for 3–5 days. If the weather is particularly hot, refrigerate them to prevent the layers from melting. For the most enjoyable flavor and texture, serve the bars at room temperature.
Nutrition Information
Serving: 1 bar | Calories: 338 kcal | Carbohydrates: 39.7g | Protein: 4.4g | Fat: 18.5g | Cholesterol: 44.3mg | Sodium: 32.8mg | Fiber: 44.3g | Sugar: 32.8g
Nutrition information is automatically calculated and should only be used as an approximation.
There you have it – your very own batch of spectacular homemade Twix Bars! These delightful treats are more than just a dessert; they’re a testament to the joy of baking and the superior taste of fresh, quality ingredients. We hope you and your loved ones enjoy every single layered bite of buttery shortbread, gooey caramel, and rich chocolate. Don’t hesitate to experiment with the variations to find your favorite twist!
If you loved making these bars, please share your experience and leave a comment below. Your feedback and creativity inspire us! Happy baking!