
Indulge in a truly restaurant-worthy Tiramisu Recipe, featuring perfectly coffee-soaked ladyfingers, a lusciously whipped mascarpone cream, and a delicate dusting of cocoa. This classic Italian dessert is an absolute delight, bringing the authentic flavors of Italy right to your kitchen.
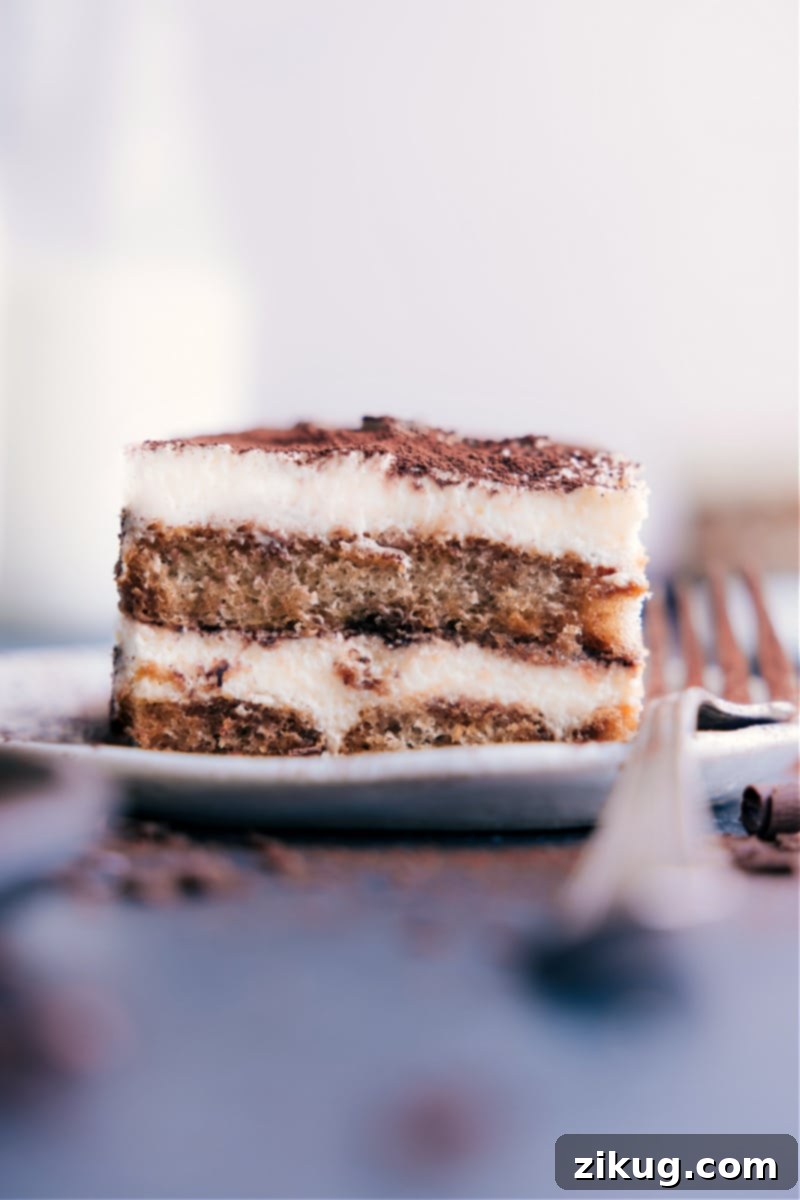

Author’s Culinary Journey
Crafting the Perfect Tiramisu Recipe, Straight from Italy!
During my extensive travels and culinary adventures in Italy, I had the privilege of immersing myself in its rich gastronomic traditions. I’ve proudly shared numerous Italian-inspired recipes from my cooking classes, including delicious bruschetta, a refreshing fennel salad, homemade gelato, and a hearty beef ragù. Yet, there remained one iconic Italian dessert that I simply couldn’t hold back any longer: Tiramisu. It truly is one of my all-time favorites, a dessert I sought out and savored at every opportunity during my time abroad. Today, this beloved classic finally takes center stage!
While this Tiramisu recipe is meticulously crafted to be largely authentic, drawing heavily from a treasured recipe I received in an Italian cooking class, I have introduced one subtle adaptation: the addition of a small amount of whipped cream. Traditionally, Tiramisu relies solely on a mascarpone-egg yolk mixture. However, I’ve found that incorporating whipped cream lends an even richer flavor and a delightfully lighter, airier texture to the overall dessert. You can certainly omit it for a strictly traditional approach, but after experiencing the enhanced version, I simply can’t imagine making it any other way. This minor tweak elevates an already magnificent dessert to new heights of indulgence.
The Rich History of Tiramisu: A Beloved Italian Classic
Tiramisu, meaning “pick me up” or “cheer me up” in Italian, is far more than just a dessert; it’s a culinary icon with a captivating past. While its exact origins are debated, most food historians agree that Tiramisu emerged in Italy during the 1960s or 1970s, with various regions like Veneto and Friuli Venezia Giulia claiming its invention. Regardless of its precise birthplace, Tiramisu quickly captured the hearts and palates of Italians and, soon after, the entire world.
The dessert’s name perfectly encapsulates its essence: a delightful blend of coffee, cocoa, and sweet cream designed to provide a gentle energy boost and an undeniable sense of comfort. It became a staple in Italian homes and restaurants, celebrated for its elegant presentation and complex yet harmonious flavors. Traditional Tiramisu has always featured ladyfingers (savoiardi) dipped in strong espresso, layered with a rich cream made from mascarpone cheese, eggs, and sugar, then finished with a dusting of cocoa powder. Over the decades, slight variations have emerged, but the core elements that define this timeless treat remain unchanged, a testament to its enduring appeal.
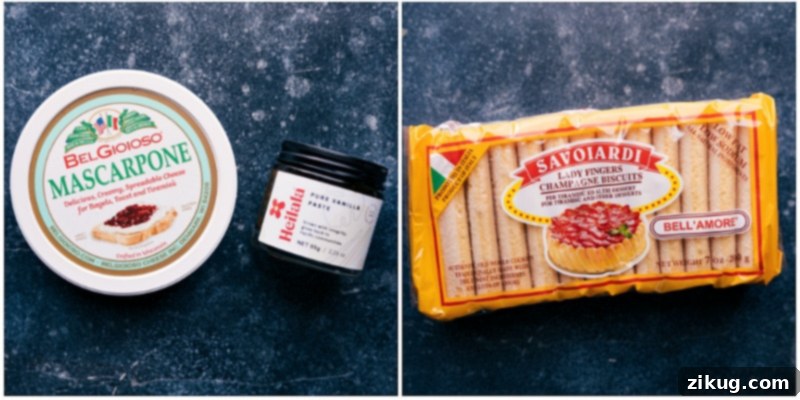
Essential Ingredients for Your Tiramisu Recipe
Crafting an authentic and utterly delicious Tiramisu begins with selecting high-quality ingredients. Each component plays a crucial role in achieving the signature texture and flavor profile of this beloved Italian dessert. Here’s a breakdown of what you’ll need and why each choice matters:
| Ingredient | Why It Matters & Pro Tips |
|---|---|
| Mascarpone Cheese | This rich, creamy Italian cheese is non-negotiable for authentic Tiramisu. Its mild sweetness and velvety texture are fundamental to the cream layer. Do not substitute with cream cheese; cream cheese has a tangier flavor and different consistency that will drastically alter the classic taste and mouthfeel of your dessert. Ensure your mascarpone is full-fat and at room temperature for optimal mixing, but don’t let it sit out too long to prevent it from separating. |
| Ladyfingers (Savoiardi) | These dry, finger-shaped sponge cakes are specifically designed to absorb liquid without becoming overly mushy. They are crucial for the structural integrity and characteristic texture of Tiramisu. If your local stores don’t carry them, they are widely available online. I’ve had great success with brands like Pavesini, Alessi, and Balocco Savoiardi. Always choose the dry, crisp variety, not the soft, cake-like ladyfingers, as they will become too soggy. |
| Espresso or Strong Coffee | The backbone of Tiramisu’s flavor comes from intense coffee. Real espresso is ideal, but a very strong-brewed coffee can work as a substitute. I highly recommend using a quality instant espresso powder whisked into hot water for a consistently rich and deep coffee flavor without the need for an espresso machine. Ensure it’s cooled to room temperature before dipping the ladyfingers. |
| Eggs | Eggs are essential for the traditional mascarpone cream, providing richness and structure. For safety in uncooked desserts, using pasteurized eggs is recommended, especially for pregnant individuals or those with compromised immune systems. Always bring eggs to room temperature before mixing; this helps them emulsify better with sugar and other ingredients, creating a smoother, more stable cream. |
| Cocoa Powder | A generous dusting of cocoa powder is the iconic finish for Tiramisu, adding a touch of bitterness that balances the sweetness of the cream. Dutch-process cocoa powder is preferred for its smoother, less acidic flavor and darker, more elegant finish. Sift it on just before serving for the freshest look and flavor. For picture-perfect slices, dust again lightly after cutting. |
| Coffee Liqueur or Dark Rum | Alcohol adds a layer of depth and complexity to the coffee flavor. Coffee liqueur, dark rum, or even brandy are classic choices. Add it sparingly at first to avoid overpowering the delicate balance of flavors. For an alcohol-free version, simply omit it and perhaps add a splash more vanilla extract. |
| Heavy Cream | While not strictly traditional, adding whipped heavy cream (my adaptation!) creates an exceptionally light and airy texture in the mascarpone mixture. It makes the Tiramisu feel less dense and more ethereal. Whip the cold heavy cream to medium peaks only; over-whipping can lead to a grainy texture. Gently fold it into the mascarpone mix to maintain its airy consistency. |
| Granulated Sugar | Standard granulated sugar provides the necessary sweetness and helps stabilize the egg yolk mixture. |
| Vanilla Extract or Paste | A touch of vanilla enhances the overall flavor profile. Vanilla paste offers a more intense flavor and visible vanilla specks. |
| Salt | A pinch of salt in the egg whites helps them whip up beautifully and adds balance to the sweetness. |
Essential Equipment for Making Tiramisu
Having the right tools makes all the difference when preparing Tiramisu. Here’s what you’ll need to ensure a smooth and successful baking process:
-
8×8-inch Baking Pan: A square baking pan is ideal for assembling your Tiramisu layers. A glass or ceramic dish works wonderfully as it’s non-reactive and great for chilling.
-
Stand Mixer or Handheld Electric Mixer: Essential for whipping the egg yolks with sugar, whipping the heavy cream, and beating the egg whites to stiff peaks. A stand mixer makes the process effortless, but a good quality handheld electric mixer will also do the job.
-
Large Mixing Bowls: You’ll need several for separating eggs, preparing the mascarpone mixture, and whipping cream and egg whites.
-
Shallow Bowl or Dish: For dipping the ladyfingers in espresso. Ensure it’s wide enough to accommodate the full length of a ladyfinger.
-
Rubber Spatula: Indispensable for gently folding ingredients, scraping down bowls, and spreading the cream mixture evenly.
-
Fine-Mesh Sieve: For dusting cocoa powder evenly over the Tiramisu layers, ensuring a smooth and professional finish.
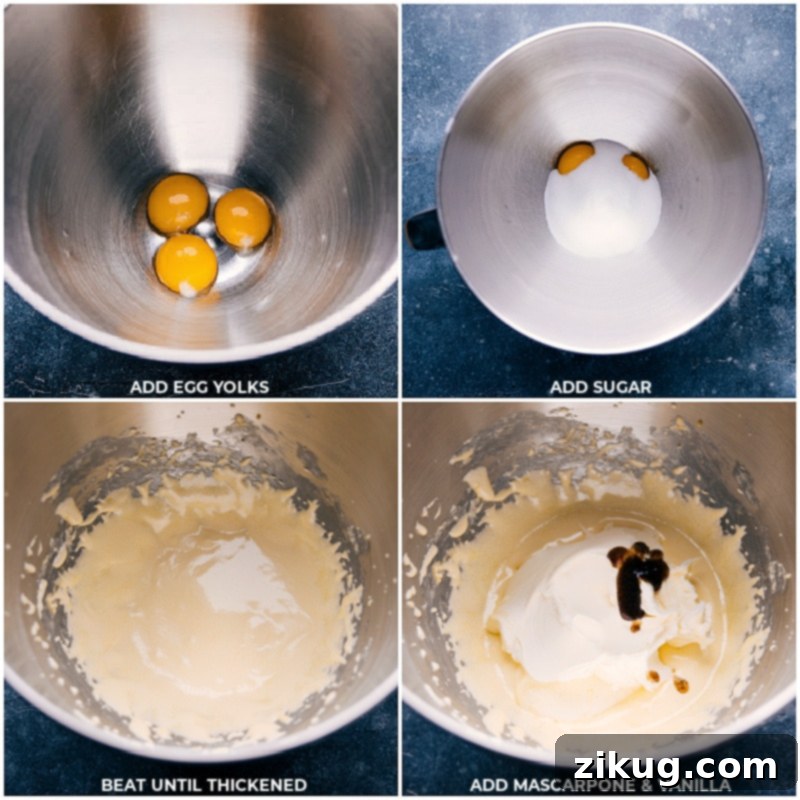
How To Make This Authentic Tiramisu Recipe: Step-by-Step Guide
Making Tiramisu is a joyful process that culminates in a truly spectacular dessert. Follow these detailed steps to create a perfect Tiramisu that will impress everyone:
- Prepare the Espresso Mixture: Begin by preparing your strong espresso or coffee mixture. Allow it to cool completely to room temperature. This is crucial; warm coffee will make the ladyfingers disintegrate. If you’re using coffee liqueur, dark rum, or brandy, stir it into the cooled coffee now. Pour the mixture into a shallow bowl, wide enough to dip ladyfingers comfortably. Lightly grease your 8×8-inch baking pan with cooking spray and set it aside.
- Whip Egg Yolks with Sugar: Carefully separate the yolks from the whites of three large pasteurized eggs. Place the yolks in the bowl of a stand mixer (or a large bowl if using a hand mixer). Add the granulated sugar over the yolks. Attach the whisk attachment and beat the mixture on high speed (speed 6 on a stand mixer) for about 10 minutes. The mixture should transform into a pale yellow, almost white, and become thick and ribbon-like. Occasionally scrape down the sides of the bowl to ensure even mixing. This step is essential for dissolving the sugar and creating a stable base for the cream.
- Fold in Mascarpone and Vanilla: Turn off the mixer. Using a spatula, gently scrape all the mascarpone cheese into the egg yolk mixture. Add the vanilla extract or paste. Beat on low speed just until the mascarpone is fully incorporated and the mixture is smooth. Be careful not to overmix, as mascarpone can curdle if beaten too vigorously. Transfer this creamy mixture to a separate, very large bowl.
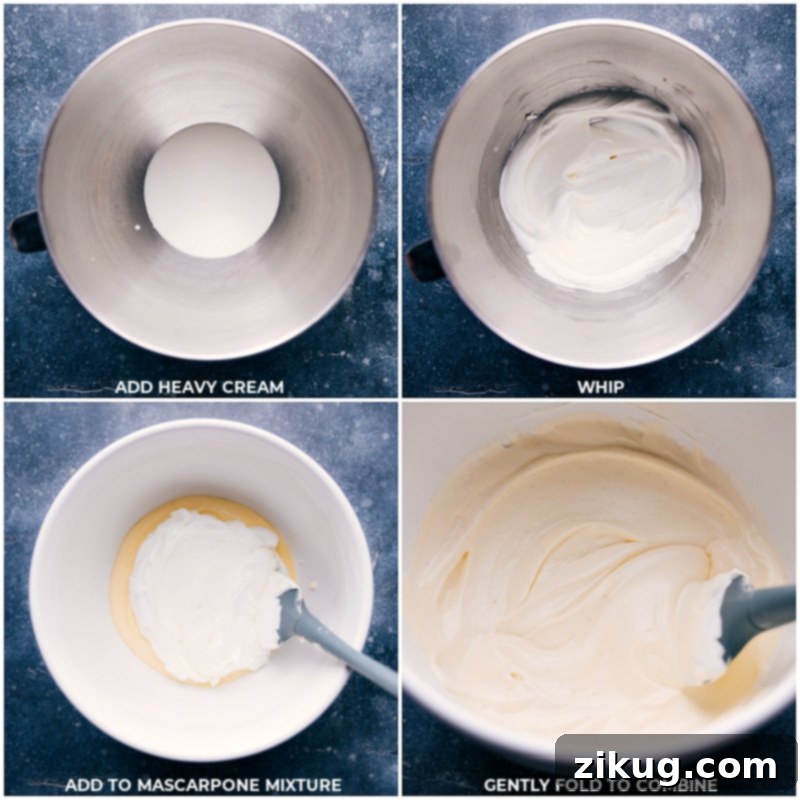
- Whip Heavy Cream: Without needing to clean the mixer bowl or whisk, add the cold heavy cream to the stand mixer bowl. Beat on high speed (speed 6) for approximately 3 minutes, or until medium peaks form. Medium peaks hold their shape but still have a slight curl at the tip. It’s critical not to overbeat, as this can cause the cream to separate and become grainy, leading to a heavy Tiramisu. Once whipped, gently fold this into the mascarpone-egg yolk mixture with a spatula until just combined. Now, thoroughly wash and dry the stand mixer bowl and whisk.
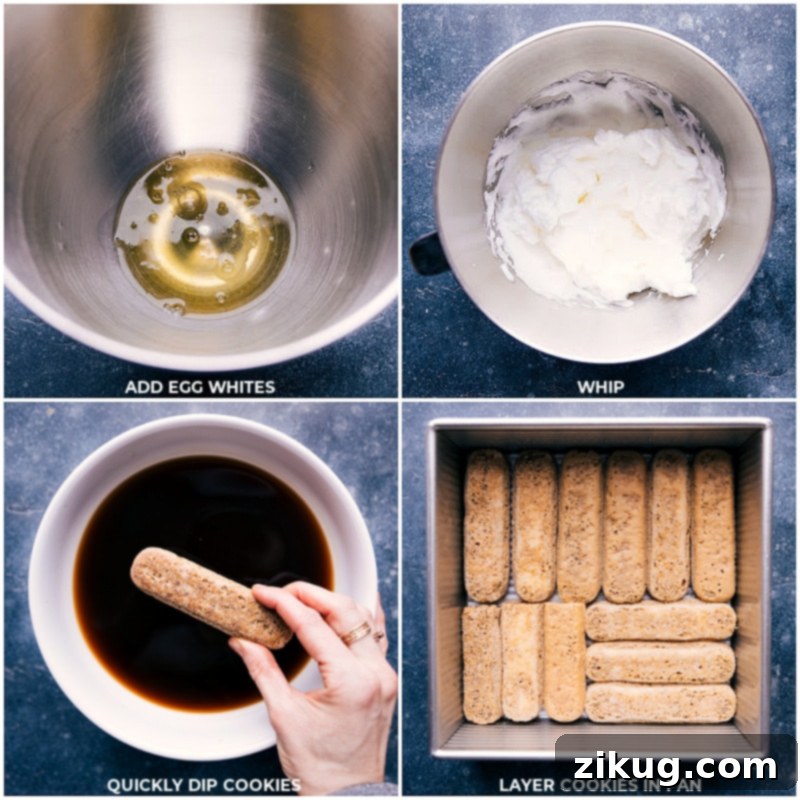
- Whip Egg Whites: Add the reserved egg whites and a pinch of salt to the clean, dry stand mixer bowl. Beat on high speed (speed 6) for 2-3 minutes, until the egg whites are stiff, bright white, and foamy, forming firm peaks. These stiff peaks will contribute to the airy texture of the final cream.
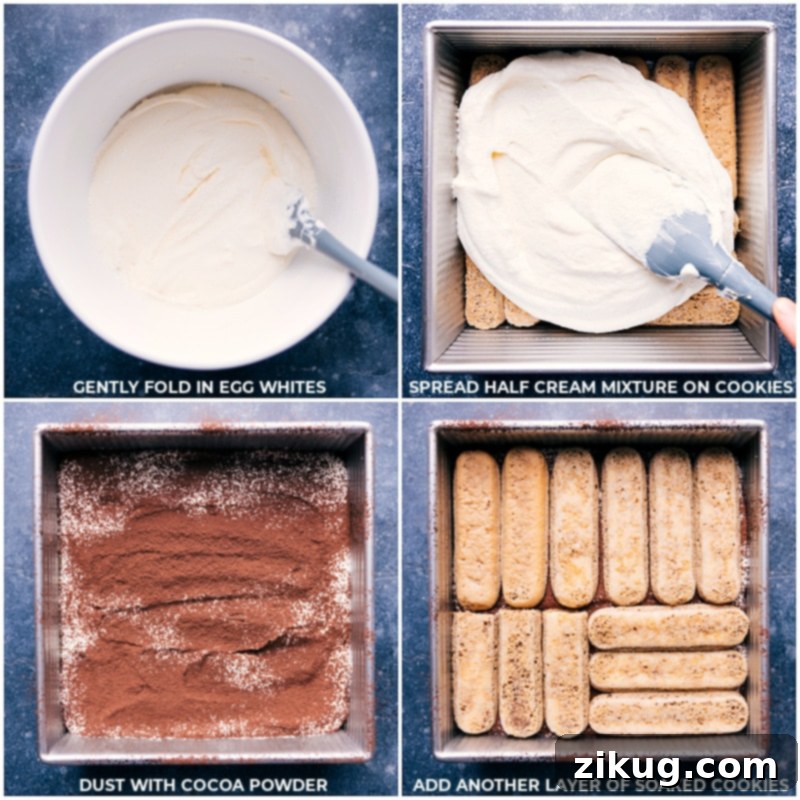
- Gently Fold Egg Whites into Cream: Take half of the whipped egg whites and gently fold them into the mascarpone-cream mixture using a spatula. Use a light, lifting motion to preserve the airiness. Once mostly incorporated, add the remaining egg whites and continue to fold very gently until just combined. The goal is a light, fluffy cream without deflating the egg whites.
- Dip and Layer the Ladyfingers: This step requires speed! Very quickly dip each ladyfinger into the cooled espresso mixture. One swift in-and-out motion is all it takes; do not soak them, or they will become soggy. Arrange the dipped ladyfingers in a single layer at the base of your prepared 8×8-inch pan, breaking cookies apart if necessary to fit perfectly.
- Build the Layers: Once the first layer of ladyfingers is complete, spread half of the prepared cream mixture evenly over them. Sift about 1/2 tablespoon of cocoa powder through a fine-mesh sieve over the cream layer. Repeat the process: quickly dip the remaining ladyfingers in coffee, arrange them as the second layer, and then spread the remaining cream mixture on top.
- Chill for Perfection: Cover the pan tightly with plastic wrap and refrigerate for a minimum of 6-8 hours, or preferably overnight. Chilling allows the flavors to meld beautifully and the dessert to set properly, resulting in firm, clean slices.
- Serve and Enjoy: Right before serving, sprinkle the remaining 1/2 tablespoon of cocoa powder on top through a fine mesh sieve for a fresh, appealing finish. To achieve perfectly clean cuts, use a sharp knife. Run the knife under hot water, quickly dry it, make a cut, and repeat for each slice. Serve immediately and savor the exquisite taste of homemade Tiramisu!
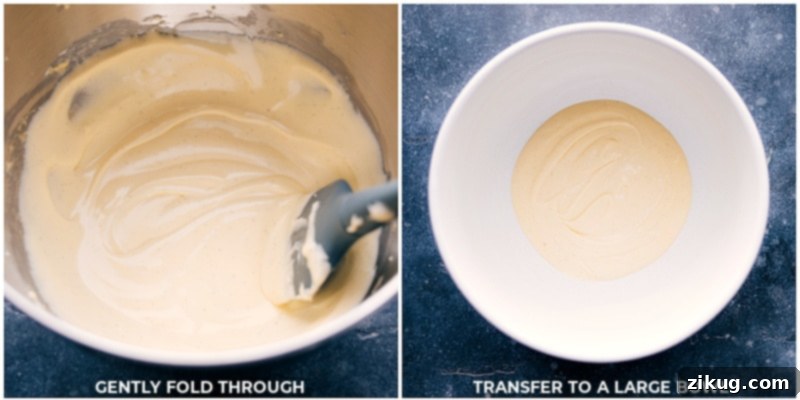
Pro Tips for Achieving Tiramisu Perfection
While making Tiramisu is relatively straightforward, a few expert tips can elevate your dessert from good to absolutely outstanding:
- Always Use Pasteurized Eggs: Since this Tiramisu recipe calls for raw eggs in the cream mixture, the FDA highly recommends using pasteurized eggs to significantly reduce the risk of foodborne illness. If pasteurized eggs aren’t available, you can gently heat your egg yolks and sugar over a double boiler, whisking constantly until the mixture reaches 160°F (71°C) before incorporating the mascarpone. This cooks the eggs to a safe temperature.
- Dip Ladyfingers Quickly: This is perhaps the most crucial tip for a perfect Tiramisu. The ladyfingers should only have a fleeting kiss with the coffee mixture – a quick in-and-out motion is all that’s needed. Never, ever soak them. Savoiardi are designed to absorb liquid rapidly, and even a second too long will result in a soggy, mushy dessert. A properly dipped ladyfinger should still have a slight structural integrity.
- Whip Cream and Egg Whites to Medium Peaks Only: When whipping both the heavy cream and the egg whites, aim for medium peaks. For heavy cream, this means the peaks hold their shape but still have a soft, slightly drooping tip. For egg whites, stiff peaks are desired, but ensure they are not over-whipped to the point of being dry or granular. Over-whipping can cause the cream to separate, leading to a heavy, greasy texture in your Tiramisu. A lighter hand ensures a delicate, airy consistency.
- Chill Thoroughly: Patience is a virtue, especially with Tiramisu. A minimum of 6-8 hours, and ideally overnight, in the refrigerator allows the ladyfingers to soften perfectly, the flavors to meld harmoniously, and the cream to set firmly. Don’t rush this step!
Creative Tiramisu Variations
Feel free to customize your Tiramisu to suit different tastes or occasions:
- Alcohol-Free Tiramisu: Easily skip the coffee liqueur, rum, or brandy. To compensate for the slight flavor loss, you can add an extra splash of vanilla extract or a touch of almond extract to the espresso mixture.
- Decaf Version: For those who prefer to avoid caffeine, simply use decaffeinated espresso or very strong decaf coffee in this Tiramisu recipe. The flavor will remain wonderfully rich without the stimulating effects.
- Chocolate-Forward Tiramisu: Elevate the cocoa notes by dusting with extra Dutch-process cocoa powder between layers and on top. For an even more decadent experience, add fine chocolate shavings (dark chocolate is best) over each cream layer before dusting with cocoa.
- Individual Cup Versions: For elegant entertaining or portion control, assemble your Tiramisu in small dessert cups or ramekins. This makes serving a breeze and creates a charming presentation.
- Sheet-Pan Tiramisu: Feeding a crowd? Assemble the Tiramisu in a large rimmed sheet pan. This makes it incredibly easy to prepare and serve larger quantities, perfect for parties or potlucks.
- Fruity Tiramisu: While not traditional, some enjoy adding a layer of fresh berries (like raspberries or strawberries) between the cream layers for a bright, tangy contrast. This creates a refreshing twist, especially in warmer months.
Storage Guidelines for Tiramisu
Proper storage is essential to maintain the quality and safety of your homemade Tiramisu, especially due to its rich, creamy dairy layers.
- This Tiramisu recipe requires refrigeration at all times because of its delicate cream components. Any leftovers must be covered tightly with plastic wrap to prevent absorption of refrigerator odors and to maintain freshness.
- Promptly return any uneaten Tiramisu to the fridge right after serving. For best quality and safety, consume it within 3 to 4 days. Beyond this, the texture and flavor may degrade, and there’s an increased risk of spoilage.
- While you can technically freeze Tiramisu, it’s generally not recommended. The dairy components, particularly the mascarpone and whipped cream, are prone to separating when thawed. This can result in a watery, less appealing texture that detracts significantly from the dessert’s signature creaminess. If you must freeze it, thaw slowly in the refrigerator overnight and be prepared for potential textural changes.
Quick Tip for Serving Tiramisu with Elegance
Serving up Tiramisu with clean, beautiful slices:
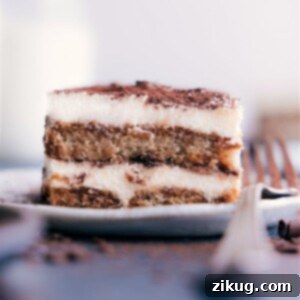
To achieve those picture-perfect, clean cuts that showcase the beautiful layers of your Tiramisu, here’s a professional trick: use a sharp knife that has been warmed. Run a sharp, thin-bladed knife under very hot water for about 10-15 seconds. Quickly dry the blade completely with a kitchen towel (do not let water drip into your dessert!). Then, make a single, decisive cut. For each subsequent slice, repeat the process of warming and drying the knife. This simple technique melts through the cocoa and cream, preventing drag and ensuring smooth, neat portions every time. It makes a significant difference in presentation.
Tiramisu Recipe FAQs
Classic Tiramisu recipes traditionally include raw egg yolks (and sometimes whites) in the mascarpone cream. For most healthy individuals, using pasteurized eggs makes this dessert low risk. Pasteurized eggs have been gently heated to kill bacteria without cooking them. However, individuals who are pregnant, elderly, very young, or have compromised immune systems should consult with their doctor or consider using a fully cooked Tiramisu version where the eggs are gently heated over a double boiler until safe, or opt for egg-free Tiramisu recipes to ensure complete safety.
While Tiramisu is indeed “spiked” with espresso, the amount of caffeine per serving is generally quite modest. A typical slice of Tiramisu contains a relatively small amount of coffee, similar to a very weak cup of coffee or even less. For most people, one slice of Tiramisu is unlikely to contain enough caffeine to significantly disrupt sleep, especially if consumed earlier in the evening. If you are particularly sensitive to caffeine, or plan to enjoy a slice late at night, you might consider making a decaffeinated version of the espresso mixture for peace of mind.
The most common reason for a soggy Tiramisu is over-dipping the ladyfingers. Ladyfingers are incredibly absorbent; they only need a very quick, split-second dip in the espresso mixture. If you soak them for too long, they will absorb too much liquid and become mushy, leading to a watery and unappetizing dessert. Another factor could be using the wrong type of ladyfingers. Always use dry, crisp savoiardi biscuits, not the softer, cake-style ladyfingers, which are less dense and will break down too easily. Ensure your espresso is also at room temperature, as warm coffee can accelerate sogginess.
A runny Tiramisu cream can be caused by several factors. Firstly, ensure your mascarpone cheese is full-fat and of good quality; low-fat versions may have excess moisture. Secondly, over-mixing the mascarpone can cause it to break and become grainy or runny. Mix it only until just combined. Thirdly, improper whipping of the heavy cream or egg whites can lead to a less stable cream. Ensure both are whipped to medium (for cream) or stiff (for whites) peaks, and then folded gently to maintain their airy structure. Finally, insufficient chilling time will prevent the cream from firming up properly. Always allow your Tiramisu to chill for at least 6-8 hours, or preferably overnight, to set completely.
The Grand Finale: A Tiramisu Recipe to Cherish
Creating this authentic Tiramisu recipe is a culinary journey that promises a truly rewarding destination. From the robust coffee-soaked ladyfingers to the exquisitely smooth mascarpone cream, every layer builds into a symphony of flavors and textures that is both comforting and sophisticated. This no-bake dessert, steeped in Italian tradition yet perfected with a touch of modern flair, is more than just a sweet treat; it’s an experience. Whether you’re sharing it with loved ones or indulging in a quiet moment of bliss, this Tiramisu is guaranteed to uplift your spirits and transport your taste buds straight to the heart of Italy. Master these simple steps and tips, and you’ll have a show-stopping dessert that will be requested time and again. Enjoy the art of Italian dessert making!
Explore More Delicious Dessert Recipes:
Desserts
Easy Chocolate Fondue
Desserts
Mini Oreo Cheesecakes
Desserts
Coconut Cream Pie Recipe
Desserts
Refreshing Lemon Tart
Tiramisu: The Classic Italian Pick-Me-Up
Chelsea Lords
35 minutes
6 hours (preferably overnight)
6 hours 35 minutes
14 servings
Video Tutorial
A video tutorial demonstrating the steps for this Tiramisu recipe is available. It visually guides you through making the espresso mixture, whipping the creams, assembling the layers, and achieving the perfect finish.
(Please note: Actual video embedding relies on external scripts, which are excluded here per instructions. This text serves as a placeholder.)
Equipment Needed
- 8 x 8-inch baking pan
- Stand mixer (or a high-quality handheld electric mixer)
- Large mixing bowls
- Shallow dish for coffee dipping
- Rubber spatula
- Fine-mesh sieve
Ingredients
- 1/4 cup + 1 tablespoon instant espresso powder (see Note 1 below)
- 1-1/4 cups hot water (for espresso)
- Cooking spray (for greasing the pan)
- 3 large pasteurized eggs, at room temperature, separated
- 1/2 cup granulated sugar
- 1 (8-ounce) container) mascarpone cheese, at room temperature (see Note 2 below)
- 1-1/4 teaspoon vanilla extract or 1 teaspoon vanilla paste
- 3/4 cups heavy cream, cold
- 1/8 teaspoon salt
- 3 tablespoons coffee liqueur, dark rum, or brandy (optional; skip for alcohol-free)
- 1 (7-ounce) package ladyfingers (savoiardi or pavesini, see Note 3 below)
- 1 tablespoon Dutch process cocoa powder, divided
Instructions
- Prepare Espresso Mixture & Pan: Boil 1-1/4 cups of water and whisk in 1/4 cup + 1 tablespoon instant espresso powder. Let it cool completely to room temperature. Pour the cooled coffee mixture into a shallow bowl suitable for dipping ladyfingers. Lightly grease an 8×8-inch baking pan with cooking spray; set aside. Separate the 3 eggs, placing yolks in a stand mixer bowl and whites in a separate, clean bowl. Take the mascarpone out of the fridge to bring to room temperature.
- Whip Yolks and Sugar: Add 1/2 cup granulated sugar to the egg yolks in the stand mixer bowl. Using the whisk attachment, beat on high speed (speed 6) for 10 minutes until the mixture turns a very pale yellow (almost white) and becomes thick and ribbons. Scrape the sides of the bowl as needed. Turn off the mixer, then scrape in all the mascarpone cheese and add 1-1/4 teaspoon vanilla. Beat on low speed just until smooth and combined. Transfer this mixture to a separate, very large bowl.
- Whip Heavy Cream: Without cleaning the stand mixer bowl, add the 3/4 cups cold heavy cream. Beat with the whisk attachment on high speed (speed 6) for 3 minutes, or until medium peaks form (where peaks hold their shape but still gently curl). Be very careful not to overbeat. Gently fold the whipped cream into the egg yolk-mascarpone mixture using a spatula. Now, thoroughly wash and dry the stand mixer bowl and whisk.
- Whip Egg Whites: Add the reserved egg whites and 1/8 teaspoon salt to the clean, dry stand mixer bowl. Beat on high speed (speed 6) until the eggs are stiff, bright white, and foamy, forming firm peaks (about 2-3 minutes).
- Fold Egg Whites into Cream: Gently fold half of the whipped egg whites into the mascarpone-cream mixture with a spatula, using a light, lifting motion. Once mostly incorporated, add the remaining egg whites and gently fold again until just combined. The mixture should remain light and airy.
- Dip and Layer Ladyfingers: If using alcohol, stir the 3 tablespoons coffee liqueur into the cooled coffee mixture. Quickly dip one ladyfinger at a time into the coffee mixture (do not soak!). Line the base of the prepared 8×8-inch pan with the dipped ladyfingers, breaking them as needed to fit.
- Assemble Layers: Spread half of the cream mixture evenly over the first layer of ladyfingers. Sift 1/2 tablespoon of cocoa powder over the cream using a fine-mesh sieve. Repeat this process: dip the remaining ladyfingers, arrange them as the second layer, then spread the remaining cream mixture on top.
- Chill: Cover the pan tightly with plastic wrap and refrigerate for 6-8 hours, or preferably overnight, to allow the Tiramisu to set and flavors to meld.
- Serve: Right before serving, sprinkle the remaining 1/2 tablespoon cocoa powder over the top through a fine-mesh sieve. For clean cuts, use a sharp knife warmed under hot water and quickly dried for each slice. Cut into pieces, serve, and enjoy!
Recipe Notes
Note 2: Mascarpone Quality: Always use high-quality, full-fat mascarpone cheese. Avoid any low-fat or low-quality varieties, as they tend to be runnier and can negatively impact the texture of the cream layer. You can typically find mascarpone in the dairy case of most grocery stores. Ensure both mascarpone and eggs are at room temperature for optimal blending, but do not let mascarpone sit out for more than 15–20 minutes, as it can get too warm and potentially break or separate.
Note 3: Ladyfinger Selection: Your local grocery store might carry ladyfingers, but if you have trouble finding them, they are readily available online. I’ve had good experiences with Alessi Ladyfingers and Balocco Ladyfingers. Crucially, always opt for the crunchy, dry savoiardi variety. Avoid soft, cake-style ladyfingers, as they will quickly become overly soggy and ruin the texture of your Tiramisu.
Storage: Tiramisu is particularly sensitive to temperature due to its creamy layers. Promptly return any leftovers, tightly covered with plastic wrap, to the refrigerator, and consume within 3–4 days. While it can be frozen, the dairy components are prone to weeping or separation upon thawing, which can affect the dessert’s texture.
Nutrition Information
Nutrition information is automatically calculated and should only be used as an approximation. Actual values may vary based on ingredient brands and preparation methods.