
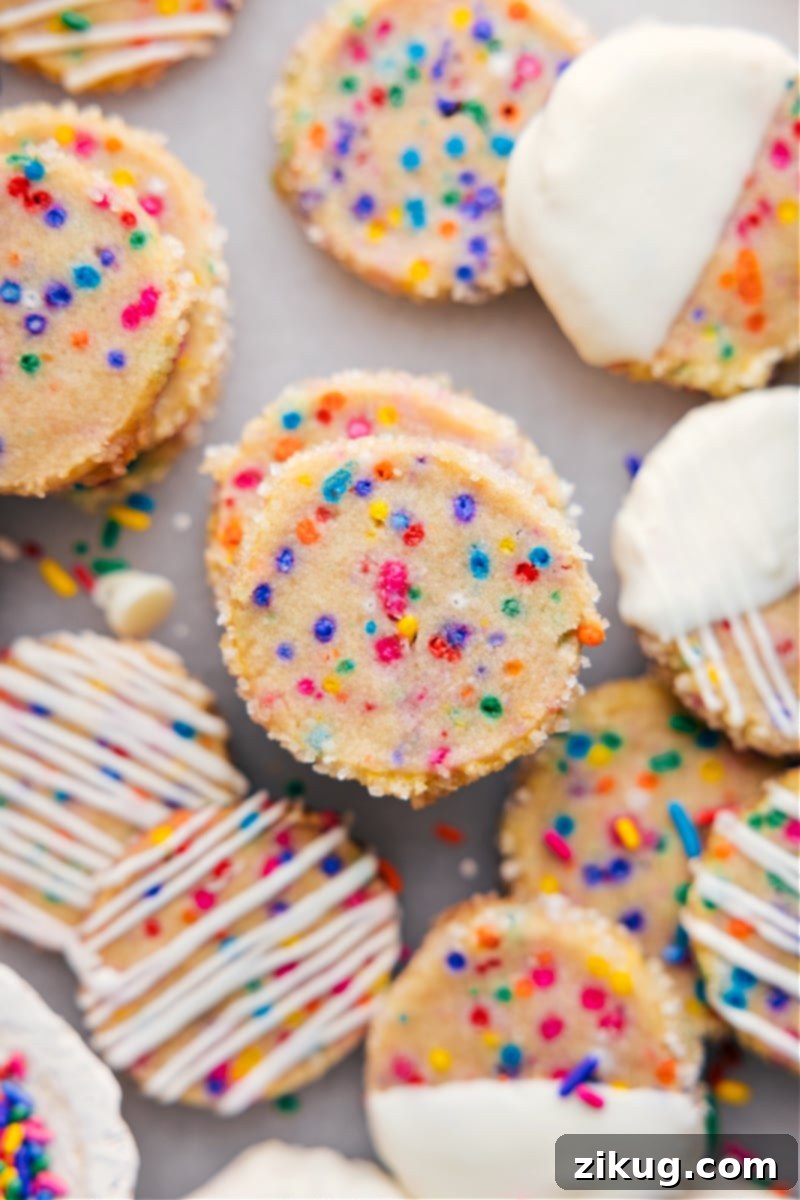
Welcome to the world of effortless baking with these delightful Slice and Bake Cookies! Crafted to be perfectly buttery, wonderfully sweet, and speckled with vibrant, colorful sprinkles, these cookies are a true joy. For an extra touch of indulgence, a luscious drizzle of creamy white chocolate elevates them to gourmet status. Ideal for busy bakers and cookie enthusiasts alike, this recipe promises homemade deliciousness with minimal fuss.
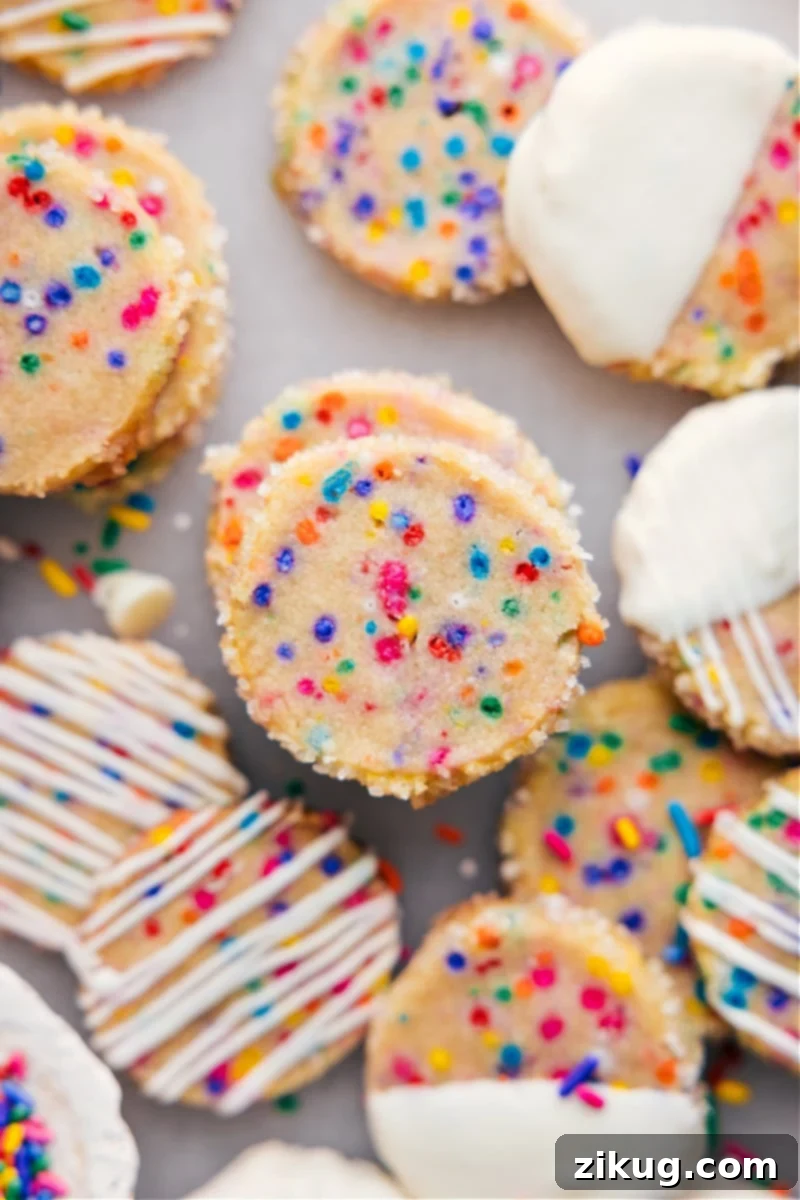

Author’s Insight
Discovering the Magic of Make-Ahead Slice and Bake Cookies!
A few months ago, I experienced a true baking revelation. A friend served us freshly baked cookies that appeared almost instantly. When I asked her secret, she casually mentioned keeping several logs of cookie dough in her fridge or freezer, ready to be sliced and baked at a moment’s notice. This simple idea struck me as pure genius – a genuine life hack for anyone who loves homemade treats without the daily effort.
Naturally, I had to try it myself, embarking on a mission to perfect my own slice-and-bake cookie recipe. Through extensive testing, I discovered a few key elements that make all the difference. A subtle addition of cornstarch proved essential for maintaining a wonderfully soft and tender cookie texture. I also learned the importance of weighing flour rather than measuring by volume, ensuring the dough remains perfectly tender and never dry. For those vibrant bursts of color, I found that ‘jimmies’ sprinkles hold their shape and hue far better than nonpareils.
Another crucial aspect was chill time. After experimenting, I found that a minimum of two hours in the refrigerator allows the dough to firm up perfectly, resulting in clean, precise slices and cookies that hold their beautiful shape during baking. Once these elements were in place, I knew I had a recipe worth sharing. Now, my freezer is always stocked with cookie dough logs. Whether a neighbor drops by unexpectedly, or my kids are craving a warm, comforting treat, I can simply slice what I need and bake. Fresh, delicious cookies, zero mess, and absolute convenience – whenever the craving strikes.
Essential Ingredients for Perfect Slice and Bake Cookies
Crafting these delectable slice and bake cookies begins with a selection of high-quality ingredients, each playing a vital role in achieving their signature buttery, sweet, and tender texture. Here’s what you’ll need, along with some helpful tips and easy swaps:
| Ingredient | Easy Swap or Tip for Best Results |
|---|---|
| Unsalted butter | Using unsalted butter gives you control over the salt content. If using salted butter, reduce the added salt in the recipe by about ¼ teaspoon. Ensure butter is cold and cut into small cubes for optimal creaming. |
| Light brown sugar | Light brown sugar adds a lovely caramel note and helps keep the cookies moist. For a slightly lighter color and a crispier edge, you can swap in half white granulated sugar. |
| Vanilla + almond extract | Vanilla extract is crucial for classic cookie flavor. A tiny dash of almond extract (1/8 teaspoon) adds a unique depth, but it’s entirely optional if you prefer a pure vanilla profile. Remember, a little almond extract goes a very long way! |
| Cornstarch | This secret ingredient is key to super soft cookies. Cornstarch helps tenderize the dough and prevents a chewy texture. If you’re out, arrowroot powder can work as a substitute in a pinch, typically using a 1:1 ratio. |
| All-purpose flour | For the most consistent and tender cookie dough, measure your all-purpose flour by weight (325 grams is ideal) rather than by volume. Over-measuring flour is a common culprit for dry, crumbly cookies. |
| Rainbow jimmies | Not all sprinkles are created equal! Opt for jimmies (the rod-shaped sprinkles) over nonpareils (tiny round balls). Jimmies are less prone to bleeding color into your dough and offer a more pleasant texture. |
| Egg wash + coarse sugar | An egg wash helps the coarse sugar adhere and creates a beautiful golden crust. Extra-coarse sugar provides a wonderful crunch and sparkle. If you can’t find it, sparkling sugar or turbinado (cane) sugar are excellent alternatives. |
How To Make Perfectly Easy Slice and Bake Cookies
Making these delightful slice and bake cookies is surprisingly simple, designed for convenience without compromising on flavor or texture. Follow these steps for homemade perfection:
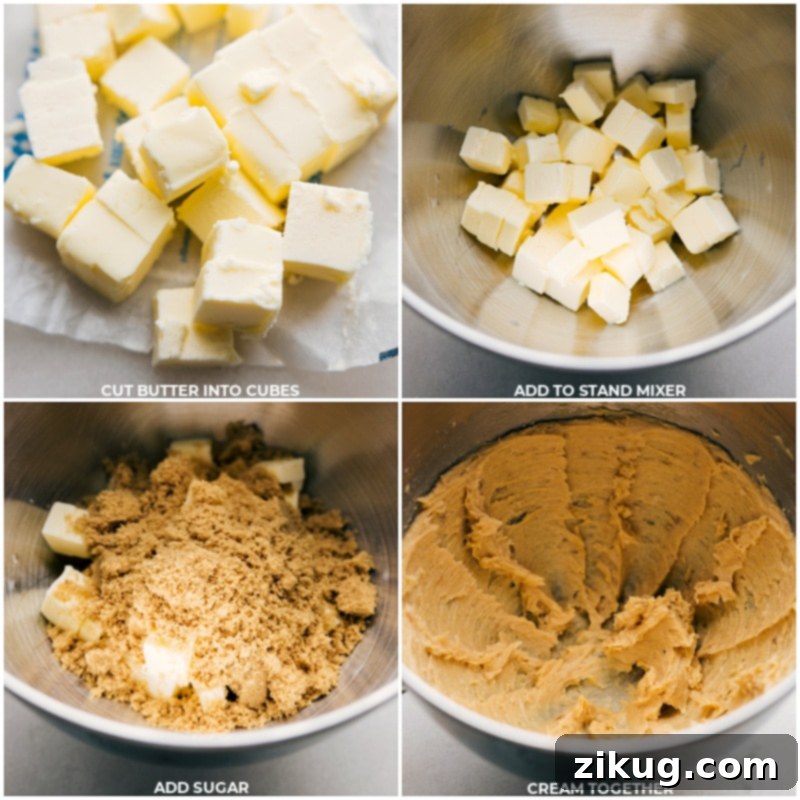
- Cream Butter and Sugar: Begin by beating the cold, cubed unsalted butter with the light brown sugar in a stand mixer (or with a hand mixer). Continue to beat until the mixture is light, fluffy, and smooth, resembling the consistency of creamy peanut butter. This usually takes about 3-5 minutes, so be sure to scrape down the sides of the bowl as needed to ensure everything is thoroughly combined.
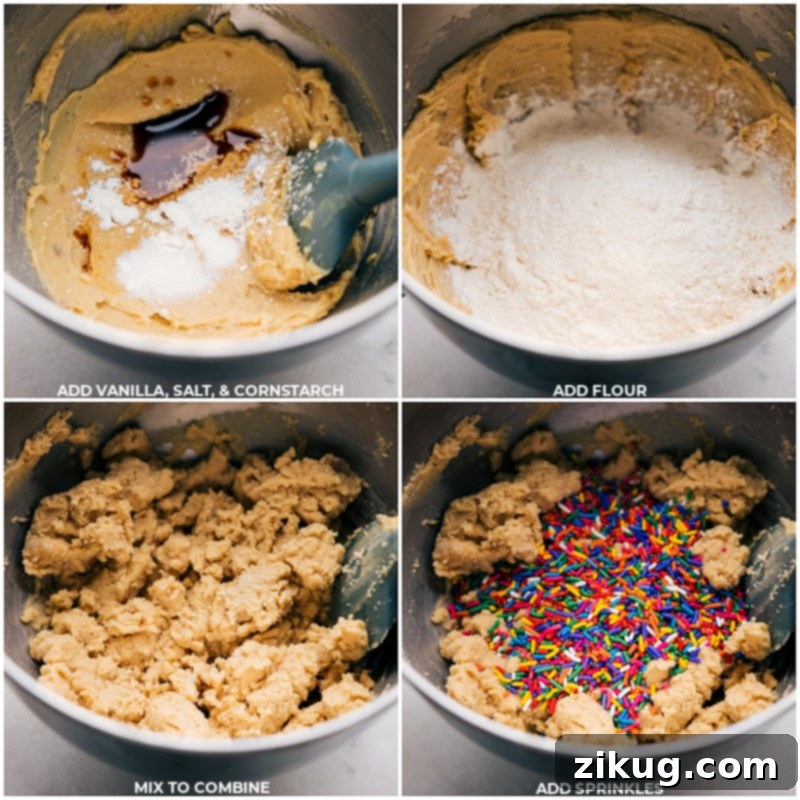
- Incorporate Flavors and Dry Ingredients: Next, add the vanilla extract, optional almond extract, salt, and cornstarch to the creamed butter and sugar. Beat just until these ingredients are well combined. Then, gradually add the all-purpose flour, mixing on low speed only until it’s incorporated and no dry streaks remain. Overmixing the flour can lead to tough cookies, so stop as soon as it’s blended.
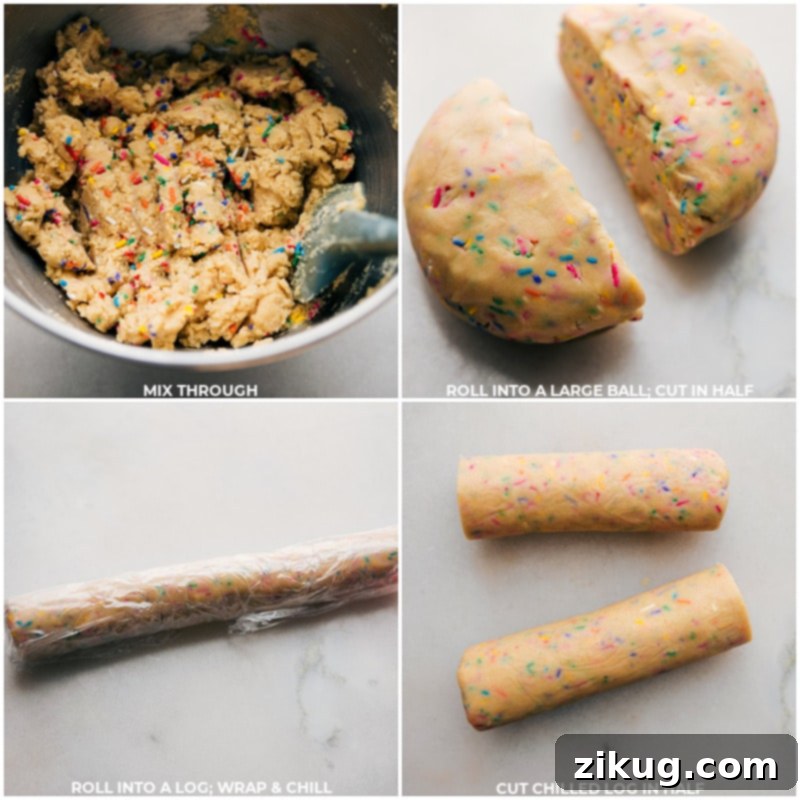
- Add Sprinkles and Chill the Dough: Gently fold in your rainbow jimmies by hand or on very low speed until they are evenly distributed throughout the dough. The dough might seem a bit crumbly at first, but it will come together with a bit of gentle mixing and kneading. Gather the dough into a large ball, then divide it in half. Shape each half into a log, approximately 11 inches long and 1.5 inches in diameter. Rolling them on the counter helps create an even shape. Tightly wrap each dough log in plastic wrap and refrigerate for at least 2 hours. This chilling step is crucial for firm dough and clean slices.
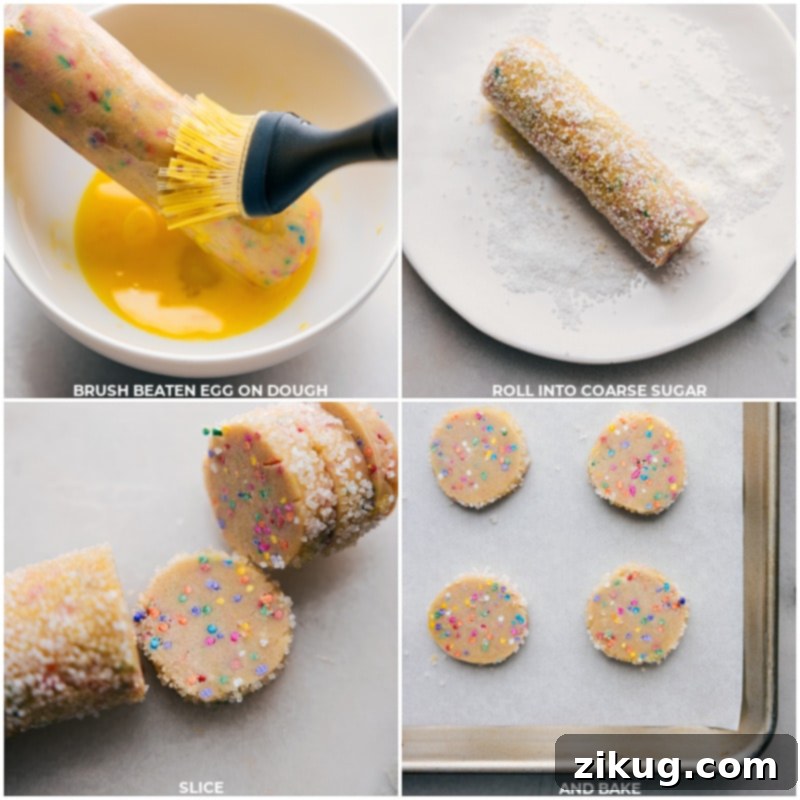
- Coat, Slice, and Bake: Once the dough is thoroughly chilled, preheat your oven to 350°F (175°C) and line a sheet pan with parchment paper or a silicone baking mat. Pour the coarse sparkling sugar onto a flat plate. Unwrap one dough log at a time, cut it in half, then brush the outside of each half-log with the lightly beaten egg. Roll the dough log evenly in the sparkling sugar until fully coated. Using a sharp knife, slice each log into uniform 1/2-inch thick cookies. Arrange them on your prepared baking sheet, leaving about 1 inch between each cookie. Bake for 8 to 12 minutes, or until the edges are just set and lightly golden. Be careful not to overbake, as this will result in dry cookies.
- Cool and Finish: Carefully remove the baked cookies from the oven and transfer them to a wire cooling rack to cool completely. If desired, melt white chocolate chips with a touch of vegetable oil in the microwave, stirring until smooth. Dip half of each cooled cookie into the melted chocolate, or drizzle it over the cookies using a piping bag (or a plastic bag with a snipped corner). Allow the chocolate to set completely at room temperature before serving. Repeat the slicing and baking process with the remaining dough logs.
Expert Tips For Bakery-Quality Slice and Bake Cookies
Achieving truly perfect slice and bake cookies is easy with a few simple techniques. These tips will help you create a batch that’s consistently delicious and beautifully presented:
- Avoid Over-mixing the Dough: Once you add the flour, mix just until it’s combined and no dry streaks remain. Over-mixing develops gluten, which can lead to tough, dense cookies instead of soft ones.
- Gentle Mixing of Sprinkles: When folding in the jimmies, do so gently. Vigorous mixing can cause the sprinkles to break apart or, worse, bleed their colors into the dough, creating a dull appearance.
- Roll Dough Evenly: Take your time to roll the dough logs evenly in diameter from end to end. This ensures that all your cookies are roughly the same size and thickness, which promotes uniform baking.
- Even Slicing is Key: Use a sharp, non-serrated knife to slice the chilled dough logs into consistent 1/2-inch thick rounds. Even slices are critical for cookies that bake uniformly, preventing some from being undercooked while others are overdone.
- Monitor Bake Time Closely: Oven temperatures can vary, so start checking your cookies around the 8-minute mark. They are done when the edges are just beginning to turn a light golden brown and the centers appear set. An under-baked cookie might be too soft, but an over-baked cookie will be dry and crumbly.
- Reshape While Warm: If any of your cookies come out of the oven a little misshapen, gently reshape them using a spatula or the back of a spoon while they are still warm and pliable on the baking sheet.
- Proper Chilling is Non-Negotiable: Don’t rush the chilling process. The recommended 2 hours (or longer) allows the butter in the dough to firm up, preventing the cookies from spreading too much in the oven and ensuring those beautiful, clean slices.
Storage and Make-Ahead Brilliance
The beauty of slice and bake cookies lies in their incredible make-ahead potential and easy storage. Here’s how to keep your cookies fresh and your dough ready for whenever a craving strikes:
- Baked Cookies: Once completely cooled, store your baked slice and bake cookies in an airtight container at room temperature for up to 5-7 days. If your cookies are drizzled or dipped in white chocolate, layer them with parchment paper to prevent sticking.
- Dough Logs (Refrigerator): Unbaked dough logs can be tightly wrapped in plastic wrap and stored in the refrigerator for up to 1 week. This means you can have freshly baked cookies whenever you want them with minimal prep time.
- Dough Logs (Freezer): For longer storage, wrap the dough logs tightly in plastic wrap, then again in aluminum foil, or place them in a freezer-safe bag. They can be frozen for up to 3 months. When ready to bake, simply slice the frozen dough and bake directly from frozen, adding an extra 2-4 minutes to the baking time. No need to thaw!
More Easy Dessert Recipes to Delight Your Taste Buds:
Bars
Lemon Icebox Cake (Only 4 Ingredients!)
Desserts
Irresistible Peanut Butter Puppy Chow
Frozen Treats
Homemade Ice Cream In A Bag
Desserts
Easy & Creamy Oreo Fluff Recipe

Saved
Pin
★
★
★
★
The Ultimate Slice and Bake Cookies
Chelsea Lords
20 minutes
10 minutes
2 hours
2 hours
30 minutes
24
cookies
Video
Equipment Needed
-
Stand mixer or a hand mixer
-
Sheet pan (standard 15″ x 10″)
-
Parchment paper or a silicone baking mat
-
Cooling rack
Ingredients
- 16 tablespoons unsalted butter cold, cut into small cubes
- 3/4 cup light brown sugar lightly packed
- 1-1/2 teaspoons vanilla extract
- 1/8 teaspoon almond extract optional, for added depth
- 1/2 heaping teaspoon salt
- 1 teaspoon cornstarch
- 2-1/4 cups all-purpose flour see note 1 for best measurement
- 1/2 cup Rainbow Sprinkles use jimmies, not nonpareils (see note 2)
- 1 large egg lightly beaten, for egg wash
- 1/2 cup extra-coarse sugar for rolling cookies in, see note 3
- 1 cup white chocolate chips
- 1 teaspoon vegetable oil to thin chocolate for drizzling
Instructions
-
In a stand mixer fitted with a paddle attachment (or using a hand mixer), combine the cold, cubed unsalted butter and light brown sugar. Beat on medium speed until the mixture is light, fluffy, and smooth, achieving a consistency similar to creamy peanut butter. This usually takes 3-5 minutes. Remember to scrape down the sides of the bowl periodically to ensure all ingredients are well incorporated.
-
Add the vanilla extract, almond extract (if you’re using it), salt, and cornstarch to the creamed mixture. Beat on low speed just until these additional ingredients are fully combined. Then, gradually add the all-purpose flour, mixing only until it’s incorporated and no dry flour streaks remain. Be careful not to overmix, as this can result in tough cookies.
-
Gently fold in the rainbow jimmies (sprinkles) until they are evenly distributed throughout the dough. The dough might appear slightly crumbly at first, but it will come together beautifully with a bit of mixing and gentle kneading by hand.
-
Form the cookie dough into one large ball, then divide it into two equal halves. Shape each half into a log, approximately 11 inches long and about 1.5 inches in diameter. Roll the logs gently on your countertop to help achieve an even thickness. Wrap each dough log tightly in plastic wrap and transfer them to the refrigerator to chill for at least 2 hours. This crucial step ensures the butter firms up, making the dough easy to slice and preventing excessive spreading during baking.
-
Once your dough is thoroughly chilled, preheat your oven to 350°F (175°C). Line a large sheet pan with parchment paper or a silicone baking mat. Spread the extra-coarse sugar onto a large, flat plate. Unwrap one dough log at a time, then cut it in half. Brush the entire outside surface of each half-log with the lightly beaten egg, then roll it evenly in the coarse sugar until well coated.
-
Using a sharp knife, slice each sugar-coated dough log into uniform 1/2-inch thick cookie rounds. Place the sliced cookies on the prepared baking sheet, ensuring they are spaced about 1 inch apart. Bake for approximately 8–12 minutes, or until the edges are just beginning to turn a light golden brown and the centers appear set. Keep a close eye on them to prevent overbaking, which can lead to dry cookies.
-
Remove the freshly baked cookies from the oven and carefully transfer them to a wire cooling rack. Allow them to cool completely before handling or decorating. Repeat the slicing and baking process with the remaining dough logs.
-
Optional White Chocolate Drizzle: For an extra touch of sweetness, combine white chocolate chips and vegetable oil in a microwave-safe bowl. Microwave in 20-second intervals, stirring thoroughly for 15 seconds after each burst, until the chocolate is completely melted and smooth. You can either dip half of each cooled cookie into the melted white chocolate or pour the chocolate into a small plastic bag, snip off a tiny tip, and drizzle it artfully over the cookies. Allow the chocolate to set at room temperature before serving or storing.
Recipe Notes for Success
Note 2: Choosing the Right Sprinkles: For vibrant color that won’t bleed into your cookie dough, always use ‘jimmies’ (the rod-shaped sprinkles). Avoid ‘nonpareils’ (the tiny round sprinkles) as they often bleed color and can have an unpleasantly crunchy texture. Here’s a breakdown of different types of sprinkles if you want to learn more!
Note 3: Coarse Sugar Options: The extra-coarse sugar provides a delightful crunch and sparkle to the edges of these cookies. If you can’t find extra-coarse sugar, excellent substitutes include sparkling sugar or turbinado (cane) sugar.
Nutrition Information
Serving:
1
cookie
|
Calories:
165
kcal
|
Carbohydrates:
23.6
g
|
Protein:
1.7
g
|
Fat:
9.1
g
|
Cholesterol:
28.1
mg
|
Sodium:
54.6
mg
|
Fiber:
0.4
g
|
Sugar:
12.4
g
Nutrition information is automatically calculated and should only be used as an approximation.
Love these cookies? Leave a comment below!
Creative Variations & Customizations
The beauty of these slice and bake cookies lies in their versatility. While perfectly delicious as is, they offer a fantastic canvas for your creativity. Feel free to customize them to suit your taste or occasion:
Make Slice And Bake Cookies Your Own
- Flavor Infusions: Experiment with different extracts beyond vanilla and almond. Consider a hint of lemon, orange, peppermint (especially for holidays), or even a touch of rum extract for a sophisticated twist. You can also incorporate warm spice blends like pumpkin pie spice or apple pie spice for seasonal flair.
- Nutty Additions: For an extra layer of texture and flavor, fold in 1/2 cup of finely chopped nuts such as pecans, walnuts, or almonds into the dough with the sprinkles. Alternatively, after brushing with egg wash, roll the dough logs in finely crushed nuts instead of coarse sugar.
- Holiday & Seasonal Themes: Change up the sprinkles and coarse sugar to match any holiday or season! Use red and green for Christmas, pastels for Easter, orange and black for Halloween, or even just solid colored sugar for a themed party.
- Chocolate Lover’s Delight: Transform these into decadent chocolate slice and bake cookies by folding in 1/2 cup of mini chocolate chips (milk, dark, or white) into the dough. After baking and cooling, drizzle them with melted milk or dark chocolate instead of white chocolate for a double chocolate treat.
- Exquisite Dipped Cookies: For an elegant presentation, dip the entire cooled cookie (or just half) into melted chocolate. While the chocolate is still wet, sprinkle with additional toppings like finely chopped nuts, toasted coconut flakes, mini chocolate chips, or even a contrasting sprinkle color.
- Citrus Zest Boost: For a bright and zesty flavor, add 1-2 teaspoons of finely grated lemon or orange zest to the butter and sugar mixture.
- Spice It Up: Add 1/2 teaspoon of ground cinnamon or cardamom to the dry ingredients for a warm, aromatic cookie.
Frequently Asked Questions (FAQ) About Slice and Bake Cookies
Got questions about making the best slice and bake cookies? We’ve got answers!
- Why do my slice and bake cookies spread too much?
Excessive spreading is usually due to butter that’s too warm, insufficient chilling time, or too much flour. Ensure your butter is cold when you start, and thoroughly chill your dough logs for at least 2 hours. Also, make sure to measure your flour accurately, preferably by weight (325 grams), as too much flour can make dough dense, while too little can make it too soft and prone to spreading.
- Can I use different types of sugar for these cookies?
Yes, to some extent. Light brown sugar gives these cookies their moist, tender texture and a slight caramel flavor. You can substitute half of the brown sugar with granulated white sugar for a slightly crisper cookie and lighter color. However, replacing all the brown sugar might significantly change the texture and flavor profile.
- What’s the best way to get perfectly round cookies?
Start by rolling your dough logs as evenly as possible. After chilling, use a very sharp, non-serrated knife to slice the dough into uniform 1/2-inch thick rounds. If any cookies look a bit uneven after coming out of the oven, gently reshape them with a spatula or the back of a spoon while they are still warm and pliable on the baking sheet.
- How long can I store the cookie dough?
Wrapped tightly in plastic, cookie dough logs can be stored in the refrigerator for up to 1 week. For longer storage, wrap them again in aluminum foil and freeze for up to 3 months. You can slice and bake them directly from frozen, just add 2-4 minutes to the baking time.
- Why should I use jimmies instead of nonpareils?
Jimmies, the rod-shaped sprinkles, are more stable and less prone to bleeding their color into the cookie dough during mixing and baking. Nonpareils, the tiny round balls, tend to melt and bleed color, often resulting in a muddy-looking dough, and their texture can be uncomfortably crunchy once baked. For vibrant, clean colors, jimmies are the way to go!
There you have it – the ultimate guide to creating perfect slice and bake cookies every time. These delightful treats are not only incredibly easy to make, but they also offer the immense satisfaction of fresh, homemade flavor with unparalleled convenience. Whether you’re baking for a special occasion, a quick snack, or simply to fill your home with the comforting aroma of warm cookies, this recipe is sure to become a cherished favorite. Enjoy the process, savor the delicious results, and happy baking!