

Indulge in the ultimate comfort food with our Easy Cheesy Chicken Melts! This simple yet incredibly satisfying recipe starts with thick, toasted slices of bread, generously topped with a rich, creamy chicken mixture, an abundance of melted cheese, and a fresh sprinkle of herbs. Baked until beautifully golden and bubbly, these open-faced sandwiches are guaranteed to become a family favorite.


From the Author
Easy Chicken Melts: Your New Go-To Weeknight Hero!
There’s an undeniable charm and deep satisfaction that comes from a warm, cheesy open-faced sandwich, and these Cheesy Chicken Melts truly hit all the right notes. Imagine sinking your teeth into crusty bread, piled high with a savory, creamy chicken filling, blanketed in copious amounts of perfectly melted cheese, and crisped to golden perfection in the oven. This isn’t just a quick weeknight meal; it’s an elevated experience that feels a little more special, a culinary hug in every bite.
At my home, these chicken melts are in heavy rotation, and for good reason. They are incredibly quick to assemble, offering maximum flavor with minimal effort, making them a lifesaver on busy evenings. What’s more, they are endlessly customizable – easily adapting to whatever ingredients you have on hand or catering to specific dietary preferences. Even the pickiest eaters give them a thumbs-up, thanks to the cleverly hidden vegetables! I often streamline the process by prepping the chicken mixture in advance, so all that’s left is to assemble and bake when dinner time rolls around. Whether you prefer them simple and straightforward or dressed up with vibrant fresh herbs, a dash of hot sauce for an extra kick, or a few slices of ripe tomato for added freshness, these easy chicken melts offer a delicious, never-boring dinner solution that satisfies every time.
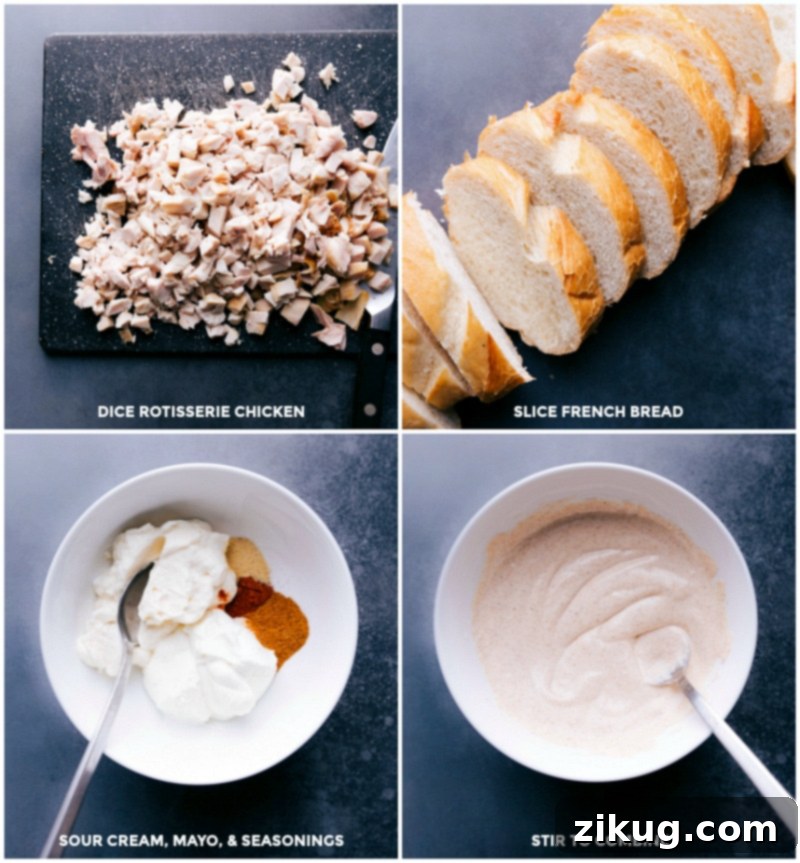
Key Ingredients for Perfect Chicken Melts
Crafting these delectable chicken melts requires a handful of simple, readily available ingredients. Here’s a detailed look at what you’ll need and why each component plays a vital role in achieving that irresistible flavor and texture:
- Rotisserie Chicken: The ultimate shortcut for this recipe! Using pre-cooked chicken, especially a juicy rotisserie chicken, saves a significant amount of prep time. You can also utilize leftover grilled or baked chicken breast. Simply dice it into small, uniform pieces to ensure it blends seamlessly into the creamy mixture.
- Shallots, Celery, and Carrots: These vegetables form the aromatic base of our chicken mixture, adding essential flavor, texture, and a boost of nutrients. Finely mincing or grating the shallots, celery, and carrots is key, especially if you’re serving picky eaters. This technique helps them melt into the creamy sauce, becoming virtually undetectable while still contributing a subtle sweetness and crunch.
- Cheddar Cheese: The star of any melt! Sharp or extra sharp Cheddar cheese offers a robust flavor and melts beautifully, creating that iconic gooey texture. For those who enjoy a little heat, consider swapping some or all of the Cheddar for pepper jack cheese. Swiss cheese also makes a delightful alternative, offering a nutty, savory profile.
- Sour Cream and Mayonnaise: This dynamic duo creates the rich, creamy binder for our chicken filling. The sour cream adds a tangy depth, while the mayonnaise contributes a velvety smoothness and binds all the ingredients together perfectly. For a lighter option or an alternative, full-fat Greek yogurt can be used as a fantastic substitute for sour cream, adding a similar tang with extra protein.
- Seasonings: A well-balanced seasoning blend is crucial for elevating the flavor of your chicken melts. We’ll be using a blend of Cajun seasoning, garlic powder, and paprika. Cajun seasoning brings a wonderful warmth and mild spice; remember to adjust based on your preferred heat level and the salt content of your specific blend. A pinch of smoked paprika can add even more depth, or a touch of Italian seasoning if you prefer a different herbaceous note.
- French Bread: The foundation of our open-faced sandwiches. A sturdy loaf of French bread, sliced thickly, provides the perfect crispy base to hold our generous filling. Its crusty exterior and soft interior are ideal for baking. Don’t hesitate to experiment with other types of bread like artisanal sourdough for a tangy twist, hearty ciabatta, or even halved hoagie rolls for a different shape and texture.
- Optional Add-ins and Garnishes: These are where you can truly personalize your melts. Consider adding thinly sliced Roma tomatoes for a burst of freshness, chopped green onions for a mild oniony bite, a drizzle of hot sauce for an extra kick, creamy avocado slices, or fresh herbs like cilantro or parsley for a vibrant finish.
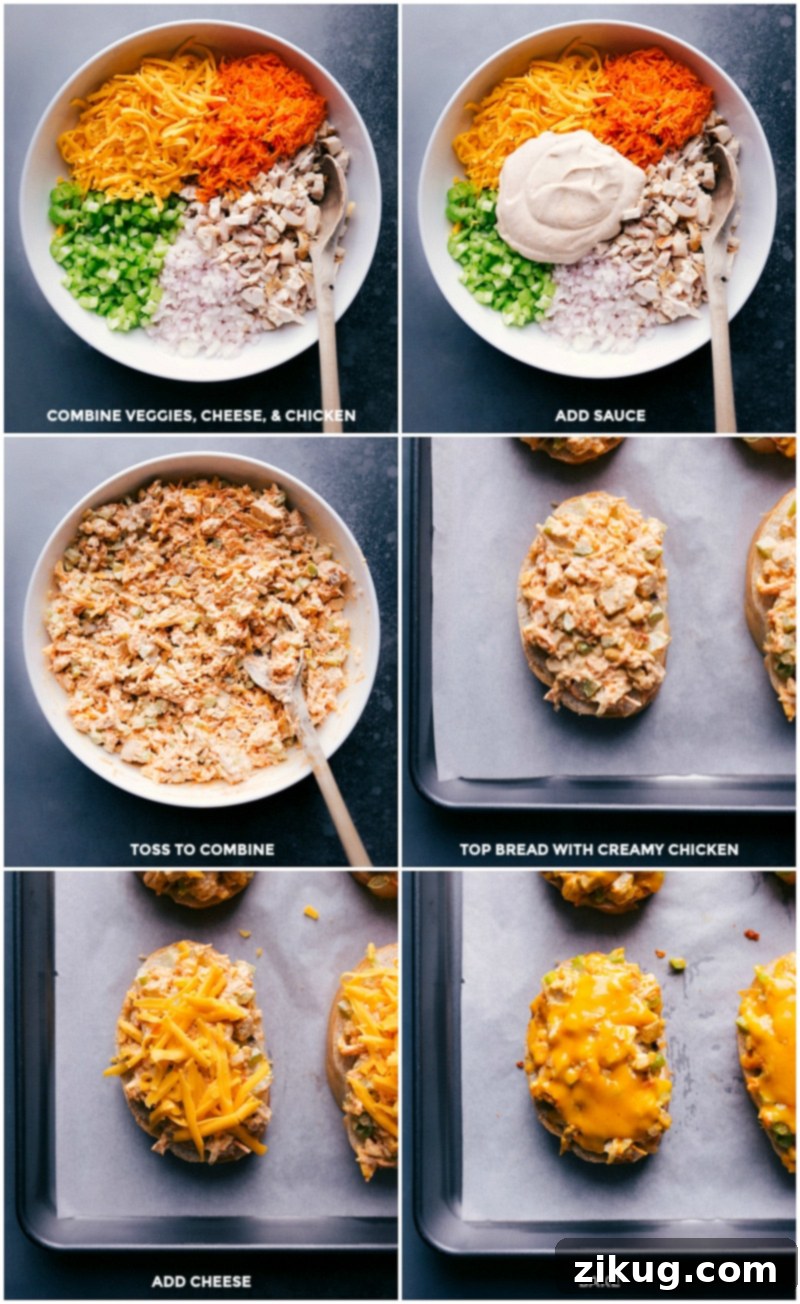
Step-by-Step Guide: How To Craft These Irresistible Chicken Melts
Making these easy cheesy chicken melts is a straightforward process that yields incredibly delicious results. Follow these simple steps for a perfect meal every time:
- Prepare Your Workspace and Ingredients: Begin by preheating your oven to 350°F (175°C). Line a large sheet pan with parchment paper to prevent sticking and ensure easy cleanup, then set it aside. This initial prep ensures a smooth cooking process. Next, prepare your core ingredients: if using a rotisserie chicken, dice it into small, manageable pieces. Finely dice your shallots and celery, and grate the carrots on the large holes of a grater. Shred your cheese if it isn’t pre-shredded – freshly shredded cheese always melts better!
- Assemble the Creamy Chicken Mixture: In a large mixing bowl, combine the diced chicken, prepared shallots, celery, carrots, and 1 cup of shredded Cheddar cheese. In a separate, smaller bowl, whisk together the sour cream, mayonnaise, Cajun seasoning, garlic powder, and paprika until the mixture is smooth and well-combined. This creates the flavorful, creamy binder for your filling. Pour this creamy sauce over the chicken and vegetable mixture. Gently stir everything together until all the ingredients are evenly coated. Now is the perfect time to taste the mixture and adjust the seasonings to your preference – you might want a little more Cajun seasoning for an extra kick!
- Construct Your Melts: Take your French bread loaf and slice it into thick pieces, approximately 1 to 1-1/2 inches thick. These sturdy slices are essential for holding the generous filling without becoming soggy. Arrange the bread slices on your prepared sheet pan. Spoon about 1/3 cup of the delicious chicken mixture onto each piece of bread, spreading it into an even layer with the back of a fork. Finally, sprinkle the remaining shredded Cheddar cheese generously over the top of each chicken melt. This ensures a beautiful golden, bubbly crust when baked.
- Bake to Golden Perfection: Place the sheet pan into your preheated oven. Bake for 8 to 10 minutes, or until the cheese on top is completely melted, bubbly, and slightly golden at the edges. The bread should also be lightly toasted and warm through. Keep a close eye on them during the last few minutes to prevent over-browning.
- Garnish and Serve Immediately: Carefully remove the baked chicken melts from the oven. For an extra touch of freshness and flavor, garnish them with fresh herbs like finely chopped parsley or cilantro. If you’re a fan of a little zest, I highly recommend adding a few thin slices of Roma tomato on top – their acidity beautifully balances the richness of the cheese and chicken. A drizzle of your favorite hot sauce can also add a delightful zing. Serve these irresistible chicken melts immediately while they are hot and the cheese is wonderfully gooey.
Quick Tip: The Magic of Shallots
Shallots are a secret weapon in many dishes, and they shine in these Chicken Melts. Compared to regular onions, shallots boast a sweeter, milder flavor profile with just a hint of sharpness. This makes them significantly less abrasive and overpowering than standard onions, allowing their subtle notes to enhance the creamy chicken mixture without dominating it. Finely dicing them ensures they blend seamlessly, adding depth without a strong raw onion taste, which is particularly great for those who are sensitive to stronger onion flavors or for discreetly adding more vegetables.

Exciting Chicken Melts Variation Ideas to Try
While the classic Chicken Melt is undeniably delicious, this recipe is incredibly versatile and lends itself beautifully to various customizations. Don’t be afraid to get creative and tailor it to your taste or what you have on hand:
- Spicy Kick: For those who love a bit of heat, a generous drizzle of Sriracha, your favorite hot sauce, or even a pinch of red pepper flakes mixed into the chicken filling can add a fantastic zing.
- Fresh Tomato Burst: Add a layer of thinly sliced Roma tomatoes directly on top of the chicken mixture before adding the final layer of cheese. They soften slightly in the oven, releasing a juicy, tangy counterpoint to the rich filling.
- Herbaceous Finish: Elevate the fresh factor by garnishing with a sprinkle of finely chopped fresh cilantro, vibrant green onions (scallions), or delicate chives just before serving. Each offers a distinct flavor that can brighten the dish.
- Cheese Adventures: Don’t limit yourself to just Cheddar! Experiment with different cheeses or create unique combinations. Try creamy Swiss for a nutty flavor, zesty pepper jack for a spicy twist, provolone for a mild, stretchy melt, or a blend of mozzarella and Parmesan for an Italian-inspired take.
- Onion Alternatives: If shallots aren’t available or you prefer a stronger flavor, finely diced red onion or sweet onion can be substituted. Remember that red onions have a sharper bite, so use them sparingly or consider briefly sautéing them before adding to the mixture.
- Avocado Creaminess: For an added layer of richness and healthy fats, top your baked melts with fresh, ripe avocado slices. The cool, buttery avocado provides a wonderful contrast to the warm, cheesy sandwich.
Serving Suggestions & Perfect Pairings
These Easy Cheesy Chicken Melts are substantial enough to be a meal on their own, but they also pair beautifully with a variety of side dishes to create a more complete and satisfying dinner. Consider these delicious additions:
- Simple Green Salad: A light, crisp green salad with a vinaigrette dressing provides a refreshing contrast to the rich and cheesy melts.
- Creamy Tomato Soup: A classic pairing with any grilled cheese or melt, a warm bowl of creamy tomato soup is the ultimate comfort combo.
- Roasted Vegetables: Asparagus, broccoli, or bell peppers roasted with a little olive oil and garlic make a healthy and flavorful side.
- Crispy Potato Chips or Fries: For a more indulgent meal, a handful of crunchy potato chips or crispy French fries makes an excellent companion.
- Tangy Coleslaw: The tangy crunch of coleslaw can cut through the richness of the chicken melts perfectly, offering a refreshing element.
Frequently Asked Questions (FAQs)
Here are answers to some common questions about making and storing your chicken melts:
- Can I make the chicken mixture ahead of time? Absolutely! Preparing the chicken mixture in advance is a fantastic time-saver. Simply combine all the ingredients for the filling, cover it tightly, and store it in the refrigerator for up to 2-3 days. When you’re ready to eat, simply spread it on the bread and bake.
- What’s the best way to reheat leftovers? For the best results and to keep your bread crispy, reheat leftover chicken melts in the oven. Place them on a baking sheet at 300°F (150°C) for about 10-15 minutes, or until warmed through and the cheese is re-melted and bubbly. A toaster oven also works great! Avoid the microwave, as it can make the bread soggy and unappetizing.
- Can I freeze these chicken melts? Yes, you can! Once assembled but before baking, place the individual melts on a baking sheet and freeze until solid. Then, transfer them to an airtight freezer-safe bag or container, separating layers with parchment paper to prevent sticking. They can be frozen for up to 1 month. To cook, bake directly from frozen, adding about 5-10 extra minutes to the baking time, or until thoroughly heated and golden.
- What kind of bread works best? A sturdy loaf like French bread, sourdough, ciabatta, or even a robust artisan loaf is ideal because it can hold up to the creamy filling without becoming soggy during baking. Avoid very thin or overly soft sandwich bread, as it won’t provide the necessary structural integrity.
More Delicious Rotisserie Chicken Recipes You’ll Love:
Dinner
Rotisserie Chicken Tacos
Dinner
Chicken Shawarma Wraps
Soups And Stews
Chicken Pot Pie Soup Recipe
Dinner
Green Chile Chicken Enchiladas

Print Recipe
Easy Cheesy Chicken Melts
Chelsea Lords
These easy, cheesy Chicken Melts feature thick bread piled with creamy chicken and melty cheese. Baked to perfection and customizable with fresh herbs for an irresistible weeknight meal!
20 minutes
8 minutes
28 minutes
10 melts
Equipment
- Large sheet pan (15″ x 21″)
- Parchment paper
Ingredients
- 2 cups cooked chicken (e.g., rotisserie), diced
- 1/2 cup shallot, finely diced (1–2 medium-sized)
- 3/4 cup celery, finely diced (2 large stalks)
- 1 cup carrots, shredded (2 medium carrots)
- 2 cups sharp Cheddar cheese, freshly shredded (or extra sharp, divided)
- 1/2 cup sour cream (lite is fine)
- 1/2 cup mayo (Hellman’s/Best Foods recommended)
- 1 teaspoon Cajun seasoning (see note 1)
- 1/2 teaspoon garlic powder
- 1/2 teaspoon paprika
- 1/8 teaspoon pepper
- 1 loaf French bread (you’ll use about 1/2 of it), sliced into 1-1.5 inch thick pieces
- Serving suggestions (see note 2)
Instructions
- Preheat oven to 350°F (175°C). Line a large sheet pan with parchment paper and set aside. Dice the chicken. Finely dice the shallots and celery. Grate the carrots on the large holes of a grater. Shred the cheese.
- Add the diced chicken, shallots, celery, carrots, and 1 cup of shredded cheese to a large bowl. In a separate bowl, combine the sour cream, mayo, Cajun seasoning, garlic powder, paprika, and a pinch of pepper. Whisk until smooth. Pour sauce over chicken and veggies and gently stir until everything is combined. Taste and adjust seasonings to personal preference, adding more Cajun seasoning if desired.
- Slice a loaf of French bread into thick slices, about 1 to 1-1/2 inches thick. Place bread slices on the prepared sheet pan. Add about 1/3 cup of the chicken mixture onto each piece of bread. Smooth into an even layer with the back of a fork. Add 1 and 1/2 tablespoons of the remaining 1 cup of shredded cheese to the top of each chicken melt.
- Bake for 8–10 minutes or until cheese is melted on top and bubbly. Remove from the oven.
- Garnish with fresh herbs and, if desired, a few thin slices of Roma tomato. Add a drizzle of hot sauce if desired. Enjoy immediately.
Recipe Notes
Note 1: Cajun seasonings vary in spice and salt levels, so add gradually and taste as you go. Most are salty enough on their own, but adjust if needed. McCormick® is a good choice. If you prefer a less-salty dish, try a low-sodium blend.
Note 2: Serving suggestions: 2–3 thinly sliced Roma tomatoes, fresh green onions (thinly sliced), fresh cilantro (finely chopped), and hot sauce.
Storage: Store leftovers in an airtight container in the fridge for up to 3 days. For best results, reheat in the oven (at 300°F/150°C for 10-15 minutes) to keep the bread crispy. You can also freeze them for up to 1 month—just wrap tightly and bake from frozen, adding a few extra minutes.
Nutrition
| Calories: 518 kcal
| Carbohydrates: 28 g
| Protein: 31 g
| Fat: 32 g
| Saturated Fat: 14 g
| Cholesterol: 106 mg
| Sodium: 780 mg
| Potassium: 280 mg
| Fiber: 2 g
| Sugar: 4 g
| Vitamin A: 4686 IU
| Vitamin C: 3 mg
| Calcium: 391 mg
| Iron: 2 mg
Nutrition information is automatically calculated, so should only be used as an approximation.
Like this recipe? Leave a comment below!