
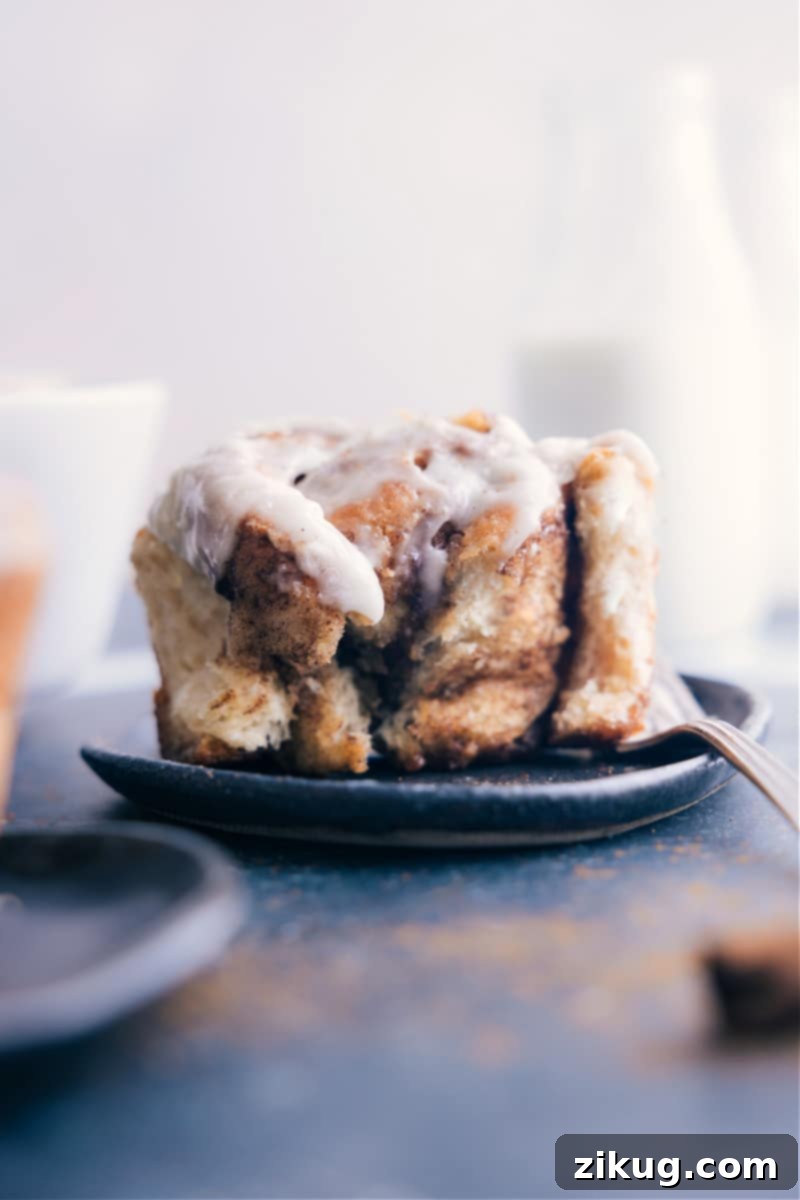
Welcome to the ultimate guide for creating the most delectable, **Easy No-Knead Cinnamon Rolls** you’ve ever tasted! This truly is a life-changing recipe that simplifies the baking process without compromising on flavor or texture. Prepare yourself for irresistibly big, incredibly fluffy rolls with a warm, sweet cinnamon core, all generously crowned with a luxurious tangy cream cheese frosting. If the idea of baking homemade cinnamon rolls has ever felt daunting, this recipe is designed to make you a confident and successful baker, turning intimidation into pure baking joy.
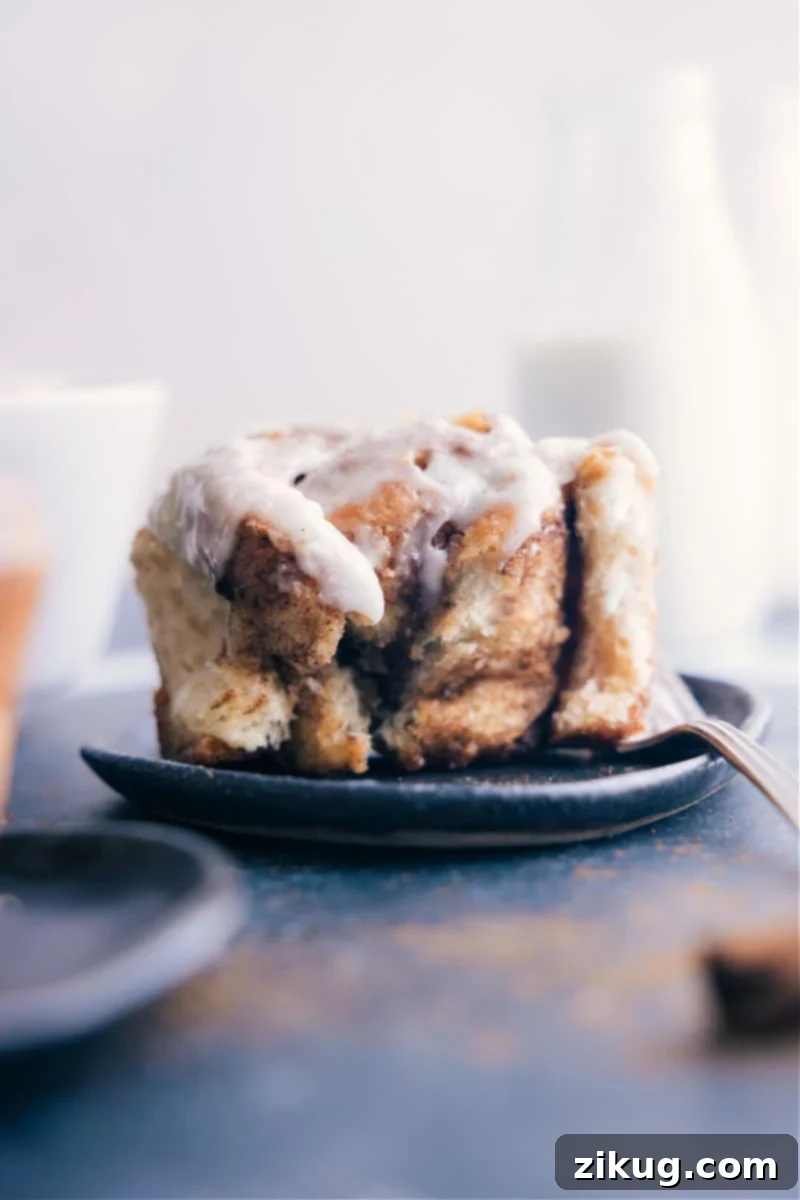
Effortless & Delicious: The Best Easy Cinnamon Rolls Recipe
Forget everything you thought you knew about baking yeast-based treats. This recipe for easy cinnamon rolls is a game-changer, proving that you don’t need to be a seasoned baker to create bakery-quality results right in your own kitchen. These aren’t just good cinnamon rolls; they are arguably the **best** you’ll ever make at home. They boast an impressive size, a remarkably soft and pillowy texture, rich flavor, and a perfectly balanced sweetness, all complemented by that signature gooey center that everyone craves.
Inspired by the simplicity of a beloved no-knead bread recipe that has become a staple in many households, including my own, this method was adapted first for dinner rolls. Now, we’ve perfected a similar approach specifically for cinnamon rolls, ensuring minimal effort for maximum reward. This revolutionary technique takes the stress out of baking, allowing you to enjoy the process and the phenomenal outcome.
Unlocking the “Magic” Behind These No-Knead Cinnamon Rolls:
What makes these easy cinnamon rolls truly special and effortless? It comes down to a few brilliant shortcuts and techniques that deliver exceptional results without requiring specialized equipment or extensive baking knowledge. Let’s delve into the features that set this recipe apart:
- No Stand Mixer or Hand Mixer Needed: Say goodbye to bulky kitchen appliances! The dough for these cinnamon rolls comes together beautifully without any electric mixers, making it accessible to everyone, regardless of their kitchen setup.
- Mix the Dough by Hand with Just a Spatula: This recipe embraces a simple, hands-on approach. A sturdy spatula is all you need to combine the ingredients, transforming what can often be a messy and complicated process into a straightforward mixing task.
- Absolutely No Kneading Required: This is perhaps the biggest “magic” trick! The traditional, time-consuming kneading step, crucial for developing gluten in most bread recipes, is completely eliminated here. This saves significant time and effort, making homemade cinnamon rolls a realistic weeknight or weekend treat.
- Flexible Preparation: Made Ahead or Same Day: Whether you’re planning a special breakfast for tomorrow or craving a warm roll right now, this recipe offers incredible flexibility. You can prepare the dough in advance and bake it when needed, or follow the steps for a delightful same-day indulgence.
- A “Secret” Ingredient for Ultra-Gooey Cinnamon Rolls: We’ve uncovered a simple, yet powerful technique to ensure every bite of your cinnamon roll is wonderfully gooey and moist. This secret touch elevates the rolls from great to truly unforgettable.
Key Ingredients for Perfect Cinnamon Rolls
Crafting the perfect cinnamon roll begins with understanding the role each ingredient plays. Here’s a breakdown of what you’ll need and why these components are essential for achieving big, fluffy, and gooey results:
- Instant Yeast or Active Dry Yeast: The magic behind the rise! Yeast is a living organism that ferments sugars in the dough, producing carbon dioxide and causing the rolls to puff up and become light and airy. Instant yeast is preferred for its faster action, but active dry works beautifully too.
- Granulated Sugar: More than just sweetness, sugar feeds the yeast, helping it activate and produce that essential rise. It also contributes to the tender crumb and golden-brown crust of the rolls.
- Warm Milk: The ideal temperature is crucial for activating the yeast. Milk provides moisture and richness to the dough, creating a softer texture compared to water. It should be warm to the touch, around 105-115°F (40-46°C), but never hot, which can kill the yeast.
- All-Purpose White Flour: The structural backbone of our easy cinnamon rolls. Using plain, all-purpose flour provides the right balance of protein for a tender yet substantial dough, even without kneading.
- Salt: Don’t underestimate salt! It enhances the overall flavor profile, balancing the sweetness and preventing the dough from tasting bland. It also plays a role in controlling yeast activity, ensuring a steady rise.
- Unsalted Butter: Used both in the dough and the filling, butter adds incredible richness, tenderness, and flavor. For the dough, melt and then cool it to avoid overheating the yeast. For the filling, softened butter is key for spreading.
- Large Eggs: Eggs contribute to the dough’s structure, richness, and golden color. They add moisture and elasticity, resulting in a more tender and flavorful cinnamon roll.
- Vanilla Extract: A touch of vanilla in the dough and frosting enhances the overall sweetness and complexity, adding a comforting aroma and depth of flavor.
- Filling Essentials (Brown Sugar & Cinnamon): This dynamic duo creates the iconic sweet, spiced layer within the rolls. Brown sugar provides a deeper, molasses-rich sweetness and contributes to the gooey texture when melted with butter, while cinnamon delivers its signature warmth and aroma.
- The “Secret Ingredient”: Heavy Cream: This is the game-changer for truly gooey cinnamon rolls! Brushing heavy cream over the rolls just before baking infuses them with extra moisture, creating an incredibly rich, soft, and melt-in-your-mouth texture in the center.
- Cream Cheese Frosting: The perfect complement to the sweet rolls. Made with softened cream cheese, unsalted butter, powdered sugar, and a hint of vanilla and salt, this frosting is smooth, tangy, and lusciously creamy, providing a delightful contrast to the cinnamon-sugar filling. Ensure ingredients are at room temperature for the smoothest consistency.
How To Make These Easy No-Knead Cinnamon Rolls
Creating these incredible no-knead cinnamon rolls is surprisingly simple and incredibly rewarding. Follow this quick overview to understand the main stages, and refer to the detailed recipe card below for precise measurements and timings to ensure perfect results every time:
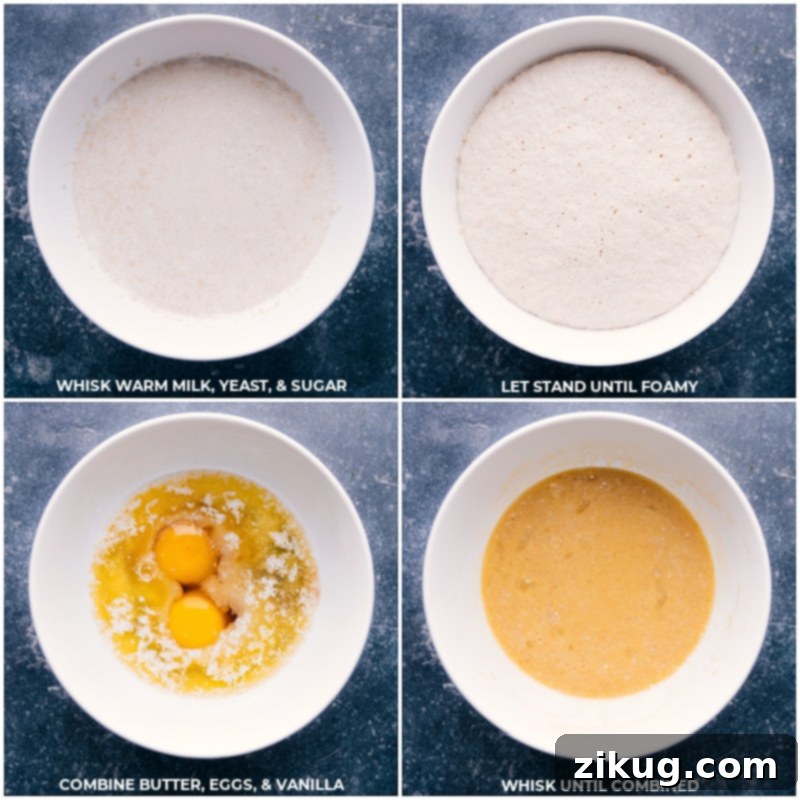
- Activate the Yeast (Proofing): Begin by gently warming your milk to the ideal temperature. In a medium bowl, combine the warm milk with yeast and a small amount of sugar. Whisk it together and allow the mixture to sit undisturbed for 5-10 minutes. This crucial step, known as proofing, ensures your yeast is active and ready to work its magic. You’ll know it’s ready when the mixture becomes creamy and foamy on the surface. If it doesn’t foam, your yeast may be inactive or the milk was too hot/cold.
- Prepare Wet & Dry Dough Ingredients: In a separate bowl, whisk together the melted (and cooled!) butter, eggs, and vanilla extract until well combined. In a large mixing bowl, thoroughly whisk together the flour, the remaining granulated sugar, and salt. This ensures even distribution of dry ingredients.
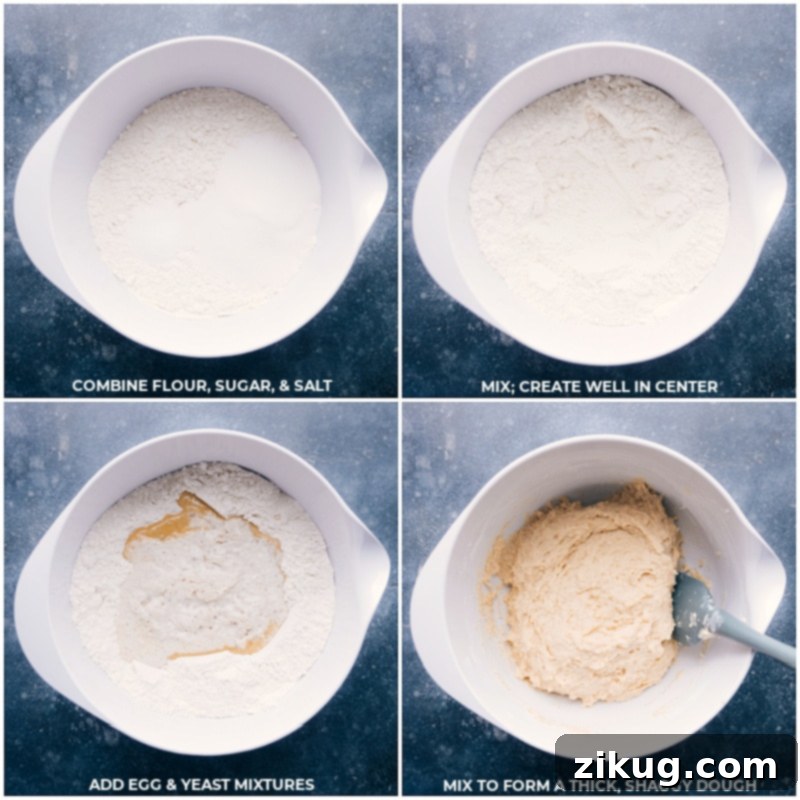
- Combine to Form Dough (No Kneading!): Create a shallow well in the center of your dry ingredients mixture. Pour in the butter-egg mixture first, followed by the activated yeast mixture. Using a sturdy spatula, stir everything together until a thick, shaggy, and slightly lumpy dough forms. Resist the urge to knead! The beauty of this recipe is that the dough doesn’t require it. Just ensure all ingredients are incorporated.
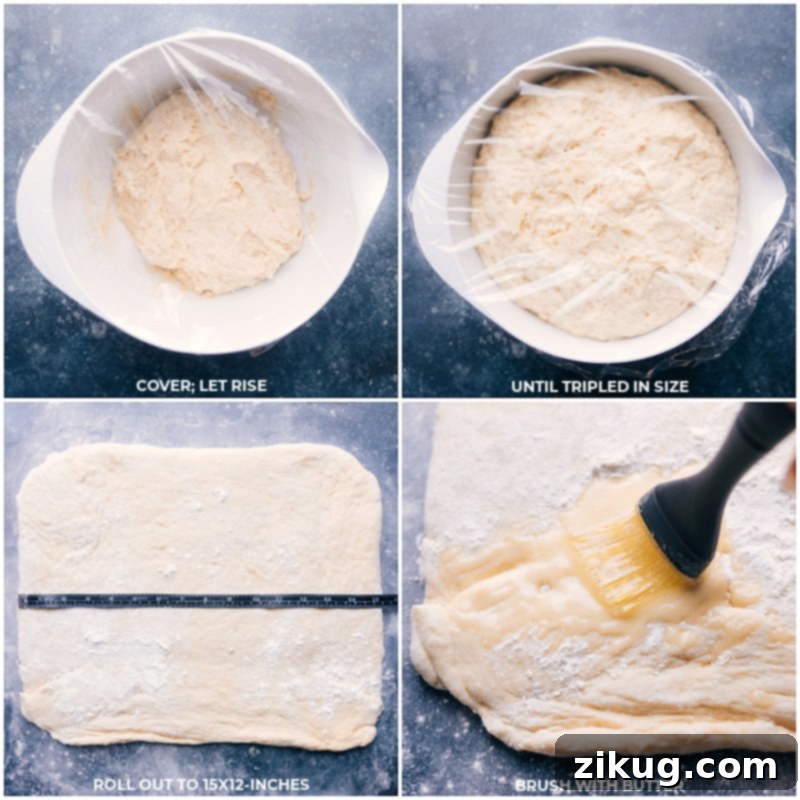
- First Rise: Cover your dough bowl tightly with plastic wrap. Place it in a warm, draft-free environment (ideally around 70°F or 21°C) to allow for its first rise. For same-day rolls, this takes about 90-120 minutes until the dough has tripled in size. If you’re planning for next-day rolls, let it rise for 30 minutes at room temperature, then transfer to the refrigerator for 8-12 hours. Remember to let refrigerated dough return to room temperature for about 30 minutes before proceeding.
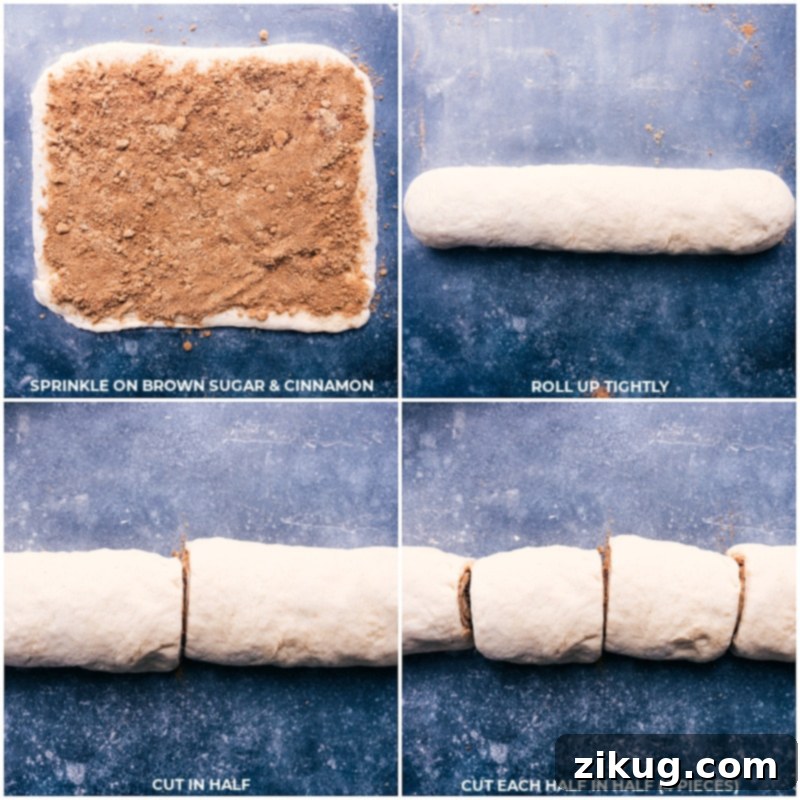
- Roll Out Dough & Add Filling: Once the dough has risen beautifully, gently scrape it onto a lightly floured work surface. Use floured hands to shape it into an even ball, adding more flour if necessary to prevent sticking. Roll the dough out into a generous 15×12-inch rectangle, with the longer side facing you. Evenly spread the softened butter for the filling over the entire surface of the dough. In a small bowl, combine the brown sugar and cinnamon, then sprinkle this mixture generously over the butter. Gently press the cinnamon-sugar into the butter. Carefully roll the dough up tightly from the 15-inch side, forming a log.
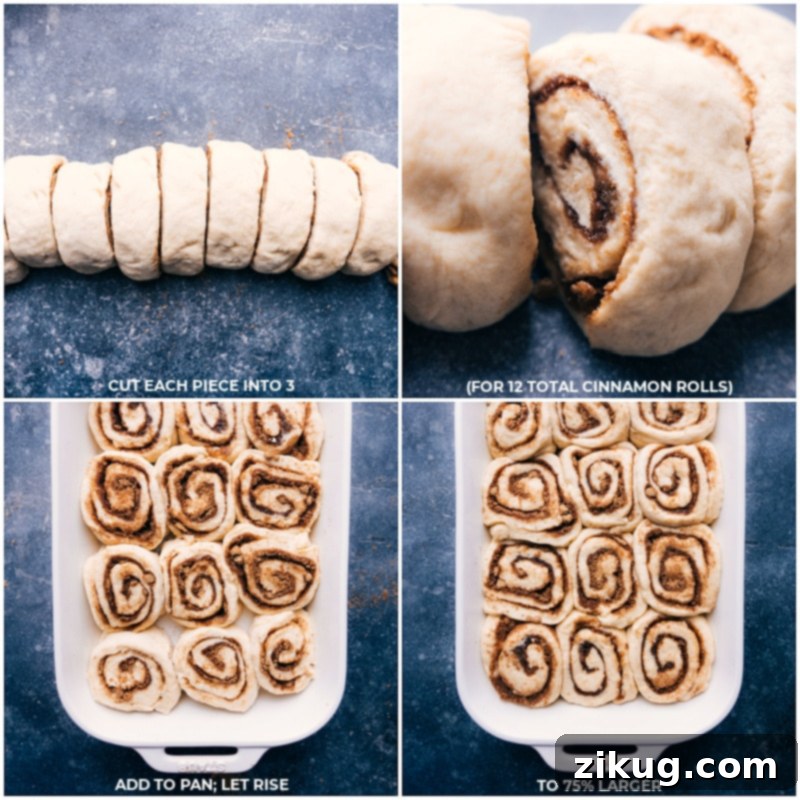
- Cut & Second Rise: Using a sharp knife or unflavored dental floss, cut the dough log into 12 even rolls. A good technique is to cut the log in half, then each half into two, and finally each quarter into three pieces. Arrange these cut rolls snugly in a well-greased 9×13-inch baking pan. Cover the pan with plastic wrap (lightly sprayed with cooking spray to prevent sticking to the dough) and let the rolls undergo their second rise for 20-30 minutes, or until they have visibly increased in size by about 75%.
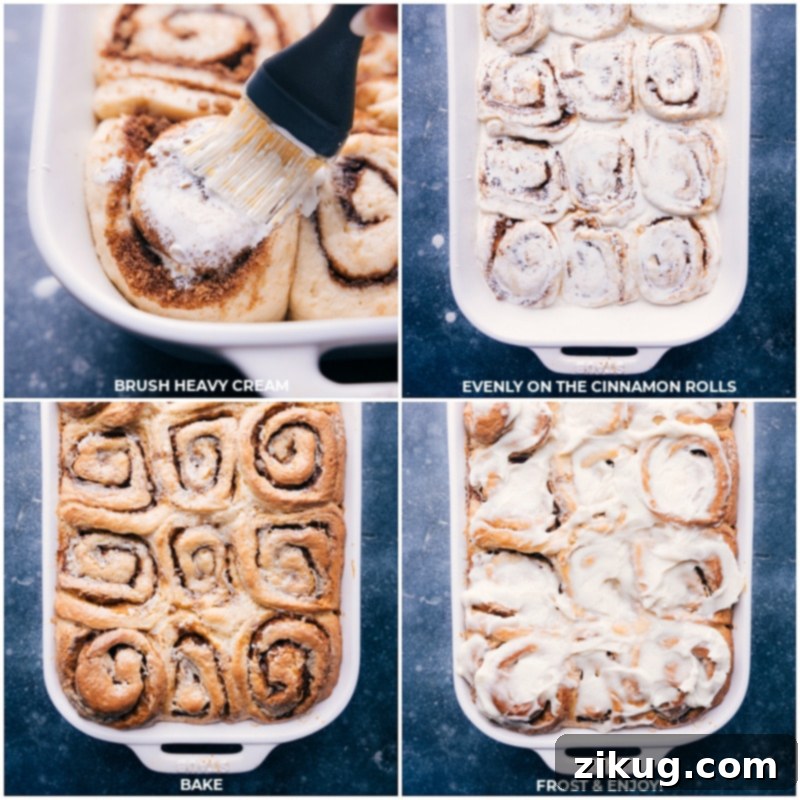
- The Secret Cream & Bake: While the rolls are completing their second rise, preheat your oven to 350°F (175°C). Once risen, remove the plastic wrap. Gently warm the heavy cream in the microwave for about 20 seconds. Evenly brush this warm cream over the tops of all the rolls. This is our “secret ingredient” for ultimate gooiness! Bake the rolls for 40-50 minutes, or until they are beautifully golden brown on top and sound hollow when gently tapped in the center (an internal temperature of around 190°F / 88°C is ideal).
- Prepare & Frost: While the rolls are baking or cooling slightly, prepare your luscious cream cheese frosting. In a medium bowl, beat together room-temperature cream cheese and unsalted butter until the mixture is smooth and creamy. Stir in the vanilla extract, a pinch of salt, and a dash of cinnamon. Gradually add the powdered sugar, beating until the frosting is light, fluffy, and perfectly smooth. Once the cinnamon rolls have cooled for 5-10 minutes (to prevent the frosting from melting off), generously spread the prepared cream cheese frosting over the warm rolls. Serve immediately and enjoy!
Expert Tips for Giant Fluffy Cinnamon Rolls
Achieving perfectly giant, fluffy, and gooey cinnamon rolls is easier than you think with these expert tips:
- Essential Baking Tools: While this easy cinnamon rolls recipe doesn’t require a lot of fancy equipment, a few key tools will make your baking experience smoother. A sturdy spatula is essential for mixing the no-knead dough, a pastry brush helps distribute the heavy cream evenly, and a reliable ceramic baking dish (9×13 inch) is perfect for baking these large rolls.
- Roll the Dough Tightly: When rolling up your cinnamon-sugar filled dough, aim for a tight, even spiral. This not only creates more beautiful, distinct cinnamon-sugar layers but also helps the rolls maintain their shape and prevents the filling from oozing out excessively during baking.
- Grease the Baking Pan Well: Don’t skimp on greasing your baking dish! A well-greased pan ensures that your delicious cinnamon rolls won’t stick, making them easy to remove and serve. Butter or a non-stick cooking spray works perfectly.
- Bake Until Golden Brown: Keep an eye on your rolls as they bake. They should achieve a lovely golden-brown color on top and feel firm in the center when gently pressed. An internal temperature of about 190°F (88°C) is a good indicator of doneness, ensuring they are cooked through but still moist.
- Cool Slightly Before Icing: Patience is key! Allow your freshly baked cinnamon rolls to cool for at least 5-10 minutes before spreading on the cream cheese frosting. This brief cooling period helps the frosting set beautifully on top, preventing it from melting and sliding off, ensuring every roll looks as good as it tastes.
Easy Cinnamon Rolls Recipe FAQs
While a simple powdered sugar glaze can be delicious, nothing quite compares to the rich, tangy, and incredibly smooth texture of classic cream cheese frosting, which is the star of this recipe. Our cream cheese frosting is typically made with softened cream cheese, unsalted butter, powdered sugar, and a hint of vanilla extract and a tiny pinch of salt to balance the sweetness. These ingredients are beaten together until wonderfully smooth and creamy. If, however, you’re not a fan of cream cheese or want to try something different, a delightful alternative is this versatile vanilla frosting recipe, which offers a sweet and classic finish.
The best way to enjoy these homemade cinnamon rolls is definitely warm, straight from the oven, on the day they are baked. However, if you find yourself with irresistible leftovers, there are a few key strategies to keep them from drying out and ensure they remain delightfully moist:
– Avoid Refrigeration Immediately: Cool air tends to dry out baked goods, making them stale much faster. Unless your home is excessively warm, storing them at room temperature is generally best for the first day or two.
– Wrap Each Roll Individually: Once the rolls have completely cooled, tightly wrap each individual cinnamon roll in plastic wrap. This creates a barrier against air exposure, locking in moisture and preserving their freshness.
– Reheat Gently: To revive leftover rolls, simply warm them in the microwave for a short burst of 8-10 seconds per roll before eating. This gently softens the dough and warms the filling and frosting, making them taste almost freshly baked.
Achieving that coveted, wonderfully gooey center in your cinnamon rolls is not a mystery, but rather a combination of two vital secrets:
(1) Precision with Flour Amount: The exact measurement of flour is critical. Too much flour can result in a dry, dense dough, preventing that signature gooeyness. Always measure your flour carefully, preferably by weight if you have a kitchen scale, or by spooning flour into your measuring cup and leveling it off, rather than scooping directly from the bag.
(2) The Heavy Cream Brush: This is our special “secret ingredient” technique! Just before baking, gently brush a generous amount of heavy cream over the unbaked rolls. As the rolls bake, this cream is absorbed, infusing the dough with extra moisture and fat, which caramelizes with the cinnamon-sugar filling, creating an unbelievably moist and gooey texture in the heart of each roll.
Storage & Make-Ahead Tips
Keeping Your Delicious Cinnamon Rolls Fresh
There’s no denying that homemade cinnamon rolls are at their absolute peak of flavor and texture when enjoyed warm, fresh from the oven, on the very day they’re made. The aroma alone is irresistible!
However, if you happen to have any delectable leftovers (a rare occurrence with these!), it’s important to store them correctly to maintain their softness and moistness. First, allow the rolls to cool completely to room temperature before storing. Once cooled, tightly wrap each individual roll in plastic wrap. This protective layer is key to preventing them from drying out.
Store at room temperature rather than refrigerating them, as the cold air in a refrigerator can actually make them stale quicker. Placed in an airtight container, they should stay fresh for 1-2 days. To bring them back to their glorious, warm, and gooey state, simply reheat each roll in the microwave for a few seconds (typically 8-15 seconds) before indulging. This quick warm-up will soften the dough and melt the frosting slightly, making them taste almost as good as fresh from the oven.
Quick Tip for Success
Because this is a slightly unique and non-traditional approach to making cinnamon rolls, we highly recommend taking a moment to watch the accompanying quick video tutorial. Additionally, giving the entire recipe a thorough read-through before you begin mixing will help you understand each step and feel fully prepared. This small investment of time will ensure a smooth and successful baking experience, leading to truly perfect easy cinnamon rolls!
Don’t Waste Yeast! Try These Related Recipes:
If you’ve opened a packet of yeast for these amazing cinnamon rolls and have some leftover, don’t let it go to waste! Yeast is a fantastic ingredient for creating a variety of delicious breads and baked goods. Here are some other wonderful recipes where you can put that remaining yeast to good use:
Lunch
Easy Focaccia Recipe
Appetizers
French Bread Recipe
Muffins And Quick Breads
Fry Bread Recipe
Lunch
White Bread Recipe

Pin
Easy Cinnamon Rolls Recipe
Video Tutorial
Equipment
-
9 x 13-inch baking pan
Ingredients
- 3 teaspoons instant yeast or active dry, see note 1
- 1/2 cup + 1 teaspoon sugar divided
- 1-1/2 cups whole milk warm (110℉)
- 4-1/2 cups flour plus more for shaping rolls
- 2 teaspoons salt
- 2 teaspoons vanilla extract
- 4 tablespoons unsalted butter
- 2 large eggs
- 8 tablespoons unsalted butter melted then cooled
- 1-1/4 cups light brown sugar gently packed
- 2 tablespoons cinnamon
- 1/3 cup heavy cream
- 4 ounces cream cheese
- 4 tablespoons unsalted butter
- 1-1/2 cups powdered sugar
- 1/8 teaspoon salt
- 1/2 teaspoon vanilla extract
Instructions
-
Melt 4 tablespoons butter in a microwave-safe bowl and let it cool completely to room temperature. In a medium bowl, add the warmed milk (ensure it’s around 110°F/43°C, see note 2 for guidance). Sprinkle the yeast and 1 teaspoon of sugar over the milk, whisk gently to combine, and let the mixture stand for 5–10 minutes. It should become creamy and foamy; if it doesn’t, your yeast may be inactive or the milk temperature was incorrect.
-
Into the cooled melted butter, whisk in 2 teaspoons of vanilla extract and the two large eggs until everything is well incorporated.
-
In a large mixing bowl, whisk together the flour, the remaining 1/2 cup of sugar, and the salt. Create a well in the center of the dry ingredients. Pour in the butter and egg mixture first, followed by the foamy yeast mixture. Using a sturdy spatula, stir everything until a thick, shaggy dough forms. It will be lumpy, and that’s perfectly fine—no kneading is required! Cover the bowl tightly with plastic wrap.
-
For same-day rolls: Allow the dough to rise in a warm, draft-free environment (around 70°F/21°C) for 90–120 minutes, or until it has visibly tripled in size. While the dough is rising, melt the 8 tablespoons of butter for the filling and let it cool completely to a spreadable, not hot, consistency (see note 3).
For next-day rolls: Let the dough rise at room temperature for an initial 30 minutes. After this brief rise, transfer the covered bowl to the refrigerator and allow it to chill for 8–12 hours. The next day, remove the dough from the refrigerator and let it stand at room temperature for approximately 30 minutes, or until it has fully tripled in size, before proceeding to the next step.
-
Lightly spray a 9×13-inch baking pan with non-stick cooking spray. Liberally flour a clean work surface and your fingers. Gently scrape the risen dough onto the floured surface. Using floured hands, lightly shape the dough into an even ball, adding more flour to your hands or the surface as needed to prevent sticking. Roll the dough into a 15×12-inch rectangle, ensuring the 15-inch side is facing you. Spread the softened butter evenly over the entire surface of the dough. In a small bowl, thoroughly mix the light brown sugar and cinnamon. Sprinkle this mixture generously over the buttered dough and gently press it in with your hands. Carefully roll the dough up tightly from the 15-inch side, forming a neat log. Cut the log into 12 individual rolls (a simple method is to cut the log in half, then each half into two, and each quarter into three pieces). Arrange the cut rolls close together in the prepared baking pan. Cover the pan with plastic wrap (lightly sprayed with cooking spray on the side facing the dough) and allow the rolls to undergo their second rise for 20–30 minutes, or until they are approximately 75% larger.
-
While the rolls are completing their second rise, preheat your oven to 350°F (175°C). Once risen, carefully remove the plastic wrap. Gently warm the heavy cream in the microwave for about 20 seconds. Using a pastry brush, evenly brush the warm heavy cream over the tops of all the rolls – this is key for a gooey center! Bake for 40–50 minutes, or until the rolls are beautifully golden brown on top and sound hollow when gently tapped. An instant-read thermometer should register around 190°F (88°C) in the center. Once baked, let the rolls cool slightly in the pan for 5–10 minutes before frosting.
-
Frosting: In a medium mixing bowl, beat together the room-temperature cream cheese and unsalted butter until the mixture is completely smooth and creamy. Mix in the vanilla extract, salt, and a dash of cinnamon. Gradually add the powdered sugar, beating on low speed until combined, then increase to medium speed and beat until the frosting is light, fluffy, and perfectly smooth. Generously spread this luscious cream cheese frosting over the slightly cooled cinnamon rolls. Serve immediately and savor every soft, sweet, and gooey bite!
Recipe Notes
Note 2: Perfect Milk Temperature: The temperature of your milk is crucial for activating the yeast correctly. To test it, simply dab a small amount on your wrist – it should feel comfortably warm, similar to a baby’s bottle. If it feels hot, it’s too warm and can kill the delicate yeast, preventing your rolls from rising. If it feels cold, it’s too cool and won’t properly activate the yeast. Aim for a temperature between 105-115°F (40-46°C).
Note 3: Cooled Butter for Filling: When preparing the butter for your filling, remember to melt it well in advance and allow it to cool completely to a spreadable consistency, similar to softened butter. Using warm or hot melted butter can cause it to leak out of the rolls during the rising or baking process. This leakage can not only make a mess but also result in drier cinnamon rolls because the crucial moisture and fat are lost from the dough.
Storage for Freshness: These homemade cinnamon rolls are truly at their best when enjoyed on the same day they are baked. If you have any leftovers, ensure they cool completely before storing. Once cool, individually wrap each roll tightly in plastic wrap to lock in moisture and protect them from air. Store them at room temperature; refrigeration can actually cause them to become stale more quickly. To enjoy them later, a quick reheat in the microwave for a few seconds will bring back their delicious warmth and softness.
Nutrition Information
Nutrition information is automatically calculated and is provided for informational purposes only. It should be used as an approximation and is not a substitute for professional dietary advice.