
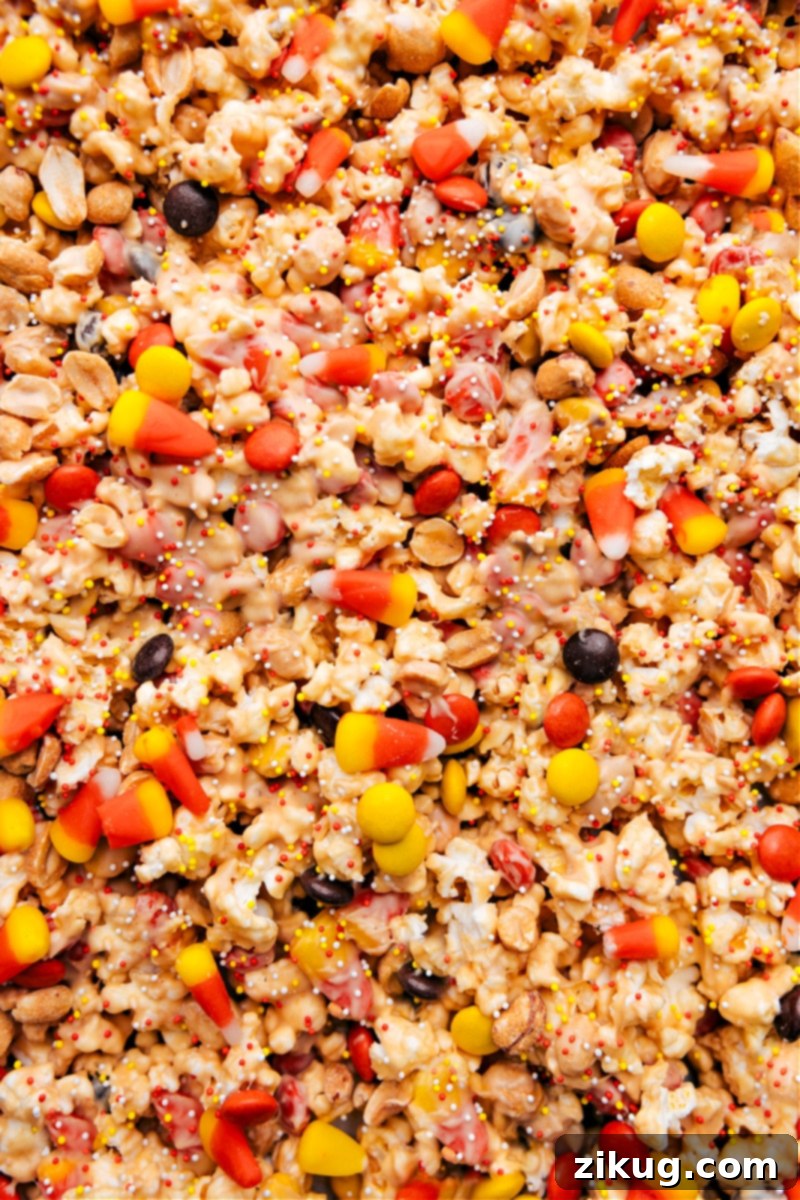
Candy Corn Popcorn offers a delightful and irresistible twist to your favorite classic snack! This perfect fall treat features fluffy popcorn generously coated in a luscious blend of creamy peanut butter and rich melted white chocolate. It’s then loaded with vibrant candy corn, crunchy dry-roasted peanuts, and sweet peanut butter candies, creating an addictive snack mix that’s absolutely perfect for any autumn gathering, Halloween party, or a cozy movie night. Prepare to fall in love with this harmonious blend of sweet and salty flavors, offering a satisfying crunch in every single bite!
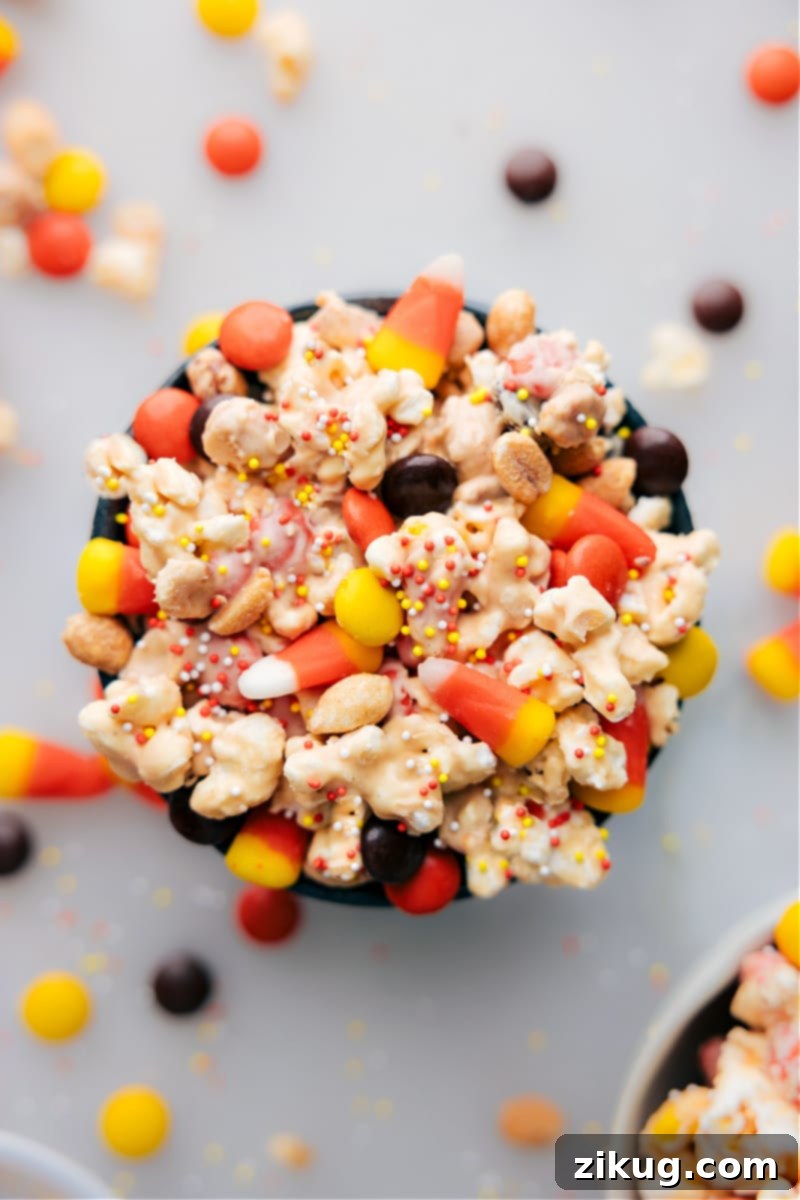
Candy Corn Popcorn: Your Ultimate Guide to a Sweet & Salty Fall Snack
There’s an undeniable magic in the air during autumn, isn’t there? The crisp breeze, the stunning display of vibrant leaves, and the joyous anticipation of festive holidays like Halloween and Thanksgiving. And what better way to truly embrace the spirit of the season than by indulging in a delightful, homemade snack that captures all the fun, comfort, and delicious flavors of fall? Today, we’re incredibly excited to share a recipe that’s guaranteed to become an instant household favorite, year after year: the utterly irresistible **Candy Corn Popcorn**.
In my home, popcorn isn’t just a simple snack; it’s a cherished ritual, especially when family movie night rolls around. The minute the opening credits begin, my kids are already eagerly asking for it, knowing full well that I adore getting creative with themed popcorn snack mixes. My website is truly brimming with innovative ideas for every season imaginable! From light and fruity summer berry variations to rich and festive holiday blends, there’s always a fresh and exciting way to enjoy this classic, versatile treat. It’s a canvas for culinary creativity, and popcorn serves as the perfect base for so many flavor adventures.
This particular fall, I was determined to surprise my family with something truly special and memorable. Naturally, the iconic, tri-colored candy corn immediately sprang to mind. It is, after all, the quintessential autumn candy, evoking nostalgia and Halloween cheer! The idea of pairing its distinct sugary sweetness with fluffy, crunchy popcorn and then enveloping it all in a luxurious, creamy peanut butter and white chocolate coating was, if I may say so myself, a stroke of pure genius. The robust flavors meld together in perfect harmony, creating a sweet, salty, and utterly addictive snack mix that tastes like pure autumn magic. This isn’t just a snack; it’s an experience, a celebration of fall in every single bite. So, prepare to grab a generously sized bowl, because resisting this delicious concoction will prove to be an almost impossible feat!
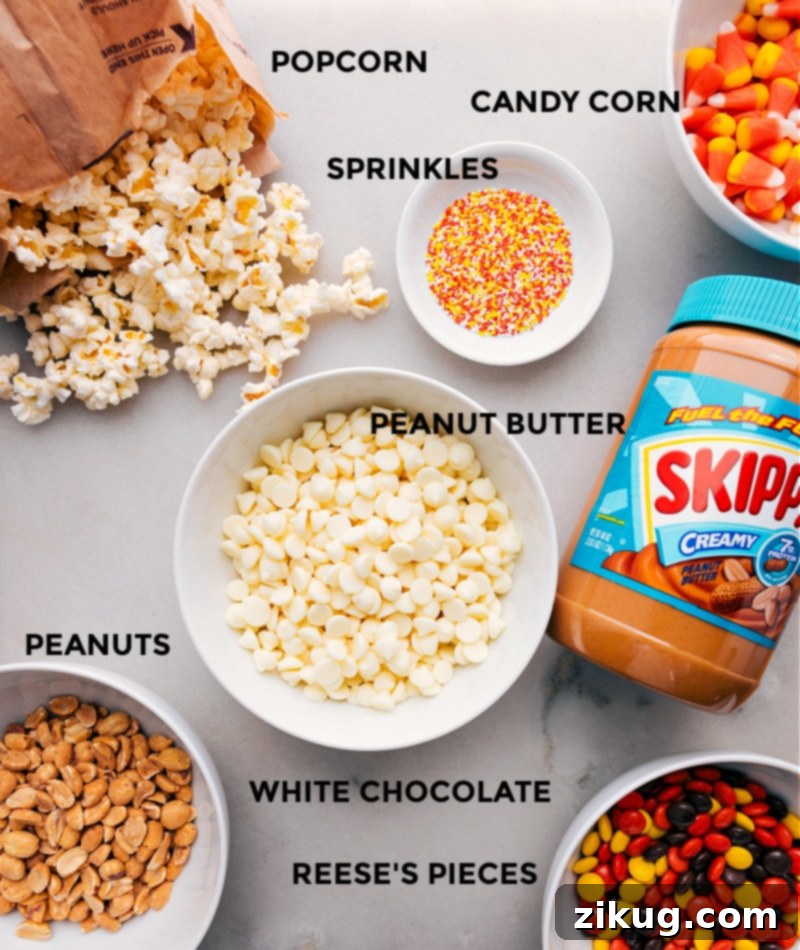
Essential Ingredients for Your Delectable Candy Corn Popcorn
Crafting the perfect Candy Corn Popcorn relies heavily on a thoughtful selection of high-quality ingredients. Each component plays a crucial role in achieving that ideal, irresistible balance of sweet, salty, and wonderfully crunchy textures. Here’s a detailed breakdown of exactly what you’ll need, along with some invaluable tips and potential variations for each item:
- Popcorn: This is the fluffy, airy foundation of our entire snack mix! You’ll need approximately eight cups of freshly popped popcorn. While popping your own kernels from scratch can certainly be more economical and allows you to customize the seasoning precisely, using pre-popped, lightly salted popcorn is an absolute fantastic time-saver, especially when you’re in a bit of a rush or hosting a last-minute gathering. If you opt for plain, unseasoned popcorn, remember to add a small pinch of fine sea salt to the popped kernels to enhance and balance the overall flavor profile of the snack. Crucially, always ensure all un-popped kernels are removed from your batch for the most pleasant and enjoyable eating experience – nobody likes biting into a hard kernel!
- Candy Corn: The undisputed star of the show and the namesake of our delightful snack! Soft and delightfully chewy candy corn pieces are absolutely essential for that iconic fall aesthetic and that wonderfully unique sugary taste. They introduce a distinct sweetness and a lovely chewiness that contrasts beautifully with the crispy popcorn. Don’t compromise on quality here; fresh, pliable candy corn truly makes a significant difference in both texture and flavor.
- Reese’s Pieces (or similar crunchy peanut candies): These vibrant, colorful candies introduce a delightful and much-needed chocolate and peanut butter crunch. Their distinct, nutty flavor and satisfying texture are an absolute must-have for the perfect blend of tastes. If Reese’s Pieces aren’t readily available, M&M’s® in yellow and orange hues can serve as a fun and visually appealing alternative, helping to maintain that cheerful, festive candy corn color scheme.
- Dry-Roasted Peanuts: Adding a wonderful savory, nutty depth, dry-roasted peanuts provide an excellent and essential textural contrast to the softer elements of the mix. Lightly salted peanuts perfectly enhance the irresistible sweet-and-salty dynamic we’re aiming for, while honey-roasted peanuts can introduce an extra layer of sweetness and a satisfyingly sticky crunch. Choose your preferred type based on how sweet and savory you desire your final snack mix to be.
- White Chocolate Chips: This ingredient acts as the magical binding agent and a primary source of creamy sweetness. Always opt for high-quality white chocolate chips for the best melting consistency and, more importantly, a superior flavor. Quality chocolate ensures a smooth, glossy, and beautifully flowing coating that adheres perfectly and evenly to the popcorn and all the other delightful mix-ins.
- Creamy Peanut Butter: This provides a rich, deeply savory counterpoint to the intense sweetness of the white chocolate and candy corn. It also significantly helps the coating achieve its perfect, luscious, and creamy texture. It’s absolutely crucial to use regular, creamy peanut butter for this recipe, deliberately avoiding natural or “stir” varieties that tend to separate. The excess oil in natural peanut butter can adversely affect the coating’s consistency, making it greasy and preventing it from setting properly.
- Fine Sea Salt: A seemingly small but incredibly mighty ingredient! A tiny pinch of fine sea salt is absolutely vital for balancing and boosting both the sweet and salty flavors in the mix, skillfully preventing the snack from becoming overly saccharine or one-dimensional. This is one crucial ingredient you absolutely shouldn’t omit, as it truly elevates the entire flavor profile!
- Optional Halloween Sprinkles: For an extra festive flourish, a burst of color, and a fun, subtle crunch, enthusiastically consider adding some colorful sprinkles! Varieties in classic autumn colors like orange, yellow, and white or themed Halloween blends will make the snack even more visually appealing, irresistible, and incredibly kid-friendly. They add that final touch of celebratory charm.
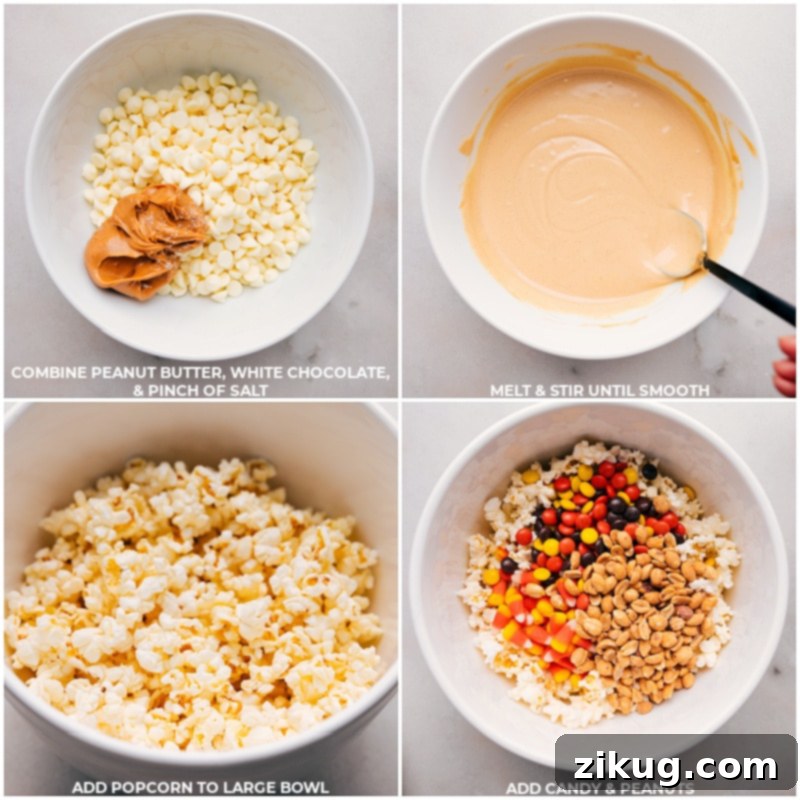
How to Create Your Perfect Batch of Candy Corn Popcorn: Step-by-Step
Making this delightful Candy Corn Popcorn is surprisingly simple, quick, and requires minimal cooking skills – just a good dose of enthusiasm! Follow these easy and straightforward steps to whip up a generous batch of this utterly irresistible fall snack that everyone will adore:
- Prepare Your Baking Sheet: Begin by lining a large baking sheet (a standard 15″ x 10″ sheet pan works absolutely perfectly for this recipe) with either parchment paper, aluminum foil (ensure it’s lightly greased to prevent sticking), or a reliable silicone baking mat. This seemingly small but crucial step is vital as it prevents the sticky, chocolate-coated popcorn from adhering to the pan. It also makes the spreading, cooling, and ultimately, the removal of your set popcorn clusters incredibly easy and mess-free. Once lined, set this prepared sheet aside for later.
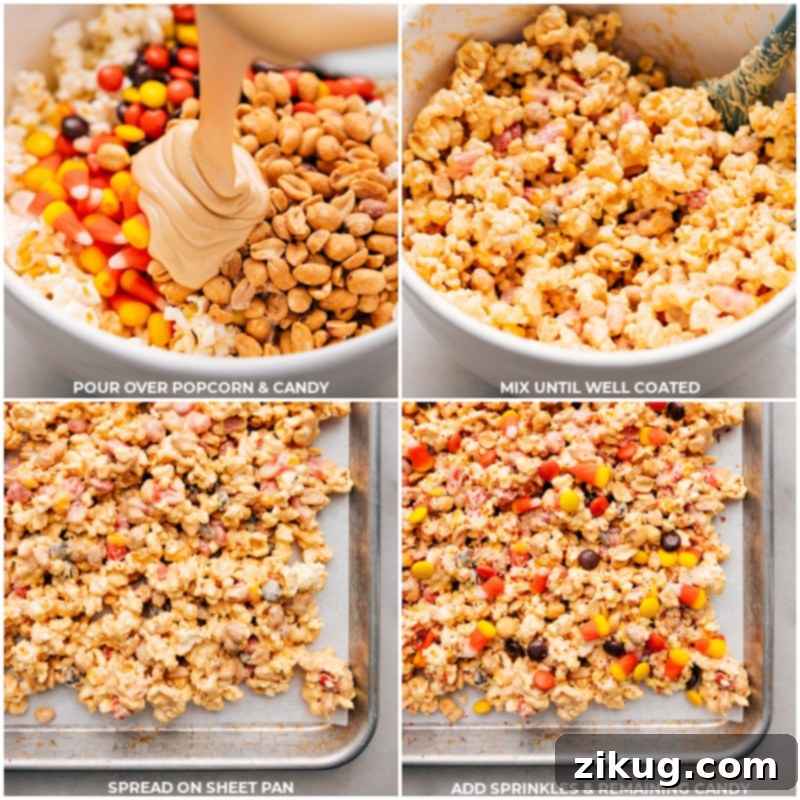
- Combine Popcorn and Mix-ins: Take a generously sized mixing bowl – the bigger, the better for easy tossing – and place your eight cups of freshly popped popcorn inside. Before adding it, quickly ensure you’ve removed any lingering un-popped kernels. (If you need a clever trick for this, check out our “Recipe Notes” section below!) Now, for the topping, reserve about 2 tablespoons each of your candy corn, Reese’s Pieces, and dry-roasted peanuts. These will be sprinkled on top at the end for visual appeal and an extra crunch. Add the remainder of the candy corn, Reese’s Pieces, and peanuts to the popcorn in the bowl. Give them a gentle but thorough stir to help distribute them evenly throughout the popcorn.
- Melt the Decadent Chocolate Coating: In a separate, microwave-safe bowl, combine your white chocolate chips, creamy peanut butter, and the tiny but mighty pinch of fine sea salt. Place this bowl in the microwave and heat the mixture in short, controlled bursts – typically 30-second intervals are ideal. After each interval, be sure to stir the mixture thoroughly with a silicone spatula. Continue this process until the white chocolate is completely melted and the entire mixture is wonderfully smooth, glossy, and homogenous. Exercise caution not to overheat the chocolate, as white chocolate is particularly prone to seizing or burning if exposed to excessive heat.
- Coat the Popcorn Mixture Evenly: Once your chocolate and peanut butter coating is perfectly smooth, immediately pour the warm, melted mixture evenly over the popcorn and candy mix in the large bowl. Working quickly, but always gently, use your silicone spatula to carefully fold and mix everything together. The primary goal here is to ensure that every single piece of popcorn and every delightful candy mix-in is beautifully and uniformly coated with the luxurious chocolate blend. Avoid aggressive stirring, which can break the popcorn.
- Spread and Top with Flair: Swiftly transfer the entirely coated popcorn mix from your mixing bowl onto your previously prepared baking sheet. Using your spatula, spread the mixture out into a single, relatively even layer across the sheet. While the chocolate coating is still wet and warm – this is crucial for adhesion – immediately sprinkle the reserved candies, peanuts, and any optional Halloween sprinkles generously on top. This ensures they adhere nicely and become embedded in the cooling coating, adding extra flavor and visual appeal.
- Chill to Perfection: Carefully place the baking sheet, with your delicious popcorn mix, into the refrigerator for approximately 30 to 60 minutes. This chilling time is absolutely essential to allow the white chocolate coating to fully solidify and set. A properly set coating will result in perfectly crunchy popcorn clusters that are easy to handle, break apart, and most importantly, enjoy!
- Break Apart and Savor: Once the Candy Corn Popcorn is thoroughly chilled and completely set, remove it from the refrigerator. Use your hands to gently break the mixture into delightful, bite-sized clusters. Transfer these irresistible clusters to a large serving bowl. Now, it’s time to gather your loved ones, find a cozy spot, and enthusiastically enjoy your homemade Candy Corn Popcorn!
Expert Tips for Success: Making the Best Candy Corn Popcorn Every Time
To ensure your Candy Corn Popcorn turns out absolutely perfect—crunchy, flavorful, and a visual delight—every single time you make it, keep these invaluable tips and tricks in mind. These little details can make a big difference in your final result:
- Line Your Pan Properly (Non-Negotiable!): This step is genuinely crucial and should never be skipped. Always line your baking sheet with a reliable non-stick baking mat, parchment paper, or even aluminum foil (ensure the foil is lightly greased to prevent sticking). This vital layer prevents the delightfully sticky, chocolate-coated popcorn from adhering stubbornly to your pan, making both cleanup a complete breeze and ensuring incredibly easy lifting and removal of the set clusters once cooled.
- Prioritize Fresh Ingredients: The overall quality of your ingredients directly and significantly impacts the ultimate taste and texture of your snack. Always endeavor to use fresh popcorn that isn’t stale, and specifically choose soft, pliable, and chewy candy corn. Stale popcorn can impart an unpleasant, cardboard-like flavor, and hard, old candy corn won’t provide the desired delightful textural contrast we’re aiming for.
- Utilize a Generously Sized Mixing Bowl: When it comes time to combine the delicate popcorn with the rich, melted chocolate mixture, a spacious bowl is truly your best friend. A large bowl provides ample room to gently fold and mix all the ingredients without crushing the popcorn, ensuring that every single piece is beautifully and evenly coated with that luscious chocolate blend.
- Melt White Chocolate with Utmost Care: White chocolate is notoriously sensitive and can easily seize (become stiff and clumpy) if it gets too hot or encounters even a tiny bit of moisture. Always microwave it in short, controlled 30-second bursts, stirring diligently and thoroughly after each interval. If, after several stirs, it appears a bit too thick, a tiny splash of neutral oil (like coconut oil or vegetable oil) can sometimes help thin it out, but generally, patience and consistent stirring will yield a perfectly smooth consistency.
- Avoid Any Traces of Moisture: This cannot be stressed enough when working with white chocolate. Before you begin melting, ensure your microwave-safe bowl and all the tools you’ll be using (spatulas, spoons, etc.) are completely and utterly dry. Even a single, tiny drop of water can cause white chocolate to seize instantly, rendering it clumpy, grainy, and essentially unusable.
- Mix Thoroughly but Gently: The secret to a truly delicious and uniformly flavored snack mix is an even coating. Take a few extra moments to gently fold the popcorn with the chocolate-peanut butter mixture until every single piece of popcorn is glistening and beautifully covered. Avoid any excessive or aggressive force, as this can easily break up the delicate popcorn kernels.
- Add Sprinkles Promptly: If you’ve decided to incorporate optional festive sprinkles, ensure you add them immediately after spreading the mixture onto the baking sheet. The warm, still-soft chocolate will act as a natural and effective adhesive, allowing the sprinkles to stick firmly and beautifully before the coating begins to set and harden.
- Consider Local Temperature and Humidity: If you happen to live in a particularly warm or humid environment, be aware that your popcorn mix might take a bit longer to fully set in the refrigerator. To achieve the best results—crispy, well-formed clusters—ensure the chocolate coating is completely solidified before you attempt to break it into pieces.
- Efficiently Remove Un-popped Kernels: There’s truly nothing more disappointing than biting into a delicious mouthful of sweet popcorn and unexpectedly encountering a hard, un-popped kernel. To easily remove them, use the clever cooling rack trick detailed in the “Recipe Notes” section. This simple step vastly improves the eating experience.
Quick Tip: Perfect for Parties!
Serving your delightful Candy Corn Popcorn for a special occasion, a Halloween bash, or a festive fall gathering? Elevate your presentation and make serving a breeze by using charming candy corn cupcake liners or small, decorative treat bags to serve individual portions. It adds an extra layer of festive touch, makes it incredibly convenient for guests to grab and enjoy, and minimizes mess!
Storage and Shelf Life: Keeping Your Popcorn Fresh
Storing Your Delicious Candy Corn Popcorn:
While this treat is undeniably best enjoyed fresh for maximum crispiness and optimal flavor, it can certainly be stored for later enjoyment. It’s worth noting that the white chocolate coating, over time, has a tendency to gradually soften the popcorn. Therefore, for the best textural experience, it’s generally a good idea to finish this delectable snack within a few days of preparing it. To effectively maintain its freshness and preserve as much of its delightful crunch as possible, transfer your Candy Corn Popcorn into an airtight container. Keep this container at room temperature, ideally away from direct sunlight, any sources of heat, or high humidity, all of which could potentially cause the chocolate to melt, become sticky, or affect the popcorn’s texture.
Have you made a larger batch or wish to extend its delicious shelf life even further? No worries at all! This delightful popcorn mix is surprisingly freezer-friendly. Simply place it into a freezer-safe, airtight bag or a sturdy container, ensuring it’s sealed tightly to prevent freezer burn. When you’re ready to indulge again, simply let it thaw at room temperature for a few minutes. Freezing can help preserve both the texture and the wonderful flavors for up to a month, making it a fantastic option for make-ahead treats, holiday gifts, or just ensuring you always have a sweet snack on hand!
More Festive Fall Treats You’ll Love: Expanding Your Autumn Baking
If you’ve been enchanted by the delightful spirit of fall and are eagerly searching for even more delicious, seasonally themed recipes, you’ve certainly come to the right place! Here are some other fantastic and festive treats from my collection that are absolutely perfect for autumn gatherings, lively Halloween parties, or simply enjoying with your beloved family on a cozy evening. These recipes celebrate the best flavors and themes of the season:
- Candy Corn Krispie Treats: These are incredibly fun, easy-to-make rice krispie treats that are cleverly shaped and beautifully colored to resemble classic candy corn pieces. They’re not only delicious but also visually striking – a true crowd-pleaser, especially with children!
- Pumpkin Oatmeal Cookies: Indulge in these wonderfully soft, perfectly chewy pumpkin-spiced oatmeal cookies, generously topped with a luscious, sweet icing. Every single bite delivers the comforting, iconic taste of fall.
- Acorn Donut Holes: Discover these adorably shaped, rich chocolate-coated donut holes that remarkably look just like charming little acorns. These are a fantastic, whimsical, and delightful treat for kids and adults alike, perfect for a woodland-themed party or just a fun afternoon snack.
- Nutter Butter Turkey Cookies: Get wonderfully creative and transform simple Nutter Butter cookies into absolutely adorable turkeys! This fun project uses candy corn and other small candies for decoration, making them an ideal and engaging activity for Thanksgiving or any fall holiday.
- Honeycomb Candy: Experience the magic of this light, incredibly airy, and delightfully crunchy honeycomb candy. Often dipped in a rich chocolate coating for an extra layer of indulgence, it’s a unique treat that’s surprisingly fun and rewarding to make right in your own kitchen.
Candy Corn Popcorn Recipe
This delightful fall treat features popcorn generously coated in creamy peanut butter and white chocolate, then loaded with vibrant candy corn, roasted peanuts, and crunchy candies. It’s an irresistible, sweet and salty snack mix that’s a guaranteed crowd-pleaser!
By: Chelsea Lords
- Prep Time: 20 minutes
- Chilling Time: 30 minutes
- Total Time: 50 minutes
- Servings: 12 servings
Equipment Needed
- 1 large Sheet pan (15″ x 10″), lined with parchment paper, foil, or a silicone baking mat.
- Large mixing bowl
- Microwave-safe bowl
- Silicone spatula
Ingredients for Candy Corn Popcorn
- 8 cups popped popcorn (see note 1)
- 1 cup candy corn
- 1 cup Reese’s Pieces
- 1 cup dry-roasted peanuts
- 2 cups white chocolate chips
- 1/3 cup creamy peanut butter
- 1/16 teaspoon fine sea salt
- Halloween sprinkles (optional, for extra festivity)
Instructions for Preparation
- Line a Baking Sheet: Line a large baking sheet with parchment paper, foil, or a silicone baking mat. Set aside.
- Combine Dry Ingredients: Place the popped popcorn (ensure un-popped kernels are removed, see note 2) in a large bowl. Reserve 2 tablespoons each of candy corn, Reese’s Pieces, and peanuts for topping. Add the remaining to the popcorn and gently stir.
- Melt Coating Mixture: In a microwave-safe bowl, combine white chocolate chips, creamy peanut butter, and salt. Microwave in 30-second intervals, stirring thoroughly after each, until the chocolate is fully melted and the mixture is smooth and glossy.
- Coat the Popcorn: Pour the melted chocolate mixture evenly over the popcorn and candy mix in the large bowl. Quickly but gently fold with a silicone spatula until everything is beautifully and evenly coated.
- Spread and Garnish: Transfer the coated mixture to the prepared baking sheet, spreading it out into a single layer. Immediately sprinkle the reserved candies, peanuts, and optional Halloween sprinkles on top before the chocolate sets.
- Chill to Set: Refrigerate the baking sheet for 30–60 minutes, or until the chocolate coating has completely solidified.
- Break Apart and Serve: Once set, break the mixture into delightful bite-size clusters. Transfer to a large serving bowl and enjoy your homemade Candy Corn Popcorn!
Recipe Notes for Best Results
Note 1: Popcorn Choice: Using pre-popped popcorn is a convenient time-saver, though it typically costs more. If you prefer to pop your own, these lightly salted plain popcorn packets or plain kernels work great. Remember to measure out 8 cups and sprinkle a bit of extra salt on any plain popcorn for enhanced flavor.
Note 2: Removing Un-popped Kernels: To easily remove any pesky un-popped kernels, place your popped popcorn in a large bowl and cover it with a cooling rack. Turn the bowl upside down over a plate and gently shake it until the un-popped kernels fall through the rack, leaving you with only fluffy popcorn!
Storage: For optimal freshness and crunch, store your Candy Corn Popcorn in an airtight container at room temperature for up to a few days. For longer storage, you can freeze the popcorn mix in a freezer-safe, airtight container for up to one month. Thaw at room temperature before enjoying.
Approximate Nutrition Facts
(Per 1 serving)
- Calories: 437 kcal
- Carbohydrates: 50g
- Protein: 9g
- Fat: 24g
- Saturated Fat: 10g
- Polyunsaturated Fat: 3g
- Monounsaturated Fat: 9g
- Cholesterol: 6mg
- Sodium: 179mg
- Potassium: 286mg
- Fiber: 3g
- Sugar: 40g
- Vitamin A: 23 IU
- Vitamin C: 0.1mg
- Calcium: 82mg
- Iron: 1mg
Nutrition information is automatically calculated and should only be used as an approximation. Individual results may vary based on specific ingredients and preparation methods.
Enjoyed this recipe and made your own batch? We’d love to hear from you! Leave a comment below and share your experience!