
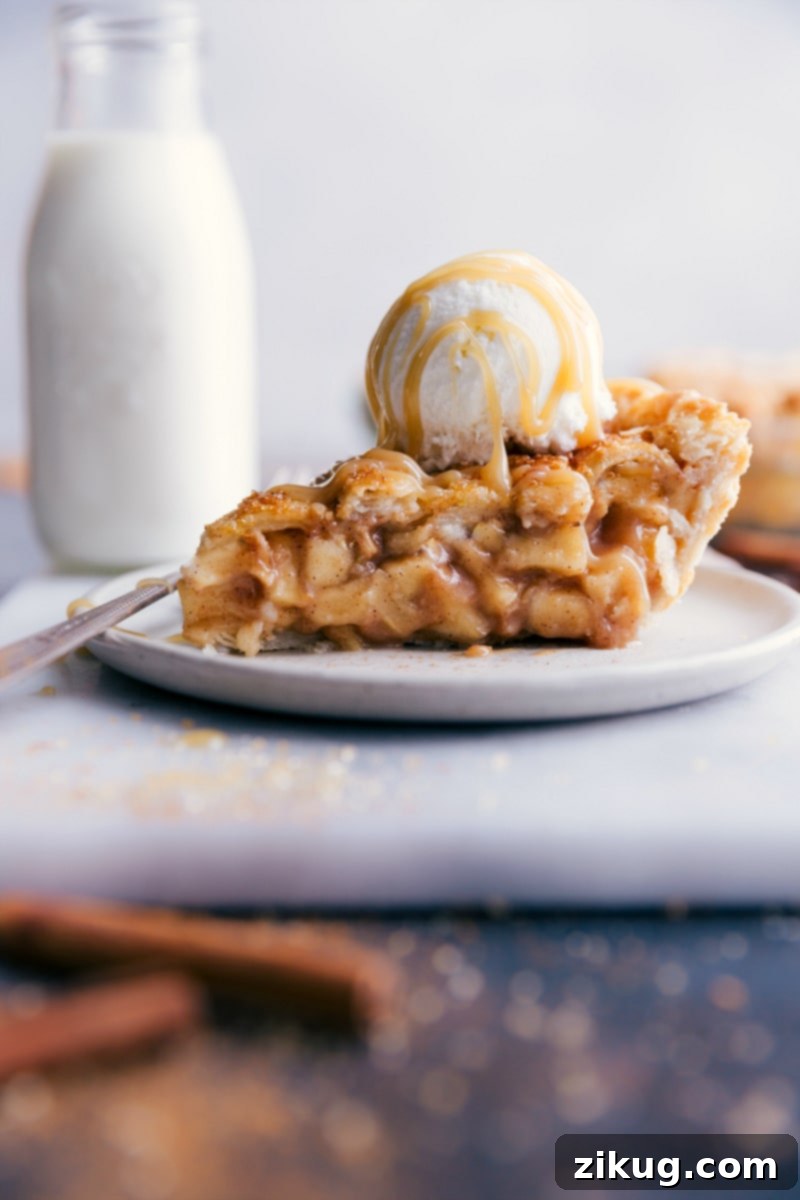
Apple Pie is more than just a dessert; it’s a golden, crispy crust encasing a thick, perfectly spiced apple filling, a symbol of comfort and homemade goodness. There’s something truly magical about the aroma of cinnamon and baked apples wafting from the oven, promising a slice of pure joy. This timeless classic, especially when served warm with a generous scoop of creamy vanilla ice cream, offers a delightful contrast of textures and temperatures that captivates taste buds and evokes cherished memories. Get ready to bake the absolute best apple pie you’ve ever tasted, designed to be a showstopper at any gathering and a comforting treat for everyday moments.
The Quest for the Best Apple Pie
When I first met my husband, I quickly discovered his deep affection for fruit-filled desserts, particularly those featuring apples and cherries. Knowing how much he appreciated these sweet treats, I embarked on a culinary mission to master all things apple. This journey led to the creation of many beloved recipes like our famous Caramel Apple Cheesecake Bars, comforting Apple Crumble, and delightful Miniature Apple Turnovers. Yet, despite these successes, the thought of baking an apple pie always intimidated me. It seemed like everyone had their cherished family apple pie recipes, and I worried I couldn’t create something that would truly impress him as much as my other apple creations had. The pressure felt immense to deliver a pie that stood out, one that would become *our* signature recipe.
After countless hours of dedicated testing, meticulous research, and a fair share of kitchen experiments, I finally mustered the courage to develop my very own apple pie recipe. Each attempt brought me closer to perfection, refining the crust’s flakiness, balancing the spices in the filling, and ensuring the apples cooked just right. The day I pulled this pie from the oven, golden and bubbling, I knew I had found something special. It wasn’t just another pie; it was a culmination of effort, passion, and a dash of culinary bravery. And let me tell you, the result was beyond my wildest expectations. It was, without a doubt, the best apple pie I had ever tasted. My apple-loving husband, whose discerning palate had inspired this quest, wholeheartedly agreed. He declared it the best apple pie he had ever experienced, a testament to the effort and love poured into every step. This recipe isn’t just about apples and crust; it’s about the joy of creation, the triumph of overcoming culinary fears, and the simple pleasure of sharing an extraordinary dessert with loved ones. It’s a recipe crafted to ensure a thick, perfectly spiced filling nestled within a buttery, flaky crust that will impress even the most seasoned pie connoisseurs.
Essential Ingredients for the Perfect Apple Pie
Crafting the perfect apple pie begins with selecting the right ingredients. Each component plays a crucial role in achieving that coveted balance of flavor, texture, and aroma. Here’s a detailed look at what you’ll need and why:
- Pie Crusts: The foundation of any great pie. Whether you choose to make your own homemade pie crust or opt for high-quality store-bought varieties, ensuring they are thoroughly chilled before use is paramount. Cold dough prevents the butter from melting too quickly, which is essential for a wonderfully flaky and tender crust. A warm crust can become soft, sticky, and difficult to handle, leading to a less desirable texture and potentially a tough crust.
- Apples: The vibrant heart of the pie! For the most complex and delightful flavor profile, I highly recommend using a mix of sweet and tart apples. Granny Smith apples, for instance, offer a bright tartness that cuts through the sweetness and helps the filling maintain its structure. Honeycrisp apples provide a lovely crisp texture, balanced sweetness, and a fantastic aroma. Other excellent choices for baking include Braeburn, Fuji, Golden Delicious, or a blend of your favorites. Peeling, coring, and dicing your apples uniformly into 1/2-inch cubes ensures even cooking and a consistent texture throughout the filling.
- Unsalted Butter: This adds an incredible richness and depth of flavor to your apple filling. Using unsalted butter allows you to control the overall salt content of your pie, preventing it from becoming too salty. It also contributes to the smooth, luxurious mouthfeel of the cooked apples, creating a truly decadent experience.
- Lemon: Don’t skip the lemon! Both the zest and juice are vital. Lemon juice adds a bright, zesty tang that beautifully complements the sweetness of the apples and spices, preventing the filling from tasting overly sweet or cloying. More importantly, the acidity helps prevent the apples from browning prematurely, keeping them looking fresh and appealing. The zest, packed with aromatic oils, infuses the filling with a vibrant, citrusy fragrance that enhances the overall aroma.
- Brown Sugar & White Sugar: A combination of both sugars creates a nuanced sweetness and helps achieve the perfect consistency for the filling. Lightly packed brown sugar brings a caramel-like depth, moisture, and a subtle chewiness to the apples. White granulated sugar contributes pure sweetness and aids in activating the flour to thicken the filling. Always ensure brown sugar is lightly packed into your measuring cup to get the correct amount.
- Spices: The aromatic soul of apple pie! My recipe uses a carefully balanced blend of ground cinnamon, allspice, cloves, and nutmeg. Cinnamon provides warmth and familiarity, allspice offers a complex, slightly peppery note, cloves add a pungent sweetness, and nutmeg delivers a subtle, earthy aroma. These spices together create the classic, comforting flavor profile. Feel free to adjust the quantities based on your personal preference for a bolder or milder spice profile.
- Flour: A crucial thickening agent for the apple filling. When mixed thoroughly with the sugars and apples, it helps absorb excess moisture released by the apples during baking, ensuring your filling is thick, saucy, and not runny. Proper thickening is key to a sliceable, neat pie. Make sure it’s evenly mixed into the dry ingredients to avoid any pockets of raw flour, which can lead to lumps in the final product.
- Vanilla Extract: A touch of good quality vanilla extract enhances all the other flavors, adding a layer of subtle sweetness and warmth. It rounds out the spice profile beautifully and adds an extra layer of gourmet flavor that truly elevates the pie.
- Greek Yogurt or Sour Cream: This might seem like an unconventional ingredient, but it’s a secret weapon for achieving an incredibly creamy and slightly tangy filling without making it heavy. Plain Greek yogurt or sour cream adds a wonderful richness, a subtle tang, and helps bind the filling together. Choose plain varieties for a neutral flavor that lets the apples and spices shine without overpowering them.
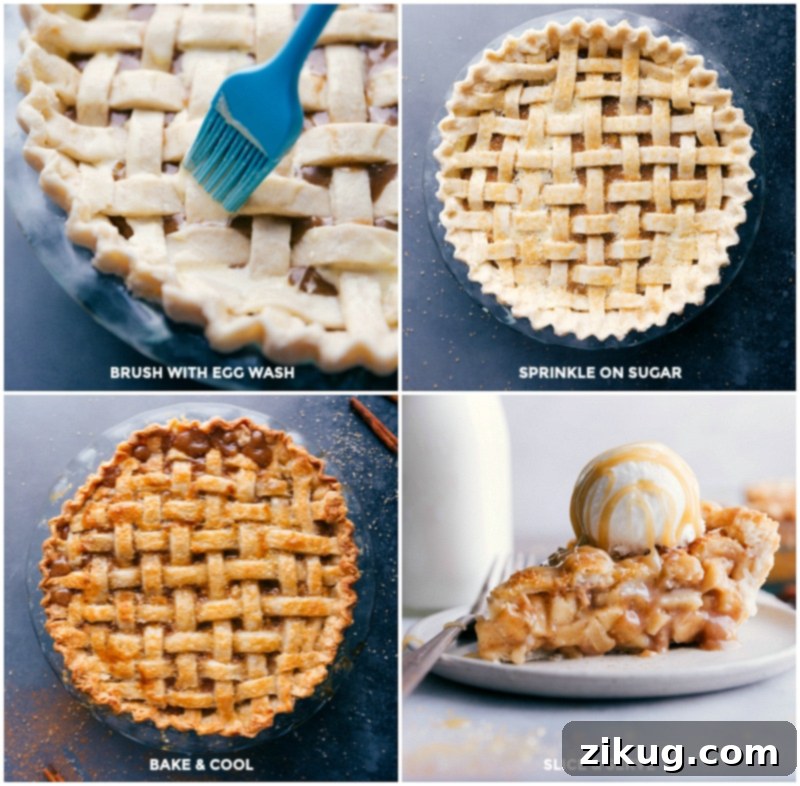
- Egg Wash: A simple mixture of beaten egg and a splash of milk, brushed over the top crust, serves two important purposes. First, it helps to seal the edges of the pie crust, preventing the filling from bubbling out and creating a mess. Second, and perhaps most visibly, it gives the crust a gorgeous, golden-brown sheen and a slightly crisp texture, making your pie look as professional and appealing as it tastes.
How To Make the Perfect Apple Pie: Step-by-Step Guide
Creating this magnificent apple pie is a rewarding process. Follow these detailed steps for a perfect result every time, ensuring a delicious and visually stunning dessert:
- Prepare the Lemon: Begin by zesting one whole lemon using a fine zester to yield about 1 teaspoon of fragrant lemon zest. Then, use a citrus juicer to extract approximately 2 tablespoons of fresh lemon juice. Both the zest and juice are vital for flavor and apple preservation, so set them aside as they will be incorporated into the apple filling.
- Chill Pie Crusts: The secret to a flaky crust starts here. If you’re using store-bought crusts, ensure they are thoroughly chilled in their packaging for at least 30 minutes in the refrigerator. If you’re making your own homemade pie dough, wrap it tightly in plastic wrap and chill it for at least an hour, or until firm. Keeping the crusts cold is vital for easy handling, preventing the butter from melting prematurely, and ensuring a tender, flaky texture.
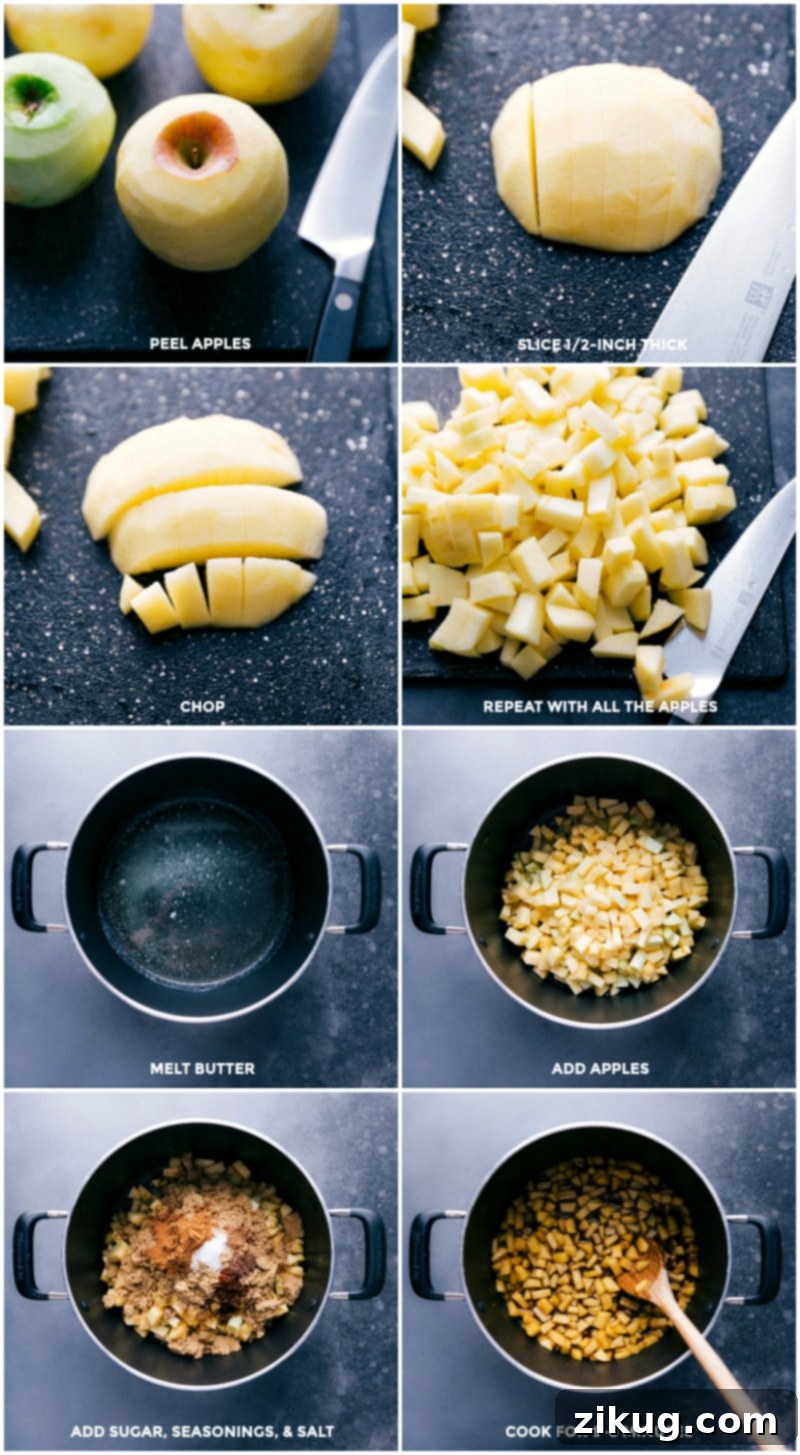
- Prepare the Apples: This recipe calls for about 7 cups of diced apples. Start by peeling, coring, and then dicing your chosen apple varieties into consistent 1/2-inch cubes. Uniform sizing is crucial to ensure that all apples cook evenly, resulting in a harmonious texture throughout your pie filling without any mushy or undercooked pieces. Once prepared, set the diced apples aside.
- Cook the Apples and Spices: In a large, heavy-bottomed pot or Dutch oven, melt the 4 tablespoons of unsalted butter over medium heat. Once melted and shimmering, add the diced apples, reserved lemon juice, and lemon zest. Stir in the 1 cup of dark brown sugar, 1-1/2 teaspoons of ground cinnamon, 1/4 teaspoon of allspice, 1/4 teaspoon of ground cloves, 1/4 teaspoon of ground nutmeg, and 3/4 teaspoon of salt. Cook this mixture, stirring occasionally, for 6–8 minutes. During this time, the apples will begin to soften slightly, and their natural juices, combined with the sugars and spices, will start to thicken into a fragrant, syrupy consistency. This pre-cooking step is crucial for preventing a “gap” between the crust and filling after baking and for intensifying the apple flavor.
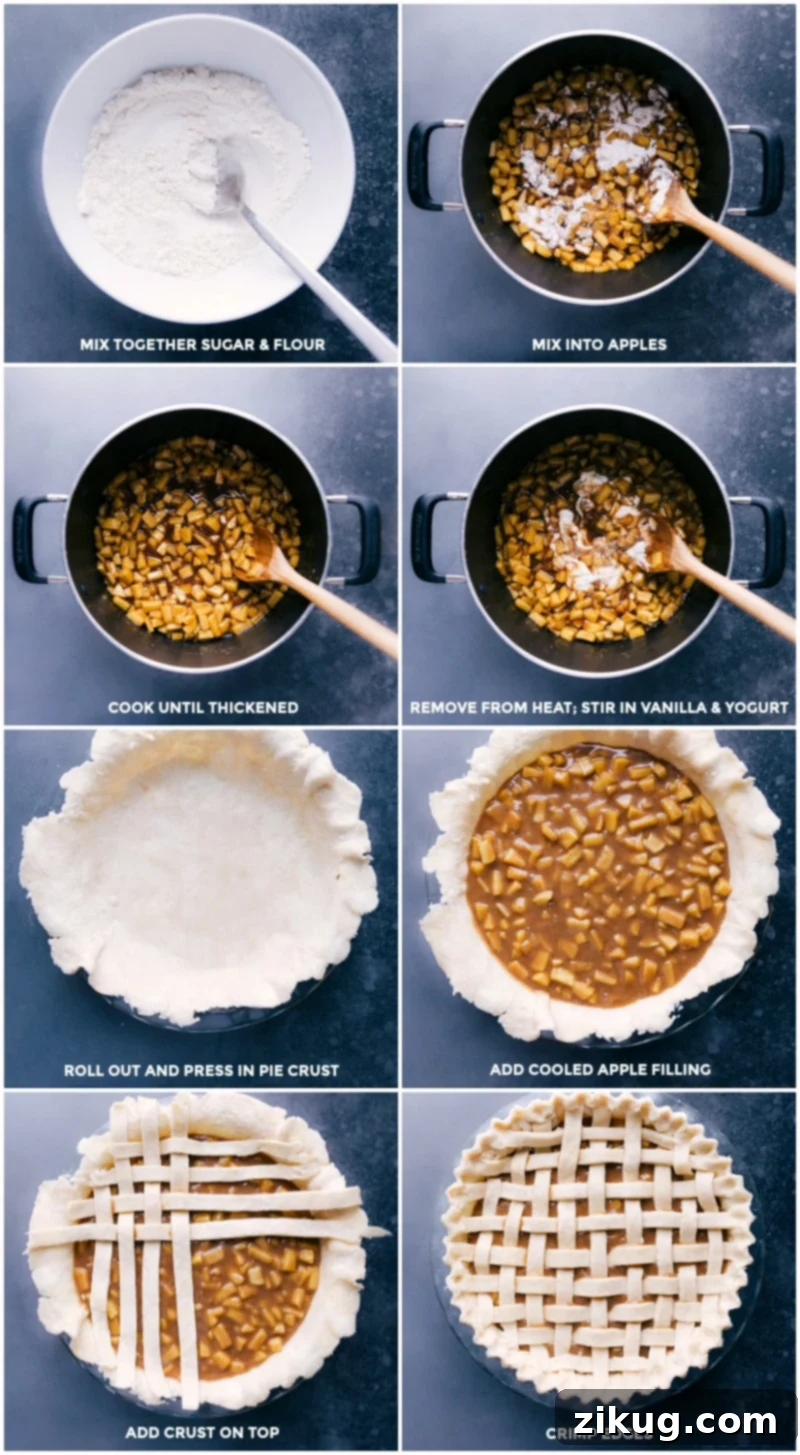
- Thicken the Filling: In a separate small bowl, combine the 1/3 cup of granulated sugar and 1/4 cup of flour, whisking them together until no lumps remain. Sprinkle this sugar-flour mixture evenly over the cooking apples in the pot and stir continuously. Continue to cook for another 4–5 minutes, stirring often, until the filling visibly thickens to a rich, glossy sauce. Remove the pot from the heat and let it cool for about 5 minutes. Then, stir in the 2 teaspoons of vanilla extract and the 1/3 cup of Greek yogurt (or sour cream). This addition adds a wonderful creaminess and a subtle tang. Once combined, refrigerate the apple filling for at least 45 minutes, or until thoroughly chilled. Chilling is essential for ensuring the filling sets properly during baking and allows for a clean slice later.
- Prepare the Egg Wash: In a small bowl, whisk together one large beaten egg with one tablespoon of milk using a fork until the mixture is smooth and uniform. This will be your egg wash, used to create a golden, beautiful crust and help seal the pie.
- Assemble the Pie: Carefully place one chilled pie crust into the bottom of a 9.5-inch pie pan. Gently press it into place without stretching the dough, ensuring it fits snugly against the sides and bottom. Lightly brush the bottom crust with a thin layer of the prepared egg wash; this acts as a barrier to help prevent a soggy bottom crust, which is a common pie challenge. Evenly spread the thoroughly chilled apple filling over the bottom crust. Now, cover the top with the second pie crust. You can either lay it flat and cut several steam vents with a sharp knife, or create a decorative lattice crust for an elegant presentation. Press firmly all around the edges to seal the two crusts together, ensuring no gaps. Trim any excess crust so it is flush with the rim of the pan. If desired, you can crimp the edges decoratively with your fingers or a fork for a classic finish. Place the assembled pie back into the refrigerator to chill for another 30 minutes to an hour. This final chill helps the crust maintain its intricate shape during baking. Preheat your oven to 400°F (200°C) during this chilling period.
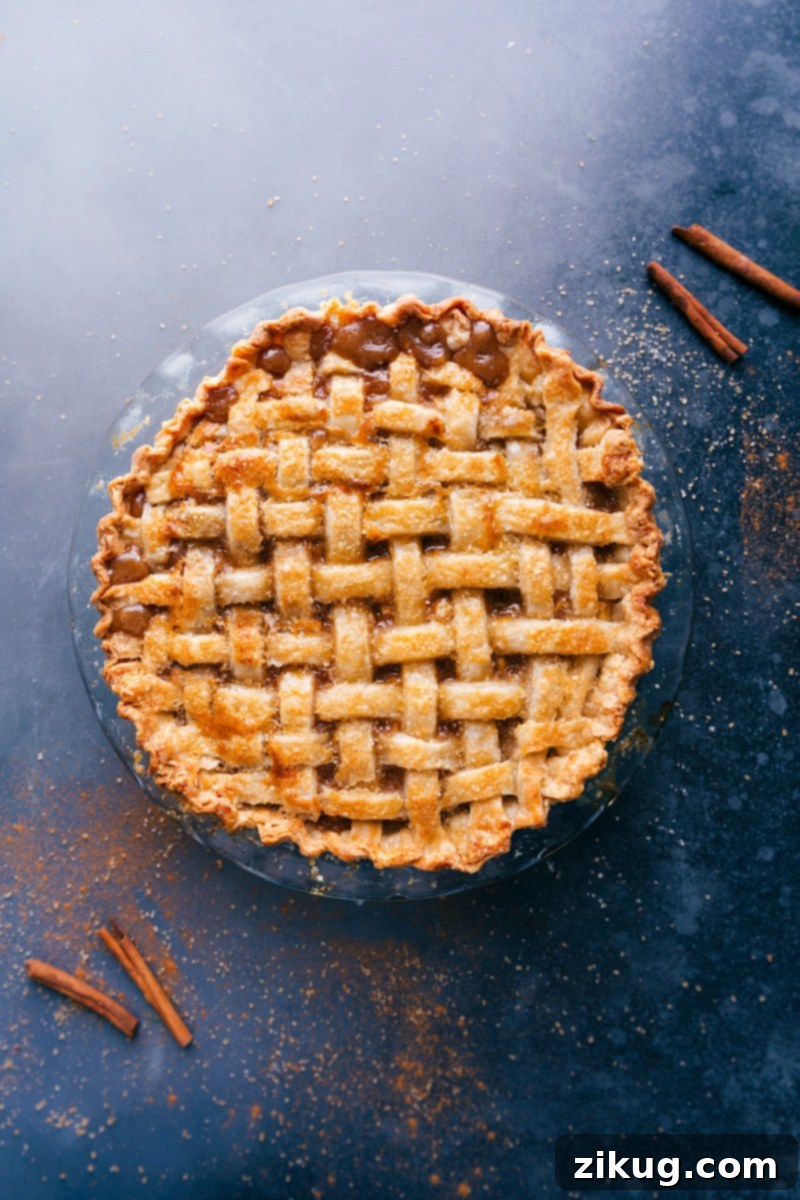
- Bake and Cool: Once the oven is preheated, remove the chilled pie from the fridge. Brush all parts of the top crust, excluding any crimped edges if you want them to remain a lighter color, with the remaining egg wash. If you desire a sweet, crunchy topping, sprinkle your choice of sparkling sugar evenly over the egg-washed crust. Carefully place the pie on a sturdy sheet pan lined with parchment paper – this catches any potential drips and makes for easier cleanup. Bake for 55–65 minutes, or until the crust is a deep, rich golden brown and the filling is visibly bubbling through any vents or lattice. If you notice the edges browning too quickly, use a pie shield or create one with aluminum foil to protect them. Once baked, the most crucial step follows: let the pie cool completely at room temperature before attempting to slice and serve. This cooling period, typically 3–5 hours, allows the starches in the filling to fully set and thicken. Cutting into a warm pie will result in a runny, soupy mess, whereas a properly cooled pie will yield thick, juicy, and perfectly sliceable pieces. Serve your magnificent apple pie with fresh whipped cream or a scoop of premium vanilla bean ice cream for the ultimate indulgence.
Apple Pie Tips for Baking Success
Achieving apple pie perfection often comes down to a few key techniques and understanding why each step matters. Master these tips for a consistently delicious pie that will be the star of any table:
- Chill Everything: This cannot be emphasized enough! Keeping your pie crusts, the apple filling, and even the assembled pie cold before baking is the golden rule for a superior apple pie. Cold butter in the crust creates pockets of steam in the oven, resulting in an exceptionally flaky texture. A cold filling ensures it thickens properly and doesn’t make your bottom crust soggy. Minimize handling the dough with warm hands, as this can melt the butter, and refrigerate components as needed.
- Optimal Apple Blend: While any apple can be used, a combination of apples (like tart Granny Smith for their firm texture and bright flavor, and sweet Honeycrisp or Fuji for their sweetness and aroma) creates a more complex and balanced flavor profile. Tart apples provide a necessary counterpoint to the sweetness, while firmer apples hold their shape better during baking, contributing to a delightful texture that isn’t mushy.
- The Power of Pre-Cooking: Lightly cooking the apples before assembling the pie is a game-changer. This crucial step helps soften the apples slightly, releases some of their excess moisture, and prevents the dreaded “gap” that sometimes forms between the baked crust and shrunken filling. It also allows the flavors of the spices and sugars to meld beautifully and deepen before the pie even enters the oven, resulting in a more flavorful filling.
- Sugar Topping for Visual Appeal and Crunch: Elevate your pie’s presentation and add a delightful textural contrast by sprinkling a coarse sugar topping over the egg-washed crust before baking. Demerara Baking Sugar, Turbinado sugar, or white sparkling sugar all add a beautiful sparkle and a delightful, sweet crunch to the golden crust, making your pie irresistible from first glance.
- Crucial Cooling Time: Patience is a virtue, especially when it comes to apple pie! It’s absolutely essential to let your pie cool completely to room temperature for at least 3-5 hours before slicing. This extended cooling period allows the starches in the filling to fully set and thicken, transforming it from a liquidy concoction into a perfectly juicy, saucy, and sliceable consistency. Cutting into a warm pie will inevitably result in a runny, soupy mess, whereas a properly cooled pie will yield thick, neat, and perfectly sliceable pieces.
- Preventing a Soggy Bottom: A soggy bottom crust is a common pie challenge, but it’s entirely avoidable. Beyond chilling your crust well, consider blind baking your bottom crust for 10-15 minutes before adding the filling. This creates a pre-cooked barrier. Alternatively, a thin layer of breadcrumbs, crushed cornflakes, or a tablespoon of flour sprinkled on the bottom crust before adding the filling can absorb excess moisture released by the apples. Brushing the inside of the bottom crust with a light egg wash also helps create a protective, water-resistant barrier.
- Mastering the Egg Wash: A simple egg wash (one beaten egg mixed with a tablespoon of milk or water) is your best friend for achieving a gorgeous crust. Brush it generously and evenly over the top crust (you can avoid the crimped edges if you prefer them to remain a lighter color) for a glossy, deep golden finish that is both appealing and appetizing.
- Protection from Over-Browning: If your pie crust edges are browning too quickly during baking, don’t fret! A pie shield is an excellent tool to protect them from excessive browning. You can easily make your own pie shield by loosely shaping aluminum foil around the pie edges, removing it during the last 15-20 minutes of baking to allow for even browning across the entire crust.
Storage Solutions for Your Apple Pie
Leftovers
Proper storage ensures your delicious apple pie remains fresh and enjoyable for as long as possible. Here’s how to keep it at its best:
- Room Temperature: A freshly baked apple pie can be stored, covered loosely with foil or plastic wrap, at room temperature for up to 2 days. This is often preferred for maintaining the crust’s crispness. Ensure it’s in a cool, dry place away from direct sunlight.
- Refrigerator: For longer storage, transfer your apple pie to an airtight container or wrap it tightly in plastic wrap and refrigerate it for up to 5 days. Chilling will help the filling maintain its set texture and prolong its freshness.
- Freezing: Apple pie freezes beautifully, making it perfect for meal prep or future cravings! To freeze, wrap the entire cooled pie (or individual slices) tightly in several layers of plastic wrap, then an additional layer of heavy-duty aluminum foil. It can be frozen for up to 3 months. When ready to enjoy, thaw the pie in the refrigerator overnight before reheating.
- Reheat: For the best texture and flavor, reheat chilled or thawed pie slices in an oven preheated to 350°F (175°C) for 15-20 minutes, or until warmed through and the crust is crisp again. This method revives the crust and warms the filling without making it soggy, giving you that freshly baked experience all over again.
More Delicious Dessert Recipes
If you’ve enjoyed this classic apple pie, I encourage you to explore more delightful dessert recipes from my collection. Each one is crafted with love and tested to bring joy to your kitchen.
- Apple Coffee Cake
- Fruit Salsa
- Peach Cobbler
- Apple Fritter Bread
- Applesauce Cake
5 out of 5 stars from 3 votes
Apple Pie
Equipment
-
Pie pan 9.5-inch
-
Large pot
Ingredients
- 1 lemon
- 2 pie crusts
- 8 apples peeled, cored, and diced, see note 1
- 4 tablespoons unsalted butter
- 1 cup dark brown sugar lightly packed
- 1-1/2 teaspoons ground cinnamon
- 1/4 teaspoon allspice
- 1/4 teaspoon ground cloves
- 1/4 teaspoon ground nutmeg
- 3/4 teaspoon salt
- 1/3 cup granulated sugar
- 1/4 cup flour
- 2 teaspoons vanilla extract
- 1/3 cup honey vanilla Greek yogurt or sour cream
- 1 large egg beaten
- 1 tablespoon milk
- Sugar topping as desired, see note 2
Instructions
-
Zest lemons with a zester to get 1 teaspoon zest. Juice the lemon using a citrus juicer to get 2 tablespoons lemon juice. Set aside.
-
You can buy pie crusts, or make them homemade. Be sure to chill pie crusts (tightly wrapped in plastic wrap) for at least 30 minutes before rolling them out. It’s best to keep everything as cold as possible! Chill pie dough, apple pie filling, and pie before baking.
-
Peel and core apples. Dice into 1/2-inch cubes, measure 7 cups, and set aside.
-
In a large pot over medium heat, melt butter. Add diced apples, lemon juice, and zest. Stir in brown sugar, cinnamon, allspice, cloves, nutmeg, and salt. Cook, stirring occasionally, for 6–8 minutes until juices thicken and apples begin to soften.
-
In a small bowl, mix granulated sugar and flour. Sprinkle over the apple filling on the stovetop and stir. Cook for 4–5 minutes, stirring often until the filling thickens. Remove from heat and let sit for 5 minutes. Stir in vanilla and Greek yogurt. Refrigerate the apple filling until chilled, about 45 minutes.
-
In a small bowl, whisk together the egg and milk with a fork until smooth. Set aside.
-
Place a pie crust in the bottom of a 9.5-inch pie pan. Lightly brush with egg wash. Spread cooled apple filling evenly over the crust. Cover the top with pie crust (see note 3). Press all around edges to seal the two crusts together. Trim or tuck excess crust so it is flush with rim of the pan. If desired, crimp edges (see note 4). Place assembled pie in fridge and chill for 30 minutes to an hour. Preheat oven to 400°F.
-
Take out the pie and brush all but the crimped edges with egg wash. Sprinkle optional sparkling sugar (see note 2) evenly over the pie. Set the pie on a sheet pan lined with parchment paper and bake for 55–65 minutes, or until the crust is a deep golden brown. If crust is browning too quickly, use a pie shield (see note 5).
-
Cool completely, at room temperature, before cutting into pie and serving. If the pie is cut straight out of the oven it’ll be runny and wet; it needs time for the filling to become juicy and thick. I typically wait 3–5 hours before cutting into the pie. If desired, serve with fresh whipped cream or vanilla bean ice cream.
Recipe Notes
Note 2: You can sprinkle your pie crust with some sugar to add a sweet crunch. I like to use Demerara Baking Sugar, Turbinado sugar, or white sparkling sugar for topping.
Note 3: Elise from SimplyRecipes.com has step-by-step instructions for creating a lattice crust. If you don’t want to do a lattice crust, simply add the entire crust on top of the apple filling and cut some vents in the top of the crust with a sharp knife.
Note 4: If you’re unsure how to crimp the edges of your pie, here’s a picture tutorial.
Note 5: You may want a pie shield to keep edges from getting too dark. You can make your own pie shield by following this tutorial.
Nutrition Note: Nutritional information is calculated using two refrigerated crusts from the grocery store.
Storage: Store apple pie covered for up to 2 days, keep in an airtight container in the fridge for up to 5 days, or wrap pie tightly and freeze for up to 3 months. Thaw in the fridge before serving. Warm in the oven at 350°F for the best texture reheated.
Nutrition
Nutrition information is automatically calculated, so should only be used as an approximation.