
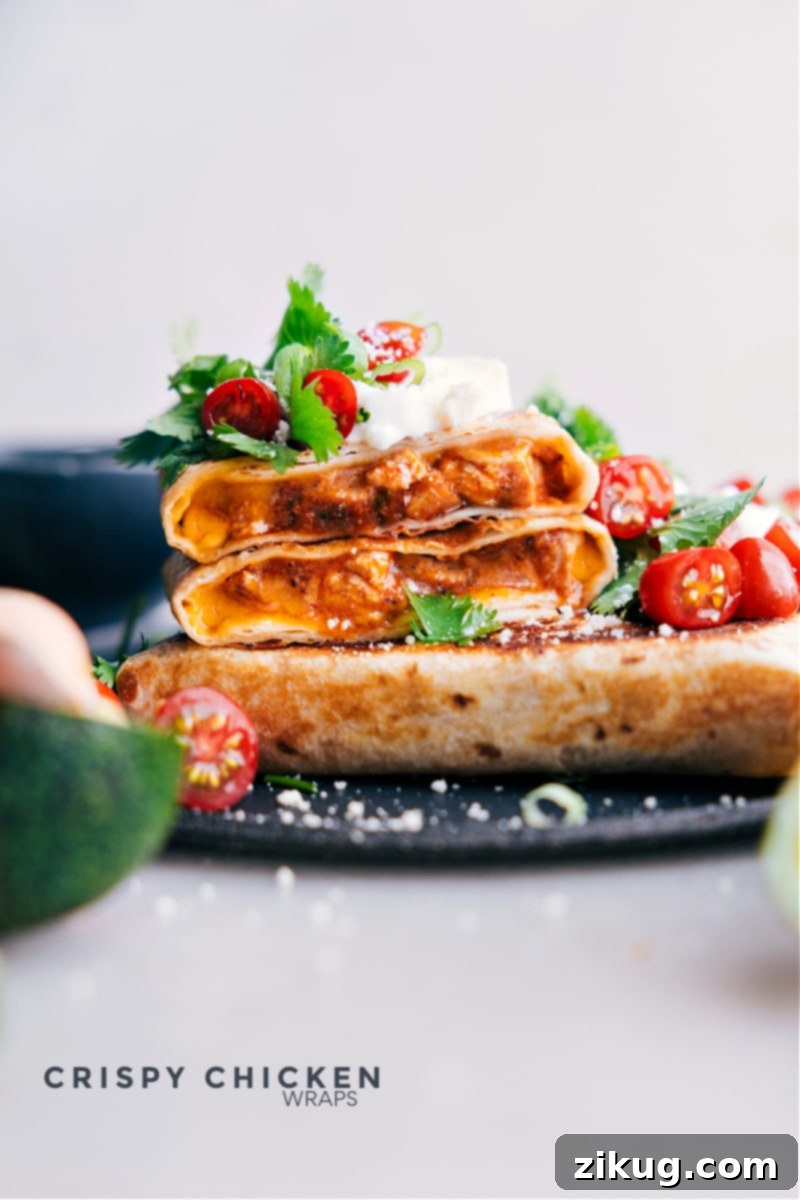
Crispy Chicken Wraps are more than just a meal; they’re an experience! Each bite delivers a delightful blend of smoky shredded chicken, creamy refried beans, and wonderfully melty cheese, all encased in a perfectly crunchy, golden tortilla. This recipe promises both incredible flavor and unmatched convenience, making it a go-to for any day of the week.
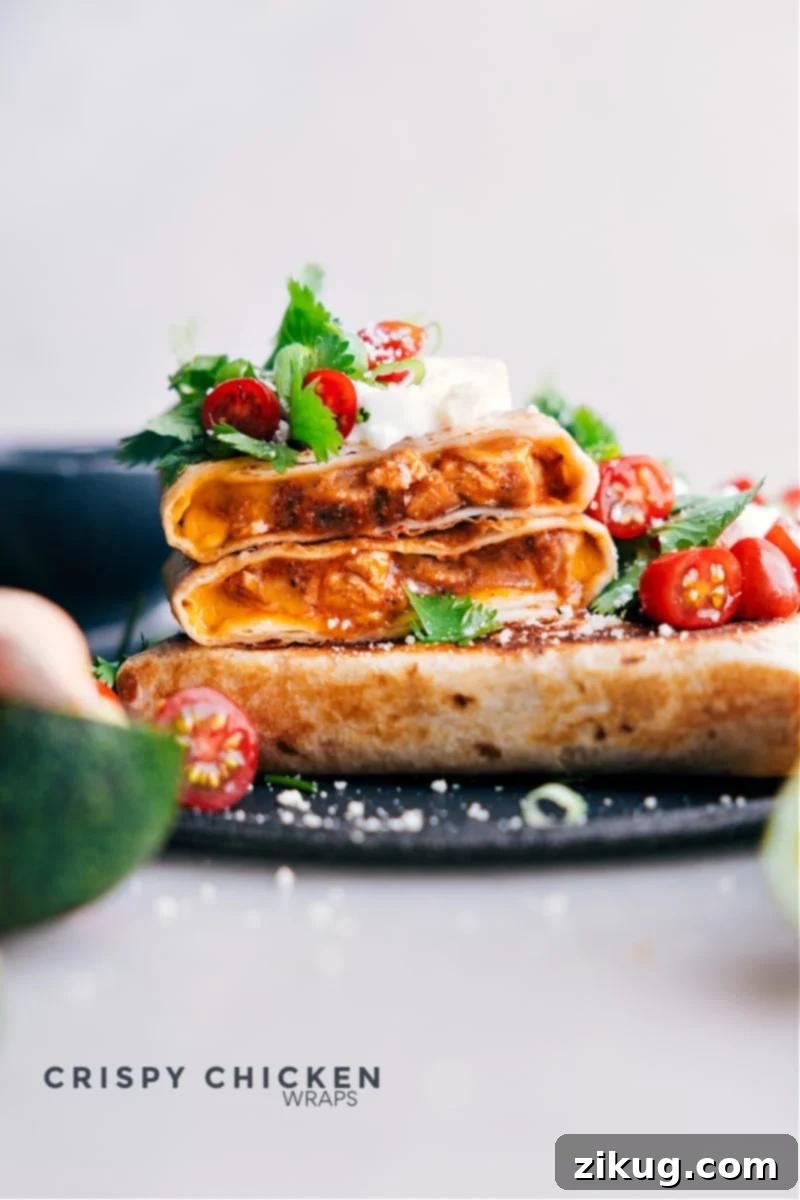
Crispy Chicken Wraps: The Ultimate Flavor Experience
Prepare to fall in love with these utterly irresistible chicken wraps! They are truly outstanding, boasting an explosion of flavor while being incredibly simple to prepare. Generously filled and packed with protein, they offer a fantastic solution for a satisfying and hearty weeknight dinner or a robust lunch. These wraps are designed to keep you full and happy without spending hours in the kitchen.
The magic begins with succulent, tender shredded chicken, meticulously seasoned with a mild taco blend that brings a comforting warmth without overwhelming spice. This flavorful chicken is then lovingly combined with a tangy, smoky mild enchilada sauce and freshly grated sharp cheddar cheese. The result is a deeply flavorful, rich, and incredibly satisfying filling that forms the heart of these amazing wraps.
To add another dimension of taste and texture, this robust filling is perfectly complemented by creamy, smooth refried beans. This harmonious concoction is then carefully spooned into a soft, large flour tortilla. Before making their grand appearance at your table, each wrap is lightly misted with olive oil cooking spray and browned in a skillet until it achieves a beautiful, irresistible golden color and that signature, crave-worthy crunch. The contrast between the crispy exterior and the tender, flavorful interior is what truly sets these wraps apart.
One of the many wonderful aspects of these wraps is their unparalleled versatility when it comes to garnishing. Whether you prefer a minimalist approach or an abundance of fresh toppings, you have complete freedom to customize. Essentially, anything you would typically enjoy on your favorite burritos or tacos will pair wonderfully with these crispy chicken wraps, allowing everyone to create their perfect bite!
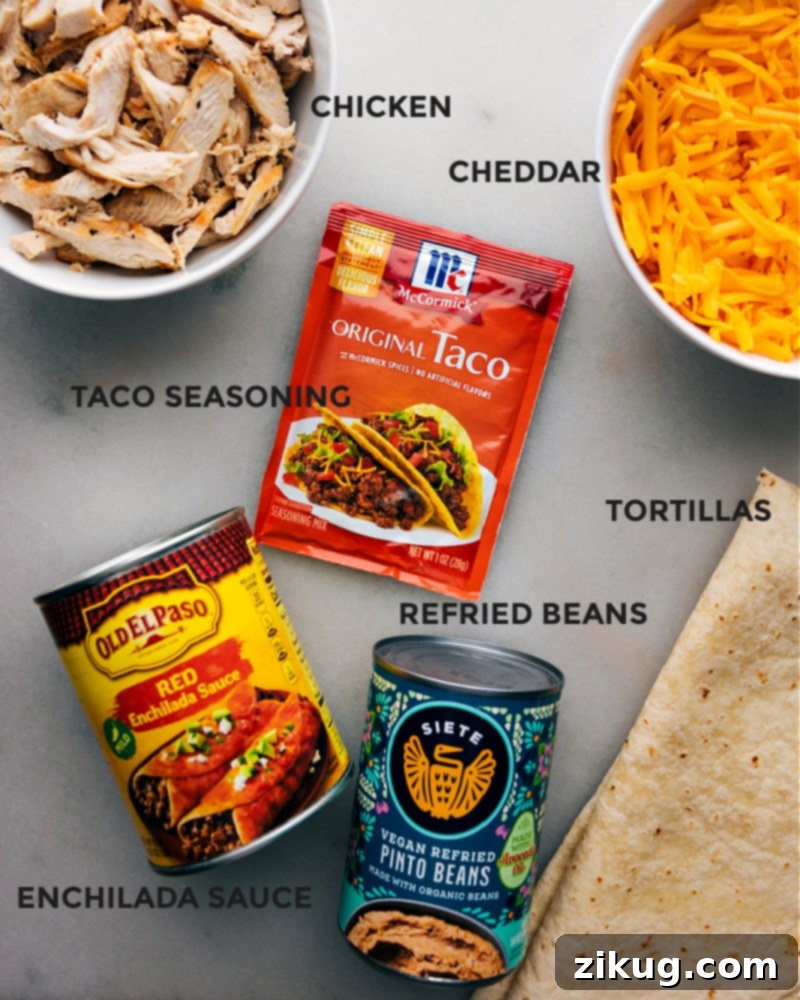
Essential Ingredients for Crispy Chicken Wraps:
Crafting the perfect crispy chicken wrap starts with selecting quality ingredients. Here’s a closer look at what you’ll need and why each component is key:
- Cooked and Shredded Chicken: The foundation of our flavorful filling. For ultimate convenience and robust flavor, consider picking up a hot-and-ready rotisserie chicken from your local grocery store. These often yield a generous amount of meat, perfect for several wraps. For even quicker preparation, many delis now offer pre-pulled and shredded rotisserie chicken meat, saving you valuable time.
- OR: Leftover Cooked or Grilled Chicken: Don’t let perfectly good chicken go to waste! If you have any leftover cooked or grilled chicken, simply seasoned with salt and pepper, it works beautifully in this recipe. There’s no need to reheat it beforehand; the chicken will warm up to perfection as the wraps cook on the skillet, absorbing all the wonderful flavors.
- Mild Taco Seasoning Blend: This seasoning is crucial for imparting that classic, irresistible Tex-Mex flavor to the chicken. Opt for a mild variety to ensure these wraps remain enjoyable for all family members, including younger palates. Feel free to adjust the quantity to suit your personal preference for intensity, adding a little more if you crave an extra kick.
- Mild Enchilada Sauce: This ingredient significantly contributes to the smoky and tangy profile of the wraps. Be aware that flavor and heat levels can vary substantially between brands. We highly recommend Old El Paso® mild red enchilada sauce for its consistent quality and balanced taste. If this specific brand isn’t available, taste-test your chosen sauce first to ensure it’s not overly spicy and that its flavor profile appeals to you. Alternatively, for a truly homemade touch, consider preparing our favorite Enchilada Sauce from scratch. For those who love a fiery kick, a medium or hot enchilada sauce can be substituted.
- Freshly Grated Sharp Cheddar Cheese: The secret to an incredibly smooth and creamy cheese pull! Grating your own cheese, rather than using pre-shredded bags, ensures a superior melt and texture, as pre-shredded varieties often contain anti-caking agents that hinder proper melting. Choose sharp or extra-sharp Cheddar to achieve a more pronounced, savory, and robust cheese flavor that truly stands out in the filling.
- Large Flour Tortillas: The vessel for our delicious filling! It’s essential to select large flour tortillas. Their flexibility and strength are vital for holding a generous amount of filling without tearing or breaking during assembly and cooking. Corn tortillas, while delicious, tend to be more fragile and prone to ripping, making flour tortillas the ideal choice for these robust wraps.
- Creamy Refried Beans: An indispensable component that adds a layer of luxurious creaminess and depth of flavor. Refried beans perfectly balance the savory chicken and cheese. If you’re fortunate enough to have a batch of homemade pinto beans on hand, they would be an absolutely incredible addition, elevating these wraps even further!
- Olive Oil Cooking Spray: This simple yet vital ingredient is key to achieving that beautiful, coveted crisp texture on your wraps. Ensure you spray all sides of each wrap evenly before cooking to guarantee a uniformly golden-brown crust that delivers the perfect crunch with every bite.
Elevate Your Wraps: Delicious Topping Ideas
While these crispy chicken wraps are phenomenal on their own, adding your favorite toppings can truly take them to the next level, enhancing both flavor and texture. Here are some fantastic ideas to inspire your culinary creativity:
- Diced Tomatoes or Fresh Salsa: Introduce a burst of bright freshness and vibrant color with finely diced ripe tomatoes. Alternatively, a spoonful of zesty salsa or chunky pico de gallo adds an extra layer of tangy, herbaceous flavor.
- Creamy Avocado or Guacamole: For a luxurious, rich, and wonderfully creamy addition, thinly sliced ripe avocado or a dollop of homemade guacamole is always a hit. The healthy fats and smooth texture beautifully complement the spiced chicken.
- Cooling Sour Cream or Crema: A generous dollop of sour cream provides a delightful creamy contrast and richness, which is especially welcome if you’ve opted for a spicier enchilada sauce. Even fat-free or light sour cream works wonderfully! For a quick, tangy crema, simply combine two parts sour cream with one part fresh lime juice.
- Zesty Jalapeños: If you crave a bolder, spicier kick, a sprinkle of finely diced fresh or pickled jalapeño peppers will deliver just the right amount of heat and zing to awaken your taste buds.
- Bright Lime Wedges: A squeeze of fresh lime juice over your finished wrap instantly brightens all the flavors, adding a wonderful, zesty tang that cuts through the richness and leaves a refreshing finish.
- Crisp Chopped Onions: For a bit of pungent crunch and a savory bite, finely chopped red or white onions are an excellent addition. They provide a textural contrast that enhances the overall experience.
Expert Tips for Perfectly Crispy Chicken Wraps
Achieving the perfect crispy chicken wrap is simpler than you might think, especially with these helpful tips:
- Always Use Freshly Grated Cheese: This is a game-changer! Freshly grated cheese melts much more smoothly and creates a creamier, more luxurious texture compared to pre-shredded varieties, which often contain anti-caking agents that can make them gritty or prevent an even melt.
- Invest in Quality Tortillas: The foundation of your wrap matters. High-quality flour tortillas not only taste better but are also more pliable and resilient. This means they will hold up beautifully during folding and cooking, preventing frustrating tears or becoming soggy prematurely.
- Opt for a Non-Stick Pan: When it comes to browning your wraps, a good non-stick skillet is your best friend. It makes a significant difference in achieving that perfectly crispy, golden exterior without the wraps sticking to the pan and falling apart.
- Avoid Overfilling Your Wraps: It’s tempting to load them up, but be mindful not to overfill the tortillas. Too much filling can make them difficult to fold neatly and increases the risk of the delicious contents spilling out during the cooking process. A balanced amount ensures a perfectly sealed and manageable wrap.
- Start Cooking Seam-Side Down: This is a crucial step for maintaining the wrap’s integrity. By placing the wraps seam-side down first, you allow the heat to seal the tortilla, effectively “gluing” it shut and preventing any filling from escaping as it cooks.
- Master Heat Control: Finding the right balance of heat is essential for a crispy wrap. Medium-high heat is generally ideal. If the heat is too high, the tortilla might burn before the filling is thoroughly warmed through. Conversely, if the heat is too low, the tortilla won’t achieve that desirable crispiness and might become soft or greasy.
- Cook in Batches: Resist the urge to overcrowd your skillet. Depending on its size, you’ll likely need to cook the wraps in batches of two or three. Overcrowding can lower the pan’s temperature and cause the wraps to steam instead of beautifully brown and crisp, hindering that coveted texture.
Step-by-Step Guide: Assembling and Browning Your Wraps
Follow these simple steps to perfectly assemble and brown your crispy chicken wraps for an optimal culinary experience:
Assembling the Wrap:
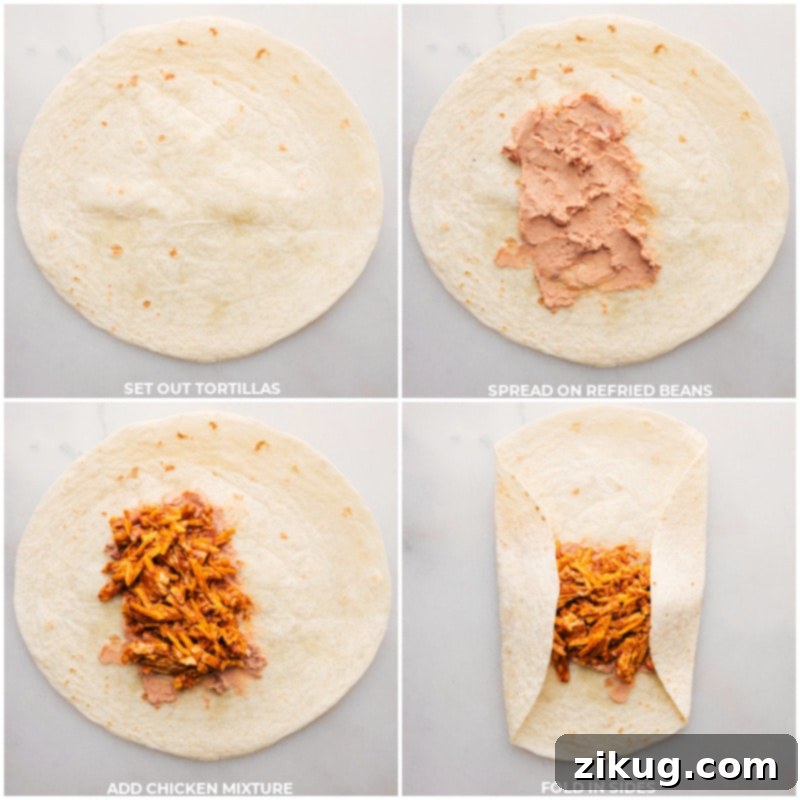
- Lay Flat and Fill: Position a large flour tortilla flat on a clean, spacious workspace. Spoon a generous portion of creamy refried beans down the center, followed by a hearty heap of your flavorful chicken and cheese filling. Be sure to leave a substantial border (about 1-2 inches) clear along all the edges of the tortilla to facilitate easy and secure folding.
- Fold the Sides In: Carefully fold in both the left and right sides of the tortilla towards the middle. These folds should partially overlap the filling, creating a somewhat narrower, elongated shape.
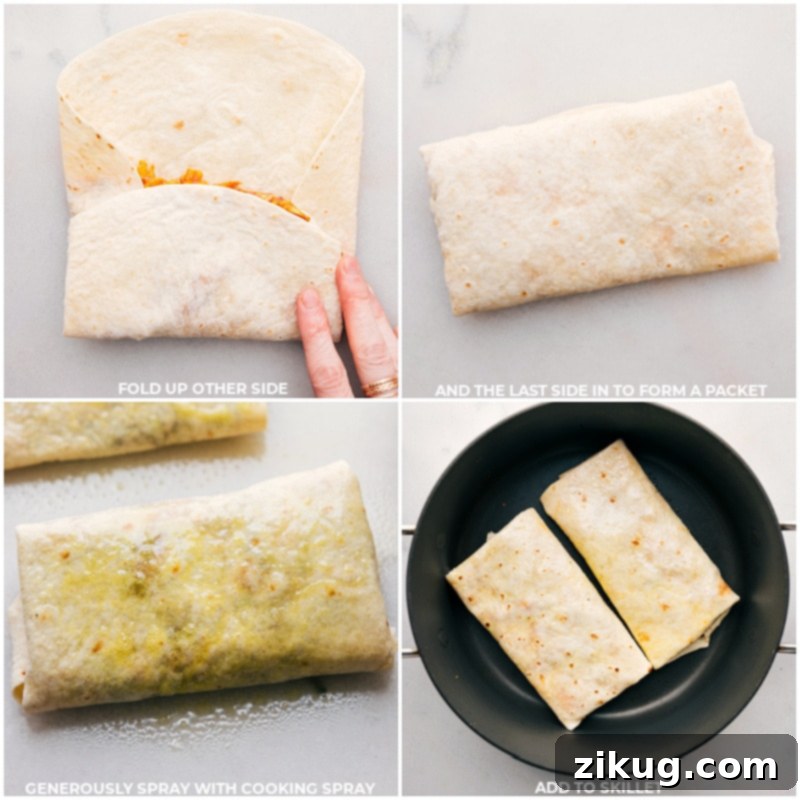
- Fold from the Bottom: Next, take the edge of the tortilla that is nearest to you (the bottom edge) and firmly fold it up and over the filling, ensuring it completely covers the folded-in sides. Gently tuck it in to create a snug packet.
- Roll to Seal: Finally, grasp the farthest edge of the tortilla (the top edge). While keeping it taut and firm, pull it down and over to the other side, continuing the roll until your filling is fully enclosed in a neat, compact packet. The goal is a tightly rolled wrap that will hold its shape during cooking.
Browning the Wrap in a Skillet:
- Prepare Your Skillet: Heat a non-stick skillet over medium-high heat. Allow it to fully preheat for a minute or two; a hot pan is key for crispiness.
- Place Wraps Seam-Side Down: Once the skillet is hot, carefully place your assembled Crispy Chicken Wraps into the pan. Ensure they have been generously sprayed on all sides with olive oil cooking spray. Crucially, place them with the seam side facing down onto the hot surface. This method helps to immediately seal the wrap and prevents it from unraveling while cooking.
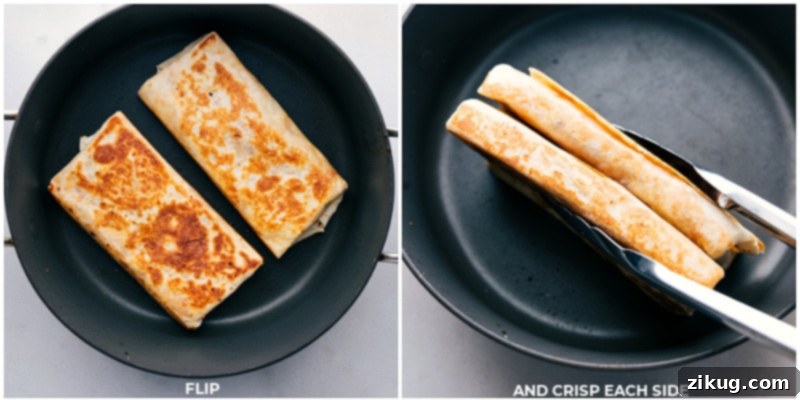
- First Side Brown: Allow the wrap to cook undisturbed for approximately 1-2 minutes. During this time, the tortilla should develop a beautiful golden-brown color and start to achieve a wonderfully crispy texture. Keep a close eye on it to prevent burning.
- Flip and Brown Second Side: Using sturdy tongs, cautiously flip the wrap over to the other side. Allow this side to cook for another 1-2 minutes, or until it also turns golden brown and becomes delightfully crispy.
- Crisp the Edges: Don’t forget the edges! Use your tongs to gently hold and rotate the wraps, pressing each edge against the hot skillet for about 30 seconds to a minute, ensuring all sides are evenly crisped and golden.
- Continue in Batches: Repeat this process with the remaining wraps. It’s important not to overcrowd the skillet. Depending on the size of your pan, it’s best to cook only two or three wraps at a time to maintain consistent heat and achieve optimal crispiness for each one.
Quick Tip for Perfect Crispy Wraps
The secret to perfectly crisp wraps with a thoroughly heated filling lies in striking the right balance with your cooking method. We recommend pre-warming the filling mixture in the microwave before assembly; this gives it a head start. Then, use medium-high heat on your skillet. Lower heat might leave your tortilla undercooked and soft, while excessively high heat could burn the tortilla before the delicious filling is warmed through. And here’s a non-negotiable step: don’t underestimate the power of cooking spray! A generous, even coat on all sides is the key to achieving those delightful, golden, crispy edges and a fantastic texture throughout.
Storage and Reheating Crispy Chicken Wraps
If you plan to prepare these delectable Crispy Chicken Wraps ahead of time or store leftovers, it’s best to avoid crisping the wraps you intend to save for later. This helps maintain their best texture upon reheating. Here’s how to properly store and reheat your wraps:
Short-Term Storage (Refrigeration):
- Cool Completely: After assembling and microwaving (but before crisping in the skillet), allow the wraps to cool thoroughly at room temperature. This step is essential to prevent condensation from forming inside the packaging, which could make your wraps soggy.
- Wrap Individually: Once cooled, encase each wrap tightly in aluminum foil or plastic wrap. This protective layer helps to seal in freshness and prevent drying out.
- Refrigerate: Transfer the individually wrapped wraps to the refrigerator. They should remain fresh and delicious for 3-4 days.
For Longer-Term Freezing:
- Cool Completely: Just like with refrigeration, it is crucial to let the wraps cool entirely to room temperature before freezing.
- Wrap Individually: Securely wrap each wrap first in aluminum foil. For an extra layer of protection against freezer burn and to maintain optimal quality, place these foil-wrapped wraps into a freezer-safe, airtight bag or container.
- Freeze: Properly stored, these wraps can be frozen for up to 3 months, making them an excellent meal prep option.
Reheating Instructions:
- From the Refrigerator: Remove the wrap from its aluminum foil or plastic wrap. Place it on a microwave-safe dish and cover it with a microwave-safe lid or another plate. Microwave on high for 30-90 seconds, or until the filling is thoroughly heated through. Once heated, you can then follow the original recipe directions (step 3 of instructions) to crisp the wrap in a preheated skillet, achieving that fresh-made crunch. Alternatively, you can reheat in a preheated oven at 350°F (175°C) for about 10-15 minutes, or until warm, before crisping on the stovetop.
- From the Freezer: If your Crispy Chicken Wraps are frozen, the best approach is to let them thaw slowly in the refrigerator overnight. Once thawed, follow the same reheating instructions as for refrigerated wraps, ensuring they are heated through before crisping in a skillet.
Explore More Quick & Delicious Wrap Recipes:
If you love the convenience and flavor of these crispy chicken wraps, you’ll definitely want to try these other fantastic wrap recipes for quick lunches or easy dinners:
- Chicken Bacon Avocado Wraps: Indulge in a creamy, savory delight packed with classic flavors.
- Cashew Chicken Wraps: A crunchy, veggie-loaded option inspired by Asian flavors.
- Buffalo Chicken Wraps: For those who love a spicy kick, balanced with cool avocado.
- Sriracha Tuna Salad Wraps: A quick, protein-packed wrap with a touch of heat.
- Turkey Lettuce Wraps: A light, refreshing, and low-carb alternative served in crisp lettuce cups.

Saved
Pin
Crispy Chicken Wraps
While these wraps offer a lovely bit of warmth, the heat is beautifully balanced, especially when served with a dollop of cooling sour cream or fresh avocado slices.
Video
Equipment
-
Large skillet nonstick
Ingredients
- 2 cups cooked chicken shredded or diced, see note 1
- 1 (1-ounce) packet taco seasoning about 2 tablespoons; see note 2
- 3/4 cup mild enchilada sauce see note 3
- 2 cups freshly shredded sharp Cheddar cheese see note 4
- 6 large flour tortillas burrito-sized
- 1 (16-ounce) can refried beans
- Cooking spray
- Optional toppings see note 5
Instructions
-
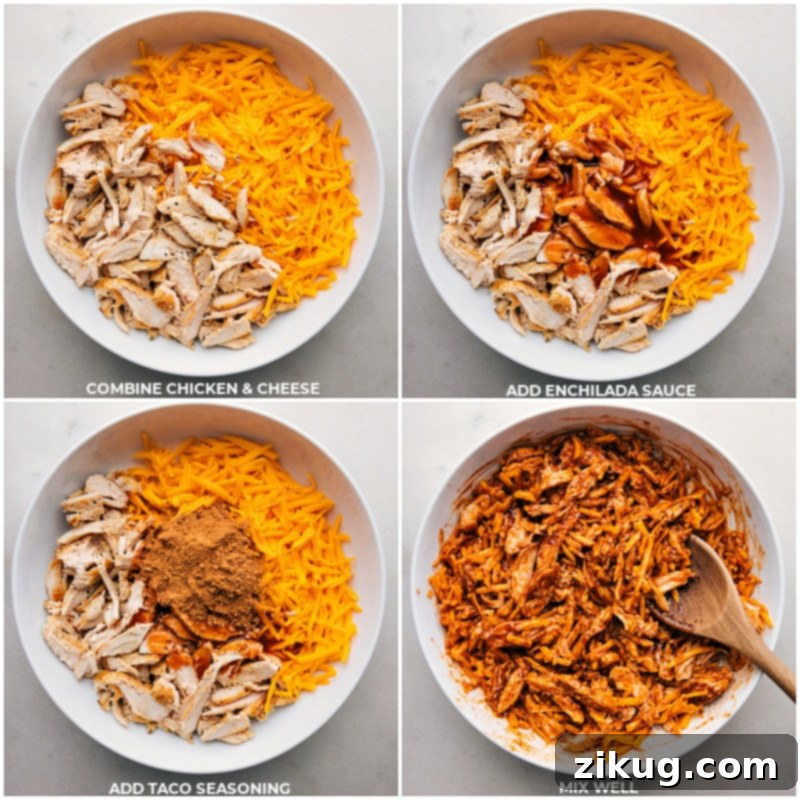
Combine the first four ingredients (cooked chicken, taco seasoning, enchilada sauce, and sharp cheddar cheese) in a large mixing bowl. Gently stir them together with a wooden spoon until well combined. Taste the mixture and season with additional salt and pepper if needed, adjusting based on the saltiness of your taco seasoning.
-
Arrange the large flour tortillas on a clean, flat surface. Evenly divide the refried beans among the center of each of the 6 tortillas (a generous 1/4 cup per tortilla). Next, evenly distribute the prepared chicken and cheese filling right over the beans in the center of the 6 tortillas (approximately 1/2 cup of the mixture per tortilla). Fold each wrap securely into a packet (refer to note 6 for detailed folding instructions). Once assembled, microwave each wrap individually for 20–30 seconds to warm the filling through.
-
After microwaving, generously spray each wrap on all sides with olive oil cooking spray, ensuring an even coat for maximum crispiness. Heat a nonstick skillet over medium-high heat. Carefully place the wraps into the hot skillet, seam side down, cooking 2 or 3 at a time to prevent overcrowding and ensure even browning. Use tongs to rotate the wraps every 1–2 minutes, or until each side turns a beautiful golden brown and develops a satisfying crispy texture. Continue this process until all wraps are perfectly crisped on every side.
-
Serve the crispy chicken wraps hot, immediately after removing them from the skillet, with your favorite toppings. For a delightful cooling crema, I love mixing 2 tablespoons of sour cream with 1 tablespoon of fresh lime juice. A creamy ripe avocado or a scoop of guacamole, along with fresh pico de gallo, also makes for an excellent combination!
Recipe Notes
Note 2: Taco Seasoning Insights: Always choose a good quality store-bought taco seasoning that you know and enjoy the flavor and spice level of.
- For a homemade taco seasoning blend, combine the following: 1 tablespoon ground chili powder, 1 teaspoon each of ground cumin, paprika, and 1/2 teaspoon each of onion powder, garlic powder, dried oregano, fine sea salt, and black pepper.
Note 3: Enchilada Sauce Selection: Remember that enchilada sauce can vary greatly in both flavor and heat depending on the brand. I personally love and highly recommend Old El Paso® mild red enchilada sauce for its consistent taste. If this specific brand is unavailable, it’s a good idea to taste-test your chosen enchilada sauce first to ensure you enjoy its flavor and it meets your preferred spice level.
Note 4: The Best Cheddar Cheese: For a truly impactful cheese flavor, opt for sharp or extra-sharp Cheddar over mild varieties. To achieve the smoothest, creamiest texture in your wraps, always shred your own cheese. Pre-shredded cheeses often contain anti-caking agents that can interfere with proper melting, leading to a less desirable texture.
Note 5: Customizing Toppings: Feel free to get creative with your toppings! Try some of your favorite additions such as cool sour cream and a squeeze of fresh lime juice, creamy guacamole or sliced avocado, and vibrant salsa or chunky pico de gallo.
Note 6: How to Perfectly Fold a Packet Wrap:
- Begin by laying your tortilla flat on your work surface. Spoon the filling (refried beans and chicken mixture) onto the center, ensuring you leave a generous border around all edges.
- Next, fold both the left and right sides of the tortilla into the center, so they partially cover the filling.
- Then, take the edge of the tortilla that is closest to you and fold it firmly over the filling and the already folded-in sides, tucking it in snugly.
- Finally, grasp the last edge of the tortilla (the one furthest away from you) and, while keeping it taut and firm, pull it over to complete the roll. Continue rolling until you have a neatly wrapped packet, with the filling completely enclosed.
Storage Advice: If you plan to store any leftover wraps or prepare some for future meals, it’s best to avoid crisping them in the skillet until you’re ready to eat. After microwaving, allow the wraps to cool thoroughly to prevent condensation. Then, wrap each one individually in foil or plastic wrap and store in the fridge for 3–4 days, or transfer to a freezer-safe bag and freeze for up to 3 months. When ready to enjoy, thaw if frozen, then reheat and crisp according to the recipe instructions.
Nutrition
Nutrition information is automatically calculated, so should only be used as an approximation.