

Authentic Homemade Fry Bread: Crispy, Chewy, and Easy to Make
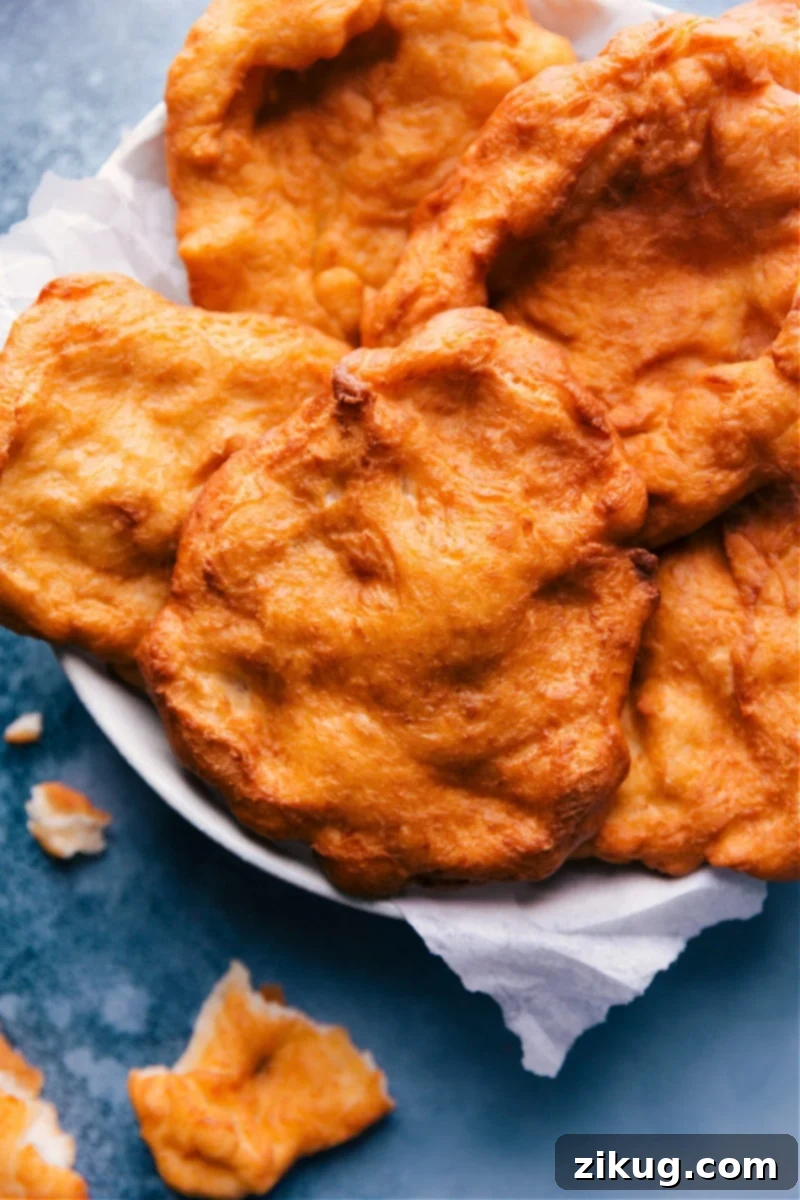
Experience the joy of making authentic Fry Bread right in your kitchen! This delightful flatbread, created from simple pantry staples, is a culinary marvel. Just a few basic ingredients, a quick mix, a short rest, and a fry in hot oil transform into a golden-brown masterpiece. Whether you prefer it plain, with sweet drizzles, or loaded with savory toppings, this recipe promises an unforgettable taste and texture.

A Note from the Author
My Long-Standing Love Affair with Fry Bread!
Growing up, dishes like these Utah scones were a staple, making me an unintentional expert in the art of Fry Bread at a young age. There’s truly nothing quite like it!
Don’t let the surprisingly short ingredient list mislead you – this isn’t just a good Fry Bread, it’s hands-down the *best* I’ve ever tasted. Each piece fries up with a perfectly crisp exterior that yields to a wonderfully soft, chewy, and incredibly flavorful inside. It’s a melt-in-your-mouth experience that keeps you coming back for more.
What makes this recipe even better? The dough comes together in a flash. Unlike traditional breads that demand extensive rising times, such as white bread, honey whole wheat bread, or dinner rolls, our Fry Bread dough requires only a brief rest to relax the gluten, making it incredibly fast and easy to prepare. This means less waiting and more delicious, freshly fried bread for you to enjoy!
What Is Fry Bread? A Beloved Golden Flatbread
Often recognized as Navajo or Indian Fry Bread, this simple yet profoundly satisfying flatbread holds a special place in many culinary traditions. Its magic lies in its preparation: a quick mix, a brief rest, and then deep-frying until beautifully golden. As it cooks, the dough puffs up dramatically, creating irresistible airy pockets and a distinct texture profile that’s both crispy on the outside and wonderfully soft and chewy within.
The beauty of Fry Bread is its incredible versatility. It serves as a blank canvas for a myriad of flavors, transforming from a comforting snack into a decadent dessert or a hearty meal component. Its light, airy texture and subtly sweet flavor make it a perfect companion for almost anything you can imagine:
- Enjoy it Plain: There’s a pure, simple pleasure in savoring a piece of Fry Bread straight out of the fryer, still warm and slightly greasy, with just a sprinkle of salt. The unadorned flavor of the dough truly shines through.
- Indulge with Sweet Toppings: Elevate your Fry Bread to dessert status with a generous drizzle of honey butter, a dollop of your favorite jam, a pour of rich syrup, or a spread of aromatic apple butter. A dusting of powdered sugar adds a classic touch, while warm honey provides simple elegance.
- Cinnamon Sugar Delight: For an instant carnival treat, dredge the warm Fry Bread in a mixture of cinnamon and granulated sugar. The sweet spice clinging to the crispy surface is utterly divine.
- Savor with Savory Toppings (Navajo Tacos): Transform Fry Bread into a substantial meal by topping it with shredded beef, tender pulled pork, seasoned chicken, or well-spiced ground beef. Add lettuce, tomatoes, cheese, and salsa for a homemade “Navajo Taco” experience that’s incredibly satisfying.
- Perfect Soup Dunker: Its sturdy yet tender nature makes Fry Bread an excellent accompaniment to hearty stews and soups. Dunk it into a bowl of warm chili or any robust soup for a comforting and fulfilling pairing.
Crafting the Perfect Fry Bread: A Step-by-Step Guide
Making delicious homemade Fry Bread is simpler than you might think. This recipe streamlines the process, ensuring perfect results every time. Follow these easy steps to create your own batch of golden, crispy, and chewy flatbreads:
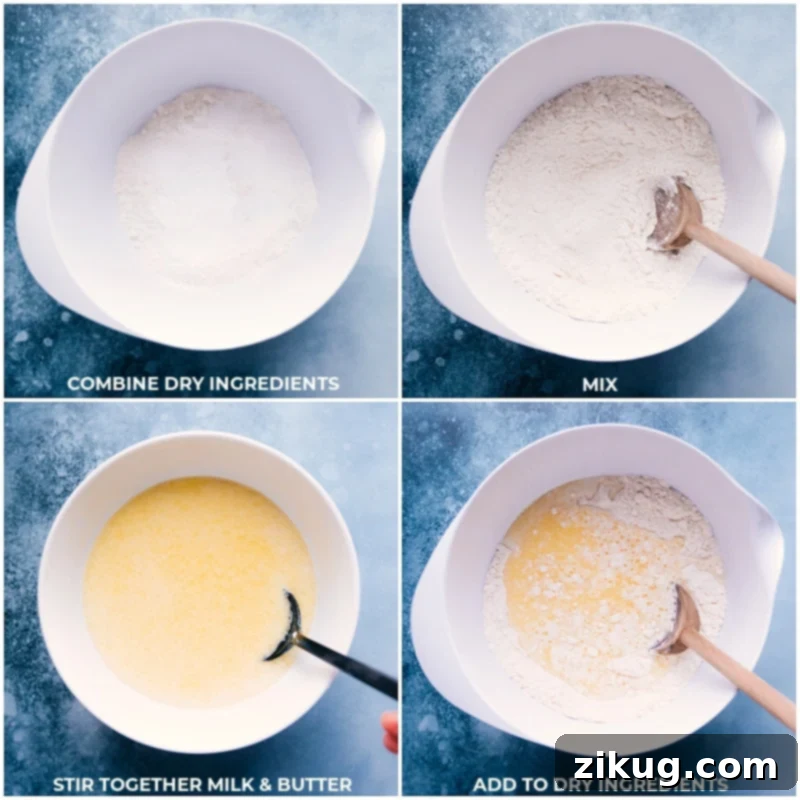
- Prepare and Mix the Dough: Begin by gently melting the butter and warming the milk to a comfortable temperature for yeast activation (not hot!). In a large mixing bowl, combine the all-purpose flour, granulated sugar, baking powder (not baking soda!), instant yeast, and salt. Whisk these dry ingredients thoroughly to ensure even distribution. Then, add the butter-milk mixture to the dry ingredients and stir with a sturdy wooden spoon until a shaggy, cohesive dough forms. It doesn’t need to be perfectly smooth at this stage.
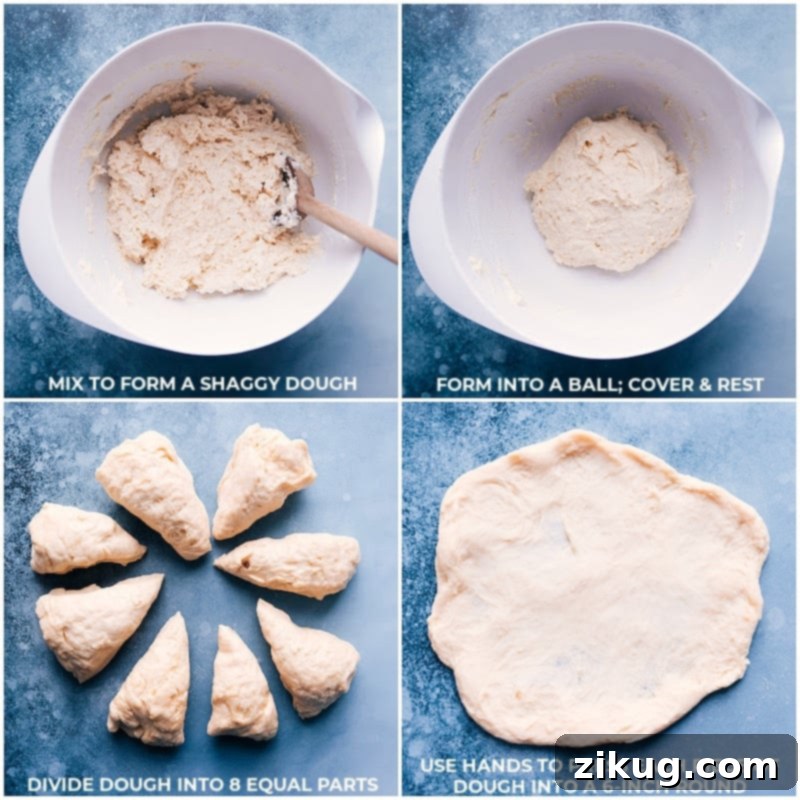
- Rest the Dough: Lightly flour your hands and briefly knead the rough dough just a few times to gather it into a ball. Avoid overworking it. Drizzle a tablespoon of vegetable oil into the same mixing bowl, coating the bottom and sides. Place the dough ball back in the bowl, turning it to ensure it’s lightly oiled. Cover the bowl with a damp kitchen towel and let the dough rest for 15-20 minutes. This resting period is crucial for relaxing the gluten, making the dough pliable and easy to shape, rather than for a full rise.
- Shape the Fry Bread: While the dough rests, prepare your frying setup (see “Frying Equipment Options” below). Once rested, divide the dough into 8 equal portions. Lightly flour your hands and take one piece of dough. Using your fingers, gently press and stretch the dough outward to form a thin 5- to 6-inch round. There’s no need for a rolling pin; the rustic, irregular shape adds to its charm and creates delightful nooks for toppings. Aim for thinness without tearing, as thinner pieces fry up crispier. Keep the remaining dough covered to prevent it from drying out.
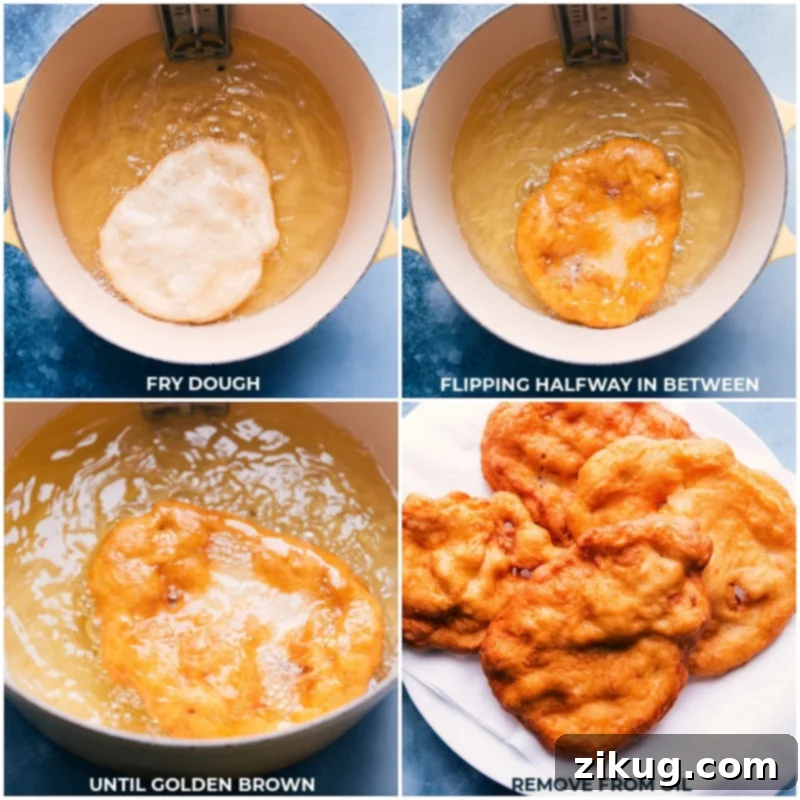
- Fry to Golden Perfection: Heat about 1 inch of oil in a large, heavy-bottomed pot (a cast-iron pot is ideal) or a deep fryer to 350°F (175°C). Carefully drop one shaped piece of dough into the hot oil. Fry for approximately 30 seconds to 1 minute per side, or until it achieves a beautiful dark golden brown color and puffs up. Flip the dough halfway through using two forks or tongs.
- Drain and Enjoy: Once golden, remove the Fry Bread from the oil using a large slotted spoon or tongs. Place it on a cooling rack set over a sheet pan lined with paper towels to drain any excess oil. Serve warm immediately with your chosen sweet or savory toppings.
Quick Tip for Mess-Free Frying
To minimize oil splatter and ensure a cleaner cooking experience, always use a large, deep pot or a dedicated deep fryer instead of a shallow skillet. This prevents oil from popping out onto your stovetop and surrounding areas, making cleanup much easier!
Expert Tips for Unbeatable Fry Bread
Achieving the perfect Fry Bread is all about a few key techniques. Keep these tips in mind to ensure your flatbreads are always light, crispy, and delicious:
- The Role of Yeast: While this dough contains instant yeast, its purpose here is primarily for flavor development and a subtle textural enhancement, not for a significant rise. The baking powder does the heavy lifting for the puffiness. This is why a short rest is sufficient, rather than a long proofing time.
- Gentle Kneading is Key: Resist the urge to overwork the dough. A few gentle kneads to form a ball are all that’s needed. Over-kneading can develop too much gluten, resulting in a tough, dense Fry Bread instead of the desired tender and chewy texture.
- Embrace Irregular Shapes: Don’t strive for perfectly uniform circles. The charm of homemade Fry Bread lies in its rustic, often irregular shapes. These natural nooks and crannies are ideal for catching and holding onto all your delicious toppings, enhancing every bite.
- Temperature Control for Frying: Maintaining a consistent oil temperature of 350°F (175°C) is paramount. If the oil is too cool, the bread will absorb too much grease and become soggy. If it’s too hot, the outside will burn before the inside cooks properly. Use a thermometer for accuracy, or refer to the wooden spoon trick detailed below.
- Frying Equipment Options:
- For the easiest and most controlled frying, a deep fryer is recommended. Its lid helps contain splatter, and the temperature control ensures consistent heat.
- If a deep fryer isn’t available, a heavy-bottomed deep pot (like a 5-quart cast-iron pot) is an excellent alternative. Always use a thermometer to monitor and maintain the oil’s temperature.
- No Thermometer Trick: If you don’t have a thermometer, stand the handle of a wooden spoon in the hot oil. If tiny bubbles gather steadily around the stick, the oil is ready for frying. If it bubbles too vigorously, it’s too hot; if there are no bubbles, it’s not hot enough.
- Warm Milk for Yeast: When warming the milk, ensure it’s just lukewarm—about the temperature of your wrist. Milk that’s too hot will kill the yeast, rendering it inactive, while milk that’s too cold won’t activate it sufficiently.
Storage and Make-Ahead
- Best When Fresh: For the ultimate experience, Fry Bread is always best enjoyed immediately after it comes out of the fryer, while it’s still warm and crispy.
- Make-Ahead Dough: If you want to prepare ahead, the dough can be covered tightly with plastic wrap and refrigerated for up to 8 hours. Before frying, allow it to come to room temperature for about 30 minutes to an hour, making it easier to shape.
- Storing Cooked Fry Bread: Leftover Fry Bread can be loosely wrapped in plastic wrap and stored at room temperature for 1-2 days. To refresh and crisp it up, reheat in a preheated oven at 350°F (175°C) for a few minutes until warm and slightly crispy again. Avoid the microwave, which can make it rubbery.
More Crispy & Delicious Fried Foods to Try:
If you loved this Fry Bread recipe, you’re in for a treat! Explore more delightful fried dishes that are sure to become new favorites in your household. From sweet, sugary churros to innovative cronuts and air fryer alternatives, there’s a fried delight for every craving:
Explore More Fried Delights:
Desserts
Churros
Desserts
Cronut Recipe
Desserts
Air Fryer Donuts
Desserts
Churro Ice Cream Sandwiches

Fry Bread
By Chelsea Lords
Fry Bread is a versatile flatbread made with everyday ingredients, deep fried until golden. Enjoy it plain or with a variety of sweet or savory toppings for any occasion.
Prep Time: 15 minutes
Cook Time: 8 minutes
Resting Time: 20 minutes
Total Time: 43 minutes
Servings: 8 fry breads
Equipment
- Deep fryer or a large/deep cast-iron pot with a thermometer (see Note 1 in recipe notes)
Ingredients
- 2 tablespoons unsalted butter, melted
- 2-1/3 cups all-purpose flour
- 2 teaspoons baking powder (not baking soda!)
- 2 teaspoons granulated sugar
- 1/2 teaspoon instant yeast or active dry yeast
- 1/2 teaspoon salt
- 1 cup milk (whole milk recommended)
- 1 tablespoon vegetable oil, plus more for frying
Instructions
- Prepare Wet and Dry Mixtures: Melt butter in the microwave and let it cool to room temperature. Warm milk until just lukewarm (see Note 2). Combine melted butter and warmed milk; set aside. In a large bowl, whisk together flour, sugar, baking powder, yeast, and salt. Add the milk mixture to the dry ingredients and stir with a wooden spoon until a shaggy dough forms.
- Rest the Dough: Lightly flour your hands and gently knead the dough a few times to form a ball, being careful not to overwork it. Drizzle 1 tablespoon of vegetable oil into the mixing bowl, coating the bottom and sides. Place the dough ball back in the bowl, turning to coat. Cover the bowl with a damp kitchen towel and let it rest for 15–20 minutes. This relaxes the gluten, making the dough easier to shape, but is not for a full rise.
- Shape the Dough: Heat 1 inch of oil in a large, cast-iron pot or deep fryer to 350°F (175°C). Divide the rested dough into 8 equal portions. Lightly flour your hands and work with one piece of dough at a time (keeping the rest covered). Gently press and stretch the dough with your fingers to form a thin 5- to 6-inch circle. No rolling pin is needed; embrace the rustic look! The thinner the dough, the crispier the fry bread will be.
- Fry the Fry Bread: Carefully drop one piece of shaped dough into the preheated oil. Fry for about 30 seconds to 1 minute per side, or until it reaches a dark golden brown color and puffs up beautifully. Flip the dough with two forks or tongs halfway through to ensure even cooking.
- Drain and Serve: Use a large slotted spoon or tongs to remove the fried bread from the oil. Place it on a paper-towel-lined plate or a cooling rack set over a sheet pan to drain excess oil. Repeat with the remaining dough. Serve warm with your preferred toppings.
Recipe Notes
Note 1: Frying Equipment Options:
- Use a deep fryer for easiest control and minimal splatter.
- If you don’t have a deep fryer, a heavy-bottomed deep pot (like a large (5-quart) cast-iron pot) is essential. Use a thermometer to accurately gauge and maintain the oil temperature at 350°F (175°C) for consistent frying. Without a thermometer, you can test the oil by inserting a wooden spoon handle; if tiny bubbles gather steadily around it, the oil is ready.
Note 2: Test Milk Temperature: Drizzle a few drops of the warmed milk onto the inside of your wrist. It should feel comfortably warm, not hot. If it’s too hot, it will kill the yeast; if too cold, the yeast will remain dormant.
Storage: Fry Bread is best enjoyed fresh, warm, and crispy. If you have leftovers, loosely wrap them in plastic wrap and store at room temperature for 1–2 days. Reheat in an oven at 350°F (175°C) for a few minutes to crisp them up.
Nutrition
Nutrition information is automatically calculated, so should only be used as an approximation.
Serving: 1 serving | Calories: 200kcal | Carbohydrates: 33.7g | Protein: 5.2g | Fat: 5g | Cholesterol: 8.2mg | Sodium: 16.4mg | Fiber: 1.2g | Sugar: 2.7g
Love this recipe? Share your thoughts and leave a comment below!