
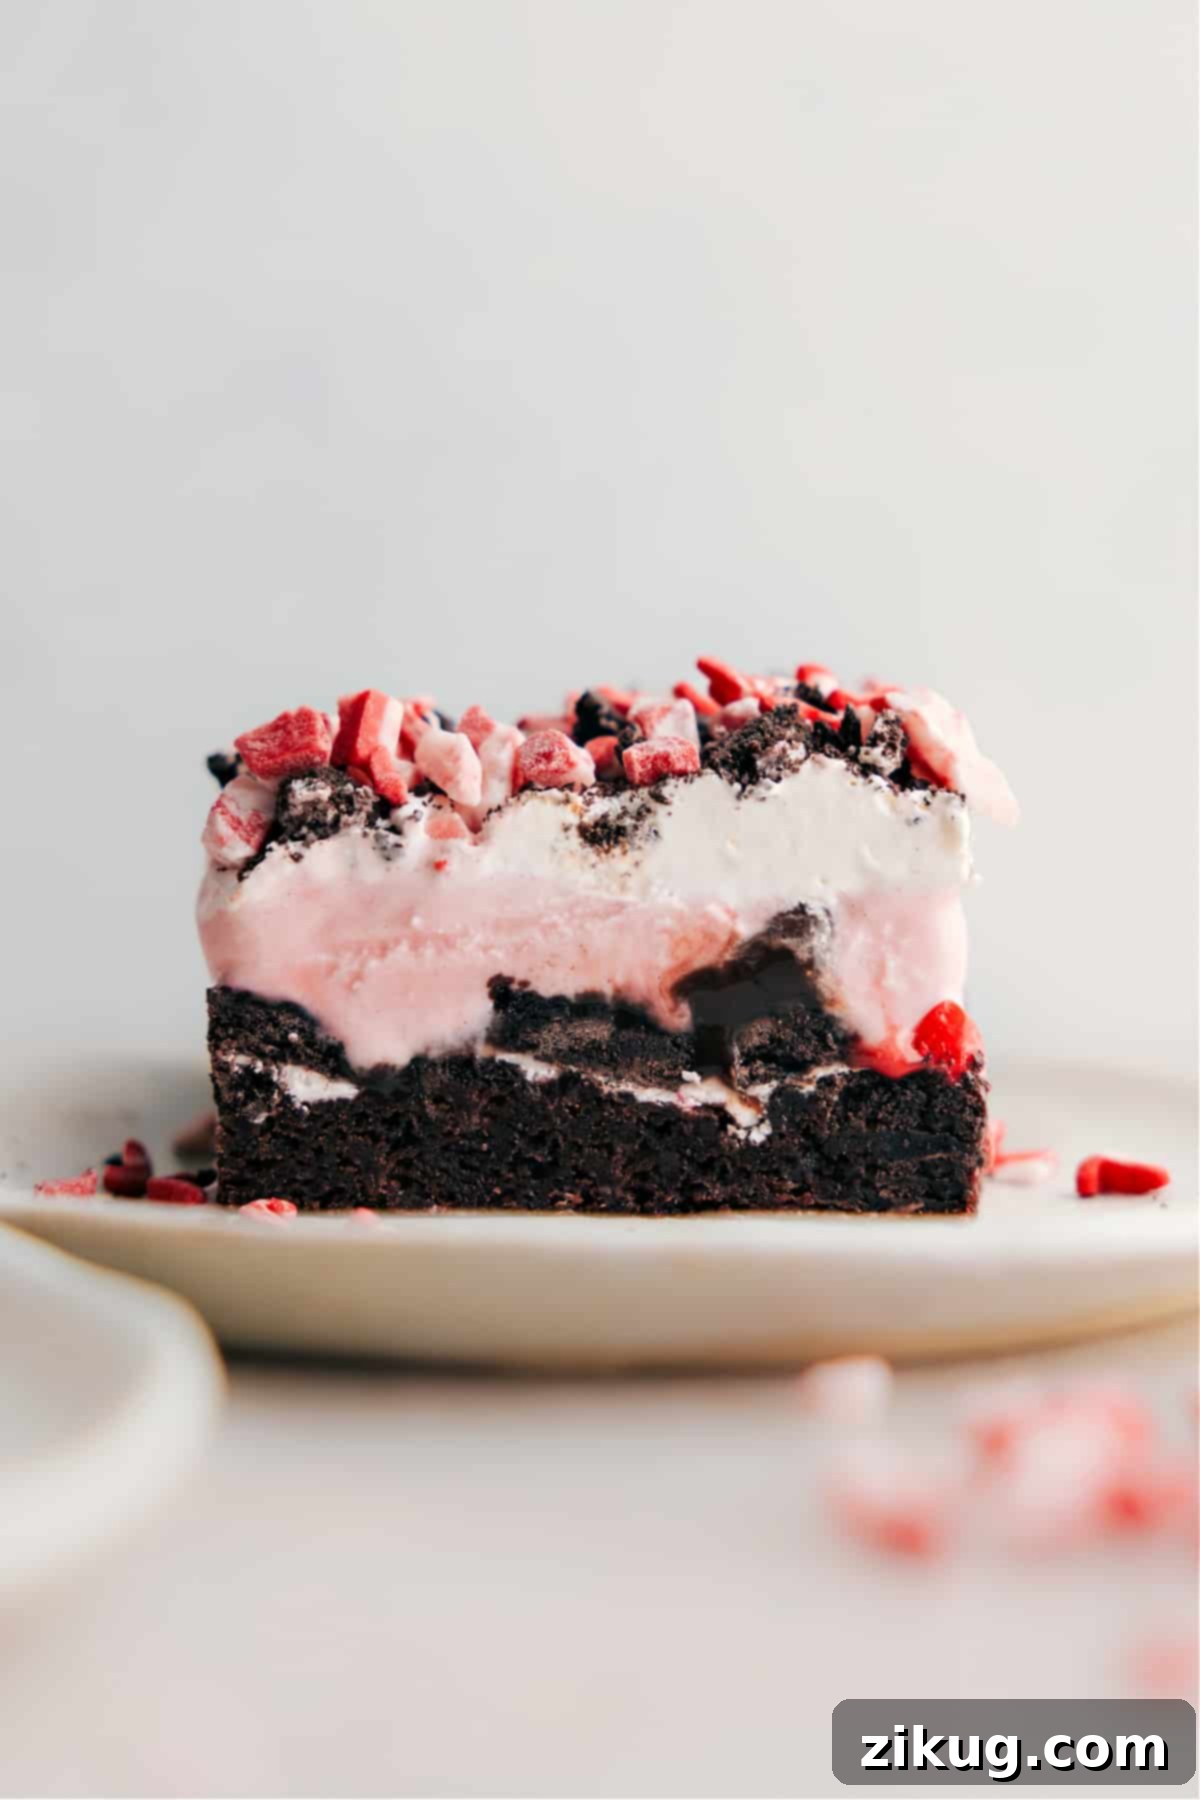
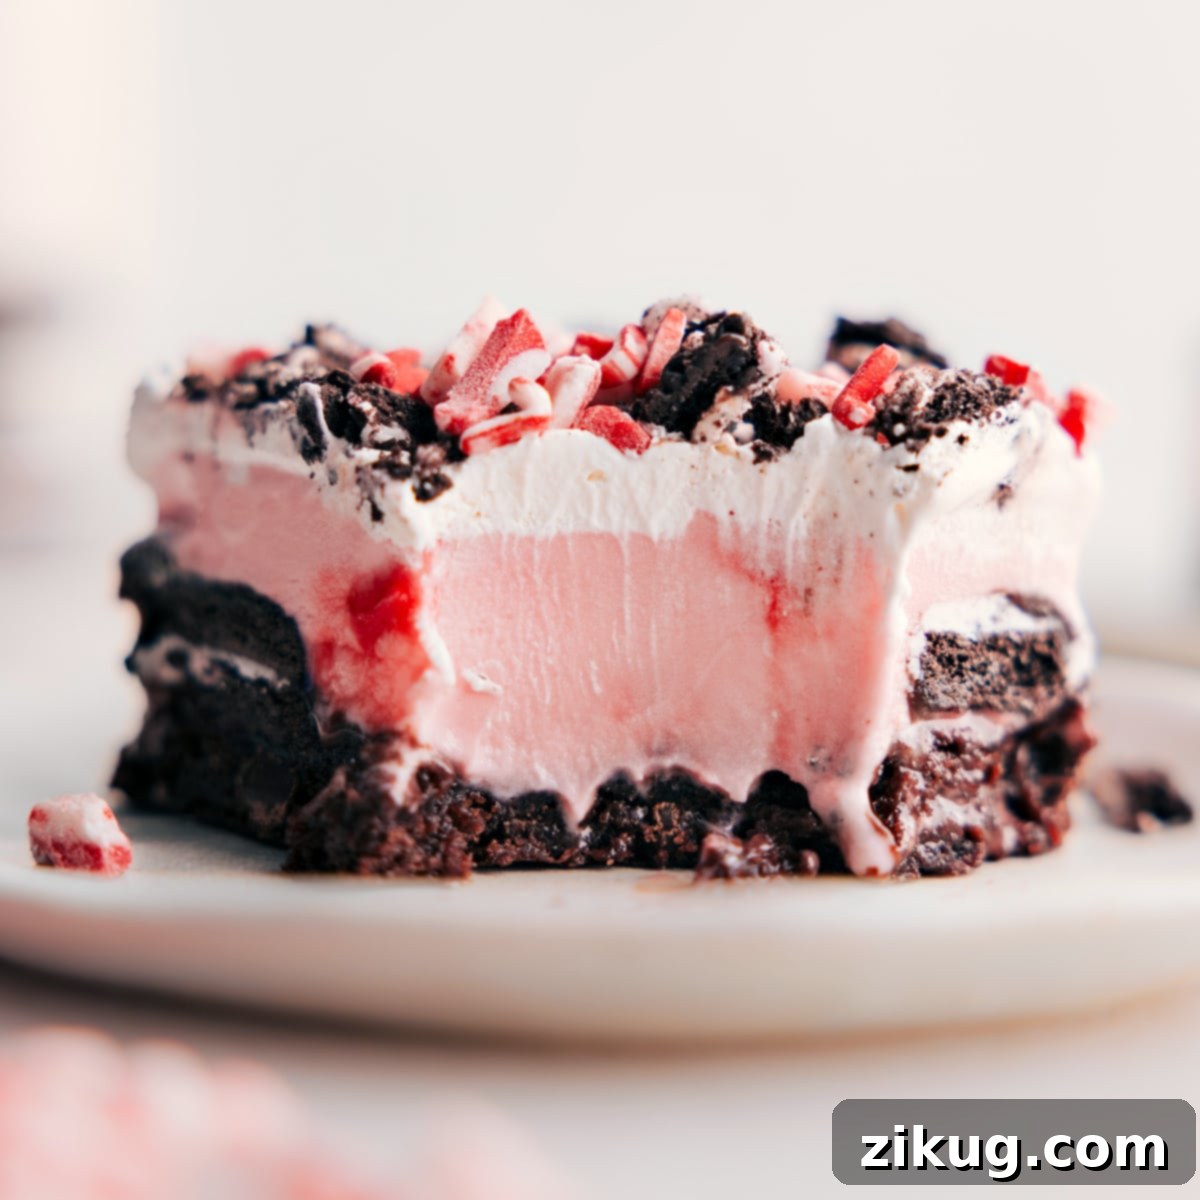
Peppermint Brownie Ice Cream Bars are truly the ultimate holiday treat, blending rich, indulgent flavors with refreshing coolness. Imagine a decadent, fudgy brownie base, generously topped with crushed Oreos, a luscious layer of warm chocolate fudge, and exquisitely creamy peppermint ice cream. Crowned with a swirl of fluffy whipped cream and a sprinkle of festive peppermint crunch, these bars are not just a dessert—they’re an experience. Best of all, this show-stopping recipe requires just five main ingredients, making it surprisingly easy to assemble and a guaranteed crowd-pleaser for any festive occasion.
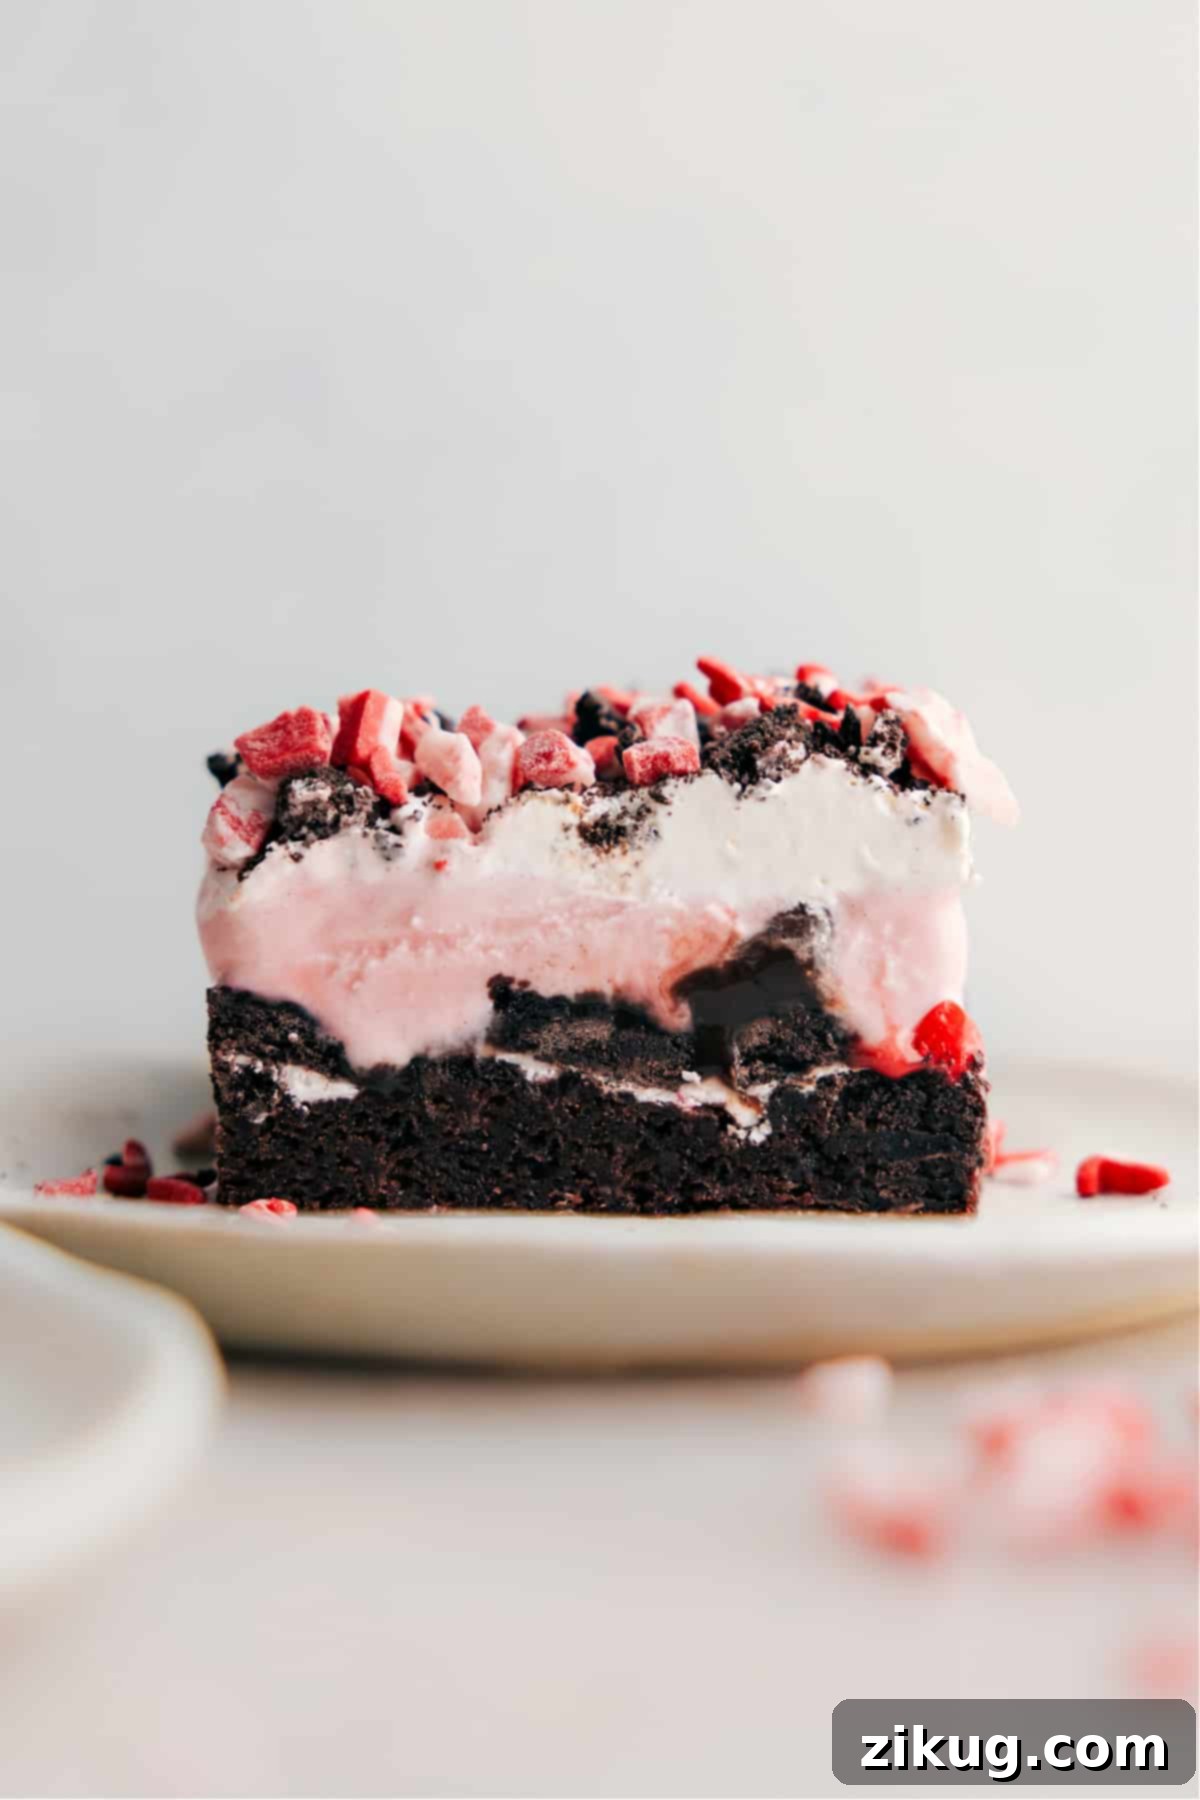
Peppermint Brownie Ice Cream Bars: A Festive Frozen Delight
For those who adored our incredibly popular Brownie Oreo Ice Cream Bars, prepare yourselves for an exciting and festive transformation! We’ve taken that beloved concept and infused it with the invigorating spirit of the holidays, creating a peppermint twist that’s simply irresistible. This seasonal variation elevates the classic with delightful peppermint-crunch ice cream and, if you can find them, special peppermint-flavored Oreos®. Each bar is then lavishly topped with a generous scattering of vibrant peppermint crunch candy, ensuring every bite bursts with refreshing flavor and satisfying texture.
These magnificent layered desserts have quickly become a staple at our holiday gatherings, earning rave reviews and cementing their status as an instant party favorite. Their striking appearance, combined with their cool, creamy, and chocolatey goodness, makes them an ideal dessert to impress guests without spending hours in the kitchen. The rich, fudgy brownie acts as the perfect anchor, providing a satisfying chew that beautifully complements the frosty layers above. The interplay of textures – from the crumbly Oreos to the smooth fudge and the airy whipped cream – creates a truly dynamic eating experience. Whether you’re hosting a large celebration or simply want a special treat for your family, these Peppermint Brownie Ice Cream Bars offer a perfect blend of convenience, elegance, and seasonal cheer that will leave everyone craving more.
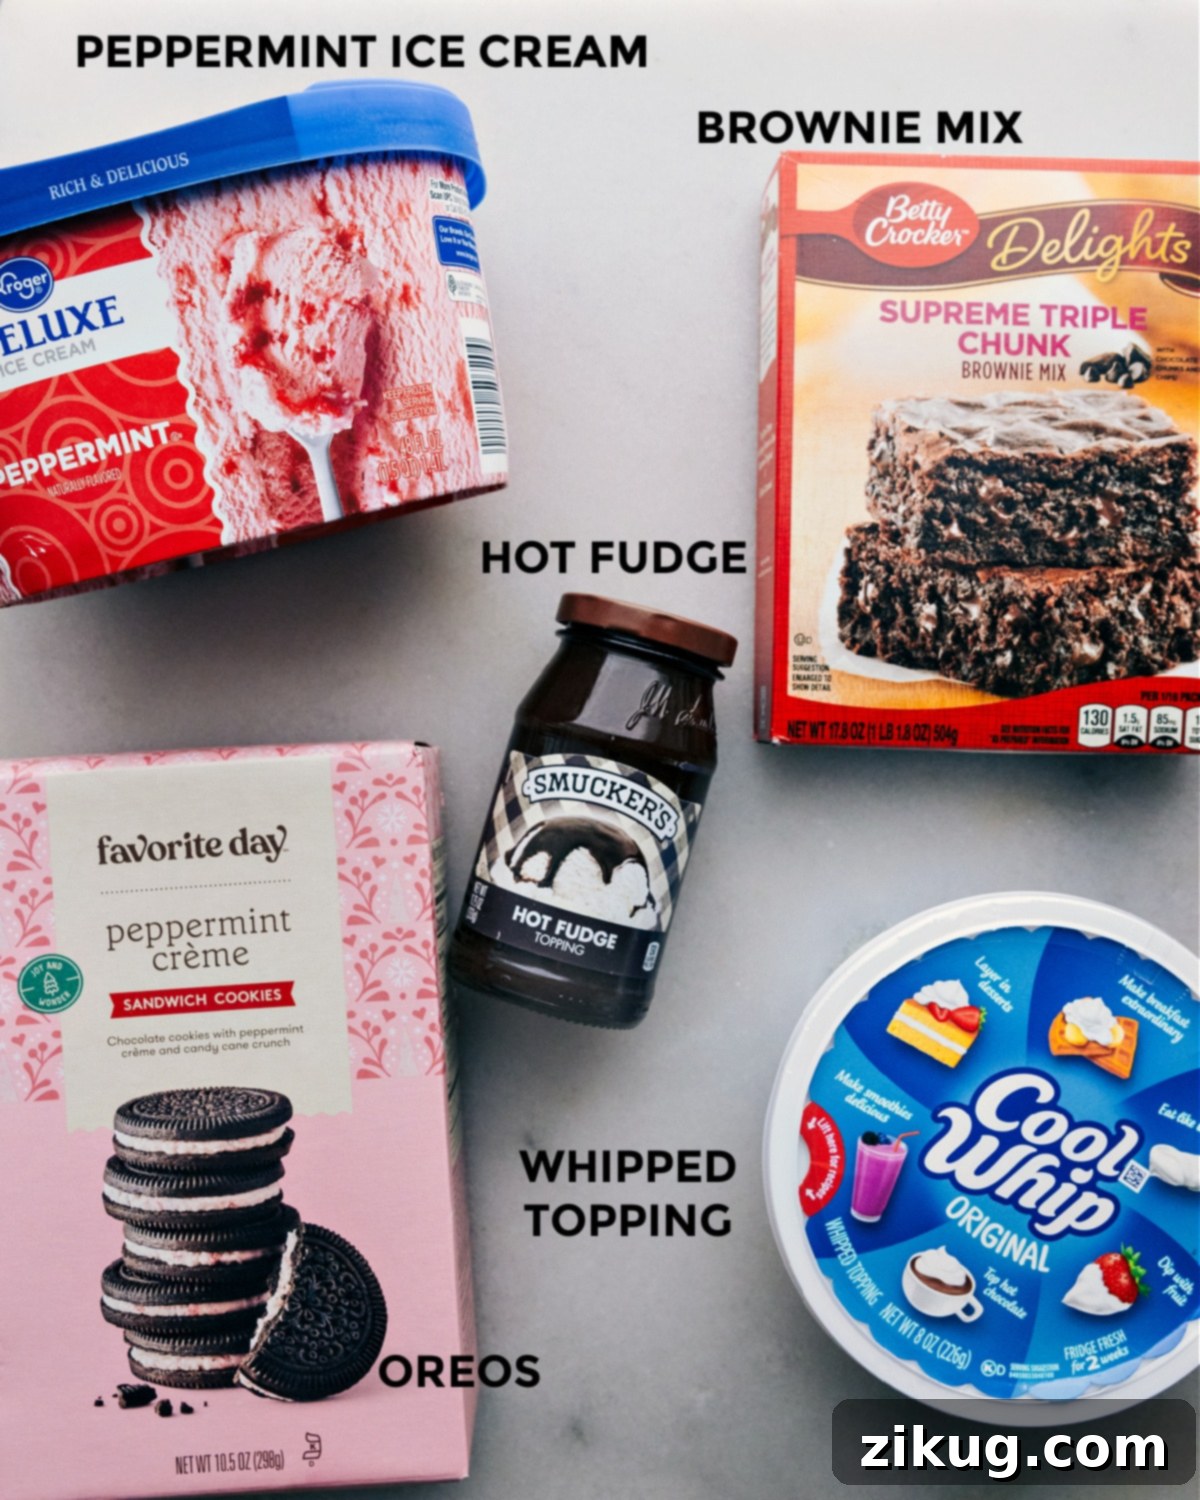
Essential Ingredients for Perfect Peppermint Brownie Bars
Crafting these delectable Peppermint Brownie Ice Cream Bars is surprisingly straightforward, thanks to a thoughtfully curated list of just five core ingredients. Each component plays a crucial role in building the layers of flavor and texture that make this dessert truly special. Here’s what you’ll need to create your own batch of holiday magic, along with tips for selecting the best items:
- Fudge Brownie Mix: The foundation of our bars starts with a rich, fudgy brownie. Choosing a quality brownie mix you already love is key. Look for a mix that promises a dense, moist, and intensely chocolatey result. Popular brands like Betty Crocker or Ghirardelli often deliver excellent fudgy brownies that are perfect for this recipe. While a good box mix makes this recipe incredibly quick and easy, feel free to use your favorite homemade fudgy brownie recipe if you prefer; just ensure it bakes up to a 9×13-inch pan size. The goal is a brownie layer that remains soft and chewy even when frozen, providing a delightful contrast to the icy layers above.
- Oreos: These iconic chocolate sandwich cookies add a fantastic crunch and an extra layer of chocolatey goodness. You can use classic regular Oreos for a familiar flavor and color contrast, or elevate the peppermint theme by seeking out seasonal peppermint-flavored Oreos, which are often available during the holidays. These minty cookies enhance the overall flavor profile wonderfully. Whichever variety you choose, they’ll be coarsely chopped to create an irresistible textured layer atop the brownie, offering a delightful bite in every bar.
- Hot Fudge Topping: A thick, rich hot fudge topping is essential for both flavor and creating a distinct barrier between the cookie and ice cream layers. When slightly warmed, it spreads beautifully and sets into a delicious, chewy layer once chilled. This fudge layer adds a deep chocolate element that perfectly complements the refreshing peppermint. Opt for a high-quality fudge that melts smoothly and offers a deep, satisfying chocolate taste, ensuring it’s not too thin or watery.
- Peppermint Ice Cream: This is where the “peppermint” truly shines! Select a brand of peppermint ice cream that you genuinely enjoy. There are many varieties available, from those with subtle peppermint swirls to those loaded with candy cane pieces. Some popular choices include Breyers, Edy’s, or local dairy brands that offer seasonal flavors. If you’re unsure which one to pick, consider consulting an article on top-rated peppermint ice creams to find your perfect match. Its creamy texture and refreshing flavor are central to the bars’ appeal, making them a true holiday sensation.
- Frozen Whipped Topping: To crown our magnificent bars, a light and airy layer of whipped topping is a must. This adds a delicate finish and a creamy texture that balances the richness of the other layers. Ensure it’s completely thawed before spreading for a smooth, even finish. Popular brands like Cool Whip are convenient and work perfectly. For an extra touch of homemade goodness, you can also opt to make your own homemade whipped cream (just be sure to stabilize it for freezing), though the frozen variety offers unparalleled convenience for this recipe.
- Optional Toppings: For an extra festive flourish and a delightful textural contrast, consider adding finely chopped peppermint bark or peppermint crunch candies to the very top layer. These add a vibrant color and an extra burst of minty sweetness, making the bars even more appealing and visually stunning.
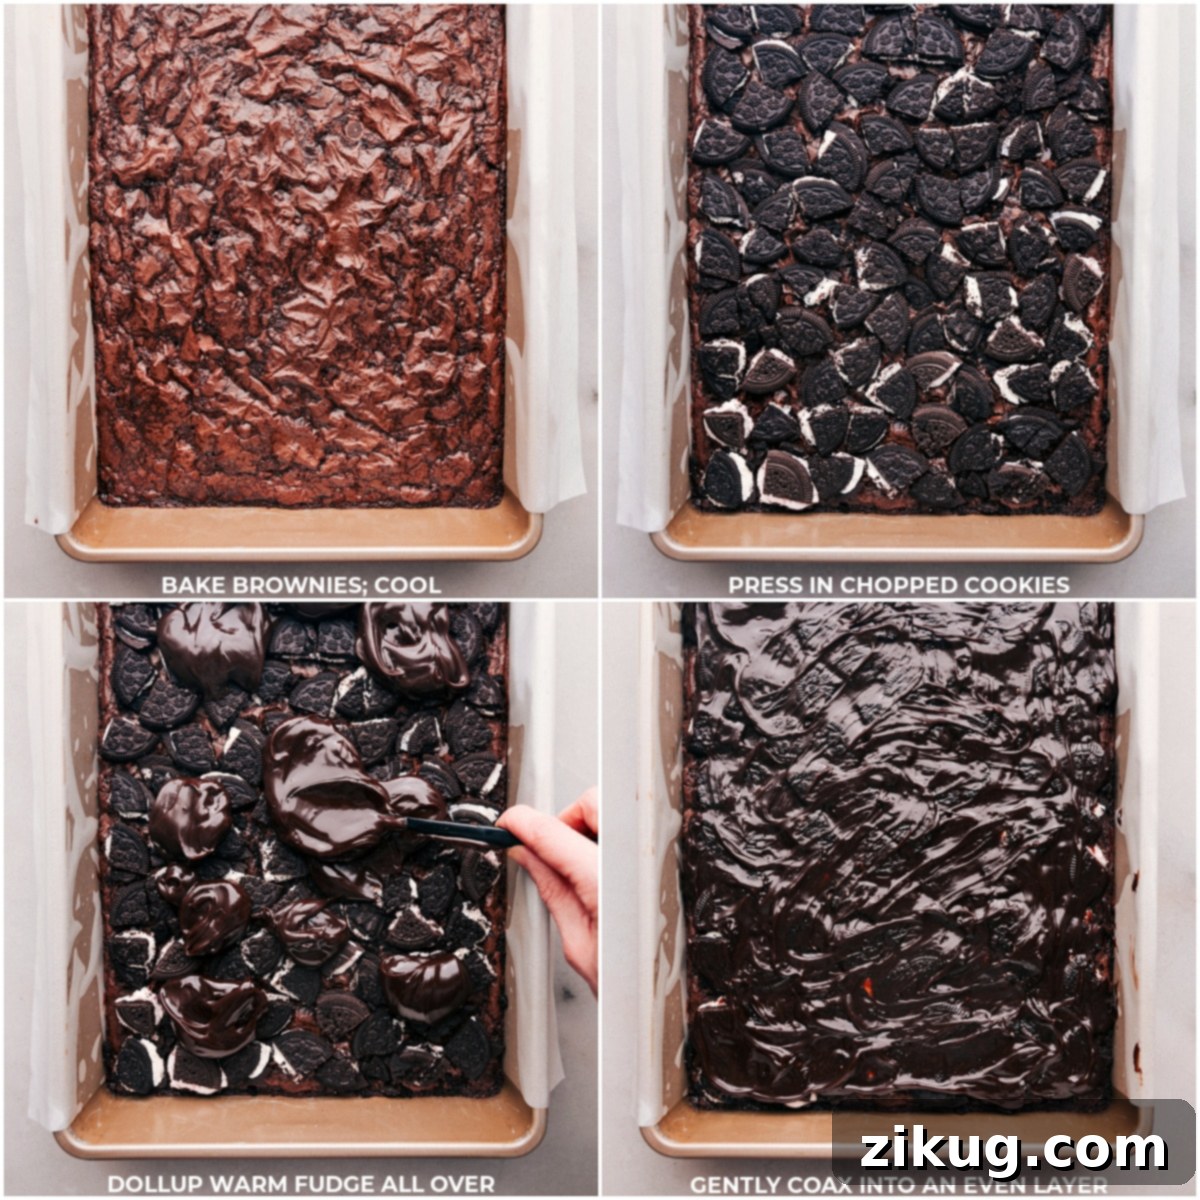
Crafting Your Peppermint Brownie Ice Cream Bars: A Step-by-Step Guide
Creating these sensational Peppermint Brownie Ice Cream Bars is an enjoyable process, and by following these simple, clear steps, you’ll achieve perfectly layered, irresistible frozen treats. The key is to work efficiently between freezing stages to ensure each layer sets beautifully, creating a stunning visual and textural masterpiece.
- Prepare Oven and Pan: Begin by preheating your oven according to the specific instructions on your chosen brownie mix package. Next, line a 9×13-inch baking pan with parchment paper. It’s crucial to leave a generous overhang of parchment on all four sides. This overhang will serve as handles, allowing you to easily lift the entire slab of bars out of the pan once frozen, which significantly simplifies the cutting and serving process.
- Bake the Brownies: Prepare your fudge brownie mix exactly as directed on the package, stirring in any required ingredients like eggs, oil, and water until just combined. Pour the batter evenly into your prepared baking pan. Bake the brownies for approximately 2 to 3 minutes less than the minimum time recommended on the package instructions. The goal is for them to be just set, with a slight fudginess in the center, ensuring they remain wonderfully moist and soft when frozen. After baking, allow the brownies to cool completely in the pan for at least 20 minutes before moving to the next step. This cooling time is essential for the integrity of the subsequent layers.
- Create the Oreo Layer: While the brownies continue to cool, coarsely chop 24 of your Oreos. You can do this by hand with a knife, or by pulsing them briefly in a food processor until you have rough, chunky pieces. Aim for pieces that are roughly quartered, as these will provide a delightful textural crunch. Once the brownies are cool, gently but firmly press these chopped cookies into an even, continuous layer over the entire surface of the brownie base. Ensure they are pressed down enough to adhere well to the brownie without crumbling it excessively.
- Add the Fudge Layer: To make spreading smooth and easy, warm your hot fudge topping slightly. You can do this by microwaving it in a microwave-safe bowl for about 30 seconds, or until it’s pourable but not overly hot. Remove the pan from the freezer. Dollop spoonfuls of the warm fudge evenly over the crushed Oreo layer. Then, using the back of a spoon or an offset spatula, carefully and patiently spread the fudge into an smooth, even layer across the cookies. This layer can be a bit tricky, so take your time to ensure full, even coverage. Once the fudge is spread, immediately place the pan back into the freezer for approximately 10 minutes to allow this layer to set and firm up completely.
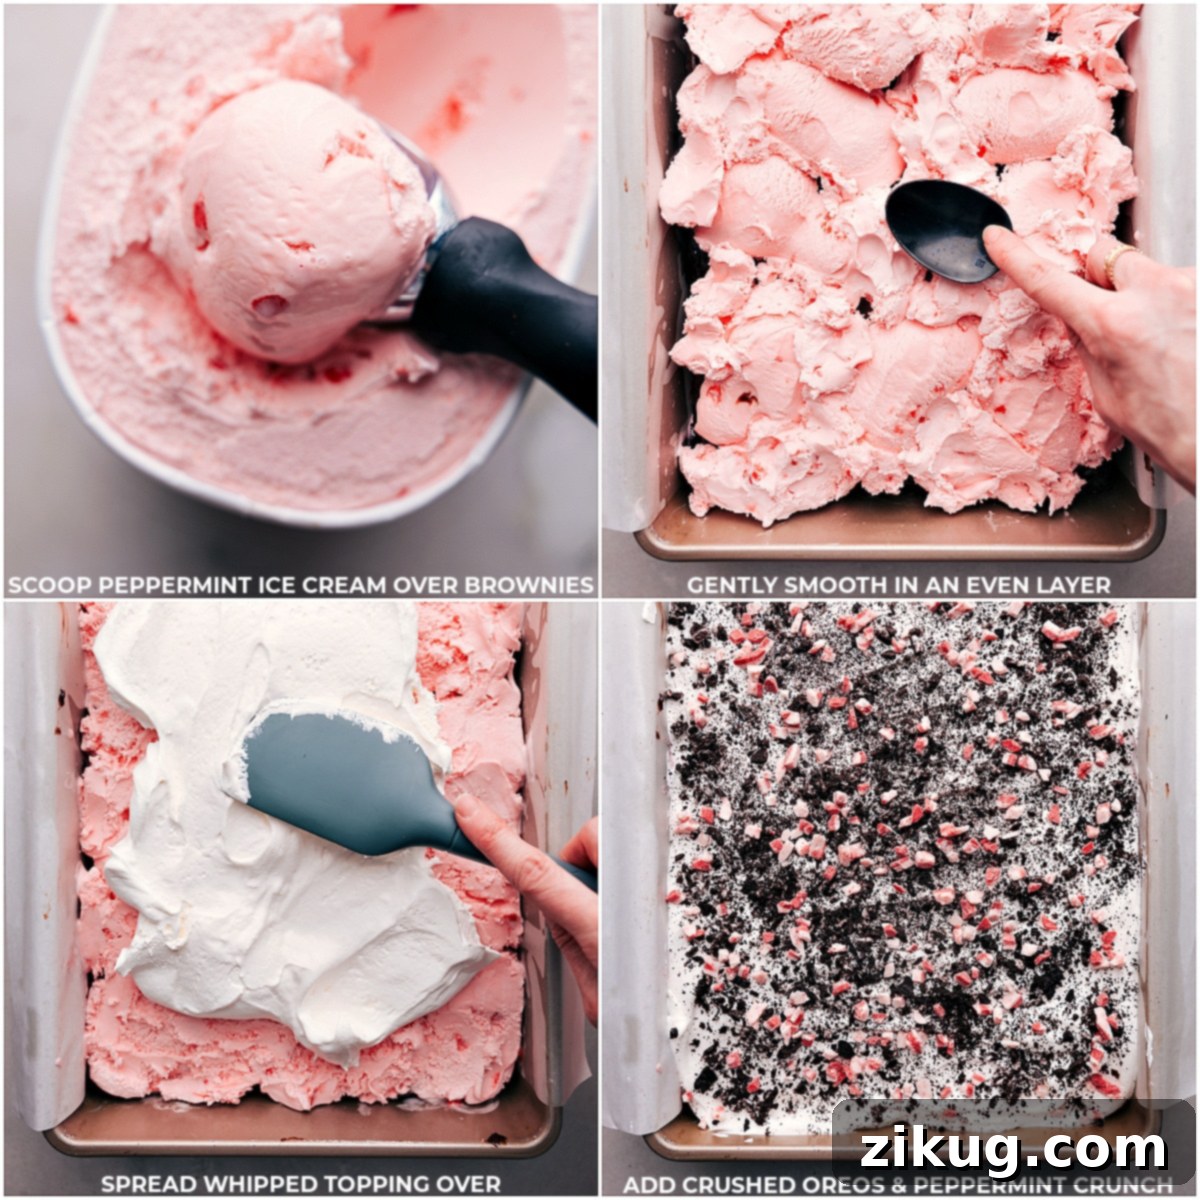
- Layer the Peppermint Ice Cream: Take your peppermint ice cream out of the freezer and let it sit at room temperature for approximately 5 to 10 minutes to soften slightly. It should be pliable enough to scoop and spread with ease, but not so melted that it becomes liquid. Remove the pan from the freezer, and scoop large portions of the softened ice cream over the now-set hot fudge layer. Working quickly to prevent excessive melting, use the back of a large spoon or a spatula to smooth the ice cream into an even, consistent layer across the entire surface.
- Apply Whipped Topping and Garnish: Once the ice cream layer is smooth, use a spatula to evenly spread the completely thawed whipped topping over the ice cream. This creates a light, airy finish. For an extra decorative and flavorful touch, you can optionally garnish the top with the remaining 3 Oreos, finely crushed (crush whole Oreos in a sturdy bag using a meat mallet or wooden spoon), and/or a sprinkle of finely chopped peppermint bark or crunch candies. Cover the pan tightly first with plastic wrap, pressing it gently onto the whipped topping to prevent freezer burn, then with aluminum foil. Freeze the bars overnight (at least 8 hours) until all layers are thoroughly set and firm.
- Serve and Enjoy: When you’re ready to serve these magnificent bars, remove the pan from the freezer and let them sit at room temperature for about 5 minutes. This brief softening period will make them much easier to cut into neat portions. Use the parchment paper overhang to carefully lift the entire slab of bars out of the pan and onto a clean cutting board. For perfectly clean, defined slices, dip a sharp knife into hot water for a few seconds, wipe it completely dry, and then make your cuts. Repeat this warming and drying process for each slice. Serve immediately, and remember to return any uneaten bars promptly to the freezer, ensuring they are tightly covered to maintain their freshness, texture, and delightful flavor.
Expert Tips for Flawless Peppermint Brownie Ice Cream Bars
Achieving perfectly layered and delicious Peppermint Brownie Ice Cream Bars is simple with a few insider tips. These pointers will help you navigate each step, ensuring your bars come out looking and tasting incredible, making you a holiday dessert hero:
- Mastering the Brownie Base: For a brownie layer that remains delightfully soft and chewy, rather than becoming rock-hard when frozen, it’s essential to slightly under-bake it. Aim for a bake time that is 2-3 minutes less than your brownie mix package recommends. The brownies should be just set, but still have a very slight give in the center. This small adjustment makes a huge difference in the final texture of your frozen bars, ensuring the brownie is pleasant to bite into.
- Perfecting the Hot Fudge Layer: Warming the hot fudge topping just slightly is key to smooth application. A quick 30-second zap in the microwave will make it pliable and easy to spread evenly over the crushed Oreos. This warmth also helps it adhere better to the cookie layer, creating a cohesive base. However, be careful not to overheat it, as excessively hot fudge can melt the Oreos and the brownie below.
- Handling the Ice Cream with Care: The consistency of your peppermint ice cream is critical for a smooth, uniform layer. Take it out of the freezer and allow it to soften at room temperature for just 5-10 minutes. It should be soft enough to scoop and spread easily with a spatula or the back of a spoon, but not so melted that it becomes a liquid. If it gets too melty, the layers might bleed together, affecting the distinct look and texture of your beautiful bars.
- Fluffy Whipped Topping Application: For a flawlessly smooth and airy top layer, ensure your frozen whipped topping is completely thawed before you attempt to spread it. If it’s still partially frozen, it will be lumpy and difficult to work with, resulting in an uneven and less appealing finish. Plan ahead and let it thaw in the refrigerator for several hours or even overnight for the best results.
- Achieving Clean Slices: The secret to neat, professional-looking slices lies in using a hot, sharp knife. Before each cut, run your knife under hot water for a few seconds and then wipe it completely dry. The warmth helps the knife glide effortlessly through all the frozen layers—brownie, Oreos, fudge, ice cream, and whipped topping—without sticking or tearing, resulting in beautifully clean and defined edges for every bar. Repeat this warming process for every single cut for consistent perfection.
- Strategic Freezing Stages: To ensure each layer is perfectly distinct and doesn’t mix with the one above or below, utilize strategic freezing. Freeze the bars briefly after adding the fudge layer, and again after the ice cream layer. This helps each component set and firm up before the next is added, preventing colors and flavors from mingling where they shouldn’t and ultimately creating those gorgeous, well-defined layers that make these bars so visually appealing.
Storage Solutions for Your Ice Cream Bars
Keeping Your Peppermint Brownie Ice Cream Bars Fresh
Proper storage is essential to maintain the delicious taste and texture of your Peppermint Brownie Ice Cream Bars. Once cut, these bars can be stored in the freezer for up to a month, allowing you to enjoy this festive treat long after the holidays.
- Airtight is Key: To prevent freezer burn and keep the flavors vibrant, always store the bars in an airtight container. This could be a sturdy plastic container with a tight-fitting lid or a heavy-duty freezer-safe bag. Airtight sealing is crucial for preserving the delicate flavors and preventing ice crystals from forming.
- Wrap Tightly: Alternatively, you can wrap individual bars or smaller sections tightly in plastic wrap, followed by an additional layer of aluminum foil. This double-layer protection is an excellent method for warding off moisture and oxygen, two primary culprits for freezer burn, thus preserving freshness and taste.
- Prevent Sticking: If you’re stacking multiple bars in a container, a simple yet effective trick is to place a small piece of parchment paper or wax paper between each bar. This step prevents them from freezing together, making it incredibly easy to grab just one whenever a craving strikes without damaging the others.
- Enjoy Within a Month: While the bars will technically remain safe to eat beyond a month, their peak flavor and optimal texture are best enjoyed within this timeframe. The longer they stay in the freezer, the more susceptible they become to absorbing subtle freezer odors or developing a slightly icier texture, which can detract from the overall experience.
By following these comprehensive storage guidelines, you can ensure every bite of your Peppermint Brownie Ice Cream Bars is as delightful and fresh as the first, making them a convenient make-ahead dessert for any occasion!
Explore More Festive Peppermint Treats
If you’ve fallen in love with the cool, refreshing taste of peppermint in these ice cream bars, you’ll be thrilled to discover other wonderful ways to incorporate this beloved holiday flavor into your baking and treat making. Peppermint adds a festive touch to a variety of desserts, making them perfect for sharing with family and friends throughout the season. Here are some more of our favorite peppermint-infused recipes that are just as easy and delightful, promising to bring more minty cheer to your holiday table:
- Peppermint Popcorn with a luscious white chocolate drizzle – a sweet and salty snack that’s hard to resist and perfect for movie nights or party favors.
- Irresistible Peppermint Cookies requiring only four simple ingredients for a quick and impressive bake, ideal for cookie exchanges.
- Delightfully crunchy, three-ingredient Peppermint Bark Pretzels – an addictive blend of sweet, salty, and minty, making them a fantastic last-minute treat.
- Classic homemade Peppermint Bark, crafted with three luxurious types of chocolate for a truly indulgent experience that’s a holiday tradition for many.
- Super simple and creamy Peppermint Fudge, a melt-in-your-mouth treat that comes together in no time, showcasing the perfect blend of chocolate and mint.
Print Recipe
Peppermint Brownie Ice Cream Bars
Chelsea Lords
35
20
8
8 55
30 servings (depending on size cut)
Video Overview
A video tutorial for making these delicious Peppermint Brownie Ice Cream Bars will be added here soon!
Equipment
-
9 x 13-inch baking pan
-
Parchment paper (optional, but highly recommended for easy removal)
-
Large Spoon or Spatula
-
Sharp Knife
-
Measuring Cups and Spoons (for brownie mix)
Ingredients
- 1 (17.8-ounce) package fudge brownie mix plus ingredients called for on package (see Note 1 for recommendation)
- 27 Oreos regular or peppermint variety, divided (reserve 3 for topping/garnish)
- 1 (11.75-ounce) container hot fudge topping
- 48 ounces peppermint ice cream
- 8 ounces frozen whipped topping completely thawed (or homemade whipped cream)
- Finely chopped peppermint bark or peppermint crunch candies, for garnish (optional)
Instructions
-
Preheat oven according to the brownie mix directions. Line a 9×13-inch baking pan with parchment paper, leaving an overhang on the longer sides for easy removal later.
-
Prepare brownie mix as per the package instructions. Bake the brownies about 2-3 minutes less than the package recommends for a fudgier, softer texture when frozen. They should be mostly set but still soft. Let brownies cool completely in the pan for at least 20 minutes after baking.
-
Coarsely chop 24 Oreos into small pieces (approximately quarters). Gently press the chopped cookies into an even layer on top of the cooled brownies, ensuring they adhere well.
-
Warm the hot fudge topping for 30 seconds in a microwave-safe bowl until it is easily spreadable but not hot. Dollop the warm fudge all over the Oreo layer, then carefully spread it into an even layer using the back of a spoon or an offset spatula. Place the pan in the freezer for 10 minutes to allow the fudge to firm up.
-
Allow the peppermint ice cream to soften at room temperature for 5-10 minutes (it should be scoopable but not fully melted). Remove the pan from the freezer. Scoop large portions of the softened ice cream over the set hot fudge layer, then smooth it into an even layer using the back of a large spoon or a spatula. Work quickly to prevent the ice cream from melting too much.
-
Using a spatula, spread the completely thawed whipped topping evenly over the ice cream layer. Optionally, garnish the top with the remaining 3 crushed Oreos (crush whole Oreos in a bag using a meat mallet or wooden spoon) and/or finely chopped peppermint bark/candies. Cover the pan tightly with plastic wrap and then aluminum foil, and freeze overnight (at least 8 hours) until thoroughly set.
-
To serve, remove the pan from the freezer and let the bars sit at room temperature for 5 minutes to soften slightly. Use the parchment paper overhang to lift the entire slab of bars out of the pan and onto a cutting board. For clean, neat slices, dip a sharp knife into hot water, wipe it dry, and then cut the bars into desired sizes. Repeat the hot water and drying process for each cut. Return any uneaten bars promptly to the freezer, ensuring they are tightly covered.
Recipe Notes
Note 2 – Oreo Choice: While seasonal peppermint Oreos add a special holiday touch and are available at many stores, classic regular Oreos work just as wonderfully and are always delicious!
Nutrition Note: Please be aware that the provided nutrition information is an approximation. It does not account for the ingredients required for the brownie mix (such as eggs, oil, water), and the nutritional values for ice cream can vary significantly by brand. This information should be used as a general guide only.
Storage Reminder: For the best quality, store any leftover Peppermint Brownie Ice Cream Bars in an airtight container or wrap them tightly in plastic wrap and foil. To prevent sticking, place parchment or wax paper between stacked bars. Enjoy them within one month for optimal freshness.
Nutrition Information (Approximate Per Serving)
Calories: 405kcal |
Carbohydrates: 64g |
Protein: 5g |
Fat: 15g |
Saturated Fat: 7g |
Polyunsaturated Fat: 1g |
Monounsaturated Fat: 4g |
Trans Fat: 0.01g |
Cholesterol: 20mg |
Sodium: 246mg |
Potassium: 224mg |
Fiber: 2g |
Sugar: 28g |
Vitamin A: 227IU |
Vitamin C: 5mg |
Calcium: 101mg |
Iron: 3mg
Nutrition information is automatically calculated and should be considered an approximation. It may not include ingredients required for brownie mix or account for brand variations.
Loved this recipe? Share your thoughts below!