
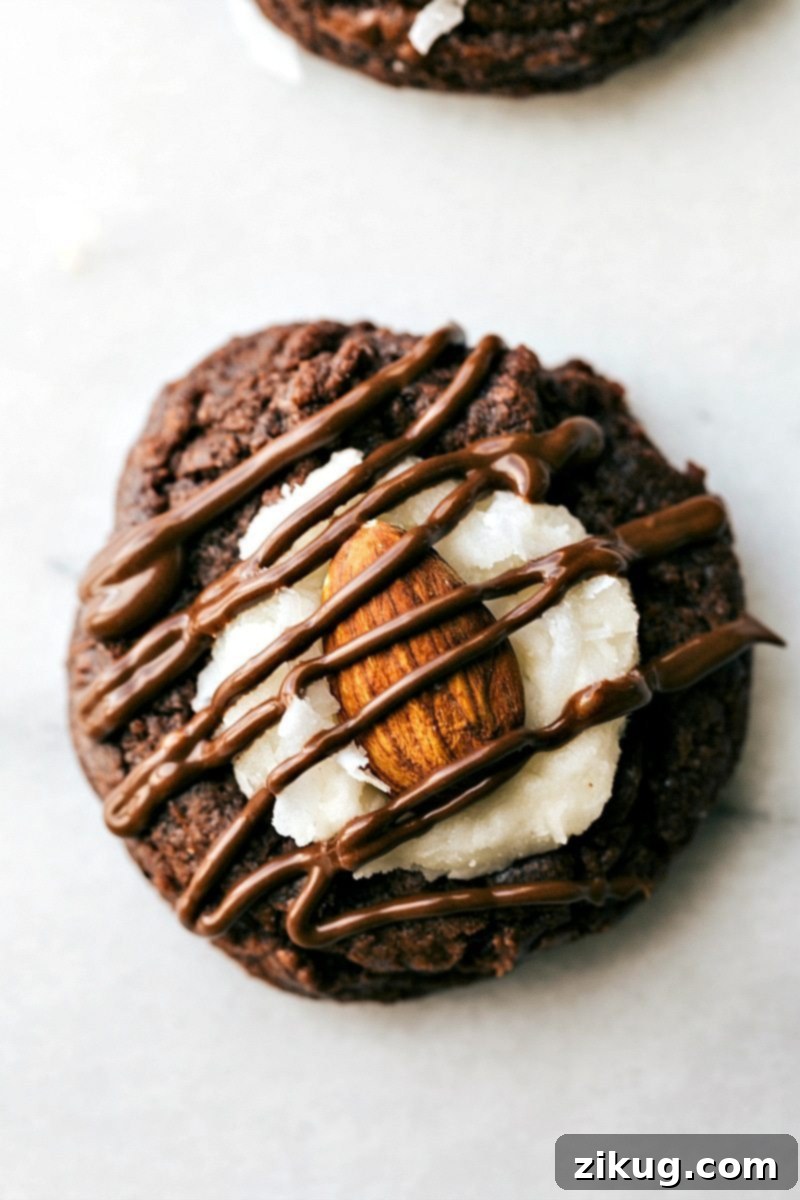
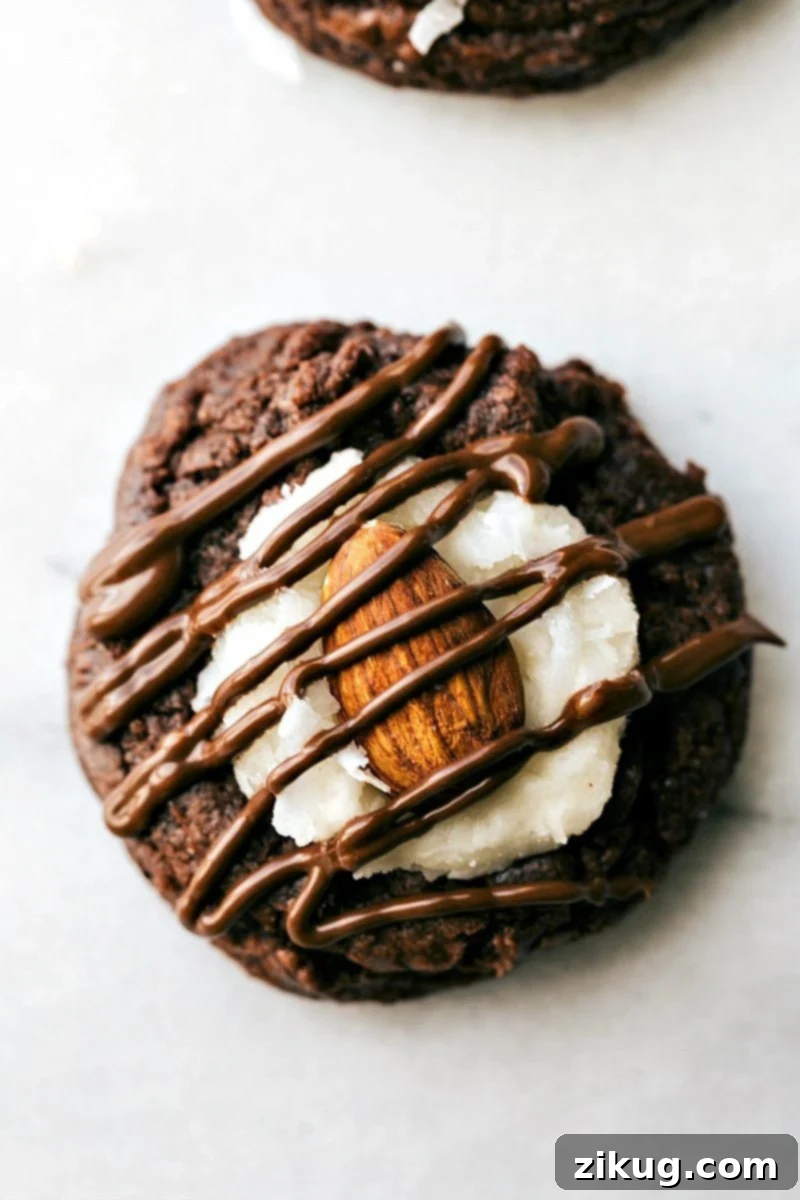
Almond Joy Cookies are an irresistible treat that reimagines the beloved candy bar into a soft, chewy, and utterly delightful cookie form. Imagine a rich, fudgy brownie cookie base, generously topped with a luscious, creamy coconut frosting, crowned with a perfectly roasted almond, and finished with a delicate drizzle of milk chocolate. This confection isn’t just a cookie; it’s a journey into a harmonious blend of textures and flavors that captivates with every single bite. Get ready to bake a dessert that promises pure bliss and will become an instant favorite in your household, perfect for any occasion.

Author’s Culinary Journey
Chocolate + Coconut + Almond = Cookie Perfection!
My husband has an undeniable obsession with Almond Joy candy bars. Seriously, if there’s a bag of fun-sized Halloween candy around the house, I can guarantee that the Almond Joys will vanish first, often within minutes of being discovered. This passion for the classic flavor combination—rich chocolate, sweet coconut, and crunchy almond—sparked a brilliant idea: why not transform his absolute favorite candy bar into an extraordinary cookie? I envisioned capturing those iconic flavors but with the delightful, soft, and chewy texture that only a homemade cookie can offer.
This culinary quest led to several delightful (and delicious!) test batches, involving a significant amount of “taste testing” by my eager husband and a few lucky friends. The result? These incredibly satisfying Almond Joy Cookies were born. The foundation is a deeply fudgy and wonderfully soft brownie cookie base, providing that quintessential chocolatey chew. Layered on top is a light, airy, and intensely flavorful coconut frosting, perfectly complementing the rich base. Finally, a perfectly roasted almond nestled in the center, alongside a delicate chocolate drizzle, seals the deal. Many have declared them even better than the original candy bar! This recipe is a testament to how beloved candy can inspire truly special homemade desserts.
Why These Almond Joy Cookies Are a Must-Bake
These aren’t just any cookies; they’re a celebration of flavor and texture, designed to bring joy with every bite. Here’s why you’ll fall in love with them and why they’re destined to become a staple in your baking repertoire:
- Unforgettable Flavor Profile: These cookies perfectly capture the classic Almond Joy taste—chocolate, coconut, and almond—in a fresh, homemade format. The combination is a nostalgic delight that appeals to candy bar lovers and cookie enthusiasts alike.
- Irresistible Texture Symphony: Experience a symphony of textures in every bite. A fudgy, chewy brownie base provides a satisfying foundation, which then meets a light, creamy coconut frosting that melts in your mouth. This is all beautifully contrasted by the satisfyingly crunchy roasted almond on top, creating a truly dynamic eating experience.
- Guaranteed Crowd-Pleaser: Whether you’re baking for a holiday gathering, a casual potluck, a birthday celebration, or simply as a special treat for your family, these cookies are guaranteed to be a hit. Their unique combination of flavors makes them stand out from typical cookie offerings.
- Deceptively Simple to Make: While they look elaborate and gourmet, this recipe is surprisingly easy to execute. By utilizing a high-quality brownie mix for the base, we simplify the process significantly without compromising on that decadent, rich chocolate flavor. You’ll impress everyone with minimal stress!
- Perfect for Any Occasion: Their delightful appearance and delicious taste make them suitable for a wide range of events. From a sophisticated dessert platter to a cozy night in, these Almond Joy Thumbprint Cookies fit right in. They are versatile, comforting, and always a welcome addition to any sweet spread.
Almond Joy Cookie Ingredients and Expert Tips
Crafting the perfect Almond Joy Cookie starts with selecting the right ingredients and understanding how each contributes to the final masterpiece. Here’s a detailed look at what you’ll need and some crucial tips to ensure your cookies turn out perfectly every time.
| Ingredient | Why It Matters / Smart Swaps & Tips for Best Results |
|---|---|
| Brownie Mix (18 oz, 510g) | The foundation of these cookies is a fudgy brownie, and a good quality mix makes it incredibly easy to achieve the desired texture and flavor. After extensive testing, I found that Betty Crocker® Supreme Chocolate Chunk delivers the best fudgy texture and rich chocolate flavor, making it my top recommendation. However, any premium, high-quality fudge brownie mix will yield excellent results. Steer clear of off-brand or basic mixes if you’re aiming for that truly decadent, rich brownie taste and chew. |
| Chocolate Instant Pudding Mix (3.9 oz, 110g) | This ingredient is a true secret weapon for achieving super chewy, incredibly moist cookies. It significantly enhances the overall chocolate flavor and contributes to that desired fudgy, dense texture. It is absolutely essential that you use *instant* pudding mix, not the cook-and-serve variety, as they behave very differently in baking. Additionally, for optimal flavor and texture, avoid sugar-free or reduced-calorie options; the full-sugar version is crucial for the recipe’s success. |
| Cream Cheese (full-fat brick) | Cream cheese plays a vital role by adding a remarkable richness and a subtle, delightful tang to the cookie base. This not only enhances the flavor but also creates an incredibly soft and tender crumb, making the cookies melt in your mouth. Always opt for full-fat, brick-style cream cheese. Lower-fat versions (like Neufchâtel) or cream cheese sold in tubs have a higher water content and different stabilizers, which can negatively affect the cookie’s texture and lead to excessive spreading during baking. |
| Unsalted Butter | Butter is a fundamental ingredient, providing rich flavor and contributing significantly to the cookie’s tender texture. Using unsalted butter gives you precise control over the salt content in your recipe. If salted butter is all you have on hand, it can work in a pinch, but be sure to omit any additional salt called for in the cookie base recipe to prevent them from becoming overly salty. Ensure it’s softened to room temperature for proper creaming. |
| Sweetened Coconut Flakes | For the signature coconut flavor and moist, chewy texture in the frosting, sweetened coconut flakes are absolutely non-negotiable. Do not substitute with unsweetened, finely shredded, or desiccated coconut, as these will drastically alter the sweetness, moisture content, and overall consistency of your frosting. The larger, sweetened flakes are crucial for the frosting’s authentic taste and delightful chewiness, truly mimicking the candy bar experience. |
| Almonds | The crowning glory of these Almond Joy Cookies! Dry roasted and lightly salted almonds offer a fantastic depth of flavor and a satisfying crunch that beautifully contrasts the soft cookie and creamy frosting. They perfectly replicate the iconic crunch of the candy bar. For an extra decadent and impressive twist, consider using chocolate-covered almonds—they are truly amazing and elevate the cookie to another level of indulgence, adding an extra layer of chocolatey richness! |
Mastering the Creamy Coconut Frosting
The coconut frosting is arguably the star of these Almond Joy Cookies, delivering that authentic tropical sweetness and creamy texture that makes them so addictive. Achieving the perfect frosting requires attention to a few key details to ensure it’s smooth, flavorful, and holds its shape beautifully on your cookies.
- Room Temperature Butter and Shortening are Essential: For a silky-smooth, lump-free frosting, it is absolutely critical that both your unsalted butter and vegetable shortening are properly softened to room temperature. This means letting them sit out for at least 1 hour before you begin. Cold butter and shortening will not cream well together, leading to a clumpy, uneven texture that’s difficult to pipe. If you’re pressed for time, you can carefully soften the butter in the microwave in very short bursts (5-10 seconds) until it’s just pliable, but never melted.
- Gradual Coconut Extract Addition for Perfect Flavor: Coconut extract can vary significantly in strength between different brands. To avoid an overpowering flavor, start by adding a smaller amount (e.g., 1/4 teaspoon), then taste and adjust. Remember that the coconut flavor tends to intensify and meld as the frosting sits, so it’s always better to under-flavor initially and add more if needed. While optional, this step truly boosts the authentic coconut aroma and taste, making the cookies even more irresistible.
- Sweetened Coconut Flakes Only: For the ideal sweetness, moisture, and textural element in this frosting, sweetened coconut flakes are non-negotiable. Do not substitute with unsweetened, desiccated, finely shredded coconut, or coconut flour. These alternatives will significantly alter the sweetness profile, moisture content, and overall consistency, failing to deliver the signature taste and delightful chewiness that sweetened flakes provide.
- Achieving the Right Frosting Consistency: When adding milk (or coconut milk, which can provide an even richer, deeper coconut flavor), do so slowly, one tablespoon at a time. The goal is a consistency that is soft, incredibly smooth, and easy to pipe, yet firm enough to hold its shape beautifully on the cookie indent. A runny frosting will seep off the cookies and create a mess, while a too-stiff frosting will be difficult to pipe and result in a less pleasant mouthfeel. Always err on the side of adding less liquid and gradually adding more until you reach perfection.
- Don’t Be Shy with the Frosting: Each cookie needs a generous dollop of this glorious coconut frosting to achieve the perfect balance of flavors and textures. The rich, fudgy brownie base is quite robust, and a substantial layer of creamy, sweet coconut is essential to truly evoke the authentic Almond Joy experience. Don’t be tempted to skimp on the frosting; a full, luscious fill is key to these cookies’ success and their irresistible appeal.
The Finishing Touches: Elevating Your Almond Joy Cookies
Once your cookies are baked, cooled, and beautifully frosted, it’s time for the final elements that truly make them sing and transform them into exquisite Almond Joy masterpieces. These finishing touches not only enhance the flavor profile but also make them visually stunning, completing the candy bar transformation.
- Choosing Your Almonds: The Perfect Crunch
- Dry Roasted and Lightly Salted: For maximum flavor and minimal effort, I highly recommend dry roasted and lightly salted almonds. The roasting process brings out a deeper, nuttier flavor that is more pronounced than raw almonds, and the subtle hint of salt perfectly cuts through the sweetness of the cookie and frosting. This creates a balanced flavor profile and a satisfying crunch that beautifully mimics the classic candy bar.
- Chocolate-Covered Almonds for Decadence: If you’re feeling particularly adventurous or want to add an extra layer of decadence, try using chocolate-covered almonds. I’ve made them this way before, and the result was absolutely incredible—a truly gourmet take on the classic that elevates the cookie to another level of indulgence!
- The Perfect Chocolate Drizzle: A Visual and Flavorful Delight
- Chocolate Type: The chocolate drizzle isn’t just for looks; it adds another layer of rich chocolatey goodness that completes the Almond Joy experience. While I personally love the smooth, sweet notes of milk chocolate for this recipe (as it’s closest to the original candy bar), semi-sweet or dark chocolate chips can also be used if you prefer a less sweet profile or a more intense, robust chocolate flavor. Choose the type that best suits your personal taste preference!
- Melting Method for a Glossy Finish: For the smoothest, most glossy, and professional-looking drizzle, always opt for high-quality chocolate. Options like baking bars, dedicated melting wafers, or premium chocolate chips are ideal. Melt them gently in a microwave-safe bowl in short bursts (15-20 seconds), stirring well and thoroughly between each burst, until the chocolate is completely smooth and free of lumps. Be careful not to overheat the chocolate, as it can seize and become unusable. A tiny touch of coconut oil or neutral vegetable oil can be stirred in to help achieve that perfect drizzling consistency and adds a beautiful, appetizing sheen to the chocolate.
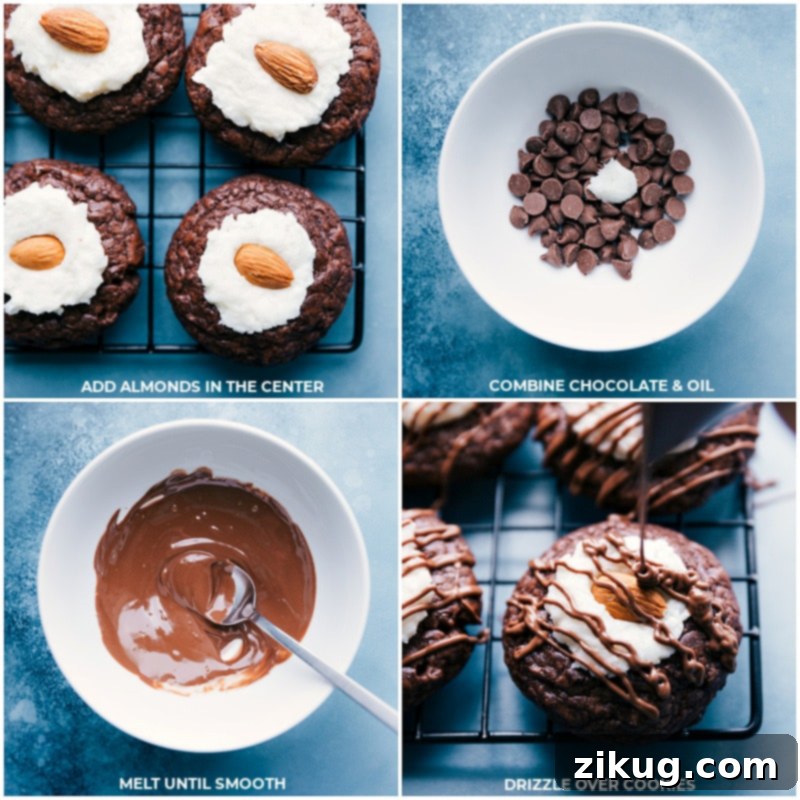
- Application for Artful Presentation: Once melted, transfer the warm chocolate to a small, clean, resealable plastic bag. Snip a tiny corner off the bag to create a fine opening, and then artfully drizzle the melted chocolate over the frosted and almond-topped cookies. This creates a professional and appealing finish that will impress everyone who sees (and tastes!) your homemade Almond Joy Cookies.
Storage and Freezing Tips for Almond Joy Cookies
To keep your Almond Joy Cookies fresh, fudgy, and delicious for as long as possible, proper storage is paramount. Here’s how to store them effectively, including options for freezing various components:
- Room Temperature Storage for Finished Cookies: Once your Almond Joy Cookies are fully cooled, frosted, and decorated, store them in an airtight container at room temperature. They will maintain their optimal freshness, chewiness, and overall deliciousness for up to 3 days. Beyond this timeframe, the texture of both the cookies and the frosting may begin to degrade, losing their desired quality.
- Freezing Baked Cookies (without frosting): If you’re looking to get a head start on baking, or simply have leftover plain brownie cookies, you can easily freeze the *unfrosted* cookie base. First, allow the baked cookies to cool completely on a wire rack. Then, arrange them in a single layer on a baking sheet and freeze until they are solid. Once frozen, transfer the individual cookies to a freezer-safe bag or an airtight container, placing parchment paper between layers to prevent them from sticking together. They can be frozen for up to 3 months. When you’re ready to enjoy them, simply thaw the unfrosted cookies at room temperature and then proceed with preparing the fresh frosting and decorating as usual.
- Freezing Unbaked Dough for Future Baking: For ultimate convenience and fresh-baked cookies on demand, you can also freeze the unbaked brownie cookie dough. Shape the dough into uniform balls (as instructed in the recipe) and then place them on a baking sheet. Freeze until the dough balls are firm. Once solid, transfer them to a freezer-safe bag or airtight container. When you’re ready for freshly baked cookies, there’s no need to thaw the dough! Simply place the frozen dough balls on your prepared baking sheet and bake them directly from frozen. You will just need to add an extra 2–3 minutes to the recommended baking time.
- Frosting & Drizzle: Not Freezer-Friendly: It’s important to note that the prepared coconut frosting and the chocolate drizzle do not freeze and thaw well. The frosting can become watery, separate, or develop an unappealing grainy texture upon thawing. Similarly, the chocolate drizzle may lose its glossy finish and become chalky or dull. For the best taste, texture, and appearance, it is always recommended to prepare the frosting and chocolate drizzle fresh when you are ready to serve your Almond Joy Cookies.
Frequently Asked Questions About Almond Joy Cookies
Here are some common questions about making and enjoying these delightful cookies:
- Can I make the cookie dough ahead of time? Yes! The cookie dough can be prepared up to 3 days in advance and stored in an airtight container in the refrigerator. This can help break up the baking process. Remember to let it soften slightly at room temperature before scooping if it’s too firm.
- What if my frosting is too runny/stiff? If your frosting is too runny, add powdered sugar, one tablespoon at a time, until it reaches the desired consistency. If it’s too stiff, add milk (or coconut milk), one teaspoon at a time.
- Can I use a different type of chocolate for the drizzle? Absolutely! While milk chocolate is recommended for an authentic Almond Joy flavor, semi-sweet or dark chocolate can be used if you prefer a less sweet or more intense chocolate flavor.
- My cookies spread too much, what went wrong? This usually happens if the butter/cream cheese was too soft (partially melted) or if the dough wasn’t chilled sufficiently. Ensure your butter and cream cheese are just softened, not melted, and always chill the dough for at least 30 minutes.
- Can I skip the coconut extract? Yes, you can. The cookies will still have a wonderful coconut flavor from the sweetened coconut flakes. The extract simply amplifies that flavor, but it’s not essential for success.
More Irresistible Cookie Recipes You’ll Love:
If you’ve enjoyed baking and tasting these extraordinary Almond Joy Cookies, you’re in for an absolute treat! Our collection features even more delightful and easy-to-make cookie recipes that are perfect for any occasion. Whether you’re craving classic comfort, a nostalgic favorite, or something uniquely delicious, you’ll find inspiration here to keep your kitchen filled with wonderful aromas and scrumptious baked goods.
Desserts
S’mores Cookies
Cookies
Homemade Oreos
Desserts
Peanut Butter Cookies
Desserts
Caramel Cookie Bars
Saved
Pin Recipe
Print Recipe
Almond Joy Cookies Recipe
Chelsea Lords
45 minutes
10 minutes
30 minutes
1 hour
25 minutes
22
cookies
Video Overview
Watch the video below for a step-by-step visual guide on how to make these incredible Almond Joy Cookies, ensuring you get perfect results every time!
Essential Equipment
-
Large Sheet Pan (15″ x 10″ or similar)
-
Stand Mixer or a reliable hand mixer with beaters
-
Resealable Plastic Bags (at least two: one for frosting, one for chocolate drizzle)
-
Parchment paper or silicone baking mats
-
Mixing bowls (various sizes)
-
Measuring cups and spoons
-
Wire cooling rack
Ingredients List
For the best Almond Joy Cookies, ensure all ingredients are fresh and measured accurately. Room temperature ingredients are crucial for proper mixing.
For the Fudgy Brownie Cookies
- 4 ounces cream cheese full-fat, brick-style, softened to room temperature
- 8 tablespoons unsalted butter softened to room temperature
- 1 large egg at room temperature
- 1 teaspoon vanilla extract
- 1 (3.9-ounce) package chocolate instant pudding and pie filling dry mix only, not cook-and-serve; avoid sugar-free for best texture
- 1/4 cup all-purpose flour
- 1 (18-ounce) package fudge brownie mix preferably Betty Crocker Supreme Chocolate Chunk or another high-quality brand
For the Creamy Coconut Frosting
- 4 tablespoons unsalted butter softened to room temperature
- 1/4 cup vegetable shortening
- 1/2 teaspoon vanilla extract
- 1/4 to 1/2 teaspoon coconut extract start with less and add more to taste; optional but recommended for intense coconut flavor
- 1/8 teaspoon salt
- 1-1/2 cups powdered sugar sifted if clumpy, for a smooth frosting
- 1-1/2 cups sweetened coconut flakes ensure they are sweetened, not unsweetened or desiccated
- 1 to 2 tablespoons milk or coconut milk, for desired consistency
- 20 to 24 whole almonds dry roasted and lightly salted, or chocolate-covered for extra indulgence
For the Chocolate Drizzle
- 1/2 cup chocolate melting wafers or good quality baking bar or chocolate chips (milk, semi-sweet, or dark chocolate recommended)
- 1/2 teaspoon coconut oil or neutral vegetable oil, helps with smooth melting and drizzling consistency
Step-by-Step Instructions
Part 1: Making the Fudgy Brownie Cookie Base
-
Begin by ensuring your cream cheese and unsalted butter are at perfect room temperature. This can be achieved by letting them sit out for about one hour. Alternatively, if you’re short on time, gently microwave them separately in very short 5-10 second bursts, being extremely careful not to melt them. If either ingredient accidentally gets too soft or starts to melt, you might need to chill the dough for about an hour after mixing. Preheat your oven to 350°F (175°C) and prepare a large sheet pan by lining it with parchment paper or a silicone baking mat to prevent sticking.
-
In a large mixing bowl, using either a stand mixer fitted with the paddle attachment or a reliable hand mixer, cream together the softened butter and cream cheese until the mixture is light, fluffy, and completely smooth. This step ensures an even distribution and contributes to the cookie’s tender texture. Next, beat in the large egg and vanilla extract, continuing to mix until everything is thoroughly combined and the mixture appears creamy and cohesive.
-
Gradually add the dry instant pudding mix, all-purpose flour, and the fudge brownie mix to the wet ingredients. Mix on low speed initially, then increase gradually, until a thick, cohesive dough forms. This process might take a few minutes as the dough needs to come together properly and fully incorporate all dry ingredients. Once combined, cover the dough tightly with plastic wrap and chill it in the refrigerator for at least 30 minutes. This chilling period is crucial for firming up the dough, making it easier to handle, and significantly preventing the cookies from spreading too much during baking.
-
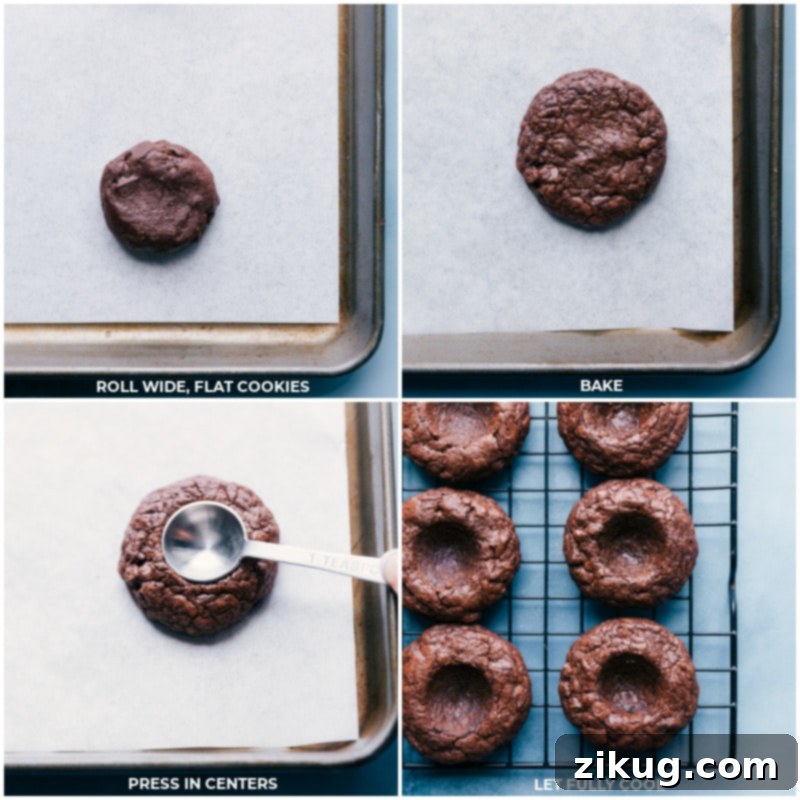
Once chilled, scoop the dough and form it into uniform balls, approximately 2 tablespoons (about 40g) each. For a consistent cookie size and even baking, consider using a cookie scoop. Gently flatten each dough ball into a wide disc shape, which will form the perfect base for your thumbprint cookie. Arrange 6–8 flattened discs on your prepared sheet pan, ensuring there is enough space between them (about 2 inches) for slight spreading during baking.
-
Bake the cookies in your preheated oven for 9–13 minutes. For that coveted fudgy, chewy brownie texture, it’s best to slightly under-bake them. They might appear a little soft in the center when you pull them out of the oven, but they will continue to set as they cool. Over-baking will result in drier, cakier cookies, so keep a close eye on them.
-
Immediately after removing the cookies from the oven, while they are still hot and pliable, use the back of a teaspoon (or your thumb, as in a classic thumbprint cookie style) to press firmly into the center of each hot cookie. This action creates a deep, well-defined indent that will be perfect for holding the creamy coconut frosting. Let the cookies cool on the baking sheet for about 5 minutes before carefully transferring them to a wire rack to cool completely. Cooling on the rack ensures air circulation, preventing the bottoms from getting soggy.
Part 2: Preparing the Creamy Coconut Frosting
-
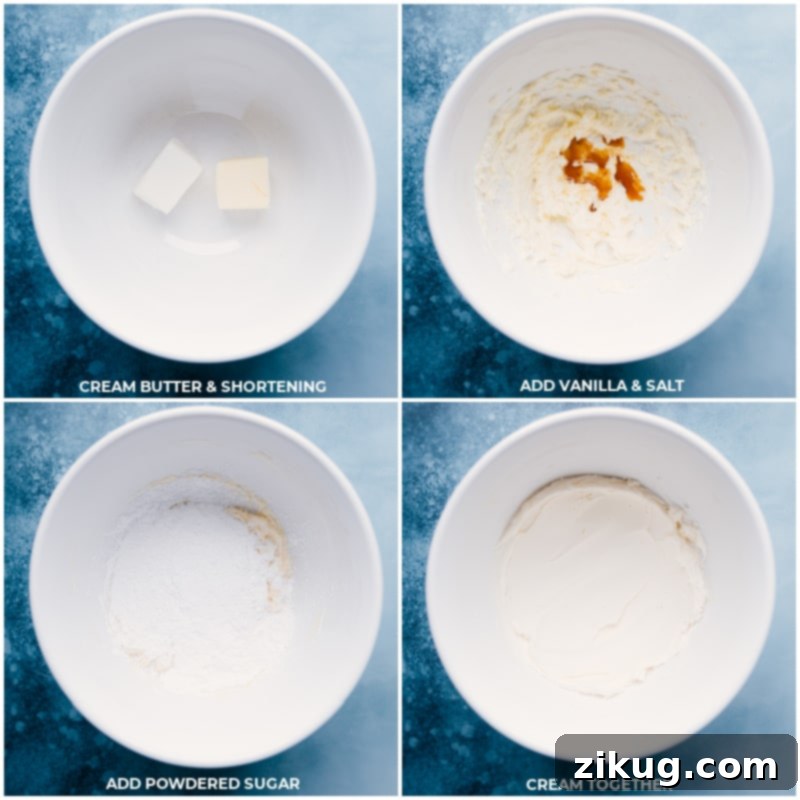
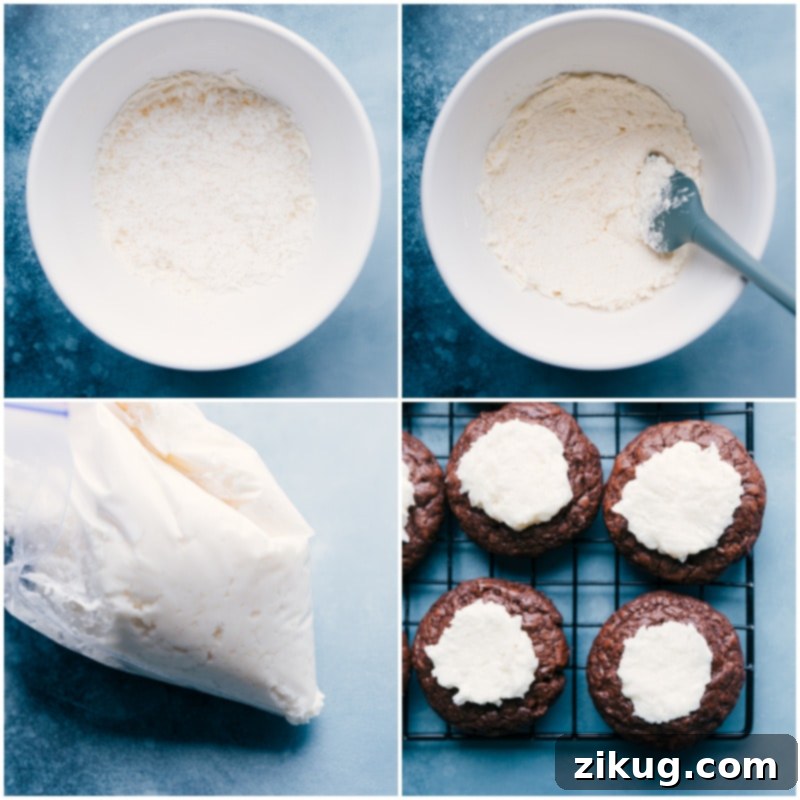
In a large bowl, using a stand mixer or hand mixer, beat the softened butter and vegetable shortening together until the mixture is light, creamy, and completely smooth. This foundation is key to a perfectly textured frosting. Next, beat in the vanilla extract, the optional coconut extract (remember to start with 1/4 tsp and add more if desired), salt, and powdered sugar until all ingredients are well combined and the frosting is smooth. Finally, gently fold in the sweetened coconut flakes. Slowly add milk (or coconut milk, for an enhanced coconut flavor) one tablespoon at a time, mixing until you achieve a thick, smooth, and easily pipeable consistency. The goal is a frosting that is not too stiff and not too runny.
-
Transfer all of the prepared coconut frosting into a large resealable plastic bag. Press out any excess air from the bag and seal it tightly. Snip off one corner of the bag, aiming for an opening about 1-inch in diameter, to create a makeshift piping bag. Carefully pipe a generous amount of frosting into the indent of each cooled brownie cookie. It’s important to use all the frosting to ensure each cookie has a balanced flavor and truly tastes like an Almond Joy. Immediately press a whole roasted almond into the center of the frosting on each cookie.
Part 3: Adding the Chocolate Drizzle (The Final Touch!)
-
In a small, microwave-safe bowl, combine the chocolate melting wafers (or high-quality baking bar/chips) with the coconut oil or vegetable oil. Microwave the mixture in short 15-second bursts, stirring thoroughly with a spoon or spatula for 10 seconds between each burst, until the chocolate is completely melted and smooth. Be extremely careful not to overheat the chocolate, as it can seize and become lumpy. Once melted and glossy, transfer the chocolate to another small resealable plastic bag and snip off a tiny corner. Drizzle the melted chocolate generously over each frosted and almond-topped cookie in a decorative pattern. Allow the chocolate drizzle to set completely at room temperature or by placing the cookies in the refrigerator for a few minutes before serving. This step creates a beautiful finish and adds an extra layer of chocolatey goodness.
Important Recipe Notes for Success
Note 2: Crucial Role of Sweetened Coconut Flakes: For the ideal texture, sweetness, and authentic flavor in your coconut frosting, it is absolutely crucial to use sweetened coconut flakes (which typically come in 3.5-ounce bags). Unsweetened coconut, desiccated coconut, or coconut flour will not provide the same desired results and will significantly impact both the sweetness and the desired moist, slightly chewy texture of the frosting. These specific flakes are key to achieving the signature Almond Joy taste and mouthfeel.
Note 3: Elevating Your Almond Choices: While any whole almond will work for these cookies, I highly recommend using dry roasted and lightly salted almonds. The roasting process brings out a deeper, more robust nutty flavor, and the slight saltiness provides a wonderful contrast to the sweetness of the chocolate and coconut. This simple choice elevates the overall flavor profile significantly without any extra preparation. For a truly luxurious and indulgent experience, I once made these cookies with chocolate-covered almonds, and they were absolutely incredible – a gourmet upgrade if you’re looking to impress!
Note 4: Quality Chocolate for the Perfect Drizzle: For the most appealing, smooth, and delicious chocolate drizzle, always opt for good quality chocolate. I personally prefer milk chocolate for its creamy sweetness and closer resemblance to the classic Almond Joy candy bar flavor. However, semi-sweet or dark chocolate are also excellent choices if you desire a less sweet or more intense chocolate flavor profile. Suitable options include a high-quality baking bar, dedicated chocolate melting wafers, or premium chocolate chips. The addition of a small amount of coconut or neutral vegetable oil during the melting process helps to create a glossy, free-flowing consistency that is perfect for elegant drizzling.
Note 5: Comprehensive Storage and Freezing Tips: To maintain optimal freshness and texture, store your finished Almond Joy Cookies in an airtight container at room temperature for up to 3 days. After this period, they tend to lose their ideal texture and freshness. Please note that frosted and decorated cookies do not freeze or thaw well; the frosting can become watery or separate, and the chocolate drizzle may lose its sheen. However, you can successfully freeze the unbaked brownie cookie dough for up to 3 months. To bake from frozen, simply add an extra 1-3 minutes to the standard baking time – there’s no need to thaw the dough beforehand, making fresh-baked cookies incredibly convenient!
Estimated Nutrition Information
Calories: 280 kcal |
Carbohydrates: 34.3 g |
Protein: 2.4 g |
Fat: 15.2 g |
Cholesterol: 27.8 mg |
Sodium: 247.6 mg |
Fiber: 0.8 g |
Sugar: 26 g
Nutrition information is an estimate based on the ingredients and preparation method. It should be used as an approximation and can vary depending on specific brands, ingredient choices, and portion sizes.
Love this recipe? Share your thoughts below!
We’d love to hear from you! If you enjoyed making these Almond Joy Cookies, please leave a comment and let us know how your delicious treats turned out. Your feedback helps us and other bakers!