
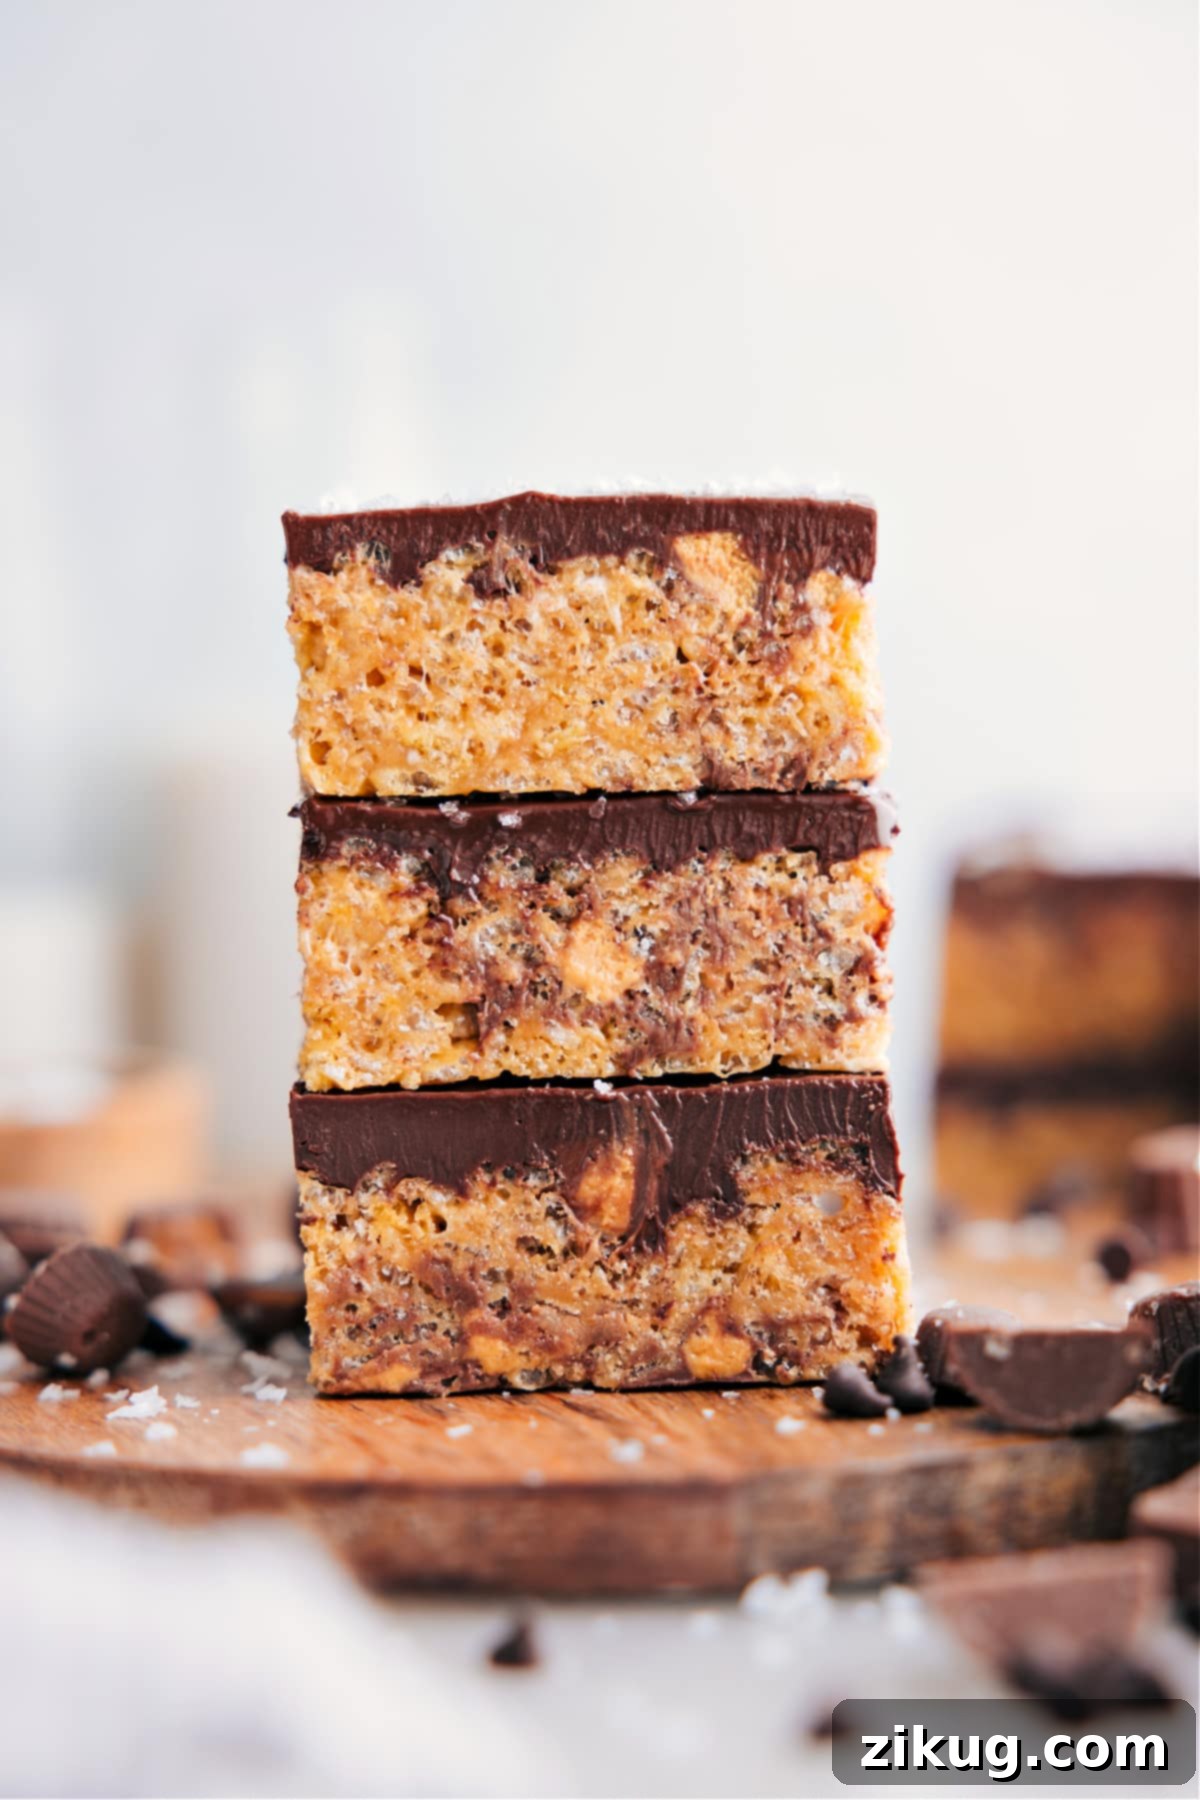
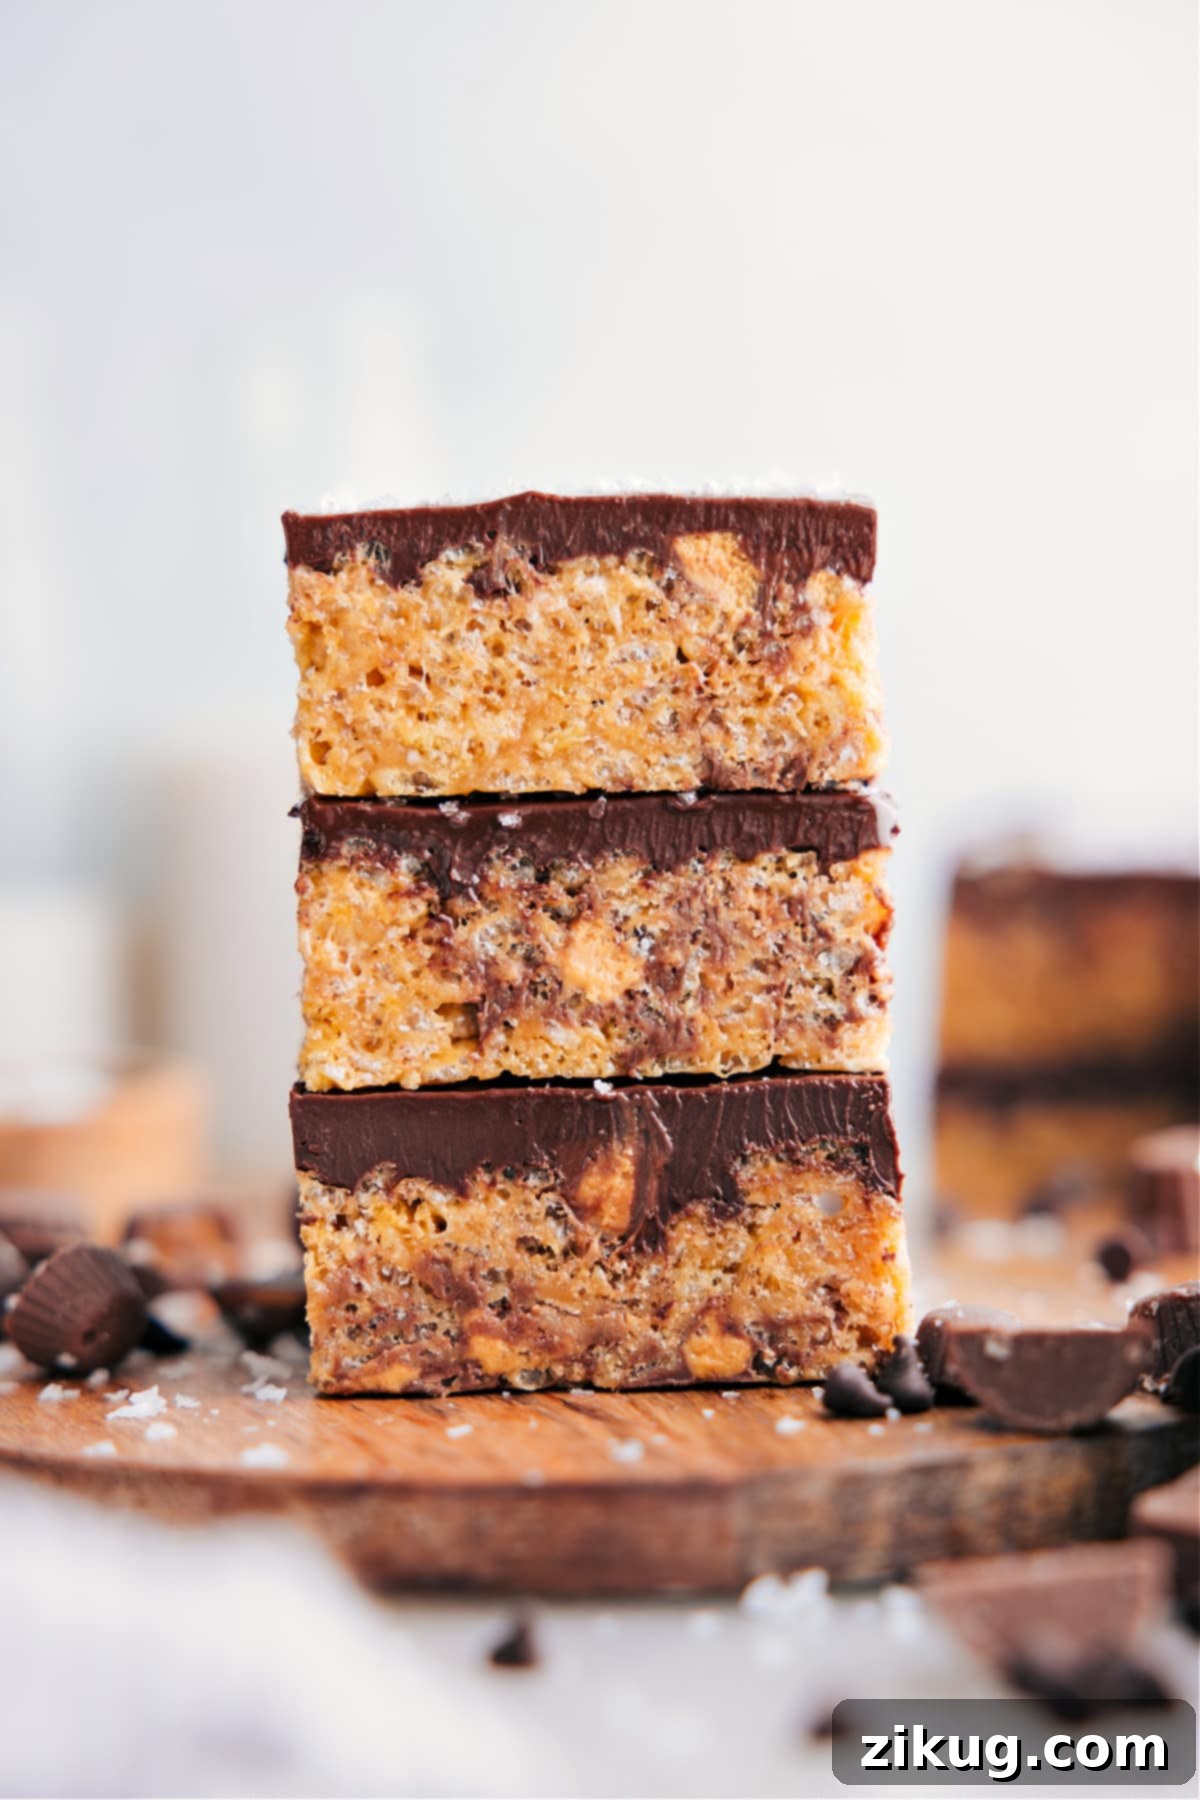
Ultimate Peanut Butter Rice Krispie Treats with Reese’s Cups are extra gooey, with mini peanut butter cups throughout. A decadent chocolate and peanut butter topping makes them even better!

Author’s Note
Reese’s Stuffed Peanut Butter Rice Krispie Treats!
I’ve always had a special place in my heart for classic Rice Krispie Treats. My mom used to make them all the time when I was growing up, and the fights over who got to enjoy the last gooey marshmallow scrape from the pot are fond memories. As I started experimenting with baking, I quickly discovered the joy of customizing this simple treat with different flavors. The moment I introduced peanut butter, I knew I had stumbled upon something truly magical. These bars, featuring irresistibly gooey marshmallows, delightful mini Reese’s cups generously folded throughout, and a luxurious peanut butter chocolate topping, are simply unparalleled. They’ve become a family favorite, a go-to for potlucks, and a recipe I’m thrilled to share with you.
If you’re eager to explore more creative variations of Rice Krispie Treats, be sure to check out my Fruity Pebbles Rice Krispies Treats for a colorful twist, the refreshing Rice Krispie Ice Cream Bars, or my rich Chocolate Rice Krispie Treats. Each recipe offers a unique, simple, and utterly delicious experience.
Irresistibly Gooey Peanut Butter Rice Krispie Treats with Reese’s
Get ready to elevate your dessert game with these incredible Peanut Butter Rice Krispie Treats, loaded with the irresistible combination of peanut butter and chocolate. This recipe takes the classic no-bake favorite to a whole new level by incorporating creamy peanut butter into the marshmallow mixture and generously studding the treats with mini Reese’s Peanut Butter Cups. A silky-smooth chocolate and peanut butter topping finishes them off, creating a truly unforgettable dessert that’s perfect for parties, lunchboxes, or a simple sweet craving.
Why You’ll Love This Peanut Butter Rice Krispie Treat Recipe
There are countless reasons why these Peanut Butter Rice Krispie Treats stand out as a must-try dessert:
- Unbeatable Flavor Combination: The timeless pairing of peanut butter and chocolate is front and center. Each bite offers a perfect balance of salty-sweet goodness that will have you reaching for another.
- Extra Gooey Texture: Thanks to a special caramel-like base made with brown sugar and heavy cream, these treats achieve an unparalleled chewiness and gooeyness that’s far beyond traditional versions.
- Reese’s Peanut Butter Cup Surprises: Mini Reese’s cups are folded directly into the mixture, ensuring a delightful chocolate-peanut butter pocket in every square.
- Decadent Chocolate Topping: A rich, spreadable chocolate and peanut butter drizzle adds an extra layer of flavor and makes these bars visually stunning.
- No-Bake & Easy: As a no-bake dessert, they’re incredibly simple to prepare, requiring no oven time. This makes them ideal for busy schedules or when you need a quick treat.
- Perfect for Any Occasion: From casual family gatherings to festive holiday parties, these treats are always a hit. They’re easy to transport and universally loved by kids and adults alike.
Essential Ingredients for Peanut Butter Rice Krispie Treats
Creating these sensational treats starts with a handful of quality ingredients. Here’s what you’ll need, along with some helpful tips and potential swaps:
| Ingredient | Swaps & Tips for Best Results |
|---|---|
| Crisp Rice Cereal (e.g., Rice Krispies) | Always opt for fresh cereal. Stale cereal can impart an off-flavor and affect the overall texture, making your treats less enjoyable. |
| Unsalted Butter | If you only have salted butter on hand, it will work. Just be sure to reduce the amount of additional salt in the recipe to avoid over-salting. |
| Light Brown Sugar | Brown sugar is key for that rich, caramel-like depth and extra chewiness. While white sugar can be used in a pinch, the treats won’t have the same depth of flavor or characteristic gooeyness. |
| Heavy Cream | Heavy cream is essential for the rich caramel base. Do not substitute with milk, as milk has a lower fat content and will not thicken or caramelize in the same way, potentially leading to a less set or less flavorful treat. |
| Creamy Peanut Butter | Stick to processed, creamy peanut butter (like Jif or Skippy) for optimal results. Natural peanut butter, which tends to separate more, can alter the texture and prevent the treats from setting properly. |
| Miniature Marshmallows | Fresh marshmallows are crucial for achieving that perfectly melted, gooey, and soft texture. Older, hardened marshmallows won’t melt as smoothly. You’ll use them in two stages for maximum gooiness. |
| Mini Reese’s Peanut Butter Cups | These add delightful pockets of chocolate and peanut butter. If you can’t find the mini unwrapped cups, you can chop regular Reese’s Miniatures (the smaller foil-wrapped ones) into quarters for a similar effect. |
| Chocolate Chips (for topping) | Semi-sweet chocolate chips provide a balanced sweetness for the topping. If you prefer a sweeter topping, milk chocolate chips are a great alternative. Dark chocolate can be used for a more intense chocolate flavor. |
| Salt | A pinch of salt balances the sweetness and enhances all the flavors, especially the peanut butter. |
| Vanilla Extract (Optional Add-In) | Vanilla adds a wonderful aromatic depth to the treats. Use a good quality pure vanilla extract for the best flavor. |
Quick Tip
Having trouble finding mini Reese’s Peanut Butter Cups? No worries! You can easily use Reese’s Miniatures (the small, foil-wrapped candies) by chopping them into quarters. They work just as great and deliver the same amazing flavor.
How To Make Peanut Butter Rice Krispie Treats: A Step-by-Step Guide
Making these delightful peanut butter and chocolate treats is surprisingly simple. Follow these steps for perfect, gooey results every time:
- Prepare Your Pan: First, line a 9×9-inch baking pan with parchment paper or aluminum foil, ensuring there’s an overhang on the sides. This overhang will act as handles, making it much easier to lift the cooled treats out of the pan. Lightly spray the parchment/foil and the sides of the pan with cooking spray to prevent sticking. Set this aside.
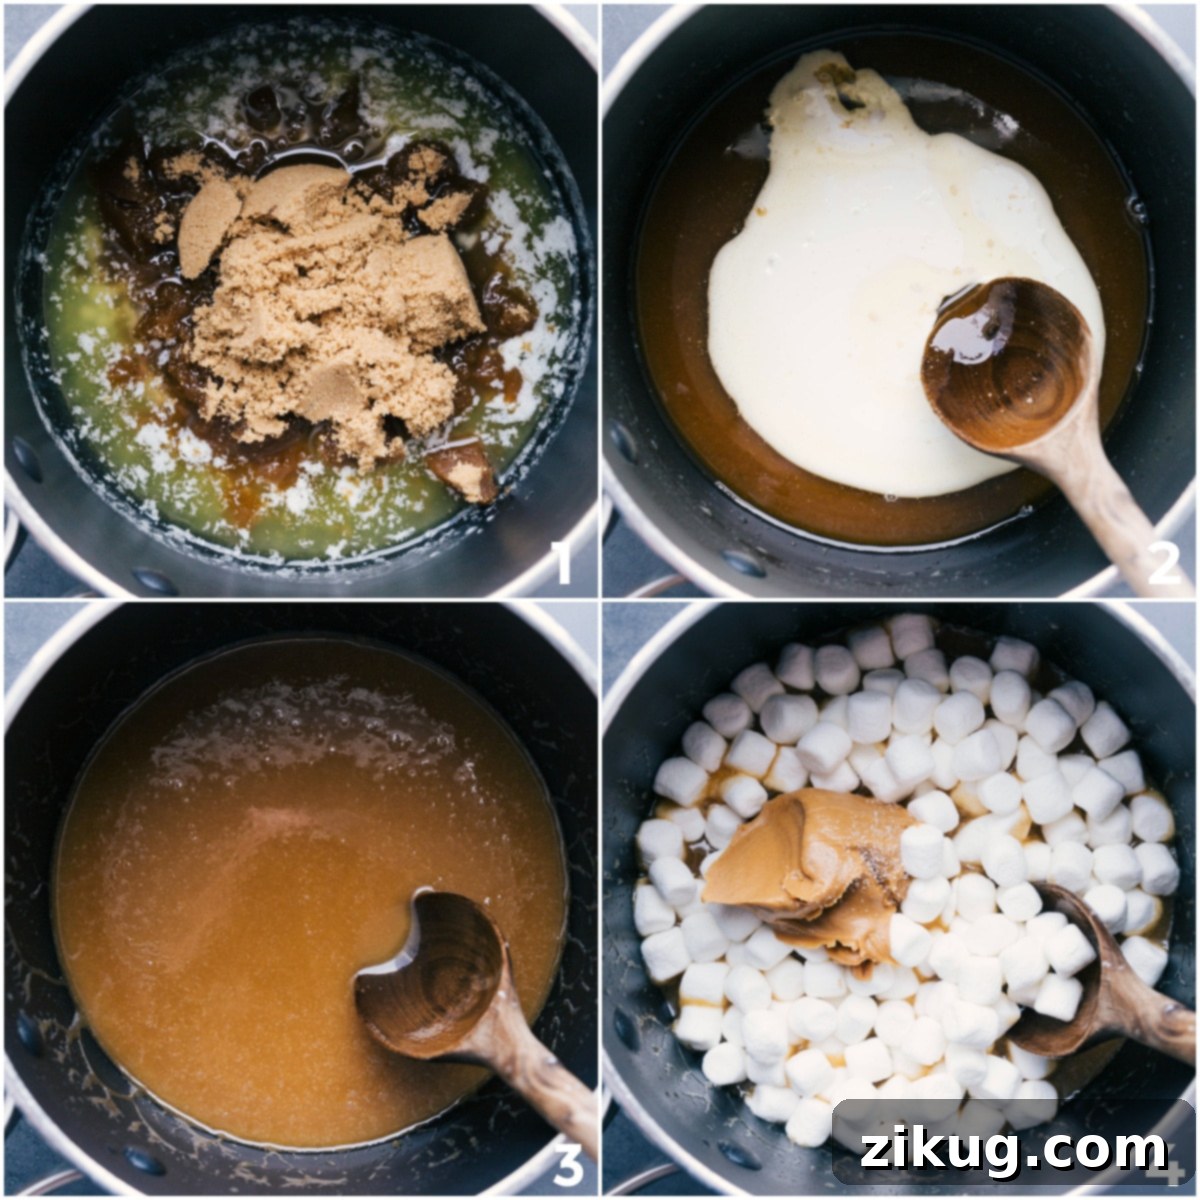
- Create the Caramel Base: In a very large, heavy-bottomed pot, melt the unsalted butter over medium-high heat. Once melted, add the light brown sugar and stir constantly until the sugar is completely dissolved, which usually takes about 1-2 minutes. Next, pour in the heavy cream. Bring the mixture to a rolling boil, then continue to stir constantly for exactly 1 minute. This step is crucial for developing the caramel flavor and ensuring the treats set correctly. Immediately reduce the heat to medium-low.
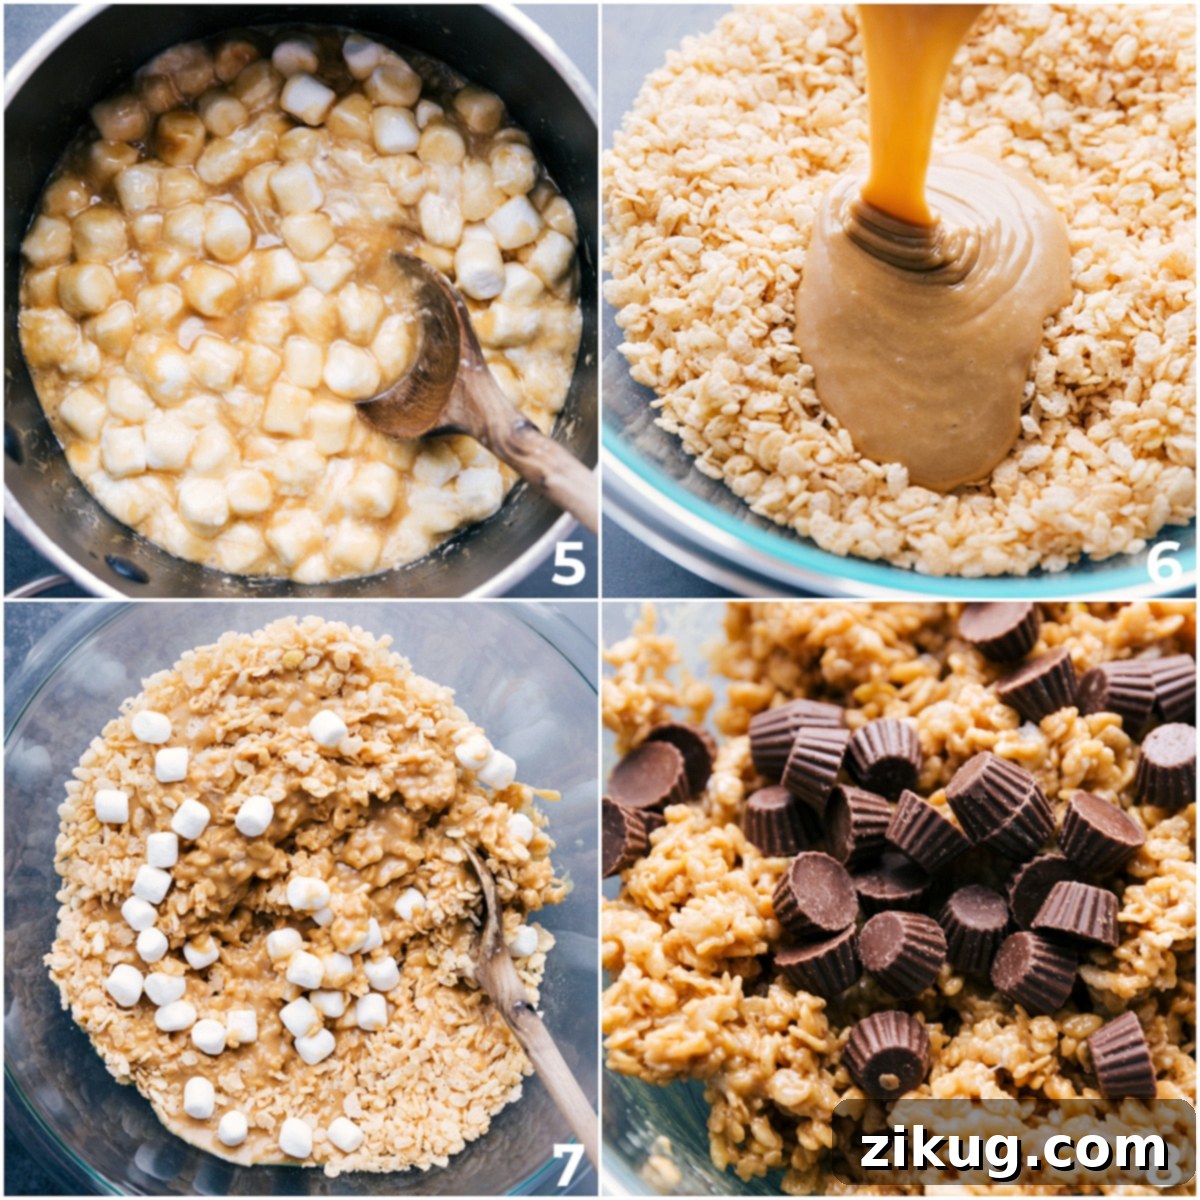
- Melt in the Gooey Goodness: Add the creamy peanut butter, 2 cups of miniature marshmallows, and the salt to the pot. Stir continuously until all the marshmallows are fully melted and the mixture is smooth and well combined. As soon as the marshmallows are melted, remove the pot from the heat. If you’re using vanilla extract, stir it in now.
- Combine with Cereal and Add-Ins: Pour the crisp rice cereal into the pot with the marshmallow mixture. Using a sturdy spatula or spoon, stir quickly until the cereal is thoroughly coated. Work efficiently to prevent the mixture from cooling too much. Next, gently fold in the additional 1/2 cup of miniature marshmallows for extra pockets of chewiness. Allow the mixture to cool for just a couple of minutes—it should still be warm but not scorching hot—then carefully fold in the mini Reese’s cups. They will soften and get delightfully melty, which is exactly what you want!
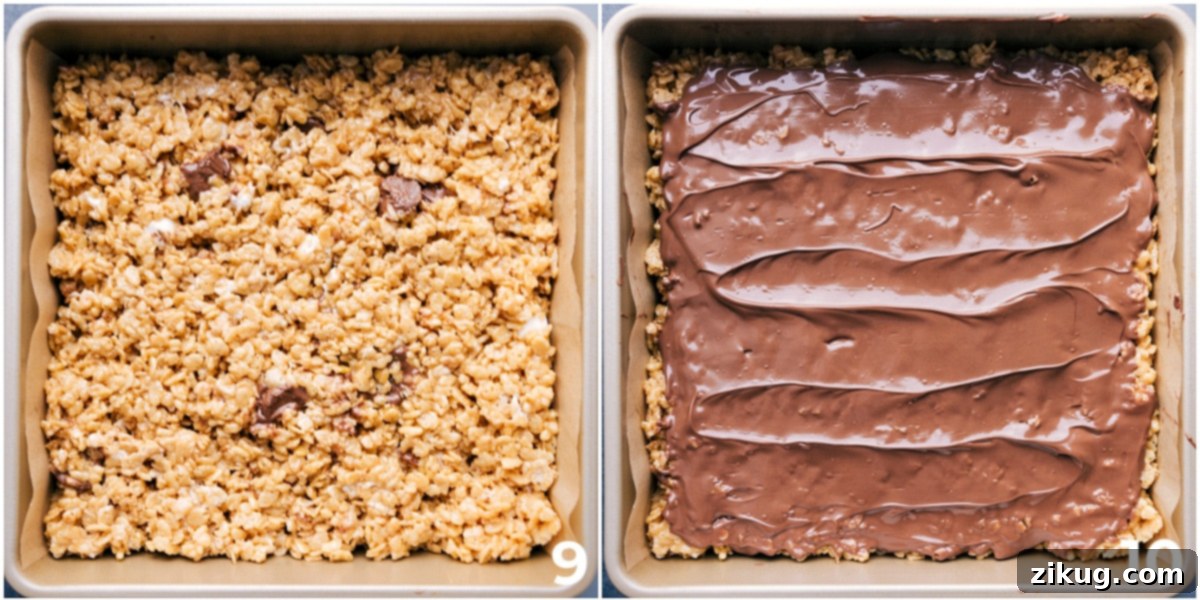
- Press into the Pan: Transfer the warm cereal mixture into your prepared 9×9-inch pan. Lightly spritz your hands or a piece of parchment paper with cooking spray. Using your greased hands or the parchment, gently and evenly press the mixture into the pan. It’s important to avoid pressing too hard, as this can compress the cereal and result in dense, hard treats instead of soft, gooey ones. Aim for an even, relaxed layer.
- Prepare the Decadent Topping: In a small, microwave-safe bowl, combine the chocolate chips and the 2 1/2 tablespoons of creamy peanut butter. Microwave in short bursts, typically 15-second intervals, stirring thoroughly after each interval, until the mixture is completely melted and smooth. Be careful not to overheat the chocolate, as it can seize. Once smooth, spread this rich chocolate-peanut butter topping evenly over the surface of the cereal bars.
- Chill, Cut, and Serve: Place the pan in the refrigerator for at least 30 minutes. This allows the chocolate topping to set firmly and the treats to firm up slightly. Once chilled, remove the pan from the fridge and let it sit at room temperature for 10-15 minutes before cutting. This prevents the chocolate topping from cracking. For clean, neat slices, warm a sharp knife under hot water, wipe it dry, and then make firm, decisive cuts through the bars. Enjoy your homemade, ultimate Peanut Butter Rice Krispie Treats!
Expert Tips for Perfectly Gooey Peanut Butter Rice Krispie Treats
Achieving that perfect balance of gooey, chewy, and flavorful Rice Krispie Treats requires a few insider tricks. Keep these tips in mind to ensure your treats are nothing short of amazing:
- Freshness is Key for Ingredients: Always start with fresh crisp rice cereal and soft, fresh marshmallows. Stale cereal can impart a cardboard-like taste, and old, hardened marshmallows won’t melt smoothly, resulting in a less desirable, tougher texture. Check expiration dates for the best quality.
- Master the Caramel Base Boil: The boiling time for the butter, brown sugar, and heavy cream mixture is critical.
- Too Little Boiling: If you don’t boil the mixture for the full minute, the caramel won’t develop properly, and your treats might be too soft, failing to set into firm bars.
- Too Much Boiling: Over-boiling will cause the sugar to crystallize too much, leading to overly hard and brittle treats. Stick to the precise 1-minute boil for the perfect consistency.
- Work Quickly During Mixing: Once the marshmallow mixture is ready, add the cereal immediately. Stir fast and efficiently to ensure the cereal is fully coated before the mixture cools and becomes difficult to work with. A large, sturdy spoon or spatula is your best friend here.
- Gentle Pressure is Best: When pressing the mixture into the prepared pan, use a light, gentle hand. Pressing too firmly will compact the cereal, making the treats dense and hard rather than light and delightfully chewy. A gentle, even press is all you need.
- Achieve Clean Cuts: For beautifully presented squares, use a sharp knife. For an even cleaner cut, warm the knife under hot water for a few seconds, wipe it completely dry, and then make a firm, smooth slice. Repeat this process for each cut to minimize sticking and tearing.
- Don’t Skip the Chilling: While these are “no-bake,” a quick 30-minute chill in the refrigerator is essential for the chocolate topping to set and the bars to firm up slightly, making them easier to cut and handle.
Storage Solutions for Leftover Peanut Butter Rice Krispie Treats
- Best When Fresh: These delightful treats are undoubtedly at their peak flavor and texture on the day they are made. The marshmallows are at their gooey best, and the chocolate topping is perfectly set.
- Room Temperature Storage: If you have leftovers, store them in an airtight container at room temperature. They will remain delicious for up to 2-3 days, though they may lose a bit of their initial gooeyness over time.
- Freezing for Longer Enjoyment: For longer storage, these bars freeze beautifully! Once cut into individual squares, wrap each piece tightly in plastic wrap, then place them in a freezer-safe, resealable bag or an airtight container. They can be frozen for up to three months. To enjoy, simply remove a bar from the freezer and let it thaw at room temperature for about 30 minutes, or until soft.
Frequently Asked Questions About Peanut Butter Rice Krispie Treats
Here are answers to some common questions about making and enjoying these treats:
- Can I use natural peanut butter?
It’s generally not recommended. Natural peanut butter tends to separate and can make the treats oily and prevent them from setting properly, leading to a greasy or crumbly texture. Creamy, processed peanut butter works best for consistency.
- How do I prevent my treats from getting hard?
The key is to avoid overcooking the sugar mixture (boil for exactly 1 minute) and not pressing the mixture too firmly into the pan. Gentle pressure keeps them soft and chewy. Also, using fresh marshmallows helps ensure a gooey texture.
- Can I make these in a different sized pan?
A 9×9-inch pan yields thicker, more substantial bars. If you use a 9×13-inch pan, the bars will be thinner, and you might need to adjust the chilling time. Ensure the pan is properly lined and greased regardless of size.
- Can I skip the chocolate topping?
Absolutely! While the chocolate-peanut butter topping adds an extra layer of decadence, the treats are still incredibly delicious without it. If you prefer a simpler version, you can omit the topping entirely.
- What other candies can I add besides Reese’s?
Get creative! You could try adding chopped Snickers, M&Ms, or even pretzels for a salty crunch. Just be mindful of how additional ingredients might affect the setting of the treats.
More Indulgent Dessert Bar Recipes:
Desserts
Classic Blondie Recipe
Desserts
Easy Chocolate Chip Cookie Bars Recipe
Desserts
Delightful Raspberry Bars Recipe
Desserts
Carmelitas (My Absolute Favorite Dessert!)
Print Recipe
Peanut Butter Rice Krispies Treats
Chelsea Lords
25 minutes
30 minutes
55 minutes
12 bars
Video
Equipment
-
9 x 9-inch baking pan
-
Parchment paper or aluminum foil
-
Large pot
Ingredients
- Cooking spray
- 5 cups crisp rice cereal (like Rice Krispies)
- 1/2 cup unsalted butter
- 3/4 cup light brown sugar packed
- 1/3 cup heavy cream
- 1/2 cup creamy peanut butter
- 2 cups miniature marshmallows
- 1/8 teaspoon salt
- 1 teaspoon vanilla extract
- 1/2 cup miniature marshmallows
- 3/4 cup Reese’s minis (see Note 1 below)
- 1-1/2 cups chocolate chips (see Note 2 below)
- 2-1/2 tablespoons creamy peanut butter
Instructions
-
Line a 9×9-inch pan with parchment paper (or foil), leaving an overhang for easy removal. Lightly spray with cooking spray. Set aside.
-
In a very large pot over medium-high heat, melt the butter. Add the brown sugar and stir until fully dissolved, about 1–2 minutes. Stir in the heavy cream, bring to a boil, and continue stirring constantly for 1 minute. Reduce heat to medium-low.
-
Add in peanut butter, 2 cups of marshmallows, and salt. Stir until the marshmallows are melted. Remove from heat and stir in vanilla extract if using.
-
Add the cereal to the pot and stir until fully coated. If using, stir in the remaining 1/2 cup marshmallows. Allow the mixture to cool slightly (just a minute or two), then gently fold in the mini Reese’s cups. They’ll get deliciously melty.
-
Pour the mixture into the prepared pan. Lightly spritz your hands with cooking spray and gently press the cereal mixture into an even layer. Avoid pressing too hard to keep the bars soft and chewy.
-
In a small microwave-safe bowl, combine chocolate chips and peanut butter. Microwave in 15-second intervals, stirring in between, until melted and smooth. Spread the chocolate-peanut butter mixture evenly over the bars.
-
Chill the bars in the fridge for 30 minutes to set the chocolate. Remove from the fridge, let them come to room temperature for 10-15 minutes, then cut into bars and serve. To cut cleanly, use a sharp knife warmed under hot water and dried off, then make firm slices.
Recipe Notes
Note 2: I prefer milk chocolate for a sweeter topping, but semi-sweet or dark chocolate chips can be used if you prefer a less sweet treat.
Tip: Pay close attention to the caramel base. Don’t overcook the sugar mix, but don’t undercook it either. Too little boiling, and the treats won’t set properly. Too much boiling and they’ll become hard.
Storage: These bars are best enjoyed the same day they’re made. Store in an airtight container at room temperature for up to 2-3 days. For freezing and thawing instructions, refer to the “Storage Solutions” section above in the main post.
Nutrition
Serving Size: 1 bar (out of 12)
- Calories: 611 kcal
- Carbohydrates: 87g
- Protein: 6g
- Fat: 29g
- Saturated Fat: 15g
- Polyunsaturated Fat: 3g
- Monounsaturated Fat: 8g
- Trans Fat: 0.3g
- Cholesterol: 29mg
- Sodium: 205mg
- Potassium: 245mg
- Fiber: 1g
- Sugar: 64g
- Vitamin A: 1120 IU
- Vitamin C: 7mg
- Calcium: 60mg
- Iron: 4mg
Nutrition information is automatically calculated and should only be used as an approximation.
Like this recipe? We’d love to hear your thoughts! Leave a comment below!