
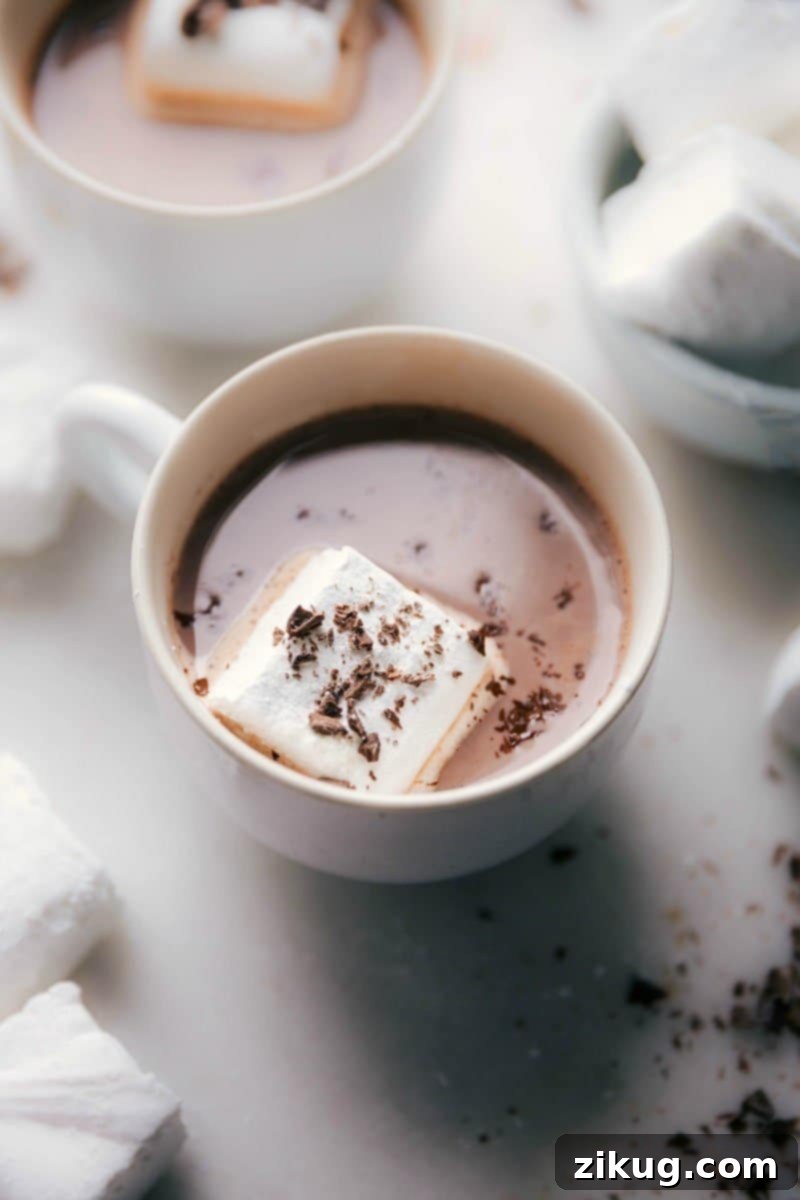
Master the Art of Homemade Marshmallows: Your Guide to Soft, Fluffy Perfection
This Homemade Marshmallow Recipe is your definitive guide to creating irresistibly soft, delightfully sweet, and ultra-fluffy marshmallows with a clean, exquisite vanilla flavor. Forget tough, store-bought varieties; with just a stand mixer and a reliable candy thermometer, you’re on your way to marshmallow bliss. This recipe is surprisingly simple, transforming basic ingredients into a gourmet treat that will elevate your hot chocolate, s’mores, and dessert creations to an entirely new level.

Author’s Culinary Journey
My Quest for the Perfect Homemade Marshmallows!
Growing up, a giant mug of hot chocolate piled high with marshmallows was a childhood dream. The hotter the cocoa, the more marshmallows the better! But my perspective completely shifted during a trip to France, where I experienced authentic sipping chocolate paired with freshly made, homemade marshmallows. It was a revelation. The thick, intensely rich cocoa, combined with a soft, incredibly springy marshmallow that slowly melted into a luxurious, glossy cap – it was truly life-changing. I realized that what I thought were marshmallows were merely a shadow of their potential.
Inspired by this unforgettable experience, I returned home determined to recreate that magic in my own kitchen. It took several rounds of meticulous testing to perfect the syrup consistency and achieve the ideal fluffy stage during whipping. However, once I nailed the technique, my family and I conducted a side-by-side comparison. The honest truth? These homemade marshmallows not only hold their shape beautifully and melt into a creamier consistency but also taste every bit as dreamy as the ones I savored in France. Perhaps even better, because they were crafted with love right in our home. This recipe isn’t just about making a sweet treat; it’s about recreating a moment of pure culinary delight and sharing it with those you love.
Why Make Homemade Marshmallows? The Unrivaled Difference
If you’ve only ever experienced store-bought marshmallows, prepare for a delightful surprise. Homemade marshmallows are a game-changer for several compelling reasons, offering an experience far superior to anything you’ll find pre-packaged:
- Unparalleled Texture: The difference is night and day. Homemade marshmallows are incredibly soft, airy, and wonderfully bouncy – truly cloud-like in consistency. They melt in your mouth, a stark contrast to the often dense, stiff, or rubbery commercial varieties.
- Pure, Vibrant Flavor: Without the need for artificial flavors, preservatives, or stabilizers, homemade marshmallows boast a clean, intense taste. When you use high-quality vanilla bean paste, for instance, that rich, complex vanilla essence truly shines, creating a more sophisticated and satisfying flavor profile.
- Complete Customization: This is where the fun begins! You have absolute control over the flavor, color, and even shape of your marshmallows. Experiment with different extracts (peppermint, orange, coffee), add citrus zests, or incorporate food coloring to create unique seasonal or themed treats that perfectly match your occasion or craving.
- Impressive & Thoughtful Gifting: A beautifully packaged batch of homemade marshmallows makes an exquisite, personal, and utterly memorable gift. Whether for holidays, birthdays, or as a thoughtful hostess present, they convey care and culinary skill that store-bought items simply cannot.
- Elevated Hot Beverages & Desserts: Drop these beauties into your hot chocolate or coffee, and watch them transform the drink. They melt into a luxurious, creamy, vanilla-infused cap that no ordinary marshmallow can replicate. For s’mores, they achieve an epic gooeyness, and in Rice Krispies Treats, they create an incredibly soft and chewy texture that will have everyone asking for more.
- Surprisingly Easy & Rewarding: While the idea of making marshmallows from scratch might seem daunting, with the right tools and a clear, step-by-step guide like this one, it’s a surprisingly straightforward process. The satisfaction of creating such a gourmet treat in your own kitchen is immense, and the reactions from friends and family are priceless.
Key Ingredients for Heavenly Homemade Marshmallows
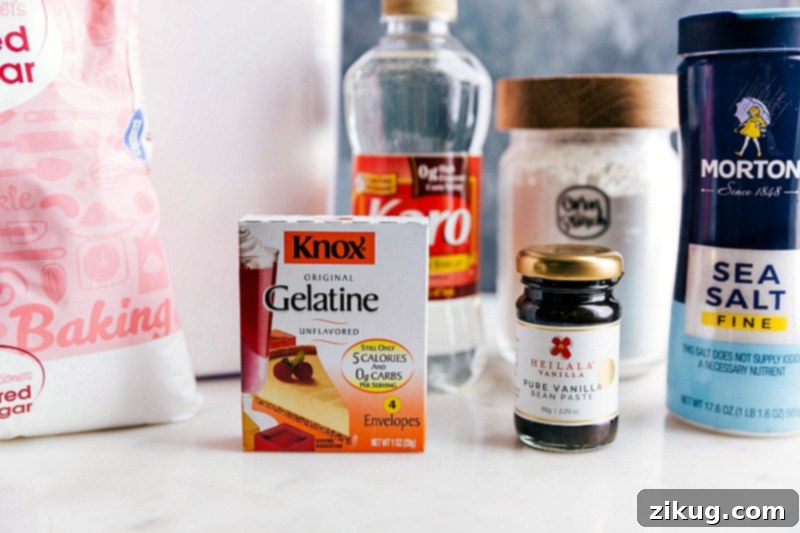
Crafting the perfect marshmallow requires a few simple yet essential ingredients. Each plays a vital role in achieving that signature fluffy texture and delectable flavor. Here’s a detailed look at what you’ll need and some helpful tips for each, ensuring you understand the purpose behind every component:
| Ingredient | Role & Expert Tips for Best Results |
|---|---|
| Gelatin (Unflavored Powdered) | This is the structural backbone of your marshmallows, responsible for their characteristic bounce, chew, and overall stability. For optimal results, use plain, unflavored powdered gelatin. If you plan to use gelatin sheets, ensure you hydrate them precisely according to the specific brand’s instructions, as rehydrating methods and quantities can vary significantly. Please note that this recipe is specifically designed for conventional gelatin, and achieving similar results with vegan alternatives would require a completely different recipe and approach. |
| Granulated Sugar | Beyond providing sweetness, sugar plays a crucial role in the marshmallow’s texture and contributes to its shelf stability. While superfine sugar dissolves a bit faster and can create a slightly smoother syrup, regular granulated sugar works perfectly well and is readily available in most kitchens. The key is to ensure it is fully dissolved in the syrup mixture before the boiling process begins to prevent a grainy texture. |
| Light Corn Syrup | This is a truly crucial ingredient. Light corn syrup acts as an invert sugar, meaning it actively prevents sugar crystallization, which is the nemesis of smooth, tender marshmallows. Without it, your marshmallows could become grainy, crumbly, or too hard. While some recipes might suggest glucose or honey as alternatives, I strongly advise against substitutions for this recipe as they can significantly alter the final texture, sweetness, and overall success of your marshmallows. |
| Salt (Fine Sea Salt) | A small but mighty ingredient! A pinch of fine sea salt might seem counterintuitive in a sweet treat, but it acts as a powerful flavor enhancer. It brilliantly balances the intense sweetness of the sugar and helps to bring out the nuanced vanilla notes, creating a more complex and satisfying taste. Fine sea salt is preferred because its small granules dissolve easily and mix in seamlessly, ensuring no gritty residue. |
| Vanilla Bean Paste | For an unparalleled, pure vanilla flavor experience complete with those visually appealing, charming little specks, vanilla bean paste is my absolute top recommendation. It imparts a richer, more profound, and more complex vanilla essence than standard extract. However, if vanilla bean paste isn’t readily accessible, a high-quality vanilla extract is a perfectly acceptable substitute; just be sure to use a good brand for the best flavor. |
| Coconut Extract | This ingredient is my unique signature twist. The coconut extract adds a subtle, fragrant, and exotic depth that beautifully complements the vanilla sweetness without ever overpowering it. It gives the marshmallows a wonderfully unique character. If coconut isn’t to your liking, or if you prefer a classic, pure vanilla experience, you can simply omit it and add an additional teaspoon of vanilla bean paste or extract instead. |
| Powdered Sugar & Cornstarch (for dusting) | This powdered duo is absolutely essential for coating the finished marshmallows. Their primary function is to prevent the marshmallows from sticking to each other, to your hands, and to the pan. It’s crucial to sift them together thoroughly before use to ensure a smooth, lump-free coating. Apply just enough to create a light, even dusting; using too much can make the marshmallows overly sweet or give them a powdery texture. |
The Science Behind the Bloom: Gelatin and Syrup Preparation
Essential Tools for Perfect Homemade Marshmallows
Having the right equipment is not just a convenience; it’s a critical component for success when making marshmallows. These specific tools simplify the process, enhance safety, and are key to ensuring a consistent, professional-quality result that lives up to your expectations:
- Candy Thermometer: This tool is absolutely non-negotiable for marshmallow making. Precision in temperature control is paramount for the sugar syrup to reach the exact “soft ball stage” (240°F or 115°C). Without a reliable thermometer, you are left guessing, and that’s the easiest way to end up with marshmallows that are either too runny to set properly or too hard and brittle. Always ensure the thermometer’s tip is fully submerged in the syrup but critically, does not touch the bottom of the pot, which can lead to an inaccurate reading.
- Stand Mixer with Whisk Attachment: A powerful stand mixer is not just recommended, it’s an absolute essential. The marshmallow mixture needs to be whipped at a high speed for a significant duration (typically 10-15 minutes, sometimes longer) to incorporate sufficient air and develop its signature fluffy, voluminous texture. A hand mixer, even a heavy-duty one, simply won’t have the sustained power or endurance required for this task, and you risk burning out the motor – a costly lesson I learned from personal experience! The whisk attachment is specifically designed to create that light, airy, and stable foam.
- 8×8-inch Baking Pan: For achieving wonderfully thick, generously sized marshmallows that have that satisfying bite, an 8×8-inch pan is the ideal choice. Using a larger pan will result in thinner marshmallows, which, while still delicious, won’t have the same plushness. Conversely, a significantly smaller pan might cause the mixture to overflow during spreading.
- Parchment Paper: Do not, under any circumstances, skip this vital step! Lining your baking pan completely with parchment paper is absolutely critical for easily removing the incredibly sticky marshmallow slab once it has fully set. Without it, you will face an incredibly challenging, messy, and potentially frustrating extraction process, possibly damaging your perfectly made marshmallows.
- Medium, Heavy-Bottomed Pot: This type of pot is crucial for cooking the sugar syrup evenly. A heavy bottom helps distribute heat consistently, preventing the sugar from scorching or burning in spots, which could impart an unpleasant flavor to your marshmallows.
- Spatula (Rubber or Silicone): A sturdy spatula is indispensable for scraping the thick, sticky marshmallow mixture from the mixer bowl into the prepared pan and for smoothing out the top. A flexible, heat-resistant spatula works best.
Quick Tip for Batch Size
The marshmallow mixture expands significantly and remarkably as it whips, almost tripling in volume. Attempting to double this recipe in a single batch can easily overwhelm most stand mixers, leading to an unsightly and sticky overflow. For this reason, if you need a larger quantity of marshmallows, it is always best and safest to prepare multiple, separate batches. Prioritize quality and successful execution over trying to rush the process!
Step-by-Step Guide: How To Make Homemade Marshmallows
Making homemade marshmallows is a process that’s both fun and incredibly rewarding. Each step is important for achieving that perfect, fluffy consistency. Follow these detailed instructions carefully for the best results:
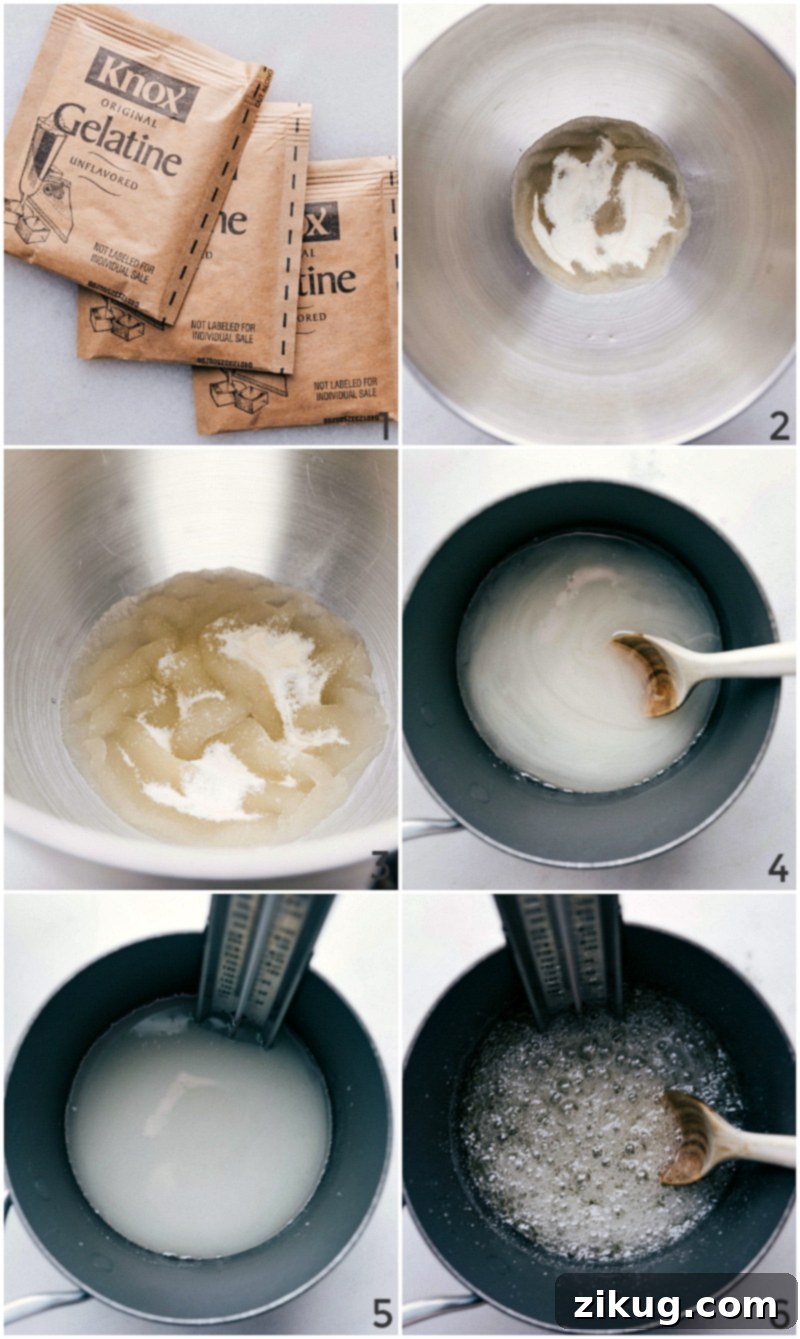
- 1. Prepare Gelatin (Bloom): Begin by pouring 1/2 cup of cold water into the clean bowl of your stand mixer. Ensure the mixer is fitted with the whisk attachment. Evenly sprinkle the contents of the three (1/4-ounce) packets of unflavored powdered gelatin over the surface of the cold water. This crucial initial step, known as “blooming,” allows the gelatin granules to fully soften and absorb the water, which is essential for a smooth, lump-free texture later. Let the gelatin sit undisturbed for at least 5-10 minutes while you proceed with preparing the sugar syrup.
- 2. Cook the Sugar Syrup to Perfection: In a medium-sized, heavy-bottomed pot, combine the granulated sugar, light corn syrup, another 1/2 cup of cold water, and the fine sea salt. Stir the mixture gently, just enough to moisten all of the sugar. Once moist, avoid any further stirring to prevent crystallization. Place the pot over high heat and bring the mixture to a vigorous, rolling boil. Immediately insert your candy thermometer, making sure its tip is fully submerged in the syrup but crucially, does not touch the bottom of the pot (as this will give an inaccurate temperature reading). Continue to cook the sugar syrup precisely to 240°F (115°C). This temperature signifies the “soft ball stage,” which is absolutely vital for the marshmallow’s final structural integrity and chewy-yet-soft texture.
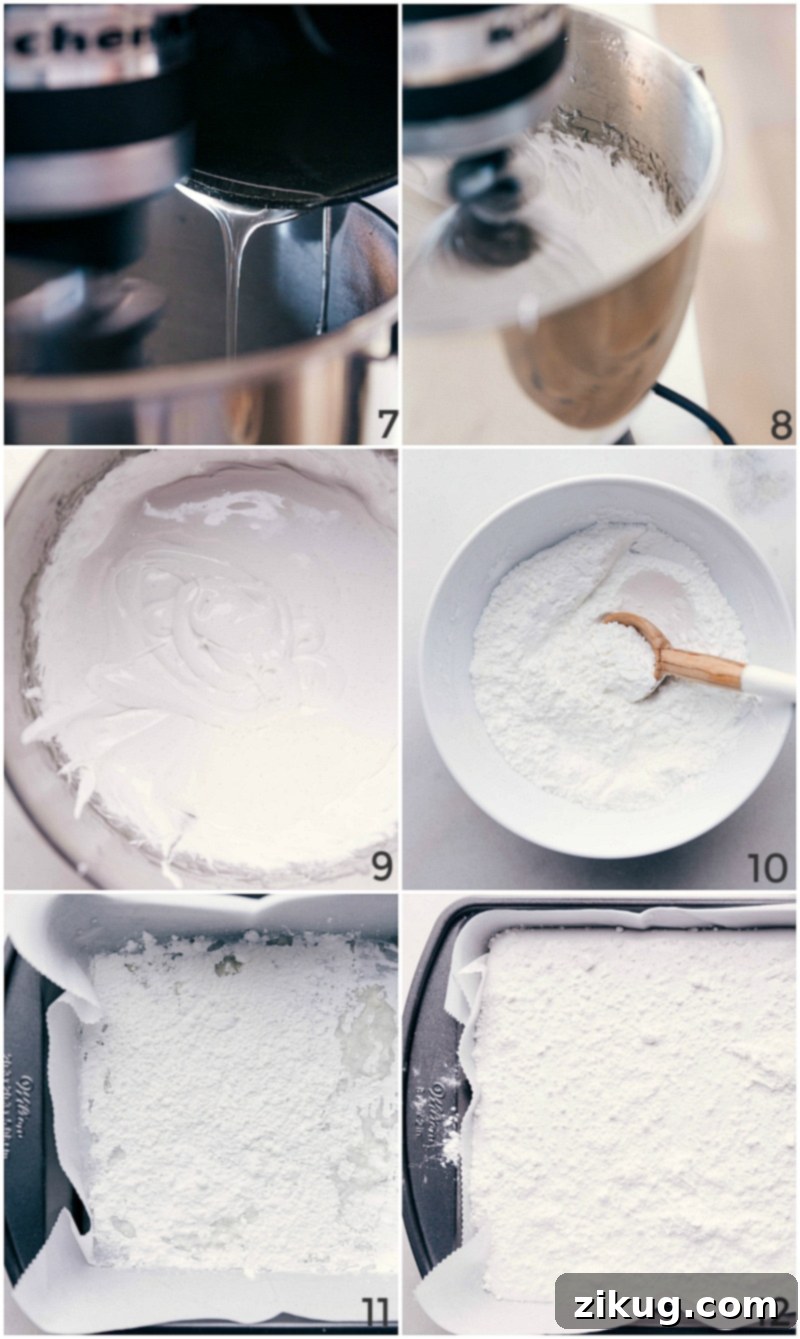
- 3. Whip the Mixture to Fluffy Perfection: As soon as the sugar syrup reaches exactly 240°F, immediately remove the pot from the heat. Without delay, turn your stand mixer on to high speed. With the mixer running, carefully and slowly stream the hot sugar mixture into the softened gelatin mixture in the bowl. It’s important to aim the stream along the interior sides of the bowl to avoid splashing and to ensure even incorporation with the gelatin. Once all the hot syrup has been added, continue whipping the mixture on high speed for approximately 10–15 minutes. During this prolonged whipping, the mixture will undergo a remarkable transformation: it will change from a milky white liquid into a very thick, glossy, incredibly voluminous, and perfectly fluffy mass that is cool to the touch. This extensive whipping process incorporates the necessary air, creating the marshmallow’s characteristic light volume and irresistible bounce.
- 4. Infuse with Flavor: In the final minute or so of the whipping process, add the vanilla bean paste and, if you are using it, the coconut extract. Continue to whip for just a few more seconds to ensure these delicate flavors are evenly and thoroughly distributed throughout the fluffy marshmallow mixture without being diminished by excessive heat.
- 5. Prepare the Baking Pan for Setting: While the marshmallow mixture is undergoing its final whipping, quickly prepare your 8×8-inch baking pan. In a separate small bowl, sift together the 1/2 cup cornstarch and 1/2 cup powdered sugar; this will be your non-stick coating. Line the bottom and all sides of the baking pan completely with parchment paper, leaving a generous overhang on two opposite sides to create convenient “handles” for easy removal later. Lightly but thoroughly grease the parchment paper with 1 to 3 teaspoons of vegetable oil (this extra step significantly aids in preventing sticking when you lift out the slab). Then, generously sprinkle a few tablespoons of the sifted cornstarch-powdered sugar mixture evenly over the oiled parchment paper. This dual coating is absolutely crucial for a clean, non-stick release.
- 6. Pour, Smooth, and Set: When the marshmallow mixture has achieved its ideal thick, fluffy, and cooled state, swiftly scrape it into the prepared baking pan. Be prepared – the mixture will be extremely sticky! To help smooth out the top surface, lightly dip a spatula in water and gently spread the marshmallow mixture evenly. Dust the entire surface of the marshmallow mixture in the pan with another few generous tablespoons of the cornstarch-powdered sugar blend (you will have some remaining for later). This final dusting ensures the top layer doesn’t stick to anything. Tightly wrap the pan with plastic wrap, ensuring all parts of the marshmallow are completely covered and sealed. Let the marshmallows sit undisturbed at room temperature overnight (a minimum of 8-12 hours) to allow them to fully set and firm up. Do not be tempted to refrigerate them, as the cold, damp environment can negatively affect their texture.
- 7. Cut and Coat for Presentation: The next day, your marshmallow slab should be wonderfully firm and ready for cutting. If necessary, run a thin paring knife along any exposed sides of the pan to gently loosen the edges. Using the parchment paper overhangs, carefully lift the entire marshmallow slab out of the pan and invert it onto a clean cutting board. Gently peel off the parchment paper. For the cleanest, most precise cuts, use a very sharp, large knife (a chef’s knife or a heavy-duty utility knife works best). Dip the knife in hot water and thoroughly wipe it clean and dry before each and every cut; this crucial step prevents the sticky marshmallow from adhering to the blade. Cut the marshmallow into uniform cubes, typically about 1-1/2 inches square (this recipe should yield approximately 25 jumbo marshmallows). Finally, toss each individual marshmallow cube in the remaining cornstarch-powdered sugar mixture until all sides are thoroughly and evenly coated. This final coating is essential to prevent them from sticking together during storage and handling.
Creative Ways to Package & Present Homemade Marshmallows
Homemade marshmallows are not only a delicious treat but also a fantastic canvas for creative presentation. They make exceptional gifts and can be beautifully packaged in various ways to impress any recipient:
- For an ultra-indulgent and decadent treat, dip individual marshmallows entirely in melted chocolate (dark, milk, or even white chocolate works beautifully). Before the chocolate has a chance to set, you can get creative by adding sprinkles, a dusting of crushed peppermint candy, toasted coconut flakes, finely chopped nuts, or even a drizzle of contrasting chocolate for extra flair and an appealing visual.
- For elegant and sophisticated gifting, place a few homemade marshmallows into charming mini muffin liners or small decorative paper cups. Then, arrange these in a small, sturdy gift box, wrap the entire box in clear cellophane, and tie it securely with a festive ribbon or a rustic bow. This presentation not only protects the delicate marshmallows but also makes them look professionally crafted and incredibly inviting.
- Create a delightful and cozy hot chocolate gift kit! Package a generous handful of your freshly made homemade marshmallows in a decorative zip-top bag or a clear food-safe pouch. Pair them with a few packets of gourmet hot chocolate mix. To complete this charming gift, attach a sweet and charming free printable gift tag with a heartfelt message. This makes for a perfect holiday gift, a thoughtful appreciation gesture, or a delightful treat for any cozy occasion.
- Consider layering different flavored marshmallows in a clear jar, creating a beautiful edible display that’s both decorative and delicious.
Storage Tips for Optimal Freshness
To ensure your homemade marshmallows remain wonderfully soft, fluffy, and delicious for as long as possible, proper storage is absolutely crucial. Following these guidelines will help preserve their quality and extend their shelf life:
- After meticulously coating the cut marshmallows thoroughly with the cornstarch and powdered sugar mixture (this step is vital to prevent them from sticking together), store them in an airtight container. Keep this container at room temperature, away from direct sunlight, excessive heat, or humidity.
- It is very important to avoid refrigeration. The cool, damp environment inside a refrigerator can cause marshmallows to become stiff, lose their delicate texture, and turn excessively sticky due to moisture absorption.
- When stored correctly, this homemade marshmallow recipe can maintain its exceptional quality and freshness for up to 3 weeks. For slightly longer storage, potentially up to a month, ensure they are impeccably coated and stored in a truly airtight container to minimize air exposure.
- If, over time, your marshmallows begin to feel a bit moist, tacky, or sticky on the surface, simply give them another light and gentle toss in a small amount of the cornstarch and powdered sugar mix. This will refresh their coating and restore their non-stick quality.
- For best flavor and texture, aim to consume them within the recommended timeframe.
Explore More Delicious Homemade Treats:
If you’ve enjoyed crafting these homemade marshmallows, you’ll love these other delightful recipes perfect for any sweet tooth!
Desserts
Scotcheroos Recipe
Desserts
Carmelitas (My Favorite Dessert!)
Desserts
Honeycomb Candy
Desserts
Homemade Toffee
Pin Recipe
Print Recipe
★
★
★
★
Homemade Marshmallows
Chelsea Lords
35
1
1
35
25
jumbo marshmallows
Equipment
-
Stand mixer
with whisk attachment -
Medium, heavy-bottomed pot
-
8 x 8-inch baking pan
-
Parchment paper
-
Candy thermometer
Ingredients
-
3
(1/4-ounce) packets
unflavored powdered gelatin
(approximately 6 and 3/4 teaspoons) -
1/2
cup
cold water
-
1-2/3
cups
granulated sugar
(superfine dissolves faster, but regular granulated sugar works perfectly) -
1
cup
light corn syrup -
1/2
cup
cold water -
1/2
teaspoon
fine sea salt
-
2
teaspoons
vanilla bean paste
-
1
teaspoon
coconut extract
(or an additional 1 teaspoon vanilla bean paste for pure vanilla) -
1/2
cup
cornstarch -
1/2
cup
powdered sugar -
1 to 3
teaspoons
vegetable oil
Instructions
-
1. Bloom the Gelatin: Pour 1/2 cup cold water into the bowl of a stand mixer fitted with a whisk attachment. Evenly sprinkle the three (1/4-ounce) packets of unflavored powdered gelatin over the water. Allow the gelatin to bloom (soften and absorb water) for 5-10 minutes while you prepare the syrup. This step is vital for ensuring a smooth marshmallow texture.
-
2. Cook the Sugar Syrup: In a small, heavy-bottomed pot, combine the granulated sugar, light corn syrup, another 1/2 cup cold water, and salt. Stir gently just enough to moisten the sugar. Without stirring further (this prevents crystallization), bring the mixture to a rolling boil over high heat. Insert a candy thermometer, ensuring its tip is fully submerged in the syrup but doesn’t touch the bottom of the pot. Cook the sugar syrup precisely to 240°F (115°C), which is the “soft ball stage.” This temperature is critical for the marshmallow’s final texture and ability to set.
-
3. Whip the Marshmallow Mixture: As soon as the syrup reaches 240°F, immediately remove the pot from heat. Turn your stand mixer to high speed. Carefully and slowly stream the hot sugar mixture into the softened gelatin along the side of the bowl. Avoid pouring directly onto the whisk to prevent splashing and ensure even mixing. Once all the syrup is added, continue whipping on high for 10–15 minutes until the mixture is very thick, glossy, fluffy, and cool to the touch. It will increase significantly in volume and transform into a cloud-like consistency.
-
4. Add Flavorings: During the last minute of whipping, add the vanilla bean paste and coconut extract (if using). Continue to whip for a final few seconds to ensure even distribution of the delicate flavors.
-
5. Prepare the Pan: While the marshmallow mixture is whipping, sift together the 1/2 cup cornstarch and 1/2 cup powdered sugar in a small bowl. Line an 8×8-inch baking pan with parchment paper, leaving an overhang on two sides for easy removal. Lightly rub the parchment paper with 1 to 3 teaspoons of vegetable oil, then sprinkle a few tablespoons of the cornstarch-powdered sugar mixture evenly across the bottom and sides. This dual coating is crucial for a non-stick release.
-
6. Pour and Set: When the marshmallow mixture has thickened, become fluffy, and is cool, quickly scrape it into the prepared baking pan. The mixture will be extremely sticky, so using a spatula lightly dipped in water can help smooth the top evenly. Dust the entire surface of the marshmallow mixture in the pan with another few tablespoons of the cornstarch-powdered sugar blend (you won’t use all of it yet). Tightly wrap the pan with plastic wrap, ensuring all parts of the marshmallow are completely covered and sealed. Let it sit undisturbed at room temperature overnight (at least 8-12 hours) to fully set. Do not refrigerate, as this can affect the delicate texture.
-
7. Cut and Coat: The next day, your marshmallow slab should be firm and ready. Run a thin paring knife along any exposed sides of the baking pan to loosen it, if necessary. Using the parchment paper overhangs, carefully lift the entire marshmallow slab out onto a clean cutting board. Gently peel off the parchment paper. For clean, precise cuts, use a sharp, large knife (a chef’s knife or a utility knife works best). Dip the knife in hot water and thoroughly wipe it clean and dry before each cut; this prevents sticking. Cut the marshmallow into cubes, approximately 1-1/2 inches square (yielding about 25 jumbo marshmallows). Toss each individual marshmallow cube in the remaining cornstarch-powdered sugar mixture until all sides are thoroughly coated to prevent them from sticking together during storage.
Recipe Notes & Troubleshooting
Storage: Homemade marshmallows can be stored in an airtight container at room temperature for up to 3 weeks, or even up to 1 month if well-coated and sealed. Keep them in a cool, dry place away from direct sunlight and excessive humidity. Do not refrigerate, as this can make them stiff and sticky. If they feel a bit moist over time, give them another light toss in the cornstarch/powdered sugar mix.
Why didn’t my marshmallows set? The most common reasons are incorrect syrup temperature (not reaching the full 240°F) or not whipping the mixture long enough to incorporate enough air and cool it down. A reliable candy thermometer is absolutely crucial! Also, ensure your gelatin is fresh and was bloomed correctly in cold water.
My marshmallows are too sticky! This often happens if they weren’t fully set overnight for the recommended duration, or if they weren’t thoroughly and evenly coated with the cornstarch/powdered sugar mixture. Make sure they sit for the full 8-12 hours, and don’t hesitate to re-coat them if they become sticky. High humidity in your kitchen can also be a contributing factor.
Can I use unflavored gelatin sheets instead of powder? Yes, you can. However, you’ll need to rehydrate them according to their specific package directions, which typically involves soaking them in cold water and squeezing out excess liquid before adding them to the mixer bowl. The exact quantity might also differ slightly from powdered gelatin, so consult your gelatin sheet packaging.
Nutrition Information (Approximate)
Serving:
1
jumbo marshmallow
|
Calories:
92
kcal
|
Carbohydrates:
23.2
g
|
Protein:
0.2
g
|
Fat:
0.2
g
|
Sodium:
9.4
mg
|
Sugar:
20.8
g
Nutrition information is automatically calculated and should only be used as an approximation. Actual values may vary significantly based on ingredients, brands, and preparation methods.
Love this recipe? Leave a comment below!
Your feedback helps me create more delicious content and improve for you.
Delightful Ways to Enjoy Your Homemade Marshmallows
Once you’ve made a batch of these glorious homemade marshmallows, the possibilities for enjoyment are endless. Their superior texture and flavor will elevate almost any sweet experience:
- Elevate Your Hot Chocolate: This is arguably their finest calling and my personal favorite. Drop a few into a steaming mug of hot chocolate (or even your morning coffee or espresso!) and watch them slowly melt into a rich, creamy, vanilla-infused cloud. The luxurious texture and flavor they impart are simply unmatched by anything store-bought.
- Gourmet S’mores: Transform your traditional campfire classic into a truly gourmet experience. While homemade marshmallows toast a bit differently than commercial ones (they tend to brown faster due to fewer additives), they offer an incredible depth of flavor and achieve a wonderfully gooey, stretchy center for the ultimate s’mores sensation. Be mindful of their faster toasting time.
- The Best Rice Krispies Treats: For an unbelievably soft, chewy, and exquisitely flavorful batch of Rice Krispies Treats, ditch the store-bought bags and use your homemade marshmallows! You’ll typically need about 16 ounces (approximately half of this recipe’s yield) to make a standard 9×13 inch pan. The improved texture and pure vanilla flavor are truly a revelation that will impress everyone.
- Stunning Dessert Garnish: Use these beautiful, fluffy cubes as a sophisticated and delicious garnish for a variety of desserts. They look stunning floating atop pies, puddings, fruit salads, custards, or even a simple bowl of ice cream.
- Marshmallow Fondue Fun: Arrange them alongside melted chocolate, warm caramel sauce, or fruit dips for a fun, interactive dessert experience. Provide various dippers like fresh fruit, cookies, or pretzels for a playful treat.
- Unique Baking Inclusions: Chop them into smaller pieces and fold them into cookie dough, brownie batter, or even use them to top sweet potato casserole for a delightful, unexpected texture and flavor.
Creative Variations to Customize Your Marshmallows
Switch Up This Homemade Marshmallow Recipe
While the classic vanilla flavor is always a timeless hit, one of the greatest joys of making homemade marshmallows is the freedom to experiment and customize them with a myriad of different flavors and colors. Here are some fantastic ideas to get you started:
- Intense Vanilla Experience: For an even stronger, more aromatic vanilla profile that truly stands out, consider increasing the vanilla bean paste to a full 1 tablespoon. Those delightful little specks of vanilla bean will be even more pronounced, enhancing both the exquisite flavor and the visual appeal. Alternatively, you can swap with 1 ½ teaspoons of high-quality vanilla paste or an entire tablespoon of premium vanilla extract for a robust vanilla kick.
- Festive Peppermint Twist: Perfect for the holiday season or any festive gathering! Replace both the vanilla bean paste and the coconut extract with 1 ½ teaspoons each of pure vanilla extract and pure peppermint extract. For an extra festive touch, add a few drops of red food coloring (gel food coloring works best) during the last minute of whipping. This allows you to create beautiful swirled pink and white marshmallows or a solid pastel pink hue.
- Zesty Orange-Chocolate Delight: For a sophisticated and incredibly delicious flavor pairing, finely grate the zest of one orange and incorporate it into your powdered sugar and cornstarch coating mixture. During the final minute of whipping the marshmallow, add 1 teaspoon of orange extract instead of the coconut extract. Once the marshmallows are fully set and cut into cubes, consider dipping them halfway into melted dark chocolate for a truly elegant and irresistible treat that combines bright citrus with rich cocoa.
- Rich Coffee or Espresso Infusion: For coffee lovers, infuse your marshmallows with a rich and aromatic coffee flavor. Add 1-2 teaspoons of high-quality instant espresso powder (ensure it’s dissolved in a tiny bit of hot water first) or use a concentrated coffee extract along with the vanilla during the last minute of whipping. These are fantastic in coffee or as a topping for tiramisu-inspired desserts.
- Bright Lemon or Lime Zest: For a wonderfully bright and tangy marshmallow, use 1-2 teaspoons of pure lemon or lime extract in place of the coconut extract. You can also incorporate a tablespoon of fresh citrus zest directly into the powdered sugar and cornstarch coating mixture for an extra burst of fresh, vibrant flavor.
- Cinnamon Swirl: After pouring the marshmallow mixture into the pan but before the final dusting, sprinkle a light layer of cinnamon sugar over the top. Use a skewer or knife to gently swirl it through the top layer for a beautiful marbled effect and a warming spice flavor.