
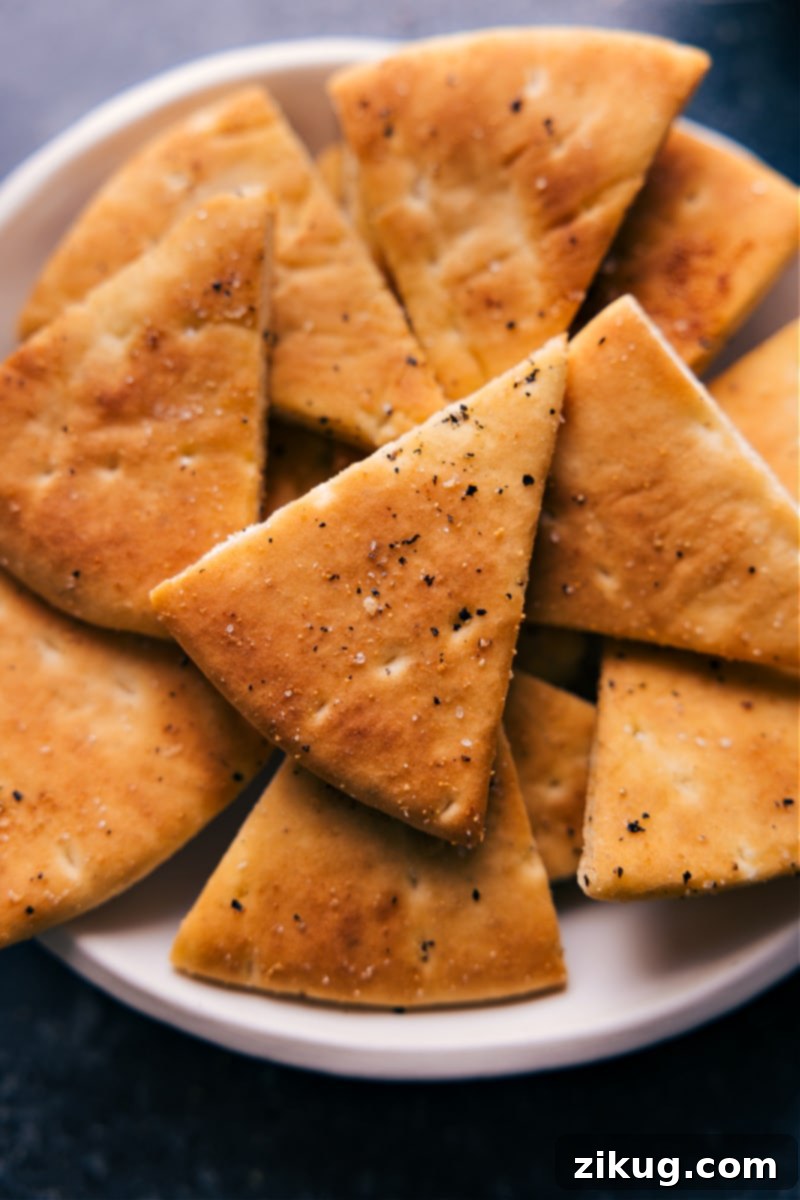
Homemade **Pita Chips** offer a delightful crunch and versatility, making them an indispensable snack for dipping into your favorite spreads or as a delicious component of a vibrant Mediterranean feast. This comprehensive guide will show you how to prepare perfectly thick, crunchy, or delightfully thin and crispy pita chips right in your own kitchen, effortlessly outshining store-bought alternatives.
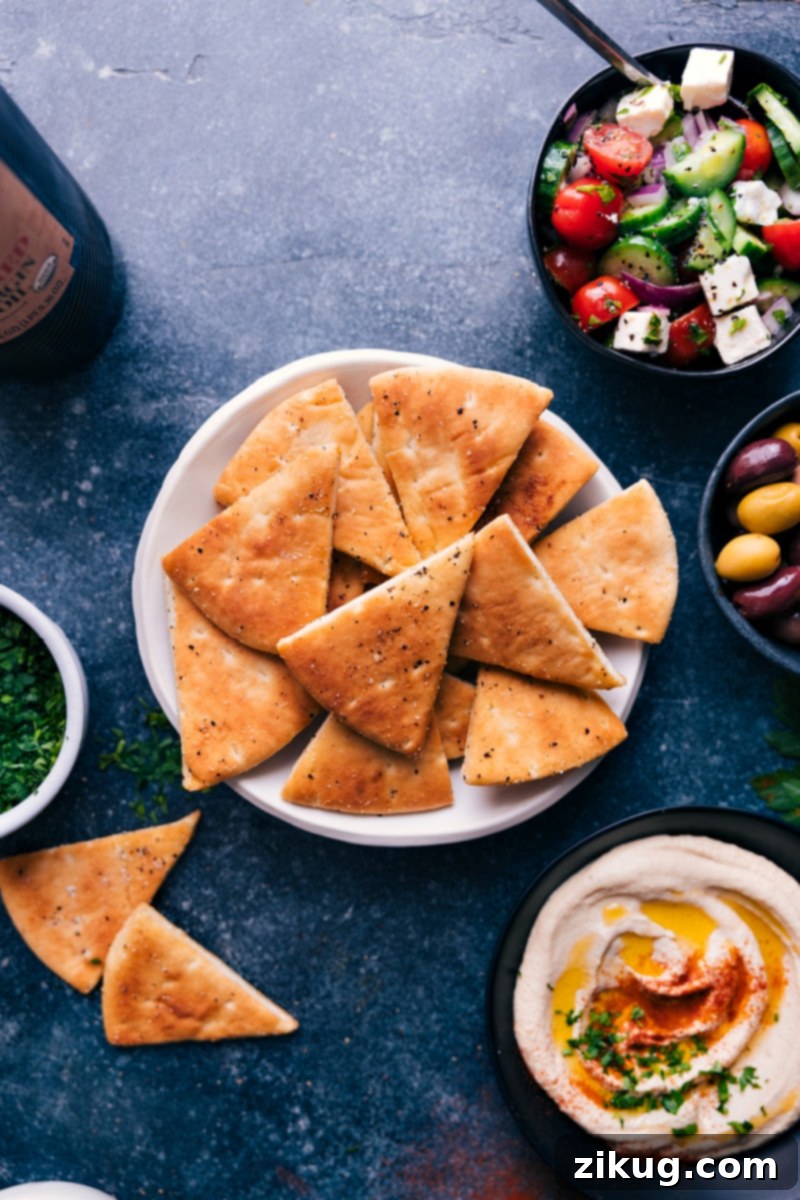

Author’s Note
Why Homemade Pita Chips Are Truly Superior
Like many, I used to rely on pre-packaged pita chips for my snack cravings. Stacy’s Pita Chips were a pantry staple, enjoyed for their consistent crunch and convenience. However, a culinary revelation occurred when I first ventured into making pita chips from scratch. The difference was astonishing, transforming a simple snack into an experience. Homemade pita chips offer a depth of flavor and a customizable texture that commercial varieties simply can’t match.
This recipe provides the flexibility to create two distinct styles of pita chips, catering to every preference. You can make a thin, irresistibly crispy version that mimics the delicate crunch of store-bought chips, ideal for lighter dips. Alternatively, you can craft thicker, more substantial chips, perfect for robust, chunky dips that require a sturdy scoop. While store-bought options hold a nostalgic place in my heart, these homemade pita chips are genuinely next-level in taste, freshness, and overall satisfaction.
Beyond taste, making pita chips at home allows you to control the ingredients, ensuring a healthier and fresher snack. You can choose high-quality olive oil, adjust the salt content to your liking, and experiment with various seasonings to complement any meal or dip. This guide is designed to empower you with the knowledge and techniques to achieve perfectly seasoned and gloriously crispy pita chips every single time, whether you prefer baking them in the oven or air frying them to golden perfection.
Essential Ingredients for Perfect Pita Chips
Crafting homemade pita chips requires just a few simple ingredients, but the quality of each plays a crucial role in the final flavor and texture. Here’s what you’ll need:
- Pita Bread: The foundation of your chips. For thinner, crisper chips, opt for pocket pita bread, which can be gently separated into two thinner rounds before cutting. If you prefer a heartier, thicker chip that stands up to weighty dips, traditional Greek-style pita flatbread is ideal. For those mindful of carbs, Joseph’s® flax, oat bran, and whole wheat pita bread offers a lower-carb alternative, though its flavor profile is slightly different.
- Olive Oil: Extra-virgin olive oil is highly recommended for its robust flavor and aromatic qualities, which beautifully infuse the pita bread as it bakes or air fries. It’s not just a cooking medium; it’s a flavor enhancer.
- Salt & Pepper: These foundational seasonings enhance all other flavors. Start with a light sprinkle, as you can always add more once the chips are hot and freshly cooked. Fine sea salt or kosher salt works best for even distribution.
- Garlic Powder: A subtle yet impactful addition, garlic powder provides a savory depth that complements most dips. If garlic isn’t to your taste, feel free to omit it.
- Other Seasonings (Optional): The beauty of homemade pita chips lies in customization. Consider adding other seasonings to match your culinary theme. Popular choices include onion powder, paprika, dried oregano, sumac, za’atar, or a touch of red pepper flakes for a subtle kick. Experiment to discover your favorite flavor combinations!
Perfect Pairings: What to Serve with Homemade Pita Chips
Homemade pita chips are incredibly versatile, serving as the perfect accompaniment to a wide array of dishes and dips. Their satisfying crunch and neutral base make them ideal for enhancing both savory and creamy flavors. Here are some fantastic ideas to elevate your snacking or meal experience:
- Spinach Artichoke Dip: A classic pairing! The creamy, rich texture of a warm spinach artichoke dip is wonderfully balanced by the sturdy crunch of thick pita chips. This combination evokes nostalgic restaurant-style appetizers.
- Hummus: An absolute essential for any Mediterranean spread. Whether it’s a traditional chickpea hummus, a vibrant roasted red pepper hummus, a smoky black bean hummus, or a fresh veggie variety, pita chips are the ultimate vehicle for scooping up this creamy, protein-packed dip.
- Tzatziki Sauce or Whipped Feta: For a refreshing experience, serve your pita chips with cool and tangy tzatziki or a creamy, slightly salty whipped feta. The bright flavors provide a delightful contrast to the savory chips.
- Salsa: Don’t limit pita chips to just Mediterranean flavors! They are surprisingly delicious with fresh, chunky salsas. Try them with a zesty Pico De Gallo or a creamy Avocado Salsa for a delightful Tex-Mex twist.
- Soup Dippers: Transform your soup experience by using pita chips as dippers. Their robust structure holds up well in creamy soups like a warmly spiced Carrot Soup or a comforting Sweet Potato Coconut Curry Soup, adding a textural element that’s truly delicious.
- Salad Topping or Dip: For a creative twist, cut your pita chips into smaller squares and use them as crunchy croutons on your favorite salad, such as a refreshing Greek Salad. Alternatively, use larger chips to scoop up spoonfuls of a hearty salad.
- Fried Pickle Dip: An unconventional but incredibly satisfying choice, a tangy fried pickle dip offers a unique flavor adventure when paired with crunchy pita chips.
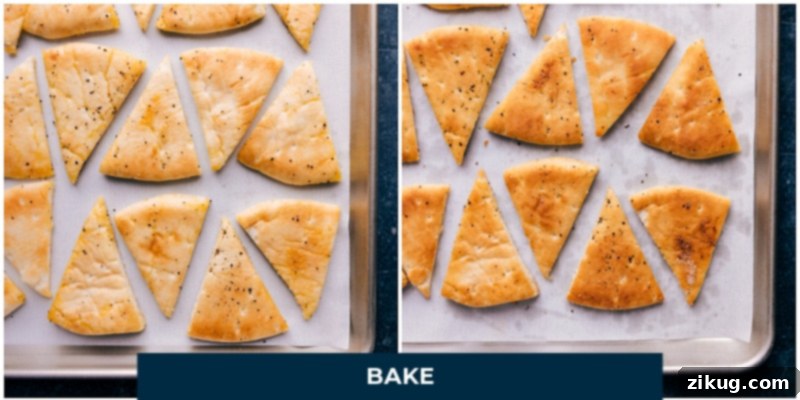
How to Make Homemade Pita Chips: Oven vs. Air Fryer
Making crispy pita chips at home is surprisingly simple, and you have two excellent methods to choose from: baking in the oven or air frying. Both yield fantastic results, but each offers distinct advantages depending on your needs.
The Oven Method: Ideal for Batches
Baking pita chips in a conventional oven is a reliable way to achieve consistent crispiness, especially when you need to prepare a larger quantity for gatherings. The oven provides ample space, allowing you to cook multiple pita breads at once without overcrowding.
- **Pros:** Great for large batches, even cooking, familiar process.
- **Cons:** Requires preheating time, might take slightly longer overall.
The Air Fryer Method: Quick & Unbeatable Crunch
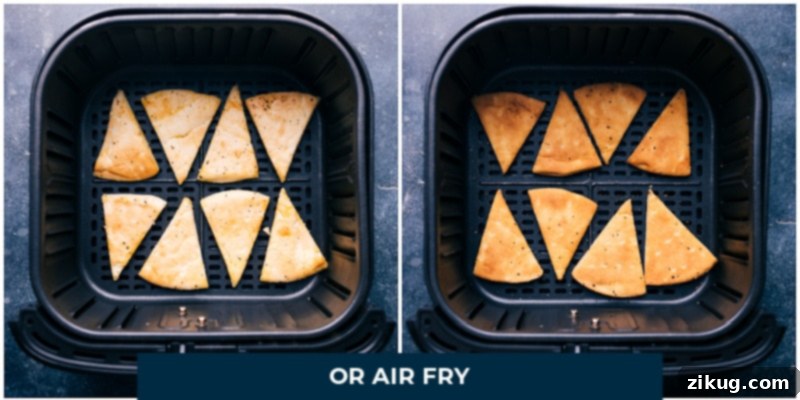
For an unparalleled texture and faster cooking time, the air fryer is truly a game-changer. Air-fried pita chips often come out with an incredibly satisfying crunch that’s hard to beat. Plus, the convenience of not waiting for an oven to preheat makes it a go-to for quick snacks.
- **Pros:** Faster cooking, no preheating needed, produces an extra-crispy texture.
- **Cons:** Limited capacity, requiring multiple batches for larger quantities.
Quick Tip: Air Fryer Considerations
If you’re new to air frying, it’s worth exploring its potential. Air fryers can vary significantly between brands and models, so the exact cooking times might need slight adjustments. It’s always a good idea to test a single pita chip after the minimum recommended time and then add more time as needed until your desired level of crispiness is achieved. This ensures perfect results tailored to your specific appliance.
Optimal Storage for Crunchy Pita Chips
The key to maintaining the irresistible crunch of your homemade pita chips is to protect them from moisture. Moisture is the enemy of crispiness and can lead to quick spoilage. Follow these storage tips to keep your chips fresh and delicious:
- Cool Completely: Before storing, ensure your pita chips have cooled down entirely to room temperature. Any residual warmth can create condensation within the storage container, leading to sogginess.
- Airtight Container: Transfer the cooled chips to an airtight container or a heavy-duty, sealable bag. Remove as much air as possible from the bag before sealing. This barrier protects them from ambient humidity.
- Room Temperature Storage: Store the chips in a cool, dark, and dry place, such as a pantry or cupboard. Avoid the refrigerator, as the cold, moist environment will quickly diminish their crispness and can even encourage molding.
- Freezing for Longer Storage: For extended freshness, pita chips can be frozen for 4-6 weeks. Place them in a freezer-safe airtight container or bag. When ready to enjoy, thaw them at room temperature. Frozen pita chips will likely lose some of their initial crispness after thawing, so a quick re-crisping in the oven (at 300°F/150°C for 5-7 minutes) or air fryer (at 300°F/150°C for 2-3 minutes) is recommended to restore their texture.
- Re-Crisping Stale Chips: If your chips do lose their crunch over time, don’t despair! A brief stint in a preheated oven or air fryer can often revive them. Spread them in a single layer and bake at 300°F (150°C) for 5-10 minutes or air fry at 300°F (150°C) for 2-5 minutes, watching them closely to prevent burning.
Craft the Ultimate Mediterranean Spread
Homemade pita chips are the cornerstone of any authentic and satisfying Mediterranean spread. Pair them with these delectable recipes to create a feast of flavors and textures that will impress your guests and delight your palate.
Salads
Tabouli (Tabbouleh) – A Refreshing Herb Salad
A vibrant and refreshing salad made with finely chopped parsley, mint, tomatoes, onion, and bulgur, dressed with olive oil and lemon juice. Its fresh flavors are a perfect contrast to crispy pita chips.
Dinner
Air Fryer Falafel – Crispy and Healthy
Enjoy these deliciously crispy falafel, cooked to perfection in an air fryer for a healthier take on the classic. Serve them alongside your pita chips for a hearty and satisfying bite.
Dips & Spreads
Classic Hummus Recipe – Smooth and Rich
No Mediterranean spread is complete without a velvety smooth and flavorful homemade hummus. This essential dip is the perfect partner for your crunchy pita chips.
Sauces
Authentic Tzatziki Sauce Recipe – Cool and Tangy
A cool and creamy Greek yogurt sauce with cucumber, garlic, and dill, tzatziki offers a refreshing counterpoint to the crispy texture of pita chips and other savory components of your spread.
Tips for Achieving Perfectly Crispy Homemade Pita Chips
While making pita chips is straightforward, a few expert tips can elevate your results from good to absolutely outstanding:
- Even Thickness for Even Cooking: When cutting your pita bread, strive for uniform thickness. This ensures that all chips cook at the same rate, preventing some from burning while others remain soft.
- Don’t Skimp on the Oil: Olive oil is crucial for achieving that golden crispiness and rich flavor. Ensure each pita triangle is lightly but thoroughly coated. Using your hands to toss them is often the most effective way to distribute the oil and seasonings evenly.
- Single Layer is Key: Whether you’re baking or air frying, arrange the pita pieces in a single layer without overcrowding the pan or basket. Overlapping chips will steam rather than crisp, resulting in a chewy texture instead of a crunchy one. If necessary, work in batches.
- Watch Closely: Pita chips can go from perfectly golden to burnt in a matter of seconds, especially towards the end of their cooking time. Keep a close eye on them, particularly during the final minutes, and flip them as directed to ensure even browning.
- Cool for Maximum Crispiness: The chips will continue to crisp up as they cool. Don’t be concerned if they feel slightly soft when fresh out of the oven or air fryer. Allow them to cool completely on a wire rack before serving or storing for the best texture.
- Season While Hot: If you plan to add any extra seasonings beyond what’s tossed with the oil, do so immediately after the chips come out of the oven or air fryer. The warmth helps the seasonings adhere better.
Frequently Asked Questions About Homemade Pita Chips
Here are answers to some common questions you might have about making and enjoying your own pita chips:
- Can I make pita chips ahead of time?
- Absolutely! Homemade pita chips are an excellent make-ahead snack or appetizer. Prepare them up to 3-5 days in advance and store them properly in an airtight container at room temperature. For longer storage, you can freeze them for up to a month, though they may require re-crisping after thawing.
- What kind of pita bread is best for pita chips?
- The “best” pita depends on your desired texture. For thin, crispy chips similar to commercial varieties, opt for pocket pita bread and split it into two thin rounds. For sturdier, thicker chips perfect for hearty dips, traditional Greek-style pita flatbreads work wonderfully. Experiment with different brands to find your favorite!
- Can I use other oils instead of olive oil?
- While extra-virgin olive oil is recommended for its flavor, you can certainly use other oils. Avocado oil, grape seed oil, or even a neutral vegetable oil would work. However, these may impart less flavor than olive oil, so you might want to increase your seasoning slightly.
- My pita chips aren’t getting crispy. What am I doing wrong?
- Several factors could be at play. Ensure your oven or air fryer is fully preheated. Crucially, avoid overcrowding the baking sheet or air fryer basket; chips need space for air to circulate and cook evenly. Make sure each piece is adequately coated in oil, and allow them to cool completely after cooking, as they crisp up further as they cool. If they still aren’t crispy, add a few more minutes to the cooking time.
- How can I add more flavor to my pita chips?
- The possibilities are endless! Beyond salt, pepper, and garlic powder, consider a sprinkle of dried oregano and thyme for a Greek-inspired flavor, a pinch of smoked paprika for depth, or a dash of chili powder for a spicy kick. For a savory-sweet option, a sprinkle of cinnamon sugar can be surprisingly delightful with certain fruit dips.
Print Recipe
Pita Chips Recipe (Air Fry or Bake!)
Chelsea Lords
15
10
25
4
cups
Equipment
-
Sheet pan (15″ x 10″) or air fryer
Ingredients
-
4
pitas
(see note 1 for types) -
3
tablespoons
olive oil -
1/2
teaspoon
salt -
1/2
teaspoon
pepper -
1/2
teaspoon
garlic powder
(optional) -
Hummus
(for serving)
Instructions
-
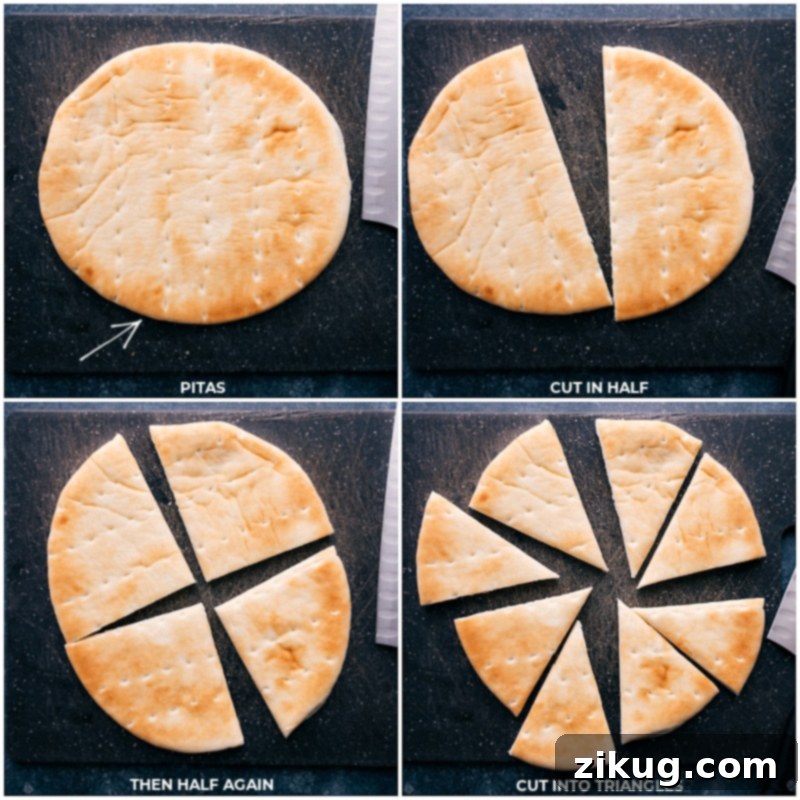
If using the oven, preheat it to 400°F (200°C). Prepare your pita bread: For thick pita chips, cut each pita into 8 triangles by first cutting it in half, then into quarters, and finally into eighths. For thin pita chips, use pocket pitas; gently separate each pita into two thinner rounds, then cut each round into 8 triangles, yielding a total of 16 thinner triangles per pita.
-
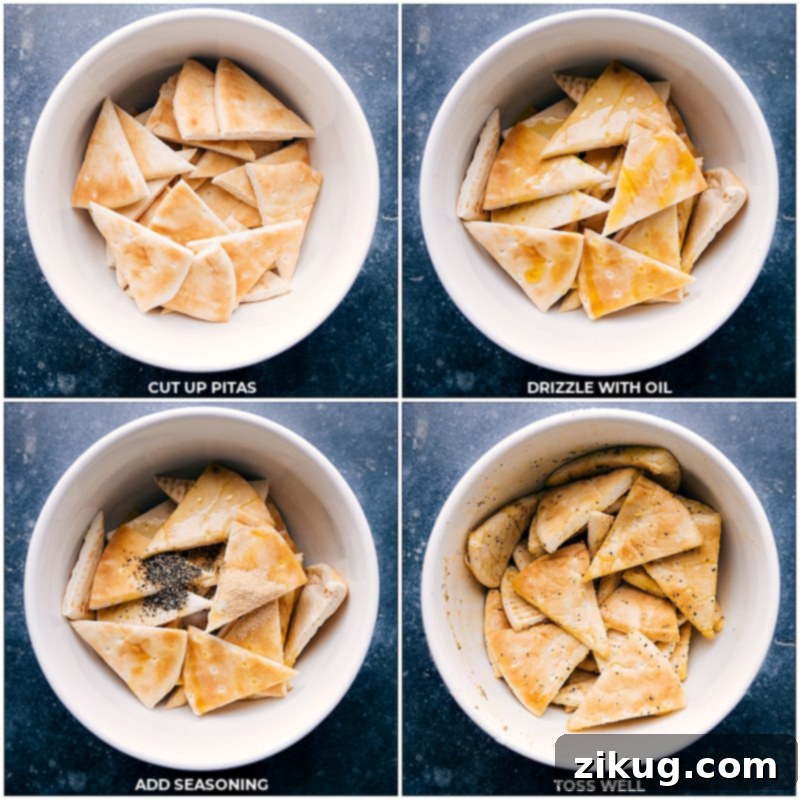
Place the prepared pita triangles in a large bowl. Drizzle generously with olive oil and sprinkle with salt, pepper, and garlic powder (if using). Toss thoroughly to ensure every piece is evenly coated. Using your hands works best for this step to achieve maximum coverage.
-
Baking Method: Line a large baking sheet (approximately 15″ x 10″) with parchment paper or a silicone baking mat. Arrange the seasoned pita triangles in a single, even layer, ensuring no pieces overlap. Bake in the preheated 400°F (200°C) oven:
For Thick Pitas: Bake for 5 minutes, then carefully flip each chip. Continue baking for another 5 minutes, flip again, and bake for an additional 2–4 minutes, or until the chips are golden brown and crisp. Remember, they will become even crisper as they cool.
For Thin Pitas: Bake for 5 minutes, then flip. Continue baking for 3–5 more minutes, or until they reach a desirable golden color and crisp texture. Like the thick chips, they will firm up further upon cooling.
-
Air Fry Method: Place a single layer of pita triangles into the air fryer basket. Avoid overcrowding to ensure proper air circulation and crispiness. Air fry at 320°F (160°C):
For Thick Pitas: Air fry for 5 minutes, then flip the chips. Air fry for an additional 5 minutes, or until they are golden and crispy.
For Thin Pitas: Air fry for 4 minutes, then flip. Continue air frying for 3 more minutes, or until they are light golden and crispy. (Refer to Note 2 for air fryer timing variations.)
-
Once cooked, transfer the pita chips to a wire rack and allow them to cool completely. This cooling period is crucial as it helps them achieve their maximum crispiness. Serve immediately with your favorite sauces or dips – hummus is a personal favorite!
Recipe Notes
Note 2: Cooking times can vary based on the thickness of your pita bread (thick vs. thin) and the specific model and calibration of your oven or air fryer. Always use visual cues like a golden-brown color and a firm, crisp texture as your primary guide. It’s better to slightly undercook and then add more time as needed, as they can burn quickly.
Storage: The key to keeping your pita chips crispy is avoiding moisture. If you reside in a dry climate, your chips will naturally stay crisp for longer. Store them in an airtight container at room temperature. Pita chips can also be frozen for extended storage, but they will likely need to be re-crisped in the oven or air fryer after thawing to regain their ideal texture.
Nutrition Facts
Serving:
1
serving
|
Calories:
249
kcal
|
Carbohydrates:
32
g
|
Protein:
5
g
|
Fat:
11
g
|
Saturated Fat:
2
g
|
Polyunsaturated Fat:
1
g
|
Monounsaturated Fat:
8
g
|
Sodium:
591
mg
|
Potassium:
75
mg
|
Fiber:
1
g
|
Sugar:
0.01
g
|
Vitamin A:
1
IU
|
Vitamin C:
0.01
mg
|
Calcium:
50
mg
|
Iron:
1
mg
Nutrition information is automatically calculated and should only be used as an approximation. Actual values may vary.
Enjoyed this recipe? Share your thoughts below!
Your feedback helps us create more delicious recipes!