
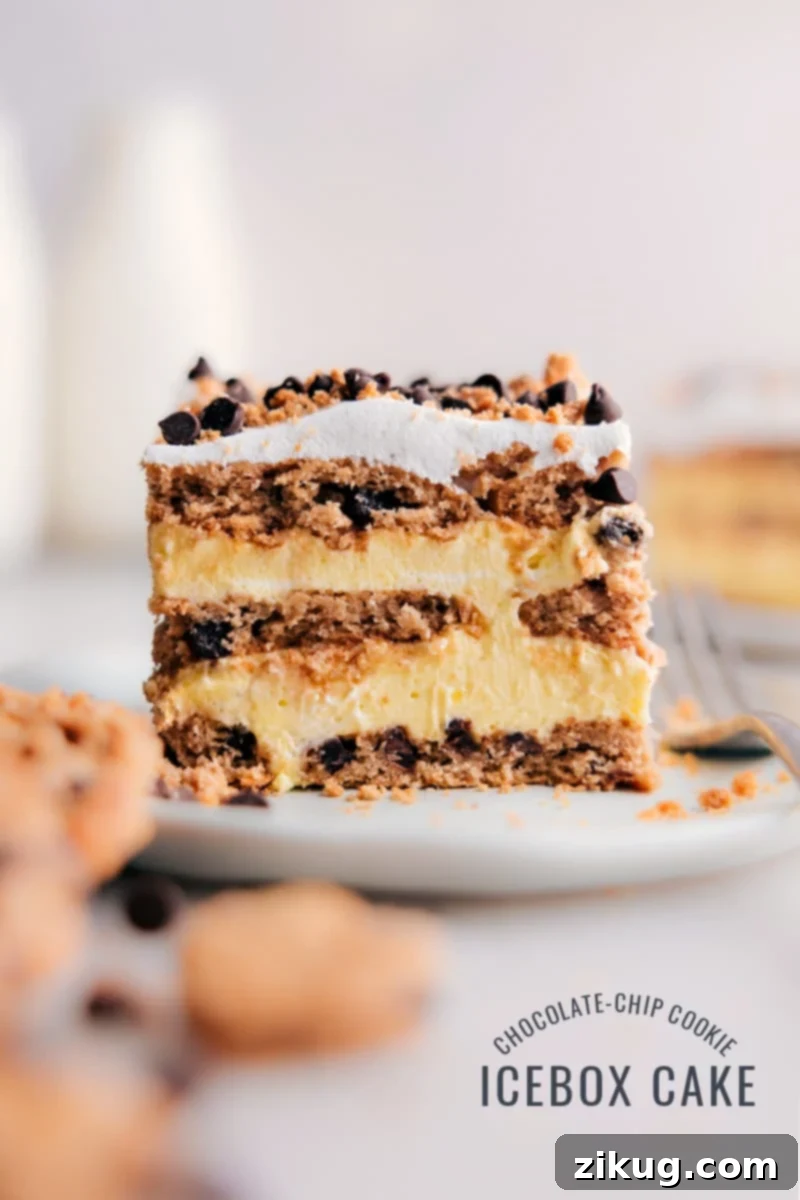
Chocolate Chip Cookie Icebox Cake is your new go-to dessert—a true culinary marvel requiring just four simple ingredients and absolutely no baking! This delightful treat is incredibly creamy, wonderfully rich, and guaranteed to be a showstopper at any gathering, or simply a perfect indulgence after a long day.
Craving more effortless, decadent desserts? Explore other fantastic icebox cake recipes like our Pistachio Icebox Cake, the crowd-pleasing S’mores Icebox Cake, or the bright and zesty Lemon Icebox Cake.
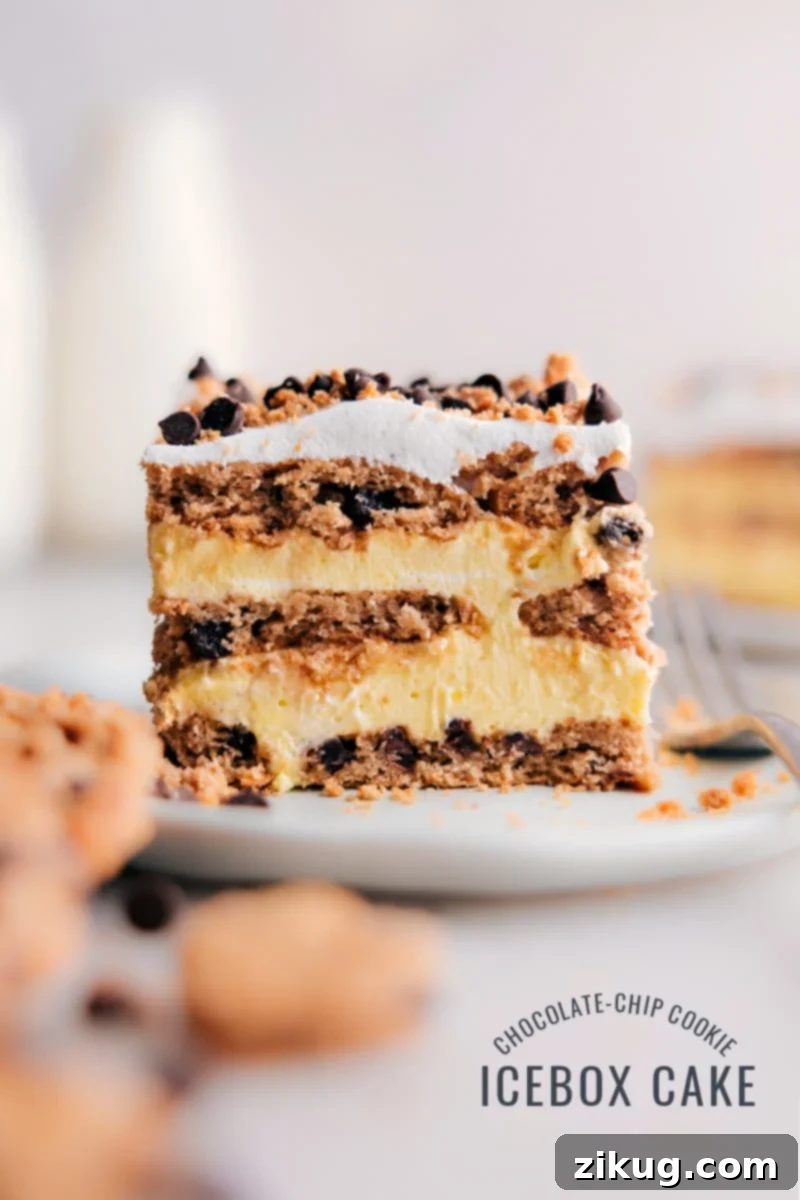
The Ultimate No-Bake Chocolate Chip Cookie Icebox Cake: Effortless Decadence
Imagine a dessert so unbelievably delicious, so surprisingly simple, that it leaves everyone speechless. This is precisely what happened one evening when my husband sent me an excited text, complete with a photo of a half-eaten dessert from our fridge. His emphatic declaration? “Omg, I don’t know what this is but it’s the greatest thing I’ve ever eaten.” That mystery dessert, ladies and gentlemen, was this very **Chocolate Chip Cookie Icebox Cake** – and it’s about to become your family’s next obsession.
If that glowing review from a self-proclaimed dessert connoisseur (my husband!) hasn’t already convinced you, allow me to share a few more compelling reasons why this no-bake wonder deserves a prime spot in your recipe collection:
- Unbeatable Simplicity: No Baking Required & Just Four Ingredients. Forget complicated techniques and endless ingredient lists. This cake comes together in a mere 15-20 minutes of active prep time, making it an absolute dream for busy weeknights, impromptu gatherings, or when you just need a sweet fix without turning on the oven. It’s truly the pinnacle of quick and easy dessert solutions, perfect for cooling down on a hot day or when you simply prefer not to bake.
- A Make-Ahead Masterpiece: Perfect for Any Occasion. One of the greatest advantages of an icebox cake is its make-ahead nature. Prepare it the day before your event, let it chill beautifully overnight, and wake up to a perfectly set, ready-to-serve dessert. This takes all the stress out of last-minute dessert preparations, allowing you to enjoy your special occasion without a kitchen-induced frenzy. The flavors also meld and deepen over time, enhancing the overall taste experience.
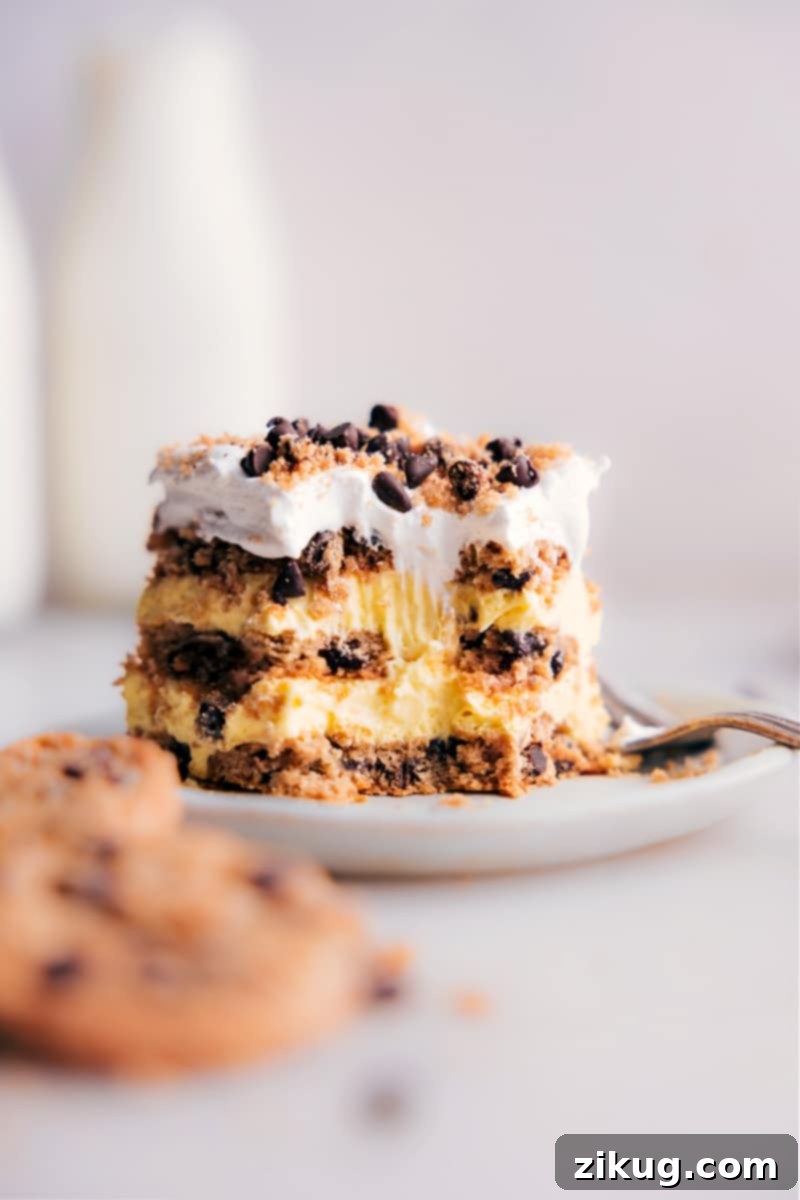
- Elegance in Simplicity: Looks Fancy, Tastes Divine. Despite its incredibly simple preparation, this Chocolate Chip Cookie Icebox Cake boasts an impressive appearance. The distinct layers of softened cookies and creamy filling create a sophisticated presentation that belies the minimal effort involved. With a few simple garnishes, your guests will be convinced you spent hours crafting this decadent treat, making it ideal for potlucks, birthdays, or holiday celebrations.
- Pure, Unadulterated Deliciousness: A Flavor Sensation. At its heart, this cake is simply irresistible. The crispy chocolate chip cookies transform into soft, tender, cake-like layers as they absorb the luscious vanilla cream, creating a symphony of textures and flavors. Each bite offers a harmonious blend of rich chocolate and smooth, sweet vanilla, a delightful contrast between the creamy filling and the softened cookie base, making it downright delicious and utterly addictive.
Key Ingredients for Your Chocolate Chip Cookie Icebox Cake
The magic of this icebox cake lies in its minimal, yet perfectly chosen, ingredients. Each component plays a crucial role in creating the irresistible texture and flavor profile. Let’s delve into what you’ll need and why these choices make all the difference:
- Crispy Chocolate Chip Cookies: The Essential Foundation. For this recipe, I consistently reach for classic regular Chips Ahoy cookies. Their inherent crispiness is paramount, as they soften beautifully when absorbing the moisture from the creamy filling, transforming into a delightful, tender, cake-like layer. I’ve experimented with higher-end brands like Tate’s or Pepperidge Farm, but found no significant difference in the final texture or taste that justified their higher cost. The key is *crispy* cookies, not soft or chewy varieties, as these won’t achieve the desired cake-like consistency. The firm structure of crispy cookies holds up well during the soaking process.
- Instant Vanilla Pudding Mix: The Creamy Heart. You’ll need two 3.4-ounce boxes of instant vanilla pudding mix. It is absolutely essential to use *regular instant pudding* and to *avoid* cook-and-serve, sugar-free, or low-fat varieties. These alternatives can result in a watery or improperly set filling, completely altering the cake’s consistency. Instant pudding acts as both a flavor base and a thickening agent, creating that rich, stable cream. For the best flavor and texture, I highly recommend using the Jell-o® brand. Crucially, disregard the package directions for preparing the pudding; we’ll be using specific amounts of milk and incorporating whipped topping to achieve our cake’s signature creamy, yet light consistency.
- Whole Milk: For Unrivaled Richness and Body. I opt for whole milk in this recipe because its higher fat content contributes significantly to a richer flavor and a luxuriously thick, stable consistency for our pudding mixture. The fat in whole milk helps create a more decadent mouthfeel and prevents the filling from becoming too thin. While 2% milk can work in a pinch, whole milk truly elevates the creamy texture, making each bite even more indulgent.
- Frozen Whipped Topping: The Light and Airy Component. My preference for frozen whipped topping is Cool Whip or a comparable brand. Again, choose the *regular* version, not sugar-free or reduced-fat options, as these can introduce excess water and compromise the cake’s structure and mouthfeel. The regular whipped topping maintains its stability, providing that wonderful lightness and creamy texture that perfectly balances the richness of the pudding. It’s pre-sweetened and contributes to the effortless nature of this dessert.
Quick Tip: Cookie Selection & Quantity
You’ll need a generous amount of cookies to build this layered cake, so make sure to grab the family-sized box (typically 18 oz) rather than the standard (13 oz) size. It’s better to have a few extra than to run short mid-assembly! The type of cookie is also vital: using crispy chocolate chip cookies is fundamental to achieving the perfect cake-like texture once they’ve had a chance to soften. Soft or chewy cookies won’t yield the same delightful transformation; they tend to become mushy instead of tender.
Don’t be afraid to experiment with other crispy cookie flavors to add a unique twist! Chips Ahoy offers several exciting varieties – I’ve personally got my eye on their Reese’s Pieces flavor for my next icebox cake creation! This small change can introduce a whole new level of deliciousness and visual appeal.
Quick Tip: Whipped Topping Choices
Our Chocolate Chip Cookie Icebox Cake recipe calls for one 8-ounce container of Cool Whip® due to its consistent texture, reliable stability, and ease of use. However, if you’re looking for alternatives or prefer a homemade touch, you have a couple of excellent options:
- For a slightly healthier choice or if you prefer products with fewer artificial ingredients, consider using TruWhip®, which is often found in the frozen dessert section.
- Alternatively, you can easily make your own fresh whipped cream from scratch. This homemade version offers a truly luxurious texture and flavor that can elevate your icebox cake even further. Just remember, Cool Whip is a non-dairy product, whereas homemade whipped cream will contain dairy.
Homemade Whipped Cream Recipe:
To prepare your own whipped cream, you’ll need:
- 1 cup heavy cream
- 1/2 cup powdered sugar
- 1/2 teaspoon vanilla extract
In a large mixing bowl fitted with a whisk attachment (or using an electric hand mixer), combine the heavy cream, powdered sugar, and vanilla extract. Beat on low speed initially to combine the ingredients and prevent splashing, then gradually increase the speed and whip until firm peaks form. This usually takes about 2-4 minutes, depending on your mixer. Once firm, you’ll have delicious homemade whipped cream ready to use in this recipe, adding an extra touch of gourmet to your icebox cake!
Expert Tips for Your Perfect Chocolate Chip Cookie Icebox Cake
While this recipe is wonderfully straightforward, a few insider tips can elevate your icebox cake from delicious to absolutely legendary. Pay attention to these details for the best possible results and to ensure your no-bake dessert is a resounding success:
- The Golden Rule: Chill the Cake Overnight. This is perhaps the most critical step for any icebox cake. The magic truly happens during the extended chilling period in the refrigerator. This allows ample time for the crispy cookies to slowly absorb the moisture from the creamy filling, transforming them into soft, tender, cake-like layers. Planning ahead and giving your cake a full 8-12 hours to chill overnight is essential for achieving that signature melt-in-your-mouth texture. Resist the temptation to cut corners on chilling time; impatience will be rewarded with less-than-optimal cookie softening!
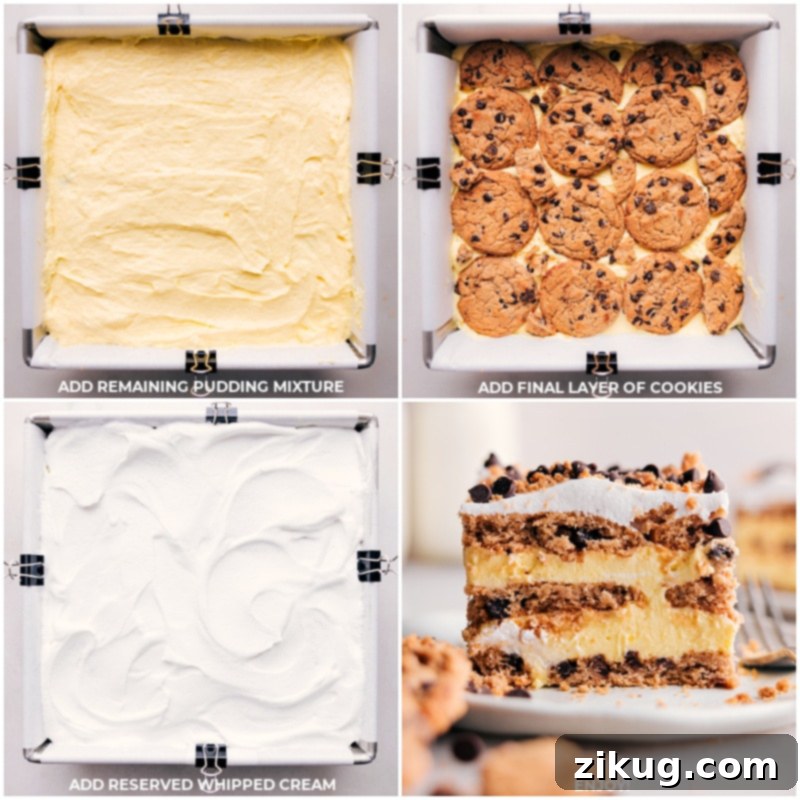
- Cookie Puzzle: Don’t Be Afraid to Break to Fit. When assembling your layers, don’t strive for perfection in cookie placement. It’s perfectly acceptable, and often necessary, to break the chocolate chip cookies into smaller pieces to fill any gaps and ensure an even, solid layer across the pan. This maximizes surface contact with the creamy filling, leading to more consistent softening. Rest assured, once the cookies have softened, these broken pieces will meld seamlessly into the cohesive, cake-like layer you desire. No one will ever know you had to “puzzle” them together!
- Garnish for Grandeur: Add a Professional Finishing Touch. A simple garnish can significantly enhance the visual appeal and even add an extra layer of flavor to your icebox cake. Consider sprinkling a handful of miniature chocolate chips over the top of the cake before serving for added texture and a burst of chocolate. Alternatively, crumble a few extra (leftover) chocolate chip cookies for a delightful textural contrast. For an even more decadent touch, a drizzle of chocolate syrup, a dusting of cocoa powder, or even a few fresh raspberries can transform your simple cake into an elegant dessert ready for any special occasion.
Storage Solutions for Your Icebox Cake
Storing Chocolate Chip Icebox Cake Properly
The Chocolate Chip Cookie Icebox Cake truly shines as a make-ahead dessert, largely because those cookie layers require sufficient time to soften and transform into their delightful cake-like state. For optimal flavor and texture, I highly recommend enjoying the cake on **days 2 or 3** after preparation. While it needs at least 8 hours (preferably 12) to fully soften, extended storage beyond 3-4 days can sometimes lead to a slightly watery consistency, as the cookies continue to absorb moisture and the dairy components can begin to separate.
To maintain its freshness and creamy texture, always serve the cake directly from the refrigerator. Keep it covered tightly with plastic wrap to prevent it from drying out or absorbing refrigerator odors. Any leftover slices should be returned to the fridge promptly, ensuring it remains chilled.
This cake is generally **not a good candidate for freezing and thawing**. Due to its high dairy content (from the milk, pudding, and whipped topping), freezing can cause the texture to become grainy and watery upon thawing, significantly diminishing its quality. It’s best enjoyed fresh and chilled, making it a wonderful short-term dessert but not one for long-term freezer storage.
Recommended Equipment for Easy Prep
To make your Chocolate Chip Cookie Icebox Cake experience even smoother and more enjoyable, here are a few indispensable tools I swear by in my kitchen:
- My absolute favorite 8×8-inch baking pan, which is the perfect size for getting those nice, thick, well-proportioned slices of cake.
- These convenient pre-cut parchment paper sheets are a total game-changer for effortlessly lining the pan. They ensure easy removal of the entire cake without any sticking, making cleanup a breeze.
- And to keep that parchment paper neatly in place while you’re meticulously layering your cookies and cream, a few trusty binder clips work wonders! They hold the paper up high enough to easily lift the cake out once it’s set.
Embracing the Joy of No-Bake Desserts
Icebox cakes, like this incredible Chocolate Chip Cookie version, hold a special place in the culinary world. Originating in the early 20th century as a clever and practical way to utilize readily available store-bought cookies and refrigerated ingredients, they quickly became immensely popular for their sheer convenience and consistently delicious results, especially in kitchens before air conditioning was commonplace. The concept is simple yet brilliant: layers of crispy cookies are strategically arranged and then softened by a rich, creamy mixture during an extended chill in the “icebox” (refrigerator), transforming into a tender, luscious, cake-like confection. This innovative method allows for incredible versatility in flavors and textures, making no-bake desserts a cherished favorite for home bakers and dessert enthusiasts alike.
Beyond their charming historical roots, no-bake desserts offer a compelling modern appeal. They are unequivocally perfect for hot summer days when turning on the oven is unthinkable, providing a refreshing and cool treat without heating up your kitchen. They are also ideal for beginner cooks and bakers who might be intimidated by complex baking techniques, as the assembly process is incredibly forgiving. Furthermore, no-bake desserts are a fantastic solution for feeding a crowd or preparing for potlucks and parties with minimal effort and maximum impact. The ease of assembly means less time spent in the kitchen laboring over hot stoves and more precious time enjoying delicious treats and making memories with loved ones. It’s a testament to how simple ingredients can create truly extraordinary results.
More Delicious No-Bake Desserts You’ll Love:
Cookies
Classic No-Bake Cookies Recipe
Desserts
Decadent Mint Oreo Truffles
Desserts
Addictive Chocolate Chip Dip
Beverages
Creamy Malted Milkshake
Print Recipe
Chocolate Chip Cookie Icebox Cake
Video
Equipment
-
8 x 8-inch baking pan lined
Ingredients
- 1 (18.2-ounce) package chocolate chip cookies see note 1
- 2 (3.4-ounce) packages instant vanilla pudding mix see note 2
- 2-1/4 cups whole milk
- 1 (8-ounce) container frozen whipped topping thawed, divided, see note 3
Instructions
-
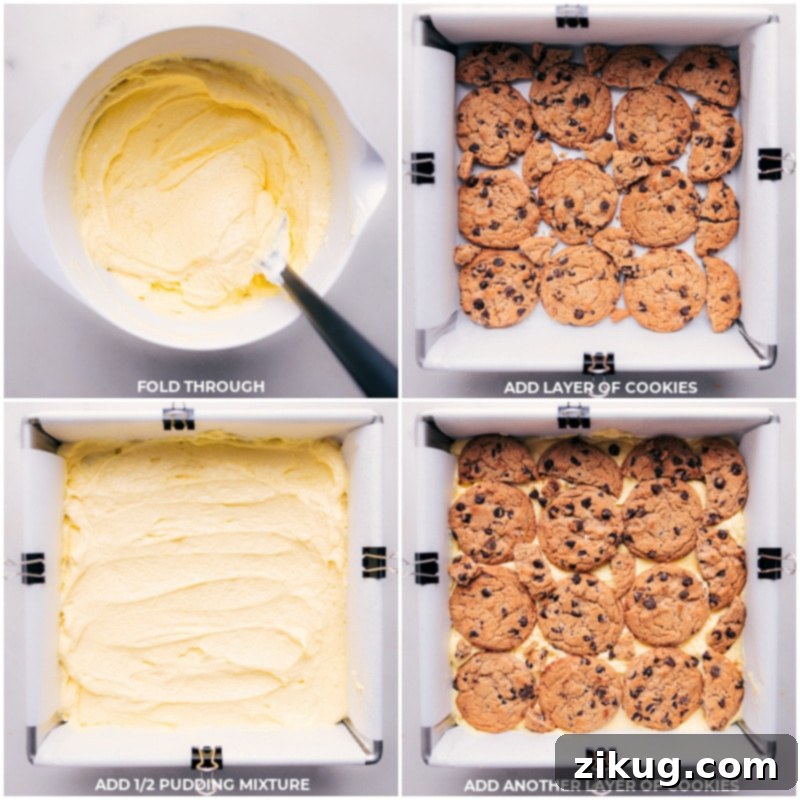
Line an 8×8-inch pan with parchment paper, leaving an overhang on the sides for easy removal of the finished cake. Remove 1 heaping cup of the thawed whipped topping and set it aside to be used for the top layer.
-
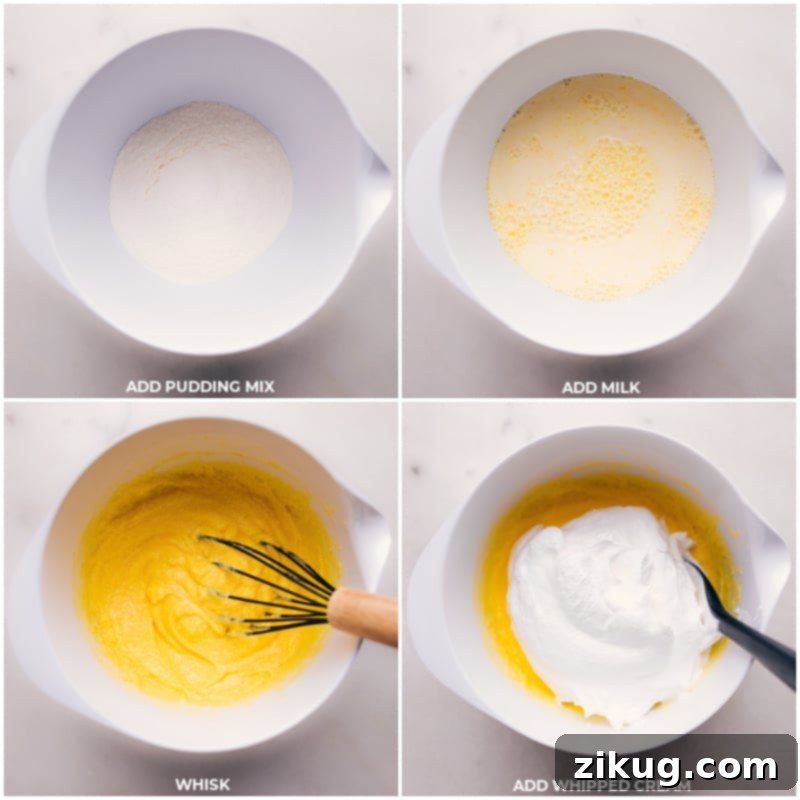
In a large mixing bowl, combine the two packages of instant vanilla pudding mix with the 2-1/4 cups of whole milk. Whisk briskly for approximately 1 minute, or until the mixture is smooth and begins to thicken slightly. Gently fold the *remaining* whipped topping (the portion not set aside) into the pudding mixture until it is fully incorporated and creates a light, airy cream.
-
Begin assembling the cake in your prepared pan. Place an even layer of chocolate chip cookies at the bottom of the pan, breaking them as needed to fit snugly and cover the entire base. Spoon half of the pudding mixture over this cookie layer and gently spread it out evenly with the back of a large spoon. Add another layer of cookies, followed by the remaining pudding mixture, spreading it smoothly. Finally, add the last layer of cookies. Spread the reserved heaping cup of whipped topping evenly over the top as the final layer. Cover the cake tightly with plastic wrap and refrigerate for a minimum of 8 hours, preferably overnight, to allow the cookies to soften.
-
Once chilled and set, carefully lift the cake out of the pan using the parchment paper overhang. When ready to serve, cut the cake into squares (see note 4 for cutting tips). For an extra touch, you can crumble a few reserved cookies or sprinkle miniature chocolate chips on top of each slice as a delicious garnish.
Recipe Notes
Note 2: Pudding Type. Ensure you use two small 3.4-ounce boxes of *regular instant* vanilla pudding mix. Do NOT use sugar-free, low-fat, or cook-and-serve pudding, as these will not yield the correct consistency for this recipe. Also, remember to follow *my recipe’s* instructions for preparing the pudding, not the package directions, to achieve the perfect creamy filling.
Note 3: Whipped Topping Details. Cool Whip is a widely available brand of frozen whipped topping that I use in my test kitchen for reliable results. It’s important to select the *regular* version; sugar-free or reduced-fat varieties tend to become watery and can compromise the cake’s structure. If preferred, you can easily make your own fresh whipped cream; the recipe is provided within the blog post above for your convenience.
Note 4: Slicing the Cake. For clean, elegant slices, use a sharp chef’s knife. Before each cut, run the knife under warm water and then wipe it completely dry on a kitchen towel. This technique helps prevent the layers from sticking and ensures beautifully presented slices every time. Repeat this process for each individual slice.
Storage: For the best texture and flavor, I recommend enjoying your Chocolate Chip Cookie Icebox Cake on days 2 or 3. It requires at least 12 hours of chilling to allow the cookies to soften thoroughly, but prolonged storage beyond 3-4 days can sometimes lead to the cake becoming watery. Always serve this dessert chilled, directly from the refrigerator. Any leftovers should be covered tightly and returned to the fridge promptly. Freezing this cake is generally not advised, as its dairy-rich filling can become grainy and watery upon thawing, affecting the overall quality.
Nutrition
Nutrition information is automatically calculated and should be used as an approximation.