
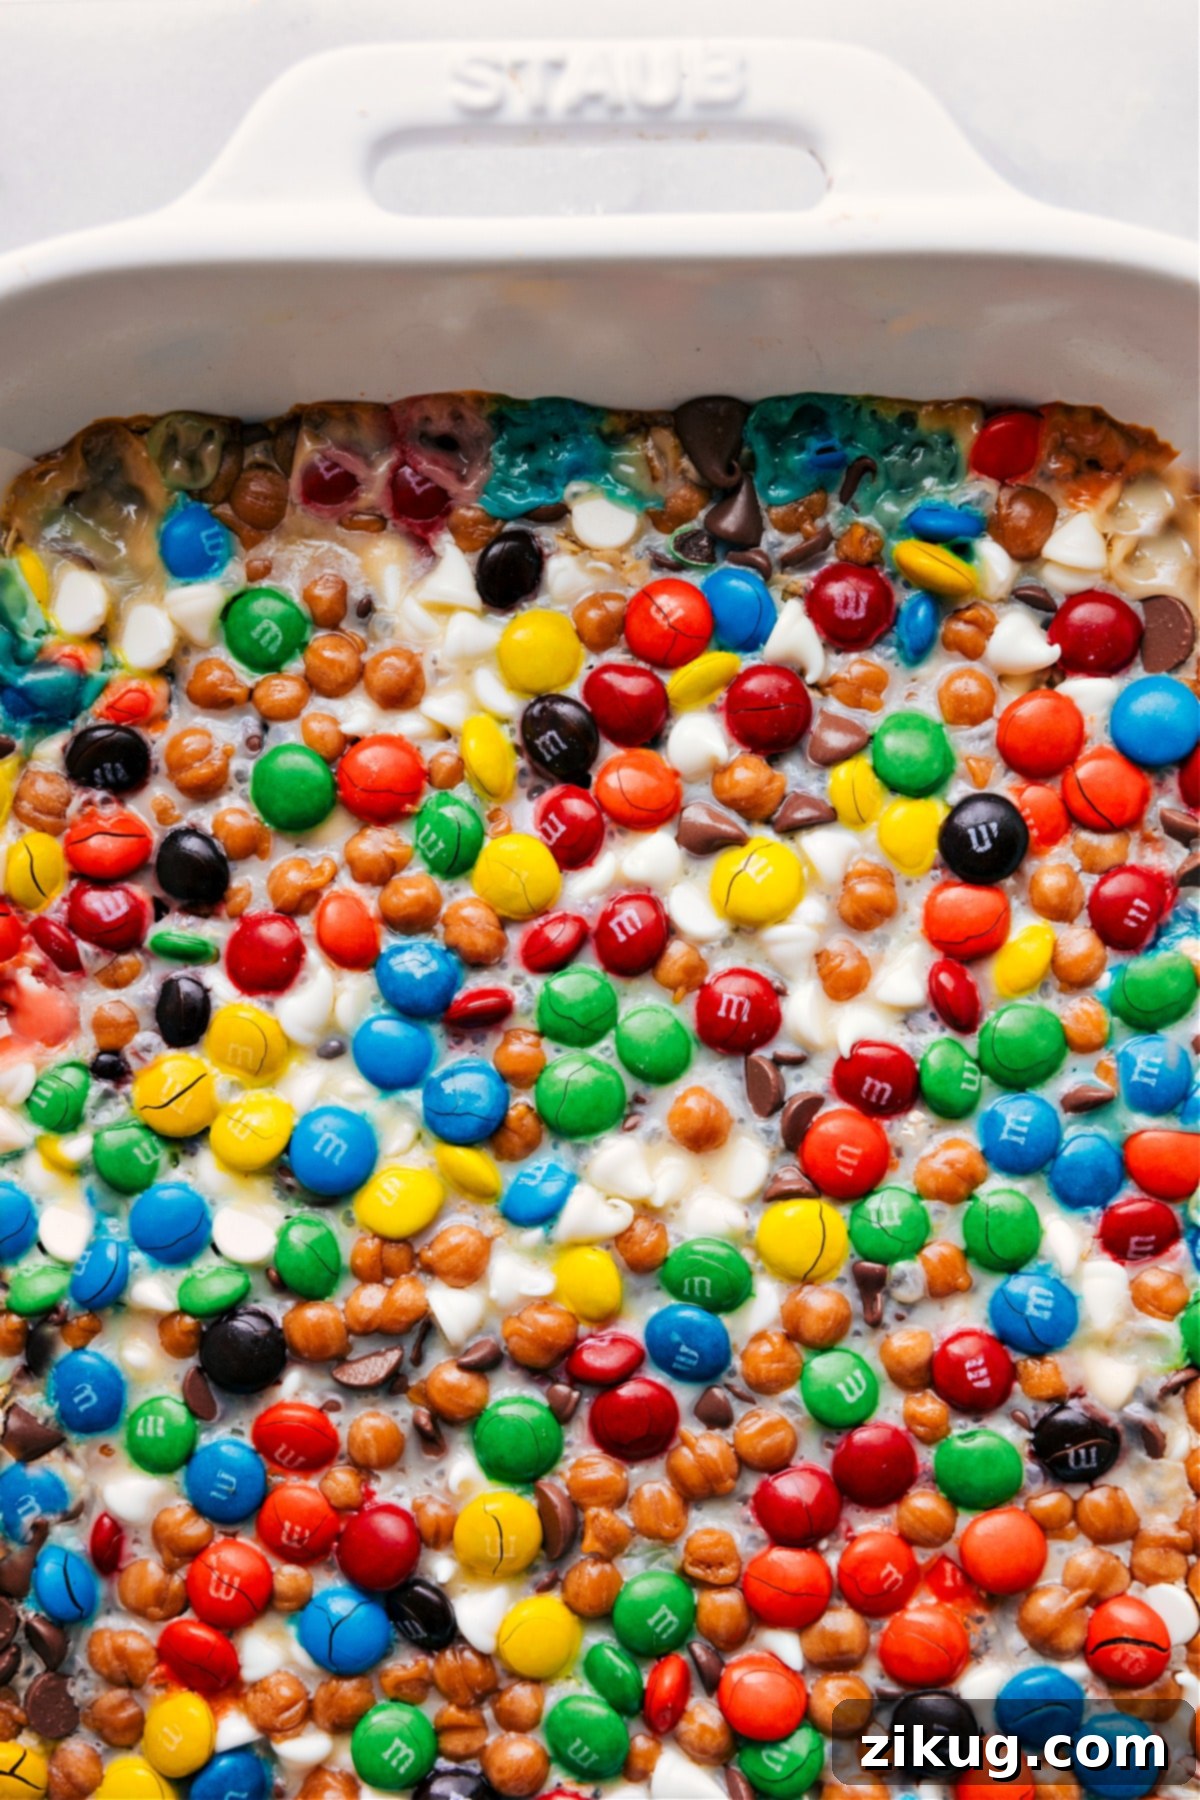
Magic Cookie Bars are a delightful dessert featuring a buttery, thick graham cracker crust, generously loaded with chocolate chips, vibrant M&M’s, gooey caramel bits, and hearty oats. All these delicious layers are miraculously bound together by a luscious blanket of sweetened condensed milk, creating an irresistible treat that’s both easy to make and incredibly satisfying.
Magic Cookie Bars: Your New Favorite Gooey Dessert
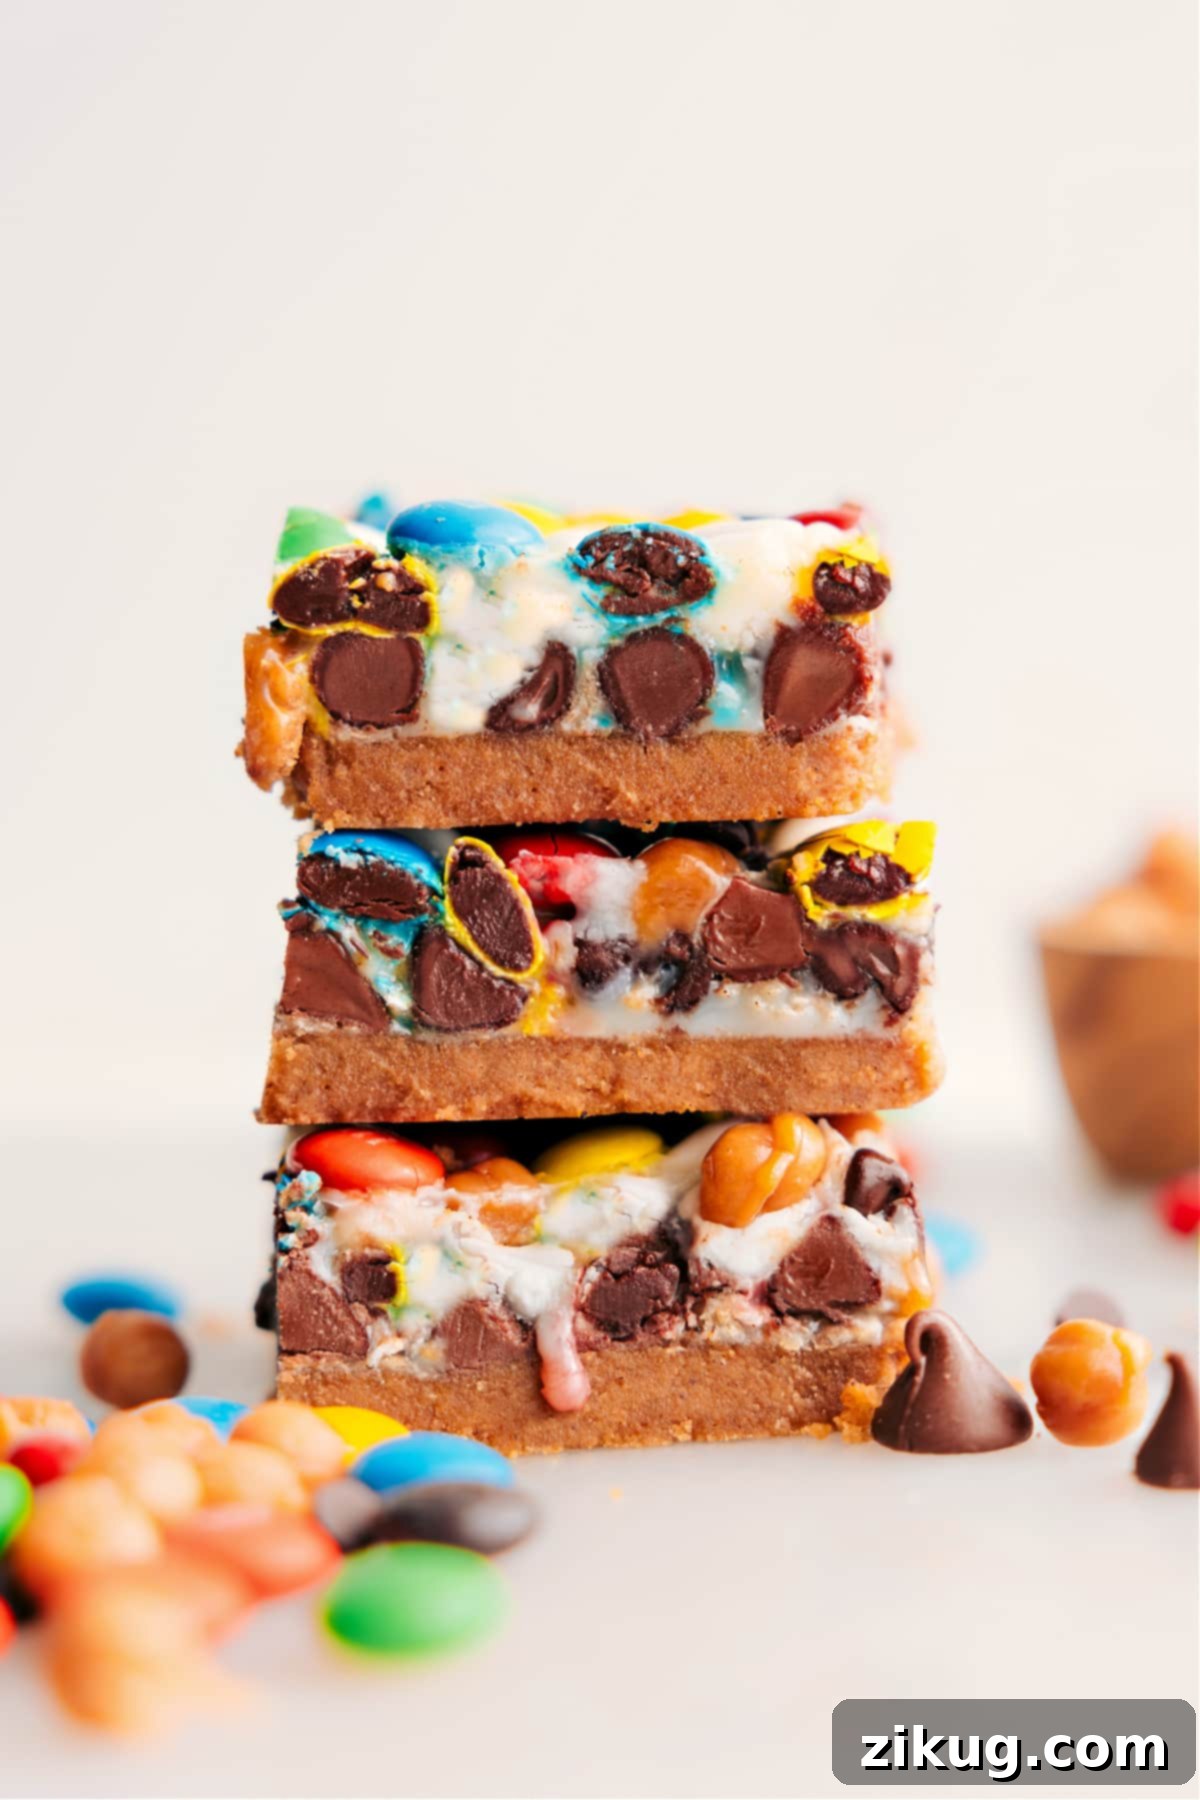
Prepare to fall in love with these Magic Cookie Bars – a true dessert lover’s dream come true! Each bite offers an explosion of flavors and textures, with rich chocolate, chewy caramel, crunchy M&M’s, and wholesome oats, all enveloped in a thick, sweet, and unbelievably gooey layer of sweetened condensed milk. These bars are an effortless way to create a show-stopping dessert that will impress everyone.
If you’re already a fan of classic 7-layer bars, then these Magic Cookie Bars are absolutely perfect for you. They share that same decadent richness and delightful sweetness, making them an ideal candidate for cutting into smaller, fudge-like squares. Their intense flavor means a little goes a long way, making them perfect for sharing at parties, potlucks, or simply enjoying as a luxurious personal treat.
Why These Magic Cookie Bars Are a Must-Bake
There are countless reasons to add Magic Cookie Bars to your baking repertoire, but here are just a few that make them truly special:
- **Effortless Assembly:** Despite their impressive appearance, these bars require minimal effort. With a simple layering process, you’ll have them ready for the oven in no time, making them ideal for busy bakers.
- **Irresistible Texture:** The combination of a firm graham cracker crust, soft oats, melting chocolate, chewy caramel, and the sticky, gooey condensed milk creates a textural symphony that’s utterly addictive.
- **Crowd-Pleasing Flavors:** Everyone loves chocolate, caramel, and M&M’s! This dessert is universally appealing and guaranteed to be a hit with family and friends, disappearing quickly at any gathering.
- **Customization Potential:** While the classic combination is fantastic, these bars are incredibly versatile. Feel free to swap out ingredients to match your personal preferences or what you have on hand.
- **Perfect for Any Occasion:** From casual weeknight desserts to holiday celebrations, bake sales, or potlucks, Magic Cookie Bars fit seamlessly into any event, always bringing a smile to faces.
Essential Ingredients for Magical Cookie Bars
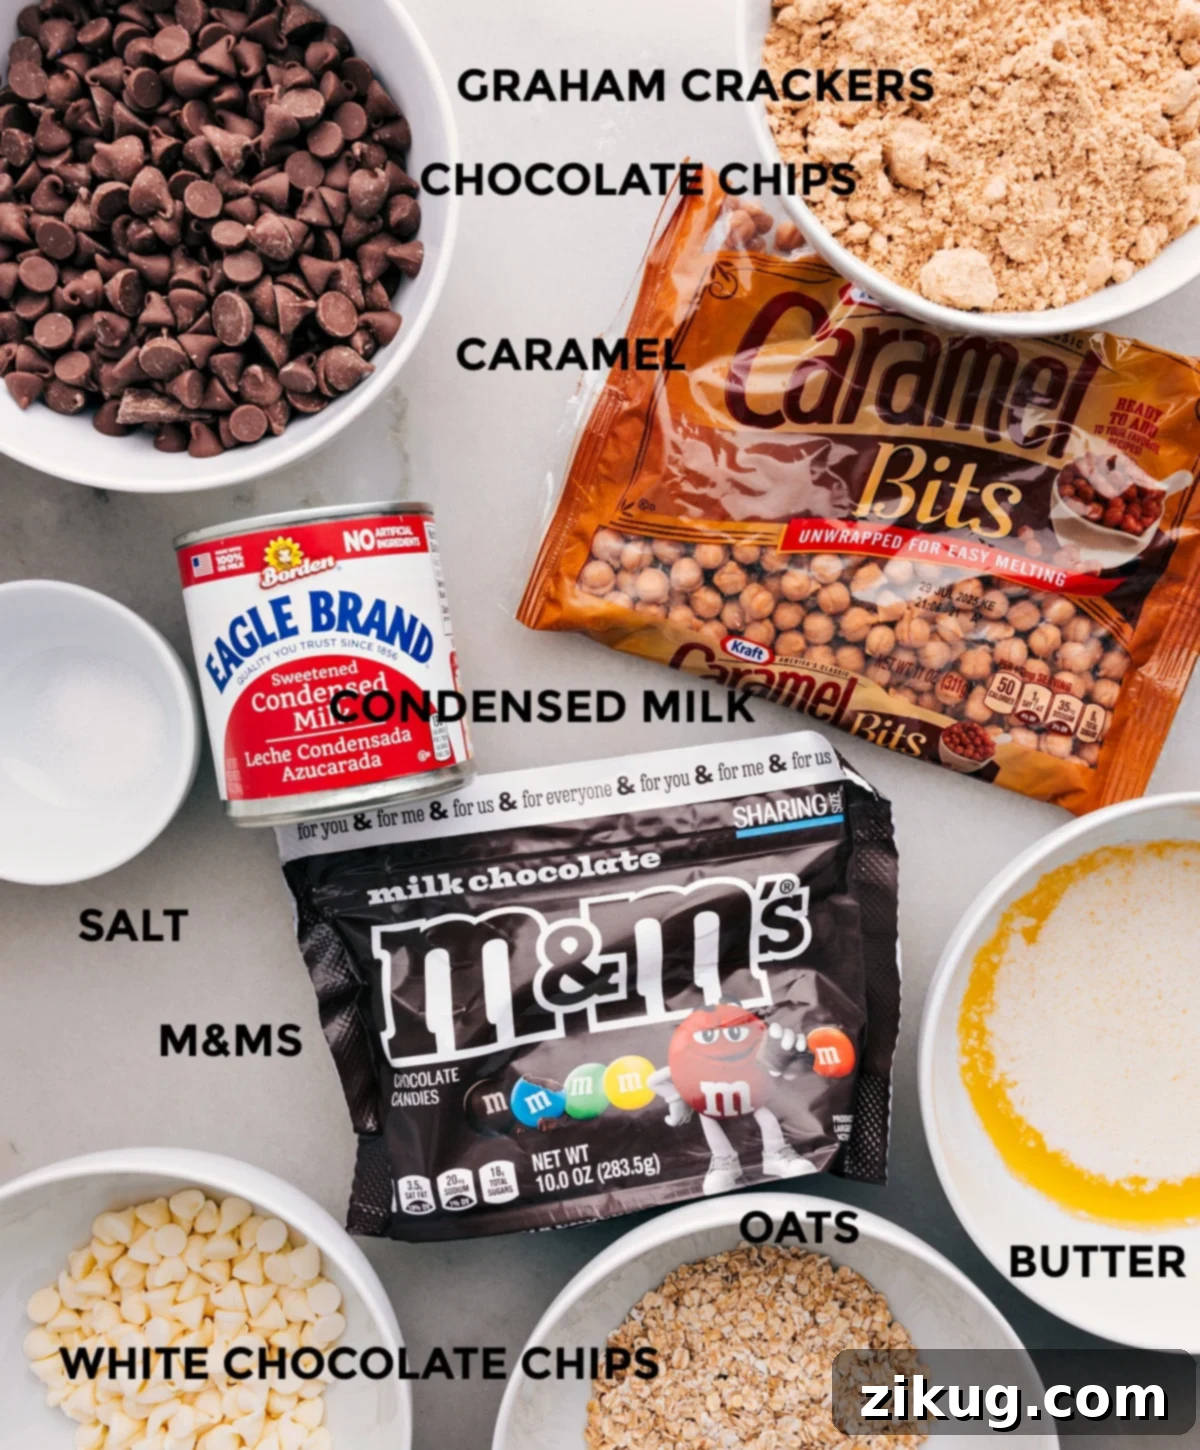
The magic truly happens with a thoughtful selection of ingredients. Here’s a closer look at what makes these Magic Cookie Bars so incredibly good, along with some tips for choosing the best:
- Quick Oats: These are ideal for achieving a softer, chewier texture within the bars, integrating beautifully with the other gooey layers. While old-fashioned oats can be used, they tend to result in a chewier, more distinct oat presence. Quick oats blend in perfectly, adding substance without being overpowering.
- Milk Chocolate Chips: Offering a classic, rich, and sweet chocolate flavor, milk chocolate chips are a fantastic choice. However, feel free to experiment with dark chocolate chips for a deeper, less sweet profile, or semi-sweet chocolate chips if you prefer a balance between the two. The key is using high-quality chocolate that melts smoothly.
- White Chocolate Chips: These add a lovely contrasting sweetness and creamy texture to the bars. If you’re looking to diversify the flavor, consider swapping them for butterscotch chips for a buttery, caramel-like note, or peanut butter chips for a nutty twist that pairs wonderfully with chocolate.
- Caramel Bits: These delightful tiny caramel balls are typically found in the baking or candy aisle of most grocery stores. They melt into pockets of buttery, chewy caramel goodness throughout the bars. Always grab a fresh bag to ensure they are soft and pliable, which contributes to that signature gooey texture.
- M&M’s®: Classic M&M’s are perfect for adding a pop of color, a delightful chocolate crunch, and an extra layer of sweetness. We recommend sticking to the regular-sized candies; larger or filled varieties might not hold up as well during baking and cutting, potentially altering the bar’s structure.
- Sweetened Condensed Milk: This is the absolute cornerstone of Magic Cookie Bars, acting as the magical binder that holds all the layers together and creates their characteristic gooeyness. It’s crucial to use full-fat and full-sugar sweetened condensed milk. Do not substitute it with evaporated milk, as they are entirely different products and evaporated milk will not yield the same rich, thick, and sweet result.
- Unsalted Butter: Essential for the graham cracker crust, the butter binds the crumbs together to form a sturdy base. Using unsalted butter allows you to control the overall saltiness of the bars.
- Fine Sea Salt: A small amount of salt in the crust helps to balance the intense sweetness of the other layers, enhancing all the flavors without making the bars taste salty.
Crafting the Perfect Graham Cracker Crust
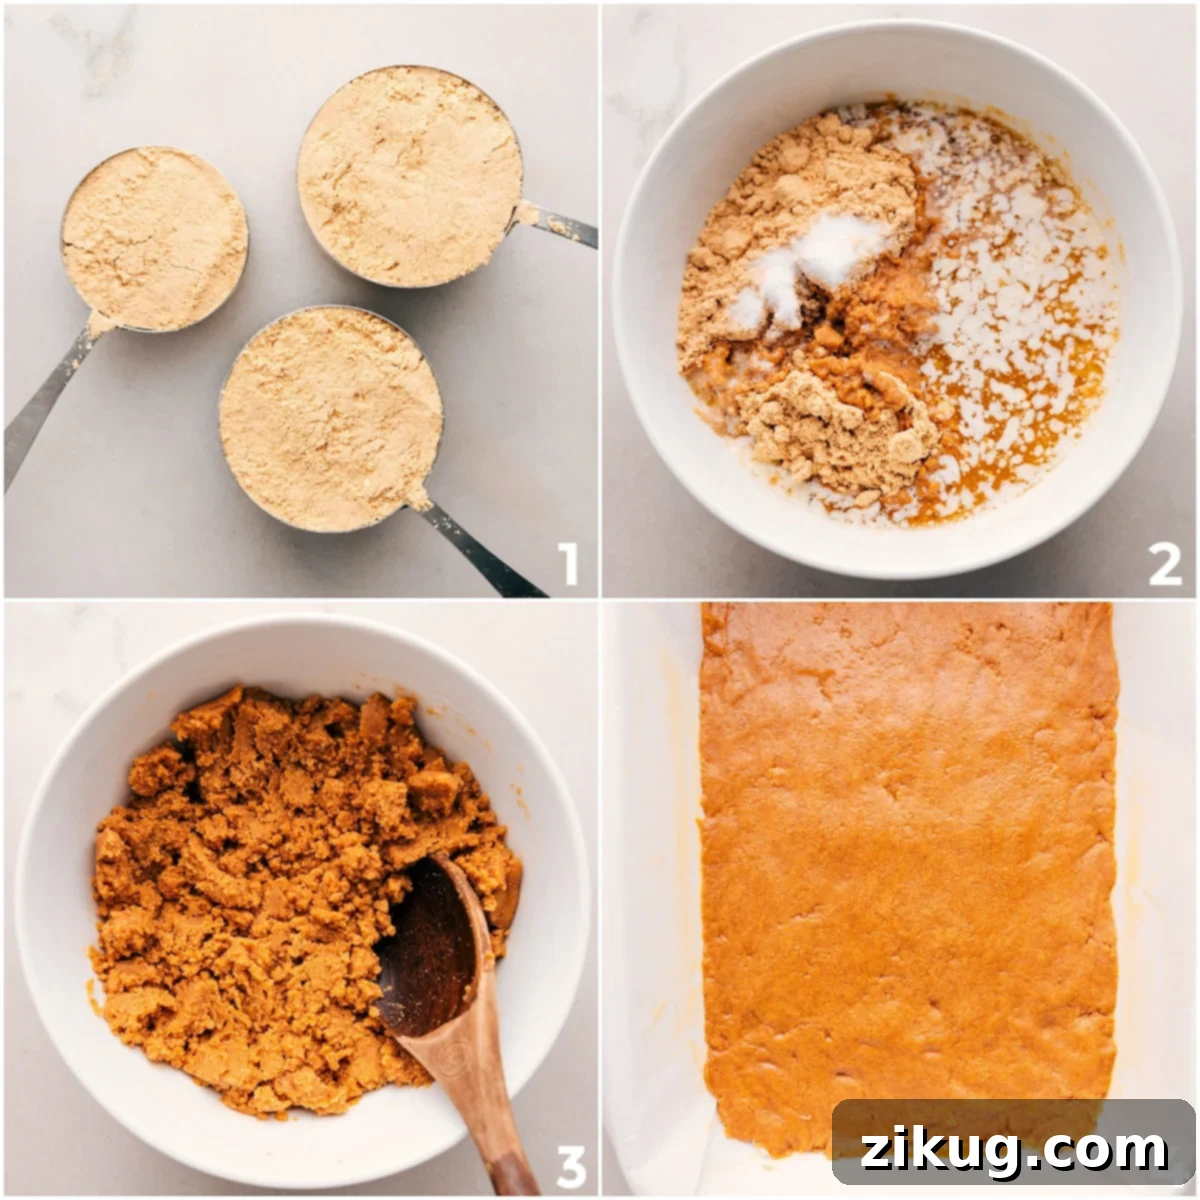
The foundation of these incredible Magic Cookie Bars is a thick, buttery graham cracker crust. Getting this layer just right is simple with these expert tips:
- Cool the Butter for a Flawless Crust: After melting your butter, it’s essential to let it cool down to room temperature before mixing it with the graham cracker crumbs. Using hot butter can cause the crust to become overly greasy and crumbly rather than firm and cohesive. A cooled butter ensures a perfectly textured, sturdy crust.
- Add Salt for Enhanced Flavor: Don’t skip the pinch of salt! It plays a vital role in balancing out the sweetness of the graham crackers and the rich toppings. The salt acts as a flavor enhancer, making every component of the bar shine without making the crust taste salty.
- Blend Graham Crackers into Fine Crumbs: For the smoothest, most even, and most compact crust, it’s crucial to process your graham crackers into very fine crumbs. A powerful blender or food processor works best here. Coarse crumbs can result in a loose, uneven crust that might crumble when cut.
- Measure Crumbs Accurately, Don’t Just Count Crackers: Graham cracker sizes and densities can vary significantly between brands. Instead of relying on a cracker count, always measure your graham cracker crumbs once they’ve been crushed. This ensures you have the precise amount needed for the perfect crust consistency, preventing it from being too dry or too wet.
- Press Firmly for a Sturdy Base: Once your butter and crumbs are mixed, press the mixture into your prepared pan with conviction. Using the flat bottom of a measuring cup or a glass, firmly and evenly pack the crust across the bottom of the pan. A well-packed crust will be clean, sturdy, and won’t fall apart when you slice into your baked bars.
Expert Tips for Perfect Magic Cookie Bars
Achieving bakery-quality Magic Cookie Bars is easier than you think with these straightforward tips:
- Always Use Parchment Paper: These bars are wonderfully gooey, which means they can be tricky to remove from the pan without the right lining. Parchment paper is essential! Make sure to leave a generous overhang on the sides of the pan. This creates “handles” that allow you to easily lift the entire slab of cooled bars out of the pan for clean cutting. Avoid using aluminum foil or wax paper, as they don’t offer the same non-stick properties and ease of removal for this type of sticky dessert.
- Customize Your Toppings: The beauty of Magic Cookie Bars lies in their versatility. While the combination of chocolate chips, M&M’s, caramel bits, and oats is classic, don’t hesitate to get creative! You can swap any of the candies or baking chips for your favorites. Consider adding shredded coconut, chopped nuts (like pecans or walnuts), pretzels for a sweet and salty crunch, or even different flavored candies. Just ensure that the total amount and approximate size of the swapped toppings remain similar to maintain the bar’s structure and even baking. For a unique crust variation, try using crushed Nilla® Wafers or Teddy Grahams® instead of traditional graham crackers.
- Gently Press Toppings into the Condensed Milk: After layering all your delicious toppings over the sweetened condensed milk, take a moment to gently press them down. This isn’t about compacting them firmly, but rather ensuring that all the toppings make good contact and are slightly nestled into the condensed milk layer. This small step helps them adhere, preventing them from scattering after baking, ensures an even distribution, and contributes to a neater appearance and a satisfyingly cohesive bar.
- Patience is Key for Cooling: It can be tempting to cut into these bars warm, but resist the urge! Allowing them to cool completely, preferably for 1-2 hours at room temperature (or sped up in the fridge after initial cooling), is crucial. This cooling period allows the sweetened condensed milk and melted toppings to set properly, resulting in firm, clean slices rather than a gooey, crumbly mess.
- Achieve Clean Slices with a Warm Knife: For perfectly neat and defined cuts, especially with gooey bars, a simple trick works wonders. Run a sharp knife under warm water, wipe it dry with a kitchen towel, and then make your cut. Repeat this process for each slice. The warmth helps the knife glide through the sticky layers without dragging or tearing the bars.
Storage Solutions for Leftover Magic Cookie Bars
Keeping Your Magic Cookie Bars Fresh
Proper storage ensures your delicious Magic Cookie Bars stay fresh and enjoyable for longer. Here’s how to store them:
- Room Temperature: If your kitchen is cool, store Magic Cookie Bars in an airtight container at room temperature for up to 3 days. Layer them with parchment paper to prevent sticking.
- Refrigerator: For an extended shelf life or if you prefer a firmer bar, store them in an airtight container in the refrigerator for up to 5 days. Again, separate layers with parchment paper.
- Freezer: To enjoy these treats much later, wrap individual bars tightly in plastic wrap, then place them in a freezer-safe bag or airtight container. They can be frozen for up to 3 months. Thaw frozen bars at room temperature before serving for the best texture.
More Irresistible Dessert Bar Recipes
If you’ve loved these Magic Cookie Bars, you’re sure to enjoy these other fantastic dessert bar recipes, perfect for any sweet craving or occasion:
- Classic Cookie Bars with plenty of chocolate chips, a timeless favorite.
- Carmelitas, a delightful combination of oatmeal, caramel, and chocolate chips.
- Scotcheroos, peanut butter and butterscotch bars topped with a rich chocolate coating.
- Brownie Oreo Ice Cream Bars, featuring a decadent brownie base, Oreo crumbles, and creamy ice cream.
- Apple Crumble Bars with a luscious salted caramel center, tasting just like apple pie.
Magic Cookie Bars
Chelsea Lords
20
25
45
36
bars
Equipment
-
9 x 13-inch baking pan
-
Parchment paper
-
Large bowl
-
Blender or Food Processor
Ingredients
For the Graham Cracker Crust:
-
12
tablespoons
unsalted butter
(3/4 cup), melted and cooled -
2-1/2
cups
graham cracker crumbs
(measure after crushing; approximately 20–22 crackers) -
1/2
teaspoon
fine sea salt
(or 1/4 teaspoon table salt)
For the Topping:
-
1
(14-ounce) can
sweetened condensed milk
(full-fat is essential; see Note 2) -
1/2
cup
quick oats -
2
cups
chocolate chips
(milk, dark, or semi-sweet; see Note 1) -
1/2
cup
white chocolate chips -
3/4
cup
caramel bits
(ensure they are fresh; see Note 3) -
1
cup
M&M’s®
Instructions
-
Preheat your oven to 350°F (176°C). Prepare a 9×13-inch baking pan by lining it with parchment paper, ensuring you leave a generous overhang on the sides. This overhang will act as handles, making it much easier to remove the bars from the pan once they’ve cooled. Do not use wax paper or aluminum foil, as they may stick. Melt the unsalted butter in the microwave and then set it aside to cool completely to room temperature. Using hot butter will result in a greasy crust.
-
Break graham crackers into coarse pieces and place them in a powerful blender or food processor (you might need to do this in batches if your blender is small). Pulse and blend until all the crackers are transformed into very fine, uniform crumbs. Measure out 2 1/2 cups of these fine crumbs and transfer them to a large mixing bowl. Add the fine sea salt and stir well to combine. Pour in the melted-but-cooled butter and mix thoroughly until the crumbs are evenly moistened and a thick, sandy mixture forms. Press this mixture firmly into the bottom of your prepared pan. Use the bottom of a flat measuring cup or a glass to pack the crust down tightly, ensuring an even and sturdy base.
-
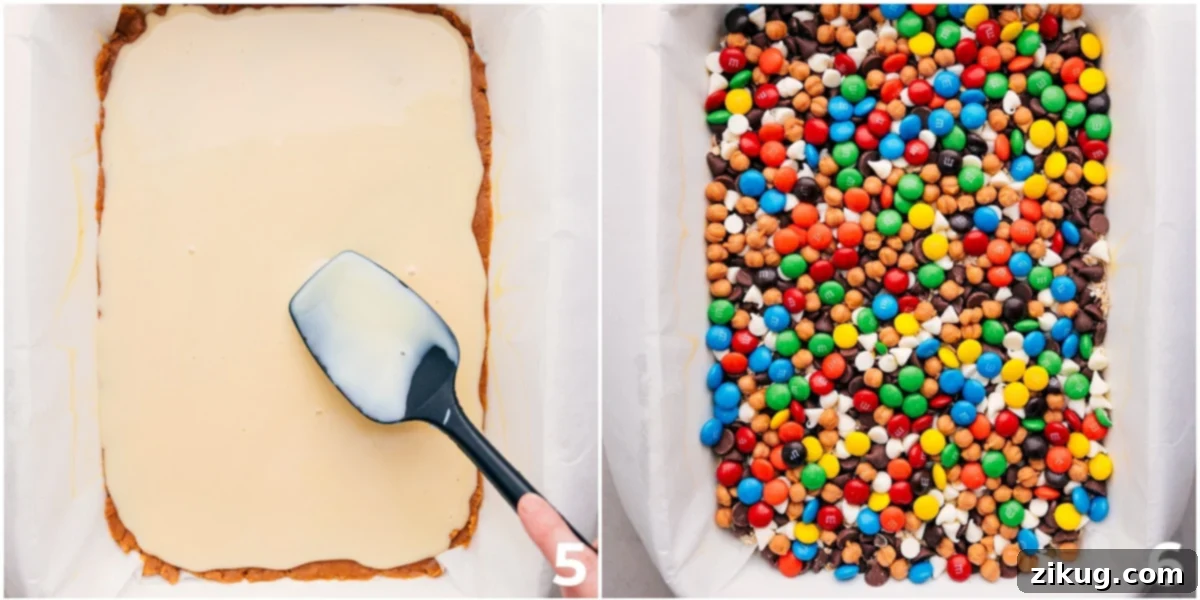
Carefully pour the entire can of sweetened condensed milk over the pressed graham cracker crust. Using the back of a spoon or an offset spatula, gently spread the condensed milk into an even layer, covering the entire crust. Next, evenly scatter the quick oats over the condensed milk. Follow with the chocolate chips, white chocolate chips, caramel bits, and finally, the M&M’s. Once all toppings are distributed, gently press them down into the sweetened condensed milk with your hands or the back of a spoon. This helps the toppings adhere to the milk layer and creates a neat, cohesive bar.
-
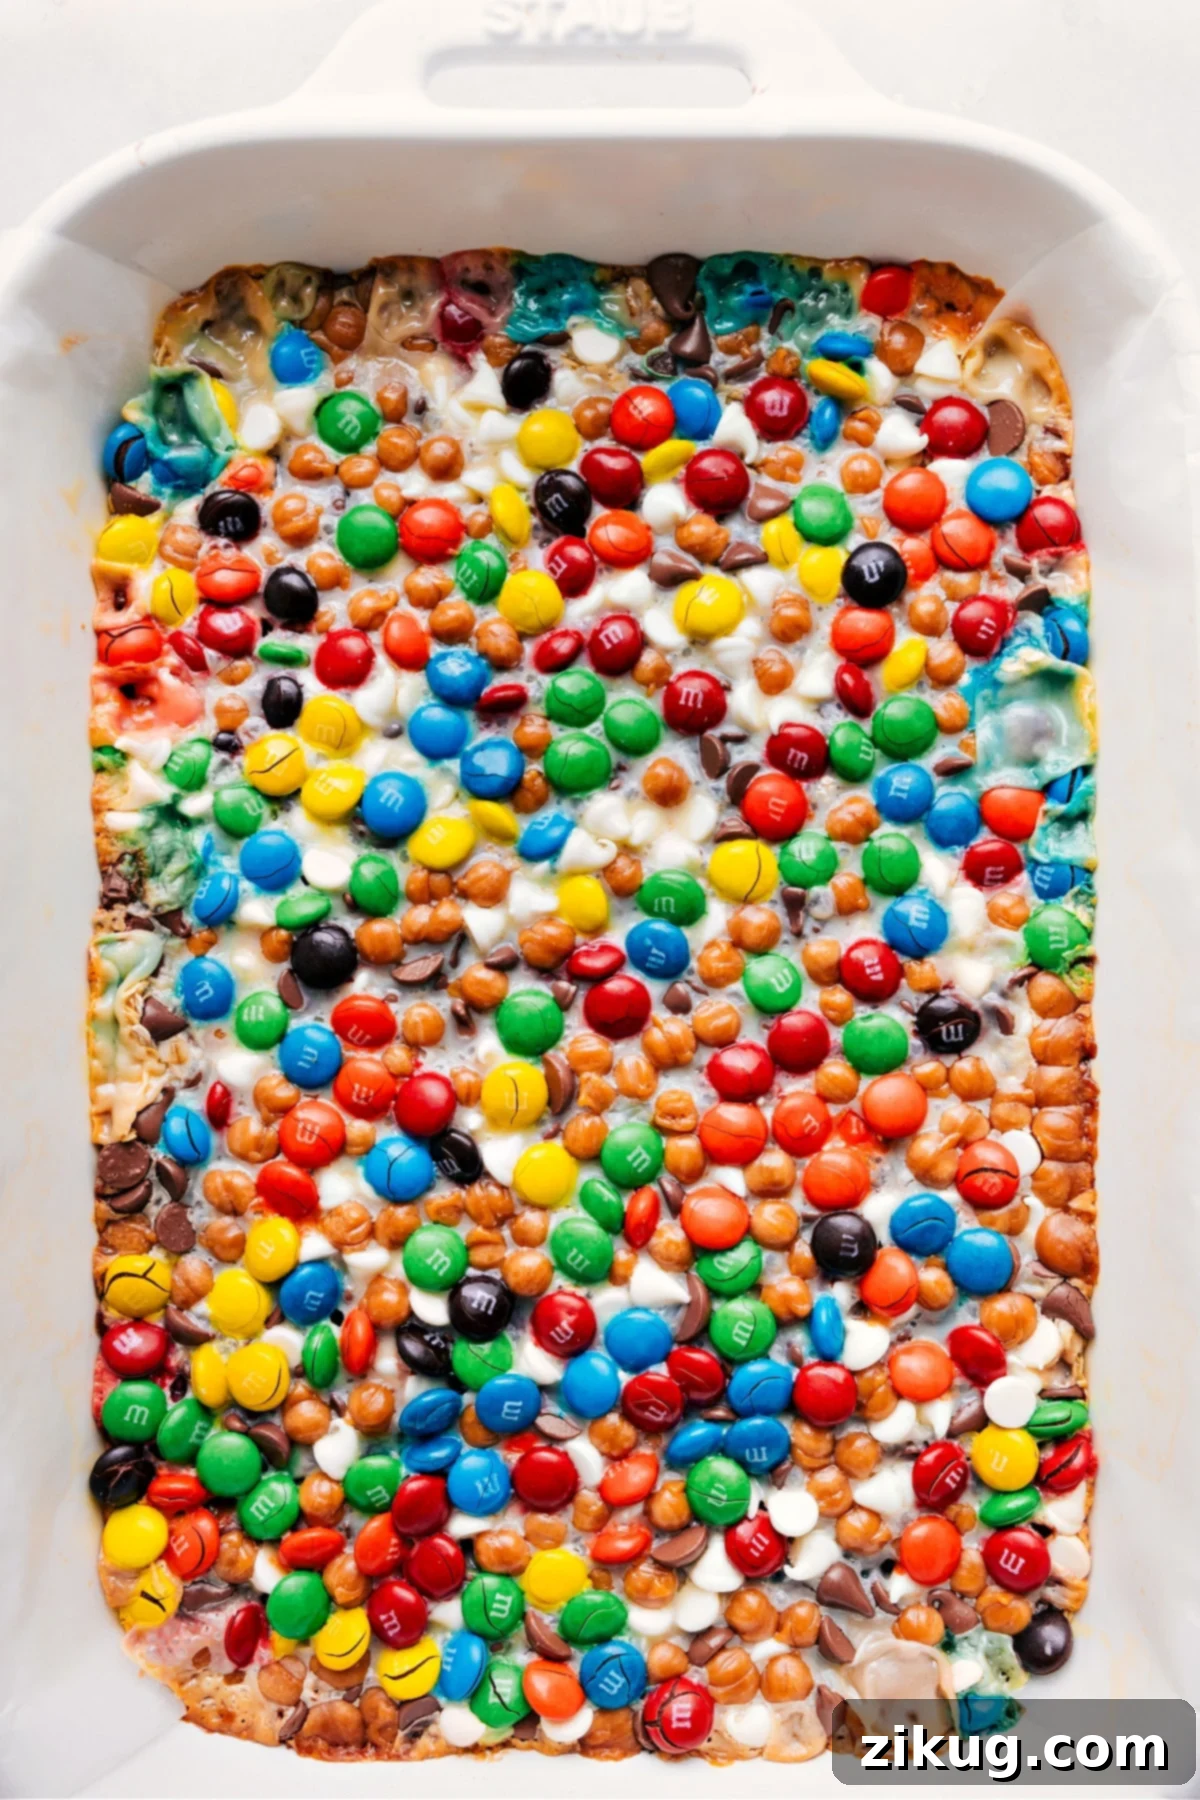
Bake the bars in the preheated oven for approximately 23–28 minutes, or until the edges are beautifully golden brown and the topping is set and bubbly. Every oven varies, so keep a close eye on them. In many ovens, the bars are perfectly done right around the 25-minute mark.
-
Once baked, remove the pan from the oven and allow the Magic Cookie Bars to cool completely on a wire rack. This is a crucial step for clean cuts and typically takes about 1–2 hours at room temperature. If you’re in a hurry, you can speed up the cooling process by placing them in the refrigerator after they’ve cooled for about 20 minutes at room temperature. Once thoroughly cooled, use the parchment overhang to carefully lift the entire slab of bars out of the pan. Place them on a cutting board and use a sharp knife to make decisive, clean cuts. For extra neat slices, run your knife under warm water, dry it on a kitchen towel, and repeat this process before each cut.
Recipe Notes
Note 2 (Sweetened Condensed Milk): This ingredient is vital for the signature gooey texture and sweetness of Magic Cookie Bars. It’s easy to mistakenly grab evaporated milk or another similar product, but only sweetened condensed milk will achieve the correct result. Be sure to select the full-fat variety and avoid any sugar-free versions, as they won’t perform the same way. We highly recommend brands like Eagle Brand® for consistent quality.
Note 3 (Caramel Bits): Caramel bits are typically found in the baking aisle, often alongside other baking chips or caramels, or sometimes in the candy aisle with similar caramel candies. Ensure you purchase a fresh bag so they are soft and melt beautifully. If caramel bits are unavailable, you can substitute them with an additional 1/2 cup of white chocolate chips or butterscotch chips for a different but equally delicious flavor.
Storage: Store any leftover Magic Cookie Bars in an airtight container. If stacking, separate layers with parchment paper to prevent sticking. They can be stored at room temperature for up to 3 days. For a firmer texture or in warmer climates, refrigerate them for up to 5 days. For longer storage, wrap individual bars tightly and freeze for up to 3 months, thawing at room temperature before serving.
Nutrition
Serving:
1
bar
|
Calories:
180
kcal
|
Carbohydrates:
23
g
|
Protein:
3
g
|
Fat:
9
g
|
Saturated Fat:
5
g
|
Trans Fat:
1
g
|
Cholesterol:
16
mg
|
Sodium:
110
mg
|
Potassium:
85
mg
|
Fiber:
1
g
|
Sugar:
17
g
|
Vitamin A:
170
IU
|
Vitamin C:
1
mg
|
Calcium:
60
mg
|
Iron:
1
mg
Nutrition information is automatically calculated and should only be used as an approximation.
Loved this recipe? Leave a comment below!