
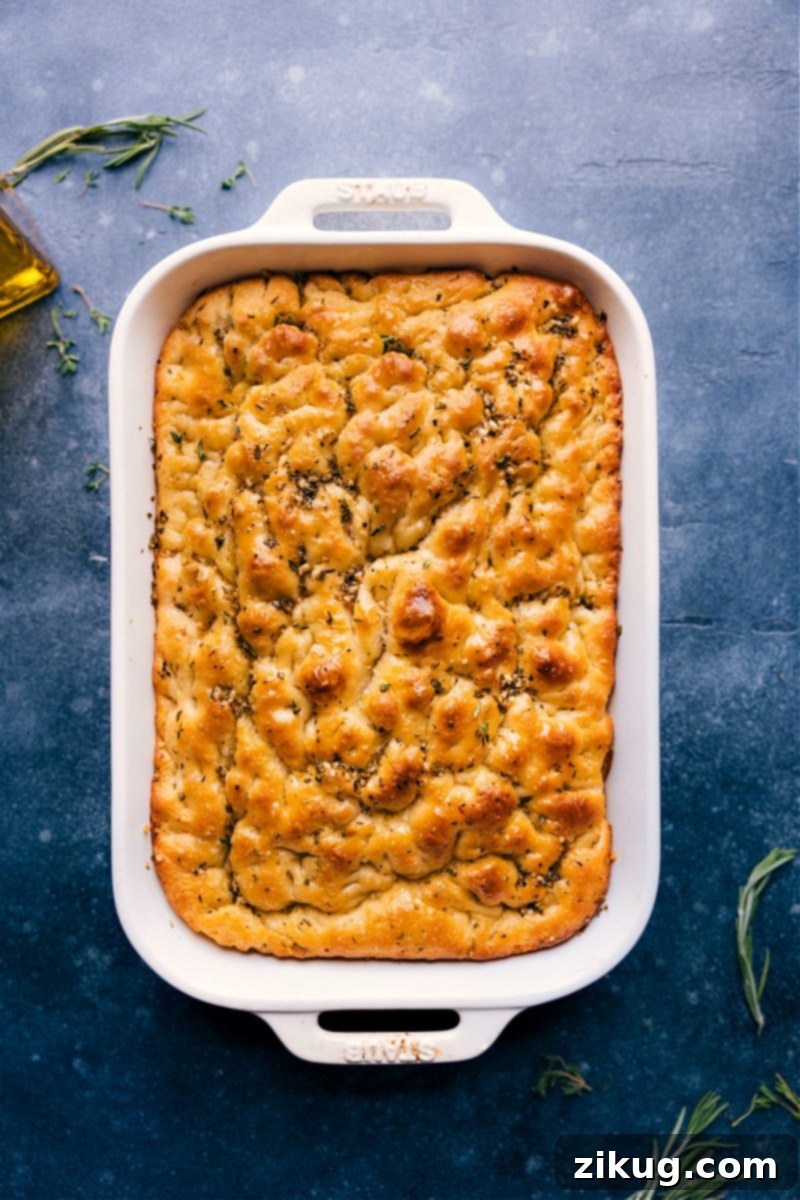
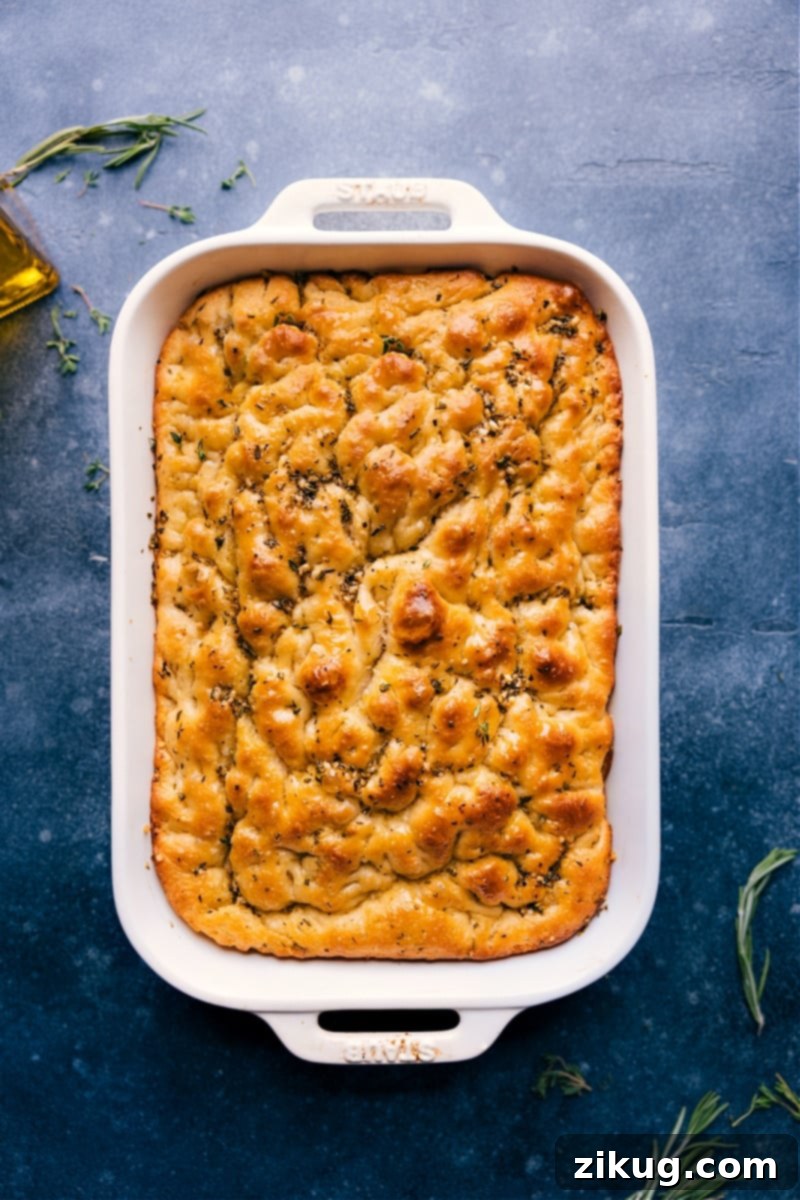
Welcome to your new favorite recipe for Easy Focaccia Bread. This culinary delight promises a perfectly crisp, golden crust that crackles with a hint of salt, revealing a wonderfully light, airy, and chewy crumb. Each bite delivers a rich, satisfying flavor that transports you straight to an Italian bakery. Whether you’re aiming for thick, substantial slices perfect for gourmet sandwiches, or a thinner, more delicate focaccia ideal for dipping and snacking, this recipe is incredibly versatile.
We’re thrilled to share our detailed instructions, guiding you through the creation of both a **classic plain focaccia** and an aromatic **herbed focaccia version**, ensuring a delightful baking experience for every home cook!

Author’s Note
Crafting the Ultimate Easy Focaccia at Home: A Personal Journey
My culinary journey with focaccia began vividly in my childhood. There was a charming local bakery that consistently served a warm, salty square of focaccia alongside my favorite creamy potato soup. That pairing—the irresistible crunch, the tender, soft middle, and the glistening olive oil on top—was sheer perfection in every bite. It’s no wonder that perfecting a homemade focaccia recipe became not just a hobby, but a dedicated mission for me. I wanted to replicate that magical bakery experience right in my own kitchen.
What makes this particular focaccia recipe truly special is its incredible accessibility and ease. You can set aside any worries about needing a stand mixer, a dedicated bread maker, or even extensive kneading. This is a genuinely “no-knead” focaccia, meaning you don’t require any specialized tools or advanced bread-making techniques. The ingredients are simple, straightforward, and readily available, making the entire process surprisingly easy for bakers of all skill levels, from beginners to seasoned enthusiasts.
Furthermore, the beauty of this recipe lies in its largely hands-off nature. Once the initial mixing is done, the dough does most of its work independently, leading to a beautifully fluffy and airy focaccia with minimal effort on your part. This recipe draws thoughtful inspiration from Sarah Jampel’s widely celebrated focaccia method, originally shared on Bon Appetit’s website. Her approach rightfully went viral, and after baking it countless times myself, I’ve incorporated a few personal refinements and tips that I believe further enhance its texture and flavor. My heartfelt thanks go to Sarah for providing such fantastic inspiration!
Essential Ingredients for Our Easy Focaccia Recipe
Crafting an exceptional homemade focaccia truly begins with the quality of your ingredients. Below is a breakdown of what you’ll need, along with valuable tips and potential substitutions to ensure your focaccia turns out perfectly every time:
| Ingredient | Swap or Tip |
|---|---|
| Extra-virgin olive oil | This is not the place to skimp! Use the highest quality, best-tasting olive oil you can find. It’s a foundational flavor. For an herbed focaccia, you can infuse the oil by gently warming it with minced garlic, fresh rosemary, and thyme. Be sure to let it cool completely before adding it to the dough. |
| Warm water | The ideal temperature is crucial for yeast activation. Aim for water that is comfortably warm to the touch, around 110°F (43°C). If it feels hot, let it cool for a minute or two before adding the yeast; water that’s too hot can kill the yeast. |
| Yeast (instant or active dry) | Both instant and active dry yeast varieties work equally well for this recipe. If you’re using active dry yeast, you’ll need to proof it first (let it sit with warm water and honey) until it becomes visibly creamy and foamy. If it doesn’t foam, your yeast may be old or inactive, and you’ll need to start over with a fresh batch. Instant yeast can typically be added directly to the flour, but proofing it briefly can still offer peace of mind. |
| All-purpose flour | Standard all-purpose flour will yield a wonderful focaccia with a lovely, soft texture. However, for an even chewier bite and a slightly more developed gluten structure, bread flour can be used. Both options are excellent, so choose based on your preference or what you have on hand. (See Note 2 for flour measurement tips.) |
| Honey | Honey serves a dual purpose: it acts as food for the yeast, helping it activate robustly, and it imparts a subtle sweetness and depth of flavor to the bread. If honey is unavailable, an equal amount of granulated sugar can be used as a simple substitute. |
| Salt + flaky sea salt | Do not reduce the amount of salt specified for the dough; it is essential for both flavor balance and proper gluten development. The finishing touch of flaky sea salt, sprinkled generously over the top before baking, is optional but highly recommended for that characteristic crunchy texture and burst of savory flavor. |
Mastering Your Yeast: The Key to Fluffy Focaccia
Understanding the role of yeast is absolutely fundamental to baking a light, airy, and beautifully textured focaccia. Proofing yeast isn’t merely another step in the recipe; it’s a critical quality check that confirms your yeast is alive, active, and ready to perform its magic.
It’s vitally important to ensure your yeast fully activates and shows signs of life before you proceed with mixing it into the flour. If the yeast doesn’t activate properly, your focaccia dough will not rise as intended, resulting in a dense, heavy bread rather than the desired fluffy, airy texture. Catching this issue early can save you significant time, effort, and ingredients!
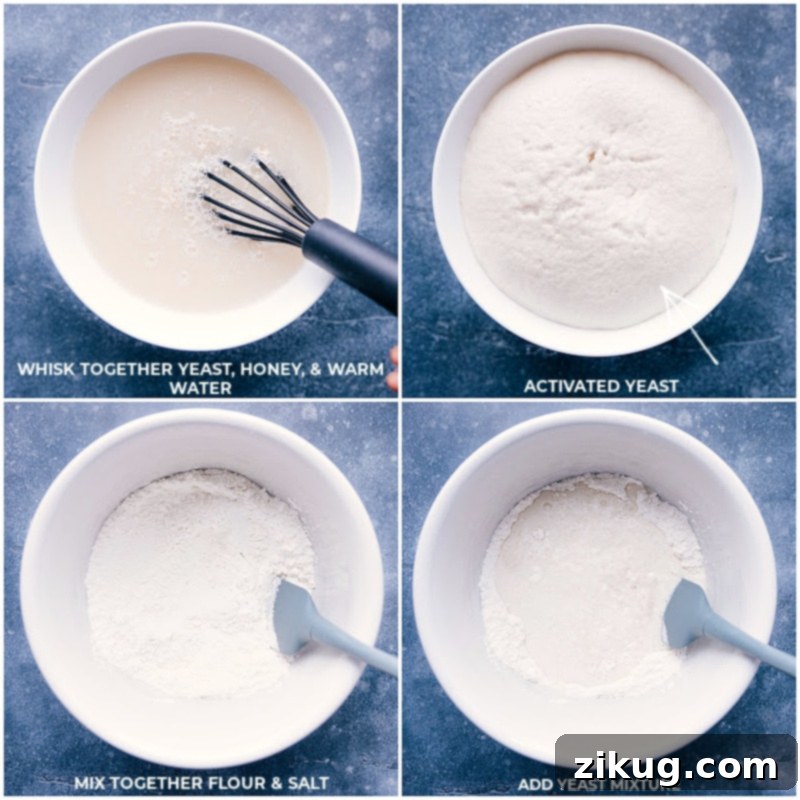
When activated correctly, the yeast mixture (yeast, warm water, and honey) will begin to foam up and develop a distinct creamy, frothy layer on its surface. This effervescence is a clear indicator that the yeast organisms are happily consuming the sugar (honey) and actively producing carbon dioxide. It’s this carbon dioxide that creates the wonderful air pockets and characteristic bubbly structure within your focaccia.
Common Reasons Why Yeast Might Fail to Activate:
- Old or Expired Yeast: Yeast has a finite shelf life. Always double-check the expiration date on your yeast packet or jar. Active dry yeast, in particular, benefits from refrigeration after opening to maintain its potency.
- Water Temperature Too Hot: Exposure to water that is too hot (typically above 120°F or 49°C) can kill the delicate yeast organisms, rendering them completely inactive.
- Water Temperature Too Cold: Conversely, if the water is too cool (below 100°F or 38°C), the yeast will remain sluggish and dormant, preventing it from activating effectively.
- Insufficient Food Source: Yeast requires sugar to feed on and thrive. Ensure you’ve accurately added the specified amount of honey (or sugar) to the warm water during the proofing stage.
- Contaminants: Sometimes, traces of soap or other chemicals in your mixing bowl can inhibit yeast activity. Ensure your bowl is thoroughly rinsed.
If your yeast mixture does not show visible signs of foaming or creaminess after 5-10 minutes, it is strongly advised to discard it and begin again with a fresh packet of yeast and carefully tempered water. This small step ensures a successful focaccia every time.
Quick Tip: Verifying Water Temperature
A reliable way to gauge your water temperature without a thermometer is to perform a simple wrist test. Drip a few drops of the water onto the inside of your wrist. It should feel pleasantly warm, akin to the temperature you’d use for a baby’s bath. If it feels hot, allow it to cool down for a minute or two. If it feels cool or lukewarm, gently warm it a little further. This ensures your yeast finds its optimal environment for rapid and effective activation, setting the stage for a perfect focaccia.
Baking Perfection: Key Tips for Making This Easy Focaccia Recipe
This easy focaccia recipe is meticulously designed to deliver exceptional flavor and texture with minimal fuss. Follow these critical tips to ensure your homemade focaccia rivals that of any artisan bakery:
- Refrigerate Dough for Enhanced Flavor (Cold Fermentation): This step is a game-changer! While the recipe includes an option for same-day baking (refer to Note 3), chilling the dough overnight or for at least 8 hours significantly deepens its flavor profile. The slow, cold fermentation allows the yeast to work gradually, producing more complex, nuanced flavors and improving the dough’s overall texture, making your focaccia even more delicious. This process also makes the wet dough slightly easier to handle.
- Generously Grease the Baking Pan: Do not underestimate the importance of proper pan greasing. A generous coating of softened butter, followed by a light spray of cooking oil and a drizzle of olive oil, creates a powerful non-stick barrier. More importantly, this combination ensures your focaccia develops its signature extra-crispy, golden-brown bottom crust, infusing it with incredible flavor as it bakes.
- Embrace the No-Knead Philosophy: This focaccia dough is intentionally high in hydration, making it very wet and sticky. Resist the natural urge to knead it extensively. This recipe thrives on minimal handling; the gentle folding technique described in the instructions is all that’s necessary to develop sufficient gluten without overworking the dough. Overworking will lead to a tougher, less airy focaccia.
- Minimal Dough Handling is Key: Because of its high hydration, this dough benefits immensely from being handled as little as possible. The less you manipulate it, the more delicate and open its internal structure will be, resulting in that wonderfully airy and bubbly texture that focaccia is famous for. Let time, temperature, and the yeast do the heavy lifting.
- Butter on Top for Luxurious Softness (Optional but Recommended): For an extra touch of indulgence, brushing melted unsalted butter over the focaccia *just before serving* will soften the crispy top crust slightly and add a rich, decadent flavor. If you prefer a fiercely crisp top, you can skip this step or apply it only to the portions you plan to eat immediately.
- Achieving Those Iconic Dimples: The characteristic dimples aren’t just for aesthetics; they serve a functional purpose! These depressions create perfect little pockets for pooling olive oil and collecting flaky sea salt and other toppings, ensuring every bite is flavorful. Don’t be shy – press your fingers firmly, almost aggressively, into the risen dough, mimicking a piano player’s rhythm, to create deep and distinct indentations.
Elevate Your Focaccia: Delicious Topping Ideas
Focaccia is celebrated worldwide for its ability to showcase simple yet exquisite toppings, often highlighting the synergy between high-quality olive oil and fresh herbs. This recipe provides you with the versatility to create two fantastic versions: a perfectly pure and classic plain bread, and a fragrant herbed focaccia infused with a truly delightful blend. Here’s my absolute favorite herb blend that promises an unforgettable herbed focaccia experience:
- High-Quality Olive Oil: This remains the essential base for any great focaccia topping. Its robust, fruity notes are indispensable.
- Fresh Thyme: Adds a delicate, earthy, and subtly floral aroma that beautifully complements the bread.
- Fresh Rosemary: Contributes a wonderfully pungent, piney, and distinctly Mediterranean flavor that is iconic in Italian baking.
- Freshly Cracked Black Pepper: A subtle touch of spice that enhances the savory characteristics of the bread without overpowering it.
- Minced Garlic: Provides a warm, deeply aromatic kick that permeates the dough and oil, filling your kitchen with an enticing scent during baking.
Beyond the Classic: Explore Other Creative Focaccia Topping Ideas:
While the herb blend is fantastic, focaccia is a canvas for your culinary imagination. Feel free to experiment with these delicious additions:
- Cherry Tomatoes & Olives: Halved cherry tomatoes (red or yellow) and thinly sliced Kalamata or Castelvetrano olives, gently pressed into the dimpled dough before baking, create beautiful bursts of juicy, salty, and briny flavor.
- Caramelized Onions: A layer of deeply sweet, tender caramelized onions spread evenly over the dough before its final rise adds a rich, savory, and slightly sweet dimension that is incredibly comforting.
- Parmesan or Feta Cheese: A generous sprinkle of freshly grated Parmesan cheese or crumbled feta cheese can add a salty, umami, or tangy kick to your focaccia, perfect for cheese lovers.
- Thinly Sliced Potatoes & Rosemary: For a heartier, rustic focaccia, arrange very thin slices of potato (like Yukon Gold or red potatoes) over the dough, drizzle with olive oil, and scatter fresh rosemary sprigs.
- Bell Peppers & Red Onion: Thinly sliced bell peppers (any color) and slivers of red onion create a colorful and flavorful topping, especially when roasted slightly on top of the bread.
- Pesto Drizzle: After your focaccia has cooled slightly out of the oven, a light drizzle of fresh basil pesto can add a vibrant, garlicky, and herbaceous layer of flavor.
- Sun-Dried Tomatoes & Capers: Chopped sun-dried tomatoes (oil-packed, drained) and briny capers offer concentrated bursts of Mediterranean flavor.
Storage and Enjoyment Tips for Your Focaccia
- Best When Fresh: Focaccia is an absolute delight when consumed on the same day it’s baked, ideally enjoyed still warm from the oven. It’s incredibly versatile—perfect as a side dish, wonderful when dipped in extra virgin olive oil, or transformed into an unforgettable focaccia grilled cheese sandwich!
- Freezing for Longer Storage: For future enjoyment, allow your baked focaccia to cool completely. Then, slice it into individual portions. Wrap each slice tightly in plastic wrap to prevent freezer burn, and subsequently place these wrapped pieces into a freezer-safe bag or an airtight container. Focaccia freezes beautifully and can be stored for up to 3 months.
- Reheating Frozen Focaccia: To reheat, simply place the unwrapped frozen slices directly onto a baking sheet. Warm them in a preheated 300°F (150°C) oven for about 10-15 minutes, or until they are heated through and the crust has regained some of its crispness. This method helps restore its wonderful texture.
- Room Temperature Storage: While truly best fresh, any leftover focaccia can be stored at room temperature for 1 to 2 days. Ensure it is tightly wrapped in plastic wrap or foil to prevent it from drying out. Be aware that its texture will naturally soften considerably over time.
Explore More Delicious Italian-Style Recipes
Salads
Healthy Italian Salad Recipe
Dinner
Classic Baked Ziti Recipe
Dinner
One Pan Italian Sausage and Veggies
Dinner
Delicious Bruschetta Pasta
Print Recipe
The Best Easy Focaccia Recipe (No-Knead)
Chelsea Lords
This easy, no-knead focaccia recipe features an irresistible crisp, salty crust and an incredibly light, airy, and chewy interior. Crafted with minimal effort, it boasts a rich, deep flavor, especially when made with high-quality extra virgin olive oil. Perfect for any meal!
20 minutes
30 minutes
11 hours
11 hours 50 minutes
9 large (sandwich size)
Video Tutorial
Equipment
-
9 x 13-inch baking pan or 13×18-inch half sheet pan (see Note 1 for pan sizes)
-
Large Mixing Bowl
-
Sturdy Spatula or Wooden Spoon
-
Plastic Wrap
Ingredients
- 6 tablespoons extra-virgin olive oil divided (for dough and pan)
- 2-1/2 cups warm water (approximately 110℉ / 43°C)
- 2-1/4 teaspoons instant yeast or active dry yeast
- 1 tablespoon honey
- 5 cups all-purpose flour (spooned and leveled, or 600g by weight)
- 1 tablespoon fine sea salt (for dough)
- 3 tablespoons unsalted butter divided, softened (for greasing pan and optional topping)
- Flaky sea salt for topping bread, optional but highly recommended
- 2 teaspoons minced garlic
- 1 tablespoon chopped fresh thyme or 1 teaspoon dried thyme
- 1 tablespoon chopped fresh rosemary or 1 teaspoon dried rosemary
- 1/4 teaspoon black pepper freshly cracked
Instructions
-
Preparation Tip: For a visual guide, consider watching the tutorial video above before you begin.
In a medium bowl, whisk together the yeast, honey, and warm water. Let this mixture sit undisturbed for 5-10 minutes. It should become visibly creamy and foamy, indicating that the yeast is active. If it doesn’t foam, your yeast may be inactive, and it’s best to start over with fresh yeast. -
Optional Herbed Oil Infusion: If you are making plain focaccia, skip this step. For a flavorful herbed focaccia, combine 6 tablespoons of olive oil with minced garlic, chopped fresh thyme, chopped fresh rosemary, and freshly cracked pepper in a small saucepan. Heat gently over low heat for 5–10 minutes, or until the herbs and garlic are wonderfully fragrant. Remove from heat and set aside to cool completely before incorporating into the dough. This infusion step is crucial for developing deep herbal flavors.
-
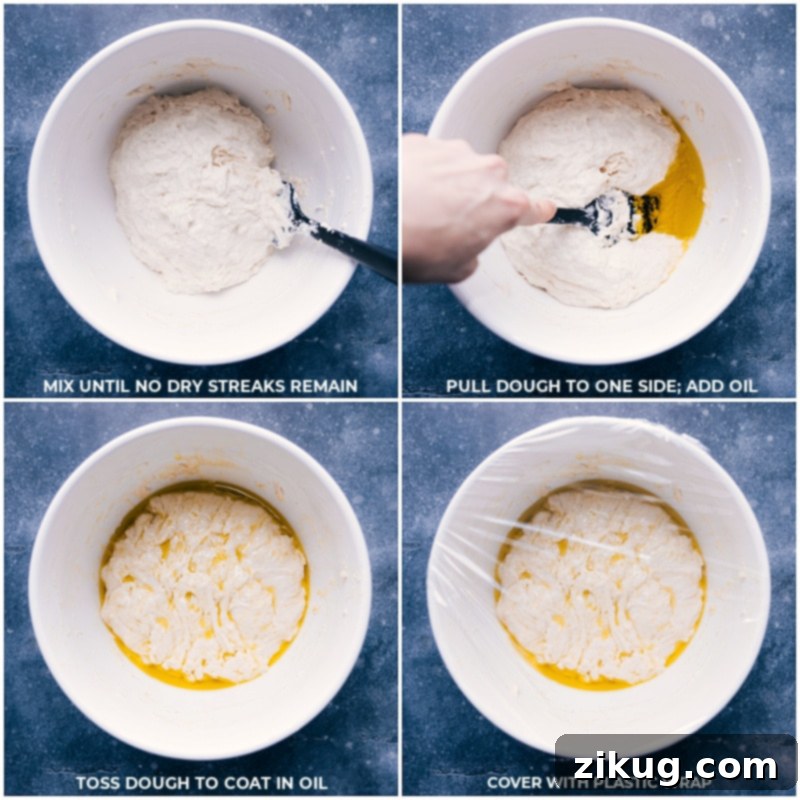
In a large mixing bowl, combine the all-purpose flour and fine sea salt. Pour the activated yeast mixture into the flour mixture. Stir with a sturdy spatula or wooden spoon until a shaggy, wet dough forms and no dry streaks of flour remain. This dough will be very sticky, and that’s exactly how it should be for a no-knead focaccia.
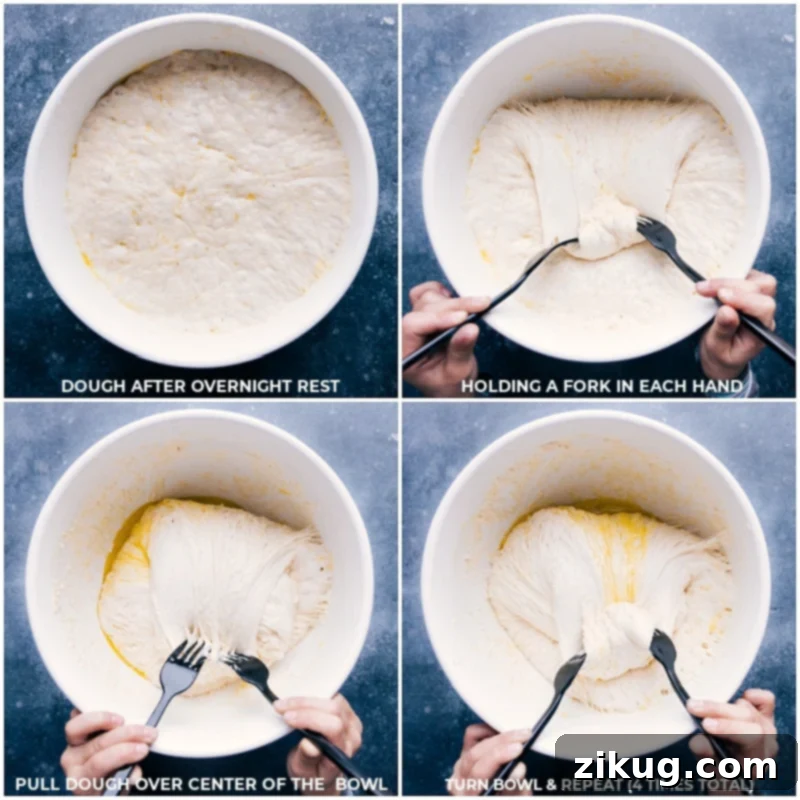
Next, gently push the dough to one side of the bowl. Pour in 4 tablespoons of plain olive oil (or your cooled herbed olive oil, if using). Using both hands, carefully pick up the sticky dough and turn it over twice, ensuring it is thoroughly coated in the olive oil. This minimal handling helps develop gluten without heavy kneading. -
Cover the bowl tightly with plastic wrap. Place the dough in the refrigerator to chill for an extended period, ideally 8–24 hours. This cold fermentation process is key to developing complex flavors and a superior texture. When you check it in the morning, the dough should be noticeably bubbly and jiggly. (Refer to Note 3 if you wish to bake sooner without overnight chilling.)
-
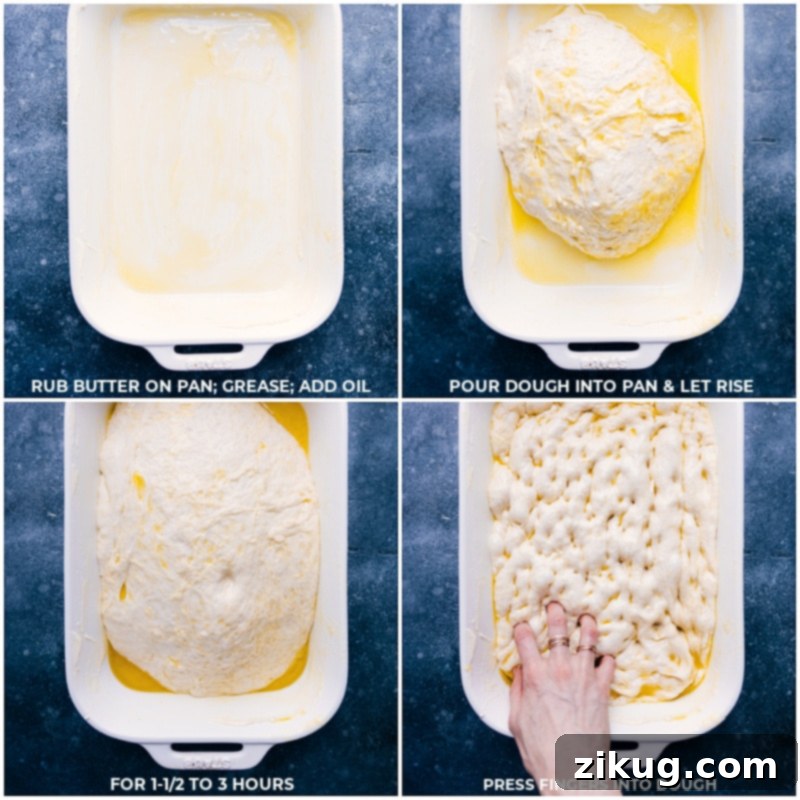
Prepare Your Baking Pan: Refer to Note 1 for choosing the correct pan size. Generously grease your chosen pan by rubbing 1 tablespoon of softened unsalted butter all over the bottom and sides. Lightly spray the pan with cooking spray for an extra non-stick layer. Then, drizzle 1 tablespoon of plain or herbed olive oil, spreading it evenly across the bottom of the pan. This triple-greasing method ensures a perfect crispy base and easy release.
-
Carefully remove the chilled dough from the refrigerator. Using two forks or your oiled hands, gently gather the dough from the side farthest from you, lifting it up and folding it over towards the center of the bowl. Rotate the bowl a quarter turn and repeat this folding process. Repeat two more times, for a total of four gentle folds. This helps build structure.
Gently allow the dough to slide from the bowl into your prepared baking pan. Do not punch down or aggressively shape. Let the dough rise (uncovered) in a warm spot in your kitchen for approximately 1.5–3 hours. The exact time will depend on your room temperature. The dough is ready when a gentle poke with your finger springs back slowly, leaving a slight indentation. If it springs back quickly, it needs more time. -
Preheat your oven to 450°F (230°C). Lightly oil your hands with about 1 teaspoon of olive oil. Gently press and stretch the dough to fill the entire pan, working from the center outwards. Now, create those signature focaccia dimples: aggressively press your fingers deep into the dough, as if playing the piano. This creates air pockets and surface area for olive oil and flaky salt.
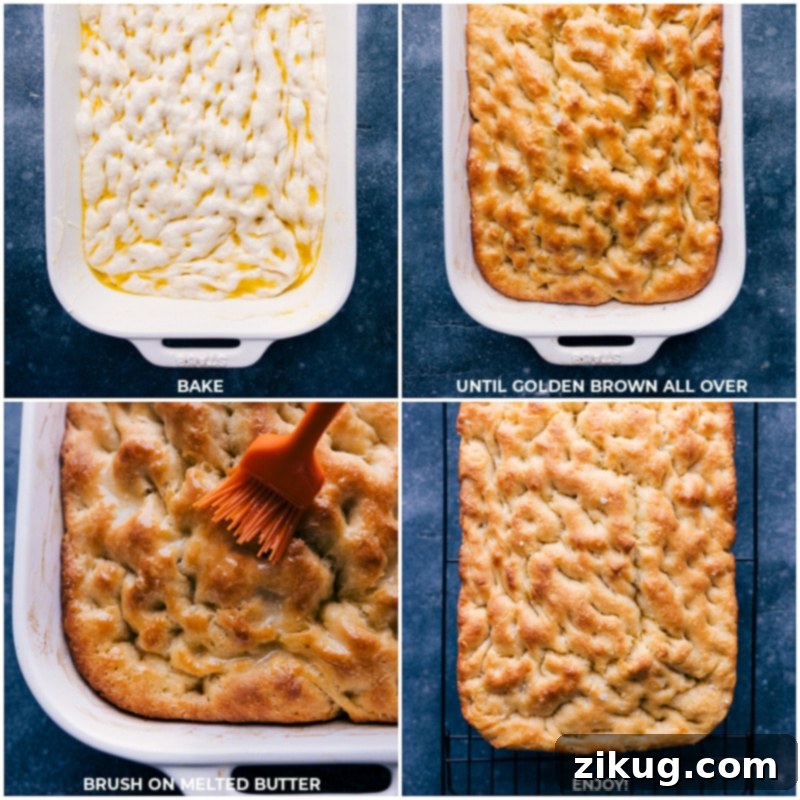
For plain focaccia, drizzle 1 more tablespoon of olive oil evenly over the dimpled bread. Bake for 20–30 minutes if using a 13×18-inch pan (half sheet pan) or 25–35 minutes if using a 9×13-inch pan. Bake until the focaccia is beautifully puffed and deeply golden brown across the top and sides.
Remove the focaccia from the oven and let it rest in the pan for 10–15 minutes. This crucial resting period allows steam to finish cooking the bread and prevents it from becoming gummy. For herbed focaccia, brush with any remaining herbed oil immediately after baking for an extra burst of flavor and a glossy finish. -
For plain focaccia: just before serving, melt the remaining 2 tablespoons of unsalted butter and use a pastry brush to lightly coat the top of the warm bread. This adds a lovely sheen and richness. Generously sprinkle with flaky sea salt if desired for added crunch and flavor. Cut the focaccia into squares and serve warm. For delicious sandwiches, slice each square horizontally to create two bread layers. Enjoy your homemade focaccia!
Recipe Notes for Focaccia Success
Note 2: Accurate Flour Measurement: The amount of flour can significantly impact the final texture of your focaccia. To achieve the most consistent and desired results, especially if you bake frequently, a food scale is highly recommended (aim for approximately 600g of all-purpose flour). If you don’t have a food scale, use the “spoon and level” method: gently spoon flour into your dry measuring cup until it overflows, then level off the top with the flat back of a butter knife. Avoid scooping flour directly from the bag, as this can compact it and lead to using too much flour, resulting in a dense focaccia.
Note 3: Baking Sooner (No Overnight Chill Option): If you’re pressed for time and wish to bake your focaccia on the same day, you can skip the overnight refrigeration step. After thoroughly mixing the dough, let it undergo its first rise at room temperature (around 70°F/21°C) until it has visibly doubled in size, which typically takes about 90 minutes to 2 hours. Once doubled, proceed to gently transfer it to your prepared pan and allow it to undergo a second rise until it doubles in size again (usually another 1-2 hours). After the second rise, bake as directed in the recipe instructions.
Storage and Reheating: Focaccia is truly at its peak when enjoyed on the very day it’s made, ideally served warm from the oven. To store any leftovers, allow the focaccia to cool completely. Then, slice it into individual portions, wrap each piece tightly in plastic wrap to prevent moisture loss, and place them in a freezer-safe bag or an airtight container. It will freeze beautifully for up to 3 months. To reheat, simply place unwrapped frozen slices on a baking sheet and warm them in a 300°F (150°C) oven until they are heated through and the crust has regained its delightful crispness.
Nutrition Information (Approximate)
Calories: 343kcal |
Carbohydrates: 57.3g |
Protein: 7.5g |
Fat: 10.1g |
Sodium: 1.9mg |
Fiber: 2.1g |
Sugar: 2.1g
Nutrition information is automatically calculated and should be used as an approximation. Actual values may vary based on ingredients and preparation methods.
Love this recipe? Share your thoughts and questions below!
Easy Focaccia Recipe: Frequently Asked Questions
Absolutely! Focaccia is incredibly versatile when it comes to toppings. Before baking, you can gently press various ingredients into the dimpled dough. Popular and delicious choices include thinly sliced black or green olives, sweet cherry tomatoes (halved), tender caramelized onions, sautéed mushrooms, thinly sliced potatoes, or a sprinkle of grated Parmesan or crumbled feta cheese for extra flavor and texture. Feel free to get creative and customize your homemade focaccia!
For this easy focaccia recipe, standard all-purpose flour works wonderfully and produces a lovely, soft, and chewy texture. However, if you’re looking for an even chewier bite and a slightly more robust crumb, you can opt for bread flour, which has a higher protein content. Both types of flour will yield delicious results, so feel free to use what you have on hand or what you prefer for your ideal focaccia texture. Remember to measure accurately (see Note 2).
Yes, you can certainly substitute dried herbs for fresh ones when preparing your herbed focaccia. Just keep in mind that dried herbs are significantly more concentrated in flavor than their fresh counterparts. A general rule of thumb is to use one-third the amount of dried herbs compared to fresh. For example, if the recipe calls for 1 tablespoon of fresh rosemary, you would use 1 teaspoon of dried rosemary.
A dense focaccia can typically be attributed to a few common issues during the baking process. Firstly, ensure your yeast is active by proofing it correctly (it should be visibly foamy). Secondly, avoid overworking the dough; this no-knead recipe thrives on minimal handling to maintain its airy, open structure. Thirdly, make sure you allow sufficient time for the dough to rise during both the cold fermentation (if applicable) and the final proofing stages. Inadequate rising time will prevent the characteristic light and bubbly texture from developing.
Yes, you absolutely can! While overnight chilling (cold fermentation) is highly recommended for developing deeper flavors, if you’re in a hurry and want to bake your focaccia on the same day, there’s an easy alternative. After mixing the dough, simply let it undergo its first rise at room temperature (around 70°F or 21°C) for approximately 90 minutes to 2 hours, or until it has visibly doubled in size. Then, gently transfer it to your prepared pan and let it rise again for a second time until doubled, typically another 1-2 hours, before proceeding with baking as instructed.
Achieving that signature wonderfully crispy focaccia crust involves several key factors. Firstly, liberally oiling the baking pan with both softened butter and olive oil before adding the dough creates a crucial barrier that effectively crisps the bottom. Secondly, using enough olive oil on the surface of the dough itself, along with the dimpling technique, helps to achieve a beautifully golden and crunchy top. Lastly, baking at a high temperature (450°F / 230°C) is essential for a quick, intense bake that promotes rapid browning and crispness while keeping the interior perfectly soft and chewy.