
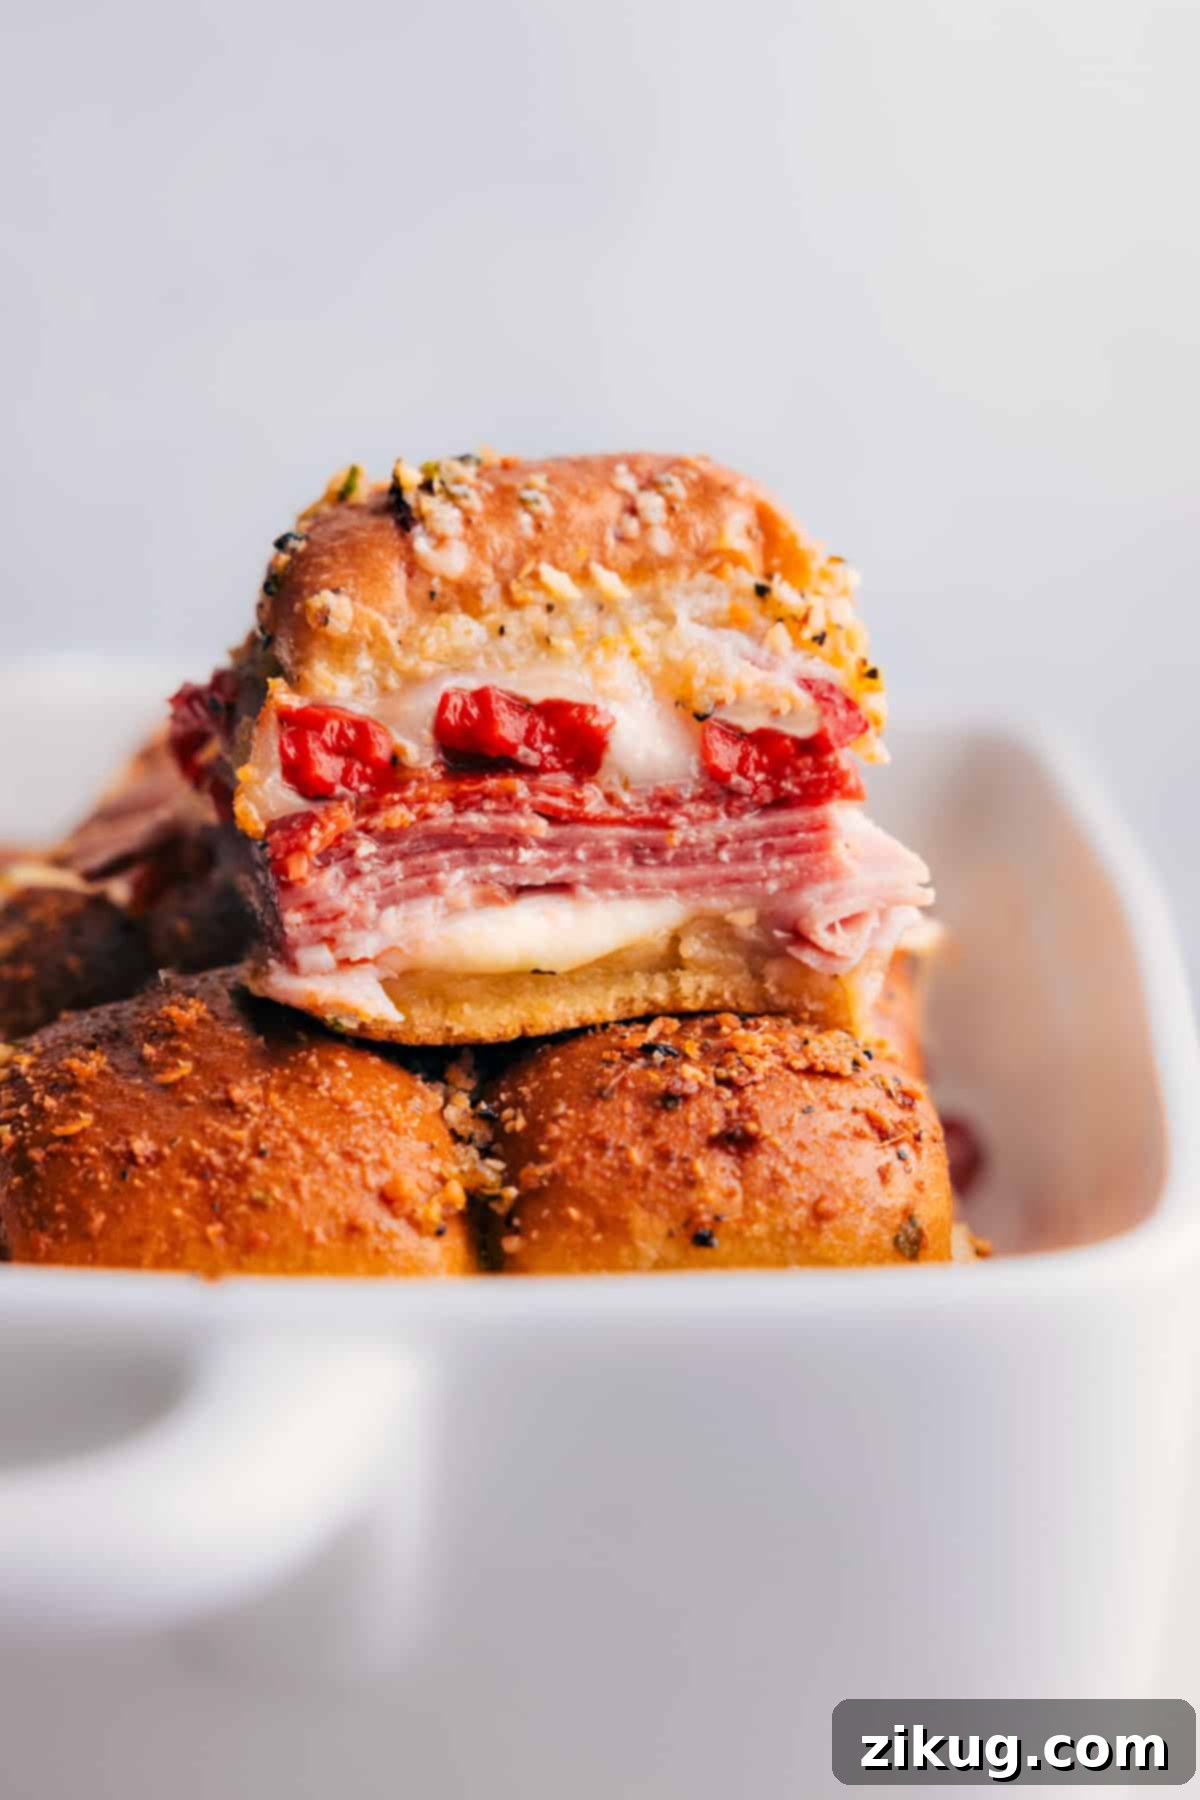
Get ready to delight your taste buds and impress your guests with this incredibly easy and utterly delicious Italian Sliders Recipe. Bursting with layers of savory ham, spicy salami, zesty pepperoni, and creamy Provolone cheese, these miniature sandwiches are elevated with sweet and tangy roasted red peppers, all nestled in soft Hawaiian rolls and brushed with a mouthwatering seasoned butter topping. They’re not just a dish; they’re an experience, guaranteed to be the first to disappear at any gathering!
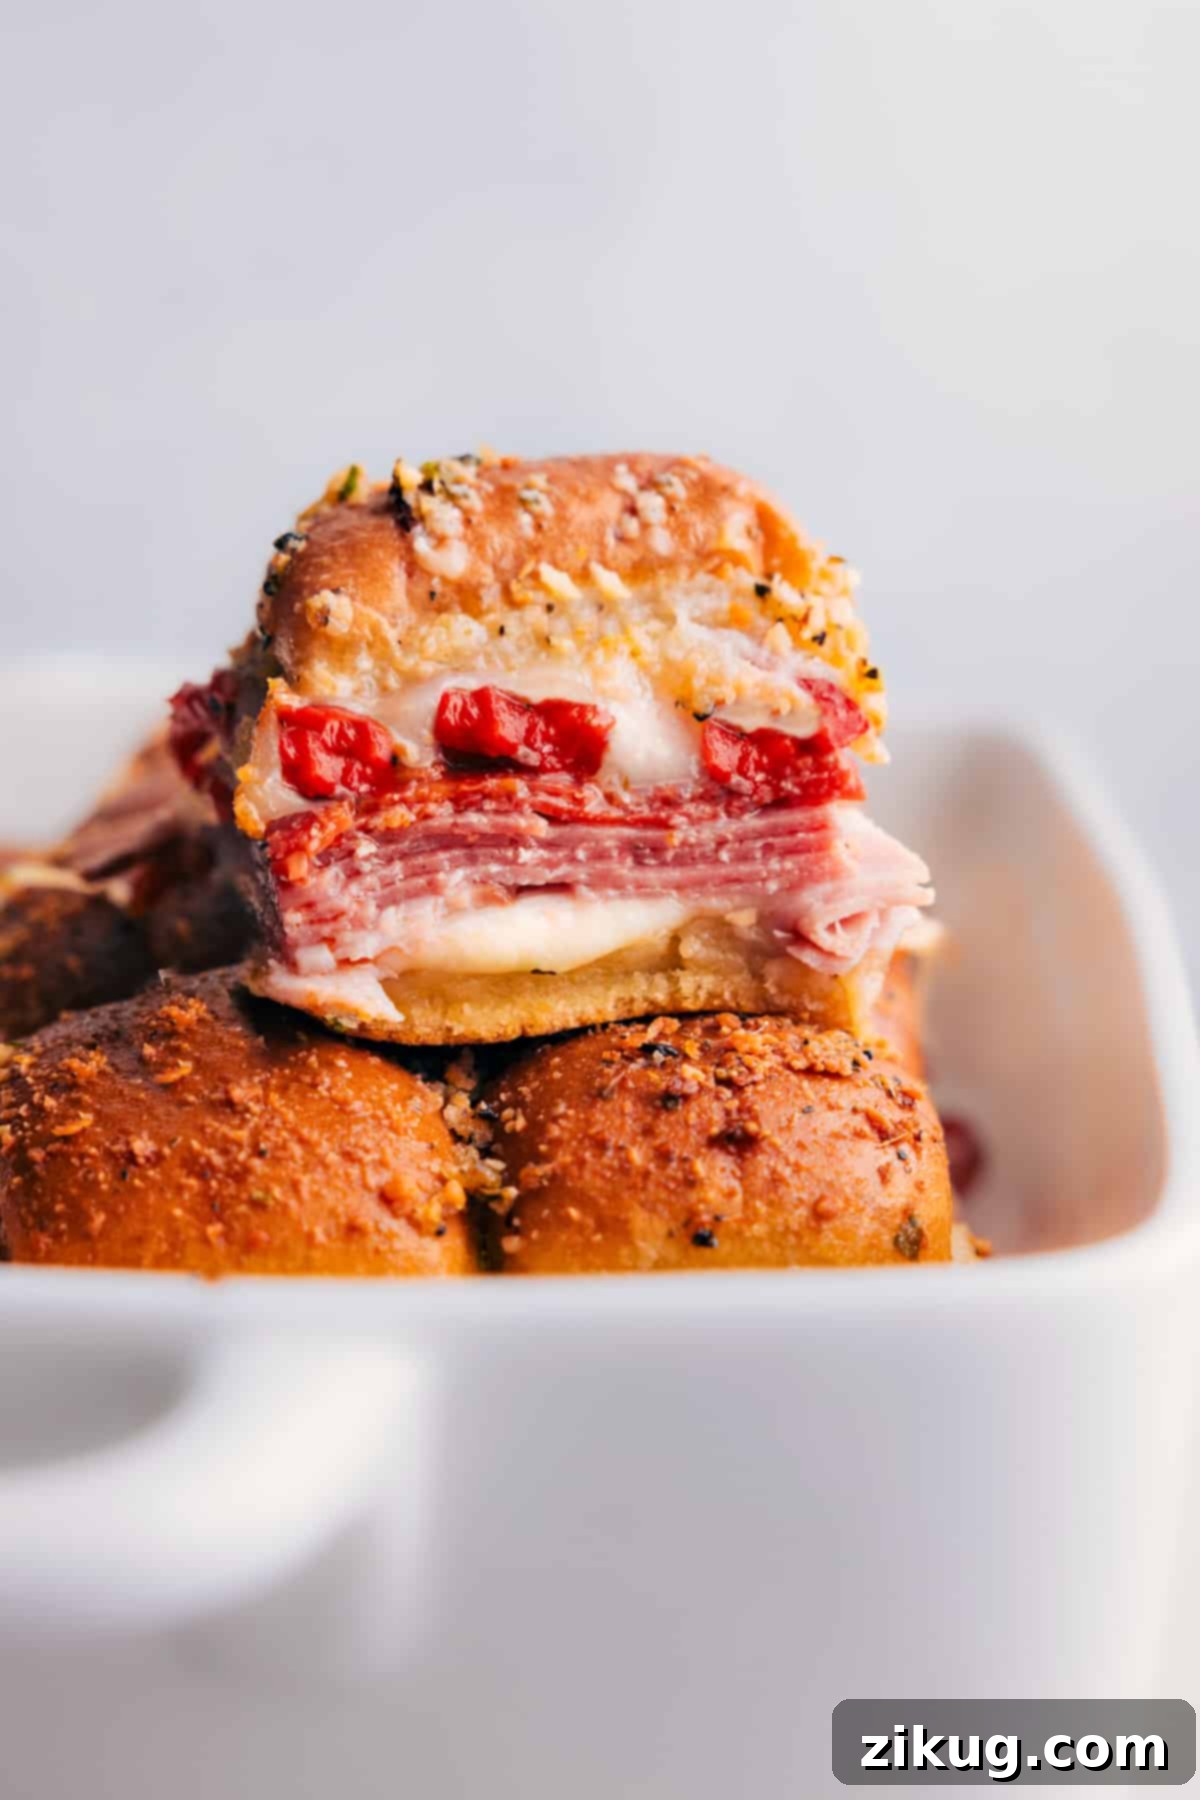
Craft the Best Italian Sliders: Your Go-To Recipe for Any Occasion
When planning a get-together, especially during the bustling holiday season or for a casual weekend party, the question of what to serve often arises. My mind instantly jumps to sliders – and for good reason! These versatile mini sandwiches are an absolute dream for hosts. They’re a true crowd-pleaser, effortlessly simple to prepare, and incredibly budget-friendly, making them a staple for any event where people are coming and going. I love preparing a generous batch or two and simply setting them out, allowing everyone to help themselves. It takes the stress out of serving and lets you enjoy the company of your guests.
This past year, these very Italian Sliders took center stage at an after-Christmas celebration, and to say they were a hit would be an understatement. I genuinely underestimated their popularity – they vanished almost instantly! Everyone raved about the perfect combination of flavors, the soft rolls, and the irresistible buttery crust. The demand was so high that I knew I had to stock up on more ingredients to whip up another batch the very next day. This recipe isn’t just good; it’s legendary among my friends and family, and it’s about to become a legend in your kitchen too.
Why These Italian Sliders Are a Must-Try
What makes these Italian Sliders stand out? It’s the harmonious blend of classic Italian deli flavors with the comforting warmth of baked perfection. The sweetness of the Hawaiian rolls provides an unexpected but delightful contrast to the savory meats and cheese, while a special seasoned butter brushed over the top creates an irresistible golden, crispy crust. They’re substantial enough to be a light meal but small enough to be a perfect appetizer, offering a taste of Italy in every bite. Plus, the minimal prep and hands-off baking time mean you can spend less time in the kitchen and more time enjoying your event.
Key Ingredients for the Perfect Italian Sliders
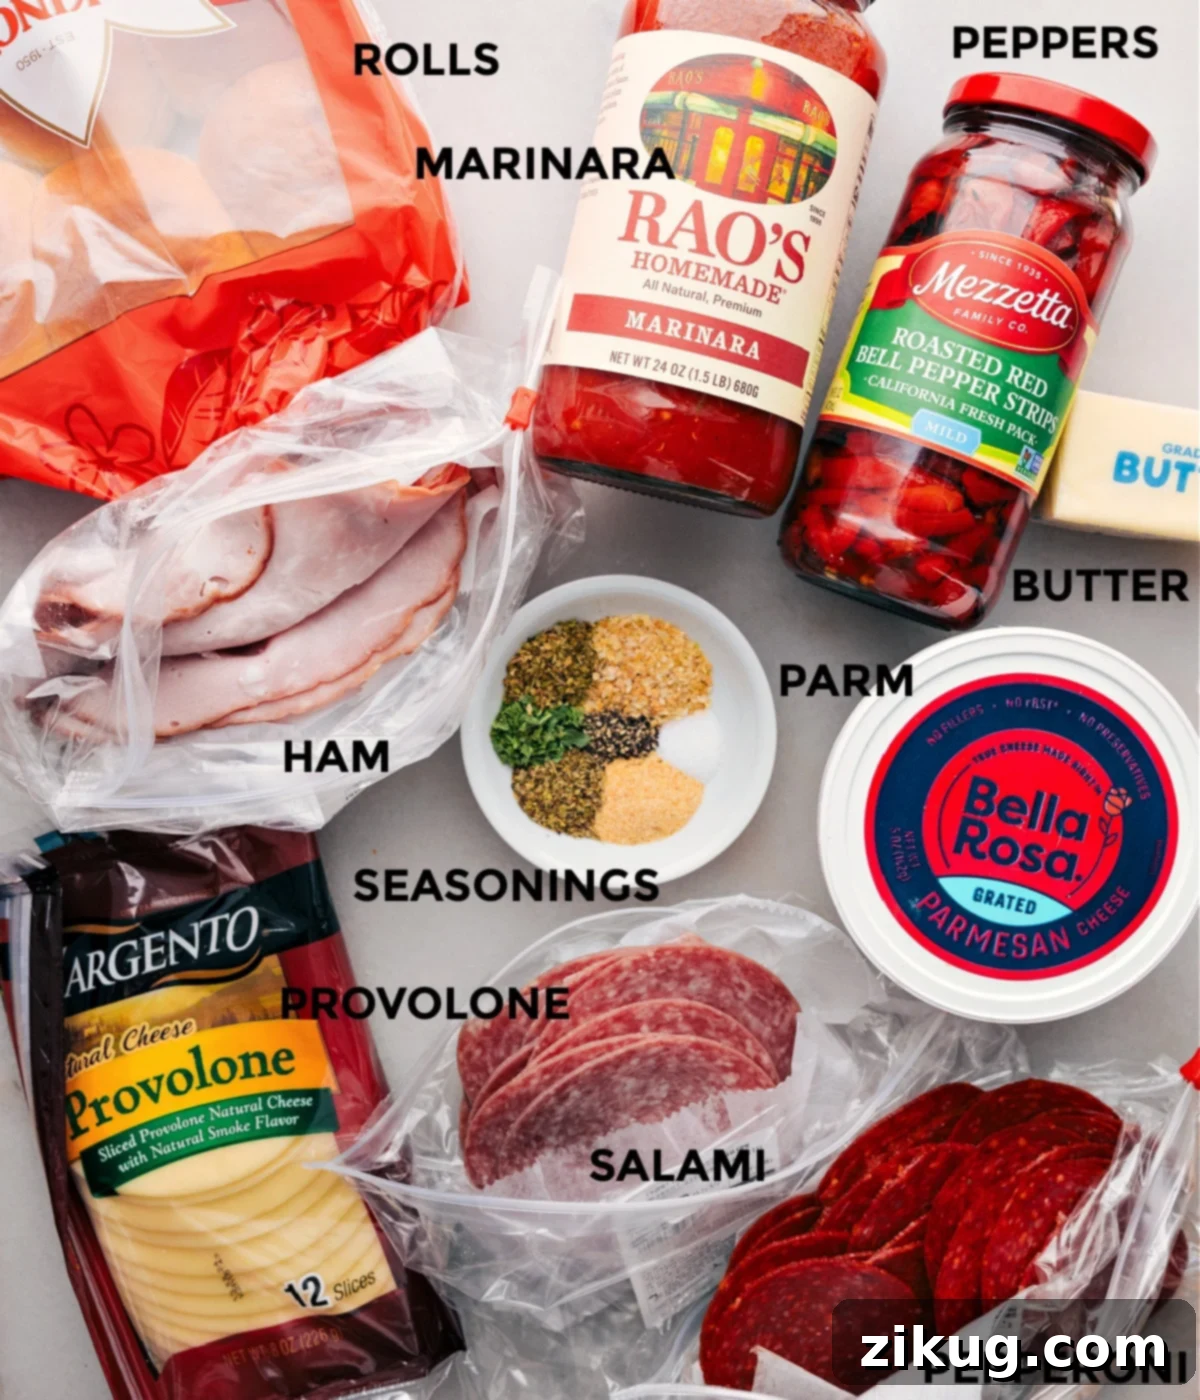
Creating these sensational Italian sliders requires a few simple, high-quality ingredients that come together to form a symphony of flavor and texture. Here’s a closer look at what you’ll need and why each component is essential:
- Hawaiian Rolls: The foundation of our sliders! Opt for a fresh, soft package. These sweet rolls offer a unique flavor profile that beautifully complements the savory fillings. Keeping them connected as a block simplifies the assembly process.
- Provolone Cheese: This semi-hard Italian cheese melts beautifully, creating gooey layers that hold everything together while imparting a mild, nutty flavor. For a twist, you can swap half of the Provolone with fresh mozzarella for an even creamier texture.
- Ham, Salami, & Pepperoni: This trio forms the heart of our Italian flavor. Using thinly sliced deli or pre-packaged meats ensures that each bite is balanced and not overly chewy. The ham provides a salty sweetness, salami adds a rich, tangy depth, and pepperoni brings a delightful, mild spice.
- Roasted Red Peppers (Optional): These vibrant peppers add a touch of sweetness and a pleasant tang that cuts through the richness of the meats and cheese. It’s crucial to drain and pat them very dry to prevent soggy sliders – nobody wants a watery bite!
- Parmesan Cheese (Optional): A sprinkle of grated Parmesan on top before the final bake forms a golden, crispy, and incredibly cheesy crust, adding another layer of umami and texture.
- The Flavorful Butter Topping: This isn’t just plain butter; it’s a seasoned concoction that truly elevates these sliders. A generous spread over the top and sides of the rolls infuses them with garlic, onion, and Italian herbs, creating that irresistible golden-brown crunch and aromatic finish that makes these sliders unforgettable.
Featured Comment
“I’ve made these several times for parties and they are always a hit!! And multiple people ask for the recipe.”
– Charlotte
How to Master This Italian Sliders Recipe
Making these Italian sliders is surprisingly straightforward, even for novice cooks. Follow these step-by-step instructions to achieve perfectly golden, gooey, and delicious results:
- Prepare Your Pan and Preheat Oven: Start by preheating your oven to 350°F (175°C). Generously grease a 9×13-inch baking pan and line it with parchment paper. This ensures easy cleanup and prevents sticking.
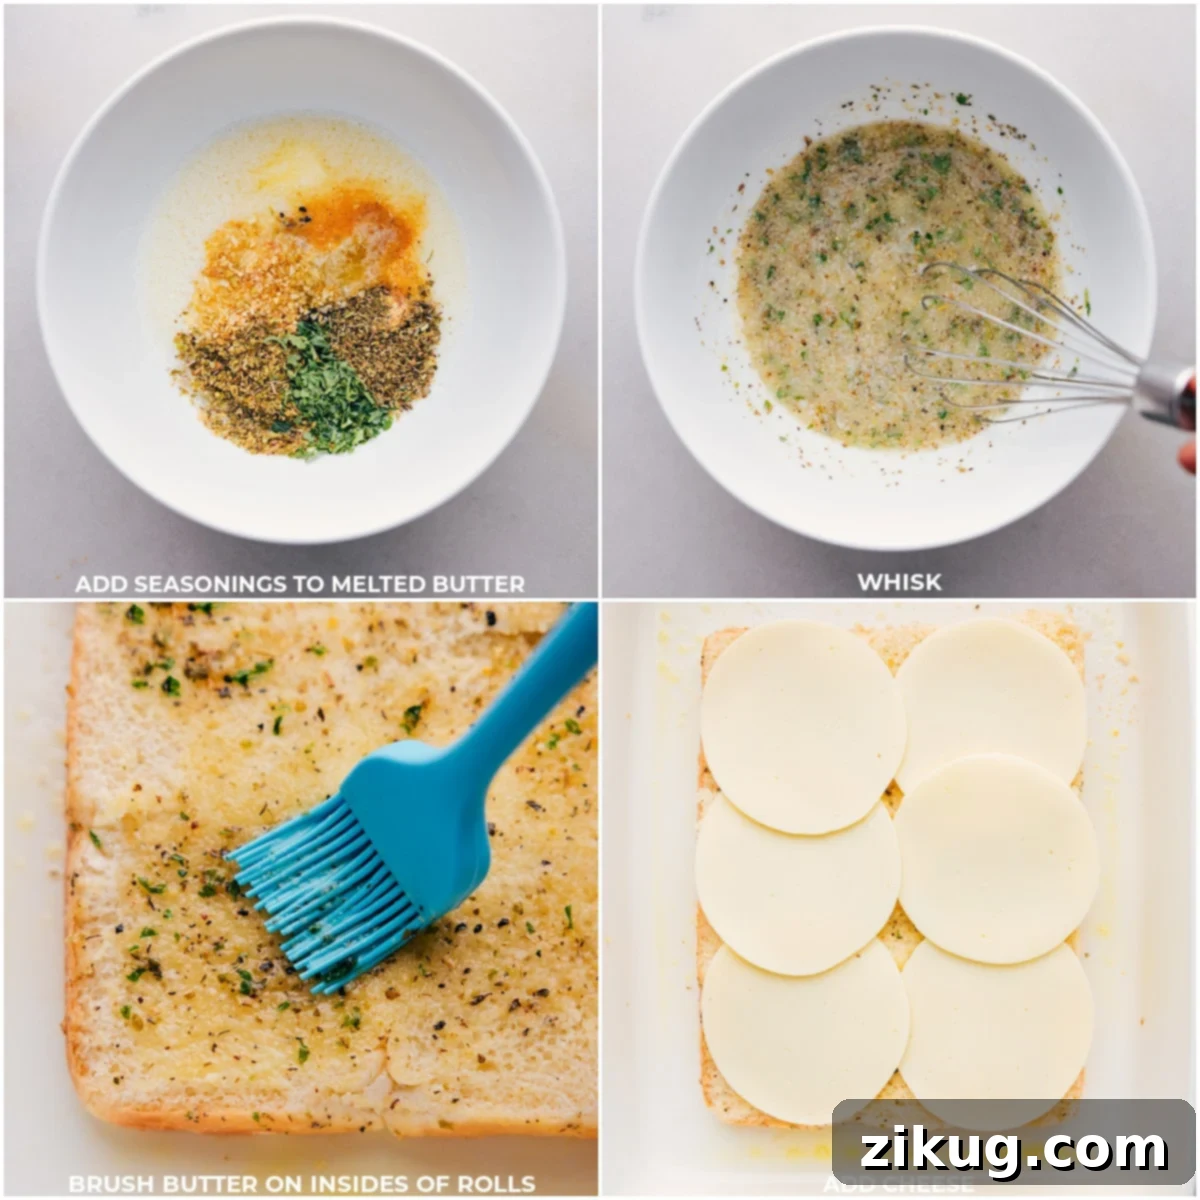
- Craft the Seasoned Butter: In a microwave-safe bowl, gently melt the unsalted butter. Allow it to cool slightly, then whisk in the dried minced onion, garlic powder, dried oregano, dried parsley, Italian seasoning, salt, and pepper. This aromatic mixture is the secret to the sliders’ incredible flavor and golden crust.
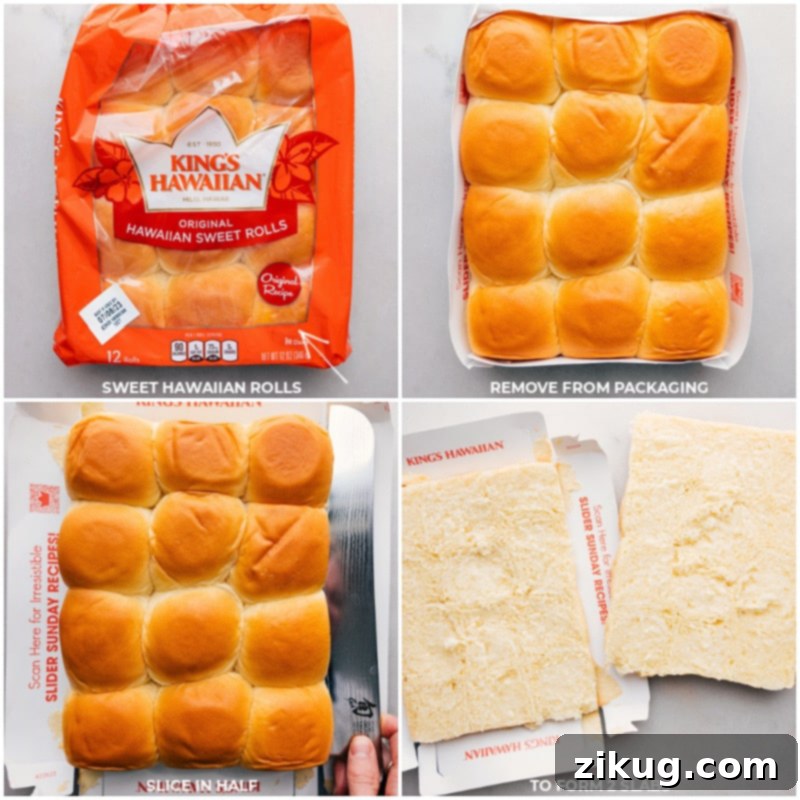
- Slice the Hawaiian Rolls: Using a sharp serrated bread knife, carefully slice the entire block of Hawaiian rolls in half horizontally. The key is to keep all the individual rolls attached as one top piece and one bottom piece. Place the bottom half of the rolls into your prepared baking pan.
- Butter the Rolls: Brush about 2 tablespoons of your seasoned butter mixture onto the cut sides of both the top and bottom halves of the rolls. This foundational layer of butter will infuse flavor from the inside out.
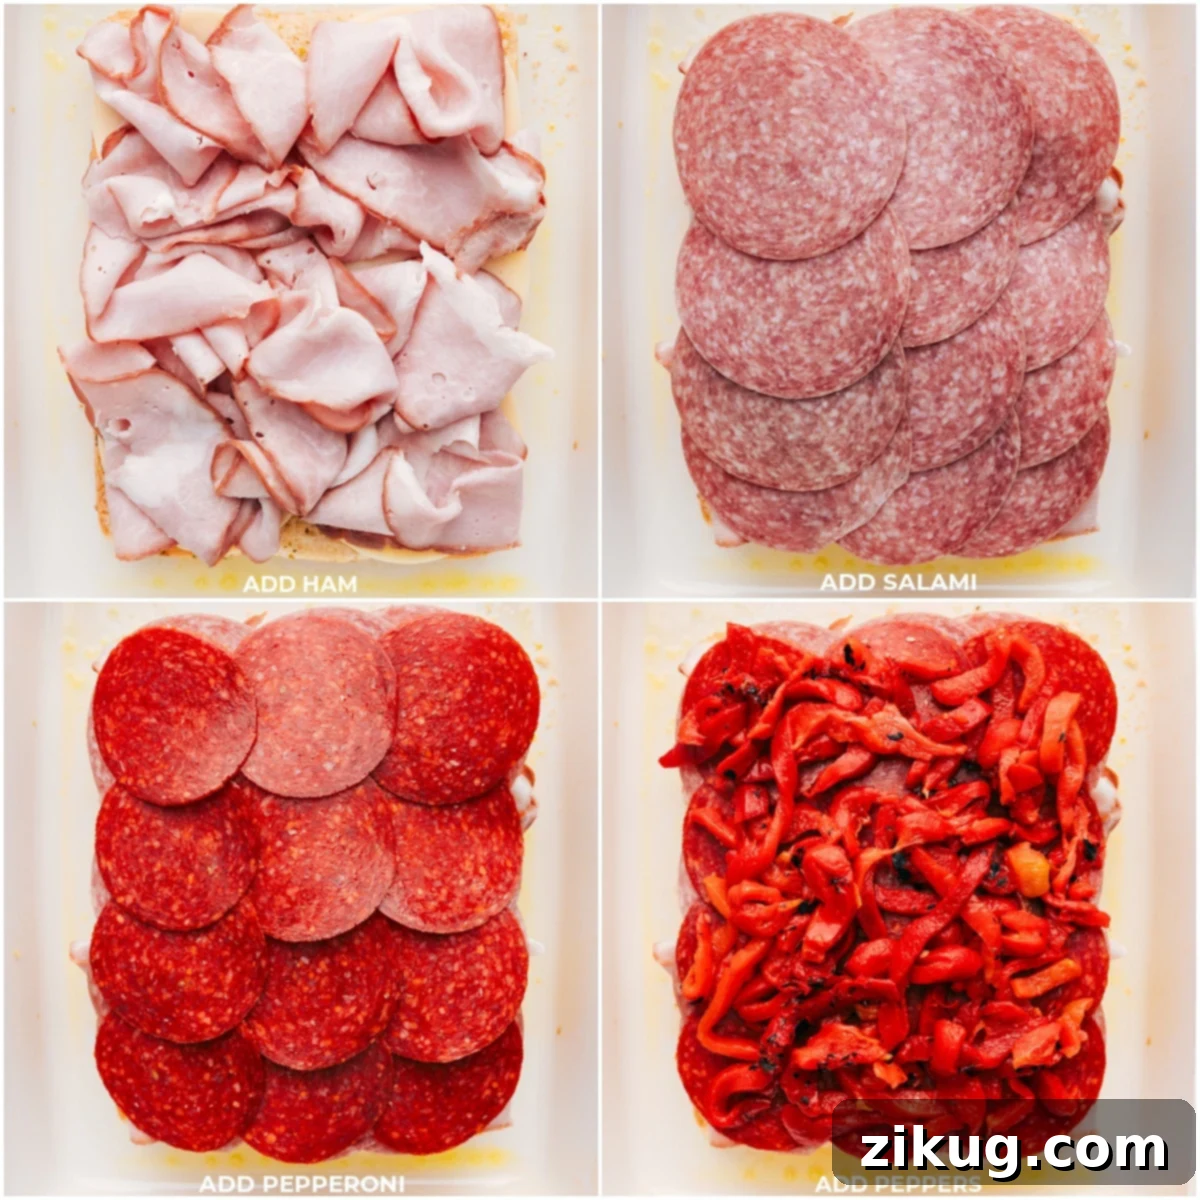
- Layer the Delicious Fillings: On the bottom half of the rolls in the pan, begin layering your ingredients in this order: start with 6 slices of Provolone cheese, followed by the ham, then salami, pepperoni, and finally, the well-drained roasted red pepper strips (if using). Finish this layer with the remaining 6 slices of Provolone cheese. Do not add the top slab of rolls yet.
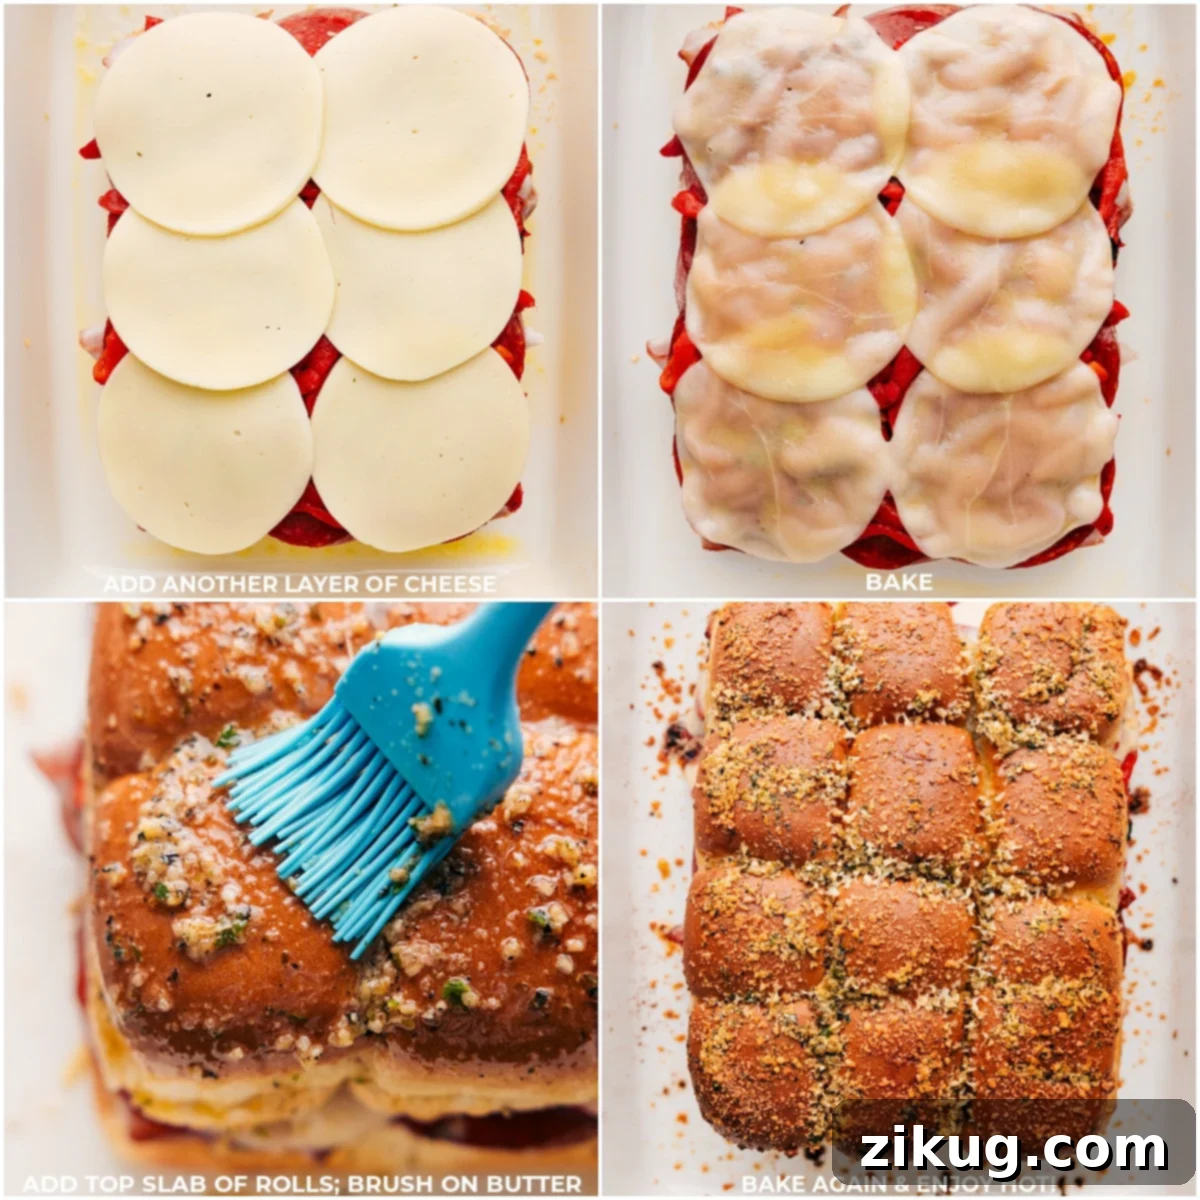
- Initial Bake: Bake the bottom portion of your sliders, uncovered, for 10 minutes. This gives the bottom cheese a head start on melting and slightly toasts the bottom rolls.
- Assemble and Second Bake: Remove the pan from the oven and carefully place the top half of the rolls back onto your layered sliders. Now, brush the top and sides of the rolls generously with the remaining seasoned butter mixture. If you’re using Parmesan cheese, sprinkle it evenly over the top for an extra cheesy crunch. Cover the pan tightly with aluminum foil.
- Final Bake: Return the covered pan to the oven and bake for an additional 20 minutes. This allows the cheese to become perfectly melty and the flavors to meld beautifully without over-browning the top.
- Golden Perfection: Remove the foil and bake for another 5-10 minutes, or until the top of the rolls are gloriously golden brown and the cheese is bubbly and fully melted.
- Serve Warm: Once removed from the oven, allow the sliders to cool for just a few minutes before slicing them into individual servings. Serve these hot, irresistible Italian sliders with a side of warmed marinara sauce for dipping. Enjoy the cheers from your happy crowd!
Quick Tip for Perfect Slicing
Always use a sharp bread knife with a serrated edge when cutting the Hawaiian rolls. Keep the entire block of rolls together and slice straight through, ensuring you create a clean, even top and bottom layer. This precision makes for easier assembly and a more professional-looking slider.
Perfect Pairings: What to Serve with Italian Sliders
Italian sliders are incredibly versatile and pair well with a variety of sides, whether you’re aiming for a light snack or a full meal. Here are some delicious suggestions to complement your sliders:
- Fresh Green Salad: A simple garden salad with crisp greens, cherry tomatoes, cucumbers, and a light vinaigrette dressing offers a refreshing contrast to the rich sliders.
- Crisp Veggie Sticks: Offer a colorful array of carrot sticks, celery sticks, and bell pepper strips alongside a creamy ranch or hummus dip for a healthy and crunchy option.
- Flavorful Pasta Salad: A vibrant Italian pasta salad tossed with fresh vegetables, mozzarella balls, and a zesty Italian dressing makes for a hearty and satisfying side.
- Classic Potato Chips: You can never go wrong with a bowl of classic, crunchy potato chips. Their salty crispness is the perfect counterpoint to the soft, warm sliders.
- Olives and Pickles: A small bowl of assorted olives and tangy pickles can add a burst of briny flavor that complements the Italian meats beautifully. Guests can enjoy them on the side or even add them directly to their sliders for extra zest.
- Hearty Soup: For a more substantial meal, pair your sliders with a comforting bowl of roasted tomato basil soup or a robust minestrone soup. The warm soup and hearty sliders create a truly satisfying combination.
- Caprese Skewers: Create elegant Italian skewers with fresh mozzarella balls, sweet cherry tomatoes, and basil leaves, drizzled with balsamic glaze. They’re easy to eat and add a fresh, colorful touch to your spread.
Storage Solutions & Leftovers
Enjoying Leftover Italian Sliders
Italian sliders are best enjoyed fresh out of the oven, but they also make fantastic leftovers. Here’s how to store and reheat them to maintain their deliciousness:
- Cool Down: It’s essential to let the Italian sliders cool completely to room temperature before storing them. This prevents condensation from building up, which can make them soggy.
- Package Properly: Once cooled, transfer the sliders into an airtight bag or container. This will protect them from air exposure and keep them fresh.
- Refrigerate: Store the packaged sliders in the refrigerator for up to 3 days. Beyond this, the bread can start to dry out.
- Reheat for Best Results: To reheat, arrange the sliders in a single layer on a baking sheet. Cover them loosely with aluminum foil to prevent them from drying out. Warm them in a preheated oven at 350°F (175°C) for approximately 10-15 minutes, or until the cheese is melted and they are heated through. Microwaving is an option for speed, but the oven method will yield a much better texture.
Explore More Delicious Slider Recipes:
Dinner
French Dip Sliders
Lunch
Ham and Cheese Sliders Recipe
Sandwiches
Turkey Sliders Recipe
Dinner
Italian Beef Sliders
Saved
Pin
Italian Sliders Recipe
Chelsea Lords
15 minutes
35 minutes
50 minutes
12 Sliders
Video
Italian Sliders
Italian Sliders are quick and simple, made with ham, salami, pepperoni, roasted red peppers, and Provolone cheese—they’re always a crowd pleaser!

Italian Sliders Video
Equipment
-
9 x 13-inch baking pan
Ingredients
- Cooking spray
- 12-count package Hawaiian sweet dinner rolls see note 1
- 12 slices provolone cheese divided
- 5 ounces thinly sliced deli ham 12 slices
- 2 ounces salami 12 large slices, see note 2
- 2 ounces pepperoni 12 large slices or 24 smaller
- 8 ounces roasted red pepper strips optional, see note 3
- 1 tablespoon grated Parmesan cheese optional
- Marinara sauce warmed, optional, for serving
- 8 tablespoons unsalted butter
- 1-1/2 teaspoons dried minced onion
- 1 teaspoon garlic powder
- 1/2 teaspoon dried oregano
- 1/2 teaspoon dried parsley
- 1/2 teaspoon Italian seasoning
- 1/4 teaspoon salt
- 1/4 teaspoon pepper
Instructions
-
Preheat oven to 350°F (175°C). Generously grease a 9×13-inch baking pan. For easy cleanup, line the pan with parchment paper.
-
In a microwave-safe bowl, melt the 8 tablespoons of unsalted butter. Allow it to cool slightly (to avoid cooking the herbs), then whisk in the dried minced onion, garlic powder, dried oregano, dried parsley, Italian seasoning, salt, and pepper until well combined. This is your flavorful butter topping.
-
Using a sharp serrated bread knife, carefully slice the entire block of Hawaiian rolls in half horizontally, ensuring all individual rolls remain connected as a single top and bottom slab (see Note 1 for helpful visuals). Place the bottom half of the rolls into your prepared 9×13-inch baking pan. Brush 2 tablespoons of the seasoned butter mixture generously onto the cut side of the bottom half of the rolls. Also, brush another 2 tablespoons of the butter mixture onto the cut side of the top half of the rolls, setting the top half aside for now.
-
Layer the fillings onto the bottom half of the rolls in the pan, maintaining this specific order: first, lay down 6 slices of Provolone cheese, followed by the thinly sliced ham, then salami, then pepperoni. If using, evenly distribute the well-drained roasted red pepper strips over the meats. Finish this layer with the remaining 6 slices of Provolone cheese. At this stage, do not add the top slab of rolls. Bake the assembled bottom portion, uncovered, for 10 minutes. This allows the foundational cheese layer to start melting and the rolls to lightly toast.
-
Carefully remove the pan from the oven. Gently place the top half of the rolls (cut-side down) onto the layered fillings. Now, generously brush the top and all visible sides of the rolls with the remaining seasoned butter mixture, ensuring good coverage for maximum flavor and crispness. If you’re incorporating grated Parmesan cheese, sprinkle it evenly over the buttered top. Cover the entire pan tightly with aluminum foil to trap moisture and ensure even cooking. Bake for an additional 20 minutes. After 20 minutes, remove the foil and continue baking for 5–10 minutes more, or until the top is beautifully golden brown and the cheese inside is bubbly and completely melted.
-
Once baked to perfection, remove the pan from the oven and let it rest for 5 minutes before cutting into individual sliders. This brief resting period helps the cheese set slightly, making for cleaner cuts. Serve these delectable Italian sliders hot, accompanied by a side of warmed marinara sauce for dipping.
Recipe Notes
When cutting the Hawaiian rolls, keep the entire block intact. Use a long, sharp serrated bread knife to slice horizontally through the middle, creating a clean top and bottom layer. This method ensures uniform sliders and makes assembly much easier.
Note 2: Meat Thickness and Quantity
For the best texture and flavor distribution, I highly recommend using thinly sliced deli pepperoni and salami. If you choose larger deli slices, about 12 slices of each will be sufficient for coverage. If you opt for smaller, pre-packaged pepperoni or salami rounds, you’ll need approximately 24 pieces to achieve adequate layering. Feel free to adjust the quantity of meats to suit your personal preference for a meatier slider.
Note 3: Roasted Red Peppers – To Use or Not to Use
Roasted red peppers add a wonderful sweet and tangy element to these sliders. However, if red peppers aren’t to your taste, you can absolutely omit them. If you do include them, ensure they are thoroughly drained and squeezed of any excess moisture with paper towels. Approximately 8 ounces equates to about 1 cup. Making sure they are very dry is key to preventing your sliders from becoming soggy.
Storage Instructions:
To store any leftover sliders, first allow them to cool completely to room temperature. Then, place them in an airtight bag or container. They will keep well in the refrigerator for up to 3 days. For reheating, simply warm them in an oven preheated to 350°F (175°C) for about 10-15 minutes, covered loosely with foil to keep them moist and prevent drying out.
Nutrition
Nutrition information is automatically calculated, so should only be used as an approximation.
Love this recipe? Leave a comment below!