
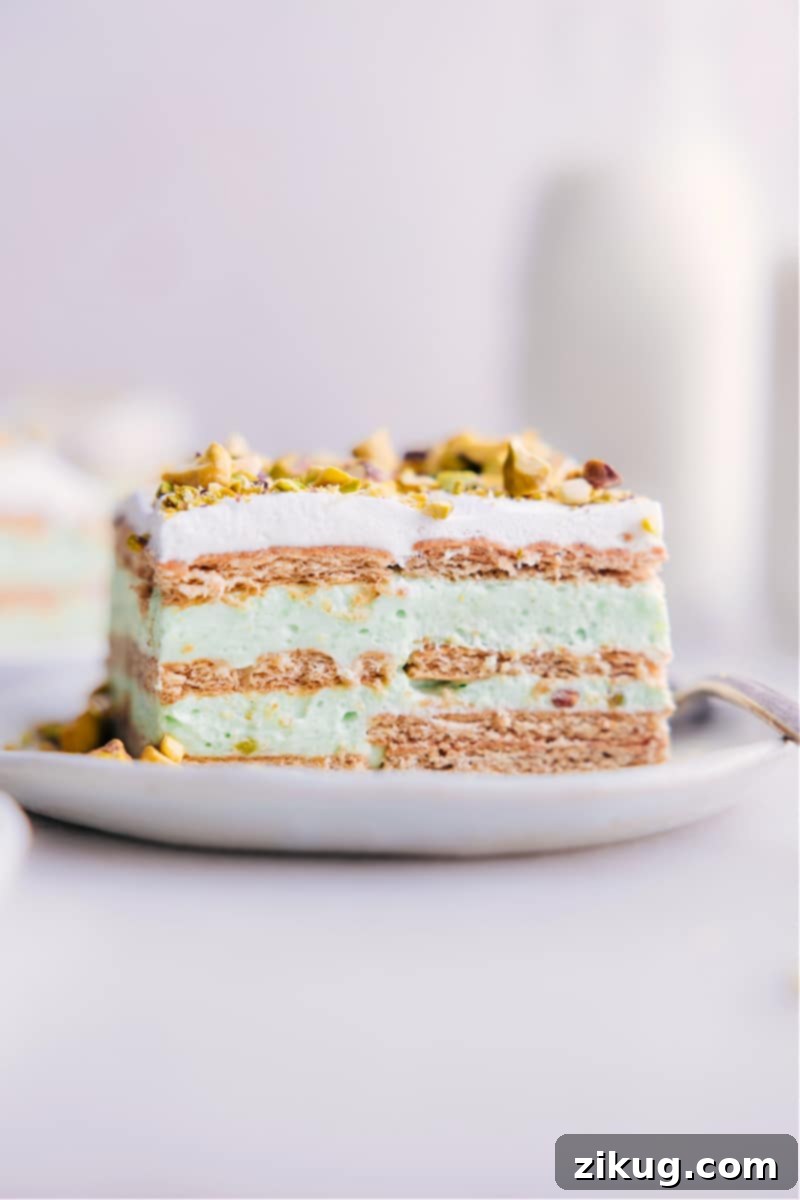
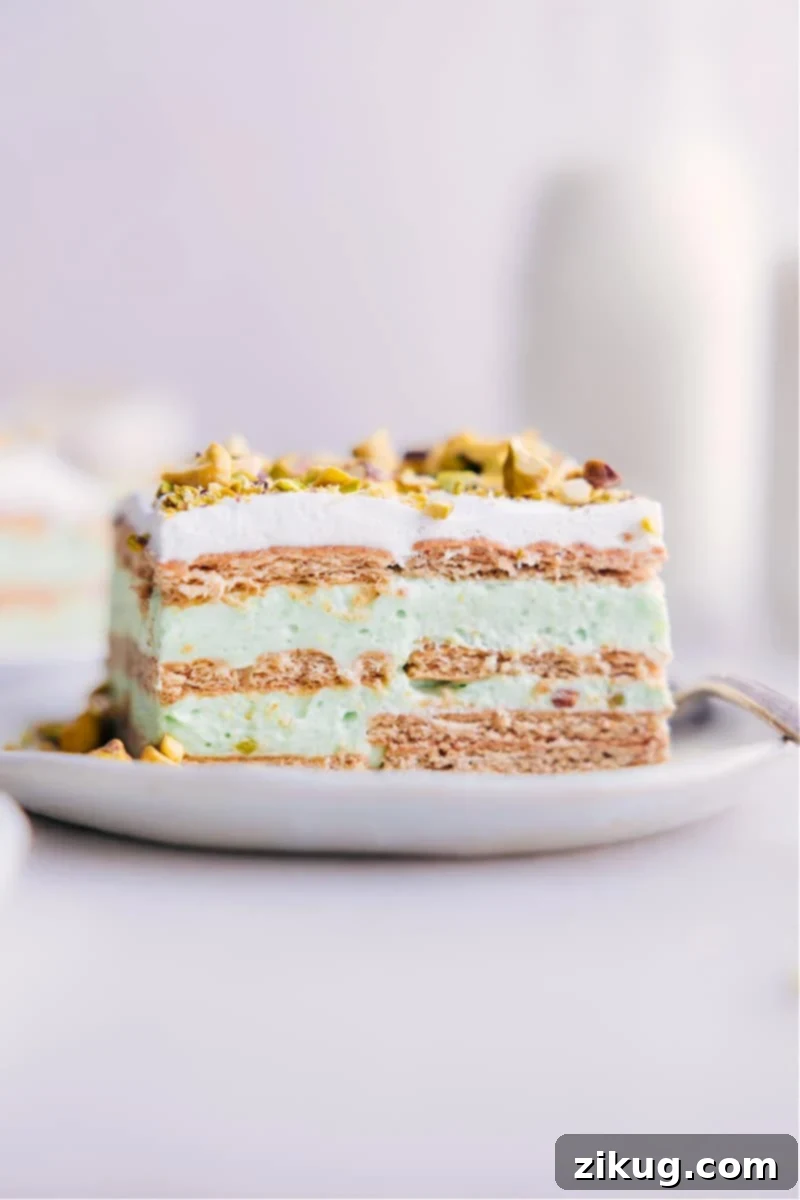
Indulge in the sweet, nutty, and incredibly creamy delight of this **Pistachio Icebox Cake**. Crafted with layers of crisp graham crackers, rich pistachio pudding, and a generous topping of whipped cream and crushed pistachios, this no-bake marvel chills overnight to transform into a luxuriously soft, cake-like treat. It’s the ultimate easy-prep dessert, perfect for any gathering or a delightful weeknight treat. Forget the oven and embrace effortless elegance!
Looking for more no-bake inspiration? You might also love our Chocolate Oreo Icebox Cake or the nostalgic S’mores Icebox Cake.
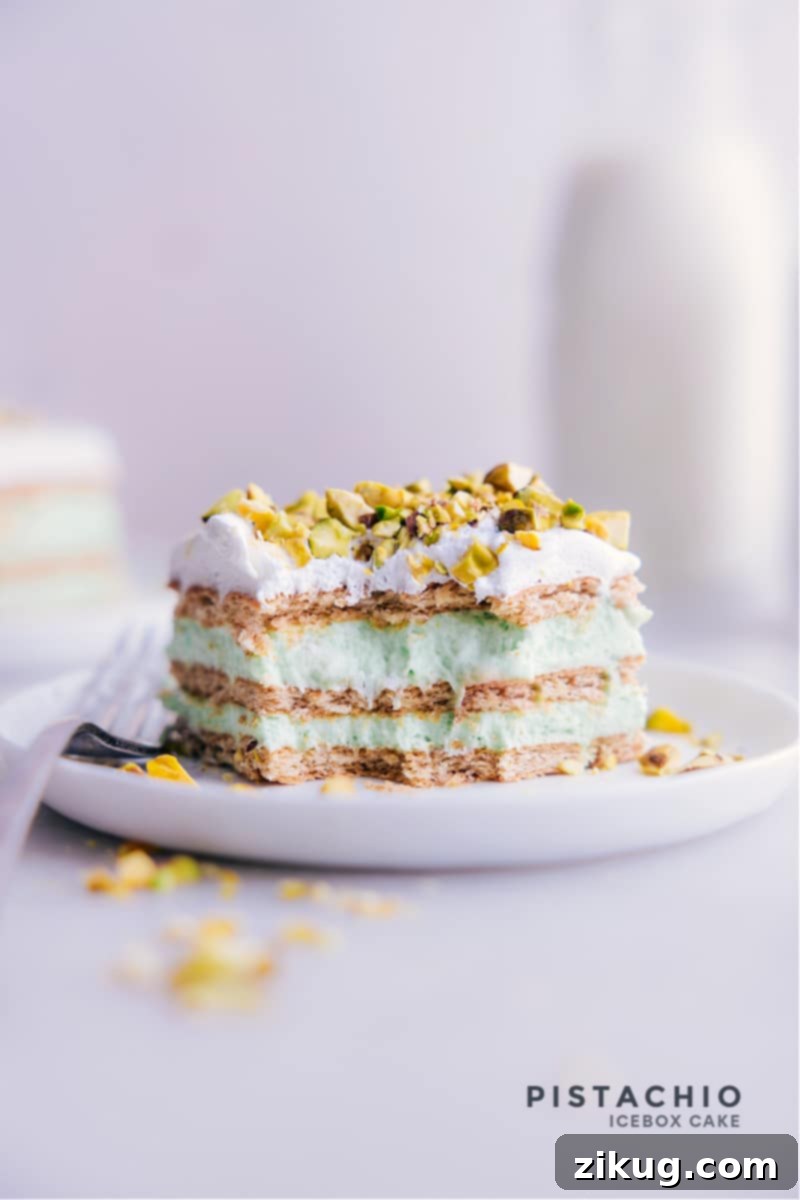
Pistachio Icebox Cake: Your Ultimate No-Bake Dessert
Welcome to the world of effortless desserts! This Pistachio Icebox Cake is not just a recipe; it’s a testament to how simple ingredients can come together to create something truly magical. With its vibrant green hue, delightful nutty flavor, and unbelievably smooth texture, it’s a dessert that consistently wows. Whether you’re a seasoned baker or a complete novice, this no-bake cake promises a hassle-free experience with results that taste like they came from a gourmet patisserie.
What Exactly Is An Icebox Cake?
An icebox cake is a classic American dessert that requires no baking whatsoever. Its charm lies in its simplicity: layers of cookies, crackers, or wafers are stacked with a creamy filling – often whipped cream, pudding, or a combination – then chilled in the refrigerator, or “icebox,” overnight. During this chilling period, the dry layers absorb moisture from the creamy filling, softening into a wonderfully tender, cake-like texture. It’s a culinary marvel that dates back to the early 20th century, gaining popularity with the advent of refrigeration, offering a convenient and delightful alternative to traditional baked cakes, especially during warmer months. These cakes are fantastic make-ahead options for parties, potlucks, or any occasion where you want to impress without breaking a sweat.
Our Pistachio Icebox Cake perfectly embodies this tradition. The humble graham crackers become transformed, soaking up the luscious pistachio pudding and airy whipped cream, culminating in a dessert that’s both rich and surprisingly light. It’s an ingenious method to achieve a luxurious cake-like dessert with minimal effort, making it a favorite for its convenience and irresistible taste.
Why You’ll Adore This Pistachio Icebox Cake Recipe
There are countless reasons why this Pistachio Icebox Cake deserves a spot in your recipe collection. First and foremost, it’s incredibly **easy to make**. No oven required, no complex steps, just simple layering and chilling. This makes it a perfect project for beginner cooks, busy parents, or anyone looking for a stress-free dessert solution.
Secondly, the **flavor profile is exceptional**. The subtle, earthy nuttiness of pistachios combined with the creamy sweetness of the pudding and whipped cream creates a harmonious blend that’s both comforting and sophisticated. The graham crackers add a hint of honey and a pleasant texture that softens beautifully.
Thirdly, it’s a fantastic **make-ahead dessert**. In fact, it’s designed to be prepared in advance, as the overnight chilling is crucial for its texture. This frees up your time on the day of your event, allowing you to focus on other preparations or simply relax. It’s also visually stunning, with its vibrant green layers, making it a showstopper for holidays like St. Patrick’s Day or any festive occasion. Plus, the minimal cleanup is an added bonus!
Pistachio Icebox Cake Ingredients: Simple Yet Impactful
Creating this delightful dessert requires just a handful of readily available ingredients. The quality of each component plays a role in the final flavor and texture, so here’s a closer look:
- **Graham Crackers**: These form the foundational layers of our icebox cake. As they soak up the creamy pudding mixture, they magically transform from crunchy crackers into soft, tender, cake-like sheets. For the best flavor, opt for quality graham crackers like Honeymaid® honey-flavored varieties, which impart a subtle sweetness and classic taste. You’ll need about 16 full sheets (or 32 squares), approximately 504 grams.
- **Instant Pistachio Pudding Mix**: This is the heart of the cake’s vibrant flavor and color. It’s crucial to use **instant pistachio pudding mix** – specifically two 3.4-ounce boxes of regular instant mix. Avoid sugar-free or low-fat versions, as they can alter the consistency and richness of the cake. Similarly, ensure it’s “instant” and not the “cook-and-serve” type, which requires heating. Jell-O® brand is a popular and reliable choice for its consistent flavor and beautiful green hue (not sponsored, just a common recommendation).
- **Cold Milk**: The liquid that brings the pudding to life. For the creamiest texture and richest flavor in your pistachio pudding, **whole milk** is highly recommended. The higher fat content contributes to a smoother, more indulgent filling. While other milk types can work, whole milk truly elevates the dessert’s decadent quality.
- **Frozen Whipped Topping**: This ingredient adds unparalleled lightness and aeration to the cake. You’ll need one 8-ounce container of frozen whipped topping, such as Cool Whip®, thawed. This is a versatile ingredient, used in two parts: a significant portion is gently folded into the pudding mixture to create a fluffy filling, while the remaining amount is spread on top as a delicate, airy frosting.
- **Optional Garnish: Chopped Pistachios**: For an extra layer of flavor and a delightful textural contrast, a sprinkle of unshelled, roasted, and lightly salted pistachios on top is highly recommended. Their crunch perfectly complements the cake’s creaminess, and their vibrant green color enhances the visual appeal.
Quick Tip: Whipped Topping Options
While this Pistachio Icebox Cake recipe calls for one 8-ounce container of **Cool Whip®**, you have flexibility with your whipped topping choice. If you’re seeking a healthier alternative or one with fewer artificial ingredients, brands like TruWhip® offer excellent options. Alternatively, you can easily make your own fresh whipped cream for an even more decadent touch. Just remember that Cool Whip is a non-dairy product, whereas homemade whipped cream is dairy-based.
Homemade Whipped Cream Recipe:
- 1 cup heavy cream (cold)
- 1/2 cup powdered sugar
- 1/2 teaspoon vanilla extract
In a chilled mixing bowl (preferably from a stand mixer) fitted with a whisk attachment, combine the cold heavy cream, powdered sugar, and vanilla extract. Beat on low speed to combine, then increase the speed to high and whip until firm peaks form. This usually takes about 2-4 minutes. You now have a batch of luscious homemade whipped topping ready to use!
How to Assemble Your Delicious Pistachio Icebox Cake
Making this icebox cake is a straightforward process, but a few key steps ensure perfection. Follow these instructions for a flawlessly layered and wonderfully creamy dessert:
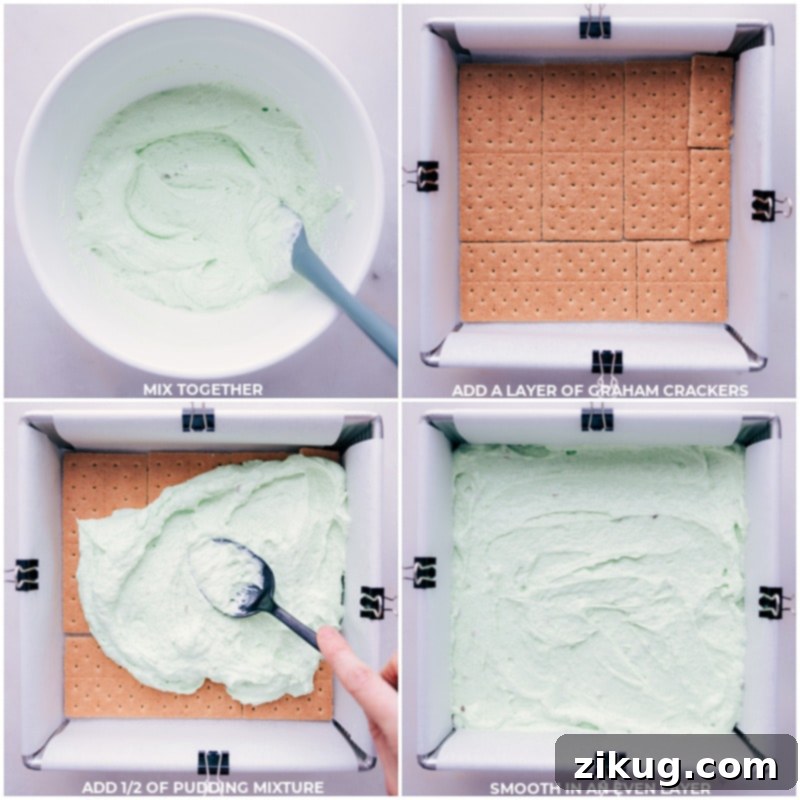
- **Prepare Your Pan**: Begin by lining an 8×8-inch baking pan with either aluminum foil or parchment paper. Make sure to leave a generous overhang on all sides. This excess paper will act as “handles,” making it incredibly easy to lift the chilled cake out of the pan for clean slicing. Set this prepared pan aside.
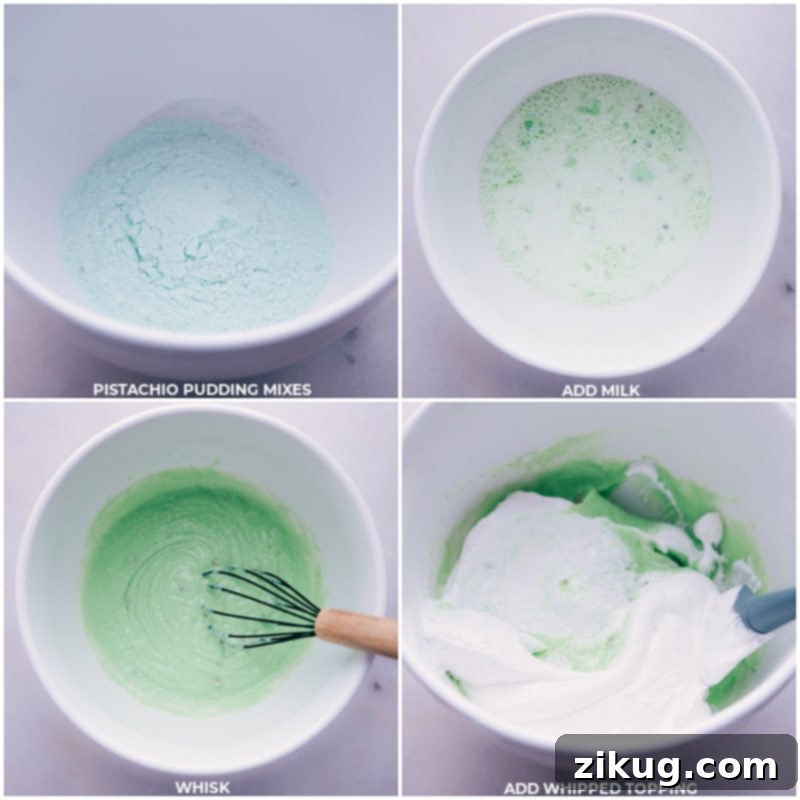
- **Whisk the Pudding**: In a large mixing bowl, combine the two packages of instant pistachio pudding mix with the cold milk. Whisk briskly for about one minute, or until the mixture is smooth and begins to thicken slightly. Avoid over-whisking, which can make the pudding too stiff.
- **Fold in Whipped Topping**: Carefully remove one heaping cup of the thawed frozen whipped topping and set it aside; this will be for the top layer. Gently fold the remaining whipped topping into the pistachio pudding mixture until it’s fully incorporated and no streaks remain. Be gentle to maintain the airy texture of the whipped topping.
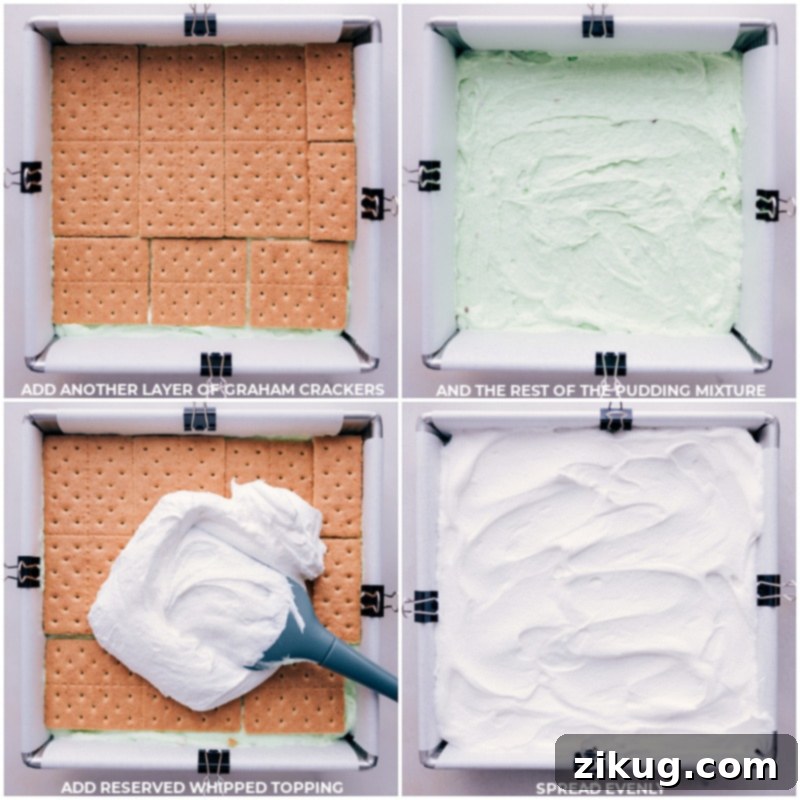
- **Layering Begins**: Now for the fun part! Arrange a single layer of graham crackers in the bottom of your prepared pan. You’ll likely need to break some crackers to fit snugly and cover the entire base. Evenly spread half of the pistachio pudding mixture over the cracker layer, using the back of a large spoon or an offset spatula to ensure a smooth, even surface.
- **Second Layer & Finish**: Place another layer of graham crackers over the pudding, breaking them as needed. Follow this with the remaining pudding mixture, spreading it evenly. Complete your layering with a final layer of graham crackers. Finally, spread the reserved heaping cup of whipped topping smoothly over the top of the last cracker layer.
- **Chill Overnight**: Cover the cake tightly with plastic wrap or the foil/parchment overhang. Transfer the cake to the refrigerator and chill overnight, or for a minimum of 8 hours. This prolonged chilling time is essential for the graham crackers to fully soften and for the flavors to meld beautifully.
- **Serve and Enjoy**: Once thoroughly chilled, use the foil or parchment overhang to lift the cake out of the pan. Place it on a cutting board. For perfect slices, use a sharp chef’s knife. For best results, wet the knife with warm water and wipe it clean between each cut. If desired, sprinkle the top of the cake with chopped pistachios just before serving for an extra crunch and visual appeal. Serve cold, straight from the fridge, and savor every creamy, nutty bite!
Expert Tips for the Perfect Pistachio Icebox Cake
- **The Right Pan**: For best results and a nicely proportioned cake, an 8×8-inch baking pan is ideal. Lining it with parchment paper or foil, leaving an overhang, is a game-changer for easy removal and neat presentation.
- **Cutting Like a Pro**: To achieve clean, attractive slices, use a sharp chef’s knife. The trick is to dip the knife in warm water and wipe it dry with a kitchen towel before each cut. This prevents the creamy layers from sticking and smearing.
- **Enhance the Crunch and Appearance**: A generous sprinkle of **chopped pistachios** on top just before serving not only adds a delightful crunch that contrasts with the cake’s creamy texture but also elevates its visual appeal, making it even more enticing.
- **Stick to Regular Ingredients**: For the best possible texture and flavor, it’s highly recommended to use regular ingredients. Avoid sugar-free instant pudding mixes and low-fat or fat-free whipped toppings (like Cool Whip). These alternatives can significantly affect the cake’s consistency, potentially resulting in a watery or less creamy finish.
- **Optimal Chilling Time**: The “icebox” in icebox cake is there for a reason! Allow at least 8 hours of chilling, or ideally overnight. This extended period ensures the graham crackers fully soften and the flavors have ample time to meld into a harmonious, cake-like consistency. Patience is key for this dessert!
- **Don’t Overmix the Pudding**: When whisking the instant pudding, mix until just combined and smooth, about one minute. Overmixing can cause the pudding to become too stiff, which makes it harder to spread and less creamy in the final cake.
Storage Guidelines for Pistachio Icebox Cake
One of the many advantages of a Pistachio Icebox Cake is its excellent make-ahead potential and good shelf life in the refrigerator. In fact, this cake tastes even better on subsequent days as the flavors deepen and the layers continue to soften. We highly recommend enjoying the cake on days 2, 3, or even 4 after preparation for the best texture and taste experience.
To store your icebox cake, simply keep it covered tightly with plastic wrap or in an airtight container in the refrigerator. It’s best served directly from the fridge, as it maintains its firm, yet creamy, consistency when cold. Any leftovers should be promptly returned to the refrigerator.
Freezing is not recommended for this particular dessert. Due to its high dairy content (milk, whipped cream, pudding), freezing and thawing can cause the cake to become grainy, watery, and lose its desirable smooth texture. Enjoy it fresh and chilled for the ultimate experience!
Frequently Asked Questions About Pistachio Icebox Cake
- Can I use homemade pudding instead of instant mix?
- While homemade pudding offers a richer flavor, it typically has a different consistency that might not set as firmly or absorb into the graham crackers as effectively as instant pudding. Instant pudding is formulated to thicken quickly and provide the right moisture for the crackers to soften. If you do use homemade, ensure it’s very thick and well-chilled before mixing with whipped topping.
- Can I substitute other crackers or cookies?
- Absolutely! While graham crackers are traditional and work wonderfully, you can experiment with other options. Vanilla wafers, Biscoff cookies, chocolate wafers, or even shortbread cookies can be fantastic substitutes, each lending a unique flavor profile to the cake. Just ensure they are thin enough to soften properly.
- My icebox cake is a bit watery. What went wrong?
- Several factors can lead to a watery icebox cake. Using sugar-free or low-fat pudding/whipped topping can alter the chemistry and make the cake less stable. Insufficient chilling time is another common culprit – the cake needs at least 8 hours to firm up. Also, using anything other than whole milk can impact the creaminess and setting ability of the pudding. Make sure to follow the ingredient recommendations closely.
- How long can I store Pistachio Icebox Cake?
- This cake is best enjoyed within 2-4 days of preparation, stored tightly covered in the refrigerator. Beyond that, the graham crackers can become overly soft, and the texture may start to degrade, possibly becoming watery. It’s a fantastic make-ahead dessert, but definitely plan to enjoy it within this window for optimal freshness.
More Irresistible No-Bake Desserts:
If you’ve fallen in love with the ease and deliciousness of this Pistachio Icebox Cake, you’re in luck! There’s a whole world of no-bake treats waiting to be discovered. Here are some other favorites that are equally simple to prepare and guaranteed to satisfy your sweet tooth:
- Shamrock Shake: A delightful mint milkshake, perfect for St. Patrick’s Day or any time you crave a refreshing, creamy treat.
- No-Bake Granola Bars: Wholesome and chewy, these bars are topped with a decadent chocolate drizzle, making them a perfect snack or light dessert.
- Lucky Charms Bars: A fun and colorful marshmallow cereal bar that’s incredibly easy to whip up and a hit with kids and adults alike.
- Chocolate Peanut Butter Pie: A rich and creamy pie featuring the classic combination of chocolate and peanut butter, all nestled in an Oreo pie crust.
- No-Bake Cookies: Classic chocolate peanut butter cookies that come together in minutes without ever touching the oven.
Pistachio Icebox Cake Recipe
By Chelsea Lords
This Pistachio Icebox Cake is irresistible! Layers of graham crackers, creamy pistachio pudding, whipped cream, and crunchy pistachios come together for a sweet, nutty treat. Just chill overnight for the easiest make-ahead dessert!
Preparation Details:
- Prep Time: 20 minutes
- Chilling Time: 8 hours (or overnight)
- Total Time: 8 hours 20 minutes
- Servings: 14 pieces
Equipment:
- 8 x 8-inch baking pan
- Parchment paper or aluminum foil
Ingredients:
- 18 full-sized graham crackers (approx. 504 grams, see note 1)
- 2 (3.4-ounce) packages pistachio flavored instant pudding (see note 2)
- 2-1/4 cups milk (whole milk recommended)
- 1 (8-ounce) container frozen whipped topping (like Cool Whip, thawed, see note 3), divided use
- Chopped pistachios (optional, for garnish)
Instructions:
- Line an 8×8-inch baking pan with foil or parchment paper, ensuring an overhang for easy removal. Set aside.
- In a large bowl, combine both pudding mixes and cold milk. Whisk briskly for about 1 minute until smooth. Remove 1 heaping cup of whipped topping and set aside. Gently fold the remaining whipped topping into the pudding mixture until completely incorporated.
- Layer graham crackers in the prepared pan, breaking them as needed to fit. Top with half of the pudding mixture, spreading gently into an even layer. Add another layer of crackers, then the rest of the pudding, spreading evenly. Finish with a final layer of crackers. Spread the reserved whipped topping over the top in an even layer. Cover the cake and refrigerate overnight, or for at least 8 hours.
- When ready to serve, lift the cake out of the pan using the overhang. Cut into squares (see note 4) and, if desired, sprinkle chopped pistachios on top. Enjoy cold, straight from the fridge.
Recipe Notes:
Note 1: Graham crackers vary in size. This recipe uses approximately 16 full sheets of crackers (or 32 squares), which is about 504 grams.
Note 2: Use 2 (3.4-ounce) boxes of regular instant pudding mix (not sugar-free, not low-fat). Ensure it’s instant pudding, not the cook-and-serve type. Jell-O® brand is recommended for best flavor.
Note 3: For the frozen whipped topping, use regular (not sugar-free/fat-free) Cool Whip for best results. You can also make your own whipped topping:
- 1 cup heavy cream
- 1/2 cup powdered sugar
- 1/2 teaspoon vanilla extract
In a mixing bowl attached to a stand mixer (with a whisk attachment), add the heavy cream, powdered sugar, and vanilla extract. Beat to combine, then increase speed and whip until firm peaks form, about 2-4 minutes.
Note 4: When cutting the cake, use a sharp chef’s knife. Run the knife under warm water, dry it on a kitchen towel, and repeat for each cut for clean slices.
Storage: We recommend eating the cake on days 2, 3, or 4. It can become watery after that. Store the cake in the fridge, and serve it directly from there. Freezing is not recommended as it can make the cake grainy and watery upon thawing.
Nutrition:
Serving: 1 serving | Calories: 308kcal | Carbohydrates: 54g | Protein: 5g | Fat: 8g | Saturated Fat: 4g | Polyunsaturated Fat: 0.3g | Monounsaturated Fat: 2g | Cholesterol: 6mg | Sodium: 539mg | Potassium: 164mg | Fiber: 1g | Sugar: 31g | Vitamin A: 88IU | Calcium: 105mg | Iron: 2mg
Nutrition information is automatically calculated, so should only be used as an approximation.