
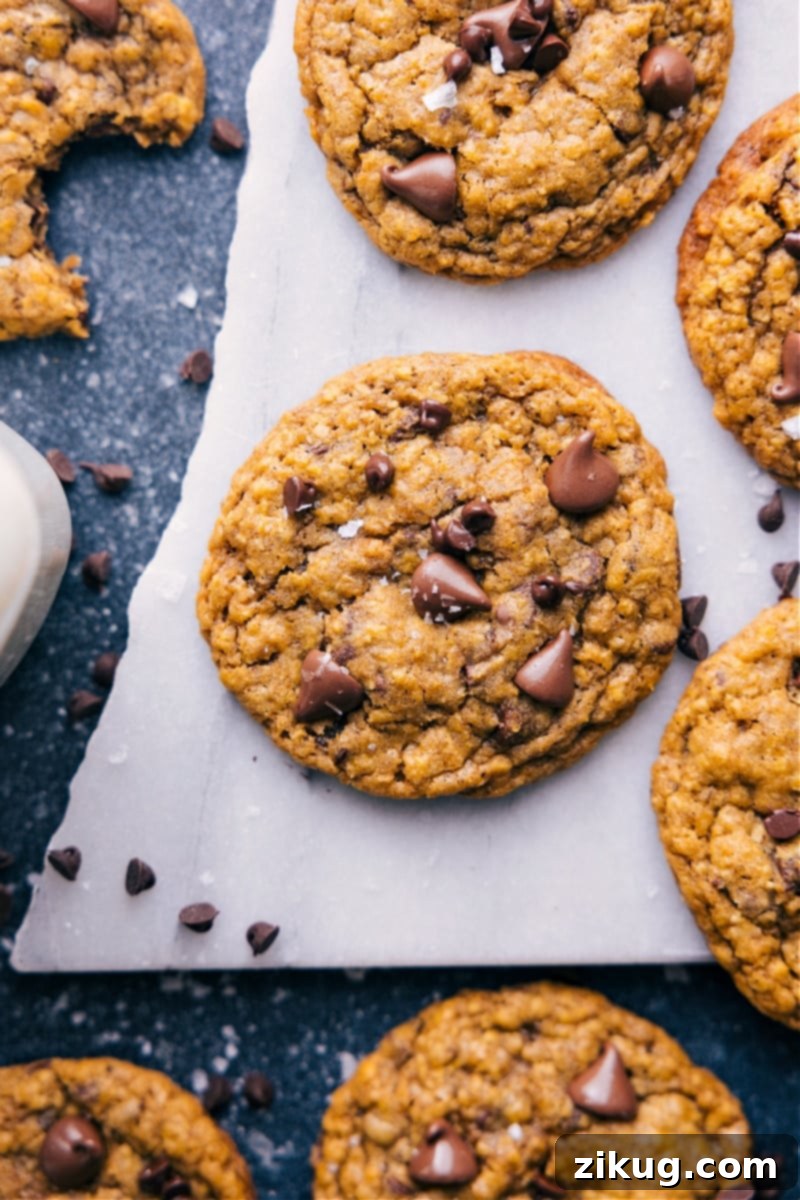
Pumpkin Oatmeal Chocolate Chip Cookies are a fall baking dream come true! This recipe delivers consistently crisp edges, a delightfully soft, chewy center, and an abundance of rich chocolate chips. Forget dry, cakey imitations – with our expert tips, you can effortlessly create bakery-quality cookies right in your own kitchen.
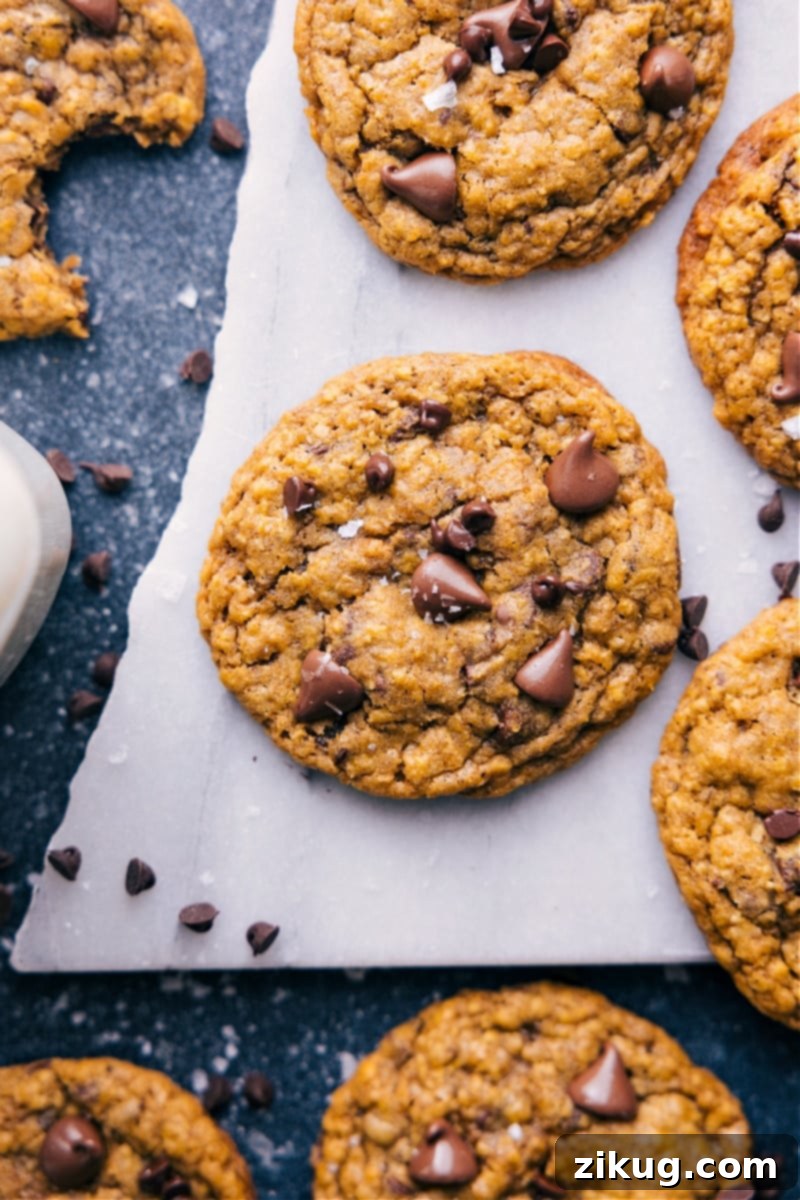

author’s note
The Only Pumpkin Cookie Recipe You’ll Ever Need!
For years, I searched for a pumpkin cookie recipe that truly tasted like a cookie, not a miniature pumpkin cake. Don’t get me wrong, I appreciate a traditional puffy pumpkin chocolate chip cookie, but many recipes produce a thin, round dessert that feels more like a sweet bread or cake than a crisp, chewy cookie.
My culinary quest led me to develop a recipe that prioritizes genuine cookie texture. The ultimate goal for these cookies was to create a distinct treat with a perfectly crisp bottom and edges, complemented by a soft, irresistibly chewy interior. There is absolutely no cakey consistency here!
These cookies are, in my humble opinion, pure perfection: thin, delightfully crispy at the edges, with that ideal soft and chewy center we all crave. So, if you’ve been on the same journey as me, searching for a pumpkin cookie that genuinely delivers on its cookie promise without any cake-like compromises, then this is the recipe you’ve been waiting for!
Essential Ingredients for Bakery-Quality Pumpkin Oatmeal Chocolate Chip Cookies
Crafting the perfect pumpkin oatmeal chocolate chip cookie starts with understanding each ingredient’s role. Here’s a detailed look at what you’ll need and why it’s important for achieving that signature crisp-chewy texture and rich flavor.
| Ingredient | Why it Matters / Smart Swaps |
|---|---|
| Unsalted Butter | Always use room-temperature butter. This is crucial for proper creaming with sugars, allowing it to trap air effectively and create a lighter, more tender cookie. Cold butter won’t cream correctly, and melted butter will lead to a greasy, dense texture. |
| Brown Sugar | Light brown sugar is key for moisture and chewiness, thanks to its molasses content. For a deeper, richer molasses note and slightly darker color, you can opt for dark brown sugar. It also helps in achieving those desirable crisp edges. |
| Pumpkin Puree | Ensure you’re using 100% pure canned pumpkin, not pumpkin pie filling, which contains added sugars and spices. Pumpkin puree adds flavor and moisture. If your puree seems excessively wet, gently pat it with paper towels to remove excess liquid before adding it to the batter. |
| Egg Yolk | Using just the egg yolk contributes significant richness and helps bind the cookie dough without adding too much extra moisture. The fat in the yolk enhances flavor and tenderness. Save the egg white for other recipes, perhaps meringues! |
| Quick Oats | Quick oats are absolutely essential for achieving the distinct chewy bite that defines these cookies. Their smaller size and finer texture integrate beautifully into the dough. Avoid substituting with old-fashioned (rolled) oats, as they will result in a different, often tougher, texture. |
| Spices | Ground cinnamon and nutmeg provide a comforting warmth that pairs perfectly with pumpkin. For an extra boost of autumnal flavor, consider adding a teaspoon or two of your favorite pumpkin pie spice blend. This elevates the overall aroma and taste profile. |
| Chocolate Chips | A thoughtful mix of semi-sweet and dark chocolate chips adds wonderful depth and complexity to the cookie. The slight bitterness of dark chocolate balances the sweetness of the pumpkin and oats. White chocolate chips also make a delightful addition, pairing nicely with the warm spices. |
Step-By-Step Guide: How To Make The Best Pumpkin Oatmeal Chocolate Chip Cookies
Follow these detailed steps to ensure your pumpkin oatmeal chocolate chip cookies turn out perfectly every time. Precision and patience are your best tools in the kitchen!
- Prepare Your Workspace: Begin by preheating your oven to 350°F (175°C). Line a large baking sheet (or two, if you have them) with parchment paper or a silicone baking mat. This prevents sticking and promotes even baking.
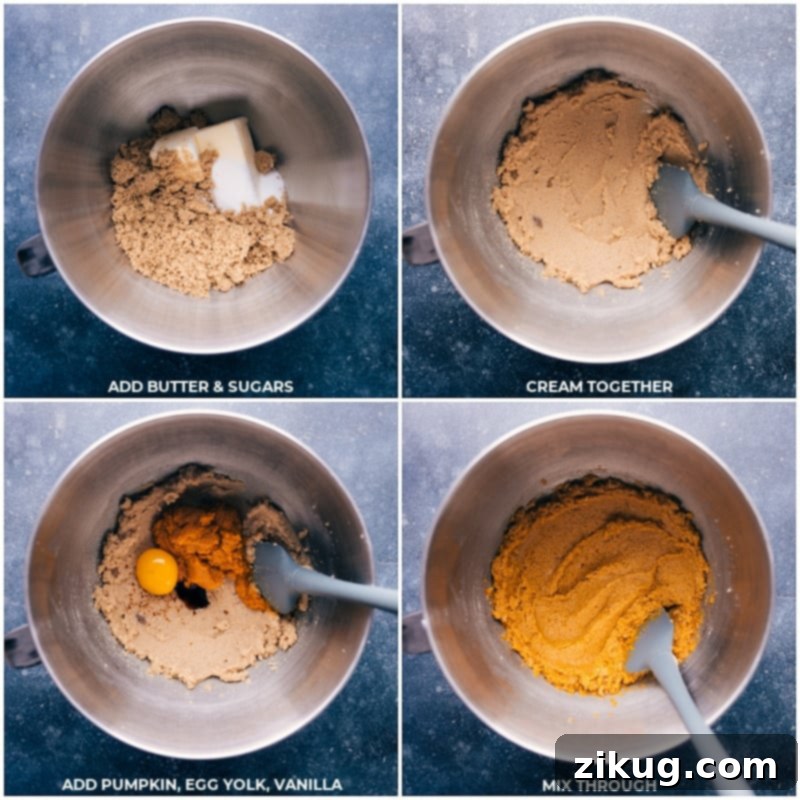
- Cream Butter and Sugars: In the bowl of a stand mixer fitted with a whisk or paddle attachment, combine your room-temperature unsalted butter, light brown sugar, and granulated sugar. Beat on medium-high speed until the mixture is light, fluffy, and creamy, usually about 2-3 minutes. Remember to scrape down the sides of the bowl occasionally to ensure everything is well incorporated.
- Incorporate Wet Ingredients: Reduce the mixer speed to low. Add the pumpkin puree, a single large egg yolk, and vanilla extract. Mix until just combined. Be careful not to overmix at this stage; we want to preserve the air whipped into the butter and sugar.
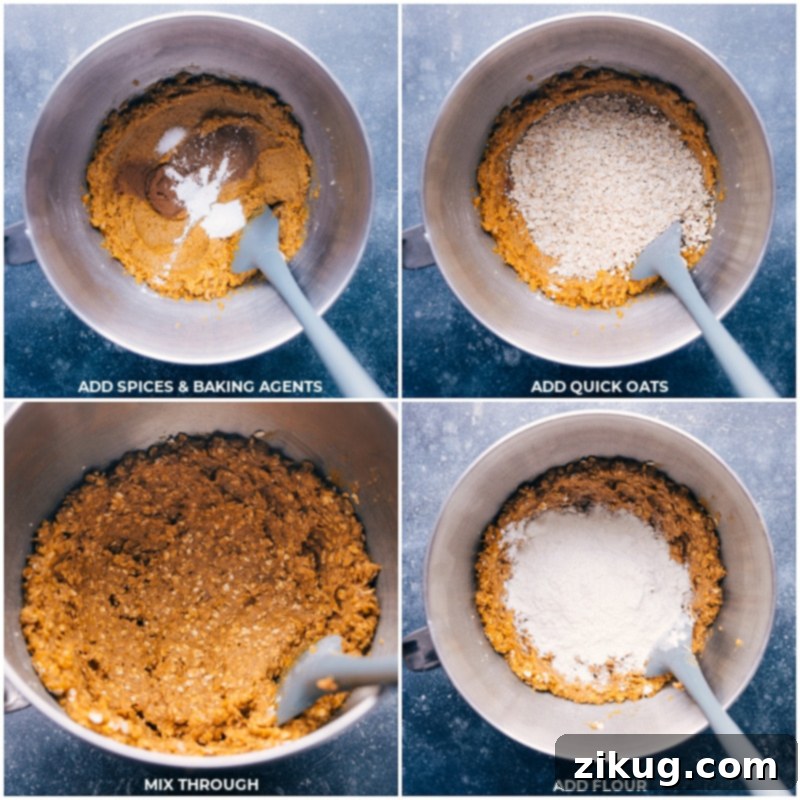
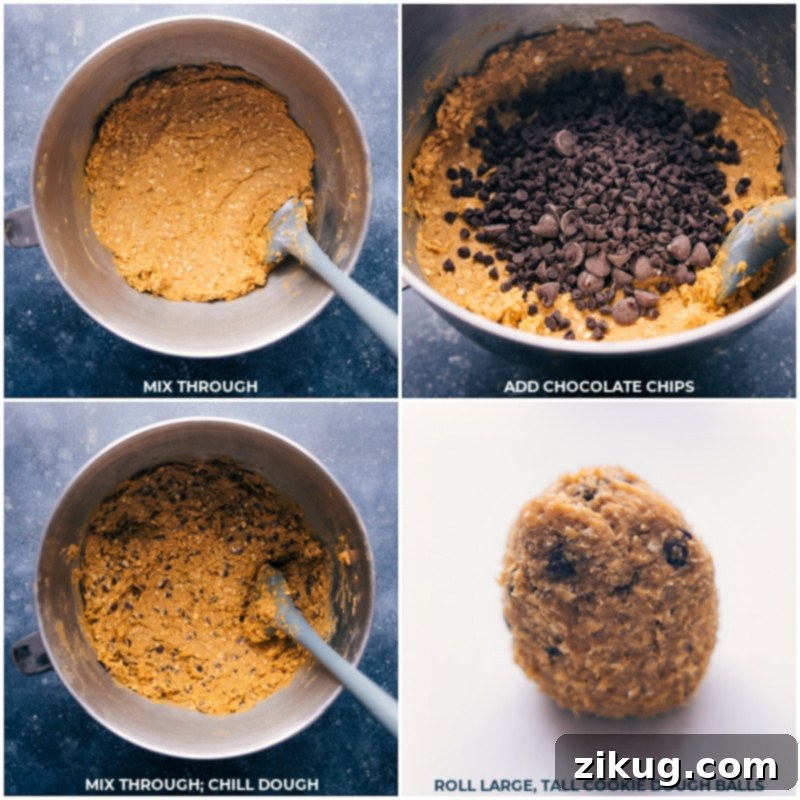
- Add Dry Ingredients & Oats: In a separate bowl, whisk together your flour, ground cinnamon, pumpkin pie spice, baking soda, baking powder, and salt. Gradually add this dry mixture to the wet ingredients in the stand mixer, mixing on low speed until no streaks of dry flour remain. Then, gently fold in the quick oats and both types of chocolate chips (miniature semi-sweet and milk or dark chocolate chips) until they are evenly distributed throughout the dough.
- Chill the Dough – Don’t Skip This!: Cover the bowl of cookie dough with plastic wrap and refrigerate for at least 1 hour. This chilling period is crucial as it allows the flavors to meld, the oats to absorb moisture, and the butter to firm up, preventing the cookies from spreading too much during baking.
- Shape and Chill Again: Once the dough is thoroughly chilled, roll it into large balls, approximately 3 tablespoons (or 58 grams) each. When shaping, aim for taller rather than wider balls – this helps achieve that perfect rise and texture. Place the shaped dough balls on a separate parchment-lined tray and chill them again in the refrigerator for another 15-20 minutes. This second chill is key for achieving those crisp edges and chewy centers.
- Bake to Perfection: Place only 6 dough balls on your prepared baking sheet at a time, ensuring they are well-spaced to allow for spreading. Bake for 12-15 minutes, or until the edges are lightly golden brown and the centers still appear slightly gooey. These cookies are always best when slightly underbaked!
- The “Pan Bang” Technique (Optional, but Recommended): Immediately upon removing the cookies from the oven, gently but firmly bang the baking sheet on your counter a few times. This deflates the cookies slightly, creating those signature crinkled edges and ensuring a perfectly chewy interior.
- Finishing Touches: Right after the pan bang, while the cookies are still warm and pliable, you can optionally press the edges inward with the back of a spoon to create a perfectly round shape. You can also press a few extra chocolate chips onto the tops of the warm cookies for an even more enticing appearance.
- Cool and Enjoy: Allow the cookies to rest on the hot baking pan for 5 minutes before carefully transferring them to a wire rack to cool completely. Repeat the baking process with the remaining dough. While delicious warm, these cookies truly shine at room temperature, and as many bakers agree, they taste even better the next day as the pumpkin flavor intensifies!
Featured Comment
“I followed the directions precisely and ended up with some of the best cookies I have ever made/eaten. I used a baking sheet, topped with a silicone mat then wax paper and the bottoms came out perfect. Thank you for the recipe.”
– Kevin
Quick Tip for Ultimate Texture
Chill the dough twice: The first chill, after mixing, allows flavors to meld and prevents over-spreading. The second chill, after rolling into balls, ensures the dough remains cold when it hits the hot oven. This temperature contrast is key to achieving those coveted crisp edges and a perfectly soft, chewy interior. Never rush the chilling process!
Storage Solutions for Your Pumpkin Oatmeal Chocolate Chip Cookies
How to Store Your Delicious Cookies
Unlike many cookies that are best enjoyed straight from the oven, these Pumpkin Oatmeal Chocolate Chip Cookies actually develop a richer, more pronounced pumpkin flavor when allowed to sit at room temperature for a day. For optimal texture and to prevent them from becoming too moist, store them uncovered on a plate or in a container with a loose-fitting lid at room temperature. This allows any residual moisture to escape, keeping those crisp edges intact.
After baking, ensure you let the cookies cool completely on a wire rack. This critical step stops the bottoms from becoming soggy due to trapped steam. Stored properly at room temperature, these cookies will maintain their fantastic flavor and texture for up to 3-4 days. For longer storage, they can be frozen in an airtight container for up to 2-3 months. Thaw at room temperature before enjoying.
Don’t Waste a Drop! Use Leftover Pumpkin Puree in These Delicious Recipes:
Got extra pumpkin puree after making these amazing cookies? Don’t let it go to waste! Pumpkin is incredibly versatile. Here are some other fantastic recipes where that leftover puree can shine:
Desserts
Pumpkin Pecan Pie
Desserts
Pumpkin Cheesecake Bars
Desserts
Pumpkin Cupcake Recipe
Desserts
Pumpkin Coffee Cake Recipe
Print Recipe
Pumpkin Oatmeal Chocolate Chip Cookies
Chelsea Lords
25 minutes
14 minutes
1 hour
1 hour 39 minutes
18 cookies
Video
Watch a video tutorial for these delicious cookies!
Find a similar video on YouTube
Equipment
-
Large sheet pan (15″ x 21″)
-
Parchment paper or a silicone baking mat
-
Cooling rack
-
Stand mixer or hand mixer
-
Rubber spatula
Ingredients
Default servings: 18 cookies
- 12 tablespoons unsalted butter at room temperature (see note 1)
- 1 cup light brown sugar lightly packed
- 1/2 cup granulated sugar
- 1/2 cup + 2 tablespoons canned pumpkin puree (not pumpkin pie filling)
- 1 large egg yolk (discard or save the white for another recipe)
- 1 teaspoon vanilla extract
- 1 teaspoon ground cinnamon
- 2 teaspoons pumpkin pie spice (see note 2)
- 1 teaspoon baking soda
- 1/2 teaspoon baking powder
- 1/2 teaspoon salt
- 1-1/2 cups quick oats (not old-fashioned; see note 3)
- 1-1/2 cups all-purpose flour
- 1/2 cup + 2 tablespoons miniature semi-sweet chocolate chips
- 1/2 cup milk chocolate chips (or dark chocolate chips)
Instructions
-
In the bowl of a stand mixer, combine room-temperature butter, light brown sugar, and granulated sugar. Beat with the whisk attachment (or paddle) on medium-high speed until the mixture is light, fluffy, and creamy, typically for 2-3 minutes. Stop and scrape down the sides of the bowl as needed to ensure even mixing. Reduce speed to low, then add the pumpkin puree, egg yolk, and vanilla extract. Mix until just incorporated, being careful not to overmix.
-
In a separate medium bowl, whisk together the all-purpose flour, ground cinnamon, pumpkin pie spice, baking soda, baking powder, and salt. Gradually add this dry ingredient mixture to the wet ingredients in the stand mixer, mixing on low speed until no streaks of dry flour are visible. Once combined, fold in both the quick oats and the chocolate chips using a rubber spatula until they are evenly distributed throughout the dough. Avoid overmixing.
-
Cover the bowl of cookie dough tightly with plastic wrap and place it in the refrigerator to chill for at least 1 hour. This chilling step is vital for the texture and flavor development of your cookies.
-
After the dough has chilled, roll it into large balls, using about 3 tablespoons (or 58 grams) of dough per cookie (see note 4). When rolling, aim for a slightly taller shape rather than a wide, flat one. Place the rolled dough balls on a separate parchment-lined tray and return them to the refrigerator to chill for another 15-20 minutes. While the dough balls are chilling, preheat your oven to 350°F (175°C) and line a large baking sheet with parchment paper or a silicone baking mat.
-
Place only 6 chilled dough balls at a time on the prepared baking sheet, ensuring they are well-spaced apart to allow for spreading. Bake for 12-15 minutes, or until the edges are lightly golden brown and the centers still look slightly gooey. For the best chewy texture, these cookies are best when slightly underbaked. Immediately after removing the cookies from the oven, firmly but gently bang the baking sheet on the counter a few times. This helps to flatten the cookies slightly and create those desirable crinkly edges.
-
Optionally, right after the “pan bang” and while the cookies are still warm, use the back of a spoon to gently press the cookie edges inward to refine their round shape. You can also press a few extra chocolate chips onto the tops of the warm cookies for an appealing finish.
-
Allow the baked cookies to rest on the hot baking pan for 5 minutes before carefully transferring them to a wire rack to cool completely. Repeat this baking process for the remaining dough. These cookies are best enjoyed at room temperature, and their pumpkin flavor actually intensifies and becomes even better the next day!
Recipe Notes
Note 2: Pumpkin Pie Spice: Pumpkin pie spice is a blend of various warm spices and can typically be found alongside other baking spices in your local grocery store. If you prefer, you can easily make your own homemade pumpkin pie spice blend from common pantry spices!
Note 3: Quick Oats vs. Old-Fashioned Oats: While it might seem logical that any type of oats would work, they are not interchangeable in this specific recipe. Quick oats are pre-cooked, dried, and cut into smaller, thinner pieces, making them more absorbent and allowing them to act almost like flour in the dough structure. This contributes significantly to the unique chewy texture. Old-fashioned (rolled) oats are thicker and will yield a tougher, less desirable texture in these cookies.
Note 4: Cookie Size Matters: The recommended size for these cookies is specifically chosen to guarantee the ideal texture balance: crisp edges and a soft, chewy center. While you might be tempted to make smaller cookies, please know that altering the size will change the final texture. The sweet spot for this recipe is exactly 58 grams (about 3 packed tablespoons) of dough per cookie. Yes, they’re big, but this size is absolutely perfect for ensuring that delightful contrast of textures!
Storage Tips: As mentioned, these cookies are a rare exception – they taste best at room temperature, and their pumpkin flavor significantly deepens by the next day! To maintain their texture, I recommend storing them uncovered on a plate or in a container with a very loose-fitting lid at room temperature. This prevents them from becoming overly moist and losing their desirable crispness. Ensure cookies are completely cooled on a wire rack before storing to avoid soggy bottoms from steam.
Nutrition
Calories: 273kcal |
Carbohydrates: 37g |
Protein: 3g |
Fat: 13g |
Saturated Fat: 8g |
Polyunsaturated Fat: 1g |
Monounsaturated Fat: 3g |
Trans Fat: 0.3g |
Cholesterol: 33mg |
Sodium: 145mg |
Potassium: 121mg |
Fiber: 2g |
Sugar: 23g |
Vitamin A: 1544IU |
Vitamin C: 0.4mg |
Calcium: 35mg |
Iron: 2mg
Nutrition information is automatically calculated and should only be used as an approximation.
Like this recipe? We’d love to hear from you! Leave a comment below!
Expert Tips for Unforgettable Pumpkin Oatmeal Chocolate Chip Cookies
Achieving bakery-level quality in your homemade cookies is easier than you think with these simple, yet impactful, tips:
- Double Chill the Dough: This is a game-changer! Chilling the dough once after mixing firms up the butter and allows the flavors to deepen. Chilling it a second time after rolling into balls ensures the dough hits the hot oven perfectly cold. This temperature shock prevents excessive spreading and locks in that ideal crisp-chewy texture.
- Master the “Pan Bang”: Right after taking the hot cookies out of the oven, lift the baking sheet about 4-6 inches and gently but firmly drop it onto a heat-safe counter. Repeat this 2-3 times. This technique deflates the cookies slightly, creating those beautiful crinkled edges and ensuring a dense, chewy center.
- Shape Edges for Perfection: Immediately after the “pan bang” and while the cookies are still warm and pliable, use the back of a spoon or a round cookie cutter slightly larger than your cookies to gently push the edges inward. This creates a perfectly round, professional-looking cookie.
- Go Big for Best Texture: Don’t skimp on dough size! Our recommended 3-tablespoon (58-gram) dough balls are essential. Smaller cookies will bake faster and dry out, losing that coveted soft, chewy interior with crisp edges. Embrace the large size for the ultimate texture contrast.
- Enjoy Them Next-Day: While it’s hard to resist warm cookies, these pumpkin wonders genuinely taste even better the next day. The resting period allows the pumpkin and spices to meld and intensify, resulting in a deeper, more complex flavor profile. Store them uncovered to preserve their texture (see storage tips above).
Favorite Cookie Baking Tools to Elevate Your Craft
Having the right tools can make a significant difference in your baking results. Here are some of our must-have items for perfect cookies every time:
- Silicone Baking Mats: Invest in high-quality silicone baking mats. They provide even heat distribution, prevent sticking, and ensure no burnt bottoms, leading to consistently perfect cookies. They’re also reusable and easy to clean!
- Cookie Scoop: A cookie scoop (preferably a 3-tablespoon size for this recipe) is invaluable. It ensures consistent cookie size, which is critical for even baking and uniform texture across your entire batch. No more guessing or uneven cookies!
- Food Scale: For the most accurate measuring, especially when dealing with specific dough weights like 58 grams, a digital food scale is your best friend. Accurate measurements equal consistent and perfect results every single time.
Frequently Asked Questions About Pumpkin Oatmeal Chocolate Chip Cookies
Here are some common questions and answers to help you bake the best pumpkin oatmeal chocolate chip cookies:
- Can I use old-fashioned oats instead of quick oats?
No, it is highly recommended to stick with quick oats for this recipe. Quick oats are finer and absorb moisture differently, contributing to the soft and chewy texture. Old-fashioned oats will result in a tougher, less desirable consistency. - Why do I need to chill the dough twice?
The double-chill method is crucial. The first chill allows the butter to firm up, preventing the cookies from spreading too much during baking. It also gives the flavors time to meld. The second chill ensures the dough is very cold when it goes into the hot oven, which helps create those crisp edges and a gooey, chewy center. - What if my pumpkin puree is too watery?
Some canned pumpkin purees can be quite wet. If yours seems excessively moist, spread it thinly on a few layers of paper towels and gently pat the top with more paper towels to absorb excess liquid. This helps prevent your cookie dough from becoming too slack. - Can I substitute pumpkin pie filling for pumpkin puree?
No, pumpkin pie filling contains added sugars, spices, and sometimes other ingredients that will significantly alter the flavor and texture of your cookies. Always use 100% pure canned pumpkin puree for this recipe. - How do I know when the cookies are done baking?
Look for lightly golden brown edges and centers that still appear slightly gooey or soft. These cookies are best when slightly underbaked, as they will continue to set as they cool on the baking sheet and cooling rack. - Can I freeze the cookie dough?
Yes! You can roll the chilled dough into balls, place them on a parchment-lined tray, and freeze until solid. Once frozen, transfer them to an airtight freezer bag for up to 2-3 months. When ready to bake, place frozen dough balls on a baking sheet and add an extra 2-4 minutes to the baking time.
Embrace the Warmth of Fall with Every Bite
These Pumpkin Oatmeal Chocolate Chip Cookies are more than just a dessert; they are an embodiment of comfort, warmth, and the joyful spirit of the autumn season. Imagine the aroma filling your home, the anticipation building as they bake, and finally, that first glorious bite—a perfect harmony of crisp, chewy, and rich, spiced sweetness. They are truly a treat that will become a beloved tradition in your fall baking repertoire. Enjoy sharing them with loved ones, or savoring them all to yourself!