
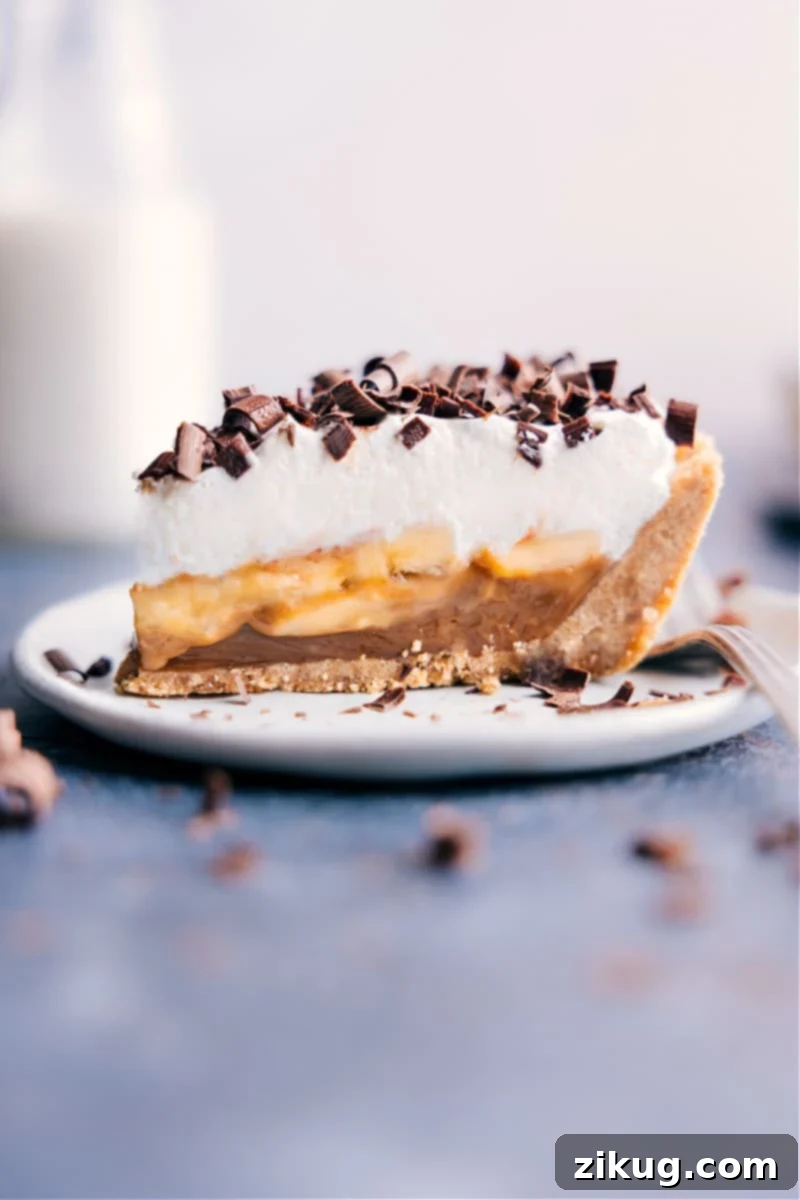
Indulge in a truly spectacular dessert with this ultimate Banoffee Pie Recipe. This beloved British classic combines a buttery graham cracker crust with a luscious layer of thick dulce de leche, perfectly ripe sweet bananas, airy homemade whipped cream, and a final flourish of delicate chocolate shavings. It’s a symphony of textures and flavors that promises to be a favorite at any gathering or a delightful treat for your family.
If you’re a fan of delightful banana desserts, be sure to explore some of our other cherished recipes, including these Banana Cupcakes, our creamy Banana Cream Pie, or the famous Banana Pudding Recipe (inspired by Magnolia Bakery!). These options are perfect for satisfying any banana craving.
What Exactly Is Banoffee Pie? A Beloved British Dessert Defined
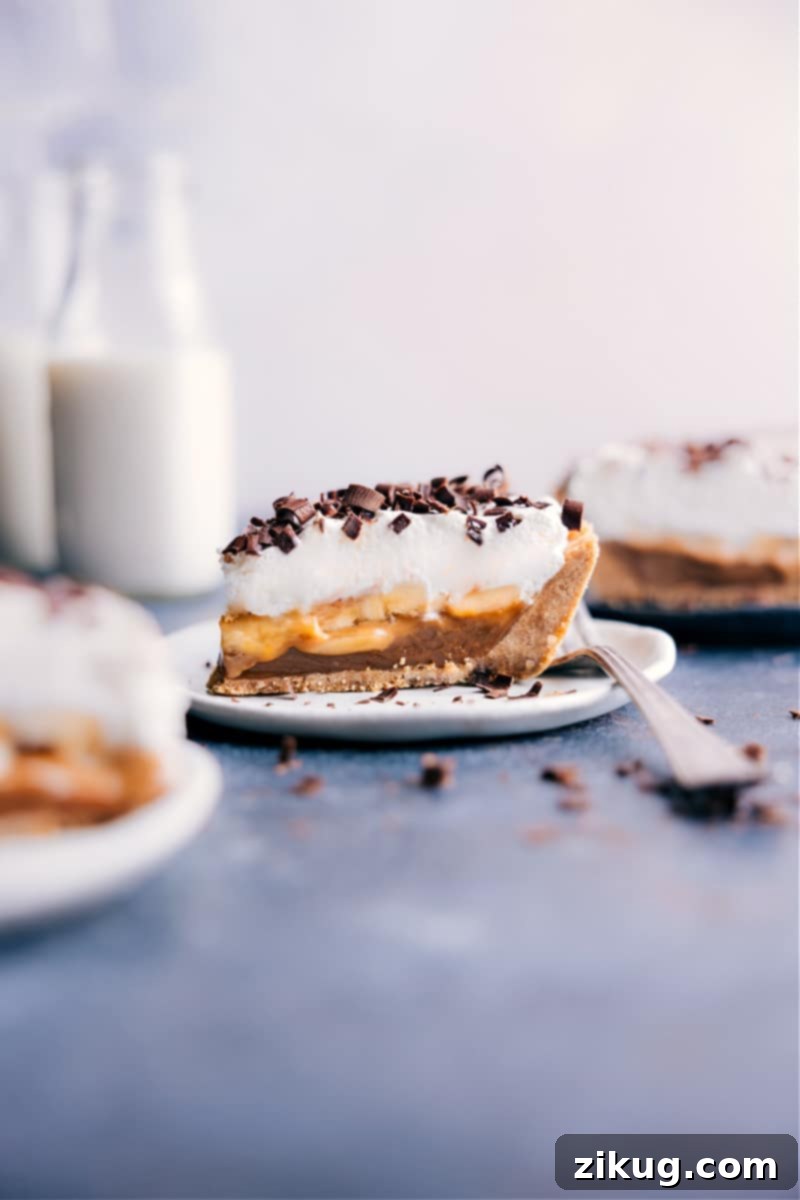
The Banoffee Pie is a celebrated British dessert, renowned for its rich, sweet, and utterly satisfying profile. Originating in England in the early 1970s, it quickly captured hearts with its simple yet ingenious combination of ingredients. At its core, it’s typically a no-bake (or minimally baked) pie featuring a sturdy and delicious buttery biscuit or cookie base, most commonly crafted from crushed digestive biscuits in the UK or graham crackers in the US. This foundational layer provides a delightful crunch that perfectly contrasts with the softer fillings.
Above this base, you’ll find layers of precisely sliced fresh bananas, providing natural sweetness and a creamy texture. The star of the show is often a generous pour of thick, decadent caramel, traditionally made from boiled condensed milk (often referred to as toffee or dulce de leche). A crowning cloud of light, airy, and fluffy whipped cream brings all the elements together, adding a luxurious finish. While the core ingredients remain consistent, some delightful variations might introduce a dusting of coffee powder or a sprinkle of chocolate for an extra layer of complexity and texture, making each bite an adventure.
My husband and I had the profound pleasure of discovering a banoffee trifle during our recent unforgettable trip to the U.K. It was, without a doubt, the culinary highlight of our entire journey. That unforgettable taste sparked a mission: to recreate that magic in our own kitchen. While a trifle offers a beautiful layered presentation, I ultimately opted for the classic pie format, finding it equally charming and perfect for sharing with family and friends. This adaptation has been a resounding success, with my oldest proclaiming it the “best Banoffee Pie recipe” ever! Its delightful balance of flavors and textures has made it an instant classic in our home.
Now, the only dilemma remaining is deciding which pies will grace our eagerly anticipated Thanksgiving dessert table this year. Should it be this incredible Banoffee Pie, our exquisitely creamy Coconut Cream Pie, or the timeless classic Apple Pie? According to my discerning family, the only acceptable answer is, of course, all of them! There’s always room for one more slice of perfection.
Quick Tip: Unveiling the Name “Banoffee”
The delightful name “Banoffee” isn’t a fancy French term or an ancient culinary secret passed down through generations. It’s simply a clever portmanteau, a playful combination of the two primary ingredients that define this pie’s iconic flavor profile: BANANAS and TOFFEE. Imagine Banana + Toffee = Banoffee! This charming and straightforward name perfectly encapsulates the sweet, fruity, and caramel-rich essence of this irresistible dessert.
Why This Banoffee Pie Recipe Will Become Your New Favorite Go-To Dessert
While the culinary world abounds with banoffee pie recipes, this particular version is meticulously crafted to deliver maximum flavor, impressive ease, and consistent results every time. We focus on achieving a perfectly balanced sweetness, ensuring that no single component overwhelms the others. The crust, whether homemade or store-bought, offers a satisfying crispness that cradles the rich fillings beautifully. Each layer, from the deeply flavorful dulce de leche to the generous topping of fresh, airy whipped cream, is designed to complement and enhance the others, creating a truly harmonious dessert experience.
What truly makes this recipe stand out is its approachability without compromising on gourmet results. It’s a recipe that is surprisingly straightforward for bakers of all skill levels, yet yields a pie so impressive that it feels like it came from a high-end bakery. We provide clear, concise instructions for every step, ensuring that even a novice in the kitchen can create a showstopping dessert. Whether you opt for homemade dulce de leche or a convenient store-bought option, the result is consistently irresistible. This Banoffee Pie is not just a recipe; it’s an invitation to create joy, perfect for special occasions, holiday feasts, or simply a delightful weekend indulgence. You’ll find immense satisfaction in preparing and, more importantly, devouring this exquisite pie.
Frequently Asked Questions About This Delicious Banoffee Pie Recipe
What Does Banoffee Pie Truly Taste Like? An Indulgent Flavor Profile
Banoffee Pie offers an exquisite taste experience that is both comforting and sophisticated. Each bite delivers a harmonious blend of flavors and textures, starting with a rich, buttery graham cracker (or digestive biscuit) crust that provides a satisfying, subtly sweet crunch. This is quickly followed by the deep, complex, and intensely sweet caramel notes of dulce de leche, which melts in your mouth. This decadent sweetness is beautifully balanced by the natural, fresh sweetness and soft texture of perfectly ripe banana slices. Finally, all these wonderful components are crowned with a light, airy, and creamy vanilla-infused whipped topping. The interplay of sweet, creamy, fruity, and slightly salty (from the crust) flavors makes it an utterly irresistible and memorable dessert.
Is Banoffee Related to Coffee or Toffee? Clarifying the Name
The name “Banoffee” is indeed a playful portmanteau, cleverly combining “bananas” and “toffee.” The “offee” component unequivocally refers to the rich, caramelized sugar flavor of toffee. In this Banoffee Pie recipe, that classic toffee-like essence is perfectly embodied by the luscious dulce de leche. While some modern or creative variations of the dessert might include a subtle hint of coffee (perhaps in the chocolate garnish or as a light dusting) for an extra layer of flavor complexity, the fundamental identity of Banoffee Pie is rooted in bananas and toffee/caramel, not coffee. So, rest assured, it’s a sweet, caramel-banana delight.
How Do You Prevent Bananas from Turning Brown in Banoffee Pie? Essential Tips
Keeping banana slices fresh and vibrant in Banoffee Pie is a common concern, as bananas tend to oxidize quickly when exposed to air. The simplest and most effective method employed in this recipe is to layer them immediately and generously with the whipped cream. The whipped cream acts as a protective barrier, significantly reducing the bananas’ contact with air, which is the primary cause of browning. For an extra layer of assurance, especially if you plan to make the pie a bit further in advance, you can lightly brush the banana slices with a tiny amount of club soda (it’s crucial to use club soda, not tonic water, as tonic water contains quinine which can impart an undesirable bitter taste). However, if you intend to enjoy the pie within 24 hours of assembly, the protective whipped cream layer alone is usually more than sufficient to maintain their appealing, golden-yellow appearance.
Tips for Achieving Perfectly Clean and Elegant Pie Slices
To ensure beautifully neat, picture-perfect slices of your Banoffee Pie, a very sharp knife is your absolute best friend. The secret lies in heat. For each individual slice, run your sharp knife under hot tap water for a few seconds. Then, immediately and completely wipe the knife dry with a clean kitchen towel. The warmth from the blade will help it glide effortlessly and cleanly through the rich, sticky dulce de leche, soft bananas, and fluffy whipped cream layers without sticking or dragging. This technique ensures a precise, elegant cut every single time, preserving the beautiful layered presentation of your pie. Remember to repeat this warming and drying process before each subsequent cut to maintain pristine edges and an elegant presentation throughout the entire serving.
Does Banoffee Pie Absolutely Need to Be Refrigerated?
Absolutely, Banoffee Pie must be refrigerated. Due to its fresh banana layers and especially its delicate whipped cream topping, it requires constant cool storage to maintain its freshness, preserve its intricate texture, and ensure food safety. Dairy products like heavy cream are perishable and will spoil quickly at room temperature. Therefore, always store any leftover Banoffee Pie tightly covered in the refrigerator. This not only prevents it from drying out but also protects it from absorbing other odors from your fridge and, most importantly, keeps all the dairy components fresh and safe to eat. This pie is best enjoyed when thoroughly chilled, as the coolness enhances its refreshing qualities and firms up the layers perfectly.
Mastering the Art of Banoffee Pie: A Simple, Step-by-Step Guide
Crafting this delightful Banoffee Pie is surprisingly straightforward and incredibly rewarding, especially if you opt for readily available ingredients like high-quality store-bought dulce de leche and a pre-made crust. The inherent beauty of this recipe lies in its elegant simplicity and the consistently impressive results it delivers, even to novice bakers. It’s a dessert that tastes complex but is actually quite easy to assemble. Here’s a quick, easy-to-follow breakdown of the main steps you’ll undertake to create your own irresistible Banoffee Pie, ensuring a smooth and enjoyable baking (or no-baking) experience:
- Prepare Your Dulce de Leche: This rich, deeply caramelized milk is the indulgent heart and soul of the pie, providing its signature toffee-like flavor. You have several convenient options here: you can embark on the wonderfully rewarding journey of making it entirely from scratch for the most authentic flavor, follow our simple and detailed method for transforming a humble can of sweetened condensed milk (full instructions are provided further down in this blog post), or for ultimate ease and time-saving, conveniently purchase a can of high-quality store-bought dulce de leche.
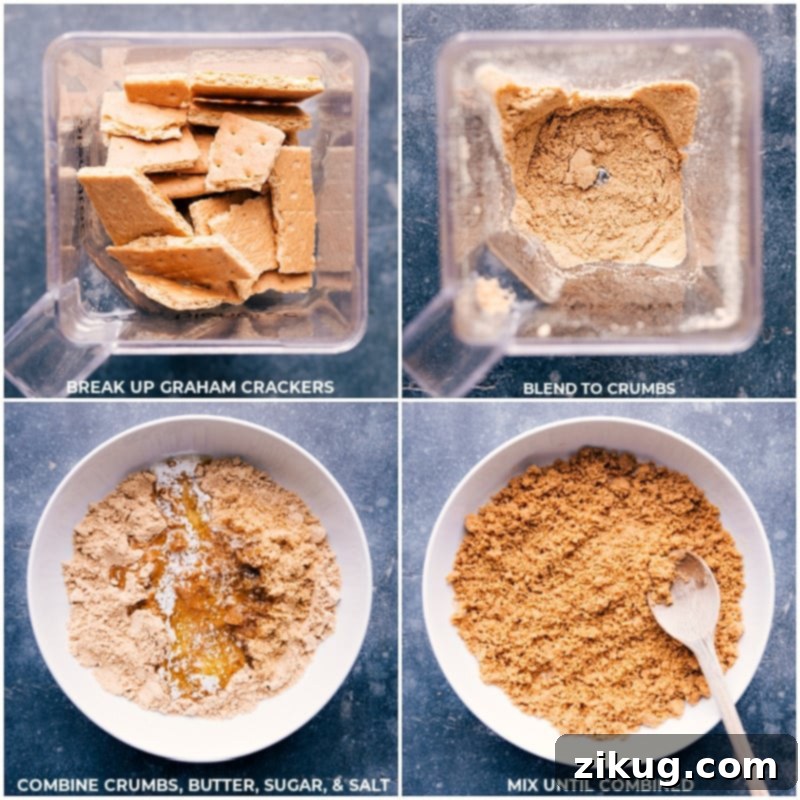
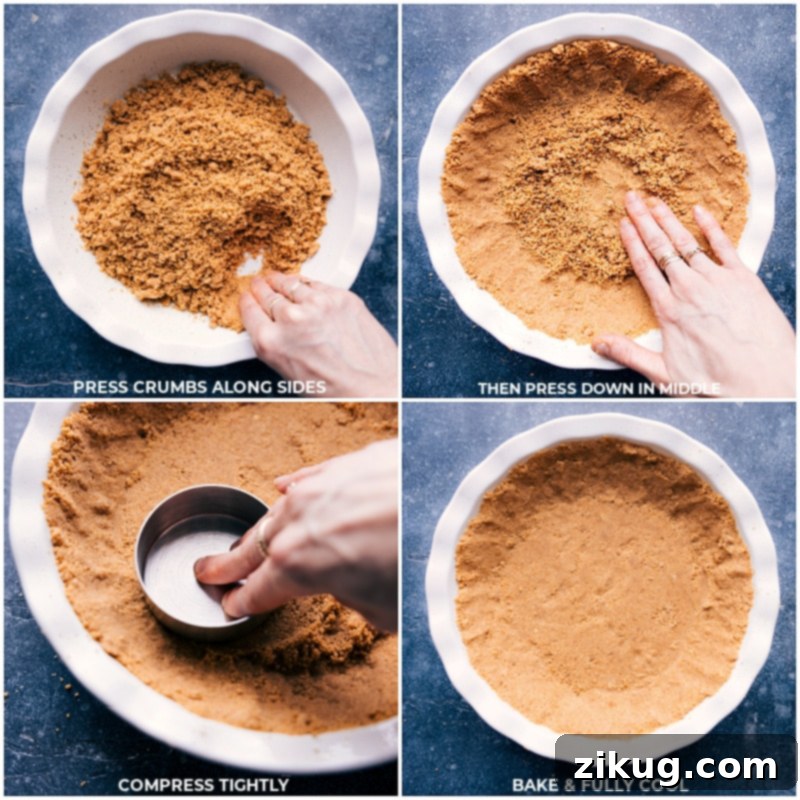
- Craft the Perfect Graham Cracker Crust: A good, sturdy, and flavorful crust is absolutely essential for any pie, and Banoffee is no exception. While excellent store-bought options are readily available and can significantly speed up the process, making your own Graham Cracker Crust is incredibly satisfying, surprisingly simple, and allows for superior freshness. We’ve even dedicated a whole blog post to mastering the art of the perfect graham cracker crust, complete with useful tips and clever tricks for achieving a consistently crisp and buttery foundation!
- Whip the Cream to Ethereal Perfection: The crowning glory of airy, ethereal whipped cream brings all the diverse textures and flavors of the pie together in a harmonious blend. Using a stand mixer makes this step remarkably quick and effortless, allowing you to achieve that ideal, fluffy, and stable consistency in just a matter of minutes. Be sure to use very cold heavy cream for the best results.
- Thoughtful Assembly: Patience is indeed a virtue, especially when assembling a layered dessert like Banoffee Pie. It’s absolutely crucial to ensure that both your prepared crust and the rich dulce de leche are completely cooled before you begin layering them. This vital step prevents a soggy crust, ensures the caramel sets beautifully, and allows for clean, distinct layers.
- Garnish for Elegance (Optional but Highly Recommended): For a truly professional touch and an added layer of subtle flavor, seriously consider topping your finished pie with delicate, thin chocolate shavings or a sprinkle of crunchy English Toffee Baking Bits. These small, thoughtful details not only elevate the visual appeal of the pie but also add a textural dimension that transforms it from merely delicious to truly extraordinary and memorable.
Pro Tip for an Effortless & Quick Banoffee Pie Experience
For an incredibly easy Banoffee Pie recipe that requires minimal effort and saves you precious time, consider embracing a brilliant shortcut: utilize a high-quality store-bought graham cracker crust. This ingenious hack means you won’t even need to turn on your oven, transforming the Banoffee Pie into a perfect no-bake dessert option, ideal for busy weeknights, last-minute gatherings, or when the weather is too warm to heat up your kitchen. It’s convenience without compromising on delicious flavor!
Homemade Dulce de Leche: A Simple, One-Ingredient Method from Sweetened Condensed Milk
While an excellent quality store-bought dulce de leche is perfectly acceptable and convenient for this Banoffee Pie recipe, creating your own at home adds a truly special, personalized touch and is surprisingly simple, requiring just one humble ingredient! This method yields a wonderfully rich, deeply caramelized flavor with a luxuriously smooth texture that truly elevates the entire pie experience. Here’s how you can easily make your own luscious dulce de leche right in your kitchen, ensuring a fresh and flavorful caramel layer:
- Select Your Ingredient: You’ll need just one 14-ounce can of good quality, full-fat sweetened condensed milk. It is absolutely crucial to ensure it’s *not* evaporated milk, as the two are distinctly different products with varying compositions and will yield very different, unsatisfactory results if substituted.
- Prepare for Baking: Begin by preheating your oven to 425 degrees F (220 degrees C). Carefully and completely empty the entire contents of the sweetened condensed milk can into a 9-inch pie pan or any other shallow, oven-safe dish. Then, cover the pan tightly and securely with aluminum foil, crimping the edges well to create a seal and prevent any water from seeping in during the baking process.
- Create a Protective Water Bath: Place the foil-covered pie pan (containing the condensed milk) into a larger baking pan with sufficiently high sides. This larger pan will serve as a water bath, also known as a bain-marie. The water bath helps the dulce de leche cook very gently and evenly, preventing it from scorching or separating, and ensuring a smooth, consistent caramelization.
- Bake to Caramelized Perfection: Carefully pour hot water into the larger pan until it reaches approximately 1 inch up the sides of the pie pan holding the condensed milk. With caution, transfer the entire setup to your preheated oven. Bake for approximately 2 hours. It’s important to periodically check the water level in the larger pan (every 30-45 minutes) and refill with additional hot water if needed, ensuring the water bath remains consistent throughout the baking time. The dulce de leche is ready when it achieves a beautiful, deep golden-brown color and a thick, luxuriously spreadable consistency.
- Cool and Finish: Once baked, carefully remove the pan from the oven and allow it to cool completely to room temperature. Once cool, remove the foil and whisk the dulce de leche vigorously for a few minutes to smooth out any potential lumps and achieve a silky consistency. It will continue to thicken even further as it chills. It is absolutely essential to ensure the dulce de leche is fully chilled and set before you spread it onto your Banoffee Pie crust for the best structural integrity and overall taste experience.
Expert Tips for Crafting the Best Banoffee Pie Ever
Achieving Banoffee Pie perfection is easy with a few key considerations. Follow these expert tips to ensure your pie is a true showstopper every time:
- Choose the Right Bananas: The quality of your bananas significantly impacts the pie’s flavor and texture. Opt for firm, ripe bananas that are bright yellow with very few, if any, brown spots. Overripe bananas can become excessively mushy and overpoweringly sweet, while underripe ones lack the essential natural sweetness and soft texture required for this dessert.
- Chilling is Absolutely Crucial: Patience is a virtue in Banoffee Pie making. Allow ample chilling time for each major layer, especially the prepared crust after baking and the fully assembled pie before serving. This critical step ensures that the pie sets properly, preventing a runny or messy consistency, and allows all the flavors to meld beautifully, achieving its characteristic firm yet wonderfully creamy texture.
- Don’t Overbeat the Whipped Cream: When whipping heavy cream, watch it diligently. Overbeating can quickly turn your light, airy cream into a grainy, almost curdled texture. Stop whisking as soon as medium peaks form – the cream should hold its shape when you lift the whisk, but still appear soft and luxurious, not stiff or crumbly.
- Ensure Even Layers for Beauty and Balance: For both a stunning presentation and a perfectly balanced flavor in every single bite, take the time to spread each layer (dulce de leche, bananas, whipped cream) evenly across the crust. This attention to detail ensures consistency and visual appeal.
- Garnish Just Before Serving: The final touches make all the difference. Delicate chocolate shavings, a dusting of cocoa powder, or a sprinkle of crunchy toffee bits are best added right before serving. This keeps them fresh, vibrant, and visually appealing, ensuring the pie looks its best when it arrives at the table.
Serving and Pairing Suggestions for Your Banoffee Pie
Banoffee Pie is a standalone star, so intensely flavorful and satisfying that it truly needs no accompaniment. However, a few simple additions or thoughtful pairings can elevate the dessert experience even further. Serve it chilled for the best texture and refreshing taste, perhaps with a light dusting of high-quality cocoa powder or a few extra fresh banana slices artfully arranged on the side for added appeal. For beverage pairings, a robust, freshly brewed cup of coffee or a comforting mug of rich hot chocolate would provide a wonderful counterpoint to the pie’s sweetness. If you prefer something lighter to cut through the richness, a sparkling water infused with a hint of citrus (like lemon or orange) can cleanse the palate beautifully. This incredibly versatile pie is perfect for holidays like Thanksgiving or Christmas, a delightful birthday treat, or simply a luxurious weekend indulgence that everyone will adore.
Storage and Make-Ahead Guide: Planning Your Banoffee Pie
Preparing your Banoffee Pie in advance can be a huge time-saver and reduce stress, especially when entertaining! Here’s how to best manage its storage and preparation timeline for optimal freshness and flavor:
Can You Make Banoffee Pie The Day Before?
Yes, you absolutely can! In fact, making certain components or even the entire pie in advance can enhance its flavors as they meld together. The graham cracker or biscuit crust can be prepared 1-2 days in advance. After baking and allowing it to cool completely, tightly cover it with plastic wrap to prevent it from drying out, and store it in the refrigerator. The fully assembled pie, complete with all its luscious layers of dulce de leche, bananas, and whipped cream, can also be made 1 day ahead of time. Store it covered in the fridge until you’re ready to serve, ensuring you add any delicate garnishes (like chocolate shavings) just before presentation for the freshest and most appealing look. Chilling overnight often helps the pie set beautifully, making it easier to slice.
Can You Freeze Banoffee Pie?
Unfortunately, this Banoffee Pie recipe does not freeze and thaw very well, and we generally do not recommend attempting to freeze it. The delicate balance of textures and the integrity of the fresh ingredients are significantly compromised during the freezing and thawing process. Specifically: the crust tends to become overly soft and loses its desirable crispness; the fresh bananas can seep liquid, become mushy, and brown unpleasantly upon thawing; and the fluffy whipped cream often turns watery and loses its airy, stable consistency, leading to a less appealing texture. For the absolute best experience and to savor its intended perfection, it is highly recommended to enjoy this pie fresh and thoroughly chilled within 1-2 days of preparation!
More Irresistible Desserts to Love and Discover:
If you have a passion for baking and enjoyed this delightful journey into the world of Banoffee Pie, you might absolutely love exploring these other fantastic and diverse dessert recipes from our collection:
- Craving something truly unique and indulgent? Try our incredible Cronut, a delightful croissant-donut hybrid masterfully crafted with flaky, buttery puff pastry dough. It’s a pastry dream come true!
- Master the art of delicate French pancakes with our comprehensive guide on How to Make Crepes. This authentic recipe is inspired by the techniques and flavors found in a traditional French bakery, perfect for sweet or savory fillings.
- Indulge in crispy, golden, cinnamon-sugar perfection with these irresistible Churros. They are absolutely perfect for dipping into warm dulce de leche or a rich, velvety chocolate sauce for a truly decadent treat!
- For a dessert that’s as incredibly easy to assemble as it is profoundly delicious, whip up our famous Magic Cookie Bars, featuring a wonderfully thick and buttery graham cracker crust as their delicious base.
- Combine two universally beloved flavors in our moist and tender Banana Chocolate Chip Layer Cake, generously frosted with a luxurious and rich chocolate buttercream frosting for an unforgettable taste.
Banoffee Pie Recipe

Banoffee Pie Recipe
By Chelsea Lords
This Banoffee Pie is a true favorite! A buttery cookie crust, rich dulce de leche, sweet bananas, fluffy whipped cream, and chocolate shavings make it utterly irresistible.
Cook Time: 10 minutes
Chilling Time: 2 hours
Total Time: 2 hours 35 minutes
Servings: 8 servings
Equipment
- 9-inch Pie pan
- Blender or food processor
- Stand mixer
Ingredients
Crust
- Cooking spray
- 1-3/4 cups graham cracker crumbs (from 12 sheets, or digestive biscuit crumbs, see note 1)
- 6 tablespoons unsalted butter, melted
- 1/4 cup light brown sugar, lightly packed
- 1/8 teaspoon salt
Filling
- 1 (13.4-ounce) can dulce de leche sauce (see note 2)
- 2 bananas, firm and ripe, not overripe
Topping
- 1-1/2 cups heavy cream
- 1/4 cup powdered sugar
- 1/2 teaspoon vanilla bean paste or 1 teaspoon vanilla extract
- 1/8 teaspoon salt
- 1 dark chocolate bar, optional
Instructions
- Preheat oven to 350°F (175°C). Lightly grease a 9-inch pie pan with cooking spray. Melt 6 tablespoons butter in a microwave-safe bowl and let cool for 5 minutes. In a blender or food processor, blend graham crackers into fine crumbs. Measure 1-3/4 cups crumbs and place them in a large bowl. Add sugar and salt from the Crust ingredients. Mix in the melted butter until well combined.
- Pour the crumb mixture into the prepared pan. Press crumbs along the sides first, then firmly onto the bottom, using your fingers. Use the bottom of a flat 1-cup measuring cup or a glass to compress the crumbs firmly, forming a sturdy crust. Bake for 10 minutes, then cool completely. For quicker cooling, you can place it in the fridge. The crust can be prepared and baked up to 24 hours in advance; cover with plastic wrap and store at room temperature.
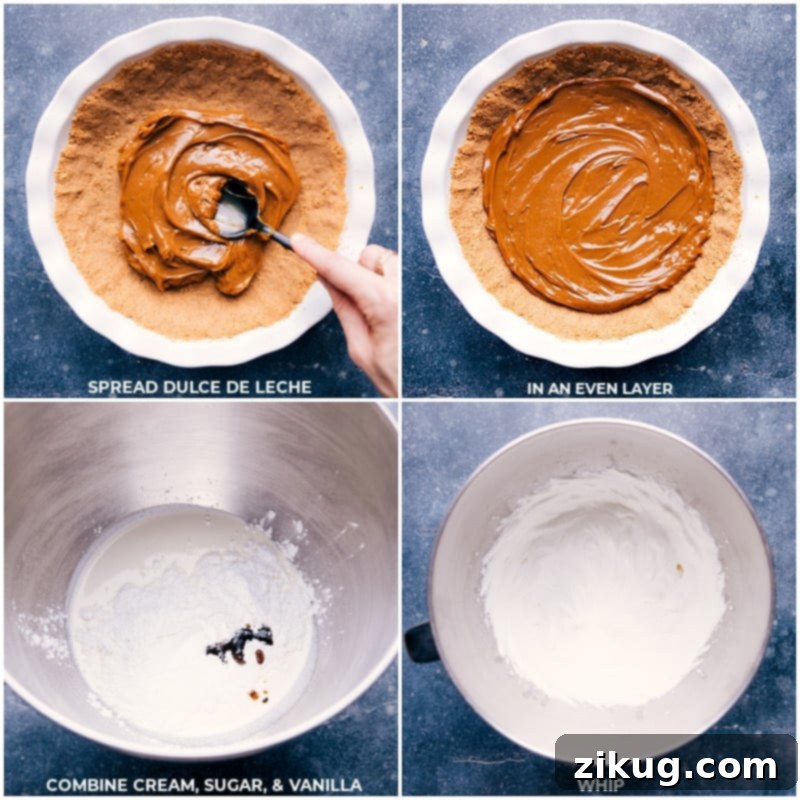
- From the Topping ingredients, pour heavy cream, 2 tablespoons powdered sugar (you can add more if you prefer it sweeter), and vanilla into a stand mixer bowl. Whisk on low speed, gradually increasing to high speed until medium peaks form (the cream should hold its shape but not be stiff). This usually takes about 2–4 minutes. Watch carefully to avoid over-beating, as it can quickly turn grainy.
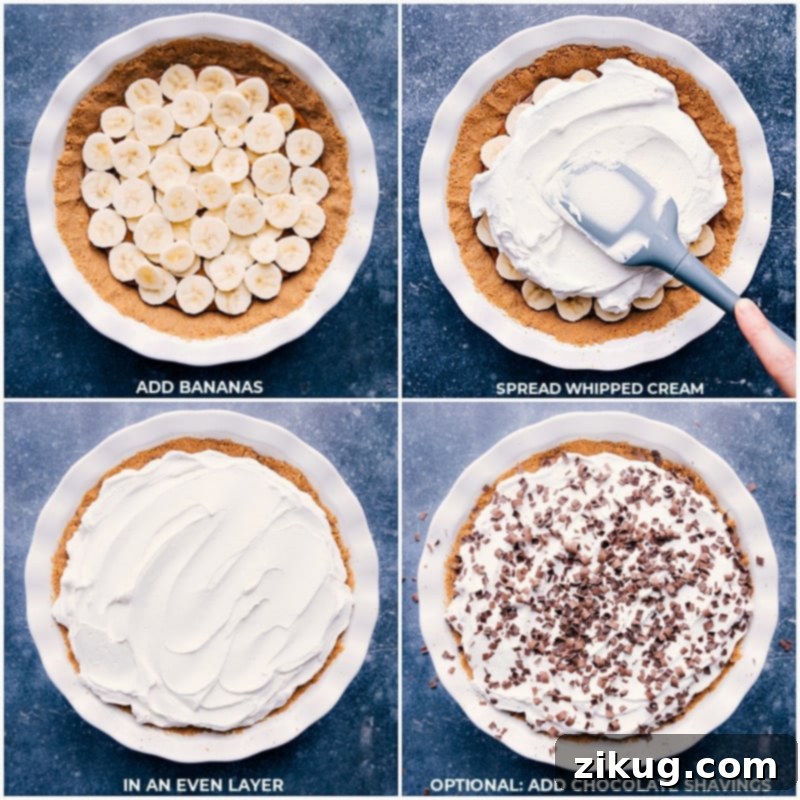
- Once the crust is fully cooled, spread a smooth, even layer of dulce de leche on the bottom. Thinly slice the 2 bananas and arrange them in two overlapping layers on top of the dulce de leche. Immediately top with the whipped cream, spreading it smoothly with a spatula or the back of a large spoon to cover the bananas completely.
- Place the uncovered pie in the fridge for at least 2 hours to allow it to firm up. You can store it in the fridge for up to a day in advance. Garnish with chocolate curls, if desired, just before serving. To make chocolate curls, simply peel a dark chocolate bar with a vegetable peeler directly onto the pie. To serve, use a sharp knife, running it under hot water and drying it off before each cut to ensure clean slices.
Recipe Notes
- Note 1 (Crust Variations): If graham crackers are not available, you can use blended digestive biscuit crumbs. The other crust ingredients remain the same. When using digestive biscuits, bake the crust for 3–6 minutes longer, keeping a close eye on it to prevent over-browning.
- Note 2 (Dulce de Leche Options): For the dulce de leche, you have several choices: make it from scratch. (Full directions are detailed in the blog post above in the “Homemade Dulce de Leche” section), use our method with a can of sweetened condensed milk, or conveniently purchase a can of prepared dulce de leche.
- Storage: Store any leftovers tightly covered in the fridge for 3–4 days. Be aware that the texture may soften and the filling might “weep” slightly over time due to the bananas. The graham cracker crust can be made 1–2 days in advance: bake, cool, cover tightly, and store in the fridge. The fully prepared pie can be made 1 day in advance and stored in the fridge until serving. This recipe does not freeze/thaw well; the crust becomes too soft, bananas brown, and the whipped cream gets watery.
Nutrition Information
Serving: 1 serving | Calories: 373kcal | Carbohydrates: 33g | Protein: 3g | Fat: 27g | Saturated Fat: 16g | Polyunsaturated Fat: 1g | Monounsaturated Fat: 7g | Trans Fat: 0.3g | Cholesterol: 73mg | Sodium: 173mg | Potassium: 192mg | Fiber: 1g | Sugar: 20g | Vitamin A: 937IU | Vitamin C: 3mg | Calcium: 54mg | Iron: 1mg
Nutrition information is automatically calculated and should only be used as an approximation. Individual results may vary based on exact ingredients and preparation methods.
Loved this recipe? We’d be thrilled to hear your thoughts! Leave a comment or share your experience below!