
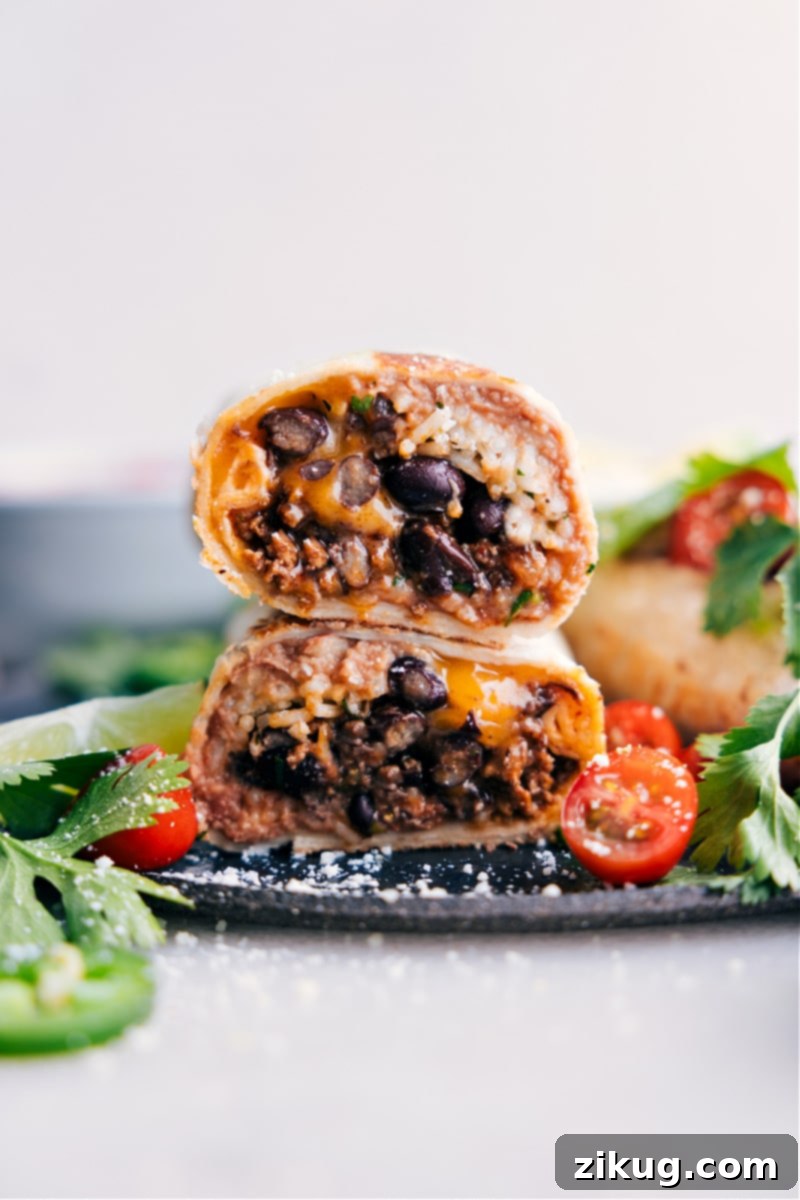
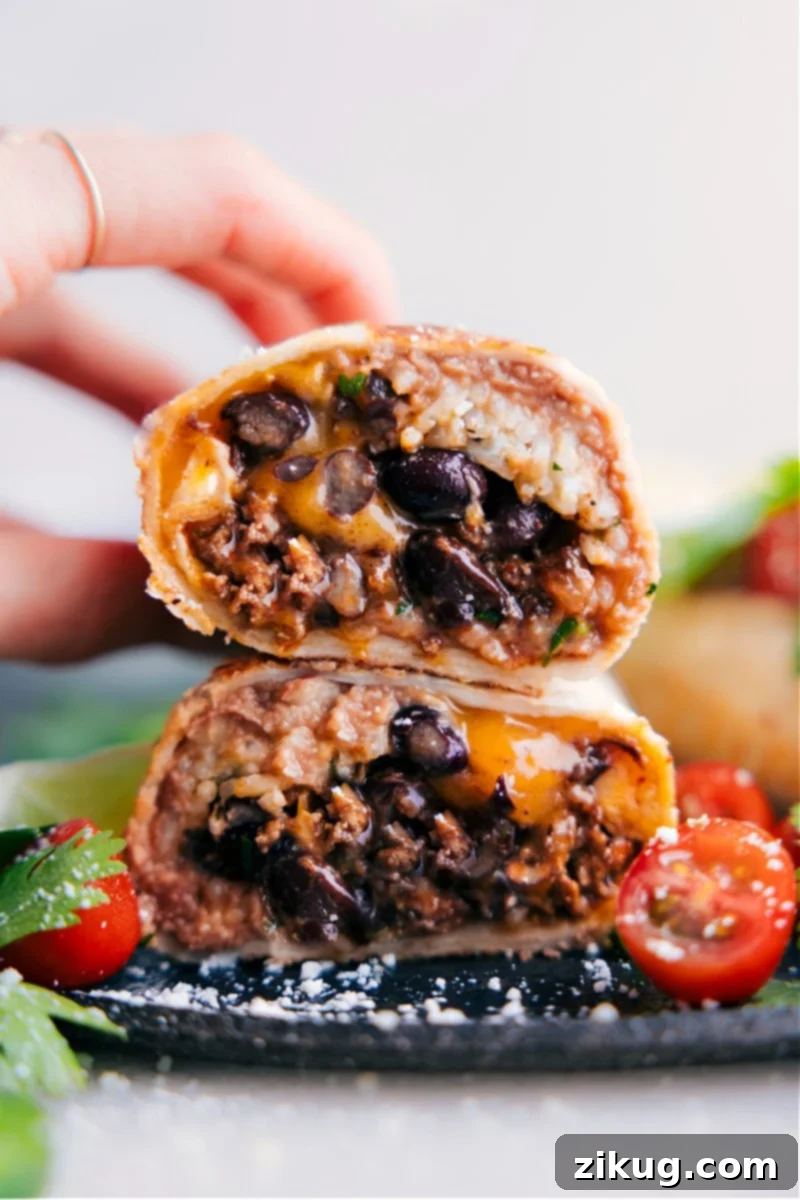
Unwrap a world of flavor with this incredible Beef Burrito Recipe! Imagine perfectly seasoned ground beef, vibrant cilantro-lime rice, rich refried beans, and gooey melted cheese, all neatly tucked into a warm flour tortilla. These aren’t just any burritos; they’re easy to customize, ready in about 30 minutes, and fantastic for meal prepping, thanks to their freezer-friendly nature. Get ready to transform your weeknight dinners with this hearty and satisfying Mexican-inspired dish.
Mastering the Easy Beef Burrito Recipe
Life can be hectic, especially when juggling family commitments. Before my third child arrived, I knew I needed a culinary strategy to keep delicious, homemade meals on the table without sacrificing precious time. This easy beef burrito recipe quickly became a top priority because it perfectly checks all the boxes: it freezes and reheats beautifully, is incredibly kid-friendly, and comes together with remarkable ease. It’s truly a lifesaver for busy weeknights and a fantastic solution for meal prepping throughout the week.
While many burrito recipes can feel overwhelming with numerous components, my goal with this particular Beef Burrito Recipe is to strike the perfect balance between maximum flavor and utmost simplicity. Yes, there are a few distinct parts to these burritos – the beef filling, the rice, the beans, and the cheese – but I’ve meticulously streamlined each step to make the entire process as quick and straightforward as possible. You’ll achieve rich, satisfying flavors without spending hours in the kitchen, making it an ideal choice for both novice cooks and seasoned home chefs alike.
Key Ingredients for the Perfect Beef Burrito
Crafting a delicious burrito begins with selecting high-quality ingredients. Here’s a closer look at what you’ll need and some tips for each component to ensure your burritos are packed with flavor and texture:
- Beef: We start with lean ground beef, expertly seasoned with taco seasoning and then simmered in a savory red enchilada sauce. This combination creates a deeply flavorful and moist filling. For a lighter option, ground turkey makes an excellent substitute. Alternatively, if you’re looking for an even richer, more tender experience, consider using the shredded beef chuck roast from our Shredded Beef Enchiladas recipe.
- Rice: The star of the show for many, our homemade Cilantro-Lime Rice adds a refreshing, zesty kick that beautifully complements the rich beef. Its bright flavors are a game-changer. However, if you’re short on time, plain cooked white rice or even microwaveable rice can be used as a convenient, quick alternative. Just ensure it’s cooked according to package directions and fluffed for the best texture.
- Tortillas: Large flour tortillas are essential for wrapping all these delicious ingredients together. Opt for 10-inch tortillas to prevent overfilling and ensure easy rolling. A crucial tip is to warm them slightly before assembly; this makes them much more pliable and less prone to tearing. You can warm them in the microwave for a few seconds, on a dry skillet, or wrapped in foil in the oven.
- Beans: This recipe uses creamy refried beans, which add a wonderful texture and richness. For an extra layer of flavor and fiber, I also love to include optional black beans. Feel free to use just one type of bean or both, depending on your preference. If using canned black beans, make sure to rinse them thoroughly under cold water to remove excess sodium and any canning liquid.
- Cheese: Freshly grated sharp Cheddar cheese is highly recommended. It melts beautifully into the warm filling, creating that irresistible gooey texture. While pre-shredded cheese is convenient, it often contains anti-caking agents that hinder a smooth melt. Grating your own makes a noticeable difference in both texture and flavor.
- Toppings & Dips: Burritos are inherently customizable, and toppings are where you can truly make them your own! My personal favorites include cooling sour cream, creamy guacamole, and zesty salsa. The best approach, especially when serving a group, is to offer a variety of toppings on the side. This allows everyone to personalize their burrito exactly to their taste, whether they prefer it spicy, mild, extra cheesy, or loaded with fresh veggies.
Quick Tip: Elevate Your Flavors!
If you enjoy making components from scratch, you’re in luck! To further enhance the homemade feel of this beef burrito recipe, we’ve got you covered with recipes for key flavor builders. Try our go-to homemade taco seasoning recipe for a fresh, vibrant blend, or craft your own rich and savory homemade enchilada sauce for an unparalleled depth of flavor.
Crafting Your Perfect Beef Burritos: A Step-by-Step Guide
Making these beef burritos is a rewarding experience, transforming simple ingredients into a flavorful, satisfying meal. Follow these detailed steps for the best results:
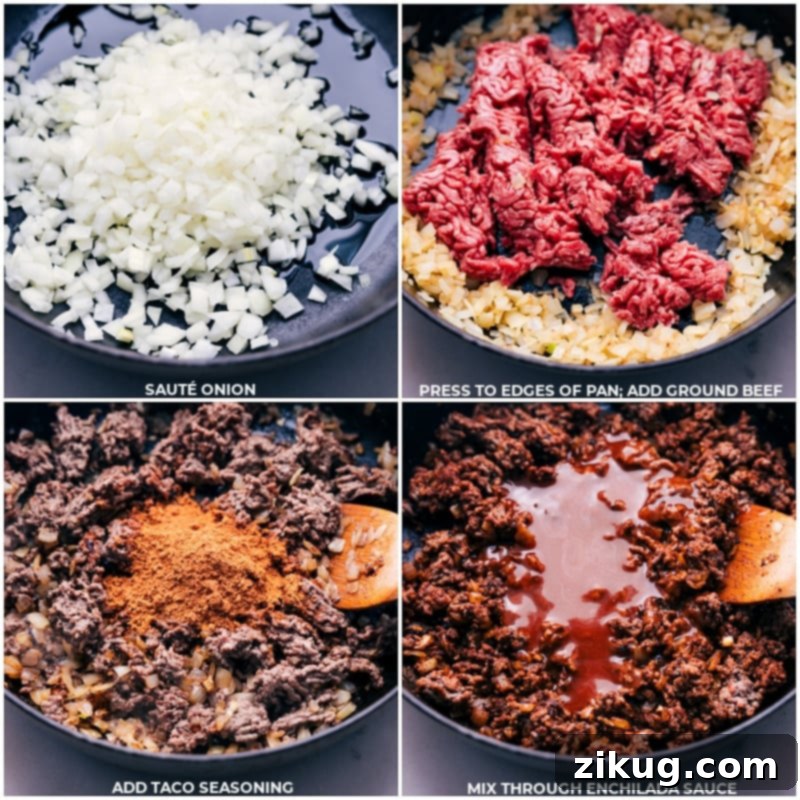
- Prepare the Flavorful Beef Filling: Begin by heating 1 tablespoon of olive oil in a large skillet over high heat. Add the finely diced yellow onion and sauté until it turns golden and translucent, which should take about 3 minutes. Once softened, push the onions to the edges of the pan to clear the center. Add 1 pound of lean ground beef to the middle of the skillet, allowing it to sear undisturbed for a few minutes to develop a rich brown crust. Then, break it apart and cook through, stirring occasionally, for about 3–5 minutes. If there’s any excess grease, carefully drain it from the pan.
- Season and Simmer the Beef: Reduce the heat to medium. Sprinkle in a 1-ounce packet of taco seasoning (or your homemade blend). Stir it thoroughly into the beef and onion mixture, allowing the spices to toast and become fragrant for 1–3 minutes. Next, pour in 3/4 cup of mild red enchilada sauce. Stir everything together and let the mixture simmer gently for a few minutes until the sauce has thickened and the flavors have melded beautifully. Remove the pan from the heat. If you’re using canned black beans, stir in one (15-ounce) can of drained and rinsed black beans at this point. Allow the filling to cool slightly while you prepare the other components.
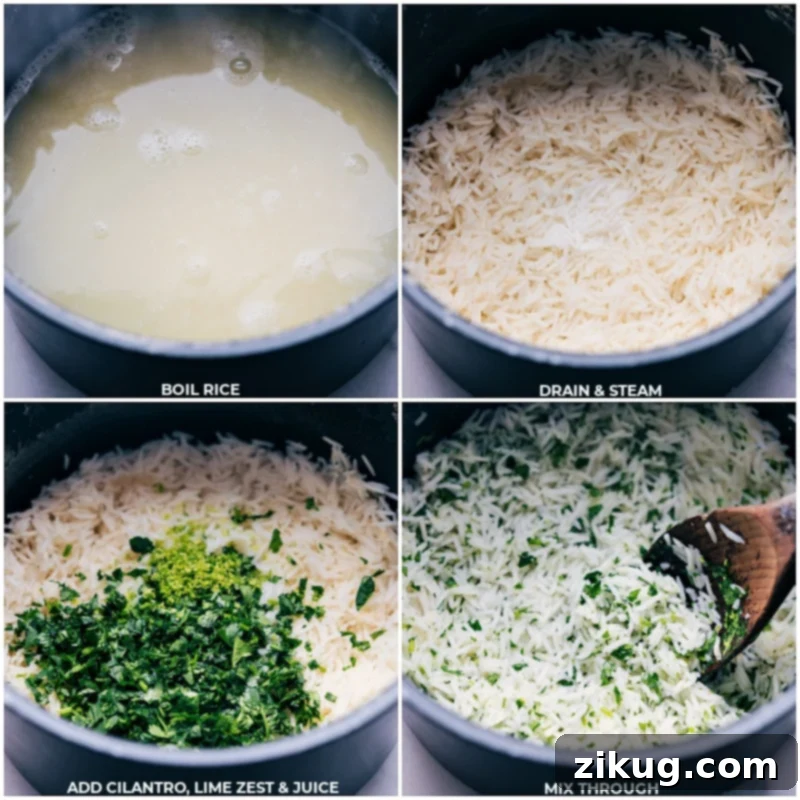
- Master the Cilantro-Lime Rice: While the beef simmers, prepare your rice. For my favorite zesty cilantro-lime rice, combine 1 cup of long-grain or basmati rice with 1-1/2 cups of water and 1/2 teaspoon of salt in a medium pot. Bring the mixture to a boil, then immediately reduce the heat to low, cover the pot tightly, and simmer for 12–14 minutes, or until all the water is absorbed and the rice is tender. Once cooked, remove the pot from the heat, stir in 1 tablespoon of butter, cover again, and let it stand for 10 minutes to fluff. Finally, fluff with a fork, then stir in 2 tablespoons of fresh lime juice, 1 teaspoon of lime zest, and 1/2 cup of freshly chopped cilantro. Taste and adjust seasoning as needed. If using plain white rice, follow package directions.
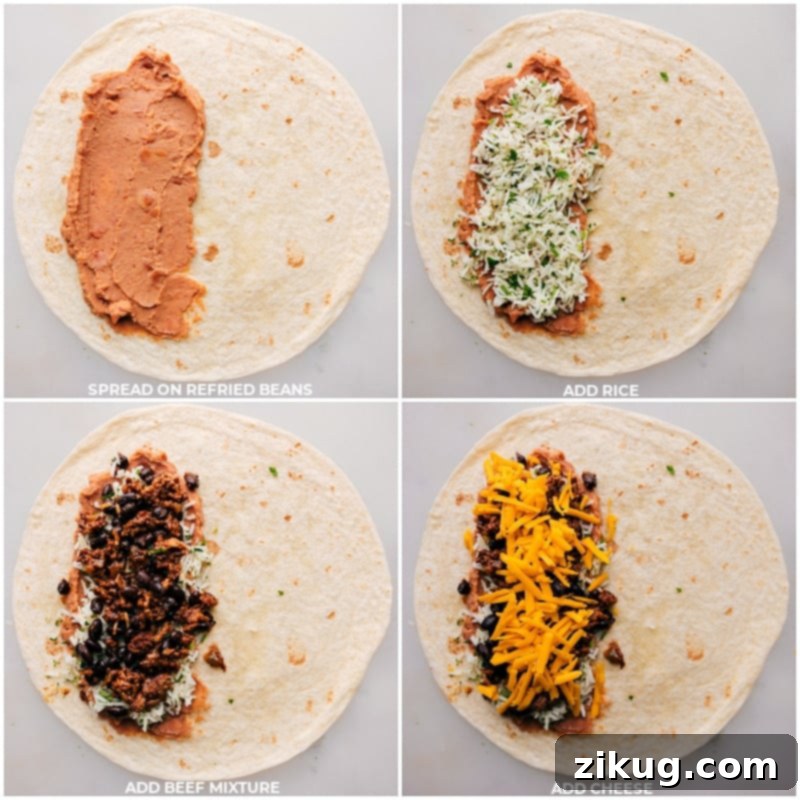
- Assemble Your Burritos: Preheat your oven to 375°F (190°C). Lay out your large (10-inch) flour tortillas on a clean work surface. Warm them slightly if you haven’t already; this makes them more flexible and easier to roll without cracking. Spread a layer of refried beans (from a 16-ounce can) evenly over each tortilla. Then, layer about 1/2 cup of the cilantro-lime rice, followed by a generous portion of the seasoned beef filling, and finally, a sprinkle of 2 packed cups of freshly shredded sharp Cheddar cheese. Be mindful not to overfill, as this makes rolling difficult.
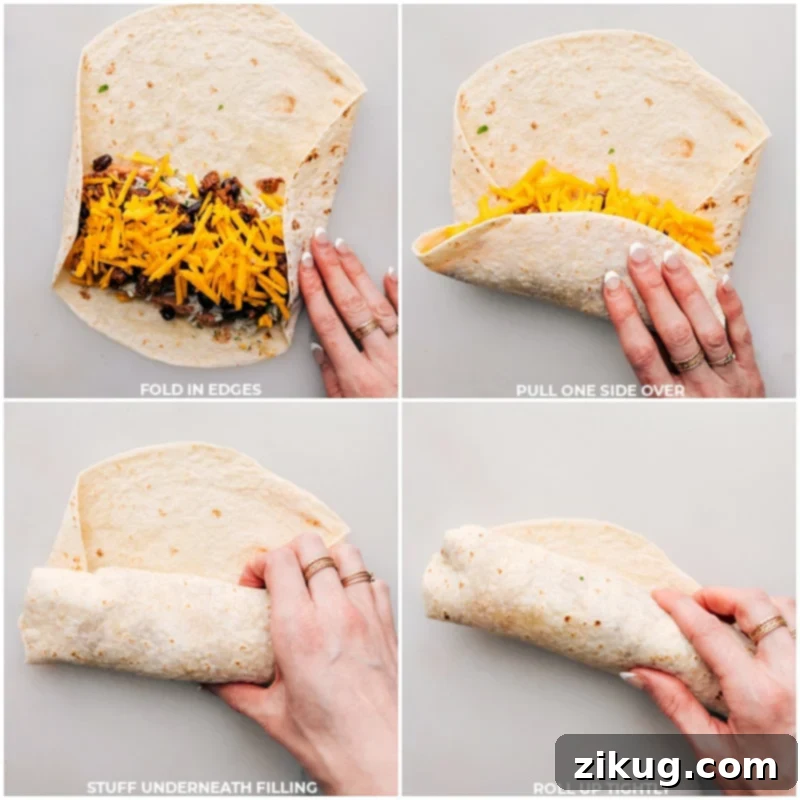
- Roll & Bake to Crispy Perfection: To roll, fold the sides of the tortilla inward over the filling, then starting from the bottom, roll the burrito up tightly and securely. Place the rolled burritos seam-side down on a large, dark-colored sheet pan that has been coated with cooking spray. Lightly spray the tops of the burritos with cooking oil as well, ensuring an even coating. Bake in the preheated oven for 8 minutes, then carefully flip them over and bake for another 5 minutes, or until the tortillas are golden brown and crispy, and the cheese inside is perfectly melted.
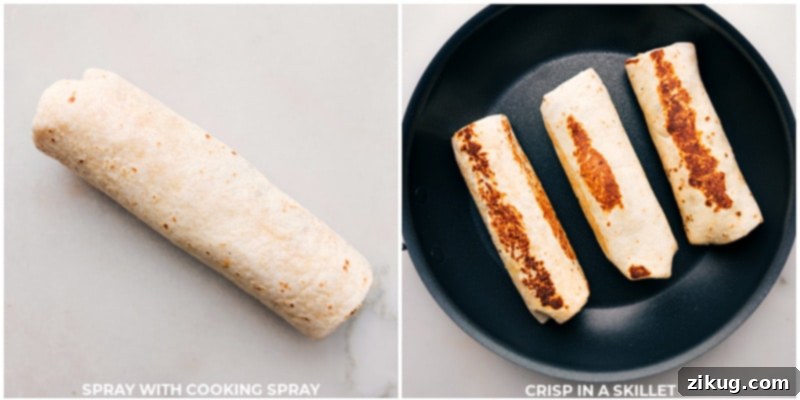
- Serve and Enjoy: Once baked, remove the burritos from the oven and let them cool for about 5 minutes. This cooling period allows the fillings to set slightly, preventing them from falling apart when eaten. Serve your delicious beef burritos warm with your favorite toppings and dips. If you prefer, you can also crisp the burritos in a hot skillet for a few minutes on each side instead of baking, for an extra golden finish.
Freezer-Friendly Meal Prep: Storage and Reheating
One of the best features of this Beef Burrito Recipe is how well it adapts to meal prep. Storing and reheating leftovers is incredibly simple, making these burritos perfect for quick, delicious meals throughout the week or for future busy days.
Storing Your Homemade Beef Burritos:
- To store freshly made burritos, allow them to cool completely after baking. Then, place them in an airtight container and refrigerate for up to five days.
- For a truly freezer-friendly option, wrap each burrito individually in plastic wrap or parchment paper, ensuring it’s sealed tightly to prevent freezer burn. Once wrapped, place them in a freezer-safe bag or container. Label with the date and freeze for up to three months. This makes them a perfect grab-and-go meal solution.
Reheating Leftover Beef Burritos:
- From the Refrigerator: For a burrito stored in the fridge, you can warm it in a skillet or on a grill pan over medium-low heat. Cook for a few minutes on each side until it’s crispy on the outside and the cheese inside is melted and gooey. For air frying, unwrap the burrito, lightly spray it with cooking oil, and cook at 360°F (180°C) for 6-10 minutes, flipping halfway through. If reheating multiple burritos, ensure they are spaced apart in the air fryer basket and adjust the cooking time accordingly.
- From the Freezer: To cook a frozen burrito, you have a few options:
- Air Fryer Method: Wrap the frozen burrito loosely in foil and air fry at 360°F (180°C) for 18-20 minutes, flipping halfway. The foil helps prevent the tortilla from burning while the inside heats.
- Microwave & Crisp Method: Microwave the frozen burrito on the defrost setting for 7-9 minutes, or until heated through. For a crispy exterior, transfer it to a hot skillet after microwaving and cook for a few minutes on each side.
- Oven Method: Bake the frozen burrito, wrapped in foil, in an oven preheated to 350°F (175°C) for 35-40 minutes. If you desire a crisper exterior, remove the foil for the last 5-10 minutes of baking, or crisp it in a pan afterward.
Please note that cooking times can vary significantly based on your appliance’s wattage and specific model (microwaves, ovens, and air fryers differ greatly). It’s always important to monitor your burritos carefully and adjust the heating time as needed to ensure they are thoroughly heated and perfectly crisp.
Elevate Your Burrito: Delicious Topping and Dip Ideas
While these beef burritos are fantastic on their own, a selection of fresh and flavorful toppings can truly take them to the next level! If you’re planning to freeze your burritos for later, I highly recommend adding the toppings only after you’ve reheated them and are ready to serve. Here are some fantastic ideas to inspire your culinary creativity:
- Shredded Lettuce: A classic choice, shredded iceberg or romaine lettuce adds a wonderful cool, crisp texture that contrasts beautifully with the warm, savory filling.
- Diced Tomatoes or Fresh Salsa/Pico de Gallo: For a burst of garden-fresh flavor and juiciness, sprinkle on some finely diced tomatoes. Even better, add a generous spoonful of homemade salsa or vibrant pico de gallo. Choose a salsa that matches your preferred spice level – from mild and tangy to fiery hot.
- Sliced Avocado or Creamy Guacamole: Nothing quite compares to the rich, buttery texture of fresh avocado. You can dice it and sprinkle it over, or go all out with a dollop of our luscious guacamole recipe. It adds a delightful creaminess and healthy fats.
- Sour Cream or Mexican Crema: A spoonful of cool, tangy sour cream or a drizzle of authentic Mexican crema is a must for many. It provides a creamy counterpoint that balances the richness of the beef and heat of the spices. Light or fat-free sour cream are also great options.
- Jalapeños: If you’re keen to turn up the heat, thinly sliced fresh or pickled jalapeños are the way to go. They add a zesty crunch and a pleasant kick that spice lovers will adore.
- Lime Wedges: A squeeze of fresh lime juice just before eating makes a world of difference. Its bright, zesty acidity cuts through the richness and awakens all the flavors within the burrito.
- Chopped Onions or Pickled Red Onions: For an extra layer of sharp flavor and crunch, sprinkle on some finely chopped white or red onions. For a gourmet touch, try homemade pickled red onions; they offer a fantastic tangy bite. You can find a simple recipe for them in our BBQ Chicken Sweet Potatoes recipe.
Perfect Pairings: What To Serve Alongside Your Beef Burritos
These hearty beef burritos are satisfying enough to be a complete meal on their own, but pairing them with a fresh side dish or two can truly elevate your dining experience. Here are some complementary options that add texture, flavor, and a touch of freshness:
- Guacamole and Tortilla Chips: The classic pairing! Use any leftover guacamole from topping your burritos and serve it with a generous basket of crispy tortilla chips for a delightful appetizer or side. It’s a fantastic way to enjoy those creamy, zesty flavors.
- Roasted or Grilled Corn on the Cob: Simple yet incredibly flavorful, corn on the cob is a perfect seasonal accompaniment. Roast or grill it to sweet perfection, then sprinkle with a pinch of chili powder and a squeeze of fresh lime juice. For an authentic Mexican street corn experience, try our famous Elote recipe!
- Fresh Corn Salad: If fresh corn is available, a vibrant corn salad is a wonderful, lighter option. Our Roasted Corn Salad with colorful bell peppers or the rich and zesty Mexican Street Corn Salad are two absolute favorites that complement the burritos beautifully.
- Simple Mexican Rice: For those who can’t get enough rice, a side dish of our easy Mexican Rice is always a hit. What makes it truly special is that it bakes in one dish, minimizing cleanup and maximizing flavor.
- A Quick Green Salad: To add a refreshing crunch and a boost of greens, a simple side salad is ideal. Our Chipotle Chicken Salad (just omit the chicken to make it a side) offers a flavorful dressing and fresh ingredients that cut through the richness of the burritos.
More Delicious Mexican-Inspired Recipes to Explore:
Dinner
Tortilla Pie
Dinner
Chicken Tacos (Mexican Street Corn)
Dinner
French Bread Taco Pizza
Beef
Ground Beef Quesadillas
Print Recipe
Beef Burrito Recipe
Chelsea Lords
45 minutes
15 minutes
1 hour
8
burritos
Equipment
-
Sheet pan (15″ x 10″) dark colored
-
Large skillet
Ingredients
- Cooking spray
- 1 tablespoon olive oil
- 1 large yellow onion finely diced
- 1 pound lean ground beef 93/7
- 1 (1-ounce) packet taco seasoning see note 1
- 3/4 cup mild red enchilada sauce see note 2
- 1 (15-ounce) can black beans optional
- 1 batch cilantro-lime rice or white rice, see note 3
- 8 large (10-inch) flour tortillas
- 1 (16-ounce) can refried beans
- 2 packed cups sharp Cheddar cheese freshly shredded
- Toppings as desired sour cream, avocado, guacamole, pico de gallo, and salsa
Instructions
-
Heat olive oil in a large skillet over high heat. Sauté diced onion until golden, about 3 minutes, then push to the pan’s edges. Add ground beef to the center, sear until brown, then crumble and cook through, about 3–5 minutes. Drain excess grease if necessary.
-
Reduce heat to medium, add taco seasoning, and stir until the beef is cooked and fragrant, about 1–3 minutes. Add enchilada sauce and simmer until thickened. Remove from heat, stir in drained and rinsed black beans if using, and let cool slightly. Preheat oven to 375°F (190°C).
-
Prepare rice. Refer to note 3 to make my favorite cilantro-lime rice, or cook plain white rice according to package directions.
-
To assemble burritos, lay out tortillas and spread refried beans. Evenly distribute the cilantro-lime rice, seasoned beef mixture, and shredded cheese among the tortillas, ensuring not to overfill. Then, roll them up tightly, folding in the sides before rolling from the bottom.
-
Spray the rolled burritos with cooking spray and gently rub it in to ensure an even coating. Coat a large, dark-colored sheet pan with cooking spray and arrange the burritos on it, spaced apart. Bake in the preheated oven at 375°F (190°C) for 8 minutes, then flip them and bake for another 5 minutes until crisped and golden. Let cool for 5 minutes before serving with your favorite toppings and dips. Optionally, for an extra crispy exterior, crisp them in a pan instead of baking.
Recipe Notes
Note 2: Enchilada Sauce Selection: The flavor and heat level of enchilada sauce can vary significantly by brand. I highly recommend using Old El Paso® mild red enchilada sauce for a balanced flavor. If this brand is unavailable, always taste your chosen sauce first to ensure it’s not too spicy and suits your personal preference. For an even more authentic and rich taste, consider preparing my favorite homemade Enchilada Sauce.
Note 3: Preparing Cilantro-Lime Rice: For a batch of my flavorful cilantro-lime rice, in a medium pot, combine 1 cup of long-grain or basmati rice with 1-1/2 cups of water and 1/2 teaspoon of salt. Bring to a boil, then immediately reduce heat to low, cover tightly, and simmer for 12–14 minutes, or until the liquid is absorbed and rice is tender. Remove from heat, stir in 1 tablespoon of butter, cover, and let stand for 10 minutes. Fluff with a fork, then stir in 2 tablespoons of fresh lime juice, 1 teaspoon of lime zest, and 1/2 cup of freshly chopped cilantro. Season to taste. If using plain white rice, follow your package directions.
Storage Tips: To store freshly made burritos, allow them to cool completely before placing them in an airtight container in the refrigerator for up to 5 days. For freezing, individually wrap each cooled burrito tightly in plastic wrap or parchment paper, then transfer them to a freezer bag, label with the date, and freeze for up to 3 months.
- Reheating Leftovers:
- From the fridge: Reheat a refrigerated burrito in a pan or on a grill pan over medium-low heat until crispy and the cheese melts. Alternatively, unwrap, spray with cooking oil, and air fry at 360°F (180°C) for 6–10 minutes, flipping halfway. For multiple burritos, space them out and adjust cooking time.
- From the freezer: To reheat a frozen burrito, wrap it in foil and air fry for 18–20 minutes at 360°F (180°C), flipping halfway. Alternatively, microwave on defrost for 7–9 minutes, then crisp in a skillet if desired. For oven reheating, bake wrapped in foil at 350°F (175°C) for 35–40 minutes, and optionally crisp in a pan afterward.
- Please note that microwaves, ovens, and air fryers can vary greatly, so always watch the burritos carefully and adjust cooking times as needed to ensure thorough heating.
Nutrition
Serving:
1
serving
|
Calories:
339
kcal
|
Carbohydrates:
49
g
|
Protein:
20
g
|
Fat:
7
g
|
Saturated Fat:
2
g
|
Polyunsaturated Fat:
1
g
|
Monounsaturated Fat:
3
g
|
Trans Fat:
0.2
g
|
Cholesterol:
28
mg
|
Sodium:
1128
mg
|
Potassium:
384
mg
|
Fiber:
8
g
|
Sugar:
5
g
|
Vitamin A:
694
IU
|
Vitamin C:
4
mg
|
Calcium:
84
mg
|
Iron:
4
mg
Nutrition information is automatically calculated, so should only be used as an approximation.