
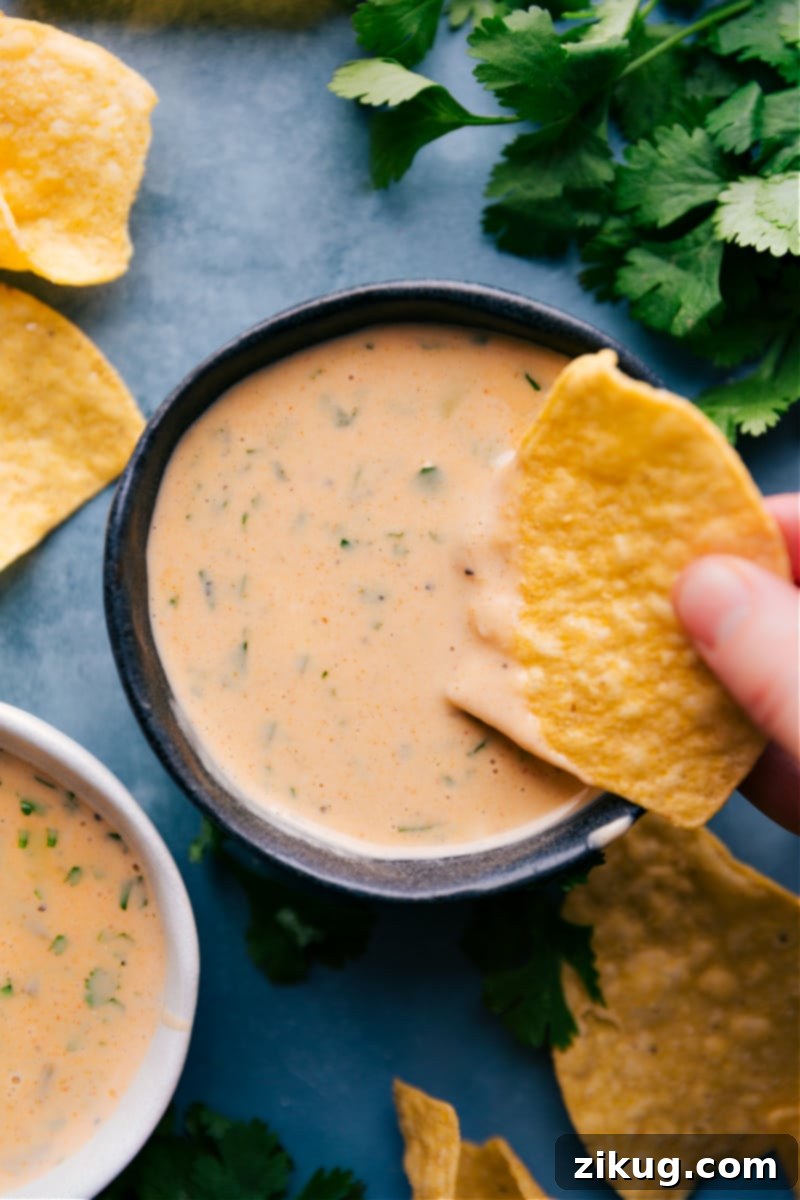
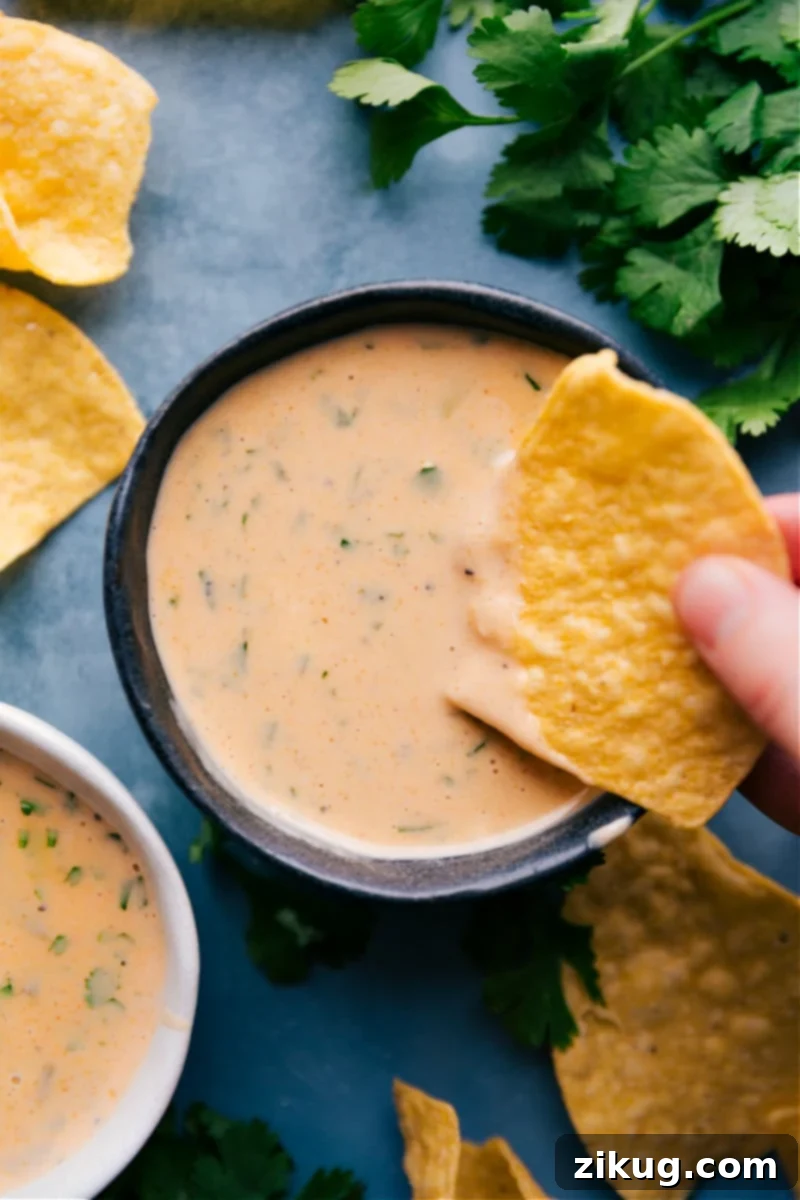
Indulge in the irresistible allure of Creamy Queso Dip, a velvety, cheesy dream that comes together in mere minutes on your stovetop. This perfectly seasoned, ultra-creamy dip is truly an experience, especially when paired with crispy, salty tortilla chips, making it the ultimate party appetizer or comforting snack.
Craving more fantastic dips for your next gathering? You’ve got to try this popular 7 Layer Bean Dip next!

Mastering the Art of Easy Queso: A Homemade Cheese Dip That Will Be Your Party Favorite!
My brother-in-law, a true queso connoisseur with an unwavering passion for the perfect cheese dip, once challenged me to replicate his all-time favorite restaurant queso recipe. What followed was a delightful and intensive journey of culinary experimentation, involving copious amounts of taste testing and even a discreet conversation with the restaurant chef. I was determined to uncover the “secret” to the local establishment’s legendary queso, which my brother-in-law steadfastly claimed was the absolute best.
I was certain there had to be some elaborate, complex blend of several different kinds of cheese in his signature queso sauce. To my utter surprise, the chef revealed a remarkably simple truth: their exquisite dip relied on just one key ingredient – **Land O’ Lakes® White American Cheese**. Furthermore, they had consistently used this single cheese, never making it any other way. This discovery was a revelation!
After finalizing this recipe, rigorously testing it, and receiving my brother-in-law’s highly coveted stamp of approval, I am beyond excited to share this incredible homemade queso with all of you. This isn’t just another easy queso recipe; it’s *the* recipe that will transform your gatherings and satisfy every cheesy craving. It’s not only undeniably delicious, delivering that luxuriously creamy texture everyone loves, but it’s also ridiculously quick and straightforward to prepare. Get ready to elevate your appetizer game and score big with this simple yet sensational cheese dip!
What Exactly is Queso? Delving into the Creamy World of Chile Con Queso
Chile Con Queso, typically shortened to “Queso,” is a rich, warm, and creamy melted cheese dip served primarily as an appetizer or a delightful side dish, traditionally with crisp tortilla chips. This iconic Tex-Mex staple is renowned for its velvety texture and savory, often spicy, flavor profile. While “queso” literally translates to “cheese” in Spanish, the culinary landscape offers many diverse cheese preparations, and understanding these distinctions is key to appreciating our specific Queso Dip recipe.
It’s crucial not to confuse our beloved creamy Queso Dip with other popular cheese-centric dishes. For example, Queso Fundido, meaning “melted cheese,” is an entirely different culinary experience. It’s a dish composed solely of hot, often bubbly, melted cheese, frequently mixed with ingredients like chorizo or mushrooms, and typically served with tortillas for scooping, rather than as a smooth dip. Similarly, it stands apart from Queso Fresco, a fresh, soft, and moist cheese often crumbled over savory dishes, which does not melt into a dip. Furthermore, terms like Quesabirria (birria tacos featuring cheese), Queso Oaxaca (a string cheese known for its excellent melting properties in quesadillas), and Queso Blanco (a white, unaged cheese often fried or used in baking) are all distinct products or recipes, despite sharing the “queso” moniker. Given that “queso” is simply the Spanish word for cheese, clarifying “Chile con Queso” (chile peppers with cheese) helps narrow down the delectable experience we’re aiming for.
Our specific Queso recipe promises a dip that is wonderfully thick, luxuriously creamy, and intensely cheesy, all balanced with a perfect touch of spice. Best of all, it couldn’t be easier to make, making it your go-to recipe for the ultimate homemade cheese dip!
Crafting the Perfect Creamy Queso Dip: A Simple Step-by-Step Guide
Achieving this unbelievably creamy Queso, ready to lovingly coat your perfectly salted tortilla chips, is surprisingly quick and simple. You’ll be amazed at how easily this delicious dip comes together in just a few minutes on your stovetop. Below is a detailed overview of the process, complete with expert tips and ideas for customization. For the complete list of ingredients and precise measurements, please refer to the comprehensive recipe card further down this page.
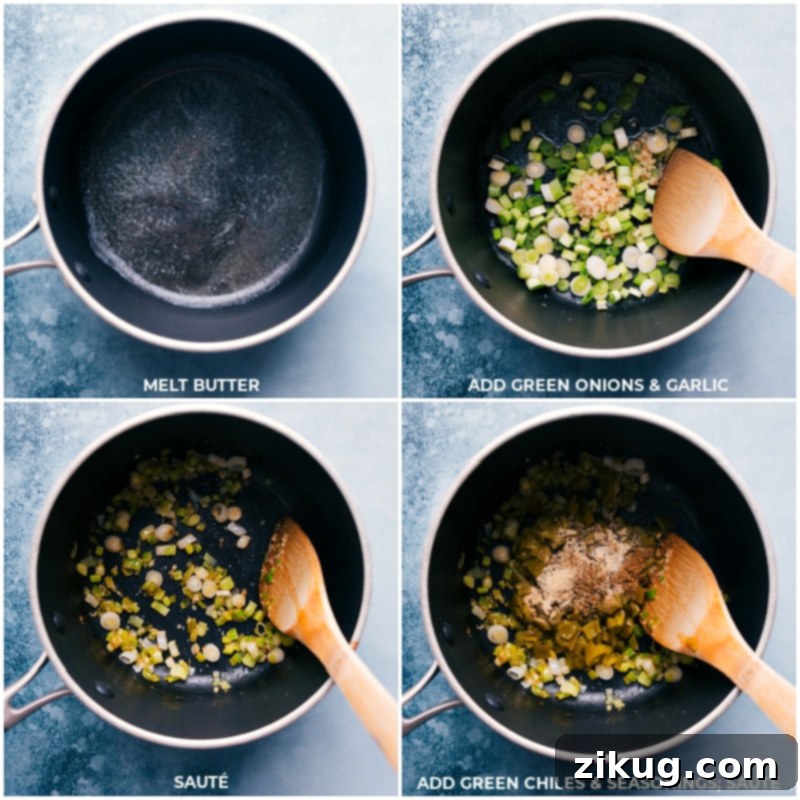
- Sauté Your Aromatics to Build Flavor: Begin by melting unsalted butter in a medium pot or saucepan over medium heat. Once the butter is fully melted and shimmering, add the thinly sliced green onions (reserving a small amount of the green tops for garnish, if desired). Sauté them gently, stirring occasionally, for 3 to 5 minutes until they become tender and wonderfully fragrant. Immediately after, stir in the minced garlic and cook for just 30 seconds more. It’s crucial to prevent the garlic from burning, as this can impart an unpleasant bitter taste to your dip. Remember, for a rich, smooth cheese dip, sticking to butter is always best; oil can sometimes lead to an undesirable texture.
- Bloom the Spices and Chiles for Depth: Next, ensure your fire-roasted diced green chiles are thoroughly drained of any liquid. Add these drained chiles along with your blend of savory spices – ground cumin, onion powder, garlic powder, and paprika – to the pot. Continue stirring constantly and cook for an additional 1 to 2 minutes. This brief sautéing period is essential as it “blooms” the spices, intensifying their aromatic compounds and deepening the overall flavor profile of your queso. If you’re a fan of extra heat, this is the perfect opportunity to stir in some finely diced fresh jalapeños (remove seeds for milder heat, leave them in for a bolder kick) or a pinch of ground cayenne pepper to amp up the spice.
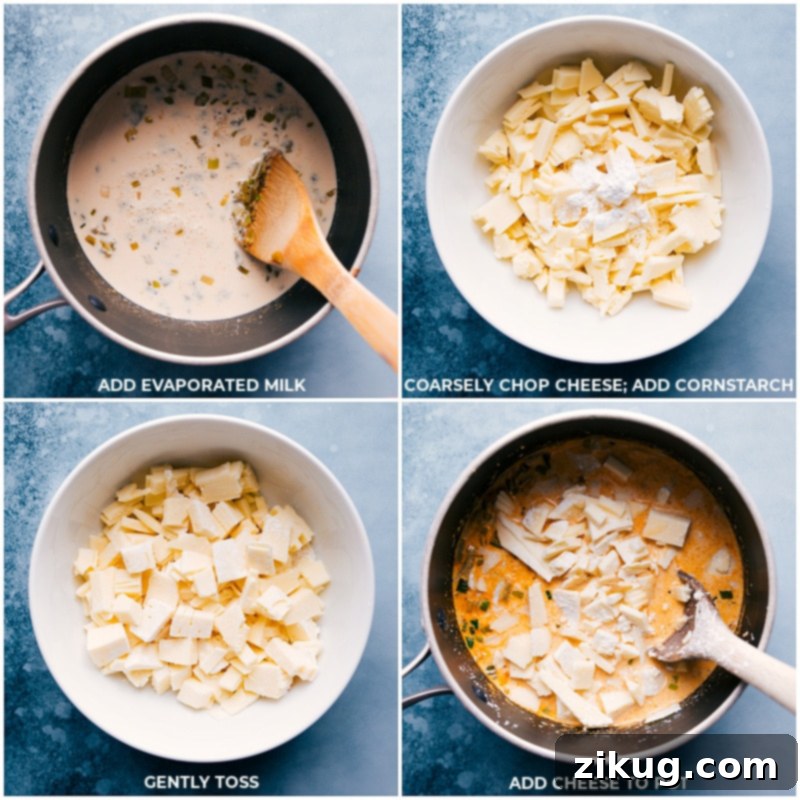
- Gently Heat the Evaporated Milk Base: Give your can of evaporated milk a good, vigorous shake before pouring it into the pot with the sautéed aromatics and spices. Stir thoroughly to combine all the ingredients. Increase the heat slightly to bring the mixture to a gentle simmer. It is absolutely vital not to let the milk come to a rolling boil, as excessive heat can cause the cheese proteins to seize, leading to a grainy or separated queso. Once you see gentle bubbles, reduce the heat immediately to medium-low to maintain a delicate warmth.
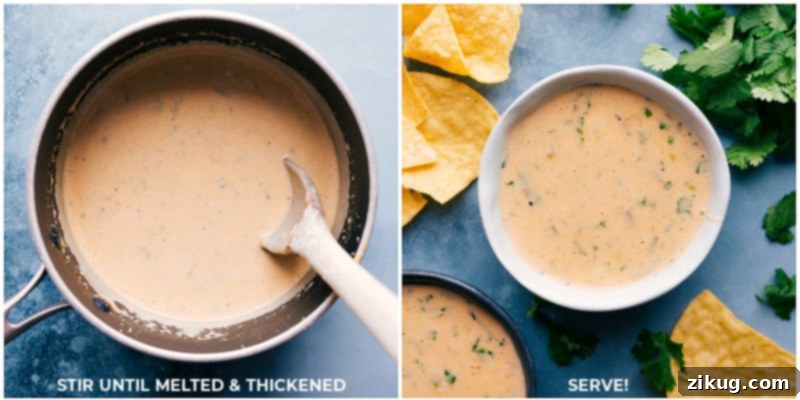
- Melt the Cheese to Silky Perfection: While the milk base is gently simmering, prepare your cheese. Tear the white American cheese slices into smaller pieces (or grate them if you purchased a block). In a separate small bowl, toss these cheese pieces with cornstarch until they are lightly and evenly coated. This seemingly minor step is a true game-changer: the cornstarch acts as a crucial stabilizer, enabling the cheese to melt into an incredibly smooth, lump-free sauce, preventing any graininess. Gradually add the cornstarch-coated cheese to the pot, stirring constantly with a whisk or heat-resistant spatula. Continue stirring until all the cheese has completely melted into a luxurious, homogenous dip. This melting process requires patience; resist the temptation to increase the heat, as that’s a common cause of grainy queso. The sauce might appear a bit thin initially, but it will thicken beautifully as it rests for a minute or two. Once fully melted, taste your homemade queso with a tortilla chip to accurately assess the seasoning, especially the saltiness, keeping in mind that tortilla chips themselves are salty. Adjust any seasonings (salt, pepper, or additional spices) to your personal preference. Finally, if using, stir in the finely chopped fresh cilantro. Remove from heat immediately and serve your glorious, creamy Queso Dip warm with an abundance of your favorite tortilla chips. Get ready for rave reviews!
Essential Ingredients for the Best Creamy Queso Dip
The magic of this Queso Dip lies in a carefully selected blend of ingredients, each playing a crucial role in achieving its signature creamy texture and rich, balanced flavor. Here’s a closer look at what you’ll need to create this irresistible homemade cheese dip:
- White American Cheese: This is unequivocally the star ingredient and the “secret” to achieving that unparalleled smooth, velvety consistency. For optimal results, we highly recommend sourcing Land O’ Lakes White American Cheese from your deli counter. When ordering sliced, ask for thick slices, as these are much easier to shred or coarsely chop, which is essential for uniform melting. Its superior melting properties and distinct mild, creamy flavor are simply unmatched for this recipe. If true white American cheese is absolutely unavailable in your area, your best runner-up would be a high-quality sharp or extra-sharp cheddar, freshly grated from a block, though the final texture may vary slightly.
- Cornstarch: A small but mighty ingredient, cornstarch is a vital thickening agent that ensures your dip achieves that luxuriously smooth consistency without any graininess or separation. When you toss the cheese in cornstarch before adding it to the warm liquid, it acts as a protective coating, preventing the cheese proteins from clumping and allowing them to melt into an incredibly uniform sauce. This simple trick is key to preventing a lumpy or broken dip.
- Unsalted Butter: This provides the rich base for sautéing your aromatics and contributes a deep, buttery flavor that enhances the overall richness of the dip. Using unsalted butter is important as it gives you precise control over the overall salt content of your queso, allowing you to season it perfectly to your taste.
- Green Onions: These delicate onions provide a mild, fresh, and slightly pungent onion flavor that brightens the dip without overpowering the rich cheese. Make sure to use both the white and the light green parts for the best balance of flavor and visual appeal.
- Minced Garlic: Freshly minced garlic is an indispensable aromatic that adds a layer of warm, savory depth. It should be sautéed briefly to release its potent fragrance, but always be cautious not to burn it, as burnt garlic quickly turns bitter and can ruin the flavor of your entire dip.
- Spices (Ground Cumin, Onion Powder, Garlic Powder, Paprika): This carefully curated blend of spices is designed to create a warm, earthy, savory, and subtly smoky flavor profile that perfectly complements the richness of the cheese and the mild heat of the chiles. Ground cumin adds a distinctive Tex-Mex essence, while onion and garlic powder reinforce the aromatic base, and paprika contributes a mild sweetness and vibrant color. Feel free to adjust the quantities to match your personal preference for spice intensity.
- Fire-Roasted Diced Green Chiles: These pre-prepared chiles are a fantastic convenience, as they are charred over a flame before being diced and canned. This process infuses them with a wonderful smoky sweetness and a subtle, earthy spice without requiring any extra effort in your kitchen. They add an incredible depth of flavor that truly sets this queso apart. You can choose mild chiles for a gentle warmth or opt for medium/hot if you desire more pronounced heat.
- Evaporated Milk: This shelf-stable canned milk is an absolutely critical component for achieving the silkiest, most stable queso. Unlike regular milk, evaporated milk has approximately 60% of its water removed, making it significantly more concentrated and creamy. This concentration makes it much less likely to separate, curdle, or become grainy under the heat required to melt the cheese, ensuring a beautifully consistent dip every time. It is imperative not to confuse it with sweetened condensed milk, which is heavily sugared and would render your savory queso unpleasantly sweet.
- Salt and Pepper: These fundamental seasonings are added to taste, allowing you to fine-tune the overall flavor balance of your queso. Remember that tortilla chips are often salty, so always taste the dip with a chip before adding excessive salt.
- Finely Chopped Cilantro (Optional): For those who love its fresh, bright, and somewhat citrusy flavor, a sprinkle of fresh cilantro added at the end provides a vibrant burst of color and a classic herbaceous aroma that perfectly complements the rich cheese.
- Tortilla Chips: Last but certainly not least, no Queso Dip experience is complete without a generous supply of sturdy, well-salted tortilla chips. They are the perfect vehicle for scooping up every last bit of this irresistible dip!
Unlock the Secret to Perfect Queso: Expert Tips for a Flawless Creamy Dip
Creating a truly magnificent, perfectly smooth, and creamy Queso Dip is well within your reach with these essential expert tips. Avoid common pitfalls and ensure your homemade queso is always a triumph, delighting everyone with its irresistible texture and flavor:
- Don’t Overheat – Gentle Simmer Only: This is arguably the most critical rule for achieving a smooth cheese sauce. While you want to bring the evaporated milk to a nice, gentle simmer to warm it through, you must resist the urge to let it come to a rolling boil. If the dip gets too hot, the cheese proteins will seize and clump together, causing your queso to become grainy, lumpy, and separate into an unappetizing oily mess. Maintain a consistent low to medium-low heat throughout the melting process.
- Melt Cheese Over Low Heat with Patience: Once you’ve added the cornstarch-coated cheese, dedicate yourself to melting it slowly over low heat. It will require a bit more patience, but this deliberate approach is crucial. Rushing the melting process by increasing the heat is the most common cause of a grainy, overly thick, or broken dip. A gradual melt ensures a perfectly emulsified and creamy consistency.
- Stir Constantly for Evenness: As you add in the cheese, do not stop stirring! Continuous and constant stirring with a whisk or heat-resistant spatula is vital. This action ensures that the heat is distributed evenly throughout the mixture, preventing any cheese from sticking to the bottom of the pot and burning, and promoting a uniform melt. Constant agitation guarantees the creamiest, most homogenous sauce possible.
- Always Use Good, Freshly Prepared Cheese: Our recipe specifically calls for white American cheese for its superior melting properties. However, if you choose to use a different cheese, like cheddar, always opt for a block of cheese that you grate yourself. Pre-shredded cheeses, which are commonly found in bags at the grocery store, contain anti-caking agents (such as cellulose or potato starch). While these prevent clumping in the bag, they also inhibit the cheese from melting into a truly smooth, creamy sauce, often resulting in a mealy or gritty texture. Freshly grated cheese melts beautifully and integrates seamlessly.
- Taste for Seasoning with a Chip: Before making any final adjustments to the seasoning, always dip a tortilla chip into your freshly made queso and taste it. Tortilla chips are inherently salty, and factoring this into your seasoning helps prevent an overly salty dip. This method ensures you hit that perfect balance of flavor. Adjust salt, pepper, or add more of your preferred spices to taste after this initial test.
- Bring Ingredients to Room Temperature: For an even smoother melting process, consider letting your cheese and evaporated milk sit out for about 30 minutes to an hour to come closer to room temperature before you begin cooking. Cold ingredients can significantly drop the temperature of the pot, making it harder to maintain a consistent low heat and achieve that ideal creamy texture.
Queso Storage & Reheating for Lasting Creaminess
While this decadent homemade Queso Dip is absolutely phenomenal served hot and fresh off the stovetop, like most melted cheese-based recipes, it will naturally thicken and firm up as it cools. But don’t let that deter you! You can easily maintain its luxurious texture and enjoy it for a longer serving period with these simple storage and reheating methods:
For Extended Warm Serving: If you’re hosting a party or simply want to keep your queso perfectly dippable throughout an event, the best method is to transfer the freshly made dip to a small crockpot (a 2-4 quart size is ideal). Set your slow cooker to the “warm” setting. This gentle, consistent heat will keep the queso beautifully creamy without overcooking it. Remember to stir it occasionally every now and again to prevent a skin from forming on top and to ensure a uniformly smooth texture.
Reheating Chilled Queso: When reheating queso that has thickened significantly after cooling and refrigeration, you have a couple of convenient options. You can gently rewarm it over low heat in a pot on the stovetop, stirring constantly until it gradually returns to its desired creamy, smooth consistency. Alternatively, for a quicker approach, microwave it in a covered, microwave-safe dish in short bursts of 10-15 seconds, stirring thoroughly after each interval, until it’s warmed through. If the dip appears too thick or slightly stiff during reheating, a splash or two of additional evaporated milk, stirred in continuously, will work wonders to restore its original smooth and pourable texture.
Refrigeration: Any leftover Queso Dip will store nicely in an airtight container in the refrigerator for 3 to 5 days. Always use the gentle reheating methods described above to bring it back to its creamy, delicious best. It’s important to note that this homemade Queso Dip does not freeze and thaw well; freezing can significantly alter its delicate texture, often leading to a grainy and separated consistency upon thawing, so it’s best consumed fresh or refrigerated.
Perfect Pairings: What to Serve with Your Creamy Queso Dip
While utterly irresistible on its own with just crispy tortilla chips, this versatile Creamy Queso Dip also makes a fantastic, flavor-enhancing accompaniment to a wide variety of Mexican and Tex-Mex inspired dishes. Elevate your next meal or party spread by serving it alongside these delicious options:
- Baked Chicken Tacos: Drizzle warm, velvety queso over these savory baked chicken tacos, especially when they’re finished with a creamy cilantro-lime sauce, for an extra layer of cheesy indulgence and flavor.
- White Turkey Chili: A generous dollop of creamy queso stirred into a hearty bowl of white turkey chili, featuring lean ground turkey and tender white beans, instantly adds a rich, comforting depth and a subtle hint of spice.
- Loaded Sweet Potatoes: Transform simple baked sweet potatoes into a more substantial and flavorful meal by topping them with a generous serving of queso, perfectly complementing a fresh avocado-corn topping for a vibrant contrast of textures and tastes.
- Mexican Street Corn Pasta Salad: This creamy, chili-lime dressed pasta salad gets an incredible boost of flavor and luxurious richness when served with a warm, savory side of queso, creating a harmonious blend of Tex-Mex delights.
- Black Bean Corn Avocado Salad: A vibrant, fresh, and zesty salad tossed in a chili-lime vinaigrette, beautifully enhanced by the creamy warmth and cheesy goodness of this queso, offering a delightful balance.

Ultimate Creamy Queso Dip
By Chelsea Lords
This ultimate creamy, deliciously cheesy Queso Dip is perfectly seasoned and just begging for some good salted tortilla chips! It whips up on the stovetop in minutes, making it the perfect easy appetizer for any occasion, from game day to family gatherings.
Prep Time: 20 minutes
Total Time: 20 minutes
Servings: 8 servings
Print Recipe
Video Overview
For a visual guide on how to make this delicious Queso Dip, watch our recipe video:
Equipment
- Medium pot
- Whisk or heat-resistant spatula
Ingredients
Amounts listed are for US standard units. For metric conversions, please use an online converter.
- 2-1/2 cups (12 ounces) white American cheese, from the deli counter (see Note 1)
- 1-1/2 teaspoons cornstarch
- 1 tablespoon unsalted butter
- 3/4 cup green onions, whites and light green parts, thinly sliced
- 2 teaspoons minced garlic
- 1/2 teaspoon ground cumin
- 1/2 teaspoon onion powder
- 1/2 teaspoon garlic powder
- 1/2 teaspoon paprika
- Salt and pepper to taste (fine sea salt and freshly ground black pepper recommended)
- 1 (4-ounce) can diced green chiles, thoroughly drained (see Note 2)
- 1 (12-ounce) can evaporated milk, well-shaken (see Note 3)
- 1/4 cup finely chopped cilantro (optional, for garnish)
- Tortilla chips, for dipping
Instructions
- Prepare Cheese: Shred white American cheese or coarsely chop if already sliced. If you don’t have an exact weight, measure approximately 2-1/2 cups. In a small bowl, toss the prepared cheese pieces with the cornstarch until lightly coated. Set aside.
- Sauté Aromatics: Heat a medium pot over medium heat on the stovetop. Melt the unsalted butter. Once melted, add the thinly sliced green onions (whites and light green parts) and cook, stirring occasionally, for 3–5 minutes or until soft and fragrant. Add the minced garlic and stir for 30 seconds, being careful not to burn it.
- Bloom Spices & Chiles: Thoroughly drain the can of diced green chiles. Add all the drained green chiles, ground cumin, onion powder, garlic powder, paprika, and your preferred amount of salt and pepper (start with about 1/2 teaspoon of each) to the pot. Stirring constantly, cook for 1–2 minutes or until the spices become very fragrant.
- Add Evaporated Milk: Give the can of evaporated milk a good shake and pour it into the pot. Stir everything to combine and bring the mixture to a gentle simmer over medium heat. Do not increase the heat too high, and crucially, do not let it boil, as this can cause the dip to become grainy. Once simmering, reduce the heat to medium-low.
- Melt Cheese to Creaminess: Gradually add the cornstarch-coated cheese mixture to the pot, stirring constantly with a whisk or spatula until all the cheese is completely melted and the dip is smooth and creamy. This step requires patience; resist the urge to increase the heat, as that is a common cause of a grainy dip. The sauce will still seem a bit thin at first, but it thickens beautifully as it sits. Once fully melted, taste the queso with a tortilla chip to gauge its saltiness. Adjust any seasonings (salt, pepper, or additional spices) to your preference. If using, stir in the finely chopped cilantro. Remove from heat immediately and serve warm with an abundance of tortilla chips.
- Storage & Reheating: This dip will thicken and harden as it cools, just like any melted cheese-filled recipe. To keep it nice and creamy for a longer serving period, transfer it to a small crockpot (ideally 2–4 quarts) and set it to “warm,” stirring occasionally. Alternatively, when it gets too thick, rewarm it over low heat in a pot on the stovetop, stirring constantly, or microwave (covered) in bursts of 10-15 seconds, stirring well after each burst. If needed, add an extra splash of evaporated milk (while stirring constantly) as you reheat the dip to restore its smooth consistency. Leftovers store well in an airtight container in the fridge for 3–5 days but do not freeze well.
Recipe Notes
- Note 1: White American Cheese: For the truly authentic creamy and smooth texture of this queso, we highly recommend Land O’ Lakes White American cheese, which you’ll find at the deli counter. If this cheese is only available sliced, ask the deli counter to make the thickest possible slices; this will give you larger pieces that are much easier to chop or shred. This specific cheese is the “secret weapon” behind this recipe’s perfect, velvety consistency, preventing any graininess. If it’s unavailable, a high-quality sharp or extra-sharp cheddar, freshly grated from a block, would be your best alternative, though the texture might differ slightly.
- Note 2: Fire-Roasted Diced Green Chiles: Fire-roasted diced green chiles are charred over an open flame before being diced and canned. This process imparts a wonderful smoky, sweet flavor that significantly enhances the dip without any additional work on your part. You can also use regular diced green chiles if fire-roasted are not available. If you prefer more heat, either choose a hotter variety of canned chiles or add 1 to 2 finely diced fresh jalapeños (remove seeds and membranes for milder heat, or leave them in for maximum spice) along with the other chiles.
- Note 3: Evaporated Milk: In some countries, evaporated milk is called unsweetened condensed milk and is a shelf-stable canned milk product. Its key characteristic is that approximately 60% of the water has been removed from fresh milk. This concentration makes it significantly creamier and, crucially, far less prone to separation or curdling when heated, ensuring a beautifully smooth and stable dip. I’ve experimented with various dairy products, and nothing creates a better, more consistent Queso than evaporated milk! Be very careful not to confuse it with sweetened condensed milk, which contains a high amount of sugar and would make your savory dip unpleasantly sweet.
- Storage: Queso Dip stores nicely in an airtight container in the fridge for 3–5 days. When reheating, always use the methods described in step 6 of the instructions above to restore its creamy texture. Unfortunately, this homemade Queso does not freeze and thaw well; freezing can cause the texture to become grainy and separated upon thawing, so it’s best enjoyed fresh or from refrigeration.
Nutrition Information
Nutrition information is automatically calculated and should be used as an approximation.
- Serving: 1 serving
- Calories: 240 kcal
- Carbohydrates: 8g
- Protein: 11g
- Fat: 19g
- Saturated Fat: 11g
- Polyunsaturated Fat: 1g
- Monounsaturated Fat: 5g
- Trans Fat: 1g
- Cholesterol: 60mg
- Sodium: 834mg
- Potassium: 235mg
- Fiber: 1g
- Sugar: 5g
- Vitamin A: 704 IU
- Vitamin C: 8mg
- Calcium: 582mg
- Iron: 1mg
Enjoyed making and tasting this ultimate creamy Queso Dip? Your feedback is invaluable! Leave a comment below and share your thoughts or any creative twists you added!