
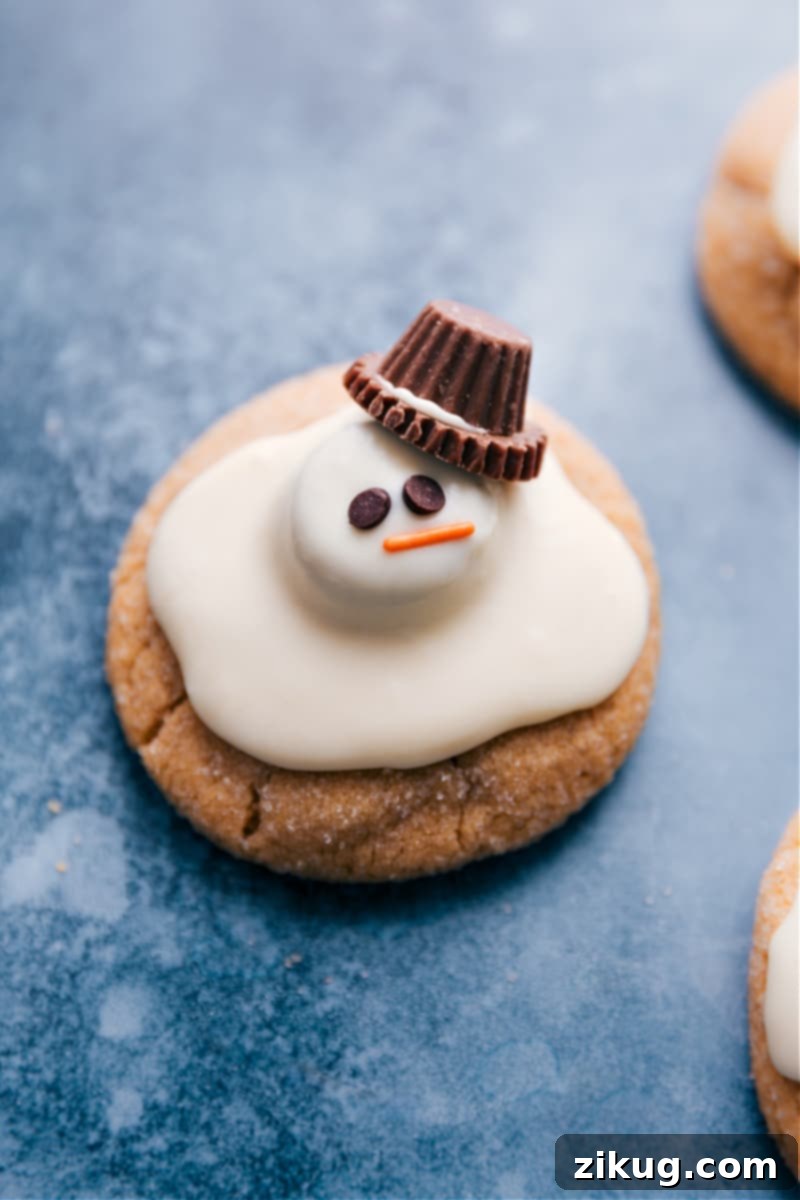
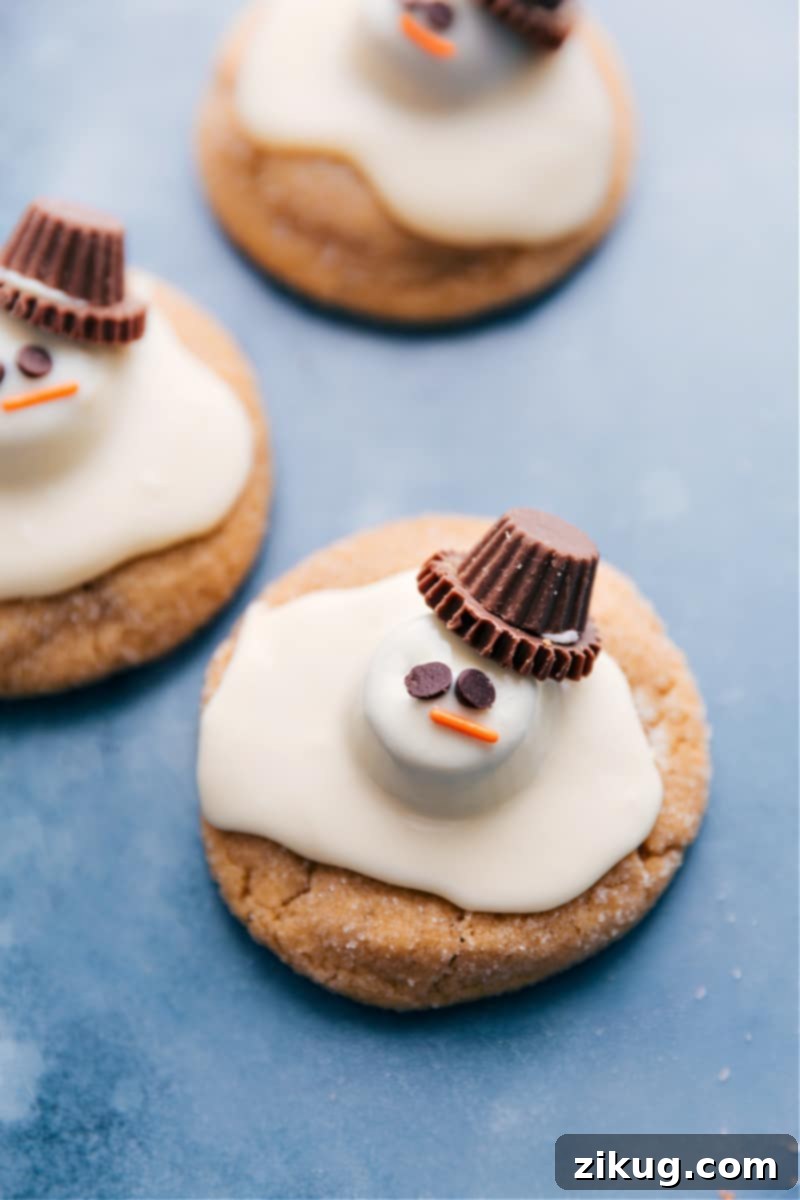
Melted Snowman Cookies are an absolutely delightful and incredibly fun winter treat, perfect for bringing smiles and warmth to any holiday gathering! Our unique take on these festive cookies features a perfectly soft and chewy peanut butter cookie base, generously topped with a rich peanut butter cup, a luscious blanket of melted white chocolate, and charming candy decorations to create that iconic melting snowman look.
Looking for more festive treats to brighten your holiday season? Explore these other delicious recipes: Christmas Oreo Truffles, classic Gingersnap Cookies, or whimsical Christmas Oreo Pops!
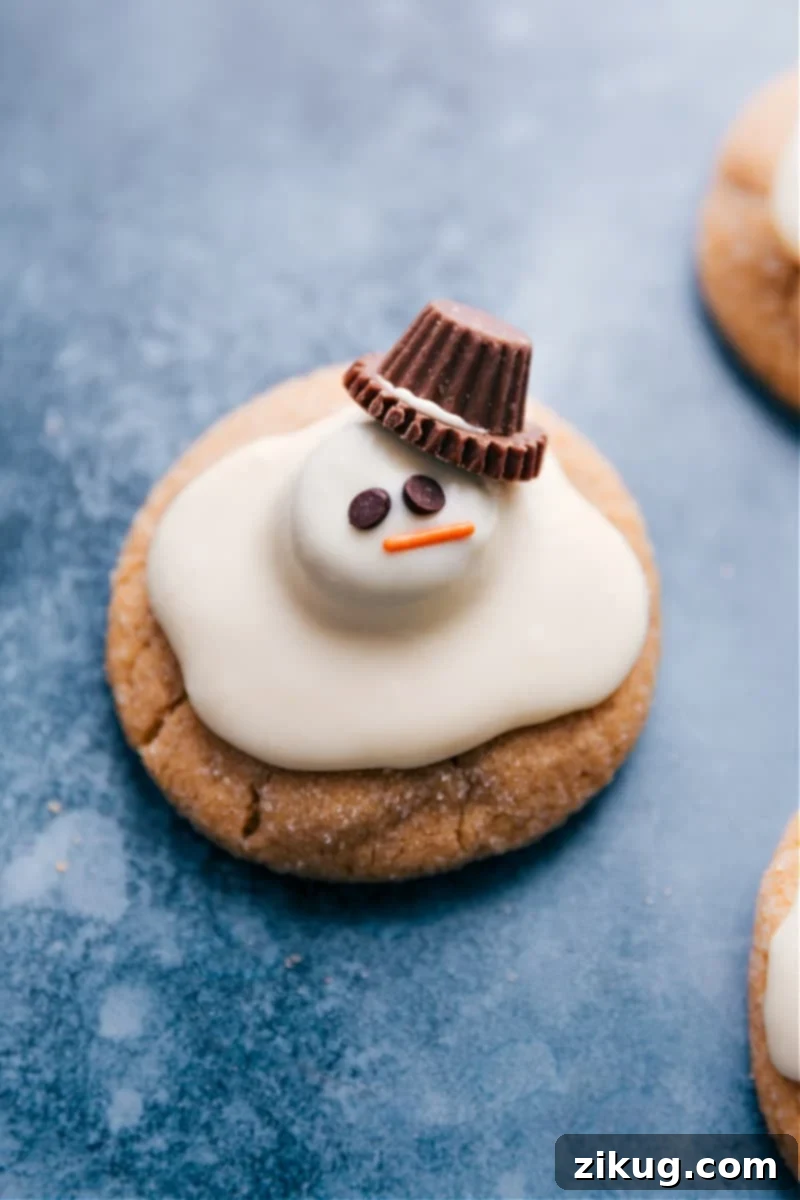
Melted Snowman Cookies: The Ultimate Festive Winter Treat
Melted Snowman Cookies have certainly captured hearts across the internet, but I am absolutely thrilled to share my perfected version with you! If you, like me, adore the classic combination of chocolate and peanut butter, then prepare yourself—this recipe is, without a doubt, the tastiest and most satisfying iteration you’ll ever encounter. Forget dry, hard marshmallows; our secret ingredient elevates these charming cookies to a whole new level of deliciousness.
Many traditional melted snowman cookie recipes rely on halved marshmallows for the snowman’s head. While undeniably cute, the unfortunate truth is that marshmallows tend to harden very quickly once exposed to air and often don’t deliver the best flavor or texture experience in a cookie. I tried them last year, and though they looked adorable, the taste simply didn’t live up to the visual appeal.
After much experimentation and brainstorming, I discovered the perfect solution: swapping out those problematic marshmallows for luscious peanut butter cups! This simple yet brilliant change makes all the difference. Peanut butter cups remain wonderfully soft and gooey, they taste absolutely incredible, and they create an unparalleled flavor synergy when paired with our rich peanut butter cookies. They even work beautifully with Chewy Chocolate Chip Cookies if you prefer a different base! This innovative twist ensures your melted snowmen are not just adorable, but genuinely delicious.
These cookies are more than just a recipe; they’re a delightful project that the whole family can enjoy. Imagine the joy on children’s faces as they help decorate these whimsical melting snowmen, each one unique and full of character. They’re perfect for holiday parties, school events, cookie exchanges, or simply a cozy winter evening treat. Plus, the combination of a homemade peanut butter cookie, creamy peanut butter cups, and sweet white chocolate is a flavor explosion that will have everyone reaching for more. Get ready to impress with these charming and undeniably delicious Melted Snowman Cookies!
Key Ingredients for Perfect Melted Snowman Cookies
Crafting these adorable melted snowman cookies requires a few simple yet essential ingredients. We’ve meticulously chosen each component to ensure maximum flavor, optimal texture, and that irresistible festive appeal. Here’s a detailed look at what you’ll need and why:
- For the Cookies: While homemade cookies offer unparalleled flavor and freshness, we understand that time is often of the essence during the busy holiday season. Feel free to use your favorite store-bought peanut butter cookies for a convenient shortcut. If making from scratch, ensure they are slightly warm when adding the first peanut butter cup for optimal adhesion.
- Miniature Peanut Butter Cups (for the head): These are the stars of our snowman’s “head”! We recommend using a generous 12-ounce bag of unwrapped miniature Reese’s Cups. Their creamy peanut butter filling and chocolate coating provide a soft, delicious contrast to the cookie that marshmallows simply can’t match. Ensure your cookies are still a bit warm when you gently press these onto the center, allowing them to settle nicely.
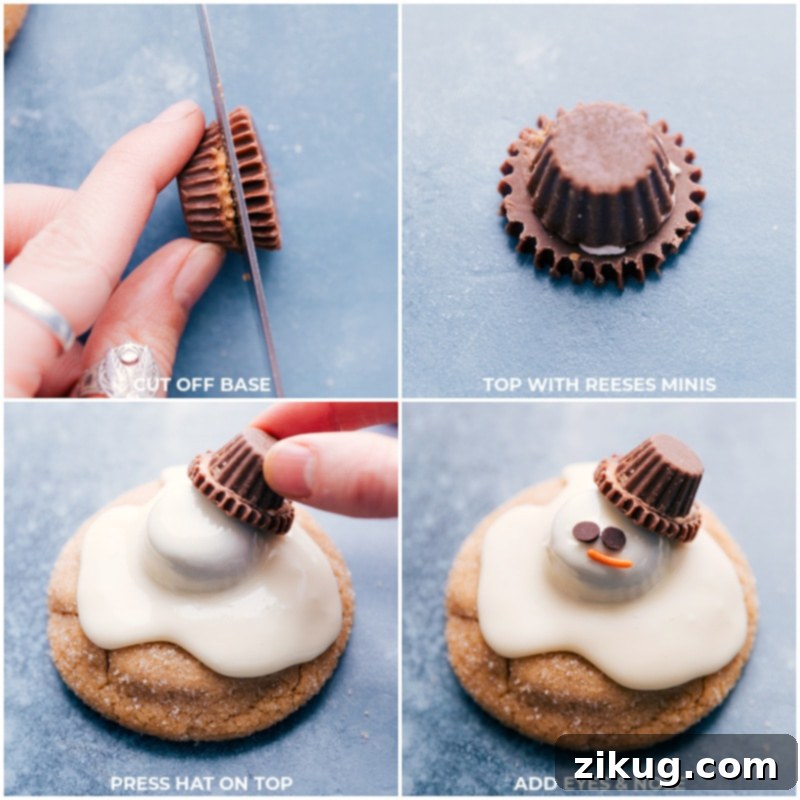
- Reese’s Minis (for the hat): To create the cutest little snowman hats, you’ll need even smaller peanut butter cups – Reese’s Minis. These typically come in an 8-ounce bag and are already unwrapped, saving you time. To cut them cleanly for the hat brim, a serrated knife warmed under hot water works wonders, creating a smooth, precise edge.
- Orange Jimmies Sprinkles: These vibrant sprinkles are essential for bringing your snowman to life, acting as the iconic carrot “nose.” Their bright color and elongated shape provide the perfect touch of character.
- Mini Chocolate Chips: Small, dark mini chocolate chips are ideal for creating the snowman’s expressive “eyes.” Press them gently into the melted white chocolate while it’s still soft to ensure they adhere properly.
- White Chocolate Chips: The “melted snow” effect comes from generous amounts of melted white chocolate chips. We recommend an 11-ounce bag of high-quality white chocolate (like Ghirardelli) for the best melting consistency and flavor. When melting, do so in short bursts in the microwave, stirring frequently between each burst to prevent overheating and ensure a smooth, creamy texture.
Step-by-Step Guide: Crafting Your Melted Snowman Cookies
Creating these delightful Melted Snowman Cookies is a fun and straightforward process. Follow these detailed steps to bring your adorable winter treats to life, ensuring each snowman is as delicious as it is charming!
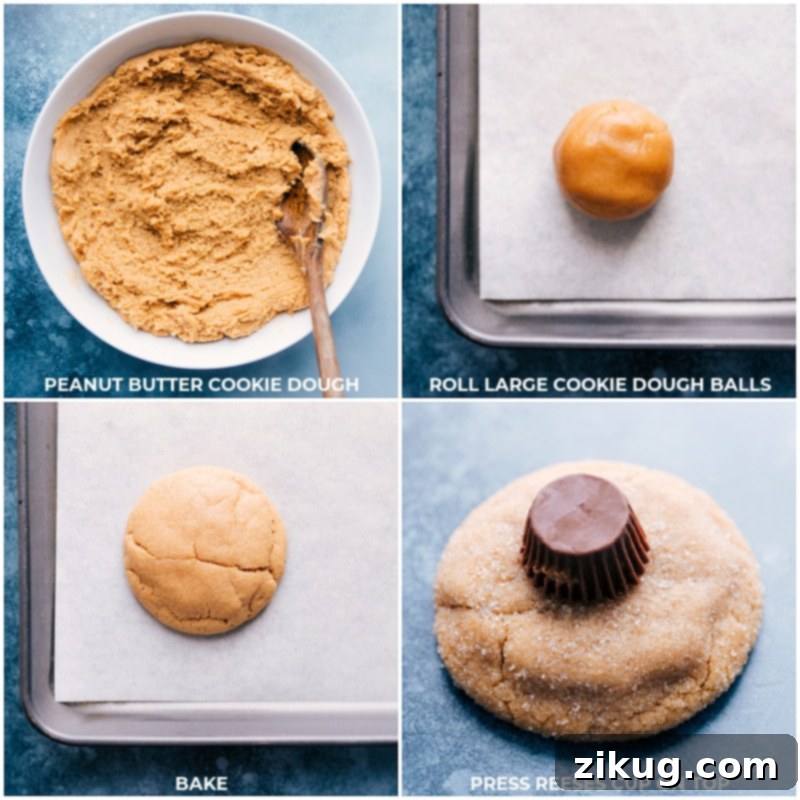
- Prepare Your Cookies: Begin by ensuring you have your cookie base ready. Whether you choose to bake a batch of our recommended homemade peanut butter cookies or opt for the convenience of store-bought ones, allow them to cool slightly. The goal is for them to be warm to the touch, but not hot enough to melt the peanut butter cups instantly. If using homemade, line a large sheet pan with parchment paper or a silicone baking mat and preheat your oven to 325°F (160°C). Prepare your peanut butter cookie dough as per the recipe card below, then scoop and roll 3-tablespoon sized balls of dough. Bake for 8-14 minutes until the edges are just set and centers are soft.
- Form the Snowman Heads: While your cookies are still slightly warm (after cooling on the sheet pan for about 5 minutes), gently unwrap a miniature peanut butter cup. Press one firmly but carefully into the center of each cookie. This slight warmth helps the peanut butter cup adhere securely. If your cookies have cooled completely, you can use a dab of melted white chocolate to attach the peanut butter cup.
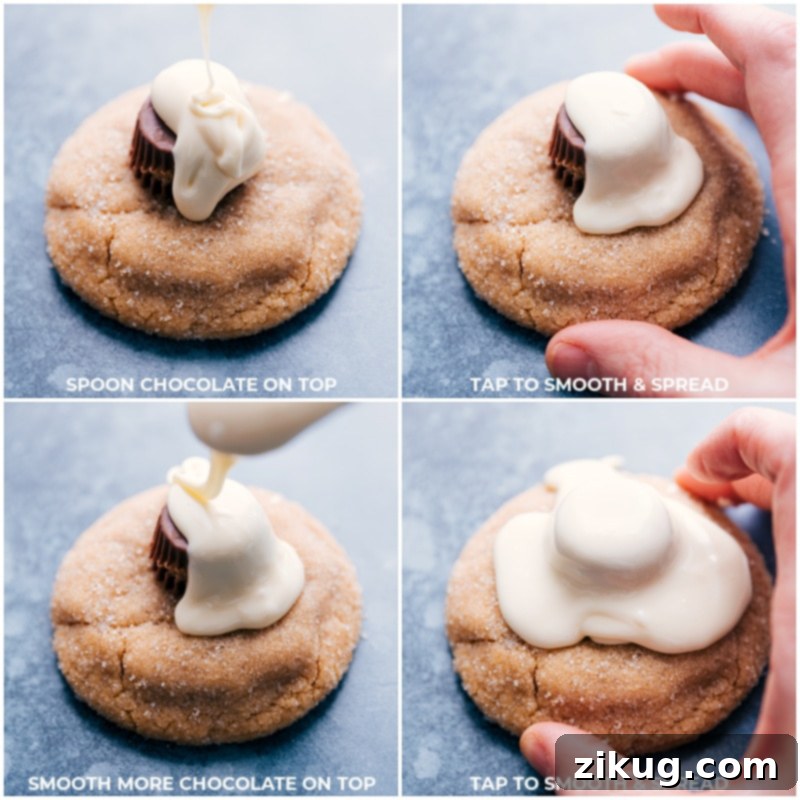
- Melt the White Chocolate “Snow”: Place your white chocolate chips in a microwave-safe bowl. Microwave in short bursts of 20 seconds, stirring thoroughly with a rubber spatula for about 10 seconds between each burst. Continue this process until the white chocolate is completely smooth and creamy, being careful not to overheat it, which can cause it to seize. Allow the melted chocolate to cool slightly for a minute or two before proceeding, ensuring it’s still pourable but not scalding hot.
- Create the Melted Snow Effect: Using a small spoon, carefully spoon a generous amount of the slightly cooled melted white chocolate over the miniature peanut butter cup you placed on each cookie. Allow the white chocolate to naturally spread, mimicking a puddle of melted snow. For a more irregular, organic melted look, gently tap the cookie on your counter a few times. If needed, add another small spoonful and tap again until you achieve your desired “melted snow” shape.
- Craft the Snowman Hats: To make the snowman’s hat, take a very sharp serrated knife and run it under hot water for a few seconds. Dry the knife thoroughly. Carefully slice off the base of a Reese’s Mini (the smaller peanut butter cup). Apply a tiny bit of the melted white chocolate to the flat, cut side of the Reese’s Mini and attach it firmly to the top of the larger miniature peanut butter cup that forms the snowman’s head.
- Decorate Quickly: Working one cookie at a time, immediately after spooning on the white chocolate, attach the hat you just made to the top of the snowman’s head. Then, while the white chocolate is still soft and pliable, press two mini chocolate chips (upside down for a rounder look) below the hat to create the “eyes.” Below the eyes, carefully place one orange jimmie sprinkle to form the “nose.” Speed is key here, as white chocolate sets rather quickly!
- Allow to Set: Once all your snowmen are decorated, allow the cookies to cool completely at room temperature. This crucial step ensures the white chocolate hardens fully, setting all your decorations in place and making the cookies easy to handle and enjoy without any messy meltdowns (except for the intentional snowman kind!). You can also place them in the refrigerator for 10-15 minutes to speed up the setting process if you’re in a hurry.
Pro Tips for Perfect Melted Snowman Cookies
Achieving the perfect Melted Snowman Cookies goes beyond just following the steps; a few expert tips can elevate your baking and decorating experience. Keep these pointers in mind for stunning and delicious results every time:
- Peanut Butter Cup Placement is Key: For optimal adhesion, press the miniature peanut butter cups onto your cookies when they are almost cooled, but still slightly warm. If the cookies are too hot, the peanut butter cup might melt into an unappealing puddle. If they’re fully cooled, no worries! Simply use a small dollop of your melted white chocolate as “glue” to secure the peanut butter cup in place. Avoid adding them too early to prevent premature melting.
- Mastering the White Chocolate “Melt”: After melting your white chocolate chips (using the short-burst microwave method), let the chocolate cool slightly for a minute or two before you start spooning it over the peanut butter cups. This ensures it’s still fluid but not so hot that it might cause the peanut butter cup to melt too much or make the chocolate too runny. When applying, spoon it on quickly and then gently tap the entire cookie on your countertop. This tapping action helps the white chocolate spread out smoothly and creates that wonderfully irregular “melted snow” puddle effect without needing to touch it with a spoon.
- Decorate with Speed and Precision: White chocolate has a notorious habit of setting up very quickly. To ensure your snowman hats, eyes, and noses stick firmly, add them immediately after spooning on the white chocolate. It’s best to decorate one cookie completely at a time. Finish adding the white chocolate and all decorations to a single cookie before moving on to the next. This rapid decorating technique ensures everything adheres before the chocolate has a chance to harden, preventing frustrating mishaps.
Creative Variations
Switch Things Up: Fun Alternatives for Your Snowman Cookies
While our classic Melted Snowman Cookies are undeniably perfect, don’t hesitate to get creative! Here are several delightful variations to customize your festive treats:
- Store-Bought Cookie Shortcuts: If baking from scratch isn’t in the cards, simply use your favorite store-bought cookies as a base. Peanut butter, sugar, or even chocolate cookies work wonderfully. You can attach the peanut butter cup with a little melted white chocolate, or explore pre-made options like Pillsbury® Snowman Cookies for an even faster start.
- Snowman Cupcakes: Extend the snowman fun to cupcakes! Prepare a batch of your favorite cupcakes using a cake mix cupcake recipe (any flavor will do!). Once cooled, top them with a generous swirl of creamy cream cheese frosting. Then, follow the rest of this recipe’s decorating steps: add a peanut butter cup head, spoon over melted white chocolate, and finish with candy decorations for an adorable melting snowman cupcake.
- Chocolate Snowman Cookies: For the ultimate chocolate lover, swap out the peanut butter cookie base for rich chocolate cookies. The dark chocolate base provides a beautiful contrast to the white chocolate “snow” and peanut butter cup elements, creating a decadent holiday treat. Decorate them just as you would the peanut butter version.
- Classic Marshmallow Snowmen (with a twist): If you still prefer the classic marshmallow look, opt for Peppermint Sugar Cookies as your base. Instead of a peanut butter cup, top them with a halved marshmallow. You can skip the hat entirely for a more traditional look and use mini M&M’s for snowman “buttons” down the body (on the cookie itself) in addition to the eyes and nose.
- Add Edible Glitter: For an extra touch of magic and sparkle, finish your cookies with a light dusting of edible glitter spray or powder. A subtle shimmer can make your melted snowmen truly enchanting and table-ready for any glamorous holiday event.
- Different Candy Decorations: Feel free to experiment with other small candies for decoration. Instead of mini chocolate chips, use edible black food marker for eyes, or small round candies. For buttons, you could add mini M&Ms to the white chocolate puddle.
Storage Solutions
Keeping Your Melted Snowman Cookies Fresh
Ensuring your delicious Melted Snowman Cookies stay fresh and delightful is easy with these simple storage tips, perfect for enjoying them throughout the holiday season or preparing ahead of time.
- Storing Finished Cookies: Once fully cooled and the white chocolate has completely set, store your decorated Melted Snowman Cookies in an airtight container. Keep them at room temperature, and they will remain wonderfully fresh and tasty for up to 5 days. Layer them with parchment paper if stacking to prevent any decorations from sticking together.
- Freezing Cookie Dough for Later: To get a head start on your holiday baking, you can easily freeze the cookie dough. After preparing the dough, scoop it into individual balls (about 3 tablespoons each) and place them on a parchment-lined sheet pan. Freeze until the dough balls are solid. Once frozen, transfer them to a freezer-safe sealed container or a heavy-duty freezer bag. The dough can be stored in the freezer for up to 3 months, ready to be baked whenever a craving strikes!
- Baking from Frozen: When you’re ready to bake your frozen cookie dough, simply transfer the desired number of dough balls from the freezer directly to a lined baking sheet. There’s no need to thaw! Bake them straight from frozen, but remember to add a few extra minutes to the baking time (typically 2-4 minutes more than the recipe specifies). Continue baking until the edges are nicely set and the centers remain soft and chewy, just as you’d want them.
More Fun Holiday Treats to Explore:
Christmas
Irresistible Peppermint Bark
Quick And Easy
Easy Christmas Brownies (Mason Jar Gift Idea)
Desserts
Delicious Peppermint Fudge Recipe
Desserts
Adorable Santa Cookies
Print Recipe
Melted Snowman Cookies
Equipment
-
Large sheet pan (15″ x 21″)
-
Parchment paper or silicone baking mat
-
Cooling rack
Ingredients
Metric Units
- 16 tablespoons unsalted butter (1 cup, melted and cooled to room temperature)
- 1 cup light brown sugar (lightly packed)
- 1 cup granulated sugar (plus extra for rolling cookie dough balls)
- 1 cup creamy peanut butter (Skippy® Creamy Peanut Butter recommended, not natural; see note 1)
- 1/8 teaspoon almond extract (optional—see note 2)
- 1 tablespoon vanilla extract
- 2 large eggs
- 1 teaspoon baking soda
- 1/2 teaspoon salt
- 2-2/3 cup all-purpose flour (see note 3)
- 12 ounces Miniature Reese’s Cups (1 bag, unwrapped)
- 8 ounces Reese’s minis (1 bag; these are smaller than miniature ones and come unwrapped)
- Orange jimmies sprinkles
- mini chocolate chips
- 1 (11-ounce) bag white chocolate chips (high-quality chips or melting wafers recommended; see note 4)
Instructions
-
Line a large sheet pan with parchment paper or a silicone liner and set it aside. This prepares your baking surface for the cookies.
-
In a microwave-safe bowl, gently heat the butter until it’s fully melted. Set this aside to cool completely back to room temperature. It’s crucial that the butter is not hot, as hot butter can prematurely melt sugars and result in greasy cookies. Once cooled, use a spatula to scrape every bit of the butter into a large mixing bowl. Add both the brown and granulated sugar. Whisk vigorously until the mixture is smooth and well combined.
-
Next, incorporate the creamy peanut butter, optional almond extract, and vanilla extract. Mix until all ingredients are thoroughly combined and smooth. Add the first egg and mix just until it’s incorporated into the batter, then add the second egg. Continue mixing until the ingredients are just combined, being careful not to overmix. Finally, add the baking soda and salt, mixing until just incorporated. Gently fold in the all-purpose flour until just combined; overmixing at this stage can lead to tough cookies.
-
Cover the cookie dough and chill it in the refrigerator for at least 30 minutes. This chilling period helps prevent spreading and enhances flavor. While the dough chills, preheat your oven to 325°F (160°C). Scoop the chilled cookie dough and roll it into large balls, each approximately 3 tablespoons in size. Do not make these smaller, as the size is important for the snowman base. If desired, roll the dough balls in some extra granulated sugar for a sparkly finish. Place 6 dough balls at a time on your lined sheet pan, ensuring ample space between them for spreading during baking.
-
Bake for 8–14 minutes. The exact time will depend on your oven and desired texture. A slight underbaking is key to keeping these cookies wonderfully soft and chewy. They will continue to bake slightly on the hot cookie sheet after removal from the oven, so be vigilant and avoid overbaking! The edges should be just set, and the centers should appear soft.
-
Remove the baked cookies from the oven and allow them to cool on the sheet pan for about 5 minutes. This allows them to firm up slightly. After 5 minutes, carefully transfer them to a wire cooling rack to finish cooling completely.
-
When the cookies are almost completely cooled, but still slightly warm to the touch, gently press an unwrapped miniature peanut butter cup into the center of each cookie. The residual warmth helps the peanut butter cup adhere securely. If your cookies have fully cooled, don’t worry—simply attach the Reese’s with a small dot of melted white chocolate in a later step.
-
Once the cookies are thoroughly cooled (you can even chill them in the fridge for 10-15 minutes if your kitchen is warm to speed this up), it’s time to melt the white chocolate chips for the “snow.” Microwave the chips in a clean, dry microwave-safe bowl in bursts of 20 seconds, stirring thoroughly for 10 seconds between each burst, until the chocolate is perfectly melted and smooth. Do not add oil or any other liquid, as this can cause the chocolate to seize. Allow the melted white chocolate to cool slightly for a minute or two before use. Using a small spoon, carefully spoon the white chocolate over the miniature peanut butter cup on each cookie. Gently tap the cookie on the counter a few times to help the white chocolate spread into an irregular “melted snow” shape. If needed, add another small spoonful and tap again to achieve an even spread.
-
To create the snowman’s hat, take a very sharp serrated knife and run it under very hot water for a moment, then dry it completely. Carefully cut off the base of a Reese’s Mini (the smaller peanut butter cup). Apply a small amount of your melted white chocolate to the bottom of the cut Reese’s Mini and gently attach it to the top of the larger miniature peanut butter cup that forms the snowman’s head. Repeat this process to prepare all your snowman hats.
-
Working quickly, immediately press the “hat” you just made onto the top of the snowman’s “head” (the larger peanut butter cup). Then, while the white chocolate is still soft, add two mini chocolate chips (placed upside down for a rounded appearance) below the hat to create the “eyes.” Finally, place one orange jimmie sprinkle below the chocolate chip eyes to form the “nose.” Remember that white chocolate sets fast, so decorate one cookie completely before moving on to the next (see note 5). Repeat this process for all remaining cookies. Allow them to harden completely at room temperature before serving or storing.
Recipe Notes
Note 2: Almond Extract (Optional Enhancement): The addition of almond extract is entirely optional. It provides an extra layer of nutty flavor that beautifully complements the peanut butter, adding a unique depth to the cookies. If you have it on hand and enjoy a richer flavor profile, feel free to add it; otherwise, the cookies will still be absolutely delicious without it.
Note 3: Accurate Flour Measurement: Measuring flour can significantly affect the outcome of your cookies, as volumes can vary greatly depending on how it’s scooped. Inaccurate flour measurement is often the culprit for cookies not turning out as expected. For the most consistent and perfect results, I highly recommend using a food scale. The ideal weight for the all-purpose flour in this recipe is 385 grams.
Note 4: High-Quality White Chocolate: For the best melting consistency, smoothest finish, and superior flavor for your “melted snow,” use good, high-quality white chocolate chips (such as Ghirardelli®) or dedicated white chocolate melting wafers/baking bars. After melting, allow the chocolate to cool slightly before spooning it onto the peanut butter cups. Instead of attempting to spread the white chocolate with a spoon, gently tap the entire cookie on your work surface. This technique helps the chocolate settle into an even layer and naturally creates that appealing irregular “melted snow” effect.
Note 5: Decorating Efficiency: White chocolate tends to set very rapidly, especially in cooler conditions. To ensure that the hat, eyes, and nose adhere properly, you’ll need to work quickly. It’s most effective to decorate one cookie completely – applying the white chocolate, then the hat, eyes, and nose – before moving on to the next. This prevents the chocolate from hardening before all your charming decorations are in place.
Storage: To maintain freshness, store your decorated Melted Snowman Cookies in a sealed airtight container at room temperature for up to 5 days. For long-term storage, you can freeze the raw cookie dough: scoop dough balls onto a sheet pan and freeze until solid. Once firm, transfer them to a sealed container or heavy-duty freezer bag and freeze for up to 3 months. When ready to bake, place frozen dough balls directly on a lined baking sheet and bake straight from the freezer, adding a few extra minutes to the bake time until the edges are golden and the centers are soft.
Nutrition
Calories: 370kcal |
Carbohydrates: 43.2g |
Protein: 6.3g |
Fat: 20.9g |
Cholesterol: 36.4mg |
Sodium: 91.6mg |
Fiber: 2.3g |
Sugar: 30.5g
Nutrition information is automatically calculated, so should only be used as an approximation.