
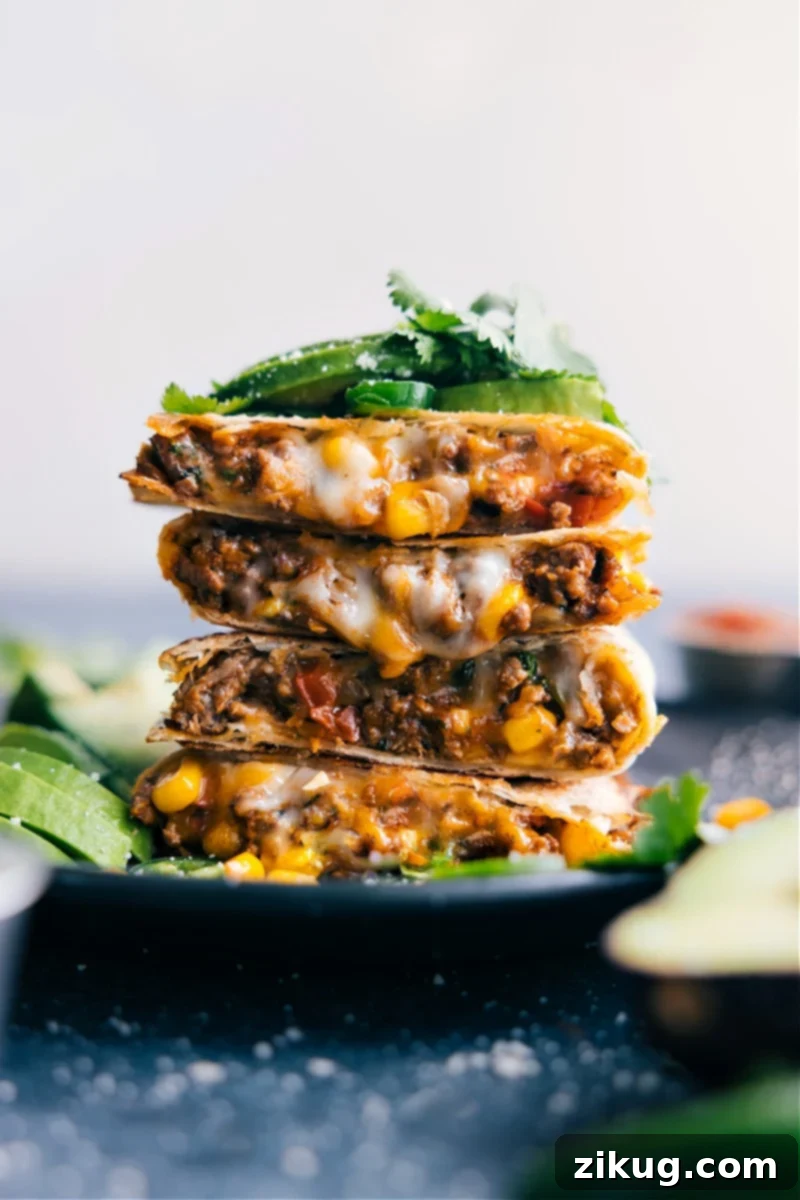
Welcome to the ultimate guide for crafting the most flavorful Ground Beef Quesadillas you’ve ever tasted! Imagine perfectly seasoned ground beef, vibrant with crisp corn and sweet bell pepper, nestled between layers of gooey, melted cheese, all encased in a golden, crispy tortilla. Every single bite is an unforgettable experience, making these quesadillas a true explosion of flavor that will delight your family and friends.
Whether you prefer the classic char of a stovetop skillet or the unbeatable crispness of an air fryer, this comprehensive recipe provides detailed instructions for both methods. Get ready to transform everyday ingredients into a spectacular meal that’s quick, easy, and incredibly satisfying.
Quick Tip: Vegetarian Alternative
Looking for a meat-free option? While this ground beef quesadilla recipe is a definite crowd-pleaser for meat-eaters, our Black Bean Quesadillas offer a fantastic vegetarian alternative that’s equally delicious and satisfying. You can also explore options like seasoned mushrooms or plant-based ground meat substitutes for a different twist, ensuring everyone at your table finds something to love.
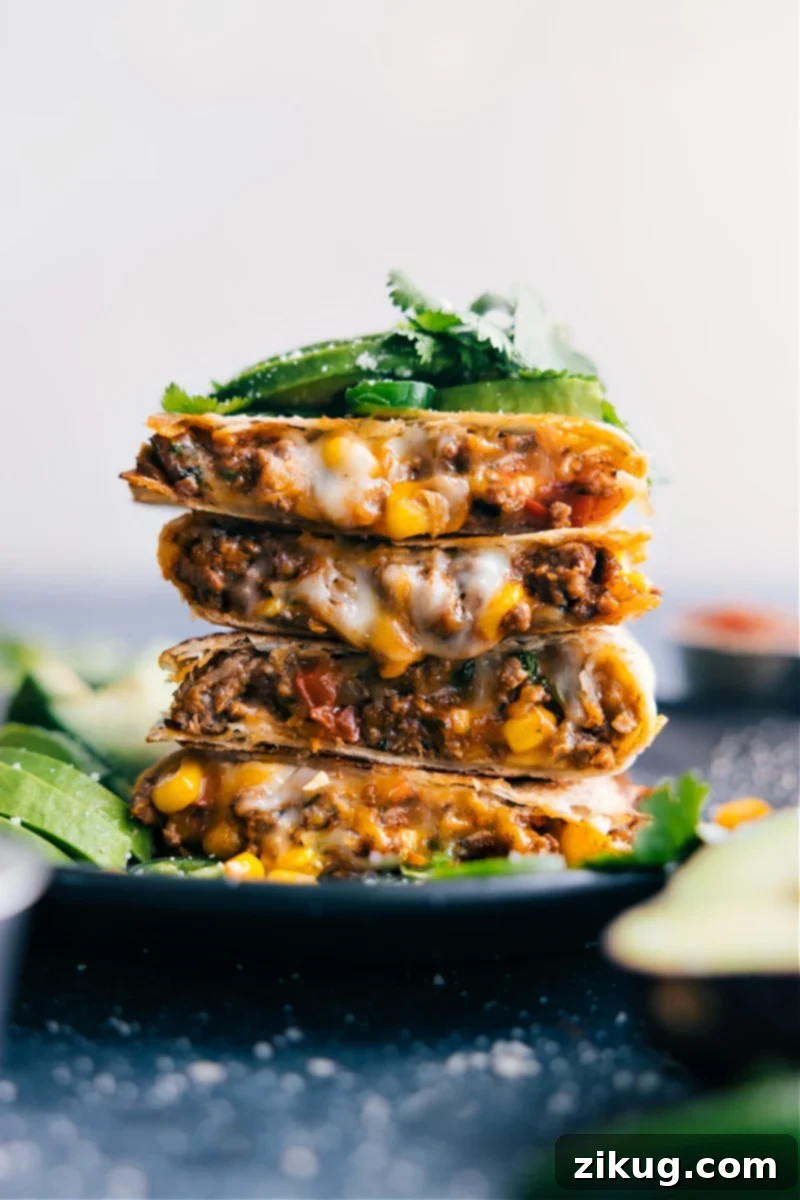
Unbeatable Ground Beef Quesadillas: Your New Weeknight Favorite
Ever since the air fryer joined our kitchen arsenal, quick and easy meals like quesadillas and grilled cheese sandwiches have become our ultimate “go-to” for busy lunches or effortless dinners. The appeal is universal: kids adore them, adults can’t get enough, and they come together with minimal fuss and even less cleanup! The incredible texture an air fryer imparts on tortillas or sandwich bread is truly unparalleled – achieving that desirable crispness without the need for excessive oil is a game-changer for healthier yet indulgent meals.
However, we understand and appreciate the timeless charm of skillet-cooked quesadillas. That’s why this recipe masterfully caters to both preferences, offering detailed instructions for achieving culinary perfection whether you’re using an air fryer or a traditional skillet. In fact, for larger gatherings or when hunger strikes fast, I often find myself simultaneously air frying a batch while sizzling another in a skillet. This dual-cooking strategy ensures a continuous supply of hot, cheesy quesadillas, ready to be devoured by everyone at the same time. These ground beef quesadillas are not just a meal; they’re an experience, combining comfort, savory flavor, and ultimate convenience into one perfect package, making them ideal for any day of the week.
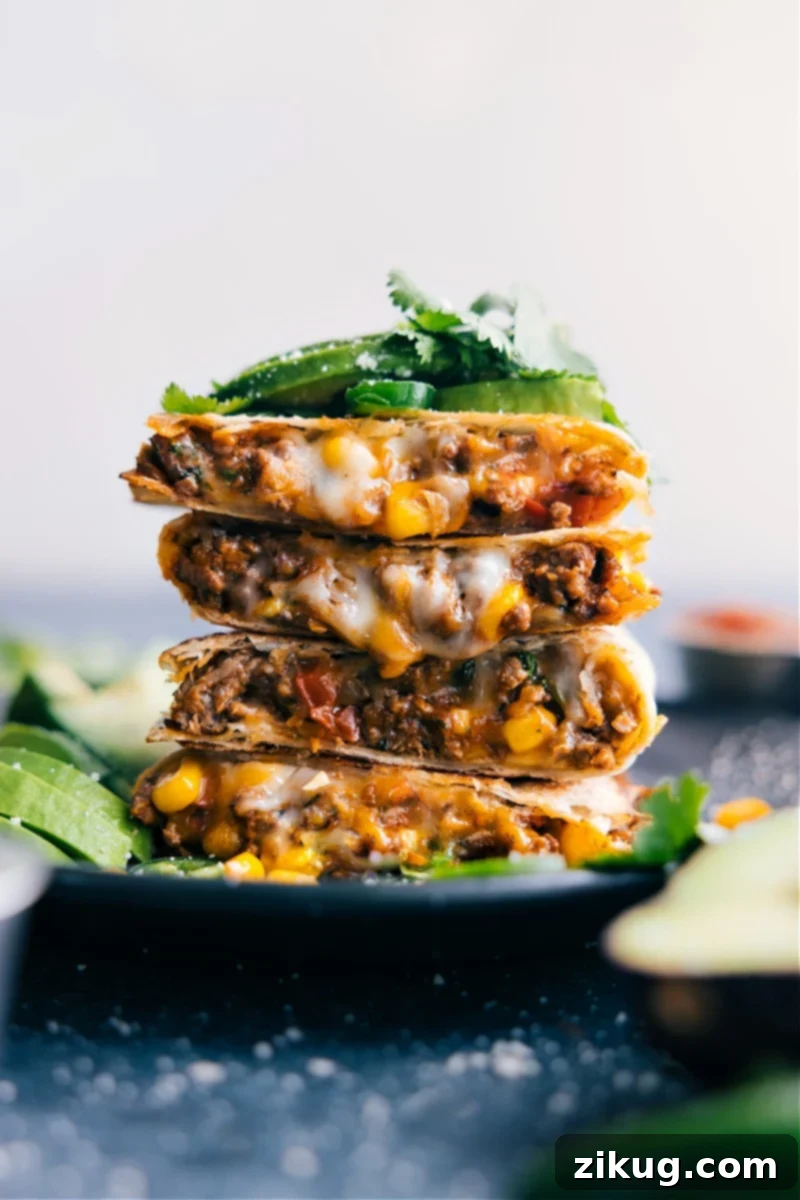
What makes these **homemade ground beef quesadillas** truly stand out is the harmonious blend of flavors and textures. The savory, deeply seasoned ground beef, tender yet satisfying, is beautifully complemented by the sweet crunch of bell peppers and the subtle burst of corn. Then comes the irresistible gooeyness of perfectly melted cheese, binding everything together, all embraced by a tortilla that’s been cooked to golden-brown crispness. It’s a symphony of sensations that makes every bite a moment to savor, solidifying its place as a favorite easy weeknight dinner or a delightful lunch option for the whole family. Their versatility also means they can be tailored to individual tastes, from mild to extra spicy, ensuring they hit just the right spot every time.
Quick Tip: Healthier Quesadilla Options
For those mindful of their diet, transforming these savory quesadillas into a healthier option is entirely possible without sacrificing flavor. Consider opting for extra-lean ground beef or substituting it with ground turkey or a plant-based meat alternative to significantly reduce fat content. You can also moderate the amount of cheese, choosing lower-fat varieties if available, and swap traditional flour tortillas for low-carb, whole-wheat, or lighter-calorie versions. These simple adjustments allow you to enjoy all the deliciousness with a lighter footprint, making them a more wholesome meal choice.
Essential Ingredients for Perfect Ground Beef Quesadillas
Creating these incredibly flavorful ground beef quesadillas relies on a selection of readily available ingredients, ensuring that a delicious meal is always within reach. Each component plays a vital role in building the robust flavor profile and satisfying texture that makes these quesadillas so special. Below, we dive into each ingredient, offering insights and tips to help you achieve culinary perfection and understand their contribution to the overall dish.
-
Flour Tortillas: The Foundation of Flavor and Texture
The choice of tortilla is paramount for a truly spectacular quesadilla. We highly recommend and love these unbaked flour tortillas by TortillaLand® (note: not sponsored). You’ll typically find them in the refrigerated section of your grocery store, often near the cheese. Their fresh, superior flavor and tender texture truly elevate the entire dish, creating a wonderfully soft interior and crispy exterior when cooked. However, any good quality *flour* tortillas will work wonderfully. Look for medium to large sizes, about 8-10 inches, to ensure ample space for the generous filling. If using uncooked tortillas, remember to lightly cook them in a skillet according to package directions before assembling the quesadillas to ensure they are pliable and cooked through, preventing them from tearing during the folding process.
-
Ground Beef: The Heart of the Quesadilla’s Richness
For the richest flavor and best texture, a lean ground beef (around 93/7 lean-to-fat ratio) is ideal. This ensures a hearty filling without excessive grease, which can make your quesadillas soggy. The beef is the savory backbone of our quesadillas, absorbing all the wonderful spices and providing a substantial, satisfying bite. If you prefer a lighter option, ground turkey or even a plant-based ground meat substitute can be used, adjusting cooking times as necessary. Always ensure your beef is thoroughly browned before adding other ingredients.
-
Taco Seasoning: The Spice of Life and Depth of Flavor
The magic of our ground beef quesadillas lies heavily in the seasoning. A high-quality taco seasoning blend infuses the beef with that unmistakable Tex-Mex flavor profile that is both savory and aromatic. While store-bought seasoning packets are convenient, their spice levels and overall flavor can vary significantly. For ultimate control and superior taste, we highly recommend making your own homemade taco seasoning. It’s incredibly simple, allowing you to adjust the heat and complexity to your liking. (Check out our dedicated Quick Tip box below for my go-to homemade blend!) Having a batch prepped means quick flavor whenever you need it for tacos, burritos, or these fantastic quesadillas.
-
Olive Oil: Sautéing for Flavor and Aroma
A good quality olive oil is essential for sautéing the vegetables and ensuring the ground beef browns beautifully, developing a rich, caramelized crust. It adds a subtle richness to the base of the filling and helps to meld the flavors together at the beginning of the cooking process, creating an aromatic foundation. Any neutral cooking oil, like canola or vegetable oil, can also be used as a suitable substitute if olive oil is not available.
-
Onion and Red Bell Pepper: Sweet & Savory Crunch and Color
Diced onion and red bell pepper bring both sweetness and a delicate crunch to the quesadilla filling, adding vital texture and vibrant color. They soften beautifully when sautéed, releasing their aromatic flavors and adding depth and complexity to the savory beef. Feel free to experiment with other bell pepper colors, but red offers a distinct sweetness that pairs perfectly with the savory beef, enhancing the overall taste profile.
-
Chicken Stock (or Broth/Water): Enhancing Richness and Moisture
A splash of chicken stock or broth, or even just water, is added to the ground beef mixture to create a richer, more cohesive sauce. This liquid helps distribute the taco seasoning evenly, preventing the filling from becoming too dry and ensuring every bite is moist and flavorful. It’s a small addition that makes a big difference in the final texture and taste, binding all the components together beautifully.
-
Tomato Paste: Concentrated Umami and Sweetness
Don’t underestimate the power of tomato paste! Just a couple of tablespoons add a concentrated burst of umami and a subtle sweetness that deepens the overall flavor of the ground beef filling. It contributes to a more complex, well-rounded taste profile, making the quesadillas even more irresistible and adding a layer of savory richness that’s often overlooked.
-
Minced Garlic: Aromatic Foundation and Pungency
Freshly minced garlic is a cornerstone of so many delicious savory dishes, and these quesadillas are no exception. It infuses the ground beef mixture with its pungent, aromatic notes, building a robust flavor base that truly shines through. While pre-minced garlic is convenient, fresh garlic offers the most vibrant taste and aromatic intensity. Be sure not to burn the garlic, as it can turn bitter.
-
Frozen Corn: Sweetness, Pop, and Color
Frozen corn adds a lovely sweetness and textural contrast to the savory beef filling. Its bright yellow kernels also make the quesadillas more appealing visually. Simply add it in at the end of cooking the beef to warm through, preserving its crisp-tender texture and natural sweetness. You can also use canned corn, drained well, or fresh corn cut from the cob when in season for an extra fresh flavor.
-
Fresh Cilantro: Burst of Freshness and Herbaceousness
Finely chopped fresh cilantro is stirred into the filling at the very end, offering a vibrant, herbaceous counterpoint to the rich beef and cheese. It brightens the flavors and adds a quintessential Tex-Mex aroma that truly rounds out the dish. If cilantro isn’t your preference, a little fresh parsley can be a mild substitute, or simply omit it, though its unique flavor is highly recommended.
-
Cheese: The Ultimate Melty Goodness and Richness
Ah, the cheese! This is where the magic truly happens, transforming simple ingredients into a gooey masterpiece. We recommend a blend of sharp or extra-sharp Cheddar for its rich, pronounced flavor, combined with Monterey Jack for its exceptional melting qualities and mild creaminess. This combination creates an unbeatable gooey, cheesy experience that is both flavorful and wonderfully textural. (More on cheese selection and tips for the best melt in its dedicated section below!)
Quick Tip: Craft Your Own Taco Seasoning Blend
For the most authentic and flavorful Ground Beef Quesadillas, consider creating your own taco seasoning blend rather than relying on a packaged mix. Homemade seasoning always tastes best, allowing you to control the freshness and exact spice balance to suit your preferences. It’s a game-changer! And while you’re at it, why not make a large batch? Divide it into small packets for convenient use throughout the week, or store it in a larger airtight container and measure out 3 tablespoons to equal one standard store-bought packet. This blend ensures your ground beef is packed with aromatic spices, creating a truly irresistible filling.
Here’s my trusted, go-to taco seasoning blend that perfectly replaces the store-bought mix in this recipe, delivering incredible depth of flavor:
- 1 tablespoon ground chili powder (McCormick® is excellent for a mild chili powder)
- 1 teaspoon EACH: ground cumin, paprika
- 1/2 teaspoon EACH: onion powder, garlic powder, dried oregano, fine sea salt, and black pepper
How to Master Homemade Ground Beef Quesadillas
Crafting these delectable ground beef quesadillas is a straightforward process, but a few key steps and tips will ensure a perfect outcome every time. Follow these guidelines to achieve golden, crispy tortillas and a rich, flavorful filling that will have everyone asking for more. The key is in the preparation and the cooking technique, whether you choose the stovetop or the air fryer.
Step-by-Step Instructions for Your Quesadillas:
-
Prepare Your Ingredients with Precision
Begin by getting all your ingredients ready and organized. If you’re using uncooked flour tortillas (like the TortillaLand® variety), warm them in a dry skillet according to the package instructions until they are soft, pliable, and fully cooked. This crucial step ensures they cook evenly and don’t tear during assembly, regardless of whether you’ll be using a skillet or air fryer for the final cook. Set these cooked tortillas aside. Next, finely dice your onion and red bell pepper, chop the fresh cilantro, and most importantly, shred your cheese from a block (more on why this matters below!). Having everything prepped and within reach makes the cooking process seamless and enjoyable.
-
Cook the Flavorful Ground Beef Filling
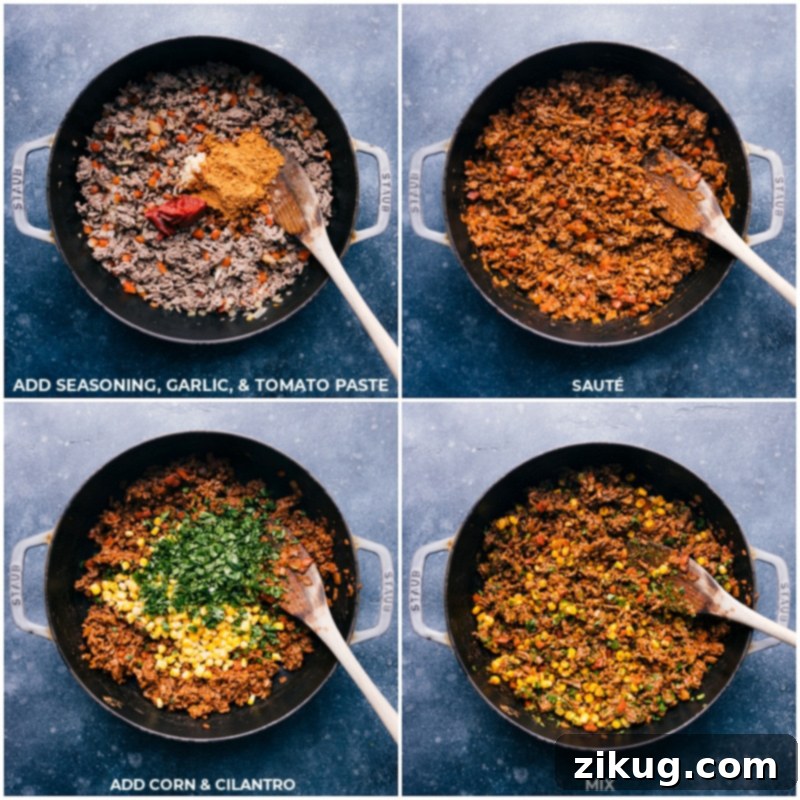
Heat a large skillet over high heat and add a tablespoon of olive oil. Once shimmering, add the diced onion and red bell pepper, sautéing them for 3-5 minutes until they’re tender and slightly golden. Push the softened vegetables to one side of the skillet and add the lean ground beef to the center. Sear, crumble, and brown the beef thoroughly, breaking it up with a spoon. Once browned, carefully drain any excess grease to prevent a soggy filling and to keep the quesadillas from being too heavy. Reduce the heat to medium, then stir in your chosen taco seasoning mix, tomato paste, chicken stock (or broth/water), and minced garlic. Cook for another 1-3 minutes, stirring constantly, until the mixture is fragrant and the liquid has mostly absorbed, creating a rich, cohesive filling. Remove the skillet from the heat, then gently fold in the frozen corn and finely chopped fresh cilantro, mixing until well combined. This is the heart of your quesadilla, bursting with savory goodness and ready for assembly.
-
Assemble Your Quesadillas Like a Pro with Layered Cheese
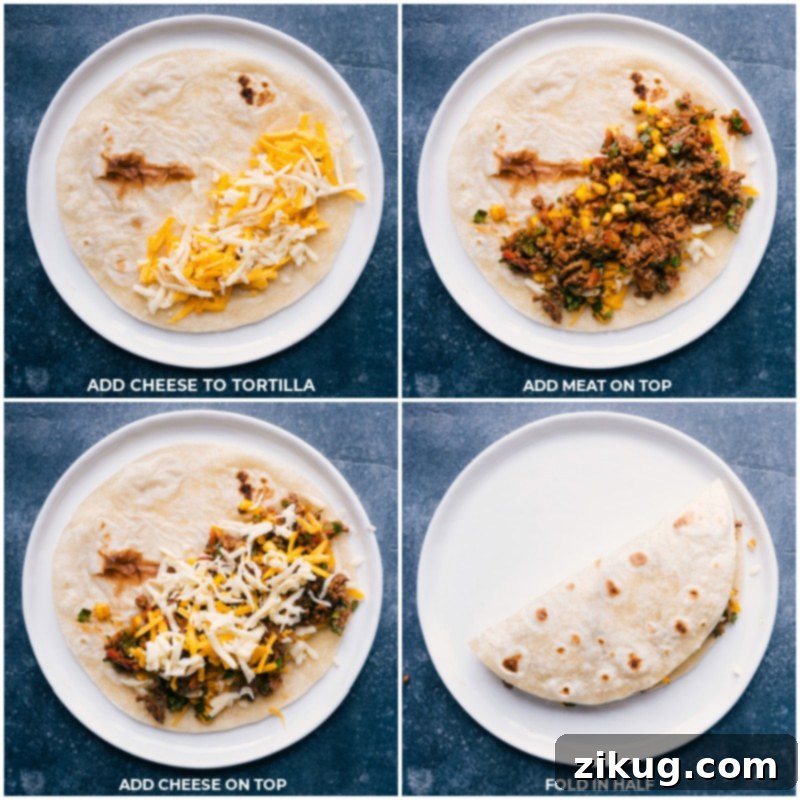
Now comes the fun part: assembly! Divide your shredded cheese and the prepared ground beef filling evenly among your six tortillas. For each quesadilla, lay a tortilla flat. Sprinkle approximately 2 tablespoons of shredded cheese evenly over one half of the tortilla. Evenly spread about 1/2 cup of the ground beef mixture over this first layer of cheese. Then, add another 2 tablespoons of shredded cheese on top of the beef. This unique layering technique – placing cheese on both sides of the filling – is the “secret” to achieving ultra-gooey, perfectly melted cheese throughout your quesadilla, ensuring every bite is rich and satisfying. Carefully fold the empty half of the tortilla over the filled half, pressing down gently to create a neat semi-circle and seal the edges.
-
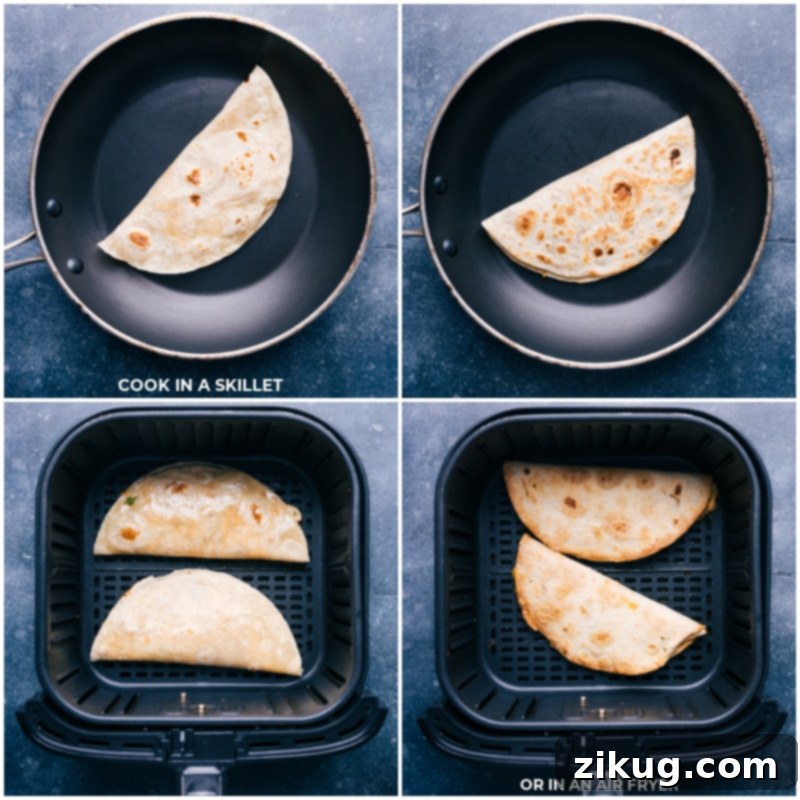
Skillet Method: For Classic Golden Crispness and Deep Flavor
If opting for the stovetop, lightly brush both sides of each assembled quesadilla with olive oil or generously coat with cooking spray. Place 1-2 quesadillas into a dry, non-stick skillet over medium-low heat (avoid overcrowding). Covering the skillet for the first 2-3 minutes is crucial; it helps to trap heat, ensuring the cheese melts beautifully while the tortilla starts to crisp. Uncover, carefully flip the quesadillas, and gently press down with a spatula to help them seal and ensure even browning. Cook for another 2-3 minutes, or until the tortillas are golden brown and wonderfully crispy, and the cheese filling is perfectly melted and gooey. Remember to keep the heat low to allow the cheese ample time to melt thoroughly before the tortillas brown too much. Repeat this process with the remaining quesadillas, adjusting cooking time slightly as the skillet will get hotter with subsequent batches, possibly requiring a slight reduction in heat.
-
Air Fryer Method: For Unbeatable Crunch and Less Oil
For an incredibly crispy, less oily result, the air fryer is your best friend. To prevent the top tortilla from lifting during air frying (which can happen due to air circulation), secure the edges with a few toothpicks pushed through the corners and/or along the center edge. Generously spray both sides of the quesadillas with cooking spray; this is vital for achieving that beautiful golden-brown, crispy exterior. Place 1-2 quesadillas in your air fryer basket, ensuring they have enough space for air to circulate freely. Cook at 350°F (175°C) for 6-8 minutes, flipping them halfway through. As you flip, gently press the quesadillas together to ensure the layers adhere and everything stays intact. Continue cooking until they are wonderfully crisp, golden, and the cheese is perfectly melted. Air fryer models vary significantly, so you may need to adjust cooking times slightly for your specific model. Note that subsequent batches might cook faster as the machine retains heat. Carefully remove from the air fryer and let cool for a minute or two before cutting and serving.
-
Serve and Enjoy Your Flavorful Creation!
Once your quesadillas are cooked to perfection by either method, carefully transfer them to a cutting board. Using a sharp knife or a pizza cutter, slice each quesadilla into manageable wedges. Arrange them attractively on a platter and serve immediately with your favorite array of toppings like creamy guacamole, cool sour cream, zesty salsa, and more! These ground beef quesadillas are truly best enjoyed fresh, when the tortillas are at their crispiest and the cheese is at its meltiest, offering an unparalleled dining experience. Prepare for a flavor fiesta that will become a regular request!
The Secret to Ultra-Gooey, Cheesy Ground Beef Quesadillas
While the savory ground beef filling is undeniably delicious, the cheese is what elevates a good quesadilla to a truly unforgettable one. Achieving that perfect, stretchy, gooey melt requires a bit of know-how and attention to detail. Here are our top tips for crafting the cheesiest ground beef quesadillas, ensuring every bite is packed with molten goodness:
- Choose the Right Cheese Blend for Maximum Impact: For maximum flavor and an ideal melt, we highly recommend using a combination of cheeses. Sharp or extra-sharp Cheddar is a must for its rich, robust flavor profile that stands up beautifully to the seasoned beef, ensuring the cheese taste isn’t lost. Mild or medium Cheddar often gets lost in the mix, so opt for something with more character. Pair the sharp Cheddar with Monterey Jack, which is renowned for its excellent melting properties and mild, creamy taste. This duo creates a harmonious balance of flavor and an incredibly desirable, stringy, gooey texture. Other great melting cheeses to consider include Oaxaca cheese, Colby Jack, or a high-quality Mexican blend for an authentic touch.
- The “Secret” Layering Technique for an Even Melt: This is a true game-changer that ensures cheese in every nook and cranny! Don’t just pile all the cheese on top of the filling. The secret to ultra-cheesy quesadillas is to add cheese on both sides of the ground beef filling. Start by sprinkling a generous layer of cheese directly onto the tortilla, then add your beef mixture, and finally, finish with another generous layer of cheese before folding. This clever layering technique ensures the cheese melts evenly around the filling, creating a sealed, gooey pocket of deliciousness that prevents dry spots and maximizes the cheesy experience.
- Always Grate Your Own Cheese for Superior Melt: While pre-shredded cheese offers undeniable convenience, it often contains anti-caking agents like cellulose or potato starch. These preservatives, while preventing clumping in the bag, can unfortunately hinder the cheese from melting smoothly and evenly, sometimes resulting in a waxy or grainy texture. For truly ultra-gooey, velvety, and perfectly integrated cheese results, we highly recommend grating your own block of cheese. It takes just a few extra minutes of effort but makes an enormous, noticeable difference in the texture and superior melt of your quesadillas. Freshly grated cheese melts into a wonderfully smooth, stretchy consistency that perfectly complements the savory beef filling.
Elevate Your Quesadillas with Irresistible Toppings
No ground beef quesadilla experience is complete without a selection of fresh, zesty, and creamy toppings. These vibrant additions provide a delightful contrast in flavor and texture, transforming a simple meal into a vibrant feast. While your quesadillas are cooking, take a moment to assemble a variety of these enhancers to truly personalize your dish and elevate the dining experience. Here are some highly recommended suggestions, each offering a unique burst of flavor:
-
Chili-Lime Sauce: The Ultimate Flavor Explosion
This incredibly vibrant sauce, first introduced with our Sweet Potato Burrito Bowls, has become an absolute staple in our home. We are utterly obsessed with its tangy, spicy, and perfectly balanced kick, and will seize any opportunity to incorporate it into a meal! Its bright, zesty profile with a hint of heat is the absolute perfect accompaniment to these rich ground beef quesadillas, adding an incredible layer of complex flavor that truly makes them shine and leaves a lasting impression.
-
Cilantro-Lime Sauce: Cool, Bright, and Herbaceous
If your palate leans towards cooler, brighter, and more herbaceous notes, our refreshing Cilantro-Lime Sauce is an exquisite choice. It offers a wonderful, zesty contrast to the savory beef and creamy cheese, with the fresh cilantro adding a fragrant, aromatic lift that brightens every bite. This sauce is particularly delightful for those who enjoy a vibrant citrusy finish to their meal, cutting through the richness beautifully.
-
Guacamole or Fresh Avocado: Creamy Indulgence
A generous dollop of creamy guacamole is practically a mandatory topping for quesadillas. You can whip up our favorite homemade Guacamole Recipe for an authentic taste and superior freshness, or simply grab a ready-made version from the store for ultimate convenience on a busy weeknight. If you prefer something simpler yet equally delicious, a perfectly ripe diced avocado offers a similar rich, buttery texture and fresh, earthy flavor that beautifully complements the savory quesadillas.
-
Sour Cream or Greek Yogurt: Cool and Tangy Balance
A generous swirl of sour cream provides a delightful cooling effect and a tangy creaminess that balances the savory, spicy notes of the filling. Whether you opt for fat-free, light, or regular sour cream, or even a healthier alternative like plain Greek yogurt for added protein, it adds a luxurious smoothness to each bite. It’s a classic pairing for a reason, as its cool tang cuts through the richness of the cheese and beef, creating a harmonious flavor profile.
-
Salsa or Pico de Gallo: Fresh and Zesty Kick
A spoonful of fresh Salsa or vibrant pico de gallo is essential for adding a burst of fresh, tangy flavor and juicy texture. Our homemade salsa is truly sublime, offering unparalleled freshness, but a good quality store-bought version works perfectly when you’re short on time. The fresh tomatoes, onions, and cilantro in these condiments add a juicy, acidic counterpoint that brightens the entire dish, making it feel incredibly fresh and zesty.
-
Fresh Lime Wedges and Cilantro: The Zesty, Aromatic Finish
Never underestimate the power of fresh garnishes! A generous squeeze of fresh lime juice over your cooked quesadillas adds an instant burst of bright acidity that cuts through the richness and awakens all the flavors, making them pop. A sprig or two of fresh cilantro, finely chopped and sprinkled on top, adds another layer of herbaceous freshness and a beautiful visual appeal. These simple additions elevate the entire dining experience, providing both aroma and zest.
-
Hot Sauce: For a Spicy Kick and Bold Flavor
For those who love a bit of heat and crave an extra layer of flavor, a dash or drizzle of your favorite hot sauce is the perfect fiery addition. Whether you prefer a smoky chipotle, a zesty habanero, or a classic Tabasco, a little hot sauce adds an exciting kick that perfectly complements the savory beef and creamy cheese, bringing an invigorating warmth to each mouthful. ‘Nuff said!
Smart Storage & Freezing Tips for Ground Beef Quesadillas
Ground Beef Quesadilla Storage and Freezing Guide
Efficient meal prep and smart storage can significantly simplify your cooking routine. These ground beef quesadillas are surprisingly versatile when it comes to storage, especially before they are fully cooked. Here’s how to best store and even freeze them for future enjoyment, ensuring you always have a delicious, quick meal option ready.
Storing Uncooked Quesadillas in the Refrigerator:
Assembled but uncooked quesadillas store remarkably well in the refrigerator, making them an excellent option for ahead-of-time meal prep. You can keep them fresh for up to **5 days**, making them perfect for busy weeknights when you just need to cook and serve. To ensure optimal freshness and prevent them from drying out or sticking together, individually wrap each uncooked quesadilla tightly in plastic wrap or parchment paper. Then, place all wrapped quesadillas into a large airtight freezer bag or a sealed container. When you’re ready to cook, simply take them straight from the fridge and cook using either the skillet or air fryer method, adding an extra minute or two to the cooking time to account for their chilled state.
Storing Cooked Quesadillas (Best Enjoyed Fresh):
While uncooked quesadillas store beautifully, cooked ground beef quesadillas are truly at their peak when enjoyed promptly after cooking. The tortillas tend to lose their crispness and can become a bit soggy after refrigeration, diminishing their desirable texture. If you do have leftovers and wish to store them, allow them to cool completely to room temperature. Then, wrap them individually in foil or plastic wrap and refrigerate for up to 1-2 days. To reheat, a dry skillet over medium heat or an air fryer at 300°F (150°C) for a few minutes can help restore some of their crispness, but be aware they won’t quite match the fresh-cooked texture. Avoid microwaving if possible, as it will make the tortillas soft and chewy.
Freezing Ground Beef Quesadillas for Later:
For incredibly convenient future meals, these quesadillas can also be frozen! This is a fantastic option for batch cooking, quick emergency dinners, or for those busy days when you need a speedy meal solution. To freeze, assemble the quesadillas as instructed in the recipe but **do not cook them**. Individually wrap each uncooked quesadilla tightly in plastic wrap, then add an additional layer of aluminum foil for extra protection against freezer burn, or place them in sturdy freezer-safe bags. They can be stored in the freezer for up to 2-3 months. When ready to cook, you can often cook them directly from frozen in a skillet or air fryer, adding approximately 5-10 minutes to the cook time and ensuring they are heated through and golden brown. For comprehensive guidance on freezing, thawing, and reheating frozen quesadillas, including tips to maintain the best possible texture, we highly recommend this resource on freezing quesadillas. Freezing them uncooked is by far the best approach to maintain quality upon reheating.
Print Recipe
Ground Beef Quesadillas
Ground Beef Quesadillas are loaded with seasoned beef, crisp corn, sweet bell pepper, gooey cheese, and golden, crispy tortillas. Every bite is delicious!
Video
For a visual guide on making these Ground Beef Quesadillas, watch the video below:
Equipment
- Large skillet
- (Optional) Air Fryer
Ingredients
- 6 flour tortillas (see Note 1)
- 1 tablespoon olive oil
- 1/2 large onion, diced
- 1 red bell pepper, diced
- 1/4 cup chicken stock (or broth or water)
- 1 (1-ounce) packet taco seasoning (see Note 2)
- 2 tablespoons tomato paste
- 1 pound ground beef (lean, 93/7 recommended)
- 1-1/2 teaspoons minced garlic
- 1 cup frozen corn
- 1/2 cup finely chopped cilantro
- 3 cups sharp Cheddar cheese (or Monterey Jack, or a combo; see Note 3)
- Serving suggestions (see Note 4, more suggestions in blog post)
Instructions
- Prepare Tortillas & Ingredients: If using uncooked tortillas, warm them in a skillet according to package directions and set aside. (These tortillas need to be cooked through before assembling quesadillas, regardless of the final cooking method.) If using already cooked tortillas, no prep is needed. Dice onion and red pepper. Finely chop cilantro. Shred cheese.
- Cook the Filling: Heat olive oil in a large skillet over high heat. Add the onion and red pepper, sautéing for 3–5 minutes until golden. Push veggies aside and add ground beef to the center. Sear, crumble, and brown the beef. Drain grease if needed. Reduce heat to medium, then add seasoning mix, tomato paste, water, and garlic. Stir for 1–3 minutes until fragrant. Remove from heat, add frozen corn and cilantro, and mix well.
- Assemble Quesadillas: Divide cheese and meat filling among 6 tortillas. On one side of each tortilla, sprinkle 2 tablespoons of cheese, add 1/2 cup ground beef, and top with another 2 tablespoons of cheese. Fold and press together.
- Skillet Method: Brush both sides of the quesadillas with oil or use cooking spray. Place 2 quesadillas in a dry, non-stick skillet over medium-low heat. Cover and cook for 2–3 minutes until golden and crispy. Uncover, flip, and press lightly with a spatula to seal. Cook another 2–3 minutes until the filling is melted and tortillas are browned. Keep heat low to ensure the cheese melts before the tortillas brown. Repeat with remaining quesadillas. (see Note 5).
- Air Fryer Method: Stick toothpicks through the edges of the quesadillas and generously spray both sides with cooking spray. Place 2 quesadillas in the air fryer, ensuring they have space. Cook at 350°F for 6–8 minutes, flipping halfway through until crisp and golden, and the cheese is melted (see Note 6). Press the quesadillas together before flipping to seal the edges. Carefully remove from the air fryer and let cool for a few minutes before cutting and serving. Repeat with remaining quesadillas (see Note 5).
- Serve: Once quesadillas are cooked, cut into wedges and serve with guacamole, sour cream, salsa, etc. Enjoy!
Recipe Notes
Note 1: I love these unbaked tortillas by TortillaLand® (not sponsored). They are generally found in the refrigerated section of the grocery store near the cheese. They have the best flavor! But any flour tortillas will work.
Note 2: Taco seasoning packets vary in spice and flavor. I recommend McCormick® and Old El Paso® mild packets, or use a homemade taco seasoning blend:
1 tablespoon ground chili powder, 1 teaspoon EACH: ground cumin, paprika, 1/2 teaspoon EACH: onion powder, garlic powder, dried oregano, fine sea salt, and pepper.
Note 3: I recommend freshly shredding your own cheese to avoid waxy quesadillas. I like sharp or extra-sharp Cheddar for maximum flavor, and love combining Cheddar with Monterey Jack—delish!
Note 4: Serving suggestions: sour cream, cilantro, salsa, guacamole, and/or lime.
Note 5: Air fryer timings for quesadillas may vary by brand, so adjust for your model. After the initial use, the air fryer and skillet will cook subsequent batches faster as they retain heat.
Note 6: Storage: Store uncooked quesadillas in the fridge for up to 5 days. Cook them straight from the fridge, adding a minute or 2 on cook time. Once cooked, these quesadillas are best enjoyed promptly and don’t store well. For freezing, refer to the detailed storage section in the main blog post.
Nutrition
Serving: 1 serving | Calories: 568kcal | Carbohydrates: 36.4g | Protein: 37.8g | Fat: 30.2g | Cholesterol: 110.8mg | Sodium: 997.7mg | Fiber: 1.6g | Sugar: 4.3g
Nutrition information is automatically calculated, so should only be used as an approximation.
Like this recipe? Leave a comment below!