

This Ultimate Chocolate Chip Scones Recipe is a game-changer for anyone craving bakery-quality scones from the comfort of their own kitchen. Each scone boasts perfectly crisp, golden edges, a tender, soft center, and delightful pockets of melty chocolate in every single bite. The secret to their incredible texture and rich flavor lies in the inclusion of Greek yogurt, which adds unparalleled moisture and a subtle tang that elevates these classic treats.


Author’s Note
One Bite, and You’ll Understand the Hype!
As a passionate home baker and a mom, I’m always looking for treats that my entire family will adore. My Strawberry Scones have long been a household favorite, a constant request from my kids. However, during a recent craving, I found myself without strawberries. Always up for a culinary experiment, I decided to adapt my beloved scone recipe to feature the timeless appeal of chocolate chips.
The result? An instant hit! My kids were just as obsessed with these chocolate-filled delights, if not more so. But what truly surprised me was how utterly decadent they tasted the very next morning, gently warmed and finished with a delicate drizzle of sweet glaze. They offer that perfect harmony of buttery richness, soft texture, and intense chocolate flavor, all balanced with those wonderfully crisp edges and sumptuously tender centers.
Creating the perfect scone can sometimes feel like a delicate art, but it doesn’t have to be complicated. With my detailed step-by-step instructions and essential baking tips provided below, you’ll be whipping up impressive, bakery-style chocolate chip scones right from your own kitchen. Prepare to amaze your taste buds and earn endless compliments!
Essential Ingredients for Perfect Chocolate Chip Scones
Crafting exceptional chocolate chip scones starts with understanding the role each ingredient plays. This recipe relies on a few key components to achieve that signature flaky, moist, and delicious texture. Here’s a breakdown of what you’ll need and why it’s important:
| Ingredient | What It Does | Easy Swap |
|---|---|---|
| All‑purpose flour | Provides the fundamental structure for your scones. | 1:1 gluten‑free baking blend (King Arthur Flour blend is recommended) |
| White sugar | Adds sweetness and contributes to those desirable crisp, golden-brown edges. | Coconut sugar for a slightly different flavor profile. |
| Butter (frozen) | Crucial for creating distinct, flaky layers and rich, buttery flavor. Using it frozen prevents it from melting too quickly. | Plant‑based butter, ensuring it’s very cold and solid. |
| Greek yogurt | The star ingredient! It locks in moisture, tenderizes the dough, and adds a delightful richness and slight tang. Full-fat is key for the best results. | Full-fat sour cream for a similar moisture and tang. |
| Chocolate chips | Delivers those irresistible pockets of melted chocolate in every bite. | Chopped dark chocolate bar, mini chocolate chips, or a mix of milk and semi‑sweet chocolates. |
| Vanilla + almond extract | Enhances and deepens the overall flavor profile of the scones. | Swap almond for coconut extract, or simply omit the almond extract if preferred. |
The Secret to Bakery-Quality Scones: Ingredient Deep Dive
Achieving truly magnificent scones involves more than just mixing ingredients; it’s about understanding their properties. The **frozen butter** is paramount for flakiness. When cold butter bits melt in the oven, they create steam, pushing apart the layers of dough, resulting in that coveted tender, flaky interior. Grating it ensures even distribution and makes it easier to incorporate without overworking.
The **Greek yogurt** is another unsung hero. Its acidity reacts with the baking soda and powder, leading to a perfect rise, while its fat content contributes to a soft, moist crumb. Opt for full-fat varieties, ideally honey vanilla Greek yogurt, for the most luxurious texture and flavor. Low-fat alternatives simply won’t yield the same tender results.
Proper **flour measurement** is critical. Too much flour will lead to dense, dry scones. Always spoon your flour into the measuring cup and level it off with the back of a knife. This prevents overpacking and ensures you get the exact amount needed for a light, airy scone.
Step-by-Step Guide: How to Bake Irresistible Chocolate Chip Scones
Ready to bake the best chocolate chip scones you’ve ever tasted? Follow these simple steps for perfectly flaky, tender, and utterly delicious results every time. Remember, gentle handling and keeping ingredients cold are your keys to success!
- Prepare Your Workspace and Ingredients: Start by ensuring your unsalted butter is thoroughly frozen. This is a non-negotiable step for flaky scones. Position your oven rack in the lower third of the oven and preheat it to 400°F (200°C). Line a large sheet pan (approximately 15″ x 21″) with parchment paper or a silicone baking mat to prevent sticking and ensure even baking. Set this aside.
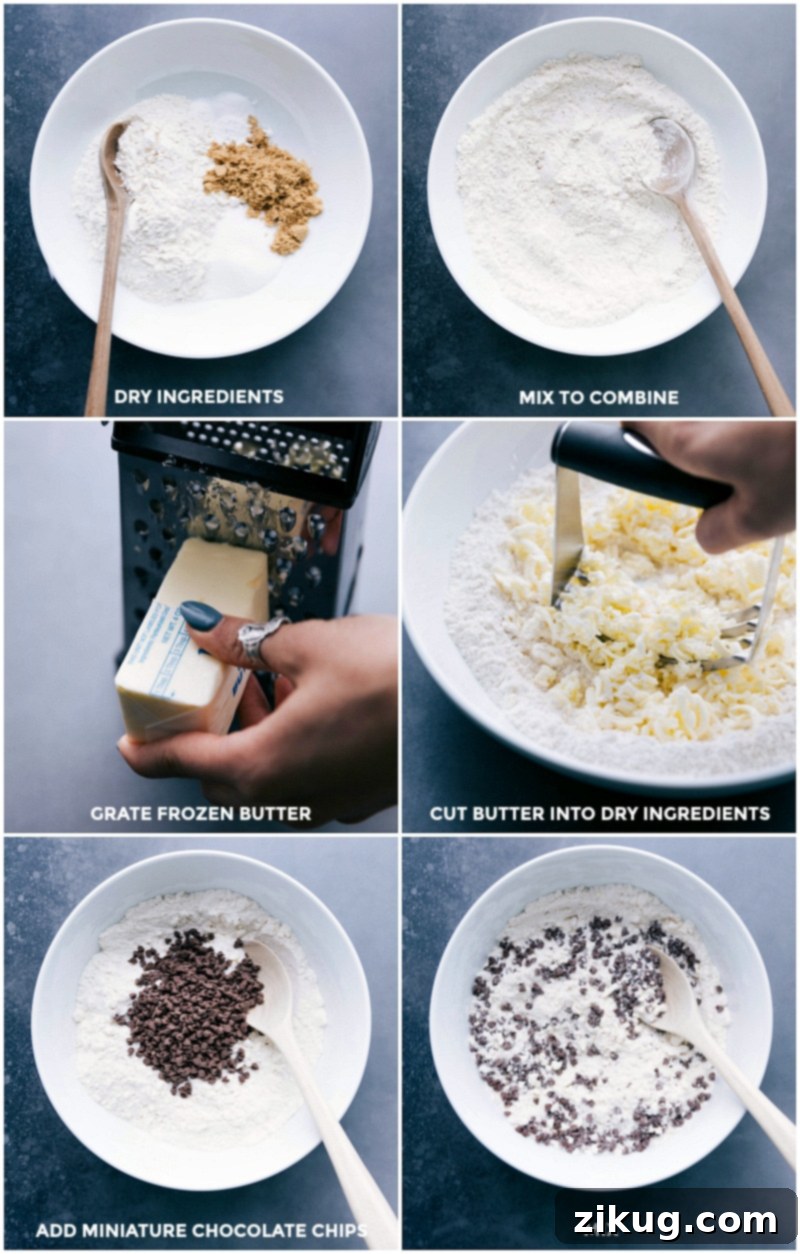
- Combine Dry Ingredients: In a spacious mixing bowl, whisk together the all-purpose flour, 1/4 cup granulated sugar, light brown sugar (lightly packed), baking soda, baking powder, and salt. Make sure these dry ingredients are well combined.
- Incorporate Frozen Butter and Chocolate Chips: Using a large-holed cheese grater, carefully grate the frozen butter directly into the dry ingredient mixture. This technique creates tiny, even pieces of butter that will melt into steam, creating flaky layers. For a visual guide, you can watch this video tutorial on grating butter. Quickly cut the grated butter into the dry mixture using a pastry cutter or two butter knives until the mixture resembles coarse crumbs with some pea-sized butter pieces. Avoid overworking it. Then, gently fold in the mini chocolate chips. Place this mixture in the fridge to keep everything cold while you prepare the wet ingredients.
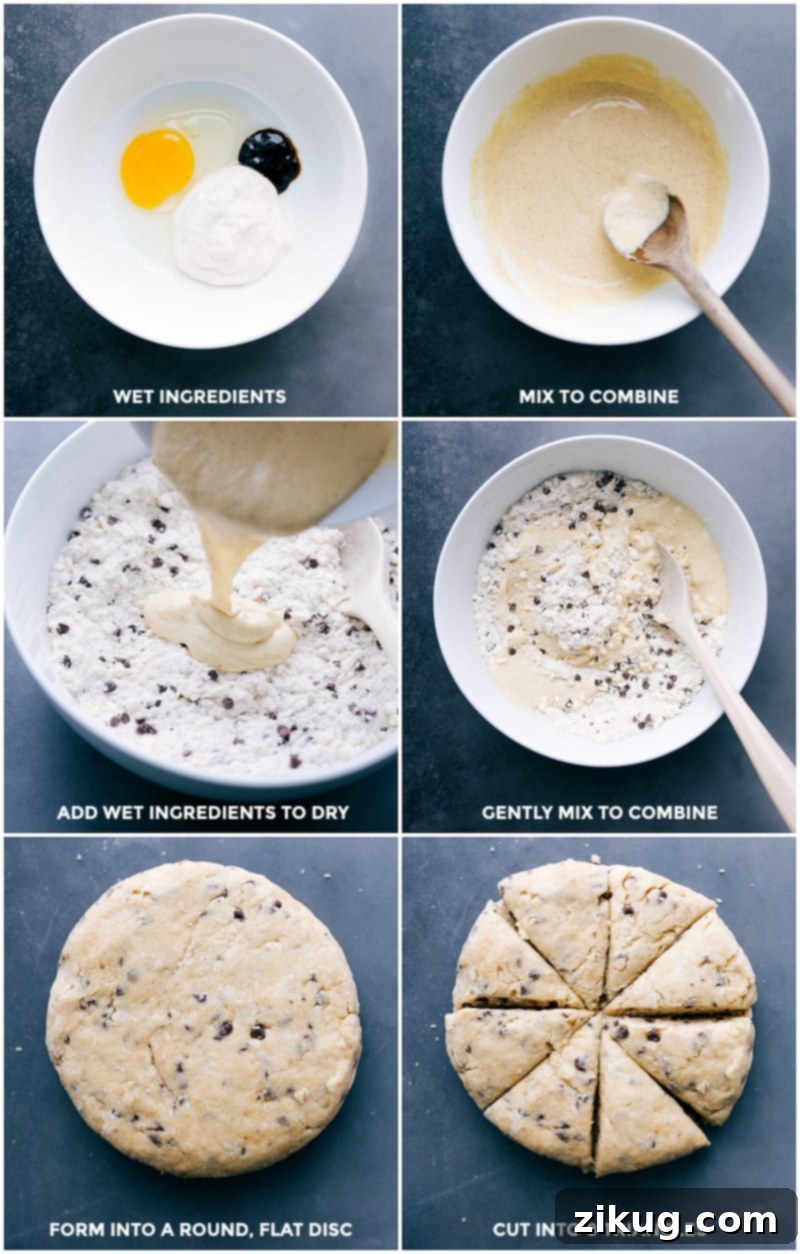
- Prepare Wet Ingredients: In a separate medium bowl, combine the vanilla extract, the optional almond extract (a single drop is often sufficient for a subtle flavor boost), Greek yogurt, and the large egg. Whisk these ingredients together until they are well combined and smooth.
- Gently Combine and Form Dough: Retrieve your dry ingredients from the fridge. Pour the wet mixture into the dry ingredients. Mix with a wooden spoon or a sturdy spatula until just combined. The dough will be slightly sticky and might seem a bit dry at first; resist the urge to add more liquid. Use your hands to gently press the dough together into a large ball. Keep kneading and pressing it gently, and it will come together. The less you mix and knead at this stage, the more tender your scones will be. A few bumps and lumps are perfectly acceptable.
- Shape and Cut the Scones: On your prepared baking sheet, use your hands to gently shape the dough into a 5.5-inch disc, about 1 inch thick. Using a sharp knife, cut the disc into 8 equal triangles. Make decisive, swift cuts rather than a sawing motion, which can create ragged edges and compress the dough. Carefully separate the triangles and arrange them on the baking sheet, leaving approximately 1 inch of space between each.
- Chill for Flakiness: For an extra boost of flakiness and to help the scones hold their shape, brush the tops of the unbaked scones with 3 tablespoons of heavy cream (this is optional but recommended for a golden finish). Sprinkle the remaining 1 teaspoon of granulated sugar over the tops. Place the entire baking sheet with the scones into the fridge and chill for a minimum of 20 minutes. This step is crucial for keeping the butter cold and ensuring maximum rise.
- Bake to Golden Perfection: Remove the chilled scones from the fridge and immediately transfer them to the preheated 400°F (200°C) oven. Bake for about 14-16 minutes, or until the edges are lightly golden brown and the tops are just barely golden. Keep a close eye on them to prevent overbaking.
- Prepare the Luscious Glaze: While the scones cool slightly, prepare the glaze. In a small bowl, whisk together the milk (or heavy cream for a richer glaze), powdered sugar, and 1/2 teaspoon vanilla extract until completely smooth. Adjust the consistency by adding a tiny bit more milk/cream if too thick, or more powdered sugar if too thin. Aim for a thick, pourable glaze.
- Cool and Drizzle: Once baked, remove the scones from the oven and let them cool on the sheet pan for about 5 minutes to finish setting. Transfer them to a wire rack to cool completely to room temperature. Once cooled, generously drizzle the prepared glaze over the tops of the scones using a spoon. Let the glaze set before serving.
Expert Baking Tip: Precision Flour Measurement
The most important measurement in this scone recipe, and many baking recipes, is the flour. If you simply press a measuring cup directly into a bag of flour, you will invariably pack in significantly more flour than intended. This excess flour will lead to dense, dry, and less flavorful scones. To ensure accuracy, always spoon the flour gently into a measuring cup until it’s overflowing, then level the top with the flat back of a table knife. This method guarantees a lighter, more tender crumb for your delectable chocolate chip scones.
Furthermore, avoid overmixing the dough. Once the wet and dry ingredients are just combined and you can form a ball, stop. Overmixing develops gluten, which can make your scones tough instead of tender and flaky. Embrace a slightly shaggy dough for the best texture!
Frequently Asked Questions (FAQs) About Chocolate Chip Scones
What is the secret to making good scones?
The ultimate secret to baking incredibly delicious, tender, and moist scones lies in two key factors: using full-fat Greek yogurt and ensuring your butter is very cold. Full-fat Greek yogurt, especially in vanilla or honey flavors, not only adds a lovely creaminess and structure to the scone but also infuses it with rich flavor and essential moisture. It reacts beautifully with the leavening agents for a perfect rise. Make sure your yogurt is well mixed before adding it to the batter, and definitely steer clear of low-fat varieties for the best results. We are particularly fond of Greek Gods® Honey Vanilla yogurt in these chocolate chip scones for its superior quality and taste (this is a genuine recommendation, not a sponsored plug!).
Why are my scones always hard or dry?
Scones can turn out hard or dry for a couple of common reasons: overmixing the dough or overbaking. Overmixing develops too much gluten, which leads to a tough, bread-like texture rather than a tender, flaky one. When combining wet and dry ingredients, mix just until the dough comes together. Similarly, overbaking dries out the scones, making them crumbly and hard. To achieve softer, more tender scones, be mindful of mixing only until necessary and keep a close eye on the baking time. They should be lightly golden, not deeply browned.
Can you freeze chocolate chip scones?
Absolutely! Freezing scones is an excellent way to prepare ahead and enjoy fresh-baked treats anytime.
To freeze unbaked scones: Place the cut, unbaked scones on a baking sheet lined with parchment paper and freeze them until they are completely solid (this prevents them from sticking together). Once frozen, transfer the individual scones to an airtight freezer-safe bag or container and freeze for up to one month. When ready to bake, place the frozen scones directly onto a prepared baking sheet and bake straight from the freezer. You may need to add an additional 1-3 minutes to the baking time. For more comprehensive details on freezing and baking scones, King Arthur Flour offers an excellent guide here.
What should I serve with chocolate chip scones?
Chocolate chip scones are delightful on their own, but you can elevate the experience! Serve them warm with a dollop of clotted cream or whipped cream and a side of your favorite fruit jam (raspberry or apricot pairs wonderfully). A fresh cup of coffee, tea, or a rich hot chocolate makes for a perfect pairing. For an extra treat, serve them with a scoop of vanilla bean ice cream!
Can I use different types of chocolate in my scones?
Yes, absolutely! While mini semi-sweet chocolate chips are classic, feel free to experiment. You can use dark chocolate chunks for a more intense flavor, milk chocolate chips for a sweeter treat, or even a mix of white and dark chocolate for a varied taste. Ensure the chocolate is good quality for the best melt and flavor.
More Decadent Chocolate Treats:
If you love chocolate, explore these other fantastic recipes!
Desserts
Chocolate Crinkle Cookies
Desserts
Best Chocolate Cake Recipe
Desserts
Chocolate Caramel Cookies
Desserts
Easy Chocolate Fondue

Print Recipe
Flaky & Buttery Chocolate Chip Scones Recipe
Chelsea Lords
30 minutes
15 minutes
20 minutes
1 hour 5 minutes
8 scones
Equipment
-
Large sheet pan (15″ x 21″) lined with parchment paper or silicone baking mat
Ingredients
- 8 tablespoons unsalted butter frozen
- 2 cups all-purpose flour spooned and leveled (see note 1)
- 1/4 cup + 1 teaspoon granulated sugar divided
- 1/4 cup light brown sugar lightly packed
- 1/4 teaspoon baking soda
- 1 teaspoon baking powder
- 1/2 teaspoon salt
- 1/2 cup mini chocolate chips
- 1-1/2 teaspoons vanilla extract
- 1 drop almond extract optional
- 1/2 cup honey vanilla Greek yogurt
- 1 large egg
- 3 tablespoons heavy cream optional, for brushing tops
- 2 tablespoons milk or heavy cream
- 1 cup powdered sugar
- 1/2 teaspoon vanilla extract
Instructions
-
Freeze the butter until completely solid. Move the oven rack to the lower third of the oven and preheat to 400°F (200°C). Line a large sheet pan with parchment paper or a silicone baking mat and set aside.
-
In a large bowl, toss together the all-purpose flour, 1/4 cup granulated sugar, light brown sugar, baking soda, baking powder, and salt.
-
Grate the frozen butter on the large holes of a cheese grater directly into the dry ingredients.
-
Quickly cut the grated frozen butter into the dry ingredients using a pastry cutter or two butter knives until well combined and crumbly. Add the chocolate chips and gently mix. Then, place the entire mixture in the fridge to keep it cold while you prepare the wet ingredients.
-
In another bowl, mix together the vanilla extract, almond extract (if using), Greek yogurt, and egg. Whisk until well combined and smooth.
-
Add the wet ingredients to the dry and mix with a wooden spoon or spatula until just combined. Use your hands to gently press the dough into a large ball. The dough will be slightly sticky and may seem too dry at first, but keep kneading and pressing it gently; it will come together. Remember, the less you mix and knead, the better the texture will be (see note 2).
-
Using your hands, shape the mixture into a 5.5-inch disc about 1 inch thick. With a sharp knife, cut the disc into 8 equal triangles, using decisive, swift cuts instead of a sawing motion. Separate the triangles and place them on the prepared cookie sheet, leaving about 1 inch of space between each.
-
If desired, brush the tops of the scones with 3 tablespoons of heavy cream. Sprinkle with the remaining 1 teaspoon of granulated sugar. Place the sheet pan with the scones in the fridge and chill for 20 minutes. This step helps ensure flakiness.
-
Remove scones from the fridge and place in the preheated oven. Bake until lightly golden around the edges and barely golden on top, approximately 14–16 minutes.
-
For the glaze, whisk the milk or heavy cream, powdered sugar, and 1/2 teaspoon vanilla extract together until smooth. Add more milk or heavy cream as needed, but aim to keep the glaze quite thick for a luscious drizzle.
-
Remove the scones from the oven and let them sit on the sheet pan for 5 minutes to finish cooking and firm up. Allow them to cool completely to room temperature on a wire rack before drizzling the glaze on top using a spoon. Enjoy!
Recipe Notes
Note 2 – Gentle Handling is Key: Knead the dough gently and stop as soon as it comes together; minimal mixing is absolutely essential for tender scones. A few bumps and lumps are fine and actually desirable. It’s also vital to keep the dough cold throughout the process—too much handling will soften the butter, reducing flakiness. Remember, excessive mixing activates the gluten in the flour, which will inevitably lead to denser, tougher scones.
Storage: Once your delicious chocolate chip scones have completely cooled and the glaze has set, store them in an airtight container at room temperature for up to 2 days. For longer storage, you can freeze baked scones (without glaze) for up to 3 months. Thaw at room temperature and warm gently in the oven or microwave before glazing and serving.
Nutrition
Calories: 431kcal |
Carbohydrates: 61g |
Protein: 5g |
Fat: 19g |
Saturated Fat: 12g |
Polyunsaturated Fat: 1g |
Monounsaturated Fat: 4g |
Trans Fat: 0.5g |
Cholesterol: 65mg |
Sodium: 262mg |
Potassium: 88mg |
Fiber: 1g |
Sugar: 36g |
Vitamin A: 558IU |
Vitamin C: 0.2mg |
Calcium: 84mg |
Iron: 2mg
Nutrition information is automatically calculated and should only be used as an approximation. It can vary based on specific brands and ingredient variations.
Love this recipe? Leave a comment below!
Your feedback helps us create more delicious recipes for you.